1
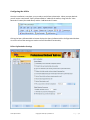
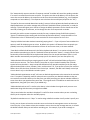
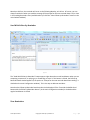
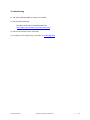
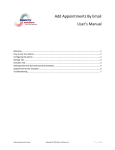
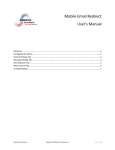
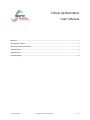
Follow Up Reminders
User’s Manual
Welcome ................................................................................................................................................. 2
Configuring the Add-in ............................................................................................................................ 3
Send With Follow Up Reminder ............................................................................................................... 5
View Reminders ...................................................................................................................................... 5
Add Reminders ........................................................................................................................................ 7
Troubleshooting ...................................................................................................................................... 8
Follow Up Reminders
Copyright © 2012 Sperry Software Inc.
P a g e |1
Welcome
Thank you for choosing the Follow Up Reminders add-in, created by Sperry Software. This add-in will
automatically notify you of anyone who has not responded to your important email messages.
To create a Follow Up Reminder, compose a new email as you normally would. When you are ready to
send it, just click the “Follow Up Reminder” button instead of the usual Send button. This will cause the
email to be sent and a reminder to be created, which will be shown in 7 days (by default – you can
change this to whatever is appropriate for you).
If you have selected the “Prompt for next reminder date” in the configuration options, then you will be
prompted at this point and given a chance to enter a reminder date different from the default, any
notes you’d like to add (which will be displayed when the reminder comes due) and/or change the color
for this reminder. The colors in a reminder can be used to designate whatever is important to you.
To see all pending reminders, just go to the main Outlook window and click the “View Reminders”
button. A window showing all pending reminders will be shown. All the reminders that are currently
overdue will be in bold, while your future reminders will be in normal font. You can click on any column
header to sort by that column in the grid that displays all your reminders, and you can double click any
row to edit notes, the reminder date and time, and the change the color. You can also resize all the
windows in the Follow Up Reminders add-in by clicking and dragging the edges so that you can see the
entire contents without having to scroll as much.
You can also click once on any row to highlight the row and select any of the buttons in the “Commands”
frame (near the bottom). The “View Original” button displays the email that you sent. “Create Follow
Up Email” creates a new email based on the original email (that is, to the same recipient with the same
subject), which is convenient when you need to send a message to the same person. The “Delete”
button removes the reminder permanently, along with the notes you may have had for that reminder.
The “Print” button allows you to print the list of the pending reminders.
Follow Up Reminders
Copyright © 2012 Sperry Software Inc.
P a g e |2
Configuring the Add-in
Once the installation is complete, you are ready to use Follow Up Reminder. When you open Outlook
you will notice a new button “Sperry Software Add-ins” added to the toolbar, along with the “View
Reminders” button (discussed above) and the “Add Reminders” button.
Figure 1 (Outlook 2007 shown)
Clicking the Sperry Software Add-Ins button displays the Sperry Software Add-ins Configuration Window.
It is on this screen that settings are made to control the add-ins functionality.
Follow Up Reminder Settings
Follow Up Reminders
Copyright © 2012 Sperry Software Inc.
P a g e |3
The “Automatically remove reminders if response received” checkbox will cancel the pending reminder
if an email is received from the same recipient. This option uses the email address, so if the person has
more than one email address, the response must be from the same email address (e.g., a work address
compared to a home address). The response must also have the same Subject (except for the “RE:”).
“Prompt for the next reminder date when sending” causes a Follow Up Reminder Details window to be
displayed whenever you send a message and you clicked “Send With Follow Up Reminder” to send the
message. This window gives you a chance to change the default parameters for the date & time of the
reminder, allowing you to add notes, and to change the color for that particular reminder.
Normally, the add-in creates a separate reminder for every recipient (except for BCC’ed recipients).
“Ignore CC addresses (when sending with the Follow Up Reminders button)” causes the add-in to not
include those in the CC field and only create reminders for those recipients in the To line.
“Display individual reminder windows instead of grouping them” – if you only have a few reminders this
option is useful for displaying one at a time. By default this option is off because like most people you
probably have many reminders and need to see them all at the same time, in the same window.
“Override the default Send button with the Follow Up Reminder button” is an option to help you if you
have trouble remembering to click the “Send with Follow Up Reminder” button. It simply puts the same
functionality of the Send with Follow Up Reminder button into the normal Send button (that is, it will
add a reminder automatically and possibly prompt you for the details if you have that option on).
“Add an Outlook follow up flag to outgoing emails as well” will add an Outlook follow up flag to the
emails that are sent out. This can be useful if you prefer to rely on Outlook instead of the reminder
system built into the add-in. Keep in mind that Outlook will only provide reminders for the four major
default Outlook folders: Inbox, Calendar, Tasks, and Sent Items. So, if you prefer to move your emails to
folders other than the Inbox, Outlook will not remind you. However, the add-in will always remind you
since it doesn’t rely on the Outlook reminder system.
“Add an Outlook appointment as well” will cause an Outlook appointment to be created at the reminder
time. This option is especially useful for phones that are synced to your Outlook calendar so that you
can receive the reminders while you’re away from your desk (assuming your phone calendar software is
set to alarm when your appointments come due. The original email is included as an attachment on the
appointment, along with your notes (if you added any).
“Add an Outlook task as well” is similar to the above, it also includes the original email you sent as an
attachment along with the notes you might have added.
“Play a sound when the reminder is displayed” is useful for those occasions when you are not looking
directly at the computer when the reminder pops up.
“By default reminders occur in 7 days” is used to assign a default reminder time if you don’t specify one.
Finally, you can choose to have the reminders occur at the time the message was sent or at the same
time every day. If you choose to have the reminders occur at the time the message was sent, it will add
the default number of days to wait before reminding you. For example, if you send a message on
Follow Up Reminders
Copyright © 2012 Sperry Software Inc.
P a g e |4
Monday at 9:45 am, the reminder will occur on the following Monday, at 9:45 am. Of course, you can
always override this when you send the message (if the prompt for the next reminder date is on) or later
in the Pending Reminders view (available when you click the “View Follow Up Reminders” button on the
main Outlook window).
Send With Follow Up Reminder
Figure 3
The “Send With Follow Up Reminder” button appears right above the normal Send button when you are
composing a new email, or replying to, or forwarding an email. If this button is clicked, the Follow Up
Reminder Detail window appears (if the option to “Prompt for the next reminder date when sending” is
checked on the main Configuration window). This is the way to add new reminders.
Note that the Follow Up Reminder Details window is also displayed if the “Override the default Send
button with the Follow Up Reminder button” (in the main Configuration window) is checked and the
regular Send button is clicked.
View Reminders
Follow Up Reminders
Copyright © 2012 Sperry Software Inc.
P a g e |5
To see a list of your reminders, click the View Reminders button in the main Outlook toolbar. It brings
up a window similar to this one:
Figure 4
The rows in bold represent items that are overdue. The grid can be sorted by simply clicking on the
header columns (Email Address, Sent Date, Reminder Date, Subject, or Notes).
Clicking the “View Original Email” brings up the email that you are to be reminded about. If the button
fails to bring up the email, then it could be because the email has been moved outside your default set
of folders (to a public folder for example) or has been deleted.
“Create Follow Up Email” creates an email based on the original email. This is useful if you have not
heard back from your recipient and you need to connect with them.
“Delete Reminder” permanently removes the reminder and any associated notes.
Note that for this option, and the two previous buttons (“View Original Email” and “Create Follow Up
Email” buttons) that multiple rows can be selected (by holding down the Ctrl key while left clicking the
rows you’re interested in) and then the operation performed so that multiple items can be deleted, or
viewed, or followed up on.
“Print” prints a list of the reminder items. A Print preview window is always shown first so that you can
select the printer and other options.
Like all the Follow Up Reminders windows, you can resize the window to be able to see more
information.
Double clicking on any row displays the Follow Up Reminder Details window:
Follow Up Reminders
Copyright © 2012 Sperry Software Inc.
P a g e |6
In this reminder, a note regarding Outlook installations has been entered and then colored blue by the
user. You can click on any of the colors to quickly change the color, but there must be text in the Notes
area in order to see the change.
Note that the follow up reminder date is changed here as well.
Add Reminders
In addition to having reminders automatically created when you click the “Send With Follow Up
Reminder” button (or possibly just the Send button depending on your options), you can also add any
arbitrary email. This is especially useful if you keep your emails in a subfolder of the default Inbox, since
Outlook does not offer reminders for items not in the Inbox, Sent Items, Calendar, and Tasks.
Once you click the “Add Reminders” button, the Follow Up Reminder Details window appears so that
you can enter the date you want to be reminded and any optional notes.
Note that multiple emails can be selected, and that the “Add Reminders” button can then be clicked so
that many emails can be processed at once. Note that if you select multiple emails in this way, that both
the notes and the reminder date chosen will apply to each email.
Follow Up Reminders
Copyright © 2012 Sperry Software Inc.
P a g e |7
Troubleshooting
Q. The “Sperry Software Add-ins” button is not visible.
A. Run the add-in Reset tool.
The add-in reset tool can be downloaded from
http://www.sperrysoftware.com/outlook/tools.asp
Q. How can we contact you for more help?
A. For help on more in-depth issues, check out our Knowledge Base.
Follow Up Reminders
Copyright © 2012 Sperry Software Inc.
P a g e |8