1
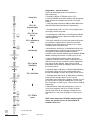
PowerPrep™ Express Plasmid Purification Kits
Store at RT
Catalog No. NP100010 (11453-016) 50 Reactions
Catalog No. NP100011 (11453-024) 250 Reactions
**Please see notice below regarding kits
NP100010N and NP100011N
Overview and Intended Use
The PowerPrep™ Express Plasmid Purification Systems
are designed for rapid isolation of plasmid DNA. A modified
alkaline/SDS procedure is used to create a cleared lysate
containing plasmid DNA with minimal amounts of genomic
DNA (1). The lysate is applied to a spin cartridge
containing silica-based membranes where the plasmid
DNA is selectively adsorbed (2). Adsorption to the
membranes is influenced by buffer composition and
temperature. RNA, proteins and other cellular waste are
removed with wash buffers containing alcohol. Since the
DNA is eluted at high concentration in TE Buffer, no
precipitation is necessary. All solutions are passed through
the column with brief centrifugations or vacuum, allowing
completion of the protocol in 30 to 45 min.
Components included with this kit:
MINIPREP kits
Components
NP100010
NP100011
# Reactions
50
250
Cell Suspension Buffer
15 mL
65 mL
RNase A
100 µL
650 µL
Cell Lysis Solution
15 mL
65 mL
Neutralization Buffer
20 mL
90 mL
Wash Buffer
12 mL
55 mL
Optional Wash Buffer
12 mL
55 mL
Plasmid DNA up to 45 kb can be purified.
TE Buffer
15 mL
30 mL
Yields of up to 40 µg (miniprep) can be obtained.
Spin Cartridges or Columns
50 each
250 each
Results are dependent on plasmid copy number,
plasmid type, bacterial strain and growth conditions
(e.g., medium, antibiotics, temperature and aeration).
Wash Tubes, Recovery Tubes
50 each
250 each
• The purified plasmid DNA is high quality and is suitable (minipreps)
for most applications, including automated fluorescent
DNA sequencing, manual DNA sequencing,
amplification reactions, restriction mapping, cloning and Additional Materials Required
labeling.
• 95-100% ethanol
• 65 to 70°C water bath
References
1. Birnboim, H. and Doly, J. (1979) Nucleic Acids Res. 7,
• For minipreps, microcentrifuge capable of reaching ≥
1513.
12,000 x g
2. Vogelstein, B. and Gillespie, D. (1979) Proc. Natl. Acad.
Sci. USA 76, 615.
•
•
Safety and Use Statement
This product contains hazardous reagents. It is the enduser’s responsibility to consult the applicable MSDS(s)
before using this product. Disposal of waste organics, acids,
bases and radioactive materials must comply with all
appropriate federal, state and local regulations. If you have
any questions concerning the hazards associated with this
product, please call OriGene at (888) 267-4436.
All biological materials should be handled as potentially
hazardous. Follow universal precautions as established by
the Centers for Disease Control and Prevention and by the
Occupational Safety and Health Administration when
handling and disposing of potentially infectious or
hazardous agents. This product is authorized for laboratory
research use only. The product has not been qualified or
found safe and effective for any human or animal diagnostic
application. Uses other than the labeled intended use may
be a violation of applicable law.
9620 Medical Center Drive, Suite 200 Rockville MD 20850
888-267-4436 (phone)
301-340-9254 (fax)
[email protected] www.origene.com
Page 1 of 5
NOTICE: Kits NP100010N and NP100011N
do not include any buffers listed.
A protocol detailing how to create
buffers necessary is provided.
Storage Conditions
Store all components at Room Temperature. After the
addition of RNase A to the Cell Suspension Buffer,
store buffer at 4°C.
Advance Preparations
1. Add RNase A to Cell Suspension Buffer according to
the following instructions.
15 mL
Volume of RNase A to
add to Cell Suspension
Buffer
85 μL
65 mL
375 μL
120 mL
650 μL
Volume of Cell
Suspension Buffer
These instructions are also on the label of the bottle. Mix
well. Place a mark on the label to indicate that RNase A has
been added. Store Cell Suspension Buffer with RNAse A
at 4°C for up to six months.
2. Add ethanol to Wash Buffer according to the following
instructions.
Wash Buffer
Volume of Wash
Buffer
Volume of EtOH to add to
Wash Buffer
12 mL
55 mL
95 mL
30 mL
140 mL
235 mL
These instructions are also on the label of the bottle. Mix
well. Place a mark on the label to indicate that ethanol has
been added.
Add ethanol to Optional Wash Buffer according to the
following instructions
Optional Wash Buffer
Volume of Optional
Wash Buffer
12 mL
55 mL
Volume of EtOH to add to
Optional Wash Buffer
17 mL
75 mL
These instructions are also on the label of the bottle. Mix
well. Place a mark on the label to indicate that ethanol has
been added.
3. Check Cell Lysis Solution for precipitate. If necessary,
warm the solution briefly at 37°C to dissolve the precipitate.
9620 Medical Center Drive, Suite 200 Rockville MD 20850
888-267-4436 (phone)
301-340-9254 (fax)
[email protected] www.origene.com
Page 2 of 5
Critical Parameters
• Use volumes, temperatures, incubation times and
centrifugations precisely as indicated in the
protocols.
• Store columns and solutions at recommended
temperatures.
• Grow cultures in LB medium. Cell density should be
1 to 1.5 A600 units/mL or ~ 1 x 10⁹ cells per mL.
• Do not overload the columns. Use the recommended culture volumes as indicated in the
protocol to obtain optimal purity.
• For centrifugation of maxiprep columns, use a
swinging bucket rotor to ensure complete removal
of solutions.
Important Considerations for the Alkaline Lysis and
Neutralization Steps
1. Cell Suspension
For efficient lysis it is important to use a vessel that is large
enough to allow complete mixing of the lysis buffers. Ensure
that RNase A has been added to Cell Suspension Buffer.
The bacteria should be resuspended completely by
vortexing or pipetting up and down until no cell clumps
remain.
2. Lysis
Mix gently but thoroughly. Do not vortex; this will shear the
genomic DNA. The lysate should appear viscous. Do not
allow the lysis reaction to proceed for more than 5 min.
3. Neutralization
After addition of Neutralization Buffer, a fluffy white material
should form and the lysate becomes less viscous. The
precipitated material contains genomic DNA, proteins, cell
debris and SDS. The lysate should be mixed thoroughly to
ensure even precipitation. If the mixture still appears to
contain a gelatinous and slightly brownish material, more
mixing is required to completely neutralize the solution. This
is more likely to happen when large cell pellets have been
processed.
Usage Notes – Centrifugation Protocol
Harvest Cells
↓
250 μl Cell
Suspension Buffer
↓
250 μl Cell Lysis
Solution
↓
350 μl Neutralization
Buffer
↓
Load Cartridge
↓
(500 μl Optional
Wash Buffer)
↓
700 μl Wash Buffer
↓
75 μl TEBuffer
(warm)
Perform all centrifugations at room temperature.
Before beginning:
a. Preheat an aliquot of TE Buffer to 65 to 70°C.
b. Verify that RNase A has been added to Cell Suspension
Buffer and that no precipitate has formed in Cell Lysis
Solution.
c. Verify that ethanol has been added to Wash Buffer and
Optional Wash Buffer (See Advance Preparations).
1. Cell Harvesting: Pellet 1 to 5 mL of an overnight culture.
Thoroughly remove all medium.
2. Cell Suspension: Add 250 µL of Cell Suspension Buffer
(containing RNase A) to the pellet and suspend the cells
until homogeneous.
3. Cell Lysis: Add 250 µL of Cell Lysis Solution. Mix gently
by inverting the capped tube five times. Do not vortex.
Incubate at room temperature for exactly 5 min. Longer
incubation times may reduce yield.
4. Neutralization: Add 350 µL of Neutralization Buffer and
mix immediately by inverting the tube until the solution is
homogeneous. When large cell pellets have been
processed, more vigorous shaking may be required. Do not
vortex. Centrifuge the mixture at 12,000 x g for 10 min.
5. Cartridge Loading: Place a spin cartridge in a 2-mL wash
tube. Load the supernatant from step 4 into the spin
cartridge. Centrifuge at 12,000 x g for 1 min. Discard the
flow-through.
6. (Optional Wash): Place the spin cartridge back into the 2
mL wash tube. Add 500 µL of Optional Wash Buffer to the
spin cartridge. Incubate at room temperature for 1 min.
Centrifuge at 12,000 x g for 1 min. Discard the flow-through.
NOTE: This wash is recommended with the miniprep protocol when nuclease-rich bacteria are used, e.g., endA+
strains.
7. Cartridge Wash: Place the spin cartridge back into the 2
mL wash tube. Add 700 µL of Wash Buffer (containing
ethanol) to the spin cartridge. Centrifuge at 12,000 x g for 1
min. Discard the flow-through. Centrifuge again at 12,000 x
g for 1 min to remove residual wash buffer.
8. Plasmid Elution: Place the spin cartridge into a 1.5 mL recovery tube (supplied). Add 75 µL of warm TE Buffer
directly to the center of the spin cartridge. Incubate at room
temperature for 1 min, then centrifuge at 12,000 x g for 2
min.
NOTE: Room temperature TE Buffer may be used for
elution, but optimal recovery is obtained with TE
warmed to 65 to 70°C.
9620 Medical Center Drive, Suite 200 Rockville MD 20850
888-267-4436 (phone)
301-340-9254 (fax)
[email protected] www.origene.com
Page 3 of 5
Harvest Cells
↓
250 μl Cell
Suspension Buffer
↓
250 μl Cell Lysis
Solution
↓
350 μl Neutralization
Buffer
↓
Load Cartridge
↓
(500 μl Optional
Wash Buffer)
↓
Usage Notes – Vacuum Protocol
Perform all centrifugations at room temperature.
Before beginning:
a. Preheat an aliquot of TE Buffer to 65 to 70°C.
b. Verify that RNase A has been added to Cell Suspension
Buffer and that no precipitate has formed in Cell Lysis
Solution.
c. Verify that ethanol has been added to Wash Buffer and
Optional Wash Buffer (See Advance Preparations).
1. Cell Harvesting: Pellet 1 to 5 mL of an overnight culture.
Thoroughly remove all medium.
2. Cell Suspension: Add 250 µL of Cell Suspension Buffer
(containing RNase A) to the pellet and suspend the cells
until homogeneous.
3. Cell Lysis: Add 250 µL of Cell Lysis Solution. Mix gently
by inverting the capped tube five times. Do not vortex.
Incubate at room temperature for exactly 5 min. Longer
incubation times may reduce yield.
4. Neutralization: Add 350 µL of Neutralization Buffer and
mix immediately by inverting the tube until the solution is
homogeneous. When large cell pellets have been
processed, more vigorous shaking may be required. Do not
vortex. Centrifuge the mixture at 12,000 x g for 10 min.
5. Vacuum Manifold Preparation: Attach the vacuum
manifold to a vacuum source. Attach a cartridge to a luer
extension on the vacuum manifold. Load the supernatant
from step 3 into the cartridge. Apply vacuum until all
supernatant goes through the cartridge, and then turn off
the vacuum source.
700 μl Wash Buffer
6. (Optional Wash): Add 500 µL of Optional Wash Buffer to
the cartridge. Apply vacuum until all supernatant goes
through the cartridge, and then turn off the vacuum source.
↓
7. Cartridge Wash: Add 700 µL of Wash Buffer (containing
ethanol) to the cartridge. Apply vacuum until all
supernatant goes through the cartridge, and then turn off
the vacuum source. Place the cartridge into a 2 mL wash
tube. Centrifuge at 12,000 x g for 1 min to remove residual
wash buffer.
75 μl TEBuffer
(warm)
9620 Medical Center Drive, Suite 200 Rockville MD 20850
888-267-4436 (phone)
301-340-9254 (fax)
[email protected] www.origene.com
Page 4 of 5
8. Plasmid Elution: Place the cartridge into a 1.5 mL recovery tube (supplied). Add 75 µL of warm TE Buffer
directly to the center of the cartridge. Incubate at room
temperature for 1 min, then centrifuge at 12,000 x g for 2
min.
NOTE: Room temperature TE Buffer may be used for
elution, but optimal recovery is obtained with TE
warmed to 65 to 70°C.
Appendix A
Troubleshooting Guide
Problem
Possible Cause
Suggested Solution
Low yield of DNA
Lysate at improper pH or salt
concentration for binding to
column
Carefully remove all medium before suspending cells in step 2.
Low-copy number plasmid
Do not process more cells than recommended over an
individual column. Process additional cells over additional
columns.
Incomplete DNA elution
Ensure that TE Buffer is warmed to 65 to 70°C.
Plasmid DNA concentration
too low
Ensure the full volume of Neutralization Buffer is added when
neutralizing the lysate in step 4.
Reduce the elution volume. This will give higher DNA
concentrations, but will also give a decrease in yield.
Precipitate plasmid DNA and dissolve in a smaller volume of
TE Buffer.
Chromosomal DNA
contamination
Genomic DNA sheared in
handling
Invert tubes to mix when adding Cell Lysis and Neutralization
Buffers. Mix thoroughly but gently to homogeneity. Do not
vortex.
Additional plasmid forms
present
Plasmid DNA permanently
denatured
Incubate the lysate at room temperature for no longer than 5
min at step 3. Permanently denatured DNA will appear as a
band electrophoresing just ahead of the supercoiled plasmid
DNA. This material will not be digested by restriction
endonucleases.
RNA contamination
RNase A digestion
incomplete
Use correct volume of Cell Suspension Buffer. Ensure that
RNase A was added to Cell Suspension Buffer and that Cell
Suspension Buffer containing RNase A is stored at 4°C and is
less than 6 months old.
Inhibition of enzymatic
reaction
Ethanol in the DNA eluate
For minipreps, discard wash buffer flow- through prior to the
second centrifugation in step 7.
Technical Support
For further technical assistance please contact us at
(888) 267-4436 or by email at [email protected].
Technical support and troubleshooting guides for these
products can also be found on our website at
www.origene.com.
Related Products
To see our full line of PowerPrep™ purification products
visit our website at www.origene.com.
9620 Medical Center Drive, Suite 200 Rockville MD 20850
888-267-4436 (phone)
301-340-9254 (fax)
[email protected] www.origene.com
Page 5 of 5