1
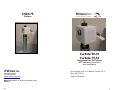
C50/C75 RVision Inc Platform Imaging Systems for Sight Carbide 50-10 Carbide 75-35 Ruggedized Pan-Tilt Platform SEE Installation Instructions and User Manual RVision Inc 2365A Paragon Drive San Jose, CA 95131 www.rvisionusa.com Specification: 660529-02 Manual, Carbide 50-75 Date: 8SEPT2006 Author: EPJohnson ©1998-2006 by RVision INC. Printed in USA. Made in USA. 660529-01 20 1 WARNINGS READ COMPLETE MANUAL. PERFORM PRE-OPERATIONAL CHECK. DO NOT OPERATE WITHOUT TRAINING. INSTALLATION IS NOT BE ‘DO-IT-YOURSELF’ HEAVY LOAD, Two-Man Lift DO NOT UNDERESTIMATE DISTRACTION IN MOBILE APPLICATION. STAY ALERT INPUT VOLTAGE 22-26VDC ONLY Carbide 50- 2.5A max, 1.0A rest Carbide 75- 1.5A max, 0.5A rest UNPLUG WHEN NOT IN USE. SEE™ Camera and Pole Mount equipment complies with Federal Communications Commission part 15, Class A, for EMI emissions. 2 RVISION LIMITED WARRANTY AND LIMIT OF LIABILITY For a period of one (1) year from the date of purchase, RVISION warrants that each of the component parts of SEE™ will not malfunction, destruct, disconnect or fail to operate when operated properly according to furnished instructions. RVISION warrants that the SEE mount will not become disconnected from the rack, bar or other device to which the product is attached when mounted in accordance with furnished instructions; except that this warranty does not apply to disconnection resulting from impact to the product, mount, rack, bar or other mounting device or to the mobile site, motor vehicle, or stationary installation site by collision, traffic accident, vandalism, calamity, or Act of God. RVISION does not warrant the use of any particular rack or mount by any particular manufacturer for use in mounting the product to the motor vehicle or other mobile or stationary site. This warranty does not cover damages resulting from malfunction, defect, destruction, or failure of the rack, bar or other device to which the camera is mounted to a motor vehicle or other mobile or stationary site. Always install a security tether to the edge-bolt of the camera This warranty does not cover adjustment of customer-operated controls as explained in furnished instructions. RVISION makes no warranty (a) that a motor vehicle or any other mobile site may be operated safely and with due care by use of the product, whether or not explained in or authorized by furnished instructions, or (b) as to the frequency an operator may make viewing changes by manual selections on the LOOK display/control, or as to the frequency or length of continuous time, if any, an operator may view and concentrate mental attention on the LOOK control/display and contemporaneously operate the motor vehicle ~ or other mobile site to which it is installed ~ and at the same time operate the motor vehicle or other mobile site in a safe manner and with due care and circumspection under any driving, roadway, traffic or other conditions or circumstances. RVISION does not warrant that it is lawful to operate the product installed on a motor vehicle while contemporaneously operating the motor vehicle on public streets and highways of any state or locality in the United States or in any other country. This warranty does not apply to uncrating, setup, installation, removal of the product or any of its components for repair or reinstallation of the product after repair. This warranty does not apply to repairs or replacements necessitated by any cause beyond the control of RVISION including, but not limited to, any malfunction, defect or failure caused by or resulting from unauthorized service or parts, improper maintenance, operation contrary to furnished instructions, shipping or transit accidents, modification or repair by the user, abuse, misuse, neglect, accident, incorrect power line voltage or connection, defective rack or other mount not provided by RVISION, fire, flood or other Acts of God, or normal wear and tear. TFT Display component is warranted for 90 days. This warranty is limited to either repair or replacement of the product by RVISION, the choice as to which is in the exclusive discretion of RVISION. The foregoing is in lieu of all other expressed warranties and RVISION does not assume or authorize any party to assume for it any other obligation or liability. THE DURATION OF ANY WARRANTIES WHICH MAY BE IMPLIED BY LAW (INCLUDING THE WARRANTIES OF MERCHANTABILITY AND FITNESS) IS LIMITED TO THE TERM OF THIS WARRANTY. IN NO EVENT SHALL RVISION BE LIABLE FOR SPECIAL, INCIDENTIAL, OR CONSEQUENTIAL DAMAGES ARISING FROM (A) THE OWNERSHIP OR USE OF THE PRODUCT, OR FOR ANY MALFUNCTION, DELAY, FAILURE OR INADEQUACY OF THE PRODUCT DURING ANY USE AND CONDITIONS, WHETHER OR NOT AUTHORIZED BY FURNISHED INSTRUCTIONS; OR (B) ANY DELAY IN THE PERFORMANCE OF ITS OBLIGATIONS UNDER WARRANTY DUE TO CAUSES BEYOND RVISION's CONTROL. SOME STATES DO NOT ALLOW LIMITATIONS ON HOW LONG AN IMPLIED WARRANTY LASTS AND/OR DO NOT ALLOW THE EXCLUSION OR LIMITATION OF CONSEQUENTIAL DAMAGES, SO THE ABOVE LIMITATIONS AND EXCLUSIONS MAY NOT APPLY TO YOU. THIS WARRANTY GIVES YOU SPECIFIC LEGAL RIGHTS. YOU MAY HAVE OTHER RIGHTS, WHICH VARY FROM STATE TO STATE. 19 TECHNICAL SUPPORT AND CUSTOMER SERVICE Trouble & Problems: 1. Review trouble shooting, verify cables, and power. 2. Contact your local sales representative. 3. Contact Technical Support at: RVision Inc 408-437-5777 Voice 408-437-9923 FAX [email protected] Call for RMA number before shipping system for repair. No systems are accepted in Receiving Department without RMA number. INDEX: SUPPLIED EQUIPMENT…………………………4 UNPACK C50………………………………………5 INSTALLATION……………………………………6 SIGHT ADJUSTING………………………………11 CAMERA FUNCTIONS (pSEE)…………………12 WIRE LIST…………………………………………14 INSTALLATION CONSIDERATIONS…………..16 TECHNICAL SUPPORT………………………….18 WARRANTY AND LIABILITY…………………….19 18 3 Video SUPPLIED EQUIPMENT Ideal: 75 ohm coaxial low-loss video coaxial cables properly terminated to coaxial connectors. Symptoms: 1. Rolling interference/ Herringbone in video: Power supply interference, power wiring may need to be relocated or shielded 2. Short Horizontal Black & White lines crossing Video: Communication lines may need to be relocated or shielded. A) Communication C) Communication is based on a two-way system, each command to the camera is received, then an acknowledgment is sent back to the controlling computer system. B) Ideal: Shielded twisted pair (RS232), twisted pairs (RS422) for long runs (200ft+) A) C50 B) Test Cable C) Octopus (optional) 700011 A) C50 Front view 4 B) P5 to Hidef Cable Connector Symptoms: 1. Sluggish pan/tilt, camera drifts after pan/tilt control is stopped: Bad Communication line transmitting from the camera to the computer. Test line and repair. 2. No Pan/Tilt/Zoom: Bad communication line transmitting from the computer to the camera 3. Erratic movement without user input: Noisy line, line disconnected at the computer side, or intermittent communication line transmitting from the computer to the camera. Test line and repair. 4. Intermittent control: Intermittent communication lines, wire run too long for wires used or communication protocol. Use wiring with better noise immunity and transmission quality. Wire runs over 200 feet may require RS422 communication camera. C) Octopus Cable 17 Warning: Before attaching the live wires to the camera use a Multi-Meter to test the voltage coming out of the positive pins and the ground pins (check wire lists). All power pins should be tied to power, all ground pins should be tied to ground. It would also be advisable to put an AMMETER in line with the power supply to indicate if the unit is drawing too much current. This may help prevent units from being damaged by incorrect application of power. UNPACK C50 Open up box and Remove cables, and then grasp the C50 firmly with both hands and lift out For Camera type 820015 (no illuminator): Peak = 3 AMPS Resting = 500 MILIAMPS. Digital Ammeter/DC Multi-Meter Lift the C50 free from the box Place on pedestal for testing and verification INSTALLATION CONSIDERATIONS The Camera has 3 main subsystems that may have independent issues. Power Requirements 22-26VDC at camera, under load Correct input voltage, sufficient current depends on payload Cable length, AWG voltage drop calculation based on peak current Ideal: Largest power conductors, shortest length possible to minimize voltage drop. Use high-quality regulated power supplies, with minimum peak-topeak ripple possible. Symptoms: Insufficient power can cause three main types of failures due to voltage drop/ insufficient current when the camera is drawing peak load. <22 Volts: C50- Weak Torque C75- No P/T movement <10 Volts at Camera: Sony camera blue screen <6 Volts at Camera: no operation 16 5 700282-01 P5 Mil Spec to HiDef INSTALLATION: J1 14-18P P5 MS Pin Awg C50 Mount Mount C50 to pedestal using 3/8 x 16 – 7/8” screws in the holes provided Place the C50/C75 on the Platform Make sure that the Platform is level and stable before mounting the C50/C 75 Align mounting holes on the C50/C75 and insert Socket head screws. Use the included hex wrench for the 4 socket head screws. After tightening, wiggle C50/C75 to ensure stability and tight attachment Removal of the C50/C75 is accomplished by releasing the same four screws. Color Black 75 Ohm coaxShield Black 75 Ohm coaxCenter J1-A 28 J1-B 28 J1-C J1-D J1-E J1-F 20 20 28 28 J1-G J1-H J1-J 28 28 28 Black Brown Wht/Org Org/Wht Wht 75 Ohm coax Center Wht/Blu Blu/Wht J1-K 28 Wht/Grn J1-L J1-M J1-N J1-P J1-R 28 20 20 20 20 J1-S 28 Grn/Wht Grn Org Yel Red Wht 75 Ohm Coax Shield J1 Back Shell Signal J1 HiDef Female Pin Video GND J2-1 Video Common GND Power Tx (232) Rx (232) J2-2 J2-3 J2-4 J2-5 J2-6 Audio/Video 2 RS485 - In a RS485 - In b RS485 - Out a RS485 - Out b NIR GND NIR Power NIR GND NIR Power Audio/Video 2 GND Cable overall shield J2-7 J2-8 J2-9 J2-10 J2-11 J2-12 J2-13 J2-14 J2-15 J2-3 J2-outside of shell Note: thread lock may be used to counteract vibration J1 6 J2 15 WIRE LIST, P5 Mil Spec to HiDef MOUNTING C50 Connector and Octopus wire setup: 700011 Hidef (M) Hidef (F) Position C50 over pedestal at desired mount position line up screw holes C50 Base 1) 2) 3) 4) 5) 6) Mil-spec Connector Power Video2/Audio Video1 RS232 RS422/485 4.645” BC 1) 5) 4) 6) 0.452” through hole 3) 2) 14 7 SECURING C50 After the C50 has been placed on mount, secure it with 3/8 x 16 – 7/8” screws in the holes provided Use provided 5/16” hexagonal tamper-proof wrench to tighten screws in pedestal CABLE ATTACH/REMOVE C50 Insert and twist the connector coupling sleeve CW to lock cable in place Preset Tour: Tour Procedure Presets 1-6 Preset mode gives you the option of manually setting 6 individual presets. Then you can run them in sequence to test the functions of your camera. Begin by moving your camera to a desired position. Once position is achieved select Preset 1, click “Get current” then, click “Set Preset.” This will set that position as your first preset. Continue to change the position of the camera and repeat the process. Each time you move to a new position select a different preset. Whatever preset you want to be the last in the series, click on the “Last Preset in Tour” box. The “Dwell” box can be used to change the number of seconds the camera stays at a certain preset. Once you have assigned positions to all six presets you can the click on “Tour Mode” or you can go to each preset individually by clicking on the 1-6 buttons. Tour mode will go through each of the six presets in order. Once the cycle is completed it will repeat itself. Titling: Vertical Position (use 1-3 to test) Horizontal Position (use 1-3 to test) Text (Use “alpha test” to test) Color (test with text) Note: Keyway must align before inserting To remove cable: twist the coupling sleeve CCW and pull out Titling allows you to put text up on your viewing screen. You are also able to decide where on the screen your “title” appears. This is based on a grid system where (0,0) is in the top left of the screen. To pick your vertical position start with zero and for each numerical increase your “title” will move to the right. To pick your horizontal position start with zero and for each numerical increase your “title” will move down. After you have positioned your text you can then choose to change its color depending on the application. When everything is how you want it press the “set” button to confirm, and text will appear on-screen. To start over, press clear. 8 13 CAMERA FUNCTIONS: Windows program, pSEE.exe. REMOVING C50 1. Remove screw in base Note: Applies to Sony 780/980 Camera Only. See payload section of the manual for specific instructions. Zoom Command: Zoom In Zoom Out Directional Command: Home Up Down Left Up Left Down Left Right Up Right Down Right Speed Slider: Slide bar to adjust the motor speed Quick Preset Command: Go to preset 1-6 Focus Command: Manual Focus: Use focus slider to adjust Auto Focus 2. Grasp C50 firmly with both hands 3. Use your arms and legs to lift the C50, do not use your back to lift. CAUTION – KEEP FIRM GRIP ON CAMERA, DO NOT DROP Misc: NIR: Near Infared Mode Stabilization: Camera Stabilization Show Log: Shows command log Backlight: turns back light mode on N2 Pressure: Nitrogen pressure Get Serial No.: Camera serial No. Reset: Restarts the Camera Defaults: Sets Camera to Defaults POD100 Setup Attach the POD100 mount by bolting it to the side of the C50 12 9 Sight Adjusting: Mount POD100 with conical washers and connect the cable Conical Washer 1. Point the Sony day camera at a predetermined point of heat such as a light bulb. 2. Make sure that the day camera has the light bulb in the center of it’s field of view. 3. Adjust the thermal imaging camera using the adjustment screws on top, side, and inside of the POD 100 mount. 4. Once adjusted, tighten all screws down. Suggest using Loctite to counteract vibration. Pan adjust: loosen these two screws. Tilt adjust: loosen inside screw and top screw. 10 Top Screw 11