1
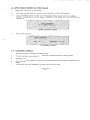
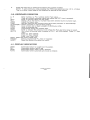
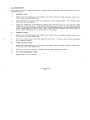
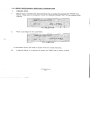
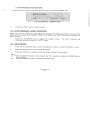
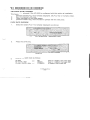
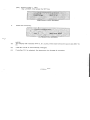
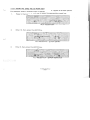
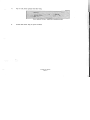
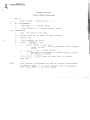
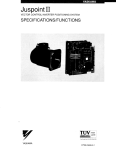
AC-2000 PLU SCALE
OPERATOR MANUAL
AC2000 USER MANUAL INDEX
Description
Page
Number
Applying Power to the Scale
Loading Labels
Key Board Operation
Display Indicators
Key Switch Operation
Zeroing the Weight Display
Tare Entry
Manual Entry
Preset Tare
Tare Look-Up
PLU Programmed Tare
Basic Operation
Weighed ltem
Non-Weighed ltem (Bakery)
AutoIManual Label Printing
Save Mode
Program Value Over-ride
Unit Price
Pack Date
@/FOR Key
AC2000 User Manual Index
1.0 APPLYING POWER TO THE SCALE
w
1.
Make sure nothing is on the platter.
2.
Make sure the key switch is turned to the ON LlNE or OFF LlNE position.
3.
Turn the POWER switch (located on the left side of the scale) to the "on" position.
NOTE: If something is on the platter, "REMOVE THE ITEM ON THE PLATTER" is
displayed.
.,
INITIAL POWER SCREEN
4.
After a few seconds,
2.0 LOADING LABELS
1.
Remove the label cassette by pulling outward.
2.
Thread the label according to the instruction drawing inside the label cassette.
3.
Remove U-pin.
4.
Pull U-Pin out and reinsert it over the end of the label so that the label is attached to the
take-up spool.
5.
Gently slide the label cassette fully back into the main body.
AC-2000 User Manual
paw 1
6.
L,
Press the FEED key to advance the label to the correct position.
NOTE: If using continuous strip pressing the FEED key advances only 112 in. of label.
This is to allow a clean edge to be obtained by tearing off the excess.
3.0 KEYBOARD OPERATION
0-9
C
SET*
PLU
ZERO
TARE
AUTOIMENU
FEED
PRINT
DATE
SAVE
@/FOR
-
Enter numbers; ie. PLU number and/or Tare value.
Clear an incorrect numerical value key before the SET* key is pressed. . .
Enter a numerical value into the scale.
Select a PLU after the PLU number has been entered by the numeric keys.
Adjust the scale to zero.
Set tare value after the numeric keys have been pressed, or autolnatically.
Select automatic or manual label printing.
Issue a blank label or feed a length of continuous strip.
Issue a complete label.
Temporarily change the packed date.
Enter or escape from prepack mode where the PLU and tare value is saved.
(Ex.) when a customer buys 5 pieces of PLU 1 ($1.0013 pieces) Press "1", then
"PLU"
Press "5", then "@/FORM
Press "3",then "@/FOR"
Enter "1OO", then "SET*"
SHIFT Select the lower preset keys.
PRESET
Select programmed PLU, Tare or Operator.
RESET
Reset the scale to the power on menu.
4.0 DISPLAY INDICATORS
ZERO
NET
SAVE
AUTO
Illuminated when no weight is on the platter.
Illuminated when a tare is set.
Illuminated when "save" mode is entered.
Illuminated when automatic print mode is entered.
5.0 KEYISWITCH OPERATION
L-
The key switch is located at the left side of the scale housing. The key switch has six positions.
Each position can be accessed by inserting either the operator key or the master key and
rotating the key.
The master key can access all positions and the operator key can access all but the SET UP
position. The keys can be removed in the on-line or off-line position. Each position of the key
.
switch accesses a different scale mode.
t
e
SET UP
SET UP mode: Accesses the mode used for setting the initial data settings, ie.
label format, etc.
SUB.
SUBTRACTION mode: Access the mode used to manually subtract returns from
the recorded PLU totals.
OFF LlNE
NORMAL OPERATION: In the off-line mode, the PLU data is not accessed from
the master scale in a system, the scale operates as a stand alone machine.
ON LINE
NORMAL OPERATION: In the on line mode, the PLU data is accessed from the
master scale.
REG.
PROGRAM mode: Access all modes used to program data for label printing.
TOTAL
TOTALEATION mode: Access modes to allow the display and print out of PLU
total information.
* Set the key switch to the desired position and refer to the corresponding chapter of this
manual for instructions.
6.0 NORMAL OPERATION
6.1 ZEROING THE WEIGHT DISPLAY
1.
2.
Make sure that nothing is on the weigh platter.
Press the 7ERO"key.
AC-MOO User M a n 4
Page 3
6.2 TARE ENTRY
<-.
There are four ways to enter a tare value: manual tare, preset tare, tare look-up key and PLU
programmed tare.
MANUAL TARE
Make sure that nothing is on the platter and check that the weight display reads zero.
..
If not zero, press the ZERO key.
Place the item to be tared (pack or container) on the weigh platter. The weight of the
tare item will be displayed.
Press the TARE key. The displayed weight value will be return to zero and the TARE
indicator will be illuminated. If the weight display does not return to zero after pressing
TARE, the scale has not yet stabilized. Let the scale stabilize for a few seconds and then
press TARE again.The scale is now tared. Note that the weight value will become a
minus value if the tared item is removed from the platter.
ii.
PRESET TARE
1.
Make sure that nothing is on the platter and check that the weight display reads zero.
If not zero, press the ZERO key.
Key in the desired tare value and press the TARE key. The tare value will be displayed
as a negative weight.
iii.
TARE LOOK-UP KEY
1.
Make sure that nothing is on the platter and check that the weight display reads zero.
If not zero, press the ZERO key.
2.
Press the preset key which is programmed with the desired tare value.
IV.
PLU PROGRAMMED TARE
Please refer to the programming menu.
AC-2000 User Manual
psee 4
7.0 BASIC WEIGHINGILABELING OPERATION
d
i.
WEIGHED ITEM
1.
Key in the PLU number and press the PLU key or press the appropriate PRESET key.
NOTE: Please refer to the section "HOW TO ASSIGN PRESET KEY" in the programming
manual.
2.
Place a package on the scale platter.
PLU SELECTION
3. In Automatic Mode, the label is issued when the weight stabilizes.
3b.
In Manual Mode, it is required to press the "PRINT"key to obtain a label.
AC-2030 User Manual
Pace 5
ii. NON-WEIGHED ITEM (BAKERY)
'V
1. Key in the PLU number and press the PLU key or press the PRESET key.
2.
Press the "PRINT" key to obtain a label.
8.0 AUTOIMANUAL LABEL PRINTING
When set to AUTO, a label will automatically be issued every time a package is placed on the
platter and the weight has stabilized. When set to MANU, the PRINT key must be pressed to
obtain a label.
1.
Press the AUTOIMANU key to select the desired mode.
illuminate when the scale is in 'AUTO' mode.
The AUTO indicator will
9.0 SAVE MODE
1.
Press the AUTOIMANU key to enter the MANUAL mode if it is the AUTOMATIC mode.
2.
Select the desired PLU if not already displayed.
3.
Press the SAVE key, indicated when the SAVE indicator is illuminated.
NOTE:
When the SAVE indicator is illuminated, the PLU selected is retained (SAVED) after a
(a)
label is printed.
Press the SAVE key again to cancel the SAVE mode.
(b)
AC-2000 User Manual
Pwe 6
10.0 PROGRAM VALUE OVERRIDE
1
UNIT PRICE ($/LB)OVERRIDE
This feature only operates if the AC-2000 is configured with this option at installation.
1.
2.
3.
4.
Select the desired PLU if not already displayed. (By PLU key or numeric entry).
Key in the desired unit price.
..
Place a package on the scale platter.
(Press the PRINT key), then the label is printed with the new price.
PACK DATE OVERRIDE
1.
Select the desired PLU if not already displayed (as above).
2.
Press the DATE key.
3.
Change the pack date as follows:
a) date
b) month, date
c) year, month, date
--
DD
MMDD
YYMMDD
(key in 2 digits), then press SET
(key in 4 digits), then press SET
(6 digits), then press SET
AC-2000 User Manual
Pace 7
(EX.) Change to May 1, 1991.
Key in 910501, then press the SET key
TEMPORARY DATE SCREEN
4.
Press the DATE key.
(a)
NOTE:
The display still indicates APR 15, 91, but the printed label shows the pack date MAY 01,
91.
(b)
"USE BY DATE is automatically changed.
(c)
If another PLU is selected, the temporary date change is canceled.
11.0 HOW TO USE THE @/FOR KEY
L/
-
For example, when a customer buys 10 pieces of PLU 3 apples at $1.0015 pieces.
1.
Press 3, then press the PLU key or press the appropriate preset key.
2.
Enter 10, then press the @/FOR key.
3. .
Enter 5, then press the @/FOR key.
AC-2000 User Manual
pew 9
4.
Key in 100, then press the SET key.
5.
Press the PRINT key to print a label.
u
'
AC-2000 User Manual
page 10
ISHIDA
AC-2000
WEIGH CHECK OPERATION
I.
SET UP
1.
11.
Label Format:
Bakery Print = 1.
PLU PROGRAMMING
1.
Sales Mode = 2
(Weigh Check).
2.
Fixed Weight (02.) = check weight value.
111. OPERATION
1.
Key = ON LINE or OFF LINE.
2.
Weight must be at ZERO (no tare weight).
3.
Select PLU.
4.
Place product on scale.
5.
Press
6.
a.
I)
Actual Weigh 2 Check Weight
b.
Label is printed with progammed check weight
value.
Actual Weight < Check Weight
7.
key.
Press
Operator is prompted to accept actual weight,
or cancel printing.
,
keys to clear PLU, or select
next PLU.
NOTE :
This feature is designed for use in a bakery environment.
If BAKERY PRINT = 1 in label format, PLU1s programmed
with Sales Mode = 0 will not print.
,'