1
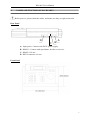
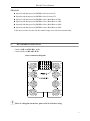
KB-1003 User’s Manual KB-1003 User’s Manual Version 1.1 080922 1 KB-1003 User’s Manual 1. IMPORTANT SAFEGUARDS AND WARNINGS Prior to installation and use of this product, the following WARNINGS should be observed. 1) All the safety and operating instructions should be read before the appliance is operated. 2) Do not use this unit near water or watery places. 3) Operate this unit from the type of power source indicated on the marking label or manual. When the voltage goes beyond the limited, please do not open the unit. 4) Don’t clean it with the punchy detergent. Please use the soft cleaner, and only clean the outer. CAUTION: TO REDUCE THE RISK OF ELECTRIC SHOCK, DO NOT REMOVE COVER (OR BACK). NO USER SERVICEABLE PARTS INSIDE. Please thoroughly familiarize yourself with the information in this manual prior to installation and operation. 2. DESCRIPTION It can control output decoders, integrated camera, speed dome, or integrated PT unit. It can also be used in our DVR system. 3. TECHNICAL PARAMETER 1. Baud Rate: 1200 Bit/S, 2400 Bit/S, 4800Bit/S, or 9600Bit/S. 2. Communication: RS-485 3. Power supply: DC 9V 4. Communication distance: max 1200m 5. Can control Max 32 speed domes. 2 KB-1003 User’s Manual 4. NAMES AND FUNCTIONS OF EACH PARTS Before power it, please check the cables, and make sure they are right connection. Rear Panel D C B A A: Input power: Connect with DC9V power supply. B: RS485-1: Connect with speed dome, decoder or receiver. C: RS485-2: No use. D: RS232 connector: No use. Front Panel 3 KB-1003 User’s Manual 1) LCD DISPLAY This displays will show the current ID number, protocol, baud rate and status. 2) 0~9 Used for setting the camera ID, Preset No. and modify the keyboard parameters. When SHIFT button is in effect, it will be light. 2, 8, 4 and 6 can also be used to move the PT unit UP (2), DOWN(8), LEFT(4) and RIGHT(6). 3) CAM Enter the ID (0-255) by the number key then press CAM key i.e.: Number + CAM The number will be displayed after item CAM on the LCD. 4) MON No use. 5) CLOSE/OPEN, NEAR/FAR, and TELE/WIDE This is used when controlling the actions of the IRIS, FOCUS, and ZOOM of the zoom lens connected to the speed dome or PT unit. Under Manual mode, pressing key CLOSE and OPEN can control the IRIS. Under Manual mode, pressing key NEAR and FAR can control the Focus. Press key WIDE and TELE until getting the image you need. Under Auto mode, manual controlling is no use for Focus and IRIS. 6) JOYSTICK It is 2D or 3D, and used to move the speed dome or PT unit on pan or tilt direction. The moving speed increases as the offset. Turning the knob on the 3D joystick can control the camera TELE/WIDE. 7) MENU Press key MENU to call the camera menu. Exit the menu from the exit item of the camera menu (recommended) or press key MENU again. For SDCI-220 model: Press key 57 + CALL , enable on screen menu on the Monitor. Press key 57 + PRESET , disable on screen menu on the Monitor.. This function is not available for the FCWO-220 and FCWO-270 model. 4 KB-1003 User’s Manual 8) TOUR For FCMO-270, FCMO-220, FSWO-220, FSCO-220 and FSCI-220 model: Press key Tour, the LED will be light and star to tour the multi preset position. Press key Tour again, the LED will be off and stop to tour the multi preset position. For SDCI-220, PTWO-100 and PTCI-100 model: Press key 51 + PRESET , star to tour the multi preset position. Move the Joystick to stop tour function. 9) SCAN. (360°pan auto scan) For FCMO-270, FCMO-220, FSWO-220, FSCO-220 and FSCI-220 model: Press key SCAN. The LED gets turned on, and auto scan begins. Press key SCAN again. The LED gets turned off, and auto scan stop. For SDCI-220, FTWO-100 and FTCI-100 model: Press key 53 + CALL , star to Auto Scan function. Move the Joystick to stop Auto Scan function. 10) SHIFT Press key SHIFT, it gets turned on, and SHIFT is in effect. Press key SHIFT again, it gets turned off, and SHIFT is off no effect. 11) BEFORE No use. 12) NEXT No use. 13) CALL This is function for search the preset position of the speed dome or receiver. Entry the Preset No. in the Number area, and press key CALL to call it. i.e. N + CALL If succeed, the number input area will reset automatically. 14) Enter No use. 15) CLEAR Press key CLEAR, the Number input area will reset 16) PRESET Set up the Presets: Move the joystick, and adjust the Lens to select the surveillance position you need. Input No. and then press [PRESET] key. i.e. N + PRESET Call the presets: Input the preset number, and press [CALL] key. i.e. N + CALL 17) MUX-C, F1—F4 & PATTERN No use. 5 KB-1003 User’s Manual 18) PGM Input 50,and then press key PGM to select Protocol P. Input 44,and then press key PGM to select Protocol D. Input 12,and then press key PGM to select Baud Rate to1200. Input 24,and then press key PGM to select Baud Rate to 2400. Input 48,and then press key PGM to select Baud Rate to 4800. Input 96,and then press key PGM to select Baud Rate to 9600. If the above action can succeed, the number input area will reset automatically. 5. KEY BOARD CONNECTION Connect O/R with RS-485+ A (Y) Connect S/L with RS-485- B (Z) Inner connection diagram B / L O / R S / L B / R B / K Y / L R / D G / R There is a diagram on the box, please take it off before using. 6