1
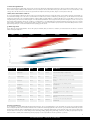
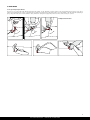
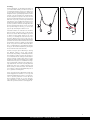
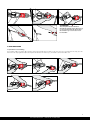
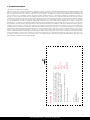
u s e r m a n u a l Wat e r k i t e s . B a r s y s t e m
wa r r a n t y c a r d I n c l u d e d
1. IMPORTANT WARNINGS
Do not use this product unless you agree with the following terms and conditions. The user of this product understands that the use of this product
exposes the user to certain unavoidable risks, dangers and hazards. The user assumes these risks voluntarily. Before using this product, the user has
carefully read the user’s manual. He understands the safety instructions and agrees to comply with them. The user of this product understands that
the seller is not responsible for any damage to property or injury caused by negligent operation of this product by the user, and the user releases the
seller from all such liability. If you do not agree with these terms and conditions, do not use this product. Kindly return this product before use and
your purchase price will be refunded in full.
2. Release of Liability
By assembling and/or using this JN Kite product, you agree that you have read and understood the JN user’s manual, including all instructions and
warnings contained in that manual, prior to using the JN kiteboarding product in any way. You also agree that you will ensure any additional or
subsequent user of your JN kiteboarding product will read and understand the manual, including all instructions and warnings contained in that
manual, prior to allowing that person to use your JN kiteboarding product. Assumption of risk: Use of the JN kiteboarding product and of any of
its components involves certain inherent risks, dangers and hazards, which can result in serious personal injury and death for both, the user and
non-user third parties. By using the JN kiteboarding product, you freely agree to assume and accept any and all known and unknown risks of injury
to you and to third parties while using this equipment. The risks inherent to this sport can be greatly reduced by abiding to the warning guidelines
listed in this user’s manual and by using common sense. Release and waiver of claims: In consideration of the sale of the JN kiteboarding product to
you, you hereby agree to the fullest extent permitted by law, as follows: To waive any and all claims that you have or may in the future have against
Jochum & Nesler and all related parties resulting from use of the JN kiteboarding Product and any of its components. To release Jochum & Nesler
and all related parties from any and all liability for any loss, damage, injury or expense that you or any users of your JN kiteboarding product may
suffer, or that your next of kin may suffer, as a result of the use of the JN kiteboarding product, due to any cause whatsoever, including negligence
or breach of contract on the part of Jochum & Nesler and all related parties in the design or manufacture of the JN kiteboarding product and any
of its components. In the event of your death or incapacity, all provisions contained herein shall be effective and binding upon your heirs, next of
skin, executors, administrators, assigns, and representatives. Jochum & Nesler-related parties have not made and expressly deny any oral or written
representations other than what is set forth herein and the JN Kite user’s manual.
3. KITE CARE AND SAFETY
a. Kite care
Due to the extreme nature of kiteboarding, a thorough approach should be taken when caring for your kite and all its associated rigging. Frequent
inspections of the kite should be made in order to detect punctures, tears, or abrasions in the canopy or struts. It is also necessary to check the flying
lines for wear and to untie knots, which often reduce the breaking strength of the flying lines.
Between sessions: Never leave an inflated kite unattended for a long period of time. Winds may shift or change and the kite may become unsecured
and take off. Do not leave an inflated kite (secured or not) directly exposed to the wind or sunrays for any length of time. This might cause the trailing
edge to flap excessively, which can damage the kite. If you must leave the kite exposed to the wind on the track, place sufficient amounts of sand
sacks between each batten and near the trailing edge to minimize or stop the flagging and additionally secure it with your sand/snow stake.
Proper storage: We recommend washing your kite with fresh water and drying it before rolling it up for storage. Wash your control system from
time to time by placing the entire control system (with lines wound onto the bar) into a bucket of fresh water and letting it sit for 5 minutes. Allow
to dry properly before storing in a dry location.
We strongly recommend the following: If you have never tried kiteboarding before and you are not sure how to get started safely you must attend
a licensed kiteboarding school in order to learn the basics of kiteboarding. Familiarize yourself with safety precautions and with your safety and
quick-release equipment in particular. Only go kiteboarding if you are in good physical shape and do not suffer from any medical conditions that
may impair your kiting ability. No risk, no fun...but always remember: There are old and there are bold riders. But there are no old bold riders! This
kite is not to be used as a paraglider or free-flying device.
b. Dangers when kiteboarding
When kiteboarding, extreme wind strengths come into play. In rare cases (improper use or loss of control), the kite or its lines and perhaps even the
rider as well may cause dangerous flight path situations with other people such as onlookers, swimmers or sun-bathers or obstacles such as houses,
vehicles, power lines, etc. Due to the enormous powers involved, this may lead to life-threatening situations. People who get caught in kite lines may
suffer from severe gashes or burns. Kite canopies crashing down may injure onlookers. When performing uncontrolled 360 ties (loops), the canopy
may give you involuntary “airtime”. An uncontrolled landing (especially on land) is particularly dangerous.
c. Threats to onlookers
It is within your responsibility to check whether uninvolved people or other athletes may be endangered or injured by your actions or your gear. Only
fly your canopy over unobstructed areas. Do not fly over people or animals. Ensure that a semicircle extending 100 meters downwind and to each
side of your flying position is clear of people and obstructions. Use a kite leash to keep your kite under control. Do not fly your kite in the vicinity of
swimmers, kayakers, (wind-) surfers and water skiers as well as near to boats.
d. Safety of the kiteboarder
Kiteboarding should only be attempted or performed by a reasonably good swimmer. Wearing a Coast Guard-approved live vest can save your life in
an unexpected dangerous situation. Go no further from land than you’re able to swim back. Do not fly your kite near power lines, telephone poles,
airports, streets, buildings and trees. If using a board-leash, you must wear a helmet for protection. Take into account all the usual risks associated
with water sports such as rocks, waves, sunburn, hypothermia, jellyfish etc.
1
J n u s e r m a n u a l . w w w. j n - k i t e s . c o m
e. Threats through kite lines
Never touch the kite lines while flying, as these lines can become dangerously sharp when under tension. Never use kite lines with notches, cuts etc.
These must be replaced. Only use lines that have no knots in them, as knots can weaken lines by as much as 50%. Do not touch the lines of the
canopy, unless the kite has been secured to the ground. Never wrap lines around your arms, fingers or other parts of the body.
f. Wind, water and weather conditions
Do not go kiteboarding in dangerous waters. Please check the wind direction before setting up the kite. Avoid offshore wind. Be careful with onshore wind when sailing close to the shore. Get information on tidal and sea current conditions at your kiting spot. Get information from both the
weather report and the locals on prevailing weather conditions. Only go kiteboarding in conditions that allow you to keep 100% control. If you’re
a beginner, limit your first ride to wind strengths of 4-5 bft (beaufort) maximum. The stronger the wind, the more dangerous it is. Do not use your
kite in gusty winds. Carefully observe the conditions, you might have to cope with additional 2-3 beaufort within shortest time. Never use your kite
in the vicinity of thunderstorms or where they are likely to develop. (Check the local weather report) Leave the water immediately when a storm is
approaching. Sailing in or near a thunderstorm means putting your life at risk.
g. Wind range chart
These charts are only general guidelines. Factors like your personal skill, water, snow and ice conditions, as well as board size are all to be considered
when selecting the right size.
8 knt
10 knt
20 knt
25 knt
30 knt +
Mr. Fantastic
4,5
6
8
10
12
14
Wild Thing
6
8
10
12
14
16,5
Description
km/h
kts
m/s
Conditions
3
Gentle breeze
12-19
7-10
3.4-5.4
Leaves and smaller twigs in constant motion
4
Moderate breeze
20-28
11-15
5.5-7.9
5
Fresh breeze
29-38
16-20
8.0-10.7
6
Strong breeze
39-49
21-26
10.8-13.8
50-61
27-33
13.9-17.1
7
High wind,
Moderate gale
8
Gale, Fresh gale
62-74
34-40
17.2-20.7
9
Strong gale
75-88
41-47
20.8-24.4
Storm, Whole gale
89-102
48-55
24.5-28.4
10
35 knt +
Prima Donna
6
7
8
9
10
11
12
13
14
Beauford
15 knt
n
n
Dust and loose paper raised, small branches begin
to move
Branches of a moderate size move, small trees begin
ees begin
to sway
Large branches in motion, whistling heard in
rd in
overhead wires
Whole trees in motion, effort needed to walk against
the wind
Some twigs broken from trees, progress on foot
is impeded
ees
Some branches break off trees, some small trees
blow over
rees are broken off or uprooted, saplings bent
and deformed
h. Know your skill level
Do not attempt to go kiteboarding without appropriate instruction. Do not go kiteboarding on your own. Make sure you are in good physical shape
before using this product. Practice with a low traction kite or trainer kite before flying this kite. The more time you spend with a trainer kite, the safer
and faster you will learn. End your Kiteboarding session before you are completely exhausted. Do your homework, make sure you know safety-rules
and precautions for all aspects of kiteboarding such as launching, landing, flying, riding, and kiting, self-rescue, etc. Only accept help from people
who know how to handle, launch and land your kite properly. You are responsible for the safe operation of your kite.
2
J n u s e r m a n u a l . w w w. j n - k i t e s . c o m
4. New JN kites and features
a. Prima Donna
JN is proudly presenting the new Prima Donna, the 5th generation of the legendary freestyler with increasing an increasing user base of wave &
free-riders. The pure performance oriented C-shape we refined in all sizes, applied only the richest fabrics only to save weight and enhance durability.
The strictly applied "Floating Batten Technology" and "Perfect Round Arc Shape" allow a wind-adapted profile. The rider benefits from a larger
wind range of its kite and smoother and secure handling even in gusty conditions. Use of highest industry quality in materials such as Teijin TM for
the canopy and Polyant Dimension TM for any Dacron area, double seams, durable Kevlar - Cordura reinforcement combined with high end and
sustainable JN manufacturing. Developed only by JN, the "Floating Batten Technology" (FBT since 2003)” allows the profile to adjust itself to current
winds and gusts, extends the wind range and smooths the handling. The "Perfect Round Arc Shape”, possible only thanks to our continuously
further developed hard- and software, reduces performance-inhibiting air turbulence and stabilises your kite at all windspeeds. The well balanced
construction of Prima Donna helps you e.g. when riding onshore conditions or doing radical jumps by a friendly lee-ward drifting and still turn able
kite whenever lines have less tension. Kite profiles, individually adapted to the respective wind speed, are making each kite size unique and specifically designed for its range. Prima Donna is offered in a complete size range which makes it easier for all disciplines, genders and weight of riders
to tailor their perfect quiver.
Sizes: 6, 7, 8, 9, 10, 11, 12, 13, 14 m²
Characteristics: Fast flying speed, mid bar pressure, lots of punch for powerful unhooked wakestyle moves, precise, direct steering combined with
balanced intuitive feedback, high wind performance like never before, impressive low wind performance, enormous lift and hangtime, instant 5th
line safety, simple relaunch
Features: "Perfect Round Arc Shape", "Floating Batten Technology" (FBT), high end manufacturing by double and taped seams, strong reinforcement , best industry materials only: Teijin™ canopy fabric and Polyant Dimension™ Dacron fabric, kevlar at critical points for enhanced durability,
stitched in graphic design to save weight, sophisticated 5 strut construction, single point inflation, simple to service
b. Mr. Fantastic
The 3rd generation will convince you with a typical JN sportive performance, very powerful kite surface, wide wind range and easy handling by a
simple and refined 4-line set up. Optionally, the kite can be used with a 5-line set up. The all purpose kite offers the necessary characteristics to all
stages of rider skills and an On/Off power generation for beginners, tight turns and a stable well balanced flying character for more experienced
freeriders and wave riders. Mr Fantastic is shaped with a "swept back" leading edge, which allows the rider to adjust the angle of approach as with
other high depower kites, but without the loss of direct steering. The JN specific canopy to tip construction gives the kite a very responsive and
direct character combined with moderate bar pressure. The simple bridles support, the increased angle of approach and additionally enhance the
kite’s stability while offering a wide wind range.
Sizes: 4.5, 6, 8, 10, 12, 14 m²
Characteristics: Increased wind range, more depower through a perfectly adapted bridle setup, enhanced low wind performance, by an optimized effective area, suits everyone, from beginner to professional through its easy handling, high jumps with great floaty hangtime, direct and
responsive steering, suitable for all conditions and skills, great upwind performance, easy instant 4 line relaunch, single front line safety
Features: Less bar pressure, simple bridle construction, revised single Inflation system, kevlar patches for longer durability, light and durable
Teijin™ sail cloth, 5 strut construction
c. Wild Thing
The Wild Thing was JN’s first kite to start with 9 years ago. Its fans loved the incredible direct steering combined with extreme grunt and hang time.
The JN team pushed the envelope the 4th time to create something stunning for the demanding WT fans. The Wild Thing profits from the rich
innovative JN features, like "Perfect Round Arc Shape" and "Floating Batten Technology" combined with the best available material choice in the
industry. We accept no compromises in quality. To answer the low wind needs with a performance model this year we added 2 sizes: 14 and 16+.
Easy four line bridle kite with open C-shape offers the benefits of a fast, responsive performance weapon when you need it. The medium bar pressure is adjustable by a fixed or open front line pulley - to either free- & wakestyle lovers or softer freeride preferences. With WT you get a sportive,
fast turning, well balanced modern 4 with optional 5 line kite concept serving freestyle and freeride in equal measure.
Sizes: 6, 8, 10, 12, 14, 16.5 m²
Characteristics: Simple 4-line leading edge bridle, instant 4 line relaunch and 5t line support for low winds, stability and increased wind range
thanks to the "Floating Batten Technology" (FBT), enhanced low wind performance and extended wind range by an optimized effective area with
proven canopy design from Michael Nesler, good upwind capability, easy access to high jumps, constant pop and hang time, most direct and
responsive steering, fast turning thanks to the JN canopy-tip construction, 4-line/5-line convertible
Features: "Perfect Round Arc Shape", "Floating Batten Technology" (FBT), high end manufacturing by double and taped seams, strong reinforcement, best industry materials only: Tejin™ canopy fabric and Polyant Dimension™ Dacron fabric, kevlar at critical points for enhanced durability, sophisticated 5 strut construction, single point inflation, simple to service
3
J n u s e r m a n u a l . w w w. j n - k i t e s . c o m
5. kite Setup
a. Set up and pack your JN kite
Don’t try to use your JN kite with different bars than the JN bar. Set up: Unwrap your kite, plan it to the ground and pin it down by some object
which doesn’t harm the kite such as a sand bag. Next, attach the pump leash to the pump leash loop in the middle of the kite and start pumping it
up by using the inflate valve. Ensure that the cleats, which are closing the single pump connection hose at the struts, are opened.
Pumpleash Connection
1
4
2
3
5
6
4
J n u s e r m a n u a l . w w w. j n - k i t e s . c o m
Pump up your kite to the recommended 6-7 psi.
If your pump doesn’t provide a pressure gauge,
pump the kite until is is nice and firm and makes
a pinging sound when flicking it with the finger.
An underinflated kite doesn’t perform properly,
impedes relaunch and wears out more quickly.
Pumped up properly, you should turn your kite
around, lie it on the leading edge and weight
it with a heavy object which doesn’t harm the
kite. Always ensure that there are no material
failures such as tears on the canopy or struts.
Next step: Unwrap your bar downwind. Ensure
that there are no tears and knots at your lines.
Sort your lines properly. All JN kites come equipped with a fool proof adapter. The bar side has
knots at the backlines and a loop at the frontlines. The kite side has exact the opposite, so no
connection mistakes are possible. Connect your
flying lines to the kite’s pigtails by a simple larks
head and ensure that they are set properly. Always check your set-up kite, ensuring untwisted
lines twice before launching.
1
2
3
4
5
6
7
8
9
10
back line left
front lines
back line right
front line attachment
back line attachment
Packing: After landing, pin down your kite properly. Always dry your kite and bar before storing them. We recommend you wash all your equipment
with freshwater first. Detach your flying lines and wrap them around the bar. Fix them by the elastic loop at the bar ends. Next, deflate your kite
completely by opening the deflate valve. Don’t forget to open all single pump clamps to be able to deflate your struts too (in case you want to keep
the struts inflated, only deflate the leading edge and wrap your kite up form both sides). Wrap up your kite from both sides. Fold the wrapped up
canopy into thirds to be able to pack it into the backpack and store your equipment dry.
5
J n u s e r m a n u a l . w w w. j n - k i t e s . c o m
b. Tuning
5th line adjustment: To gain ideal performance of
your 5-line Prima Donna your 5th line tension is
essential. If the 5th line’s tension is too high it reduces the kites low wind performance, the lift, the
hangtime and the general flying behaviour. After
months of use the frontlines get stretched a little
because they take most parts of the load. The 5th
line doesn’t take that much load so doesn’t stretch
that much. If you feel your kite isn’t performing as
well any more, try to lengthen the 5th line 2-5cm
and the kite’s full performance is recovered. In opposite it’s possible to influence the high wind character by shortening the 5th line 2-5cm. To extend
the top wind range of the kite, you can do the
opposite by shortening the 5th line 2-5cm.
Stretched Frontlines: As told above the frontlines
take most parts of the kite’s load, so they are the
first lines to stretch. When this happens you need
to adjust your line lengths. Therefore use a tree
or fence, or something else static and tie a rope
around it. Attach all 4 or 5 lines to this rope, unwind your bar and hold the bar tight with bar fully
powered. The lines should end all the same level.
The backlines offer the possibility to attach them
at the "less power" knot which extends the backlines, so length difference gets balanced. Alternatively you can extend the backlines by moving the
knots under the floats at the bar ends.
3
4
free
style
free
style
free
ride
free
ride
Freeride / Freestyle option: Wild Thing is offering
two different setups to choose from, Freestyle
and Freeride. Depending on individual preference
and operating condition you have the freedom to
choose between the two settings. Freeride (attachment of front line on pulley only) offers you a very
dynamic kite with increased depower, most stable
character and easy access to a maximum of range.
We recommend this setting for wave riding. Freestyle (attachment of front line on pulley and fixed
hangpoint) offers more constant power/pop and
direct steering for unhooked tricks. This will lead
to a reduction of depower and additionally ease of
use to generate low wind grunt.
More / Less bar pressure: Wild Thing provides different hangpoints for backlines too. For easy and
relaxed freeriding adjust your kite to "less bar pressure" to preserve your arms. For more bar feedback (technical freestyle) use a "more bar pressure" hangpoint to receive better bar feedback
which tells you where the kite is currently placed.
6
J n u s e r m a n u a l . w w w. j n - k i t e s . c o m
6. elements of kitesurfing
1
a. 5-line relaunch
Prima Donna: After dropping, the kite generally floats on the leading edge. Make sure you
are perfectly hooked into your harness. Simply pull the 5th line until the profile tilts backwards. Don’t pull too much, so the full canopy
doesn’t touch the water. This would hinder a
fast and easy relaunch. Around 45 degrees is
adequate. Now pull one of the backlines so
the kites tip is able to catch wind. Patiently
wait until the kite starts to crawl to the wind
window edge and slowly release the 5th line
which should still be under tension. The 5th
line should be completely released when kite
erects itself vertically. Pull one side of the bar
so the kite launches skywards and your kite is
relaunched and ready for further action. We
recommend to pull the 5th line above the bar
at the Clamcleat, this is easier, clearer and safer
because the pulled line is away with a safe distance from your body. The handling with the
5th line is so much easier than below the QR.
1
2
3
4
b.1) 4-line relaunch
Mr. Fantastic: Simply wait until the kite is lying on the leading edge in the very middle of the wind window. Make sure you are perfectly hooked
into your harness. Pull the trim adjuster cleat all the way in, and push away the bar for maximum of depower. Then grab either left or right backline
handle and pull. The stronger the wind, the faster the kite’s tip will rise out of the water, therefore pull harder on the backline-handle in light winds
and more gently in strong winds. Once the kite starts to crawl towards the wind window’s edge you can let go of the handle and grab the bar
accordingly. Keep on pulling/steering until the kite leaves the water. Steer the kite to the zenith and adjust the power according to the prevalent
conditions. Find the sweet spot on the depower rope to be able to restart instantly. Wild Thing: Act as instructed above but do not depower the
adjuster whilst pulling on one side of the bar.
1
2
3
b. 2) 4-line low wind reverse relaunch
With strong, extended pressure on both steering lines, the kite will fly backwards out of the water. Take the control lines on the PU tubes or with low
wind, higher at the end of the front line leaders. Just let the Kite climb in reverse as high as possible and then take the bar and steer the kite out of
the power zone. The higher the kite flies backwards the more space there is to control the kite once in the powerzone.
c. Safety and Quick Release
Attention, the applied safety release is passive, in a case of emergency the mechanism has to be activated manually and in time! The safety system
consists of two separate safety steps. First step is the release of the chicken loop by pushing the red handle next to the chicken loop upwards. This
leads to an almost pressure less kite which falls to the ground, but is still connected to the kiter by a safety leash. If danger (for you or people and
objects around) still exists, it’s possible to release the second safety at the leash. By pushing away the red handle at the leash, the kite becomes fully
disconnected from the kiter. Be aware, releasing the secondary safety leash disconnects you from your kite so it will fly away and could harm other
people or objects around. Practice releasing the safety mechanism, to be able to react instantly in a case of emergency.
7
J n u s e r m a n u a l . w w w. j n - k i t e s . c o m
1
2
1
2
3
Attention!
The safety line must be attached
through the triangle of the chicken loop
to tie on at the leash. This means that
the chicken loop is secure also for unhooked rider.
7. kite barsystem
a. Quick Release reassembling
The assembly of QR is very simple. QR centerpiece at the upper handle with one hand to hold, put loop in the second hand into the strap, press the
hard end of the strap against the QR heart and push the handle down until it stops, the handle locks with an audible click.
2
1
4
3
5
8
J n u s e r m a n u a l . w w w. j n - k i t e s . c o m
5
5
3 metres
b. Adjustable depowerway
At the PU hose on the depower line and safety line near the bar socket is a stopper ball
with a grub screw with which you can individually set the depower throw for example:
for a rider with shorter arms. Attention: It’s important is that the grub screw in the
stopper ball is not too tight or it will prevent the safety line in the hose from working.
16
16
4
4
14
c. Switchcraft bar setup and mode conversion
Detail Y
3
barend changing lines
8
2a back leader lines
7
2b back leader lines
back flying lines
4
back lines extension 3m
5
back flying pigtails
6
safety line
7
safety line extension 3m
8
safety line
9
depower line
3
13
12
12
Detail S
6
21 metres
3
24 metres
1
14
11
10 adjuster line
11 center line
Frontline 14
13 center line
14 front lines
safety line 8
5th line 16
A
H
1
2a
7
3
B Chicken Stick
3D Grip Bar
F
Floater
G Adjuster
F
F
9
3
2a
12
1
Detail S
1
E
D Bar-Ends
E
15
G
Frontline 14
Chicken Loop
C Quick Release (QR)
10
Centerline 13
15 landing line
16 5th line
2b
2b
12 center line extension 3m
D
D
C
A
6
11
6
H Depower Line Stop
B
9
J n u s e r m a n u a l . w w w. j n - k i t e s . c o m
Mode conversion: 4-line mode 1
The safety line attaches to a single front line,
meaning the kite will flag out sideways.
Frontline 14
Safetyline 8
Centerline 13
5th line 16
1
Mode conversion: 4-line mode 2
Frontline 14
The safety line attaches to both front lines, meaning the kite will depower and gently drop
down the edge of the wind window. If using
this mode it is important to attach the safety
line to the centre line as shown, and not the
Y section.
Backline 3
Centerline 11
Centerline 13
Centerline 12
Safetyline 6
Frontline 14
Backline 3
1
2
Mode conversion: 5-line mode
The Master´s Craft ships in 5-line mode. All lines
are installed with the 24m version ready tofly.
The 5th line mode is essential for Prima Donna,
but can be used also for Wild Thing and Mister
Fantastic, all JN-Kites are supplied complete
with nose lines or already installed, and ready
to fly. After activating the safety, the guide ring
is used in the safety line 6 at the same time as
stopper ring and limits the activation distance,
this prevents that the line wrapped around the
kite.
Frontline 14
Backline 3
Centerline 12
safety line 8
5th line 16
Centerline 11
Safetyline 7
Safetyline 6
Centerline 13
Frontline 14
Backline 3
1
d. Switchcraft 2 length adjustment
The bar end permits 2 bar lengths, 45cm and 55cm, by
putting on the changing line #1 on the bar end.
2
4,5 qm - 8 qm
45 cm
8 qm - 12 qm
45/55 cm
12 qm - 16,5 qm
55 cm
e. Master´s Craft line length adjustment
The built 3m Extensions allow to shorten the line lenght from 24m to 21m.
The conversion is easy, the involved Extensions (E 4, E 12 and E7) can be dissambled or mounted by hand.
The Extensions are shown green (E) in the sketch.
With 6m-Extensions (not included in the scope of supply) the Leashlenght of Master´s Craft for lowwind-Kites can be extended at 27m, or at 30m.
These Extensions are either in place of the existing 3m Extensions (=27m) or installed in addition to the existing extensions.
Under the Floatern are on the controllinglines node leaders with which the line length can be corrected. Just move the floager up.
The correct line length for all JN-Kites = all 5 (4) leashes at the same lenght on full power bar (Adjuster full open, bar is at the QR), head node at
the controll line on the middle node = normal
f. Service, spare parts
JN’s desire is to serve every customer from the very first contact till the support with spare parts. Whether a strut bladder, an one-pump hose or a
substitution line, we will provide best customer service to you and your kite! For information and / or spare part orders contact [email protected]
10
J n u s e r m a n u a l . w w w. j n - k i t e s . c o m
8. Jn limited warranty
Post: TTP
An der Leiten 4,
82290 Landsberied,
Germany
or
PDF/Scan: [email protected],
We would appreciate to get the warranty Card either via:
In order to validate the JN warranty and to demonstrate that
you have taken notice of its limitations, please complete the
following warranty card with details and return it to JN within
30 days from the purchase, or register online within the same
period at www.jn-kites.com or inform us by e-mail ([email protected]) about all necessary details.
Warranty Card
Name
Address
City
Zip Code
State / Province
Country
E-mail
Product
Serial Number
Purchase Date
(JN is a brand of Jochum & Nesler GmbH)
Warranty for kites: This Jochum & Nesler product is warranted to be free of defects in material and workmanship to the original purchaser for the
period of 180 days from the date of purchase. All warranties are limited and subject to some restrictions. Please read the attached warranty policy
before using these products. Please keep the original receipt of the purchase. To validate this Jochum & Nesler warranty and to demonstrate that
you have taken notice of its limitations please fill out the warranty card and return it to Jochum & Nesler within ten (10) days from the date of
purchase or register online at www.jn-kites.com within the same period of time, or inform us by e-mail about all details mentioned in the warranty
card within ten (10) days from the date of purchase. The warranty is valid only if these products are used for normal recreational activities, and does
not cover products used in rental or teaching operations.This warranty does not cover damage caused by misuse, abuse, neglect, or normal wear
and tear, including but not limited to: punctures, rigging with components other than Jochum & Nesler, damage due to excessive sun exposure,
damage due to over inflation of the bladders, damage caused by improper handling and storage, damage caused by use in waves or shore break,
and/or damage caused by anything other than defects in material and workmanship. This warranty is voided if any unauthorized repair, change or
modification has been made to any part of the equipment. The warranty for any repaired or replacement equipment is good from the date of the
original purchase only. There are no warranties that extend beyond the warranty specified herein. Jochum & Nesler will make the final warranty
determination, which may require inspection and/or photos of the equipment, which clearly show the defect. This information or these photos
must be compiled and sent by the purchaser at his own cost. Products can be returned only if the purchaser, in advance of returning the product,
obtains a return authorization number. The return authorization number must be clearly visible on the outside of the package or the package will be
refused. The warranty covers the repair or replacement of the defective product only. Jochum & Nesler will not be responsible for any costs, losses,
or damages incurred as a result of loss of use of this product. The original purchase receipt must accompany all warranty claims. The name of the
retailer and date of purchase must be clear and legible.
11
J n u s e r m a n u a l . w w w. j n - k i t e s . c o m