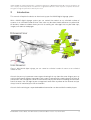
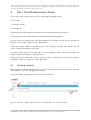
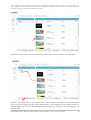
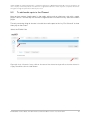
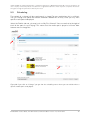
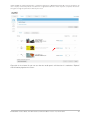
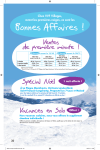
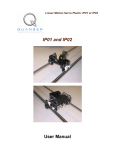
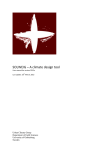
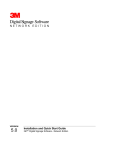
1
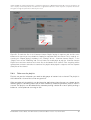
MultiQ DSMS ver. 3.8 User Guide
Administrator, Installer & Publisher
Version 1.2, 10/02/2013
©2013 MultiQ are registered trademarks or trademark applications of MultiQ International AB in various jurisdictions. All
other company names and products are trademarks or registered trademarks of their respective companies. We reserve
the right to change the specifications without prior notice.
©2011 MultiQ are registered trademarks or trademark applications of MultiQ International AB in various jurisdictions. All
other company names and products are trademarks or registered trademarks of their respective companies. We reserve
the right to change the specifications without prior notice.
Table of Contents
Table of Contents ......................................................................................................................2
1
Revision history ..................................................................................................................3
2
Introduction.........................................................................................................................4
3
Part 1 The DS Administrator’s Guide ...........................................................................7
3.1
3.2
3.3
3.4
3.5
3.6
3.7
Creating a channel ...................................................................................................................... 7
Define your first site .................................................................................................................... 8
Populating the sites with units (media players) and assigning channels ....................... 9
Providing the installer with information needed to setup the media players ............... 12
To replace the channel that is assigned to the media player.......................................... 13
Using tickers and splitting the screen .................................................................................. 17
To monitor and maintain the DS system .............................................................................. 25
3.7.1 E-mail notification ............................................................................................................................... 26
3.7.2 To set up display hours..................................................................................................................... 27
3.7.3 Play log retrieval .................................................................................................................................. 28
3.7.4 Software upgrade ............................................................................................................................... 28
3.7.5 To set up user rights .......................................................................................................................... 29
4
Part 2 The DS Media Player Installer’s Guide ......................................................... 31
4.1
5
To set up a media player in a centrally managed network............................................... 31
Part 3 The DS Publisher’s Guide ............................................................................... 34
5.1
5.2
5.3
5.4
5.5
5.6
To upload content to the “Import” tab .................................................................................. 34
To add media spots to the Channel ..................................................................................... 39
Scheduling .................................................................................................................................. 42
Using tickers and adding content to split screen applications....................................... 47
Using templates ......................................................................................................................... 49
Using playlists ............................................................................................................................ 51
5.6.1 Using playlists for improved scheduling ..................................................................................... 52
5.6.2 Using playlist for common content when using local channels ........................................ 54
5.6.3 Other uses for playlists ..................................................................................................................... 55
MultiQ DSMS 3.8 User Guide, -DS Administrator, Installer & Publisher Version 1.2, 10/01/2013
2
©2011 MultiQ are registered trademarks or trademark applications of MultiQ International AB in various jurisdictions. All
other company names and products are trademarks or registered trademarks of their respective companies. We reserve
the right to change the specifications without prior notice.
1
Revision history
A description of changes with revision number will be noted in the revision log below:
Version
Date
Comments
1.10
2012-10-16
Initial version
1.2
2013-01-10
Updated version to cover templates
MultiQ DSMS 3.8 User Guide, -DS Administrator, Installer & Publisher Version 1.2, 10/01/2013
3
©2011 MultiQ are registered trademarks or trademark applications of MultiQ International AB in various jurisdictions. All
other company names and products are trademarks or registered trademarks of their respective companies. We reserve
the right to change the specifications without prior notice.
2
Introduction
This manual will explain the basics on how to set up your first MultiQ digital signage system.
With a MultiQ digital signage system you can control the content on an unlimited number of
screens at an unlimited number of sites. Your sites may be stores, hotels, offices or any other kind
of locations, indoor or outdoor where you wish to convey your messages that may be video clips,
images, animations or web pages.
Figure 1. With MultiQ digital signage you can control an unlimited number of screens at an unlimited
number of sites.
At each site you may have one or more screens showing that may show the same thing or you may
want to show several different messages. Each screen is connected to a media player that picks up
content from the management server via the Internet and play the content according to instructions
from that server. You can login to your management server from anywhere on the Internet and you
always have full control of your sites and content.
At each site the existing or a separate broadband connection can be used for the media players.
MultiQ DSMS 3.8 User Guide, -DS Administrator, Installer & Publisher Version 1.2, 10/01/2013
4
©2011 MultiQ are registered trademarks or trademark applications of MultiQ International AB in various jurisdictions. All
other company names and products are trademarks or registered trademarks of their respective companies. We reserve
the right to change the specifications without prior notice.
Figure 2. At each site there can be one or more screens with media players. The media player can be an
integrated part of the monitor or a separate media player that is connected to one or more screens.
The use of channels is the key to easy management of the content. A channel can be regarded as
a container that includes a number of media spots that are played in a loop. The media spots can
be video files, images or even links to web pages or streaming media. Media files can be stored
either in the media player itself or retrieved continuously from sites on the Internet. Several media
players (up to hundreds or thousands of media players) can share the same channel.
Figure 3. Also you probably want your screens to be able to show the same content and you wish to be
able to update the content simultaneously. The key to all this is to use channels. A channel is a loop of
media spots (video, clips, images or web pages).
MultiQ DSMS 3.8 User Guide, -DS Administrator, Installer & Publisher Version 1.2, 10/01/2013
5
©2011 MultiQ are registered trademarks or trademark applications of MultiQ International AB in various jurisdictions. All
other company names and products are trademarks or registered trademarks of their respective companies. We reserve
the right to change the specifications without prior notice.
When you update the content of a channel, this will affect all media players using that channel.
The manual is organized into three parts arranged into the natural order that is followed in any
project and according to the different roles played by the Administrator, the field Installer and the
Publisher. If you intend to do everything needed to set up and use your system you can read all
three parts of the manual. However each part is self containing and can be used by the
Administrator, Installer and the Publisher separately.
The DS Administrator’s guide (Page 7)
This guide is intended for the system administrator in charge of setting up a digital signage system.
This includes how to create channels and to define sites, units (media players) and how to assign
the channels to the media players in the management system. This guide also includes how to set
up user rights and how to monitor and to maintain the system.
The DS Media Player Installer’s guide (Page 31)
This guide includes all necessary information on how to install a media player in the field. The
installer only needs to work with the media players.
The DS Publisher’s guide (Page 34)
The Publisher’s guide includes everything needed to fill the channels with content. This includes
how to upload, organize and schedule content. The publisher only needs to work with the “Import”
and “Publishing” tabs of the management system. However it is advisable use a media player for
monitoring.
MultiQ DSMS 3.8 User Guide, -DS Administrator, Installer & Publisher Version 1.2, 10/01/2013
6
©2011 MultiQ are registered trademarks or trademark applications of MultiQ International AB in various jurisdictions. All
other company names and products are trademarks or registered trademarks of their respective companies. We reserve
the right to change the specifications without prior notice.
3
Part 1 The DS Administrator’s Guide
In this manual you will learn how to set up a MultiQ digital signage system:
This includes:
1. Creating channels
2. Defining sites
3. Defining units (media players) inside the sites and assigning channels to the units.
4. Providing the installer with information needed to setup the media players
Once all sites and media players have been defined, the installers can be sent to the different
locations to set up the screens and the media players.
Finally the content creators and publishers can start filling the channels with content and the
system can be said to be up and running.
The Administrator works with all five tabs in the management system while the publisher only
needs to access the “Import” and “Publish” tabs.
We will now take a closer look at how to set up a system including one channel that is to serve a
number of screens in a simple full screen application.
3.1
Creating a channel
When setting up a digital signage system you first need to define how many channels you need.
(most projects start up including just one channel).
Login to the digital signage system and click the “Publish” tab.
Figure 4. Select the “Publish” tab and click the “Create” button in the “Channels” menu.
MultiQ DSMS 3.8 User Guide, -DS Administrator, Installer & Publisher Version 1.2, 10/01/2013
7
©2011 MultiQ are registered trademarks or trademark applications of MultiQ International AB in various jurisdictions. All
other company names and products are trademarks or registered trademarks of their respective companies. We reserve
the right to change the specifications without prior notice.
Figure 5. Next, name your channel (here “My First Channel”) and then click “Create”.
Figure 6. You now have an empty channel. You can wait until later to fill it with content. You can add as
many channels as you like, but for now we only need one.
3.2
Define your first site
The next step is to define the sites that are to be served by your system.
Now, define your first site in the “Sites” tab.
MultiQ DSMS 3.8 User Guide, -DS Administrator, Installer & Publisher Version 1.2, 10/01/2013
8
©2011 MultiQ are registered trademarks or trademark applications of MultiQ International AB in various jurisdictions. All
other company names and products are trademarks or registered trademarks of their respective companies. We reserve
the right to change the specifications without prior notice.
Figure 7. Create your first site by selecting the “Sites” tab and by clicking the “Create site” button in the
“Sites” menu.
Figure 8. Name the site (here “My First Site”) and then click “Save”. You can add details on the site right
now or wait until later. The sites tab is actually your database to store information on your infra structure.
3.3
Populating the sites with units (media players) and assigning
channels
The sites should be populated with one or more media players and each player should be
connected to a channel. When defining a unit you can assign a channel to the media player.
MultiQ DSMS 3.8 User Guide, -DS Administrator, Installer & Publisher Version 1.2, 10/01/2013
9
©2011 MultiQ are registered trademarks or trademark applications of MultiQ International AB in various jurisdictions. All
other company names and products are trademarks or registered trademarks of their respective companies. We reserve
the right to change the specifications without prior notice.
Figure 9. You now have an empty site with no media players. You can add as many sites as is needed
however for now we can do with just one. Add your first media player by clicking the “Create unit” button.
Figure 10. As the media player (unit) is defined, it automatically gets a Unit Id (which is a unique number
for each media player) and a name. Now check the box for the channel that you want to have connected
to the media player and then click “Add”. Note that you can replace the channel later on if needed.
MultiQ DSMS 3.8 User Guide, -DS Administrator, Installer & Publisher Version 1.2, 10/01/2013
10
©2011 MultiQ are registered trademarks or trademark applications of MultiQ International AB in various jurisdictions. All
other company names and products are trademarks or registered trademarks of their respective companies. We reserve
the right to change the specifications without prior notice.
You now have defined your first site with your first media player.
Figure 11. You can add as many media player (units) as you like to each site. If you click on the name of
the media player “My First Site Screen 1 (101)” you will get into the “Screen 1” menu.
Figure 12. Here you can see that “My First Channel” is connected to the full screen “Primary” area of the
media player having Unit Id=101.
MultiQ DSMS 3.8 User Guide, -DS Administrator, Installer & Publisher Version 1.2, 10/01/2013
11
©2011 MultiQ are registered trademarks or trademark applications of MultiQ International AB in various jurisdictions. All
other company names and products are trademarks or registered trademarks of their respective companies. We reserve
the right to change the specifications without prior notice.
3.4
Providing the installer with information needed to setup the media
players
The first media player is now defined in the system and the next step is to set up the media player
in real life.
To set up the media player some configuration information is needed. The first piece of information
is the unit Id which in this case is “101”.
Then also some other information is needed that you can find by selecting the “System” tab and
then the “Settings” menu.
Figure 13. In the “Settings” menu of the “System” tab you find the “Account URL”, the ”User Name” and
the “Password” that in addition to the “(Media Player) Unit Id” are needed to set up a media player in the
field. This information can be cut and pasted into a mail and sent to the installer.
Now the system has been set up and the first media player can be installed by the Installer and the
Publisher can start adding content to the channel. This concludes the Quick start portion of the
guide. You now have the knowledge to set up a full screen application in your digital signage
system.
The next sections contain additional information to increase your skills to extend the capabilities of
your digital signage system further.
MultiQ DSMS 3.8 User Guide, -DS Administrator, Installer & Publisher Version 1.2, 10/01/2013
12
©2011 MultiQ are registered trademarks or trademark applications of MultiQ International AB in various jurisdictions. All
other company names and products are trademarks or registered trademarks of their respective companies. We reserve
the right to change the specifications without prior notice.
3.5
To replace the channel that is assigned to the media player
We have already learned how to create a channel and define a site and a media player in the
system. When defining the media player (unit) in the system we also assigned the channel that we
just created “My First Channel” to the media player.
After a while you may want to add more channels to be able to use different content at different
sites. Then you may need to replace your first channel with another channel.
In this section we will create a second channel, “My Second Channel” and assign this channel to
the media player having Unit Id =101.
First select the “Publish” tab and create a new channel “My Second Channel” by clicking the
“Create button and add the name.
Figure 14. There are now 2 channels in the system. Using the “Create” button you can add as many
channels as you wish.
Next select the “Sites” tab and you will see that there is one site in the account “My First Site”.
Try to navigate through the site menu. On the top level you have a list of sites. By clicking on a site
you get “inside” the site and you can see what media players are there. Finally by clicking on a
media player you get into the menu of that particular media player and you can see what channel
are connected to the media player and other technical details related to the media player.
MultiQ DSMS 3.8 User Guide, -DS Administrator, Installer & Publisher Version 1.2, 10/01/2013
13
©2011 MultiQ are registered trademarks or trademark applications of MultiQ International AB in various jurisdictions. All
other company names and products are trademarks or registered trademarks of their respective companies. We reserve
the right to change the specifications without prior notice.
Figure 15. Click on the icon or the name of the site and you will see what media players are defined
inside the site.
Figure 16. Click on the icon or the name of the media player and you will get into the menu for technical
details related to this specific media player.
MultiQ DSMS 3.8 User Guide, -DS Administrator, Installer & Publisher Version 1.2, 10/01/2013
14
©2011 MultiQ are registered trademarks or trademark applications of MultiQ International AB in various jurisdictions. All
other company names and products are trademarks or registered trademarks of their respective companies. We reserve
the right to change the specifications without prior notice.
Figure 17. You can now see that “My First Channel” is assigned to the “Primary” full screen area on the
screen. To delete this channel, check the box to the left of the channel and click on “Delete”.
Figure 18. To add the second channel, press the “Add” button.
MultiQ DSMS 3.8 User Guide, -DS Administrator, Installer & Publisher Version 1.2, 10/01/2013
15
©2011 MultiQ are registered trademarks or trademark applications of MultiQ International AB in various jurisdictions. All
other company names and products are trademarks or registered trademarks of their respective companies. We reserve
the right to change the specifications without prior notice.
Figure 19. Tick the box for the other channel “My Second Channel” and then click “Add channel”.
Figure 20. The channel has now been replaced by “My Second Channel”.
MultiQ DSMS 3.8 User Guide, -DS Administrator, Installer & Publisher Version 1.2, 10/01/2013
16
©2011 MultiQ are registered trademarks or trademark applications of MultiQ International AB in various jurisdictions. All
other company names and products are trademarks or registered trademarks of their respective companies. We reserve
the right to change the specifications without prior notice.
3.6
Using tickers and splitting the screen
As default the media players are configured for full screen operation with only one area.
In digital signage it is possible to split the screen into areas. A common reason for adding an extra
area is to add a ticker. A ticker is a strip with text that moves across the screen.
The best way to add tickers is to go to the “Import” file and set up a ticker. The ticker can either be
a text ticker or an RSS feed. “Web” means a text file that is available from another server than the
management server.
Figure 1. Start by creating a “text” ticker. And save it under a suitable name. Here “Text ticker”. Finally click
the “Save” button.
To split the screen into more than one area including a “ticker area” you first need to create a new
video mode. In this first example we will put a ticker at the bottom of the screen which is Full HD
1080p (1920x1080 pixels).
To create a video mode you need to start the Video Mode Editor. This is a Java application that
requires that Java is installed on your computer. (Note that if you are using MAC, the Java plugin
needs to be activated in your web browser before you can use the Mode Editor).
MultiQ DSMS 3.8 User Guide, -DS Administrator, Installer & Publisher Version 1.2, 10/01/2013
17
©2011 MultiQ are registered trademarks or trademark applications of MultiQ International AB in various jurisdictions. All
other company names and products are trademarks or registered trademarks of their respective companies. We reserve
the right to change the specifications without prior notice.
Figure 2. To start the video mode editor, click the “Open mode editor” button in the “Modes” menu of the
“Publish” tab.
Figure 3. First select the resolution of your screen, here 1080p (1920 x 1080) pixels.
MultiQ DSMS 3.8 User Guide, -DS Administrator, Installer & Publisher Version 1.2, 10/01/2013
18
©2011 MultiQ are registered trademarks or trademark applications of MultiQ International AB in various jurisdictions. All
other company names and products are trademarks or registered trademarks of their respective companies. We reserve
the right to change the specifications without prior notice.
Figure 4. Press the “+Area” button and then drag out an area that is as wide as the screen (here 1920
pixels) and that has a height of 984 pixels. By default this area gets the name “Area0”.
Figure 5. Click the “Ticker” button and drag the new ticker across the screen to fill the screen.
MultiQ DSMS 3.8 User Guide, -DS Administrator, Installer & Publisher Version 1.2, 10/01/2013
19
©2011 MultiQ are registered trademarks or trademark applications of MultiQ International AB in various jurisdictions. All
other company names and products are trademarks or registered trademarks of their respective companies. We reserve
the right to change the specifications without prior notice.
Figure 6. Name the new mode “Ticker” and press the “Save” button. Then close the window containing
the mode editor.
To use the video mode you just created you go to the “Sites” tab. Then select your site and then the
media player.
MultiQ DSMS 3.8 User Guide, -DS Administrator, Installer & Publisher Version 1.2, 10/01/2013
20
©2011 MultiQ are registered trademarks or trademark applications of MultiQ International AB in various jurisdictions. All
other company names and products are trademarks or registered trademarks of their respective companies. We reserve
the right to change the specifications without prior notice.
Figure 7. Select the unit ( in this case unit 101) and then select the “Settings” tab of that unit. Scroll to the
Display section and select the new “Ticker” video mode from the drop down menu. Finally scroll to the
bottom of the page and click the save button.
The media player will now reboot and start up with a ticker area at the bottom of the screen.
In the unit menu you will now see a ticker tab.
MultiQ DSMS 3.8 User Guide, -DS Administrator, Installer & Publisher Version 1.2, 10/01/2013
21
©2011 MultiQ are registered trademarks or trademark applications of MultiQ International AB in various jurisdictions. All
other company names and products are trademarks or registered trademarks of their respective companies. We reserve
the right to change the specifications without prior notice.
To make the ticker available to the publisher without accessing the sites tab , a ticker needs to be
defined in the “Import” tab.
Figure 8. You can choose between different kinds of tickers, such as text tickers and RSS tickers.
Figure 9. Setting up an RSS feed. The Publisher will be able to change the address of the RSS feed.
MultiQ DSMS 3.8 User Guide, -DS Administrator, Installer & Publisher Version 1.2, 10/01/2013
22
©2011 MultiQ are registered trademarks or trademark applications of MultiQ International AB in various jurisdictions. All
other company names and products are trademarks or registered trademarks of their respective companies. We reserve
the right to change the specifications without prior notice.
Figure 10. In the “Ticker” tab you select what ticker to be used in the application. The publisher will be
able to change the content of the ticker and to disable the ticker.
You can create video modes with as many areas as you like. To each area you will need a channel.
MultiQ DSMS 3.8 User Guide, -DS Administrator, Installer & Publisher Version 1.2, 10/01/2013
23
©2011 MultiQ are registered trademarks or trademark applications of MultiQ International AB in various jurisdictions. All
other company names and products are trademarks or registered trademarks of their respective companies. We reserve
the right to change the specifications without prior notice.
Figure 11. In the Mode editor you can create video modes including any number of areas you like.
MultiQ DSMS 3.8 User Guide, -DS Administrator, Installer & Publisher Version 1.2, 10/01/2013
24
©2011 MultiQ are registered trademarks or trademark applications of MultiQ International AB in various jurisdictions. All
other company names and products are trademarks or registered trademarks of their respective companies. We reserve
the right to change the specifications without prior notice.
Figure 12. In the menu for a unit using multiple areas you get one tab for each area. Each area needs to
be connected to a channel. There is also an “invisible” but audible area, the “Audio” area that can be used
to add audio that runs independent from the visible areas on the screen. This area can be used for an in
store music system etc.
3.7
To monitor and maintain the DS system
Here are some useful features that help you to monitor and to maintain the DS system.
The media players make requests back to the management server every 2 minutes (default value).
You can see when a media player made a request last time. This way you know for sure that the
unit is in operation and online. This can of course also be used to verify when a unit has been
installed.
MultiQ DSMS 3.8 User Guide, -DS Administrator, Installer & Publisher Version 1.2, 10/01/2013
25
©2011 MultiQ are registered trademarks or trademark applications of MultiQ International AB in various jurisdictions. All
other company names and products are trademarks or registered trademarks of their respective companies. We reserve
the right to change the specifications without prior notice.
Figure 13. You can monitor that the media players report back to the management server directly in the
user interface.
3.7.1
E-mail notification
Figure 14. A practical way of setting up alarms and alarm levels is to use the E-mail notification feature.
Here you can set how many minutes without connection to the media player that are considered as an
alarm. You can also disable the feature outside business hours.
MultiQ DSMS 3.8 User Guide, -DS Administrator, Installer & Publisher Version 1.2, 10/01/2013
26
©2011 MultiQ are registered trademarks or trademark applications of MultiQ International AB in various jurisdictions. All
other company names and products are trademarks or registered trademarks of their respective companies. We reserve
the right to change the specifications without prior notice.
3.7.2
To set up display hours
Figure 15. You can set the display hours on a site or unit level. This makes MultiQ monitors and several
others monitors to go to standby mode. This is a way to preserve energy as well as to prolong the lifetime
of the monitors.
MultiQ DSMS 3.8 User Guide, -DS Administrator, Installer & Publisher Version 1.2, 10/01/2013
27
©2011 MultiQ are registered trademarks or trademark applications of MultiQ International AB in various jurisdictions. All
other company names and products are trademarks or registered trademarks of their respective companies. We reserve
the right to change the specifications without prior notice.
3.7.3
Play log retrieval
Figure 16. You can log what media has been played and when it has been played and then export the
logs to formats that can be further processed in spreadsheet software such as Excel.
3.7.4
Software upgrade
Figure 17. In the software upgrade section of the “System” tab you can upgrade all units by pressing a
button. You can also schedule the updates and control your upgrades in detail.
MultiQ DSMS 3.8 User Guide, -DS Administrator, Installer & Publisher Version 1.2, 10/01/2013
28
©2011 MultiQ are registered trademarks or trademark applications of MultiQ International AB in various jurisdictions. All
other company names and products are trademarks or registered trademarks of their respective companies. We reserve
the right to change the specifications without prior notice.
3.7.5
To set up user rights
There are mainly two different reasons for setting up user rights. One reason is to be able to
restrict what content and channels can be altered by particular users. Another reason is to be able
reduce the visible parts of the user interface to the parts actually needed by a Publisher etc. This
give a more simplified user interface.
Figure 18. Restricted users can be added to the system.
Figure 19. The user rights can be set on a channel and media level.
MultiQ DSMS 3.8 User Guide, -DS Administrator, Installer & Publisher Version 1.2, 10/01/2013
29
©2011 MultiQ are registered trademarks or trademark applications of MultiQ International AB in various jurisdictions. All
other company names and products are trademarks or registered trademarks of their respective companies. We reserve
the right to change the specifications without prior notice.
Figure 20. The user rights settings can be used to provide a simplified user interface for the publisher by
limiting the visible parts of the user interface to the desired media and channels. Here the “Sites” tab is not
visible to the “Publisher”.
MultiQ DSMS 3.8 User Guide, -DS Administrator, Installer & Publisher Version 1.2, 10/01/2013
30
©2011 MultiQ are registered trademarks or trademark applications of MultiQ International AB in various jurisdictions. All
other company names and products are trademarks or registered trademarks of their respective companies. We reserve
the right to change the specifications without prior notice.
4
Part 2 The DS Media Player Installer’s Guide
4.1
To set up a media player in a centrally managed network
The first media player is now defined in the system and the next step is to set up the media player
in real life.
To set up the media player you need some configuration information. This information is available in
the central management system and can be supplied by the system administrator.
The following information is needed:
Unit Id:
Account URL (without “http://”) :
User name:
Password:
The first piece of information is the unit Id which in this case is “101”.
To get into the configuration menu of the media player you will need a USB keyboard and a USB
mouse connected to the media player which also needs to be connected to a monitor.
To initiate the setup menu, press “Ctrl+Alt+c” on the keyboard.
Figure 21. After a while you will see the first setup screen. If the menu is oriented correctly, press “Next “
to continue.
MultiQ DSMS 3.8 User Guide, -DS Administrator, Installer & Publisher Version 1.2, 10/01/2013
31
©2011 MultiQ are registered trademarks or trademark applications of MultiQ International AB in various jurisdictions. All
other company names and products are trademarks or registered trademarks of their respective companies. We reserve
the right to change the specifications without prior notice.
Next select the appropriate keyboard for your language and press “Next”.
You will now be prompted for a user name and a password to get into the setup menu. Default user
name is “installer” and default password is “pass”.
Next you will find yourself in the Basic setup menu. The button “Managed” is selected by default.
Now add the Media Player ID (Unit Id) and the Account URL, User name and the Password that
were mentioned in Figure 12.
Figure 22. When the media player parameters have been added you press the “Test connection” button.
MultiQ DSMS 3.8 User Guide, -DS Administrator, Installer & Publisher Version 1.2, 10/01/2013
32
©2011 MultiQ are registered trademarks or trademark applications of MultiQ International AB in various jurisdictions. All
other company names and products are trademarks or registered trademarks of their respective companies. We reserve
the right to change the specifications without prior notice.
Figure 23. If the connection test is successful, the media player is connected to the management server
and you just press “Close” and then on the “Next” button to set the media player into operation.
The media player is now ready to display any content that you add to the attached channel (here
“My First Channel”). If no content has been assigned to the media player you will get an “Idle” sign
on the screen.
MultiQ DSMS 3.8 User Guide, -DS Administrator, Installer & Publisher Version 1.2, 10/01/2013
33
©2011 MultiQ are registered trademarks or trademark applications of MultiQ International AB in various jurisdictions. All
other company names and products are trademarks or registered trademarks of their respective companies. We reserve
the right to change the specifications without prior notice.
5
Part 3 The DS Publisher’s Guide
The Publisher adds content to the digital signage system. In this guide you will learn how to:
1. Upload content to the archive of the system, the “Import” tab.
2. To select an add content to the channels.
3. To schedule your media.
4. Using tickers and adding content to split screen applications.
As Publisher you only need to work within the “Import” and “Publish” tabs of the management
system.
5.1
To upload content to the “Import” tab
You now have a media player up and running. However there is only a sign saying “Idle” on the
screen telling that no content is available.
To add content you select the “Import” tab. The “Import” tab contains the archive of your digital
signage system. Once you have uploaded video clips, images or web content to the “Import” tab you
can use the content files to fill your channels.
Use the following media formats:
Images:
JPG (jpg)- or PNG (png) format images having a maximum resolution of 1920x1080 pixels. Larger
resolution images need to be resized before uploaded to the “Import” tab.
Video clips:
MPEG-4 (h.264) 720p or Full HD 1080p
You can also use links to websites and links to live streams from surveillance cameras as content.
Finally you can upload complete websites as zipped folders to the system.
The only thing that you have from the start in the media archive is the “idlespot.png” image. You can
replace this by uploading a file having the name “idlespot.png”. Some like to use a logo or other
message as default if nothing is uploaded to the channel used.
MultiQ DSMS 3.8 User Guide, -DS Administrator, Installer & Publisher Version 1.2, 10/01/2013
34
©2011 MultiQ are registered trademarks or trademark applications of MultiQ International AB in various jurisdictions. All
other company names and products are trademarks or registered trademarks of their respective companies. We reserve
the right to change the specifications without prior notice.
Figure 24. Files can be uploaded to the “Import” tab to be stored on the server. This will become your
media archive. Click the “Upload” button to get to the “Upload” menu. Note that if you intend to add a
hyperlink to a web page or streaming media you should use the “Add URL” button instead.
Figure 25. First press the “Browse” button and then select the file to be uploaded and finally press
“Open”.
MultiQ DSMS 3.8 User Guide, -DS Administrator, Installer & Publisher Version 1.2, 10/01/2013
35
©2011 MultiQ are registered trademarks or trademark applications of MultiQ International AB in various jurisdictions. All
other company names and products are trademarks or registered trademarks of their respective companies. We reserve
the right to change the specifications without prior notice.
Figure 26. Then press the “Upload” button to confirm.
Figure 27. When the file has been uploaded you get a chance to adjust the settings for the media spot. By
setting “Keep Aspect Ratio” to “Yes”, black borders will be added to the image (or the video clip) if needed
to preserve the aspect ratio. Finally press the “Save” button to confirm the upload.
MultiQ DSMS 3.8 User Guide, -DS Administrator, Installer & Publisher Version 1.2, 10/01/2013
36
©2011 MultiQ are registered trademarks or trademark applications of MultiQ International AB in various jurisdictions. All
other company names and products are trademarks or registered trademarks of their respective companies. We reserve
the right to change the specifications without prior notice.
Figure 28. The image file is now visible in the “Media” folder of the “Import” tab. By clicking the “Edit”
button you can get back into the menu shown in the previous figure (Figure 19) where you can adjust
settings and find information about the file.
Figure 29. If you have several files to upload, you can save time by uploading them simultaneously. If
using Firefox or Google Chrome you can mark several files directly in the upload dialog box. If using
Internet Explorer, you must use the Multiple File upload tool. This tool requires Java to be installed on your
computer.
MultiQ DSMS 3.8 User Guide, -DS Administrator, Installer & Publisher Version 1.2, 10/01/2013
37
©2011 MultiQ are registered trademarks or trademark applications of MultiQ International AB in various jurisdictions. All
other company names and products are trademarks or registered trademarks of their respective companies. We reserve
the right to change the specifications without prior notice.
Figure 30. You now have a selection of files in the archive. Each item in the archive is a media spot.
Figure 31. The “Import” tab is a very versatile archive. You can add as many folders and sub folders to the
archive as you like (by pressing the “Create folder” button). It can be practical to use different folders for
different projects etc. Files can be moved between the folders by selecting a file and dragging it to a
different folder.
MultiQ DSMS 3.8 User Guide, -DS Administrator, Installer & Publisher Version 1.2, 10/01/2013
38
©2011 MultiQ are registered trademarks or trademark applications of MultiQ International AB in various jurisdictions. All
other company names and products are trademarks or registered trademarks of their respective companies. We reserve
the right to change the specifications without prior notice.
5.2
To add media spots to the Channel
Now we have content (media spots) in the media archive and we also have a site with a media
player. There is a channel “My first channel” assigned to the full screen “Primary” area of the media
player.
The only remaining thing to do now is to add the media spots to the “my First Channel” to have
them play on the screen.
Select the “Publish” tab.
Figure 32. In the “Channels” menu, click on the name of the channel and you will see that the channel is
empty. To add files click the “Add” button.
MultiQ DSMS 3.8 User Guide, -DS Administrator, Installer & Publisher Version 1.2, 10/01/2013
39
©2011 MultiQ are registered trademarks or trademark applications of MultiQ International AB in various jurisdictions. All
other company names and products are trademarks or registered trademarks of their respective companies. We reserve
the right to change the specifications without prior notice.
Figure 33. Select the proper folder and choose the media spots to be used by checking the boxes to the
left of the spots. Then finally click the “Save” button.
MultiQ DSMS 3.8 User Guide, -DS Administrator, Installer & Publisher Version 1.2, 10/01/2013
40
©2011 MultiQ are registered trademarks or trademark applications of MultiQ International AB in various jurisdictions. All
other company names and products are trademarks or registered trademarks of their respective companies. We reserve
the right to change the specifications without prior notice.
Figure 34. Here we have a channel with 3 media spots, one video clip and two images. These files will be
repeated in a loop. You can change the order between the spots by clicking the tiny arrows to the left of
the spots or by changing the number in the boxes and then clicking outside the box. The duration of each
spot (except for the video clip that has a fixed duration) can be changed in the boxes to the right. Default
duration is otherwise 15 seconds. Hint, 7-8 seconds is a suitable duration for most signs.
Figure 35. Within a few minutes the content will play on the screen.
This concludes the quick start portion of the Publisher’s Guide. You can now bring content to a
basic digital signage system.
In the following sections you can increase your skills to bring more flexibility to how the system
display your content and also add other kinds of content.
MultiQ DSMS 3.8 User Guide, -DS Administrator, Installer & Publisher Version 1.2, 10/01/2013
41
©2011 MultiQ are registered trademarks or trademark applications of MultiQ International AB in various jurisdictions. All
other company names and products are trademarks or registered trademarks of their respective companies. We reserve
the right to change the specifications without prior notice.
5.3
Scheduling
The content of a channel will play continuously in a loop. For many applications this is sufficient.
You just change and update the content whenever needed. But in many cases you may want
specific media spots to be played.
Select the Publish tab and a channel, such as “My First Channel”. You can see that to the right of
each of the spots it says “Playing”. This means that the media spot is played at all times. Now
however we can change this.
Figure 36. If you click on “Change” you get into the scheduling menu where you can decide when a
specific media spot is to be played.
MultiQ DSMS 3.8 User Guide, -DS Administrator, Installer & Publisher Version 1.2, 10/01/2013
42
©2011 MultiQ are registered trademarks or trademark applications of MultiQ International AB in various jurisdictions. All
other company names and products are trademarks or registered trademarks of their respective companies. We reserve
the right to change the specifications without prior notice.
Figure 37. In the scheduling menu you can set the validity interval for the media spot. Outside this interval
the spot will not be used. This is practical when planning campaigns.
MultiQ DSMS 3.8 User Guide, -DS Administrator, Installer & Publisher Version 1.2, 10/01/2013
43
©2011 MultiQ are registered trademarks or trademark applications of MultiQ International AB in various jurisdictions. All
other company names and products are trademarks or registered trademarks of their respective companies. We reserve
the right to change the specifications without prior notice.
Figure 38. In the channel list you can see that the media spot is still there but it is marked as “Expired”
and will not be played on the screen.
MultiQ DSMS 3.8 User Guide, -DS Administrator, Installer & Publisher Version 1.2, 10/01/2013
44
©2011 MultiQ are registered trademarks or trademark applications of MultiQ International AB in various jurisdictions. All
other company names and products are trademarks or registered trademarks of their respective companies. We reserve
the right to change the specifications without prior notice.
Figure 39. If we select another media spot such as the “Ladies Pumps.mp4” video clip, and click on
“Change” we can use the lower part of the screen to decide at what times this clip should be shown.
MultiQ DSMS 3.8 User Guide, -DS Administrator, Installer & Publisher Version 1.2, 10/01/2013
45
©2011 MultiQ are registered trademarks or trademark applications of MultiQ International AB in various jurisdictions. All
other company names and products are trademarks or registered trademarks of their respective companies. We reserve
the right to change the specifications without prior notice.
Figure 40. By clicking the ”+” buttons you can add different kinds of scheduling alternatives for your
media.
MultiQ DSMS 3.8 User Guide, -DS Administrator, Installer & Publisher Version 1.2, 10/01/2013
46
©2011 MultiQ are registered trademarks or trademark applications of MultiQ International AB in various jurisdictions. All
other company names and products are trademarks or registered trademarks of their respective companies. We reserve
the right to change the specifications without prior notice.
Figure 41. In this example the media spot will be shown between 0900-1200 hours every day with an
additional playing interval Monday through Friday between 1500-1800 hours. By clicking the “Refresh”
button you can get a graphical representation of when the media spot is to be played.
5.4
Using tickers and adding content to split screen applications
In most digital signage applications the media players are configured for full screen operation with
only one area.
In digital signage it is possible to split the screen into areas. A common reason for adding an extra
area is to add a ticker. A ticker is a strip with text that moves across the screen.
If a ticker mode has been defined on your system (see The Administrator’s Guide), there is an area
at the bottom of the screen where you can add your own text.
If there is a ticker in your application you are able to edit the ticker in the “Import” tab.
MultiQ DSMS 3.8 User Guide, -DS Administrator, Installer & Publisher Version 1.2, 10/01/2013
47
©2011 MultiQ are registered trademarks or trademark applications of MultiQ International AB in various jurisdictions. All
other company names and products are trademarks or registered trademarks of their respective companies. We reserve
the right to change the specifications without prior notice.
Figure 42. In the “Ticker” section of the “Import” tab you can find available tickers. Note that there needs
to be a ticker video mode set up for the application.
Figure 43. In the “Modify Ticker” dialogue you can update the ticker.
MultiQ DSMS 3.8 User Guide, -DS Administrator, Installer & Publisher Version 1.2, 10/01/2013
48
©2011 MultiQ are registered trademarks or trademark applications of MultiQ International AB in various jurisdictions. All
other company names and products are trademarks or registered trademarks of their respective companies. We reserve
the right to change the specifications without prior notice.
Figure 44. Finally you can choose to enable or disable the ticker by selecting “Allow Ticker” to “Yes” or
“No” for each media file. If set to “No” the ticker will be replaced by a black area.
5.5
Using templates
Much content for digital signage consists of video clips and images that are produced in external
software. Also external or locally stored web pages can be used as content.
However digital signs are often based on templates making it quick and simple to update what is
displayed on the screens. Using templates allows for non-experienced users to update the
messages which make updating the content with short notice within a few minutes possible.
MultiQ digital signage includes a template packs based on web pages that are easy to edit. The
web pages can be stored directly on the media players the same way as video clips or images and
will therefore continue to play even if the broadband connection to the media player should fail.
There are standard template packs that are provided with the system. However customized
templates can be made to fit any purpose.
The template packs are zipped folders that are uploaded to the Import tab just as a video clip or an
image. Each template pack is like and editable slideshow where the user can choose between a
number of templates to be used either separately or as a slideshow. There is a separate login to
each template pack. This means that it is simple for the Publisher to delegate update of text and/or
MultiQ DSMS 3.8 User Guide, -DS Administrator, Installer & Publisher Version 1.2, 10/01/2013
49
©2011 MultiQ are registered trademarks or trademark applications of MultiQ International AB in various jurisdictions. All
other company names and products are trademarks or registered trademarks of their respective companies. We reserve
the right to change the specifications without prior notice.
images to people that are not trained to use digital signage systems. Also professional publishers
benefit from both producing and using the template packs.
Figure 45. The template user can easily choose either one template or create a slideshow that is based
on one or more templates.
Figure 46. The user can choose from a wide range of templates within in a template pack.
MultiQ DSMS 3.8 User Guide, -DS Administrator, Installer & Publisher Version 1.2, 10/01/2013
50
©2011 MultiQ are registered trademarks or trademark applications of MultiQ International AB in various jurisdictions. All
other company names and products are trademarks or registered trademarks of their respective companies. We reserve
the right to change the specifications without prior notice.
Figure 47. The templates are edited using any web browser and no external software is needed. Text can
be edited and images can be inserted into the templates. The template can contain an area for live TV or
surveillance cameras as well as playback of video files or other hardware accelerated video.
The MultiQ system is provided with pre-made master template packs that can be used either
directly or be modified to become a customized template pack to fit into any area.
5.6
Using playlists
A channel is a collection of media spots that are played in a loop which is sufficient for most
applications. The channel is the basis for handling media in an efficient and easy way.
However sometimes you would like to add “Sub Channels” inside the channel. Such a “Sub
Channel” is called a “playlist”.
MultiQ DSMS 3.8 User Guide, -DS Administrator, Installer & Publisher Version 1.2, 10/01/2013
51
©2011 MultiQ are registered trademarks or trademark applications of MultiQ International AB in various jurisdictions. All
other company names and products are trademarks or registered trademarks of their respective companies. We reserve
the right to change the specifications without prior notice.
Figure 48. Playlists are created and edited in the “Playlists” menu of the “Publish” tab. The content of the
playlists can be rearranged using drag-and-drop. Playlists can be regarded as a kind of “sub channels´”
that are used to create sub-groups of media spots within the channels.
Now we will take a closer look at two examples where it can be useful add playlists to a channel.
5.6.1
Using playlists for improved scheduling
Within a channel you can schedule each media spot individually. This kind of scheduling is
sufficient in many cases. However if there are lots of media files that are to be used at different
times, this means a lot of scheduling. Therefore it may be more practical to create two or more
separate playlists that are used at different times within the channel.
MultiQ DSMS 3.8 User Guide, -DS Administrator, Installer & Publisher Version 1.2, 10/01/2013
52
©2011 MultiQ are registered trademarks or trademark applications of MultiQ International AB in various jurisdictions. All
other company names and products are trademarks or registered trademarks of their respective companies. We reserve
the right to change the specifications without prior notice.
Figure 49. By creating two separate playlists and placing them into a channel, you can schedule the
playlists them same way as media spots. This simplifies scheduling of larger numbers of media spots. If
there is no scheduling it is the playlist on top in the channel that will play at all times.
MultiQ DSMS 3.8 User Guide, -DS Administrator, Installer & Publisher Version 1.2, 10/01/2013
53
©2011 MultiQ are registered trademarks or trademark applications of MultiQ International AB in various jurisdictions. All
other company names and products are trademarks or registered trademarks of their respective companies. We reserve
the right to change the specifications without prior notice.
5.6.2
Using playlist for common content when using local channels
In many cases, different channels are to be used in different geographical regions. There may even
be cases where each site uses individual channels. However, even if content is local there may be
parts of the content that is to be used at all locations, i.e. that there are channels that share parts of
the content. Of course you can edit each channel individually and add the content that is in
common manually. But this is not practical.
A way to get around this problem is to add a playlist containing all common media spots to each of
the channels. When you want to update the media spots that are in common you just update the
common playlist and then all channels using that playlist will automatically get updated.
To get the playlist to play together with local content within a channel you must get the content of
the playlist to play in sequence with the local content. To make this happen you need to stop the
content of the playlist to play in a loop.
Figure 50. In this case, “My Second Channel” contains a playlist “Common Content Playlist” that is used
in several channels. The athletic shoes images at the bottom are only used in this particular channel (can
be local or regional content). By disabling the repetition in the playlist, its content will be played in
sequence with the separate files at the bottom of the channel.
MultiQ DSMS 3.8 User Guide, -DS Administrator, Installer & Publisher Version 1.2, 10/01/2013
54
©2011 MultiQ are registered trademarks or trademark applications of MultiQ International AB in various jurisdictions. All
other company names and products are trademarks or registered trademarks of their respective companies. We reserve
the right to change the specifications without prior notice.
Figure 51. To make the files in the “Common Content Playlist” to play in sequence with the files at the
bottom of the channel you must disable the “looping” or repetition within the channel. This is made by unchecking the ”Repeat playing” checkbox in the “Settings” for the “Common Content Playlist” in the
“Playlist” menu of the “Publishing” tab. This will make the media player to play the “Common Content
Playlist” once and then continue to the three files at the bottom of the channel. Then everything will be
repeated over and over and make the content of the playlist to be played in sequence with the separate
(local) files of the channel.
5.6.3
Other uses for playlists
Playlists are practical whenever you need to add groups of content into a channel. The playlist is
the sub level of a channel that can be very practical.
Other examples of using playlists can be interactive applications where the user can choose to play
different playlists containing video clips or other content by addressing different playlists within a
channel. The playlists can be addressed by someone pushing a button on a touch panel, pushing a
button on a smart phone or scanning an item.
MultiQ DSMS 3.8 User Guide, -DS Administrator, Installer & Publisher Version 1.2, 10/01/2013
55