1
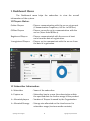
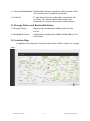
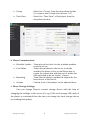
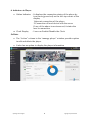
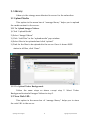
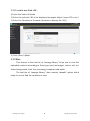
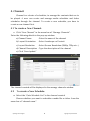
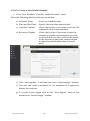
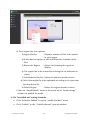
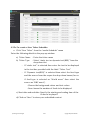
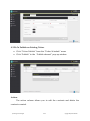
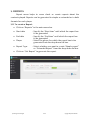
SPOTFORGE TECHNOLOGIES SIGNAGE PLAY USER MANUAL Table of Contents Chapter No. 1 Chapter Name Dashboard Menu 1.1 Player Status 2 3 2 1.2 Subscriber Information 2 1.3 Storage Status and Bandwidth Status 3 1.4 Location Map 3 Player Menu 2.1 To create a New Group 4 2.2 To edit Player Information 4 Library 3.1 Upload Media 7 3.1.1 To upload Images/Video 7 3.1.2 To upload Ticker Background 7 3.2 New Web URL 7 3.2.1 To add a new web URL 3.3 Filter 4 5 8 8 Channel 4.1 To create a New Channel 9 4.2 To create a New Schedule 9 4.2.1a To create a New Media schedule 10 4.2.1b To publish an existing Schedule 11 4.2.2a To create a New Ticker schedule 12 4.2.2b To publish an existing Ticker 13 Reports 5.1 To create a New Report SpotForge Technologies Page No. 1 14 Signage Play User Manual 1. Dashboard Menu: The Dashboard menu helps the subscriber to view the overall information of the system. 1.1 Players Status: Online Players : Players communicating with the server at present (Communication Frequency: 60 Sec to 180 Sec) Offline Players : Players currently not in communication with the server (More than 180Secs) Registered Players : Players communicated with the server at least once from the date of registration. Unregistered Players : Players yet to communicate with the server from the date of registration. 1.2 Subscriber Information: ➢ Subscriber : Name of the subscriber ➢ Expires on : Subscriber has to renew the subscription within the specified date for further usage of the product ➢ Allocated players : Number of Players licensed by the Organization ➢ Allocated Storage : Storage size allocated on the cloud server for subscriber usage (to store media contents) SpotForge Technologies 2 Signage Play User Manual ➢ Allocated Bandwidth : Bandwidth limit per month for data transfer with the cloud server (Upload/Download). ➢ Email id : E-mail id used by the subscriber to activate the account. The former should be used by the subscriber to renew the product subscription. 1.3 Storage Status and Bandwidth Status: ➢ Storage Status : displays the used and available space on the server ➢ Bandwidth Status : displays the used and available bandwidth for the subscriber 1.4 Location Map: It displays the player(s) location and online/offline status in Google map. SpotForge Technologies 3 Signage Play User Manual 2. Player Menu: The player menu helps you to create and manage the players. Each player has its own group*(Group consists of one or more players clustered according to location/type/content). 2.1 To create a New Group: Click “New Group” in the menu bar of “manage player” window Enter the group name and the group description in the “add group” pop-up window Click “Save&Update” 2.2 To Edit Player Information: Click on “edit player” symbol in the “action” column of “manage player” window. a. Player Details: Player Name : Enter the player name Player Location : Enter the geographic location of the player Player Orientation: Select the orientation of the player (eg:Landscape) Channel SpotForge Technologies : Select the “Channel” from the drop-down list box (To create a new Channel refer section “4.1”) 4 Signage Play User Manual Group : Select the “Group” from the drop-down list box (To create a new Group refer section “4.1”) Time Zone : Select the “Time Zone” of the player from the drop down list box. b. Player Communication: Schedule Update : Time interval to check for the schedule updates from the server Live Status : Time Interval taken by the server to decide whether the player is live or not(Player has to regain the connection with the server within the time specified to be an “active” player) Reporting : Time Interval taken to update the reports by the local device to the Server Volume : Volume level of the player can be adjusted here. c. Player Storage Settings: User can change Player’s current storage device with the help of changing the settings in the server (For eg: If the local storage (SD card) of the player is overloaded then the user can change the local storage device by enabling this option). SpotForge Technologies 5 Signage Play User Manual d. Indicators in Player: Online Indicator : It displays the connection status of the player by two icons (green/red) on the left-top corner of the display 1.Internet connection of the player 2.Connection of local device with the server Clock Display If any of the above icons turns red, it states the loss in connection. : User can Enable/Disable the Clock Action: The “Action” column in the “manage player” window provides option to edit and delete the player It also has an option to display the player information SpotForge Technologies 6 Signage Play User Manual 3. Library: Library is the storage area allocated in server for the subscriber. 3.1 Upload Media: This option in the menu bar of “manage library” helps you to upload the media content to the server. 3.1.1 To Upload Images/Videos: 1) Click “Upload Media” 2) Select “Image/Videos” 3) Click “Add Files” in the “upload media” pop-window 4) Select files to be uploaded and click “upload” 5) Wait for the files to be uploaded in the server. Once it shows 100% status in all files, click “Done”. 3.1.2 To Upload Ticker Background: Follow the same steps as above except step 2. Select Ticker Background instead of Images/Videos in step 2. 3.2 New Web URL: This option in the menu bar of “manage library” helps you to store the web URL to the server. SpotForge Technologies 7 Signage Play User Manual 3.2.1 To add a new Web URL: 1) Enter the Name of Media 2) Enter the website URL to be displayed (example: https://www.123.co.in/) 3) Enter the Duration in Seconds (duration to display the URL) 4) Click Save/Update. 3.3 Filter: This feature in the tool bar of “manage library” helps you to view the uploaded contents according to their types such as images, videos, swf, url, ticker background, feed, live streaming, templates and audio. The tool bar of “manage library” also consists “search” option which helps to you to find the contents at ease. SpotForge Technologies 8 Signage Play User Manual 4. Channel: Channel is a cluster of schedules, to manage the contents that are to be played. A user can create and manage media schedules and ticker schedules through the channel. To create a new schedule, you have to create a new channel first. 4.1 To create a New Channel: Click “New Channel” in the menu bar of “Manage Channels”. Enter the following details in the pop-up window. a) Channel Name : Enter the name of the channel b) Layout Orientation : Select Landscape or Portrait c) Layout Resolution : Select Screen Resolution (1080p, 720p etc…) d) Channel Description : Type the description of the channel e) Click “Save/update” The channel created will be displayed in the manage channels window. 4.2 To create a New Schedule: Select the “Goto Schedule List” in the channel created. Choose whether you want to schedule a media file or ticker from the menu bar of “channel name”. SpotForge Technologies 9 Signage Play User Manual 4.2.1a To Create a New Media Schedule: Click “New Schedule” from the “media Schedule” menu Enter the following details in the pop-up window. a) Schedule Name : Enter the schedule name b) Start and End Time : Specify the start date and end date c) Loop the Content : Check the tick box if you want to run the file repeatedly till the time specified d) Recursive Display : Check the tick box if you want to play the content on regular intervals(once you click on the tick box, you have to fill in the details of the interval in which the content should be played and until which date it should play) e) Click “save/update”. It will lead you to the “layout design” window. f) The user can create a minimum of 1 to maximum of 4 regions to display the contents. g) To create a new region click on the “New Region” menu in the menu bar of “layout design” window. SpotForge Technologies 10 Signage Play User Manual h) Each region has four options. 1) Region Playlist : Displays number of files to be played in each region @ It also has the option to edit and delete the schedule of the files. 2) Resize the Region : Option for Resizing the region of display @ The region has to be resized by entering the co-ordinates in pixels. 3) Add Media to Playlist : Option to add new media content @ Select the media file to be uploaded according to its type from the drop down list. 4) Delete Region : Delete the region already created i) Click on “Save&Publish” menu in the menu bar of “layout design” window to publish the media. 4.2.1b To publish an Existing Schedule: Click “Schedule Publish” from the “media Schedule” menu Click “Publish” in the “Publish channel” pop-up window SpotForge Technologies 11 Signage Play User Manual 4.2.2a To create a New Ticker Schedule: Click “New Ticker” from the “media Schedule” menu Enter the following details in the pop-up window. a) Ticker Name : Enter the ticker name b) Ticker Type : Select “static text or dynamic text(RSS)” from the drop down list - If “static text” is selected then enter the text to be displayed in the text box provided with the label “Ticker Text” - If “Dynamic text(RSS)” is selected then select the feed type and the source from the respective drop down boxes.(for ex: if feed type is selected as “World news” then select the source as “BBC news”) -Choose the background colour and text colour -Now choose the number of feeds to be displayed c) Start date and end date: Specify the starting and ending time of the ticker to be played d) Click on “Save” to store your scheduled content SpotForge Technologies 12 Signage Play User Manual 4.2.2b To Publish an Existing Ticker: Click “Ticker Publish” from the “Ticker Schedule” menu Click “Publish” in the “Publish channel” pop-up window Action: The action column allows you to edit the contents and delete the contents created. SpotForge Technologies 13 Signage Play User Manual 5. REPORTS: Report menu helps to cross check or create reports about the contents played. Reports can be generated in simple or extended or in both formats for each player. 5.1.1 To create a Report: Click on “Reports” in the main menu bar Start date End date Player : Specify the “Start time” until which the report has to be generated. : Specify the “End time” until which the report has to be generated. : Select the player for which the report has to be generated from the drop down list box. Report Type : Select whether you want to create “Simple report” or “Extended Report” from the drop down list box Click on “Get Report” to generate the report. SpotForge Technologies 14 Signage Play User Manual