1
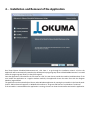
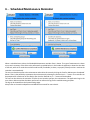
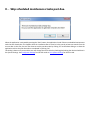
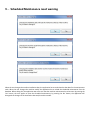
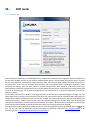
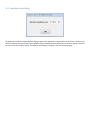
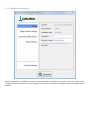
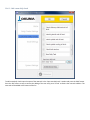
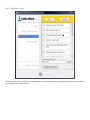
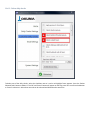
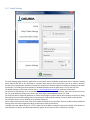
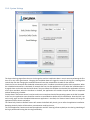
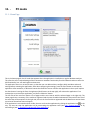
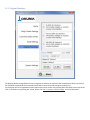
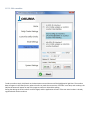
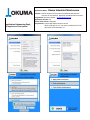
Application Engineering Dept. API Applications Development Application Name : Okuma Scheduled Maintenance Purpose: remind customer of the machine scheduled Maintenance as shown on the machine Operation and Maintenance manual Programmer: Germano Zerbini - [email protected] Application Version: 2.0 Status of the release : Released Requirement : Okuma OSP P200 minimum control Okuma OSP API ver. 1.9.1 or newer installed on the CNC Microsoft .NET framework 3.5 1. - Introduction The Scheduled Maintenance Application helps in keeping your Okuma machines at top performances. The application runs in background and reminds the machine operator when maintenance tasks as due. Every Okuma machine tool has two different maintenance tasks: after-installation and periodical. The after installation tasks happens only once after the machine goes in operation the first time. After that, the periodical tasks take over for the machine life. The Operation and Maintenance manual provided with your machine contains all the information needed to know about your machine maintenance. This application is not a replacement of the manual, but it is intended to provide reminders about incoming maintenance events. Always refer to the machine Operation and Maintenance manual when performing maintenance tasks. On top of the scheduled maintenance reminders, the application allows the user to show daily tasks or checks that the machine operator follows at the start of the working day, for example, check the coolant level, put grease in the chuck, and so on. The application has two operative modes: CNC mode and PC mode. The application automatically choses the mode depending if the user installs the application on a P200/P300 CNC with API up and running or on a Windows machine (PC, laptop, or tablet). When the application is installed on a CNC, the machine model and serial number are taken from querying the API and the user has to specify the installation date of the machine. If the application is installed on a Windows machines, the user has the ability to specify one or more machines and their respective serial numbers and installation dates. When in PC mode, the application monitors the scheduled maintenance tasks of more than one machine chosen by the user. The user must input the machine serial number so the application can uniquely identify each machine. The daily reminders functionality is still available in PC mode, but is disabled by default. The Scheduled Maintenance Application provides the following functionalities: Shows a daily reminder for common tasks and checking to be performed at every start of the working day Shows scheduled maintenance reminders for the periodical maintenance events Sends emails in advance about the next scheduled maintenance tasks Shows a preview of the next scheduled maintenance event in the application Home page The user can customize the daily reminders accordingly to his/her specific needs. The application works on an Okuma OSP control (CNC mode) or on a windows desktop, laptop, or tablet machine (PC mode) 2. - Email sending functionality The application uses any SMTP server specified in the email settings page to send emails. It does not monitor any incoming emails nor does it use any POP or IMAP server. The application developer advises the users to create a free email account to be used solely for the application when the application is installed on one or more CNCs. The same email account can be reused for any instance of the application; there is no need to create a different email address for each CNC. Most important, the user is advised to work with his/her IT department to ensure that the company policies about network security are respected. The application is configured by default for Gmail accounts and there is no affiliation between the developer and Google. The user is free to use any available email provider. Due to the impossibility to test every possible email provider and any possible network configuration, let the developer know if there are problems with the email sending functionality in your facility. 3. - Application specifications The application works for Okuma Lathes, Multifunction, and Machining Center Automated installation and removal of the application The application is constantly running in background and it is accessible by an icon in the tray In CNC mode, the application starts automatically when the CNC is fully loaded and ready When installed on a P200 or a P300 CNC, it automatically recognizes the machine and load the proper maintenance schedule from a database file When installed on a Windows PC, laptop, or tablet, the user is responsible to register the machines he/she wants to keep under control At the first run on a CNC the application asks the user to input the machine installation date The application records every user choices in a log file. Okuma or the distributor personnel may collect the log for troubleshooting purposes. The log can be viewed at any moment from the System Setting page The application records any changes to the machine installation date in the log file, and any time the user terminates the application from the System Settings page The user can choose to display daily reminders about tasks to perform at a specified time. The user can enable or disable the daily reminders functionality at any time The daily reminders can be customized by the user as well as the show up time Emails to remind about the next scheduled maintenance evert are sent in advance. The user has to configure the email settings in accordance with his/her company policies. The CNC or PC must be connected to a network that provides Internet access. The user is responsible for his/her CNC, PC, and network The email functionality is disabled by default. The user can enable or disable it at any time The email account set in the application is used only for sending emails, which means only the SMTP server is used. The application does not use any IMAP or POP3 server for monitoring incoming emails 4. - Installation and Removal of the Application Run ‘Setup Okuma Scheduled Maintenance.exe’, click ‘Next >’ to go through the installation wizard. A link to the Application will be automatically created on the desktop and a program group ‘Okuma Scheduled Maintenance’ is created under the program group ‘Okuma’ in Start/All Programs. Once the application is launched for the first time on a CNC, the user has to provide the machine installation date. If the user installs the application on a regular windows machine, the application shows the main form with the ‘Register Machine’ page selected. The application can be uninstalled just like any other Windows application by running the uninstaller in the Control panel: look for ‘Add or Remove Programs’ on Windows XP machines or ‘Programs and Features” on Windows 7 machines. If the uninstaller is executed when the application is running, the user can have the uninstaller terminate the application. 5. - Minimum Requirements: OSP Think API 1.9.0 or greater: click on the API icon in the tray (next to date and time), a window will pop up showing which version of the API is currently running. If the version is less than 1.9.0, please contact your distributor for having the newest API release installed on your machine. .NET framework 3.5 or greater: the setup wizard checks if the proper .NET framework is present. If it needs to be installed, a message box will show up during the application installation process informing to run ‘dotnetfx35.exe’. Simply press OK, run ‘dotnetfx35.exe’ (from the application zipped archive) and re-run the application installer. The user must ensure that the date, time, and time zone on his target CNC or PC are correct for his location. 6. - Scheduled Maintenance Reminder PC mode CNC Mode When a scheduled event is due, the Scheduled Maintenance reminder form is shown. The type of maintenance is shown on top and a summary of the tasks to be performed is provided below. In CNC mode the application shows the due date of the task, while in PC mode the machine model and ID (if available) is shown, to properly identify to what machine the reminder is associated with. The user can decide to perform the maintenance and archive this event by clicking the ‘Confirm Maintenance Completed’ button. There is the possibility to postpone the maintenance by selecting the ‘Remind me in …” button. The reminder can be postponed for a maximum of two weeks, after that the ‘Remind me in …” button will be disabled. The user can also dismiss the reminder if he/she do not intend to perform the maintenance. The application logs in the user choices. Okuma and the distributor personnell can collect this log file for troubleshootong purposes. The log can be viewed from the System Settings page. Always refer to the machine Operation and Maintenace manual for more details. 7. - Daily Checks Reminder When the daily checks functionality is enabled and at least one daily check task is checked (see 10.5 - Daily Checks Settings and 10.6 – Customize Daily Checks), the application shows the Daily Checks reminder. The daily tasks are numbered and listed in an alternating background color list; in this way, it is easier to read the tasks and refer to them. The application shows this reminder once a day at the preselected time. The user can decide to disable this functionality by checking the ‘Stop showing the daily reminders’ checkbox directly in this form. To enable the Daily Checks again, check the ‘Show the daily reminders’ checkbox in the ‘Daily Checks Settings’ page. 8. - Skip scheduled maintenance tasks past due. When the application is activated by pressing the ‘Start’ button, the application checks if there are scheduled maintenance tasks that are already due. This happen when the installation date is set to be in the past by at least one month from the current date. In this case, the user can chose to see this past due tasks by clicking ‘Yes’ to the above dialog or to have the application archive the past due tasks as completed by clicking ‘No’. This dialog is shown only once and the user can change the initial choice by checking/unchecking the relative checkbox in the System Settings. See 10.8 System Settings for the CNC mode or 11.6 System Settings for the PC mode. 9. - Scheduled Maintenance reset warning When the user changes the machine installation date, the application has to recalculate the due dates for the maintenance tasks. When the user changes the machine model, the application has to reload the scheduled maintenance from the database. Before doing this, the application warns the user that the machine maintenance has to be reset. By pressing the ‘Yes’ button, the user agrees to reset the scheduled maintenance; by pressing the ‘No’ button, the application will disregards the changes to the installation date and/or machine model. 10. - CNC mode 10.1 - Home Page After installing the application on a P200/P300 control, the application automatically recognizes the machine model from the API and it prompts the user for the machine installation date, which is the date when the machine went in function the first time. After that, the application shows the main screen, with the Home page selected. The application starts in a not active status, so the user can configure daily reminders and email settings before activating the application. After configuring the settings, press the ‘Start’ button to activate the application. After activation, a ‘Minimize’ button that allows the user to minimize the application in the tray will replace the Start button. Pressing the form closing button (Red X button at the top right), will activate the application if not activated yet or minimize the application, just like the ‘Minimize’ button. The left side of the main form shows a list of pages and the user interacts with the selected page in the right side. The Home page shows a summary of the machine (name from API, serial number and the installation date) along with the Machine ID and Machine Location that the user can fill if needed. The machine ID is how the machine is identified in the machine shop and the ‘Location’ field is useful if there are different buildings. The reminder email uses the Machine ID and Location to identify the machine requiring maintenance. The machine ID and Location are optional. The Home page also shows the next scheduled maintenance event with a brief list of the tasks that will be required. If the application is minimized and not visible the user can show the application by clicking the application icon in the tray. The user can stop the application only by terminating the application itself (see 10.8 - System Settings) or by uninstalling it (see 4 – Installation and Removal of the Application). 10.2 - Installation Date Dialog The application shows the Installation Date dialog as soon as the application is executed for the first time. The user has to select the machine installation date. The installation date is intended to be the date when the machine was turned on for the first time at the customer facility. This date can be changed, if needed, in the System Settings page. 10.3 - Machine not supported When the application is installed on a machine not yet supported, the application will show it next to the machine name. The daily checks functionality will be still available, but the email and change of installation date functionalities will be disabled. 10.4 - Accept or Cancel changes Each time the user changes one or more settings the OK and Cancel buttons show up in the top right part of the main form. The changes made to the settings are recorded only when the user press the OK button. By pressing the Cancel button the changes made are reverted to their original state. Changes to the Daily Checks Settings, Customize Daily Checks, Email Settings, and System Settings pages require to be confirmed by pressing the ‘OK’ button or cancelled by pressing the ‘Cancel’ button. If the user tries to minimize the form or close the application while the changes have not been accepted or canceled, the application will flash the yellow rectangle, indicating that the changes have to be accepted or rejected. After that, the user can minimize or close the application. 10.5 - Daily Checks Settings The Daily Checks Settings page allows the user to have a quick view of which daily checks are going to be shown and at what time. The daily checks with the green highlight frame will be shown in the daily check form. Click in the checkboxes next to the daily checks for enabling or disabling them. The daily checks functionality can be completely disabled by unchecking “Show the daily reminders” and the user can choose at what time to show the Daily Checks. The Daily Checks form is shown once a day. The ‘Test Daily Reminder’ button allows the user to show the daily reminder form at any moment. This is for testing only; the application will automatically show the Daily Reminder form once a day at the specified time. 10.6 - Customize Daily Checks The Customize Daily Checks page allows the user to customize the daily checks, by modifying the existing ones, adding new ones, or deleting any. As soon as a change is made to any daily checks, the OK/Cancel confirmation box will appear. Press OK to apply the customization or press Cancel to dismiss the changes. See ’10.4 - Accept or Cancel changes’ for more information. 10.6.1 - Add a new daily check To add a new daily check input the name of the new task in the ‘Input new daily task:’ textbox and press the ‘Add’ button. Press the ‘OK’ button on top to confirm the adding of the new task, press ‘Cancel’ to dismiss the new task addition. The new task will be added at the bottom of the list. 10.6.2 - Edit daily checks To modify a daily check, just click on the text and edit it. Confirm the editing by clicking the ‘OK’ button on top or dismiss the change with the ‘Cancel’ button. 10.6.3 - Delete daily checks To delete one of the daily checks, select the checkbox next to it and a red highlight frame appears. Press the ‘Delete Selected Tasks’ button to delete it. The ‘OK’ and ‘Cancel’ button will appear on the top, press ‘OK’ to confirm the deletion or ‘Cancel’ to dismiss it. More than one task can be selected and deleted at the same time. 10.7 - Email Settings The Email Settings page allows the application to send emails about scheduled maintenance tasks in advance. Sending emails requires the CNC to be connected to a network with Internet access and security has to be taken in account, therefore, the IT department should be involved. The ‘Send Emails’ checkbox allows the enabling or disabling of the email functionality. The sending email functionality is disabled by default when the application is run for the first time. The default settings are for Gmail accounts. See 2. – Email sending functionality for important information. The user has to complete the ‘From’ email address and the password to the email account. After that, the user can insert the ‘To’ email addresses. Always press ‘Enter’ after inputting any email addresses in the ‘To:’ field. The ‘Send Test Email’ allows the application to send a test message to confirm that the email settings are correct. A dialog box confirms the successful sending of the test email and it will provide information in case the email cannot be sent. The reminder email is sent in advance by the number of days set. When using an email provider other than Gmail, update the SMTP server name field. The Port number and the Enable SSL settings may have to be changed accordingly to the email provider specifications. To delete any email address from the ‘To:’ list, select the email address to delete and press the Delete or Del button on your keyboard. As always, the OK/Cancel button will appear on the top to confirm or dismiss the change. 10.8 - System Settings The System Settings page allows the user the change the machine installations date in case it was entered wrong the first time or for any other good reason. Changing the installation date will trigger the record in the log file. A message box reminds the user that changing the installation date will reset the maintenance schedule for the machine. Check the ‘Do not show past due scheduled maintenance tasks” checkbox to avoid seeing tasks that are past due. When the scheduled maintenance is calculated, for example the first time the application is run or when the installation date is changed, there can be tasks that had to be done in the past. When this checkbox is unchecked, the application will show all the past reminders; when the checkbox in checked, the application will consider the past due tasks as completed without showing any reminder. ‘Backup Status’ and ‘Restore status’ are to be used in case a complete reload of the operating system on the CNC is needed. In this case, the application status should be saved to a removable drive before the OS reinstallation. Once the CNC is up and running again and the Scheduled Maintenance application is installed, the ‘Restore Status’ button will bring the application back to how it was before. The ‘Reset Daily Checks to Default’ button will restore the default daily checks, just as after the application installation. Resetting the daily checks will discard any customization made by the user. The ‘Close Application’ button terminates the application and the ‘View Log’ allows anybody to view the log. No editing of the log is possible while using the view Log functionality. 11. - PC mode 11.1 - Home Page This is the home page for the PC mode that appears when the application is installed on a regular Windows machine. This allow the user to take advantage of the maintenance reminders functionality for older Okuma that do not offer the API functionality, but still need regular maintenance. The application starts in a not active status, so that the user can add machines, configure daily reminders and email settings before activating the application. After done configuring the settings, press the ‘Start’ button to activate the application. After activation, a ‘Minimize’ button that allows the user to minimize the application in the tray will replace the Start button. Pressing the form closing button (Red X button at the top right), will activate the application if not activated yet or minimize the application, just like the ‘Minimize’ button. The left side of the main form shows a list of pages and the user interact with the selected page in the right side. The Home page shows a summary of the machines registered and the next scheduled maintenance event with a brief list of the tasks that will be required. On the right side, there is the list of machines registered and the Next Event section shows a preview of the earliest event to happen. If the application is minimized and not visible, the user can show the application by clicking the application icon in the tray. The user can stop the application only by terminating the application itself (see 10.8 - System Settings) or by uninstalling it (see 4 – Installation and Removal of the Application). 11.2 - Daily Checks Settings See 10.5 Daily Checks Settings in CNC mode. 11.3 - Customize Daily Checks See 10.6 Customize Daily Checks in CNC mode. 11.4 - Email Settings See 10.7 Email Settings in CNC mode. 11.5 - Register Machines The Register Machines page allows the user to register the machine or machines that the application will use to remind for scheduled maintenance tasks. Reminder emails will be sent if the email settings are properly set. Any change to the list of registered machines require the user to confirm it by pressing OK in the yellow area on top of the form, or to dismiss it by pressing the ‘Cancel’ button. See ’10.4 - Accept or Cancel changes’ for more information. 11.5.1 - Add a machine For adding a machine fill the relevant information (highlighted by the red ellipse) and press the ‘Add’ button. The fields in blue (Model, Serial Number, and installation date) are mandatory, while the Machine ID and Location are optional. The model name is normally written on the front side of the machine. The serial number must be unique and the application will warn you when trying to add more than one machine with the same serial number. 11.5.2 - Delete a machine To delete a machine simply select the checkbox next to it. The machine will be highlighted with a red frame. Then, press the ‘Delete’ button. More than one machine can be selected for deletion at the same time. As always, the OK/Cancel button will appear on top of the pages to confirm or discard the machine deletion. 11.5.3 - Edit a machine To edit a machine simply click/touch on the description text and the area will be highlighted in light blue. The machine data will appear in the lower portion, where the user can make the corrections. Click ‘Edit’ once done, and as always, the OK/Cancel button will appear on top of the pages to confirm or discard the editing. During the editing the serial number can be changed, and the application will warn if the new serial number is already registered with another machine. 11.6 - System Settings Check the ‘Do not show past due scheduled maintenance tasks” checkbox to avoid seeing tasks that are past due. When the scheduled maintenance is calculated, for example the first time a machine is registered or when the installation date of registered machines is changed, there can be tasks that had to be done in the past. When this checkbox is unchecked, the application will show all the past reminders; when the checkbox in checked, the application will consider the past due tasks as completed without showing any reminder. The System Settings page provides the ‘Backup Status’ and ‘Restore status’ functionalities to be used in case a complete reload of the operating system on the CNC is needed. In this case, the application status should be saved to a removable drive before the OS reinstallation. Once the CNC is up and running again and the Scheduled Maintenance application is installed, the ‘Restore Status’ button will bring the application back to how it was before. The ‘Reset Daily Checks to Default’ button will restore the default daily checks, just as after the application installation. Resetting the daily checks will discard any customization made by the user. The ‘Close Application’ button terminates the application and the ‘View Log’ allows anybody to view the log. No editing of the log is possible while using the view Log functionality. 12. - Sample Scheduled Maintenance Email This is a sample of the scheduled maintenance email sent to every email address listed in the ‘To:’ field. The application sends this scheduled maintenance emails accordingly to the settings in the Email Settings page (see 10.7 Email Settings). The email identifies the machine by its name, ID, serial number and location, and lists the tasks for the maintenance event that is due. 13. - Test email This is the test email that is sent by the application if the email settings are correct. Every email address in the ‘To:’ field will receive this test email. See 10.7 Email Settings.