1
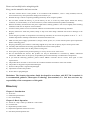
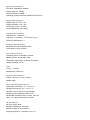
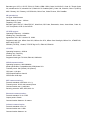
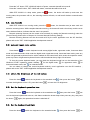
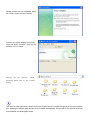
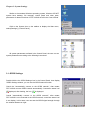
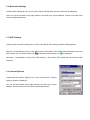
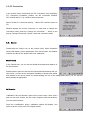
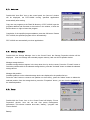
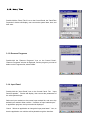
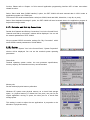
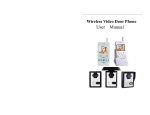
User Manual PDT-1000W Series Vesion: V 1.20 Type No.:PDT-1000W-A0/A2 Series Date: Copyright @ 2009 Masterpiece Technology (International) Co., Ltd. All rights reserved. Masterpiece Technology (International) Co., Ltd. retain the right to make changes to this manual at any time without notice. Without Masterpiece Technology (International) Co., Ltd written permission shall not be reproduced in any form, of any part of the dissemination of this manual. This manual has been validated and reviewed for any loss caused by errors, omissions or discrepancies between the manual and product, Masterpiece Technology (International) Co., Ltd. does not assume any liability. Trade Marks All company and product names mentioned in this manual are the legitimate rights and interests of people who hold trademarks or registered trademarks. FCC Class B Information Has been tested in accordance with Part 15 of the FCC regulations, the products comply with the provisions of the Class B digital device. These provisions are intended for the installation of the product, to provide reasonable protection against harmful interference. This equipment generates, uses and can radiate radio waves, if not properly installed, used, would cause harmful interference to radio communications. However, it does not guarantee that a particular installation will not cause harmful interference. If the products cause harmful interference to radio and TV signals acceptance (by opening and closing of this product can be determined), the user can try to use the following method to resolve: Readjust or relocate the receiving antenna To increase the distance between the disturbed equipment Connect this product and the disturbed device to different outlets Consult the dealer or an experienced radio / TV technician for help. Warning: Without certification of relevant international standards or norms, any changes or modifications of this product will result in failure of MPTIC’s quality assurance of the product and service commitments. Note: The battery on the incorrect location will be likely to cause an explosion; replace the battery, you must use the same specification, it is recommended to use the products of the same brand and model; discard waste batteries to protect the environment in accordance with the manufacturer's recommendations. How to Get Help Please visit our website www.mptic.com to receive the latest product information. If you need more technical support, please contact Service Center of MPTIC, or your local dealer. Before you find technical support, please confirm the following information: product model number and serial number of your purchase detail description of devices which used together with MPTIC’s products detailed content of software development complete description of the problem detailed error records of the product Detailed records and description of the problem may help us solve your problem as soon as possible. WARNING! Input: 220V/50Hz AC power Battery: 4.2V lithium-ion battery Handling: Use both hands handling, to avoid falling and hitting Maintenance: use dry cleaning materials to clean and maintain the product’s surface. Safety Operation Guide Please read carefully before using this guide. Keep your the manual be the latest version. 1. The laser emission device of the product is in accordance with EN60825-1, Class 1 safety standard, however, non-normal use may cause permanent damage to the human eyes. 2. Prohibit driving a vehicle or operating handling machinery when using this product. 3. Do not strike, extrude the battery, or put the battery on fire; to avoid any metal objects shorten the battery connector; in case the battery is on non-normal fever, switch-off and maintain the product immediately. 4. Remove the battery and disconnect the power input before cleaning products. You can use slightly moist cleaning materials, but do not use liquid or aerosol cleaners. 5. Avoid to use the product in wet environment and dust environment that exceeds the design standard. 6. Properly tethered or fixed this product, bump or drop more than design standards will result in damage to the product. 7. Avoid using this product in temperatures exceed design standard, use and store the product in the 0 ℃ - 45 ℃ ambient temperature will help extend the life and reduce the failure rate. 8. Make sure the power supply specifications (voltage, current, power, etc.) in line with the power input requirements before connecting power. 9. Properly placed the power cable to avoid being stepped on by staff. Do not put any objects on the power cable. 10. Carefully read and follow the warning signs affixed to the surface of the product. 11. Disconnect power cable if not use this product for long time. 12. Never pour any liquid into the product openings, or it may cause a fire or short circuit. 13. Do not disassemble the chassis, this product can only be demolished or converted by MPTIC authorized technicians. MPTIC does not accept any responsibility for user disassembly or modification consequences. 14. If you find the following problems, please contact MPTIC Customer Service Centre, local agent or sales representative: a) The product does not work or can not work in accordance with the instructions of the user manual. b) The product is dropped or impacted and damaged. c) Surface of the product is significantly damaged. d) Liquid enter inside of this product e) Power cable or plug damaged Disclaimer: The Security Operations Guide developed in accordance with IEC 704-1 standard, it is recommended guidance; Masterpiece Technology (International) Co., Ltd. does not bear any responsibility of the consequences of this guide. Directory Chapter 1: Introduction 1.1: Overview 1.2: Technical Specifications 1.3: Use of the battery Chapter 2: Basic Operation 2.1: Power on / sleep / wake up / shutdown / state switch 2.2: scan barcode 2.3: keyboard input state switch 2.4: adjust the brightness of the LCD screen. 2.5: Set the keyboard operation tone 2.6: Set the keyboard backlight 2.7: replace battery 2.8: install / remove the SIM card 2.9: battery charging 2.10: Connecting to a PC Chapter 3: System Settings 3.1: GPRS Settings 3.2: Bluetooth Settings 3.3: WiFi Settings 3.4: Internet Options 3.5: PC Connection 3.6: Stylus 3.7: Auto-run 3.8: Storage Manager 3.9: Power 3.10: Administrator Password 3.11: Regional Settings 3.12: Date / Time 3.13: Remove Programs 3.14: Input Panel 3.15: Mouse 3.16: Barcode Scan Settings 3.17: Networks and Dial-up Connections 3.18: System 3.19: Displays 3.20: Dialing 3.21: Certificate 3.22: Taskbar and Start Menu Chapter 1: Introduction 1.1: Overview PDT-1000W MPTIC PDT-1000W is a lightweight design mobile data terminal with 400MHz processor and Windows CE 5.0 O/S. It is widely used in the fields of manufacturing, warehousing, express courier, retail industry. Its built-in bar code scan engine, RFID reader and other data collection modules have high recognition rate and acquisition speed, ensure PDT-1000W works with high performance and high reliability on the barcode acquisition and data processing work. PDT-1000W supports real-time transmission of data over GPRS network, WiFi, Bluetooth and other wireless network. 2.8 inch touch color LCD screen, compared to traditional monochrome character display, with a more user-friendly interactive experience, the amount of information displayed is also much larger than traditional products, with high-speed processor and operating system, making the smart field applications technology and accuracy is greatly improved. 3600mAh lithium-ion battery can guarantee 8 hours continuous work on full loads, or 12 hours on normal loads (communication excluded) or up to 400 hours standby. PDT-1000W is IP54 dust and water standards, and can work at various industrial environments. PDT-1000W pass cement floor drop test from 1.2 meters on running status. PDT-1000W run Microsoft Windows CE 5.0 O/S, support for various Microsoft standard development interface and database formats. PDT-1000W significantly reduce the time and cost of the application development cycle, also make simpler and more convenient system integration, and has a high degree of portability. 1.2 Product Technical Specifications System Specifications: Processor: SAMSUNG 400MHz System memory: 128MB Program Memory: 128MB Operating systems: Microsoft Windows CE.NET 5.0 Display Specifications: Display Type: 2.8 "TFT LCD Display resolution: 240 * 320 Viewing area: 43.2 * 57.6mm Screen Brightness: 250 cd/m2 Interface specifications: USB Device 1.1 interface * 1 USB Host 1.1 Interface * 1 (A2 version only) RS-232 COM interface * 1 Keyboard Specifications: Keystroke life: 800 thousands times The number of keys: 23 keys Power specifications: Operating power consumption: 300mA Standby power consumption: 8mA The battery: 3600mAh/3.7V lithium-ion battery Charging voltage: 5V DC Time: Time: 8 - 12 hours Standby time: 400 hours Physical specifications: Overall: 160 mm x 70 mm x 30 mm Weight: 260g Environmental Specifications: Operating Environment: -10 ° C to 50 ° C Storage environment: -30 ° C to 70 ° C Humidity: 10% to 90% (non-condensing) Waterproof and dustproof criteria: IP54 Electrostatic Protection: 6KV contact, 12KV air Drop: 1.2 m drop cement floor 26 times 1D barcode Jet: Jet type: 650nm laser Maximum Resolution: 0.078mm Maximum depth of field: 820mm Scanning frequency: 100 times / sec ± 10 Barcode type: UPC-A, UPC-E, EAN-13, EAN-8, ISBN / ISSN, Code 39 full ASCII, Code 32, Trioptic Code 39, Interleaved 2 of 5, Industrial 2 of 5, Matrix 2 of 5 Codabar (NW7), Code 128, Code 93, Code 11 (USD-8), MSI / Plessey, UK / Plessey, UCC/EAN128, China Post, China Finance, GS1 DataBar 2D barcode Jet: Jet Type: CMOS sensor Read distance: 51mm - 330mm Targeting: LED, laser Barcode types: PDF417, MicroPDF417, MaxiCode, QR Code, Datamatrix, Aztec, Aztec Mesa, Code 49, UCC Composite, OCR-A, the OCR-B HF RFID engine: Operating Frequency: 13.56MHz Working way: read and write Agreement: ISO / IEC 14443A / B, 15693 Supported card type: Mifare One S50, Mifare One S70, Mifare One UltraLight, Mifare Pro, AT88RF020, 66CL160S, SR176 SRIX4K (TYPE-B), I-Code2, TI RFID Tag-it HF-I, EM4135, EM4034 LF RFID: Operating frequency: 125KHz Working way: read-only Protocol: ISO 11786 Supported card type: TK4100, EM4100, SMC4001 GPRS communication: Operating frequency: 900/1800MHz Mode specification: compatible with GSM phase 2/2 + Transmit power: 2W (Class4) 1W (Class1) CSD rate: 14.4k bps GPRS specifications: class10 GPRS rate: 86.5k bps WiFi communications: Protocol standards: IEEE 802.11 b / g Transmit power: 50-25 mW transmit power Communication rate: 11mb/54mb Security protocols: WEP, WPA, 802.11x Bluetooth communication: Protocol standard: V2.0 + EDR Output power: Class2 Communication distance: 10 meters Infrared communication: Protocol standards: IrDA 1.0 Communication rate: 115Kb Communication distance: 1m Database Engine: EDB / CEDB Microsoft SQL Server CE 3.0/3.5 SQLite for WinCE Software development tools: MFC Class library for CE Embedded Visual C + + 4.0 Visual C + +. NET 2005 . NET Compact Framework 3.5 Visual Basic.NET 2005 Visual C #. NET 2005 Product Certification: Electromagnetic compatibility: CE, FCC Part 15 Security: UL60950/EN60950 1.3 Use of the Battery This device is powered by a rechargeable battery. New battery only upon completion of the two or three complete charge and discharge cycles to achieve the best performance. The battery can charge and discharge capacity of five hundred cycles, but will eventually expire, buy a new battery when the battery work time was significantly shorter. The ambient temperature is too high and too low will affect battery performance. Do not do the battery to the other purposes; do not use a damaged charger and battery. To avoid any metal objects shorten the battery connector, although the battery has a self-protection function, but in some cases may still be permanent damage to the battery, and may cause a fire. Put the battery on fire may explode and cause injury; in case the battery is in non-normal fever, switch-off and maintain the product immediately. Put expired battery to specialist category that complies with recycling processing guides, the battery can not be discarded as garbage. Chapter 2: Basic Operation 2.1: Power on / sleep / wake up / shutdown / state switch When PDT-1000W is turned off, press the the button, the device is turned and load Windows CE.NET operating system, while finished loading, PDT-1000W turned into the system desktop. When PDT-1000W is running, press the key and hold for 1 second, PDT-1000W displays "Turn off the power window. Press the "Sleep" button, then processor of PDT-1000W enters sleep mode, PDT-1000W will turn off the LCD screen, the scanning module and all wireless communication modules. Press the "off" button, PDT-1000W will switch off power, unsaved data will be lost at all. Press the "restart" button, PDT-1000W will restart, unsaved data will be lost at all. While PDT-1000W is in sleep mode, press the button, the device will wake up and enter into running state, the processor will run, the scanning module will work, as well as all wireless communication modules. 2.2: scan barcode While PDT-1000W is on running mode, press the button, the barcode scan jet start work and emission scanning beam. While complete barcode scanning, the buzzer will emit a short beep, and the scan status indicator flashes, indicates that the scan is successful. Barcode scanning features can be turned on/off manually by setting the [barcode scanning] under the [Control Panel], please refer to Chapter 16 of manual barcode scanning settings. Barcode scanning features can also be turned on/off by the users’ application over the API interface, please refer to the "PDT-1000W application development manual”. 2.3: keyboard input state switch Press button can switch keyboard mode among digital mode, uppercase mode, lowercase letter mode and extended mode; while under the digital mode, uppercase mode, lowercase letter mode, press any button will generate keyboard function which marked on the button itself; while under the expansion mode, press any button will generate keyboard function which marked at the top right of that button. To view the current keyboard mode, you can check the keyboard mode icon on the status bar of the Windows CE.NET operating system desktop. for the digital mode, for uppercase mode, for lowercase letters mode, and for extended mode. You can obtain or change the current keyboard mode by users’ application over the API interface, , please refer to the "PDT-1000W application development manual. 2.4: adjust the brightness of the LCD screen. Press the button , switch the keyboard to the extended mode increase the brightness of the LCD, press the button , then press the button can to lower the LCD brightness. 2.5: Set the keyboard operation tone Press the button , switch the keyboard to the extended mode , then press the button can turn the keyboard operational tones on, this feature makes the buzzer beep when press any key; and press the button again, the operational sounds is switched off. 2.6: Set the keyboard backlight Press the button , switch the keyboard to the extended mode , then press the button can turn keyboard backlight on; and press the button again, the keyboard backlight is switched off. 2.7: replace battery Exit all applications, turn off the power. One hand push the battery snaps upward, unlock the battery, then the other hand move the battery away from the battery slot. Please refer to the illustration at right: 2.8: install / remove the SIM card Exit all applications, turn off the power, and remove the battery. Push the SIM card slot, unlock it, then turn it to 90 degrees erectly, install or remove the SIM card After completed the installation or remove of the SIM card, push the SIM card slot back and lock it. Please refer to the illustration at right: 2.9: battery charging Make sure the battery is installed on the terminal. Plug the charger into the power input jack. Please refer to the illustration at right: While the battery is charging, the charge indicator on the keyboard shows red, indicates in charging; while the battery is fully charged, the charge indicator shows green, indicates that charging is completed, then you can unplug the charger. While under external power supply, power status icon icon will display on the desktop status bar. While under battery power supply, power status will display on the desktop status bar. 2.10: Connecting to a PC The terminal can be connected to PC directly via the USB port, we recommend to install Microsoft ActiveSync software. Start ActiveSync, PC will automatically search for the USB port and establish a connection with the PDT-1000W. Microsoft ActiveSync is on the disc accessories box, after installation, ActiveSync program. of the run the Connect PDT-1000W to PC with a USB cable in the accessories box. The bottom of USB port is illustrated as picture on right The ActiveSync program automatically detects to PDT-1000W, the "New Partnership" window is displayed. Press the icon to select "Yes", press the "Next" button In the “Synchronization Settings" window, cancel all items that are synchronized, press the" Next "button. Wizard prompts set up completed, press the "Finish" button to end the setting. ActiveSync program displays connected. Press the button "Browse", open the file directory of PDT-1000W. Through the file directory, upload, download, delete files in the terminal directly. The user can write application software at PC side, and access PDT-1000W through the ActiveSync interface then exchange or transfer data and file to PDT-1000W automatically. Please refer to the relevant technical documentation for development works Chapter 3: System Settings Similar to the standard Windows operating system, Windows CE.NET system have desktop, file manager, control panel and other parts; parameters of related functions of PDT-1000W are all in the Control Panel. Click on the System icon on the taskbar to display the Start menu, select [Settings] - [Control Panel] All system parameters are listed in the Control Panel, the user can set system parameters according to the following instructions. 3.1: GPRS Settings Double-click the the GPRS Settings icon in the Control Panel, then display "GPRS Settings window, you can set the GPRS network function. Check the "automatically connect to the GPRS network”, after restart, PDT-1000W connect GPRS network automatically. Connection status icon displayed; after landing, the icon is displayed. Cancel "automatically connect to the GPRS network", after restart, PDT-1000W is not connected to the GPRS network, connection status icon is not display. In this state, user can test the GPRS signal strength through the window illustrate on right. 3.2: Bluetooth Settings Double-click the Bluetooth icon on the Control Panel, the Bluetooth Options window will be displayed. User can set the browser home page address, the Web proxy server address, security level and other browser-related parameters. 3.3: WiFi Settings Double-click the the WiFi settings icon on the Control Panel, WiFi Settings window will be displayed Select the "Automatically connect to the WiFi network, after restart, PDT-1000W will automatically connect to WiFi network, the connection status icon is displayed, after landing, icon is displayed. Not select “Automatically connect to the WiFi network ", after restart, PDT-1000W will not connect to WiFi networks. 3.4: Internet Options Double-click the Internet Options icon in the Control Panel, "Internet Options" window is displayed. You can set the browser home page address, the Web proxy server address, security level and other browser-related parameters. 3.5: PC Connection In the Control Panel, double-click the "PC Connection" icon will display "PC Connection Properties” window, set the connection between PDT-1000W and PC, e.g. a USB or serial connection. Select “Enable PC connected directly ", allows PDT-1000W connect to PC; Window displays the current connection, in case need to change the connection mode, press the "Change the connection ..." button in the pop-up "Change Connection" window, select the connection mode. 3.6: Stylus Double-click the "Stylus" icon on the Control Panel, Stylus Properties window will display, set the parameters of the touch screen; this window contains two tabs of the "double-click" and "calibration". Double-Click In the "double" tab, you can set the double-click speed and distance of the touch screen; Double-click the grid icon above at the right speed and distance that you feel correct, you can set the recognition standard of double-click speed and distance of the touch screen; by double-clicking the icon of the wedge plate below, you can test the above settings is appropriate. Calibration "Calibration" tab can relocate a point on the touch screen, when click a point on the touch screen, but the screen response with the deviation, you can use this feature. Press the "recalibration" button, calibration window will display. Use stylus to tap the center point of the target window. 3.7: Auto-run Double-click “Auto Run” icon on the control panel, the "auto-run" window will be displayed, set PDT-1000W running specified applications automatically after starting Copy auto run programs to the Flash file directory of PDT-1000W, input the programs address and file name to the text box in the window, or click the Browse button on right to locate the program. Completion of the specified program address, press the OK button. Restart PDT-1000W, the specified program will run automatically. PDT-1000W can automatically run three applications. 3.8: Storage Manager Double-click the Storage Manager icon in the Control Panel, the Storage Properties window will be displayed. User can manage the extended program memory card over the Properties window. Manage storage devices Available storage devices appear in the drop-down box by device names. Press the "Format" button to format the partition table of the selected storage device; press the "Uninstall" button to delete the selected storage device. Manage disk partition Available partitions on the selected storage device are displayed in the partition list box. Press the "New" button to create a new partition on the memory; press the "delete" button to delete the selected partition from the storage device; press the "Properties" button, you can view the properties of the selected partition. 3.9: Power Double-click the Power icon on the Control Panel will display "Power Properties" window. User can set and view power management parameters; This window contains three tabs, "battery", "program" and "Device Status". Battery: View power and battery status of PDT-1000W Program: In the state of battery-powered or external power supply, no user operation after a certain period of time, PDT-1000W automatically enters sleep mode; Device Status: View power consumption of each module of PDT-1000W. 3.10: Administrator Password Double-click "Administrator Password" icon on the control panel, "Administrator Password" window will be displayed. User can set the security status of PDT-1000W after startup. Check the "enable administrator password", input password in the Password field, and press the OK button, PDT-1000W will boot into safe mode. Only in administrator mode, user can operate PDT-1000W’s file system and control panel. In safe mode, the user desktop operation is invalid, click on the System icon in the status bar, the “administrator password window” will pop up, only after entering correct password, PDT-1000W enters Administrator mode. 3.11: Regional Settings Double-click the "Regional Settings" icon on the control panel, the “regional and language settings” window will be displayed, you can set display type and format of text and numbers. There are the three tabs in the "Regional and Language Settings” window, Region, Language, Enter, for system text format, language and content setting. 3.12: Date / Time Double-click the "Date / Time" icon on the Control Panel, the “Date/Time Properties” window will display, user can set the system date, time, and time zone. 3.13: Remove Programs Double-click the "Remove Programs" icon on the Control Panel., "Remove Programs" window is displayed, find the program you want to delete on the Programs list, select Delete. 3.14: Input Panel Double-click the "Input Panel" icon on the Control Panel. The “Input Panel Properties” window will display. User can set the parameters of the soft keyboard input. Select an input method on the current input method list, and set to the default input method. When call the “interface of input method open” in application program, the input method is displayed. Check “Allows an application to change the input panel state” box, so that the application can call the soft keyboard through the interface. PDT-1000W preloaded with 3 soft keyboard input method, Keyboard: English letters input The Pinyin input: Pinyin input Penpower Input Method: Chinese character handwriting input 3.15: Mouse Double-click the Mouse icon on the Control Panel. The Mouse Properties window will display, set the mouse operating characteristics of PDT-1000W. In the "double-click" tab, user can set the double-click speed and distance; Only through a dedicated remote control program, mouse can run on PDT-1000W. Double-click the grid icon above at a speed and distance you feel appropriate, you can set the system identification standard of double-click speed and distance of mouse; by double-clicking the icon of the wedge plate below, you can test the suitability of the above settings. 3.16: Barcode Scan Settings Double-click the “bar code scan settings" icon in the control panel, the barcode scanning settings window will display, set the upload mode after scanning a barcode data. Select the "Automatically open bar code scanning” option, after starting PDT-1000W, you can scan a bar code by pressing the button. In case not select "Automatically open bar code scanning" option, the user need to call program control interface to open and close the scanning function. Please refer to Chapter 4 of this manual “application programming interface API” to learn more about related functions. Select “Send serial data (COM2 interface)” option, the PDT-1000W will send scanned data in ASCII mode to application program over COM2 port. The format of the serial communication: serial port COM2, baud rate 9600, 8 data bits, 1 stop bit, no parity Select “Send keyboard messages” option, the PDT-1000W will send scanned data to the application program in keyboard messages mode. 3.17: Networks and Dial-up Connections Double click "Network and Dial-up Connections" icon in the Control Panel, “Network and Dial-up connection” window will be displayed. You can set the network parameters of PDT-1000W. We pre-created GPRS connection settings file "My Connection" which saved GPRS network parameters of China Mobile. 3.18: System Double click the “System” icon in the Control Panel, "System Properties" window will be displayed. You can set the terminal system operating parameters. General tab: Terminal operating system version, the core processor specifications, memory capacity, and extension memory card information. Memory tab: Set the terminal physical memory allocation. Windows CE system uses physical memory as a virtual fixed storage space, so, physical memory is divided into two parts, one part for the regular application running of space, the other part for a virtual fixed storage space. This setting is used to adjust the two applications in proportion to the allocation of physical memory. 3.19: Displays Double-click "Display" icon In the Control Panel, the "Display Properties" window will display. This window contains "background", "look", "backlight" tab. Appearance tab: Settings window sizes and colors, and can set the desktop background image. Background light tab: To set automatically turn off the LCD backlight after a certain period of time without user action to save power consumption. 3.20: Dialing Double click the "Dialing" icon in the Control Panel, the "Dialing Properties” window will display. This window allows you to set and view some of the parameters PDT-1000W used to establish a modem dial-up connection, such as location, phone number information, as well as dial-up, call mode. If you are using a wireless dial-up to access network, please ignore this setting. 3.21: Certificate Double click the "Certificate" icon in the Control Panel, the “Certificate” window will display. You can view the certificate installed on PDT-1000W. Windows CE system maintains a trusted certification authority (CA) database. While try secure connection, Windows CE extract the root certificate from the certificate chain and check it in accordance with the Certificate Authority database. If you use your own stand-alone CA that issued the IIS server certificate, the root certificate does not appear in the WinCE.NET certificate authority database. Therefore, WinCE.NET will not trust this IIS server certificate. To use your own server certificate, you must certificate your stand-alone CA by a trusted certificate authority organization, or added your independent CA root certificate to the Windows CE certificate authority database. In the Certificate window, you can import a new certificate over file or by inserting a smart card, you can view the attribute information of the installed certificate, you can also delete the certificate. 3.22: Taskbar and Start Menu Under administrator mode, click the “System” icon on the taskbar to display the Start menu, select [Settings] - [Control Panel] - [Taskbar and Start Menu], Taskbar and Start Menu window is displayed. General tab: Set the system status bar features, whether it is displayed at the top of all applications; lose focus and auto-hide; whether to display the clock. Advanced tab: Clear whether the contents of the document menu; whether the control panel option in the Start menu expands to show.