1
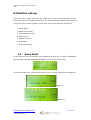
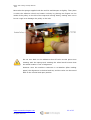
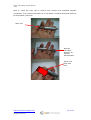
Matrix 300 Training & Setup Manual 2012 Matrix 300 Training & Setup Manual www.mcortechnologies.com All Rights Reserved. 1 of 67 Matrix 300 Training & Setup Manual 2012 1.Thank you Firstly from everybody in Mcor Technologies we would like to thank you for purchasing our 3D printer. We have worked tirelessly to design and build you a quality piece of precision machinery. This manual explains everything you need to know to operate your machine correctly to obtain maximum results. We hope you have years of satisfaction with our 3D printer and look forward to hearing from you via our forums and website. Signed: ………………………………………. Dr Conor MacCormack CEO Mcor Technologies Ltd www.mcortechnologies.com All Rights Reserved. 2 of 67 Matrix 300 Training & Setup Manual 2012 2.Content Table of Contents 1.Thank you................................................................................................2 2.Content...................................................................................................3 3.Introduction.............................................................................................5 3.1.Machine Components...........................................................................5 3.2.What Is the Matrix 300?.......................................................................8 3.3.So, how does it work?..........................................................................9 3.4.How do I get this 3D digital data?........................................................10 3.5.SliceIT..............................................................................................10 3.6.Minimum Requirements......................................................................10 3.7.Machine Location...............................................................................11 3.8.Toolkit..............................................................................................12 4.Powering up...........................................................................................13 4.1.Multifunction head restraint:...............................................................13 4.1.1.Removal sequence.......................................................................13 4.2.Paper Feed mechanism restraint:.........................................................14 4.3.Install the blade holder.......................................................................14 5.Initialisation...........................................................................................15 6.Machine set-up ......................................................................................17 6.1.Setup Build.......................................................................................17 6.2.Attach the first Sheet.........................................................................19 6.3.Clean Adhesive Wipe..........................................................................22 6.4.Knife Setup.......................................................................................24 6.5.Adhesive set-up.................................................................................32 6.6.Load Paper........................................................................................33 7.SliceIT...................................................................................................37 7.1.Installing SliceIT................................................................................37 7.2.Licensing Activation...........................................................................42 7.3.Setting up IP Address.........................................................................45 7.4.Setting Machine Type.........................................................................46 7.5.Setting Paper Type............................................................................48 7.6.Email Setting....................................................................................50 7.7.Setting up the PC Network Card..........................................................51 7.8.Connecting to the controller................................................................51 7.9.Running the software.........................................................................51 8.Computer Settings..................................................................................52 8.1.Power...............................................................................................52 8.2.Automatic Updates.............................................................................52 9.Part completion.......................................................................................53 10.Weeding the part...................................................................................54 11.Standby Mode.......................................................................................63 12.Operator Input Required.........................................................................64 13.Maintenance.........................................................................................65 13.1.Cleaning the Paper Feed Rollers.........................................................65 Trouble shooting........................................................................................67 www.mcortechnologies.com All Rights Reserved. 3 of 67 Matrix 300 Training & Setup Manual 2012 14.Quick Instructions for Machine Use..........................................................68 15.Quick Instructions for Machine Use..........................................................69 www.mcortechnologies.com All Rights Reserved. 4 of 67 Matrix 300 Training & Setup Manual 2012 3.Introduction 3.1. Machine Components Ensure when closing either door that your fingers are clear from any pinch points which could cause injury. www.mcortechnologies.com All Rights Reserved. 5 of 67 Matrix 300 Training & Setup Manual 2012 www.mcortechnologies.com All Rights Reserved. 6 of 67 Matrix 300 Training & Setup Manual 2012 www.mcortechnologies.com All Rights Reserved. 7 of 67 Matrix 300 Training & Setup Manual 2012 3.2. What Is the Matrix 300? The Matrix 300 is the worlds only paper based Laminated Object Manufacturing LOM machine that uses sheets of office paper to produce detailed, durable, low cost and eco-friendly parts. The consumables on your machine are A4/Letter paper, water soluble adhesive and cutting knife. The machine is connected to a standard PC at all times which sends the information to the 3D printer. The software on the PC which comes with the 3D printer is called SliceIT. SliceIT enables the manipulation of CAD data via the STL file format for the generation of data necessary for the Matrix 300. Once the model has been prepared within SliceIT, paper loaded, knife depth set and adhesive bottle filled, we are ready to make 3D objects by simply hitting print. When the build is finished the parts are removed from the waste by a process called “weeding”. Weeding times vary depending on the intricacy of the part. Keeping in mind how the part can be weeded is an important aspect of the Matrix 300 and needs to be considered before printing can begin. This is explained in more detail in the weeding chapter. When the parts have been weeded you will see that they are durable and can be finished in a number of ways such as spray painted, hardened, plated and cast. www.mcortechnologies.com All Rights Reserved. 8 of 67 Matrix 300 Training & Setup Manual 2012 3.3. So, how does it work? The Matrix 300 uses simple sheets of A4/Letter paper to build up the 3D object you desire. If your machine was purchased outside of the US you will be using A4. Otherwise you will be using US Letter paper. The software which controls the Matrix 300 is called SliceIT and it is this software that takes the digital 3D data that you want to make and slices it into layers equal to the thickness of the A4/Letter sheet, approx 0.1mm. Once SliceIT calculates the 2D profile on each of these newly created layers, it sends the information to the Matrix 300 to start building. The 2D profile is accomplished using our drag blade. The depth of the drag blade is accurately set and this ensures a perfect cut every time. The sequence within each layer for the machine is as follows: Deposit adhesive on the top layer Pull-in & place the next sheet Press against heat plate NO Cut 2D profile into the new top layer Is Part finished? YES Remove Finished Part As you can see in the flowchart above, once the 2D profile is cut the machine checks if its finished and if not it goes back and starts applying adhesive for the next layer. If the layer is the last layer in the model, the part is finished and the part can be removed. www.mcortechnologies.com All Rights Reserved. 9 of 67 Matrix 300 Training & Setup Manual 2012 3.4. How do I get this 3D digital data? There are numerous ways to generate your 3D data. You can use standard mainstream 3D CAD programs, online packages, downloaded designs and 3D scans of the actual physical object. All of the main stream packages available support the “stl” file format. Stl is short for Stereo-lithography Within the CAD program simply save the design as an STL and the program will generate the data automatically. 3.5. SliceIT The software package which controls the Matrix 300 is called SliceIT. There are help files in SliceIT to guide you through using the software, but here we will only outline the main steps. SliceIT is used to read in the STL file, position and manipulate the part, slice the model into layers and send the information to the 3D printer. There are 6 main steps needed to successfully send information to the Matrix 300 machine. These 6 main steps are as follows: 1. Create a project 2. Open and model – load the stl data 3. Manage the model – orientate, scale, copy, add planes etc. 4. Generate the layers 5. Save the Project – saves all the information from 1 to 4 6. Print in 3D – send the information to the Matrix 300 The help files within SliceIT will guide you through steps 1 to 6 above. www.mcortechnologies.com All Rights Reserved. 10 of 67 Matrix 300 Training & Setup Manual 2012 3.6. Minimum Requirements The following requirements are needed to run the machine correctly 1) Standard PC running Windows 2000, XP, Vista or Windows 7 2) Dedicated Ethernet card on the PC connected directly to printer at all times. Speed 10/100 or greater. 3) Cross over cable – supplied with machine 4) Temperature range (10 – 25 Deg C) 5) Relative Humidity range (30 – 70%) 6) Table capable of supporting 160Kg with lockable wheels. This facilitates the movement of the machine to provide access to the back for essential maintenance if necessary. 7) Suitable ceiling height to enable door to open fully. Typically sitting on a 800mm high table, 2.4m ceiling height 3.7. Machine Location As stated in point 6 in the minimum requirements, the machine should be located on a sturdy table capable of supporting the 160Kg mass of the machine. Ideally, the table should have lockable wheels which facilitate the movement of the machine to provide access to the back for essential maintenance if necessary. Sufficient space should be left at the font and paper feed side of the machine to allow both doors to open fully. Attention should also be paid to the ceiling height to enable the opening of the doors. Because there is a large amount of mass moving at high velocity within the machine, the momentum can cause the table to oscillate during normal operation. Once the wheels are locked, this oscillation should be minimal. Ensure that the location of the machine is situated to maintain the machine in the operational range as listed in points 4 and 5 in the minimum requirements. www.mcortechnologies.com All Rights Reserved. 11 of 67 Matrix 300 Training & Setup Manual 2012 3.8. Tool-kit Each machine is supplied with a tool-kit to help you with the day to day operation of the machine and carry out any routine maintenance procedures. The tool-kit items are shown below: 1 2 3 4 5 7 6 1. Blades 2. Mcor adhesive 3. Glue wheel cleaning sponge.(Dampen with warm water to use). 4. Lint free cloth.(Use with IPA to periodically clean the paper feed rollers). 5. Tweezers.(Used when weeding(removing waste / support material(. 6. 3mm Allen key.(Used to remove / install transport bracket). 7. Glue wheel / wipe cleaning tool.(Only use this tool to remove paper / glue from the glue wheel or wipe. Use of metal instruments can seriously damage the mechanism). www.mcortechnologies.com All Rights Reserved. 12 of 67 Matrix 300 Training & Setup Manual 2012 4.Powering up WARNING: Before the machine can be switched on and operated the transportation restraints have to be removed. There are two restraints, one for the multifunction head and one for the paper feed mechanism. 4.1. Multifunction head restraint: Open the front door and remove the bracket shown in the image below with a 3mm hex key wrench. Remove the Transportation Bracket From the Multifunction Head 4.1.1. Removal sequence Remove fasteners No1 & No2 Move by hand the multifunction head into the centre of the machine Then remove fastener No3 making sure not to drop the fastener into the machine. www.mcortechnologies.com All Rights Reserved. 13 of 67 Matrix 300 Training & Setup Manual 2012 4.2. Paper Feed mechanism restraint: Open the page door and remove the cable tie connecting the paper feed roller mechanism to the side of the paper tray. Paper Feed Cable tie removal Connect the power cord from the Matrix 300 to a standard wall outlet. Then connect the supplied Ethernet cross over cable between the matrix300 and the PC. 4.3. Install the blade holder Locate the knife holder and install into the multifunction head Note, if you need to move the machine please remove the blade holder and secure outside the machine to prevent the mechanism falling out and becoming damaged. www.mcortechnologies.com All Rights Reserved. 14 of 67 Matrix 300 Training & Setup Manual 2012 5.Initialisation Instructions are relayed to the operator via the LCD touch screen in the centre control panel. The control panel is shown below E Stop Reset Button LCD Display The ON/OFF switch is located at the rear of the machine. Before the machine is switched on close both doors. When the machine is switched on the following message will be displayed on the LCD screen At this point the machine checks if both doors have been closed, if they are the following message will be displayed on the LCD: The reset button is the blue button on the left hand side on the LCD screen. Once the reset button has been pressed, the machine will then perform an initialization routine which should take 1-2 minutes. www.mcortechnologies.com All Rights Reserved. 15 of 67 Matrix 300 Training & Setup Manual 2012 If you forget to close one or both of the doors, the machine will detect this and inform the operator to close whatever door is open, for this example the front door was left open when the machine was powered on, and the following message was displayed: Again, when the doors have been closed, the machine will request that the reset button be pressed and initialisation can take place. The system then “homes” all the axis, X, Y, Z Build and Z Paper Feed, parks the multifunction head in the XY home location and the Z build at the build height and finally seals the adhesive axis by rotation the adhesive wheel. From this point onwards the doors are locked. If the doors are forced open the build with stop and the job will be terminated. www.mcortechnologies.com All Rights Reserved. 16 of 67 Matrix 300 Training & Setup Manual 2012 6.Machine set-up There are seven steps that must be completed in order to start building a part. This guide will go through each step of the set-up process so that your part will come out of the machine perfect every time. The seven steps are as follows: 1. Setup Build 2. Attach First Sheet 3. Clean adhesive wipe 4. Knife set-up 5. Adhesive set-up 6. Load Paper 7. Run the software 6.1. Setup Build If the machine has not already been powered up then do so. After initialization the following message should be displayed on the touch screen LCD: At this point there are 3 options to choose from. The three options are as follows: Option 1: Option 2: www.mcortechnologies.com All Rights Reserved. 17 of 67 Matrix 300 Training & Setup Manual 2012 Option 3: Option 1: Enables the operator to gain access to the machine by turning off the interlocks on the front and paper feed side door. Option 2: Is used to set up the machine prior to each new build Option 3: Is used to set the machine into maintenance mode to conduct tests by the maintenance personnel. This option should not be selected unless instructed to do so. Because we are starting to make a new 3D model, we need to select option 2, so press the touch screen as below: You will then notice 3 things happening. Firstly the multifunction head moves to the centre of the front door for easy access. Then the build axis lowers down to its lowest position and finally the paper feed lowers to its lowest position to enable the loading of paper, at a later stage. Once the 3 actions have completed, the LCD will display the following: Do not press OK until the setup is complete! The doors can now be opened to allow access to the machine to attach the first sheet. www.mcortechnologies.com All Rights Reserved. 18 of 67 Matrix 300 Training & Setup Manual 2012 6.2. Attach the first Sheet Step 1: remove the build plate by loosening the knob on the front of the build plate. It is not necessary to completely unscrew this knob. Once loose, lift the front of the build plate and slide out the entire assembly. The Knob is not connected to the removable build plate therefore be careful not to completely unscrew as it could fall out and into the machine. www.mcortechnologies.com All Rights Reserved. 19 of 67 Matrix 300 Training & Setup Manual 2012 Step 2: Place the build plate on a level surface along with a single sheet of A4/Letter paper and a roll of 10mm wide masking take. Position the page in the centre of the green mat. Start at one corner and using a small length of masking tape, no longer than 50mm, tape down the corner. Then move over to the diagonal corner and do the same. Repeat this for the other two corners. Ensure that the sheet is flat when finished. Then 4 longer pieces, approximately 100mm long are attached along the centre of the top and bottom and left and right hand sides. Ensure that only 2mm of the A4/Letter page is covered along the edges. A4/Letter sheet Build plate Masking tape Tape down the corners Ensure that the tape isn’t too long as this could interfere with the fixed build plate underneath the removable build plate www.mcortechnologies.com All Rights Reserved. 20 of 67 Matrix 300 Training & Setup Manual 2012 100mm long pieces along the edges Step 3: Place the build plate back into the machine and secure with the locking knob on the front. www.mcortechnologies.com All Rights Reserved. 21 of 67 Matrix 300 Training & Setup Manual 2012 6.3. Clean Adhesive Wipe At the start of every build the adhesive wheel must be cleaned. The adhesive wheel is shown below and can be accessed by opening the front door. If the adhesive wheel is going to be cleaned using the provided sponge the wheel needs to be rotated therefore the adhesive system must be turned off. If only using the wheel cleaning implement, it is not necessary to shut off the adhesive valve. For this demonstration, please turn off the adhesive system now by turning the shut off valve on the side of the machine to the horizontal position Use the adhesive wheel cleaning implement that come with the Mcor Toolbox supplied with the machine to clean the adhesive wheel. The adhesive wheel cleaning tool has an aluminium body but a firm but flexible plastic tip that is strong enough to remove any excess adhesive build-up but delicate enough not to damage the wheel or the adhesive wipe above the wheel. Most of the excess adhesive is located at the top of the adhesive wheel where the adhesive wipe is. Do not place any metal objects between the wipe and the wheel as this will damage the mechanism www.mcortechnologies.com All Rights Reserved. 22 of 67 Matrix 300 Training & Setup Manual 2012 Next take the sponge supplied with the tool-kit and dampen it slightly. Then place it under the adhesive wheel and rotate it slowly by placing two fingers on the inside of the pulley on the left of the wipe and moving slowly, making sure not to be too rough as to damage the pulley or the belt. Do not turn back on the adhesive shut-off valve at this point since cleaning with the sponge and rotating the wheel would ensure that the wheel location is out of alignment. However once the machine continues to re-initialise (after loading paper) the alignment is checked and set, and the valve can be turned back to the vertical and open position www.mcortechnologies.com All Rights Reserved. 23 of 67 Matrix 300 Training & Setup Manual 2012 6.4. Knife Setup There a 3 different circumstances when the knife should be changed: If this is your first time using the machine there will be no blade in the blade holder The software tells you that the knife has exceeded its travel life and must be changed At the start of every build Note that the knife holder only allows for adjustment of the knife in one direction, out of the body of the knife holder, for this reason every time the knife depth has to be adjusted, we must first remove it from the knife holder. Here are the steps to removing the knife. Step 1: Take the blade holder out of the top head of the machine being careful not to put dust over the belt and shafts. Place your thumb on the top of the Knife holder as shown below and place your other fingers on the bottom of the Knife holder, this ensures that the knife holder does not fall out when it is been removed. Then lightly press your thumb to release the knife holder into your fingers. Push down with thumb Blade holder www.mcortechnologies.com All Rights Reserved. 24 of 67 Matrix 300 Training & Setup Manual 2012 Step 2: get an A4/Letter sheet and the blade holder Step 3: Fold the paper in half once, then twice so that our test piece is 4 layers thick. www.mcortechnologies.com All Rights Reserved. 25 of 67 Matrix 300 Training & Setup Manual 2012 Step 4: Screw out to the blade to it Max position by turning the threaded adjuster (shown on the right hand side in the figure below) in the clockwise direction until the blade protrudes to the maximum position. Then remove the blade completely. Turn Clockwise Blade www.mcortechnologies.com All Rights Reserved. 26 of 67 Matrix 300 Training & Setup Manual 2012 Step 5: Twist the nose cap to remove and unscrew the threaded adjuster completely. Then reinsert the blade (or a new blade if needed) and press down as far as possible until flush. Nose Cap Remove Threaded Adjuster by turning anticlockwise Insert until flush with here www.mcortechnologies.com All Rights Reserved. 27 of 67 Matrix 300 Training & Setup Manual 2012 Step 6: Replace nose cap making sure not to make contact with any part of the blade. Ensure that there is no gap between the nose cap and the body of the blade holder. Insert threaded adjuster by rotating clockwise. Ensure no gap Insert Threaded Adjuster, turn clockwise www.mcortechnologies.com All Rights Reserved. 28 of 67 Matrix 300 Training & Setup Manual 2012 Step 7: Place the blade holder onto the folded sheet and start rotating clockwise the threaded adjuster until the blade holder cuts just one page. This is done in small increments until one page is cut. Just one page cut www.mcortechnologies.com All Rights Reserved. 29 of 67 Matrix 300 Training & Setup Manual 2012 Step 8: Rotate the bezel so that any of the grooves on the bezel align with the single longitudinal groove in the threaded adjuster. Then the threaded adjuster is rotated in a clockwise direction to the next groove in the bezel and then just past the groove see second image below. Each division between bezel grooves represents 0.05mm. At this setting the blade completely cuts the top layer and scores the second layer underneath. Bezel Bezel groove Longitudinal groove Just past the groove www.mcortechnologies.com All Rights Reserved. 30 of 67 Matrix 300 Training & Setup Manual 2012 Top page cut Second page scored Step 9 Place blade holder back into the multifunction head www.mcortechnologies.com All Rights Reserved. 31 of 67 Matrix 300 Training & Setup Manual 2012 6.5. Adhesive set-up With reference to the image below, examine the “Low Level” indicator on the adhesive bottle to check for levels of adhesive. This “Low Level” indicator is a viewing glass. If the top level of the adhesive is visible through this viewing glass then adhesive needs to be added. The following steps are used to fill the adhesive bottle. Step 1: Open the adhesive bottle “Low Level” Indicator Step 2: Fill the bottle with Mcor Adhesive. Ensure that you do not over fill. In general, stop filling when the adhesive level reaches the neck of the bottle. Step 3: Put the lid back on and tighten. www.mcortechnologies.com All Rights Reserved. 32 of 67 Matrix 300 Training & Setup Manual 2012 6.6. Load Paper This machine currently only uses 80gsm A4 or 20lbs Letter paper. Before you begin making a part, check how much paper is in the paper tray. The amount of paper needed depends on the size of the part being built. A ream of paper is 50mm high so you can estimate the amount of paper based on the height of the part being made. 100mm equals two reams etc. It’s always safer to put in more paper than needed to prevent unplanned stoppages. The following techniques will improve the reliability of the paper feed mechanism. If possible always use the same grade and manufacturer of paper Ensure that the room where the paper is stored and where the machine is operated is maintained between the Relative Humidity (RH) range 2070%, and a temperature range 10-25°c. Never touch the paper feed rollers with your fingers as the oils from your hands can cause the coefficient of friction to change on the rollers. Clean the rollers at the first sign of slippage using IPA (Isopropyl alcohol) or IPA alcohol wipes. Do not add more than three reams of paper to the paper feed. The following steps should be taken every time new paper is added. Step 1: orientate the ream so that the wrapper seam is pointed upwards Step 2: If the wrapper has an arrow, ensure that it’s pointing upwards. This arrow indicates the orientation of the top side of the sheet that’s best suited to printing. Always load the paper with the orientation of the top sheets pointing upwards. www.mcortechnologies.com All Rights Reserved. 33 of 67 Matrix 300 Training & Setup Manual 2012 Step 3: Open the wrapper and remove the top 3 sheets. These sheets can contain dust from the production environment when packaged. (The same applies to the last 3 sheet, please remove and discard) Step 4: Remove sections of the ream approximately 20mm thick at a time. Do not try to load the entire 500 sheets of the ream in one operation. www.mcortechnologies.com All Rights Reserved. 34 of 67 Matrix 300 Training & Setup Manual 2012 Step 5: Fan the sheets along the front edge which is loaded into the paper tray first. While doing this ensure that you remember the orientation of the top surface of the sheets. Step 6: Load the paper into the paper tray. At this stage the doors can be closed and we continue the procedure with the touch screen LCD. The LCD screen with display the following: When you press OK, the machine then asks: www.mcortechnologies.com All Rights Reserved. 35 of 67 Matrix 300 Training & Setup Manual 2012 Note that from this point onwards, the software keeps track of the knife travel internally so that the calculation of when to change the blade is accurate. If you have inserted a new knife, select “YES” if you didn’t, select “NO”. If you select “YES” it will assume that knife has been changed and will reset the internal travel value to 0km, therefore do not say “YES” unless it has been changed. This only applies for a new blade and not when adjusting. The LCD then displays the following: Then you will need to press the reset button “R” The machine will then re-initialize and when complete the LCD will display: If you have cleaned the adhesive wheel, make sure that the shut-off valve is opened by rotating it to the vertical position. Now the machine is ready to accept data from the PC. www.mcortechnologies.com All Rights Reserved. 36 of 67 Matrix 300 Training & Setup Manual 2012 7.SliceIT 7.1. Installing SliceIT Place the CD that comes with the Matrix 300 into your computer CD drive and follow the on screen setup instructions shown below: Welcome Screen. Click Next to continue License Agreement: Click I Agree to continue www.mcortechnologies.com All Rights Reserved. 37 of 67 Matrix 300 Training & Setup Manual 2012 Choose Install Location: Click Next to use the default location. Click Install to continue www.mcortechnologies.com All Rights Reserved. 38 of 67 Matrix 300 Training & Setup Manual 2012 SliceIT being installed You will be asked to install a service related to licensing. It is essential to install this service the first time you are installing SliceIT. Click Yes in the dialogue and a separate installer will start to install the service. When that installer has finished click Finish and you will be returned to the primary Mcor installer. The Nalpeiron installer. www.mcortechnologies.com All Rights Reserved. 39 of 67 Matrix 300 Training & Setup Manual 2012 Software installed successfully. Click Finish to end and open SliceIT www.mcortechnologies.com All Rights Reserved. 40 of 67 Matrix 300 Training & Setup Manual 2012 NB on windows 7 operating system, when the SliceIT software is installed, the 3D view is blank and does not show the build environment. To fix this right click on the SliceIT icon and select properties then select compatibility and "disable Desktop composition" see image below. www.mcortechnologies.com All Rights Reserved. 41 of 67 Matrix 300 Training & Setup Manual 2012 7.2. Licensing Activation In Slice-IT there are two ways to activate the product: Internet activation or manual self-serve activation. Both methods require interaction with the License Manager utility which can be invoked from the Help menu. Internet activation is the simplest method and requires that the PC you are licensing the software on has an Internet connection. To activate this way: Click on the Internet Activation icon in the License Manager. Type or paste in the license key you received from Mcor Technologies. Press the Activate button. You should receive a message to say the product has been activated. At this point you are ready to use licensed functions in Slice-IT. Internet Activation www.mcortechnologies.com All Rights Reserved. 42 of 67 Matrix 300 Training & Setup Manual 2012 Manual self-serve activation requires a little more effort. You do not need an Internet connection on the machine connected to the Matrix printer, but you do need access to another PC with an Internet connection (This method is intended to be used in a situation where the PC connected to the Matrix printer has one network card and so precludes an Internet connection.) To activate with this method you must generate and import a certificate (which is a long sequence of digits) at the self-serve web-site (http://www.internetactivation.com). To do this: Click on the Import Certificate icon in the License Manager Copy the installation ID to the clip-board (there's a button to do this or select and use Ctrl-C) and transport it to the Internet connected PC using a standard USB memory stick or other transportable memory device. On the Internet connected PC visit the self-serve web-site and paste in the installation id. Also type or paste in the license key you received from Mcor Technologies. Press the Generate Certificate button A certificate should be available for you to copy. Paste the certificate into the Activation Certificate field of the License Manager Import Certificate screen back on the PC connected to the printer Click the Import Certificate button. Your product should now be activated and you are ready to use licensed functions in SliceIT. www.mcortechnologies.com All Rights Reserved. 43 of 67 Matrix 300 Training & Setup Manual 2012 Import Certificate Self-serve web-site www.mcortechnologies.com All Rights Reserved. 44 of 67 Matrix 300 Training & Setup Manual 2012 7.3. Setting up IP Address When SliceIT opens one of the first things we need to do is instruct the software to go out and look for the Matrix 300 printer. The IP Address on the Matrix 300 is set to the following: 10.10.10.11, therefore we need to instruct the SliceIT program to look for this. This is done by selecting the “Machine Interface” and then “Set IP Address”. See image below Select “Set IP Address” Enter the IP Address of the Matrix 300 printer: 10.10.10.11 Once complete we can then test the connections to the machine by selecting “Machine Interface” and then “Test Controller Connection”. If the connection was successfully then you should see the confirmation on the SliceIT console. www.mcortechnologies.com All Rights Reserved. 45 of 67 Matrix 300 Training & Setup Manual 2012 7.4. Setting Machine Type Next we need to verify the machine type. This is illustrated in the images below. Select Machine Type The default value should be “D”. Ensure that this is selected on all installations of SliceIT. www.mcortechnologies.com All Rights Reserved. 46 of 67 Matrix 300 Training & Setup Manual 2012 7.5. Setting Paper Type Next we need to set the paper type for the machine. Note that the machine is configured at the factory to run either A4 or Letter paper. The Slice-IT needs to be set up to the same paper configuration as the machine, then when the model is been printed Slice-IT tests to see if it configuration matches machines. The steps required are illustrated below. Select Preferences under the help menu Select Either A4 or Letter depending on machine configuration www.mcortechnologies.com All Rights Reserved. 47 of 67 Matrix 300 Training & Setup Manual 2012 7.6. Email Setting Slice-T also has the ability to send an email to the user to alert them to the status of the machine such as paper tray empty, or to any errors it may encounter. The figure below show how to set the email preferences. Note the user can select to receive email notifications on the following events (Build finished, user assist and machine error) The user enters there email address and selects which events they want to be notified on. Slice-IT also has the option to email the same information to Mcor Technologies this is done to improve field service support for the customer. Note that this feature requires the PC to have access to the internet. www.mcortechnologies.com All Rights Reserved. 48 of 67 Matrix 300 Training & Setup Manual 2012 7.7. Setting up the PC Network Card Finally we need to set the IP address on the network card on the PC that’s permanently connected to the Matrix 300 printer. Open up the network card TCP/IP 4 properties (the location varies depending on the operating system) and follow the illustration below and enter the same numbers exactly. Enter the IP address and Subnet mask 7.8. Connecting to the controller Now that the IP address has been entered into SliceIT and the computer network card, it is now possible to test the connection from the printer to the PC. To do this simply select “Test Controller Connection” under the “Machine Interface” drop down menu, the results are displayed on the Slice-IT console. www.mcortechnologies.com All Rights Reserved. 49 of 67 Matrix 300 Training & Setup Manual 2012 7.9. Running the software The SliceIT software has an extensive help menu and tutorials which will help you load an STL file, place it in the correct orientation and get the data ready for the Matrix 300 printer. Once the STL files have been processed then the data can be sent to the Matrix 300 printer to begin the build process. To ensure normal operation of the machine, the PC needs to be connected to the 3D printer at all times during the build operation 8.Computer Settings 8.1. Power Ensure that the power settings on the computer are modified to ensure that the hard drive never sleeps. If the hard drive goes asleep SliceIT will stop running and the printer will stop working. 8.2. Automatic Updates Ensure that updates are configured not to install automatically. It is possible to have the computer download the updates automatically but requires permission to install. www.mcortechnologies.com All Rights Reserved. 50 of 67 Matrix 300 Training & Setup Manual 2012 9.Part completion Once the part is complete the following message is displayed on the LCD screen. The operator then selects “next to remove” option by selecting the arrow on the right. When this is selected, the build axis lowers down to its lowest position to enable the removal of the build plate and the part thereon. The locking knob is loosened and the build plate removed with the part attached on top. At the end of each build it’s vitally important for the correct operation of the machine to leave it in the correct state. The following steps should be adhered to at the end of every build. NB: At the end of every build Once the part has been removed from the build plate, place a single sheet of A4/Letter paper in position as previously detailed Replace build plate is replaced into the machine. Failure to do so will result in serious damage to the machine Close down and restart SliceIT Close the doors, and follow the touch screen instructions on the Matrix 300 to ensue that the machine is in the “Standby mode” Never leave the machine powered off. www.mcortechnologies.com All Rights Reserved. 51 of 67 Matrix 300 Training & Setup Manual 2012 10. Weeding the part Once the part has been removed from the machine it must be weeded. This is the name given to the process of removing the excess paper from around the desired 3D object. The first thing to do is remove the masking tape from the build plate and separate the build from the build plate. The last layers will need 15 -30 minutes to fully cure depending on the room temperature and RH. Therefore if you remove the build immediately it would be advisable to start on the bottom of the build as this will be fully cured. It is very helpful to have the cad or STL file open of the printed part so that the locations of various geometries are known. It is also helpful to see where the cut planes are if they were used during the build setup in SliceIT. www.mcortechnologies.com All Rights Reserved. 52 of 67 Matrix 300 Training & Setup Manual 2012 At the start of the building process a number of layers are glued down without any cuts to act as a base for the model. This base is the first thing that needs to be removed. Setup layers There is a large outer border casing the part and keeping the build together. The next step is to remove this border. Once this is removed you can concentrate on the inner portion. www.mcortechnologies.com All Rights Reserved. 53 of 67 Matrix 300 Training & Setup Manual 2012 Next the outer waste can be removed by simply breaking the part Now that the outer waste material has been removed, the waste closer to the part is next. www.mcortechnologies.com All Rights Reserved. 54 of 67 Matrix 300 Training & Setup Manual 2012 www.mcortechnologies.com All Rights Reserved. 55 of 67 Matrix 300 Training & Setup Manual 2012 Individual layers can be removed using the supplied tweezers. Sometimes when a layer is removed, the page separates not at a boundary between two layers, but within the layer itself leaving a half layer. When this happens the layer left behind is not smooth. This is shown in the image below. Half Layer To get this smooth, use the tweezers to remove the half layer to expose the smooth part surface below. Removing Half Layer www.mcortechnologies.com All Rights Reserved. 56 of 67 Matrix 300 Training & Setup Manual 2012 To remove internal cavities, use the tweezers and press in one corner to get a grip on the first piece of waste. Then keep going to expose a hole within the waste. www.mcortechnologies.com All Rights Reserved. 57 of 67 Matrix 300 Training & Setup Manual 2012 Once the hole within the waste is created, use this to remove the remaining waste until the entire internal cavity is removed. www.mcortechnologies.com All Rights Reserved. 58 of 67 Matrix 300 Training & Setup Manual 2012 For small through holes, once the waste either side of the part is removed, simply use the tweezers to punch through and open up the hole feature. www.mcortechnologies.com All Rights Reserved. 59 of 67 Matrix 300 Training & Setup Manual 2012 If the part has very fine details, these will have to be orientated so that they are built perpendicular to the Z axis (build axis). In cases of very fine detail, remove the waste material by pulling in the same plane as the page, or perpendicular to the build axis. Fine Detail Remove in this direction www.mcortechnologies.com All Rights Reserved. 60 of 67 Matrix 300 Training & Setup Manual 2012 11. Standby Mode In order for the adhesive system to perform optimally, the machine should be either making a part or in “Standby” mode. The screen below shows the “Standby” mode which is displayed after power up, when a part is finished or if a part is terminated. If the machine is left in “Standby” mode for 24hrs it will automatically apply a coat of adhesive on the build area and load and press the page. Note that the machine will apply 2 pages at a time and then repeat every 24 hours, this process will repeat indefinitely as long as there is sufficient paper and adhesive in the machine. For example: 1 ream of paper in the machine (500 pages) will enable the machine to repeat this process for 250 days and prevent the adhesive lines from clogging and requiring a maintenance call. To exit “Standby” mode simple follow the on screen options to get to the desired state. Please note that if you are exiting the “Standby” mode to build a new part, the pages stuck to the build plate will first need to be removed. www.mcortechnologies.com All Rights Reserved. 61 of 67 Matrix 300 Training & Setup Manual 2012 12. Operator Input Required If for any reason the machine is not making a part or has not been left in the “Standby” mode, after 30 minutes the lights inside the machine will begin to flash to inform the operator that their input in required. The operator can follow the on screen instruction to either start making a part or place the machine into “Standby” mode. www.mcortechnologies.com All Rights Reserved. 62 of 67 Matrix 300 Training & Setup Manual 2012 13. Maintenance Over time the rollers on the paper feed mechanism require cleaning to remove paper dust and debris. 13.1. Cleaning the Paper Feed Rollers Step 1: If the machine is running, select the “PRESS OK TO PAUSE” option on the LCD screen as shown below. (If the machine is switched off, simply open the paper feed door and remove any paper that might be lodged between the roller and the separation pad) Step 2: scroll through the onscreen LCD options to “Load Paper” as shown below. This will cause the paper feed tray to lower to its lowest position to enable the greatest amount of space to facilitate the cleaning of the roller. If necessary remove some or all of the paper in the tray. www.mcortechnologies.com All Rights Reserved. 63 of 67 Matrix 300 Training & Setup Manual 2012 Step 3: Using IPA (isopropyl alcohol) on a lint free wipe, gently press the wipe into the surface of the roller. With your other hand rotate the roller shaft 5 complete revolutions. Do the same on both rollers making sure not to make contact with the rollers with your bare fingers. Roller Roller Shaft Separator Pad Paper Lint Free Wipes with IPA You can also pass the wipe between the roller and the separator pad as a single sheet to clean the surface of the separator pad. www.mcortechnologies.com All Rights Reserved. 64 of 67 Matrix 300 Training & Setup Manual 2012 Trouble shooting If there is a problem with the machine and it stops automatically or if there is an error message on the LCD, the first thing you will notice is that the lights inside the machine will start flashing to highlight to you that your input is needed. Follow the instructions on LCD screen which will guide you through what to do next. Message on screen Cause Solution Paper tray empty Paper Empty Access machine and load paper following the Paper tray empty Pages cant be separated loading paper instructions, continue build Although there is paper present, it thinks that its empty because it cant separate the top layers of paper. Access the machine and remove the top 3-5 Paper Jam Rollers Spring dirty or loaded plungers sticking. sheets and discard, continue build. A single page will be in location but has not travelled far enough during the feeding and therefore did not break the “one page present” sensor. Access the machine, remove and discard the page in question, clean the rollers as specified Paper Feed Error Adhesive applied but in the manual, continue build. If the machine has an error after the adhesive is Clear Feed, Place Page, page not placed applied but before the next sheet is applied, the Press OK when Done LCD display will instruct the operator to access the machine and place a sheet on the build which can be done by hand. The positioning of the manually placed page does not have to be critical but endeavour to get it aligned with the existing build location. If this error occurred longer than 3 minutes, then the adhesive layer on top will have cured and will not adhere to the manually placed sheet. Therefore in this circumstance, close the door and follow the on screen instructions on the LCD as if the new sheet was placed. The machine will then cut again over the top layer and apply a new layer of adhesive. Obviously this means that a layer has been missed in the build and could be noticeable when the part is removed, depending on Fill Adhesive Bottle Ran out of adhesive the geometry. The doors have been automatically released therefore simply open the paper feed door and top Change Knife. Blade life have been up the adhesive bottle as outlined in the manual The 7KM blade life has been reached and needs to Press OK When Done reached be replaced. www.mcortechnologies.com All Rights Reserved. 65 of 67 Matrix 300 Training & Setup Manual 2012 14. Quick Instructions for Machine Use (Do not operate this machine without first completing the training) 1. Do not power off the machine at any time 2. Restart the SliceIT software after each build is completed 3. When the part is complete, remove the build plate from the machine and peel off the masking tape to release the part. 4. Place a new page on the build plate and replace the build plate back into the machine 5. The machine CAN NOT be operated without the build plate in the machine. Failure to do so will result in damage to the machine 6. Clean the adhesive wheel before each build - (see user manual) 7. Make sure to turn on the adhesive valve before printing 8. When the blade is changed ensure the blade height is correctly set -(see user manual) 9. Check the blade depth after approximately the 1st kilometre of use (5 – 10mm of build height) 10. If the machine is not building a part please leave the machine in Standby Mode by following the LCD instructions ensuring that the build plate is in the machine and a clean sheet is taped down. www.mcortechnologies.com All Rights Reserved. 66 of 67 Matrix 300 Training & Setup Manual 2012 15. Quick Instructions for Machine Use (Do not operate this machine without first completing the training) 1. Do not power off the machine at any time 2. Restart the SliceIT software after each build is completed 3. When the part is complete, remove the build plate from the machine and peel off the masking tape to release the part. 4. Place a new page on the build plate and replace the build plate back into the machine Cut Here 5. The machine CAN NOT be operated without the build plate in the machine. Failure to do so will result in damage to the machine 6. Clean the adhesive wheel before each build - (see user manual) 7. Make sure to turn on the adhesive valve before printing 8. When the blade is changed ensure the blade height is correctly set -(see user manual) 9. Check the blade depth after approximately the 1st kilometre of use (5 – 10mm of build height) 10. If the machine is not building a part please leave the machine in Standby Mode by following the LCD instructions ensuring that the build plate is in the machine and there is a clean sheet taped down. www.mcortechnologies.com All Rights Reserved. 67 of 67