1
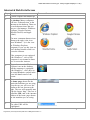
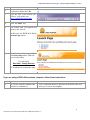
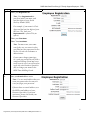
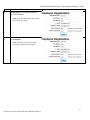
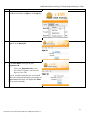
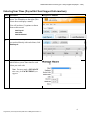
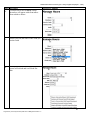
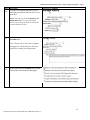
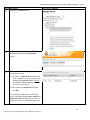
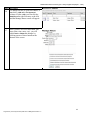
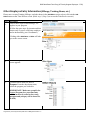
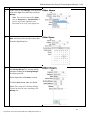
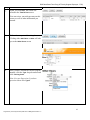
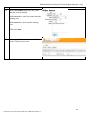
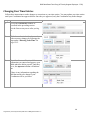
RISE Web Portal Time Entry (UT Family Support Professional - FSP)
My Registration ID:
My Password:
My Program #:
RISE Web Portal
Time Entry
Utah Family Services
Family Support Professional (FSP) Employee
FSP User Guide
August 2012 (UT Family Services) RISE Time & Billing Web Portal v.1.0
RISE Web Portal Time Entry (UT Family Support Professional - FSP)
Table of Contents
Introduction & Guidelines..................................................................................................................................... 1
Internet & Web Portal Access............................................................................................................................... 2
From a Local Computer
From a RISE Office Computer
Employee Registration .......................................................................................................................................... 4
Employee Web Portal Access & Sign-in .............................................................................................................. 7
Entering Your Time (Payroll & Client Support Information) .............................................................................. 9
Payroll
Client Support Information
Other Employee Entry Information .................................................................................................................... 15
Mileage
Training Hours
Vacation
(Use only if you are a full-time employee and approved to do so by your Supervisor.)
Sick
(Use only if you are a full-time employee and approved to do so by your Supervisor.)
Reviewing Your Time Entries ............................................................................................................................ 19
Changing Your Time Entries .............................................................................................................................. 20
Notes ................................................................................................................................................................... 21
August 2012 (UT Family Services) RISE Time & Billing Web Portal v.1.0
RISE Web Portal Time Entry (UT Family Support Professional - FSP)
Introduction & Guidelines
Utah Family Support Employees:
Welcome to the RISE Web Portal. Your accurate and timely entry of information into the Web Portal fulfills
several essential purposes. It ensures that you are paid correctly for the time you work. In addition, it provides
the documentation that RISE has delivered the days/hours (units) of service which they contracted to provide
for people in RISE services.
Effective immediately, enter your time worked using the RISE Web Portal. You
may use your own home computer, one in the public library, etc., and/or use a RISE
office computer in a RISE office nearest you.
Every employee must first register in the RISE Web Portal
before making time entries.
Registration is a one-time process.
We recommend that you make daily entries of your hours worked into the RISE Web
Portal. However, we recognize that you may not have access to a computer every
day, so the minimum time entry requirements are:
Two times per week, and on the 15th and last days of each month
o Before 11:59PM on Wednesday and Sunday nights
o Before 11:59PM on the 15th and last days of each month
Make use of the Notes section as instructed by your Coordinator/Director.
See instructions for time entries for Mileage and Training hours.
(Make entries for Vacation and Sick hours only if you are a full-time employee and approved
to do so by your Supervisor.)
Follow the instructions listed in this training packet.
Check with your Coordinator, Director, and/or Resource Specialist if you have questions or need help. Your
Supervisor is responsible for checking and approving your time entries and communicating with you about the
system.
1
August 2012 (UT Family Services) RISE Time & Billing Web Portal v. 1.0
RISE Web Portal Time Entry (UT Family Support Employee - FSP)
Internet & Web Portal Access
Step
Procedure
1.
Turn the computer and monitor on.
The screen that comes up is called
the desktop. Many computers
will have a shortcut icon to the
internet on the desktop. There are
several shortcut icons that you
may see (for instance, Windows
Explorer, Google Chrome,
Mozilla Firefox, and Apple
Safari).
2.
Screen or Comment
The most common shortcut icon
shown to the right is the icon
from Windows 7 (it is the icon
for Windows Explorer
program). If you see this icon on
your desktop, double-click it to
access the internet.
3.
4.
5.
If the computer is not equipped
with Windows 7, refer to the
computer’s user manual to learn
how to access the internet.
If you do not see the Windows
Explorer icon on the desktop
and the computer is equipped
with Windows 7, click once on
the round Windows symbol in the
lower left-hand corner of the
screen.
The screen that comes up is called
the home page chosen for the
particular machine you are using.
Near the top you will see a line
similar to the one shown to the
right. The text will normally start
with the letters “http.” This text is
called the URL and is the internet
address of the home page chosen
for the machine you are using.
Place your cursor inside the text.
The entire URL will be
highlighted.
2
August 2012 (UT Family Services) RISE Time & Billing Web Portal v.1.0
RISE Web Portal Time Entry (UT Family Support Employee - FSP)
Step
Procedure
7.
Press the Del (Delete) key on the
keyboard to delete the URL.
Type the URL of the website you
want to visit: in this case,
http://risebilling.riseinc.net/
8.
Press the Enter key.
9.
The website URL you typed in will
open on the screen.
6.
Screen or Comment
In this case, the RISE Web Portal
Launch Page opens.
Attn: In the near future, you will see
this Launch Page where Utah will
have two divisions.
You will select
Rise Utah – Family Services
Everything else remains the same.
If you are using a RISE office winterm computer, follow these instructions
Step
Procedure
1.
Be sure the winterm computer and
monitor are switched on.
Screen or Comment
Your Coordinator/Resource Specialist at the RISE office will
assist you to access the computer.
3
August 2012 (UT Family Services) RISE Time & Billing Web Portal v.1.0
RISE Web Portal Time Entry (UT Family Support Employee - FSP)
Employee Registration
Step
Procedure
1.
Each employee must register in the
system.
2.
To Register, click the Access tab and
then scroll down to Registration;
Screen or Comment
This is a one-time process and will usually be
completed at a RISE office during employee
Pre-Service.
click Registration.
The Employee Registration page
appears. (See next page.)
4
August 2012 (UT Family Services) RISE Time & Billing Web Portal v.1.0
RISE Web Portal Time Entry (UT Family Support Employee - FSP)
Step
Procedure
3.
Enter your Registration ID
Screen or Comment
Note: Your Registration ID is
your first initial, last name, and
last four digits of your Social
Security Number (SSN).
For example, if your name is Chris
Jones and the last four digits of your
SSN are 1234, then your
Registration ID is cjones1234 (no
spaces)
Enter your First Name.
Enter Your Last Name.
Note: You must enter your name
exactly the way you wrote it when
you filled out your paperwork in PreService. Do not use nicknames or
abbreviations.
If your name changes (marriage,
etc.), and you provide Payroll with a
completed Change Form and a new
social security card, you will need to
work with your Resource Specialist
(RS) to change your name in the
RISE Time & Billing Portal.
4.
Enter your E-mail address twice.
Note: Use an e-mail address that you
want your password to be sent to in
case you forget your password.
If do not have an e-mail address, use
the RISE e-mail address of your
Resource Specialist. If you need
assistance, please check with your
Resource Specialist.
5
August 2012 (UT Family Services) RISE Time & Billing Web Portal v.1.0
RISE Web Portal Time Entry (UT Family Support Employee - FSP)
Step
5.
Procedure
Screen or Comment
Set Password: by creating a password
you will remember.
Note: Your password must be at least
four characters long.
6.
Click Register.
Note: You will receive notice that
you have registered successfully.
6
August 2012 (UT Family Services) RISE Time & Billing Web Portal v.1.0
RISE Web Portal Time Entry (UT Family Support Employee - FSP)
Employee Web Portal Access & Sign-In
Step
1.
Procedure
To log in to Web Portal, type the
following URL in your web browser:
Screen or Comment
http://risebilling.riseinc.net/
The RISE Web Portal Launch Page
appears.
Double-click Rise Utah.
Attn: In the near future, you will see this
Launch Page where Utah will have two
divisions.
You will select
Rise Utah – Family Services
Everything else remains the same.
2.
The Utah home page appears.
7
August 2012 (UT Family Services) RISE Time & Billing Web Portal v.1.0
RISE Web Portal Time Entry (UT Family Support Employee - FSP)
Step Procedure
Screen or Comment
3.
Click the Access tab in upper left of screen
and then scroll down to Sign In; click Sign In.
4.
Once you are on the Sign In screen, make sure
Type: is set to Employee.
5.
In the User Name field, type in your
Registration ID.
Note: your Registration ID is your
first initial, last name, and last four
digits of your SSN.
Type in your Password (the one you created
when you registered) and place your cursor on
Sign In button and click (or depress the Enter
key on your keyboard).
8
August 2012 (UT Family Services) RISE Time & Billing Web Portal v.1.0
RISE Web Portal Time Entry (UT Family Support Employee - FSP)
Entering Your Time (Payroll & Client Support Information)
Step Procedure
Once you sign in, the Time Review screen
1.
opens. See illustration to the right. (This
screen does not display a name.)
Screen or Comment
You will see three (3) options to choose
from on this screen:
Add Payroll
Add Other
Add Residential
2.
To make a time entry that documents hours
you worked directly with each client, click
Add Payroll.
3.
This opens the Manage Hours screen,
which allows you to enter time for each
client you work with.
Note: You must make a SEPARATE
time entry for EACH PERSON you
support.
9
August 2012 (UT Family Services) RISE Time & Billing Web Portal v.1.0
RISE Web Portal Time Entry (UT Family Support Employee - FSP)
Step Procedure
Click the arrow next to Client. A drop4.
down box will appear with client names
from which to choose.
5.
6.
Screen or Comment
Select (click on) the name of the client you
worked with.
After you click on the client’s name, the
screen will refresh and it will look like
this.
10
August 2012 (UT Family Services) RISE Time & Billing Web Portal v.1.0
RISE Web Portal Time Entry (UT Family Support Employee - FSP)
Step Procedure
Next, click the arrow on the Service Code:
7.
box to select the correct Service Code:
8.
Screen or Comment
Click the arrow next to
Service Date:
This will open a calendar and you will
select the date you worked
with this client to make your time entry.
9.
Ignore the Auth: field.
Note: The Auth: shows that the client has a
current authorization for service in place
and the units (or hours of service) the
client is eligible to receive. It will decrease
with each service time entry.)
04/19/201
2
11
August 2012 (UT Family Services) RISE Time & Billing Web Portal v.1.0
RISE Web Portal Time Entry (UT Family Support Employee - FSP)
Step Procedure
You have two options that allow you to
10.
enter the start and end time of service you
provided.
Screen or Comment
Note: You can type in your Check In: and
Check Out: times, or you can use the
arrows to scroll up or down to select the
correct times of service.
11.
Enter your daily documentations in
the Notes: box.
Note: Please refer to the client’s Support
Strategies for clarification on what you
should be working on/writing about.
12.
In the section below the Notes: box, please
click all the outcome boxes that apply.
12
August 2012 (UT Family Services) RISE Time & Billing Web Portal v.1.0
RISE Web Portal Time Entry (UT Family Support Employee - FSP)
Step Procedure
Then click the Save button.
13.
14.
After you click Save, the screen view will
refresh and return to the Time Review
screen.
15.
Please notice the first two fields midway
down on the screen.
Screen or Comment
1) The first is an Item ID number that refers
to the “transaction” you just made. (For
example, this Item ID number is 97711.)
The number changes/updates each time
you review your entries.
2) The second is an Approved field that
says NO.
You can edit your past time entries until
your Coordinator changes NO to YES under
Approved. (YES indicates that your time is
approved and can be submitted to payroll.)
13
August 2012 (UT Family Services) RISE Time & Billing Web Portal v.1.0
RISE Web Portal Time Entry (UT Family Support Employee - FSP)
Step Procedure
To change/edit one of your time entries, it
16.
must have a NO under the Approved
column. If it has a NO, you can click the
Item ID number (the first entry to the left)
and the Manage Hours screen will appear.
17.
Screen or Comment
After you have reviewed and edited your
entry (date, time, notes, etc.), you will
either Save or Delete the changes by
clicking on one of those buttons at the
bottom of the screen.
14
August 2012 (UT Family Services) RISE Time & Billing Web Portal v.1.0
RISE Web Portal Time Entry (UT Family Support Employee - FSP)
Other Employee Entry Information (Mileage, Training Hours, etc.)
Please note: to enter Training, Mileage, and other hours in the Add Other section, select (click on) the Add
Other button on the Time Review screen. (Refer to p. 9, Step 1) to access the Time Review screen.)
Step Procedure
Follow these steps to enter mileage, if it
1.
applies in your program.
Screen or Comment
(Follow the same steps for Vacation and Sick
entries only if you are a full-time employee
and as instructed by your Coordinator.)
Clicking either Add Other or Other will take
you to the correct screen.
2.
After clicking Add Other or Other, this
screen appears.
3.
Click the arrow in the box next to
Program: From the drop-down menu,
select the program you worked in.
(IMPORTANT: Make sure you pick the
correct Program # or your time entry
will be incorrectly coded to the wrong
program and your pay will be incorrect,
as well.)
15
August 2012 (UT Family Services) RISE Time & Billing Web Portal v.1.0
RISE Web Portal Time Entry (UT Family Support Employee - FSP)
Step Procedure
Screen or Comment
In this case, to enter Mileage, click the arrow
4.
next to the Type: box and select (click on)
Mileage.
Note: You can also enter other Types,
such as Sick hours or Vacation hours if
you are a full-time employee and
instructed to do so by your Supervisor.
5.
Select (click on) the arrow by the Service
Date: and select (click on) the correct date
from the drop-down box.
6.
Enter your beginning odometer reading in
the Starting Mileage: box and the ending
odometer reading in the Ending Mileage:
box from your trip.
Write trip details in the Notes: section.
Click the Save button when you finish.
Note: The system will calculate mileage.
You do not need to enter anything in the
Mileage box.
16
August 2012 (UT Family Services) RISE Time & Billing Web Portal v.1.0
RISE Web Portal Time Entry (UT Family Support Employee - FSP)
Step Procedure
When you click Save, the screen will
7.
refresh to the Time Review screen.
You can review your mileage entry on this
screen, as well as other information you
entered.
8.
Screen or Comment
Rise
Follow these steps to add training hours.
Clicking either Add Other or Other will take
you to the Other Hours screen.
9.
After you have entered the correct Program
number, click the Type: drop-down box and
click Training hours.
Note: See your Supervisor if you have
questions about other Types.
17
August 2012 (UT Family Services) RISE Time & Billing Web Portal v.1.0
RISE Web Portal Time Entry (UT Family Support Employee - FSP)
Step Procedure
10.
In the Service Date drop-down box, enter
the date of your training.
Screen or Comment
In the Hours box, enter how many hours the
training was.
In the Notes box, enter what the training
was.
Then click Save.
11.
After you click Save, the screen will refresh
to the Time Review screen.
18
August 2012 (UT Family Services) RISE Time & Billing Web Portal v.1.0
RISE Web Portal Time Entry (UT Family Support Employee - FSP)
Reviewing Your Time Entries
Follow these steps to review the time entries you have made.
Step
1.
Procedure
Sign in using the above Sign In
steps.
2.
Click the Employee tab.
3.
From the drop-down list under the
Employee tab, click the Time Review
button.
4.
Review the list of the shifts and times
you have entered.
Screen or Comment
See the next section for information
on changing or correcting your time
(or other) entries.
19
August 2012 (UT Family Services) RISE Time & Billing Web Portal v.1.0
RISE Web Portal Time Entry (UT Family Support Employee - FSP)
Changing Your Time Entries
Follow these instructions to make changes or corrections to your time entries. You may update your time entries
until your Coordinator has approved them. Once they are approved, only the Coordinator may make changes.
Step
1.
Procedure
Access the Time Review window as
described in the preceding section.
Screen or Comment
It is the first screen you see after you log
in.
2.
Click the number in the ID column and
make necessary changes by following the
steps under “Entering Your Time” on
page 12-13.
3.
Your Coordinator will review all the
information you entered and approve your
shifts and times before payroll. Until they
do so, the Approved column will indicate
No.
If there is any information regarding the
shift that needs to be changed, your
Coordinator will let you know.
20
August 2012 (UT Family Services) RISE Time & Billing Web Portal v.1.0
RISE Web Portal Time Entry (UT Family Support Employee - FSP)
Notes
21
August 2012 (UT Family Services) RISE Time & Billing Web Portal v.1.0


![Hockey Canada Registry User Manual [Complete]](http://vs1.manualzilla.com/store/data/006861334_1-f3aefff99f86c1666505c30ddd463ccc-150x150.png)