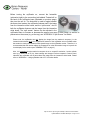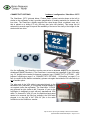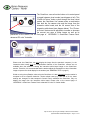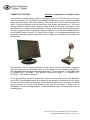
1
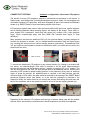
Vision Resource Centre - North Tips and Tricks: Improving Accessibility to Electronic Board Notes for Students with Visual Impairments by Brenda Bentz and Niels Nicolajsen Newton School, 5523 - 122 Avenue NW Edmonton, Alberta, Canada T5W 1S3 Telephone: 780-472-4470 Fax: 780-478-7037 Email: [email protected] Web: vision.alberta.ca TABLE OF CONTENTS: PREAMBLE: background / information …………………………………………………… page 2 GENERAL TIPS: traditional / standard / best practices ………………………………… page 3 SPECIAL NOTICE: precautions / generalizations ……………………………………… page 4 CONNECTIVITY OPTIONS: hardware / configuration / classroom LCD projector …… page 5 CONNECTIVITY OPTIONS: hardware / configuration / VGA splitter ………………… page 6 CONNECTIVITY OPTIONS: hardware / configuration / myReader CCTV …………… page 8 CONNECTIVITY OPTIONS: hardware / configuration / ClearView+ CCTV ………… page 10 CONNECTIVITY OPTIONS: hardware / configuration / SceneEye monitor ………… page 12 CONNECTIVITY OPTIONS: software / configuration / overview ……………………… page 13 CONNECTIVITY OPTIONS: non-exhaustive list for software solutions ……………… page 14 GENERAL TIPS: software solutions to interactive whiteboards ……………………… page 14 ……………………………………………………………………………………………………………… APPENDIX 1: Using myReader with a PC ……………………………………………… page 15 APPENDIX 2: Split Screen ………………………………………………………………… page 20 APPENDIX 3: ClearView+ Feature Pack: advanced PC units ………………………… page 22 APPENDIX 4: On-Screen Display Menu – SceneEye Monitor Inputs ………………… page 25 APPENDIX 5: Software Comparison Chart ……………………………………………… page 27 Tips and Tricks: Improving Accessibility to Electronic Board Notes… by Brenda Bentz and Niels Nicolajsen – Page 1 of 31 PREAMBLE: background / introduction Students with low vision face significant barriers to note-taking in the classroom. There is a great deal of variance in what a student who is referred to as having “low vision” is capable of visual performing. Many students with low vision – who are quite capable of near visual tasks – do not have sufficient distance-viewing abilities to see board notes even from the front row. Some students with low vision are quite technologically-savvy, and as such may already use a notebook computer (a.k.a. ‘laptop’), whereas others may be too young or are very reluctant to use any device, even a CCTV (‘closed-circuit television viewer’, an electronic magnification tool of varying designs that includes a view screen with a document camera and adjustable image). This reluctance usually stems from a desire to ‘blend in’ with peers and go unnoticed as having a visual impairment. Many classrooms today are equipped with technology that succeeds the traditional white board / chalk board as a teaching tool. Whether these new teaching tools are fully-interactive white boards (such as a SMART Board, Promethean, or other similar), or the teacher is simply projecting his/her board notes via computer with an LCD projector onto a screen, both are created and displayed to students electronically. As such, the digital image is able to be replicated and displayed on an alternate viewing screen for the student who has low vision; when students with low vision are provided with near viewing access, they manage quite well both visually and academically. That being said, the onus of differentiating instruction falls to the teacher, and despite a duplicate image being available to the student who is visually impaired, the teacher may need to make further accommodations. This handout contains suggestions for the classroom teacher to improve the visual quality of the digital image for better clarity, which benefits all students, not just the one with low vision. In addition to these teaching tips, connectivity options to provide the digital image to the student with a visual impairment are also included in this handout (which describes several configuration techniques that can be used to provide students with low vision the access to electronic board notes). This document is written as part of a project that was funded by Alberta Education to research issues related to the access of electronic board notes for students with low vision. We hope you find it useful and/or beneficial. Best regards, - Brenda Bentz [email protected] - Niels Nicolajsen [email protected] Tips and Tricks: Improving Accessibility to Electronic Board Notes… by Brenda Bentz and Niels Nicolajsen – Page 2 of 31 GENERAL TIPS: traditional / standard / best practices - The teacher should… verbalize as he/she presents visual information: whether the teacher is using a chalkboard, overhead projector, whiteboard, or LCD projector, having the teacher read what is presented will reinforce those in the audience with multipleintelligences; also, verbally describing diagrams is beneficial - The teacher should… call on students by name, including those with low vision (so that the student will know when he/she is being called upon, as well as who the other speakers are in the room) - The teacher should… enlarge font size as necessary and as per what is most appropriate for individual students; this may require a coordinated effort with the student’s Teacher of the Visually Impaired (TVI) who has assessed his/her optimal print size for reading fluency. Font changes may include selecting ones without serifs (i.e. tails and sloops) – such as switching to Verdana (which has increased letter spacing) as opposed to Times New Roman. - The teacher should… select the best contrast for the board note presentation; black-onwhite or white-on-black may be optimal for the student, unless the student’s visual diagnosis includes colour deficits (then refer to the TVI’s assessment of best contrast colours to use) - The teacher should… consider where the student is optimally positioned in the classroom, and use preferential seating as needed; this may include checking the angle to the front board for glare or other obstructions, or considering access to electrical plugins - The teacher should… consider changing the resolution on his/her own computer: the lower the resolution, the larger the image appears (e.g. from 1280×800 down to 800×600), and the teacher may need to experiment to find the optimal setting; these changes are made in the “Control Panel – Display” settings menu. Please note: some devices (e.g. a “myReader”) that the student may be using to view a duplicate image of the teacher’s view screen may require the teacher’s computer to not only be set to a certain resolution (e.g. 800×600), but also that the hertz (Hz) and refresh rate need to also match (see “APPENDIX 1: Using myReader with a PC”) - The teacher should… consider changing the DPI (dots per inch) settings: increasing the DPI setting to 120% (in the “Control Panel – Display” menu); this could improve the size of objects and text on the student’s view screen enough for him/her to see the information better without distorting the image too dramatically on the teacher’s screen. Tips and Tricks: Improving Accessibility to Electronic Board Notes… by Brenda Bentz and Niels Nicolajsen – Page 3 of 31 SPECIAL NOTICE: precautions / generalizations 1. In the scenario where the same visual image is being split from the teacher’s computer to the LCD projector (SMART Board, etc.) at the front of the class, and to a student’s CCTV, please note that the student is only able to enlarge a live image under the camera (or also enlarge a scanned and saved image when using a “MyReader”); these devices are not able to adjust the size or contrast of the image on his/her screen when the image is fed from the teacher’s computer; the teacher must adjust the image (see “GENERAL TIPS” on page 3) to improve visuals for the student on his/her monitor 2. There are different viewing options for students with low vision when it comes to viewing the split visual image from the teacher’s computer. In general, the following is recommended: a. Grades K-6 (with a SMART Board, etc.): a direct cable connection from the teacher’s computer to an alternate monitor (or CCTV) for the student to view (see Special Notice 1 above) b. Grades 6-12+ (again, with a SMART Board, etc.): student usage of a laptop with Ethernet/Internet connectivity to view the teacher’s Desktop image via software (either wirelessly or via CAT-5 cable connection) It should be noted that for (b) above, the student needs to be “laptop-savvy” and able to troubleshoot technological difficulties as they arise, and the school environment needs to be conducive to supporting such a connectivity option. Also, the comfort level of the classroom teacher with technology has a tremendous and direct bearing on the success of this connectivity option. Tips and Tricks: Improving Accessibility to Electronic Board Notes… by Brenda Bentz and Niels Nicolajsen – Page 4 of 31 CONNECTIVITY OPTIONS: hardware / configuration / classroom LCD projector The benefit of having LCD projection systems in educational environments is well known. In Alberta today, most classrooms (including Kindergarten through to Grade 12) are equipped with multimedia computer LCD projectors, with some integrated as part of an interactive whiteboard system (e.g. SMART Board) or as a stand-alone projector with screen. LCD projectors typically have various video (and some with audio) input ports, and the projector can be switched between which incoming signal it will display on the screen. These video ‘in’ ports include RCA (“composite” round plug with centre pin), multiple VGA (“video graphics array,” 25-pin computer-type plug), and even HDMI (flat, includes audio signal, in “high definition”). Many projectors also have an additional VGA ‘out’ port (pictured below), originally designed to connect one projector to another – as in a multiple-screen presentation from one video source (e.g. showing the same movie on various screens around a gymnasium). This additional VGA ‘out’ port could be used instead to connect an additional monitor, one which can be used by the student with low vision. VGA ‘out’ ports To connect the classroom LCD projector to any external monitor (for viewing by a student with low vision), an extended-length VGA cable is required to be the direct cable-connection between the projector and the student’s monitor – possibly in excess of 35’ (or 10+ metres). The one end is plugged into the VGA ‘out’ port and the other to the additional monitor, with the cord extending to the student’s optimal seating position in the classroom (likely near an electrical outlet to power the monitor). No additional setup is required; in the ideal situation and with sufficient length of VGA cable, the cable would be recessed in the housing of the SMART Board gooseneck projector mount (see below), or in the case the projectors is mounted in the classroom ceiling, the cable would be run through the various drop-ceiling tiles and down the back of the classroom wall to the student’s monitor to be out of the way (tripping hazard, etc.). Plug into the VGA ‘out’ Feed cable into arm Pull cable end at base Feed cable behind screen Pull cable from bottom Depending on the school’s LCD projector and the type of monitor being used with the student with low vision, the resolution rate and monitor refresh frequencies may need to be adjusted. Tips and Tricks: Improving Accessibility to Electronic Board Notes… by Brenda Bentz and Niels Nicolajsen – Page 5 of 31 CONNECTIVITY OPTIONS: hardware / configuration / VGA splitter A VGA amplification-splitter device allows for multiple video-signal receivers (i.e. monitors, projectors) without degradation of the video image. The amplification-splitter boosts the video signal so the image on the various monitors and/or projectors does not appear grainy. One common method of connectivity used in schools where a SMART Board or similar has been installed is to use a two-way splitter box, where the one VGA ‘in’ coming from the teacher’s computer tower is split into two ‘outs’, one running to the teacher’s monitor, the other along a longer VGA cable up to the projector (ceiling-mounted or wall-mount-with-gooseneck-arm) for the interactive whiteboard (SMART, etc.). For the purpose of introducing an additional monitor for use by the student who is visually impaired, a three-way splitter is required. When a SMART Board (or other) is initially installed, purchasing and equipping the system with a three-way splitter at that time would not cost much more than a two-way splitter (as explained above). However, most systems are already in place when this student arrives in the classroom. Therefore, the purchase of one (1) additional threeway amplification-splitter would be required – the third VGA ‘out’ running to the student’s monitor – and this splitter could follow the student as he/she progresses from one grade to the next. Please note: for students in multiple classrooms during the same school year, either additional three-way splitters need to be provided in each room along with additional monitors, or a software solution may need to be explored (see section on “CONNECTIVITY OPTIONS: software”) Three-way amplification-splitters may be purchased at many local electronics stores; most school boards have a preferred vendor with special pricing for these common electronic accessories, and may cost less than $200 (approximate). In the scenario where a teacher’s computer workstation is already connected to an LCD projector (SMART, etc.), swapping out the existing two-way splitter for a three-way only requires unplugging each VGA cable (one at a time is recommended) and reconnecting each to the new splitter. Once each VGA cable is swapped out and the new three-way splitter is plugged into an electrical outlet, the teacher’s monitor and LCD projector should work as before; the student’s additional monitor with extended-length VGA cable may now be attached. Occasionally, the model of the previous two-way splitter may have one specialized cable running from the VGA ‘in’ to the teacher’s computer tower; this cable may have one end with “female” pins, and the other with “male” (as opposed to homogenous ends as most VGA cables have). In the event that the new three-way splitter does not use the same specialized cable, an additional cable may need to be used, or a “gender-changer” VGA adapter or one style or the other may be necessary (see pictures below); these are also available from local electronics stores (e.g. Memory Express). VGA male to male gender changer VGA female to female gender changer Tips and Tricks: Improving Accessibility to Electronic Board Notes… by Brenda Bentz and Niels Nicolajsen – Page 6 of 31 Displayed below is one example of how the configuration may appear for a three-way splitter with multiple monitors, one of which is for the student with low vision. The diagram of the Kramer “VP-300K” amplification-splitter shows the device with three VGA ‘out’ ports and one VGA ‘in’ port. The VGA signal from the teacher’s computer tower is split 3-ways, with one signal going to the teacher’s monitor, a second to the LCD projector, and the third to whichever model of monitor the student with low vision is using. OUT TEACHER’S MONITOR IN OUT OUT STUDENT’S TEACHER’S CPU TOWER MONITOR (CCTV OR OTHER) LCD PROJECTOR (TO SMART BOARD OR OTHER) In this diagram example, the student is using a CCTV device (referenced previously as the myReader). The student could use other models of CCTV, as long as his/her specific model has a “monitor in” or “VGA in” port, and is enabled to allow split-screen. Please note: the two major models of CCTV – the myReader and the ClearView+ – that are available for loan to schools (for registered students with diagnosed low vision) from the Learning Resources Centre are both capable of split-screen with a “monitor in” or “VGA in” port (see the next section on “CONNECTIVITY OPTIONS: myReader” and “APPENDIX 1: Using myReader with a PC”, or the section on “CONNECTIVITY OPTIONS: ClearView+” and “APPENDIX 3: ClearView+ Feature Pack: advanced PC units”) Aside from the student with low vision using a CCTV, he/she could use a standard monitor that is likely available within the school. For optimal screen size, the student should be assessed by a TVI; as well, the classroom teacher would still need to follow the suggestions in the section on “GENERAL TIPS” (page 3). Of course, any style of monitors as well as the CCTV option would require the student to be optimally positioned in the classroom near an electrical outlet (as running extension cords are both a tripping and an electrical-fire hazard). There are also some models of portable (light-weight) battery-operated monitors available. Some have enough battery power to last an entire school day, recharge overnight, and be ready for the next day’s use – thus eliminating some of the cable and/or electrical outlet issues in the classroom. A drawback to portable monitors is screen size – and of course, the smaller the screen, the harder it is for students with low vision to see the information. A rechargeable monitor is not essential in the three-way splitter configuration, and a standard monitor requiring an electrical outlet will work just as well for most students, and may be more economical than a costly portable monitor. Tips and Tricks: Improving Accessibility to Electronic Board Notes… by Brenda Bentz and Niels Nicolajsen – Page 7 of 31 CONNECTIVITY OPTIONS: hardware / configuration / myReader CCTV The myReader CCTV provides magnification for students with low vision. The myReader (pictured below) is unique (in the line of CCTV products) in that it has the ability to capture or scan several pages of text (up to 13 pages) for later viewing / reading, and can manipulate each page’s text into line, column or word viewing. myReader folded down for transport myReader unfolded and in use To use the myReader monitor as an alternate display for the interactive whiteboard (SMART Board etc.), the myReader is connected via a standard 15-pin VGA cable (e.g. 35’ length) to the teacher’s classroom computer (see “CONNECTIVITY OPTIONS: ...LCD projector” beginning on page 5, or “CONNECTIVITY OPTIONS: ...VGA splitter” on page 6-7 on how to connect to the teacher workstation); please note that wireless VGA connectivity is not a feasible option. The other end of the VGA cable is connected to the backside of the myReader. This will require the use of a female-to-female VGA gender-changer adapter (pictured below; described at the bottom of page 6); the myReader “Computer In” port (pictured at right) was designed to work with the proprietary 3’ cable provided by Humanware, not with a standard-end (35’ length or other) VGA cable, the type that one would likely use to connect to an interactive whiteboard. The gender-changer adapter requires connecting the mounting nuts (utilizing a flat/slotted screwdriver) before attaching the VGA cable. Finally, the footswitch is also required… “Footswitch” jack Tips and Tricks: Improving Accessibility to Electronic Board Notes… by Brenda Bentz and Niels Nicolajsen – Page 8 of 31 Before turning the myReader on, connect the footswitch (pictured at right) to the connection jack labeled “Footswitch” on the back of the myReader base (illustrated on previous page), then turn the unit on. The footswitch is used to toggle between the three visual modes: the myReader features menu; the image from the interactive white board; and the “split screen” view of both the myReader features and the image from the interactive white board. The “split screen” feature can be adjusted in the myReader Menu to increase or decrease the amount one sees of either image, as well as its placement on the screen (e.g. at the top); see “APPENDIX 2: Split Screen” for details. Please note: the myReader can only display the image from the teacher’s computer (i.e. the interactive white board) as is; the magnification features of the myReader are not available when the student is viewing the interactive white board image on the myReader monitor. Therefore, it is recommended that the teacher adjust the Powerpoint or other information image to improve the visual display for the student (see “GENERAL TIPS” on page 3). Also, it is imperative that the teacher’s computer is set to a specific resolution / monitor refresh rates (e.g. 1024×768 at 75 Hz); these settings are changed via that computer’s Control Panel, otherwise the myReader will not auto-detect the image from the interactive white board. Please refer to “APPENDIX 1: Using myReader with a PC” for further details. Tips and Tricks: Improving Accessibility to Electronic Board Notes… by Brenda Bentz and Niels Nicolajsen – Page 9 of 31 CONNECTIVITY OPTIONS: hardware / configuration / ClearView+ CCTV The ClearView+ CCTV (pictured below; “Feature Pack” optional controls shown at the left) is similar to the myReader in that it provides magnification of reading materials for students with low vision. The ClearView+ digitally magnifies the visual image (book, worksheet, map, etc.) that is placed on a sliding X-Y tray (this tray also locks into position). This image can be enhanced in several ways to improve the readability of the text or the clarity of the image for the student with low vision. Like the myReader, the ClearView+ monitor can act as an alternate display for the interactive whiteboard (SMART Board etc.). The ClearView+ is connected via a standard 15-pin VGA cable (e.g. 35’ length) to the teacher’s classroom computer (see “CONNECTIVITY OPTIONS: ...LCD projector” beginning on page 5, or “CONNECTIVITY OPTIONS: ...VGA splitter” on page 6-7 on how to connect to the teacher workstation); please note again that wireless VGA connectivity is not a feasible option. The other end of the VGA cable is connected directly to the backside of the ClearView+; a VGA gender-changer adapter is not required (unlike the myReader). The ClearView+ “VGA IN” port (pictured at right; similar to the “Computer In” port on the myReader) is designed to work with any standard-end VGA cable. To access the “VGA IN” port, the dark-blue back panel needs to be removed (by lifting up vertically); the VGA cable plugged in to the right of the “VGA IN” port is the cable connection to the ClearView+ monitor. Tips and Tricks: Improving Accessibility to Electronic Board Notes… by Brenda Bentz and Niels Nicolajsen – Page 10 of 31 The ClearView+ uses a function button on its control panel to toggle between visual modes (see diagram at left). This “Picture-in-Picture” button cycles through the three visual modes: the ClearView+ live camera mode; a combination from both the live camera view and the image from the interactive white board; and the full screen view of the interactive white board (see diagram below). The “Picturein-Picture” feature can be adjusted to increase or decrease the amount one sees of either image, as well as its placement on the screen; see the first page of “APPENDIX 3: ClearView+ Feature Pack: advanced PC units” for details. Please note: the ClearView+ can only display the image from the teacher’s computer (i.e. the interactive white board) as is; the magnification features of the ClearView+ camera are not available when the student is viewing the interactive white board image on the ClearView+ monitor. Therefore, it is recommended that the teacher adjust the Powerpoint or other information image to improve the visual display for the student (see “GENERAL TIPS” on page 3). Similar to using the myReader, when using the ClearView+ it is also imperative that the teacher’s computer is set to a specific resolution / monitor refresh rates (e.g. 1024×768 at 75 Hz); these settings are changed via that computer’s Control Panel, otherwise the ClearView+ may not display the image from the interactive white board. Please refer to the second page of “APPENDIX 3: ClearView+ Feature Pack: advanced PC units” for further details. Tips and Tricks: Improving Accessibility to Electronic Board Notes… by Brenda Bentz and Niels Nicolajsen – Page 11 of 31 CONNECTIVITY OPTIONS: hardware / configuration / SceneEye monitor The SceneEye (pictured below at right) is a portable version of a CCTV that also serves as a room-viewer device. The SceneEye is an adjustable-image camera (with an optional portable battery-powered monitor, also pictured below). This device can be used to view documents up close, or objects at distance (such as board notes, wall posters, the teacher, etc.). The image from the SceneEye camera can be displayed either through its VGA port, its RCA port, or via the USB port on a computer with its proprietary software. In this respect, the SceneEye can also be used to view board notes (regardless if using a chalkboard, or an interactive whiteboard such as the SMART Board). However, it is limited to line-of-sight – if not aimed straight ahead at the front board, the image appears trapezoidal, and the image can be blocked by the teacher as he/she writes. The SceneEye LCD 12” monitor (optional purchase) can be used for dual function: displaying either the image from the SceneEye camera, or the image from the interactive whiteboard – thus eliminating the line-of-sight issues described above. To be connected via VGA cable, refer to “CONNECTIVITY OPTIONS: ...LCD projector” beginning on page 5, or “CONNECTIVITY OPTIONS: ...VGA splitter” on page 6-7. To use the SceneEye monitor for dual function, one would connect its monitor to the SceneEye via the RCA (round-headed) cable, and connect to the interactive whiteboard via VGA cable. The user can then switch back and forth, using either the small remote control that is included with the monitor, or via the menu buttons on the front of the monitor – please refer to “APPENDIX 4: On-Screen Display Menu – SceneEye Monitor Inputs” for further instructions on switching inputs. Tips and Tricks: Improving Accessibility to Electronic Board Notes… by Brenda Bentz and Niels Nicolajsen – Page 12 of 31 CONNECTIVITY OPTIONS: software / configuration / overview There are software solutions to display the visual image from the interactive whiteboard on a student’s computer (desktop or notebook/laptop); however, both the teacher’s computer station and the student’s must have Internet access. This can be accomplished by connecting one or both computers to the school’s Ethernet port (with a CAT-5 / CAT-5e Ethernet cable), OR by connecting one or both of the computers to the school’s wireless network. In either event, both options must have Internet connection. As noted previously, the software connectivity option for the interactive whiteboard works best when the student is “laptop-savvy” (a knowledgeable user of computers) and is able to troubleshoot technological difficulties as they arise. It has also been noted that technological comfort level of the classroom teacher has a tremendous bearing on the success of this connectivity option. Some software solutions that enable the viewing of the teacher’s presentation on the student’s computer are PC-based – that is, they only work on a Windows operating system (OS). Other software can be cross-platform – meaning that they work on both a PC-based and an Apple Mac OS. Almost all software solutions require a request for school district IT personnel to assist with connecting the laptop of a student with low vision to view the image from the teacher’s computer. A wide rage of options exists in respect to the cost of software solutions. Some programs can be downloaded free from the Internet, while other programs can cost in the hundreds of dollars. Some can be purchased as single units, while other programs may be leased on a month-tomonth basis. Leasing software licenses is often a less expensive option than purchasing a licensed program outright. Some school districts may also have purchased and have used connectivity software for other school purposes (such as companion software for videoconferencing); this would need to be explored at the onset of any specific setup for a student with low vision. Preliminary data (from the 2009-2010 school year of “Access to Electronic Board Notes Project”, funded by Alberta Education) strongly suggests that the greatest hurdle to the setup of any software program used to address connectivity is related to the availability of IT personnel – not the individual school’s specific OS platform or the cost of the software. Virtually every schoolowned computer (laptop or otherwise) has restrictions in terms of what software can (or cannot) be installed; more than likely little-to-no installation rights rest with the user and ‘Administrative Passwords’ are needed (likely residing with the IT personnel assigned to that school). Enumerated on the next page is a non-exhaustive list of software solutions that are able to transmit the visual image from the teacher’s computer image to the student’s computer via the Internet. Note that a simple reference chart (outlining benefits vs. drawbacks) of some of these software programs is available in “APPENDIX 5: Software Comparison Chart”: Tips and Tricks: Improving Accessibility to Electronic Board Notes… by Brenda Bentz and Niels Nicolajsen – Page 13 of 31 CONNECTIVITY SOFTWARE: • • • • • • • • • Accessible·Event Radmin Real·VNC Screen·Stream SMART·Bridgit SMART·Sync Team·Viewer Tight·VNC Ultra·VNC GENERAL TIPS: non-exhaustive list for software solutions http://www.serotek.com/accessible-event-sr http://www.radmin.com/products/radmin/ http://www.realvnc.com/ http://www.nchsoftware.com/screen/ http://www.smarttech.com/bridgit http://www.smarttech.com/sync http://www.teamviewer.com/ http://www.tightvnc.com/ http://www.uvnc.com/ software solutions to interactive whiteboards - A reminder to teachers to launch the program (i.e. turn it on) before beginning the class lecture (and check with student that it is working after he/she has launched the reciprocal program) - Internet connectivity is required (either wireless, or direct Ethernet-cable connection), and must be in working order (i.e. no network down-time) - Some software options also work within a school’s network (intranet) without needing access outside the firewall (to the World Wide Web Internet) – which generally means faster connectivity - Teachers and students should have a contingency (backup) plan, in the event that: (a) the teacher workstation is unresponsive; (b) the student computer is non-functional (e.g. dead battery, no plug-in, power adapter at home, etc.); or (c) network / Internet is down - Although technology is an excellent solution, one simple contingency (backup) plan would be for the student to utilize a low-tech piece of equipment such as a monocular telescope (see pictures below) 4× static-focus monocular 6× adjustablefocus monocular Tips and Tricks: Improving Accessibility to Electronic Board Notes… by Brenda Bentz and Niels Nicolajsen – Page 14 of 31 APPENDIX 1: Using myReader with a PC Excerpt taken from “myReader2 User Guide” by Humanware Tips and Tricks: Improving Accessibility to Electronic Board Notes… by Brenda Bentz and Niels Nicolajsen – Page 15 of 31 Using myReader with a PC If you connect myReader to a PC, you can use the same screen to view what is on myReader's platter and on the PC, either by switching from one to the other, or with a split-screen display. To connect myReader to a PC: 1. Connect the PC’s VGA video output to the connector labeled “Computer In” on the back of myReader’s head with the VGA video cable that came with myReader. 2. Connect the footswitch that came with myReader to the connector labeled “Footswitch” on the back of myReader’s base. Each press of the footswitch moves the display on screen to: myReader's platter the PC screen a split-screen display showing both. an external camera, if one is connected - refer to page 65. The split-screen display settings can be adjusted in the menu. See Split Screen, on page 47. When displaying the full screen PC picture, myReader's lights are not needed and can be automatically switched off after a time. 62 PC Compatibility PC operation will only work if your PC operates in a video graphic mode that is compatible with myReader. Compatible video modes include: 640 x 480 at 60 or 75 Hertz 800 x 600 at 60 or 75 Hertz 1024 x 768 at 60 or 75 Hertz. If you change your PC's video mode, allow at least five seconds for myReader to detect and adapt to the new mode. While this is happening, myReader will display the message "Auto detection", and when synchronized it will automatically go back to the previous full screen or split-screen setting. If the new video mode is not compatible with myReader, the message "Incompatible mode" is displayed along with information about the video mode. If the PC is switched off or disconnected, the message "No Signal" is displayed. 63 Changing the video mode The method of changing your PC's video mode depends on your model of PC and the version of Windows you are using. 1. With Windows XP, select Start, then Control Panel. With earlier versions of Windows, select Start, Settings, then Control Panel. 2. Double click on the Display item to bring up the Display Properties box. 3. Select the Settings tab. 4. The resolution can be set in a box labelled "Screen Resolution" or "Screen Size". If the screen resolution setting is not set to one of the modes listed above, drag the slider to set the resolution to one of these modes. 5. Click on the Advanced button. 6. The tab you need next depends on the PC and might be called "Monitor". Check this tab and if necessary the other tabs until you find the "Screen refresh rate" setting. 7. Set the screen refresh rate to 75Hz. 8. Before disconnecting your PC's normal display and connecting the myReader, use the display's controls to check the PC's video mode. Most displays have 4 buttons and the left-hand button brings up an on-screen menu. The middle two buttons normally allow you to scroll through the menu items and the right-hand button allows you to select an item. 64 9. Select the item that displays the PC's settings. This depends on your model of display and may be called something like "Information" or "Viewmeter". If your changes don't appear to have taken effect, try restarting the PC and checking the settings again. myReader to an External Connecting Camera You can connect an external video camera, such as a blackboard camera, to myReader. Plug the camera's video cable into the socket labeled "Video In" on the rear panel of myReader. When myReader is switched on it automatically checks for the presence of an external camera signal. Connect the footswitch that came with myReader to the connector labeled “Footswitch” on the back of myReader’s base. By using the footswitch, you can cycle between the external and internal cameras. This is useful, for example, if you are using a blackboard camera and also writing notes, or following a text book. If a PC is also connected, it is included in the display cycle - refer to page 62. The socket labeled “Remote Camera In” on the rear panel of myReader, is provided for future expansion. 65 APPENDIX 2: Split Screen Excerpt taken from “myReader2 User Guide” by Humanware Tips and Tricks: Improving Accessibility to Electronic Board Notes… by Brenda Bentz and Niels Nicolajsen – Page 20 of 31 Split Screen To display this menu, select Main Menu>Settings>Split Screen. Use this menu when you have a PC connected to myReader. See Connecting to External Devices, on page 60. Split Screen Back Ratio 50/50 PC Display Top Lights Off 1min Back takes you back to the Settings Menu. Ratio lets you set the ratio between the PC part of the display and the myReader camera part of the display. PC Display is used to specify which part of the display the PC picture is displayed on. The options are Top or Bottom (with a horizontal split) or Left and Right (with a vertical split). The default is Top. Lights Off sets the time delay between full screen PC display or external camera display being selected and myReader's lights going off. The default is 1 minute. "On" can be selected to disable this feature. 47 APPENDIX 3: ClearView+ Feature Pack: advanced PC units Excerpt taken from “ClearView+ User manual” by Optelec Tieman Group Tips and Tricks: Improving Accessibility to Electronic Board Notes… by Brenda Bentz and Niels Nicolajsen – Page 22 of 31 Optelec Optelec 6 ClearView+ User Manual ClearView+ User Manual Feature Pack: advanced PC units This advanced Feature Pack is required for optimum operation of the advanced PC unit. Semi colours Pressing this button cycles you through 8 different foreground and background colour combinations. You may choose to display text in a pair of selectable colours when more contrast is needed or when alternate colour combinations provide better visibility. Note: This button will not work when the photo mode is activated. It is only effective in one of the reading modes. Pointer (position locator) Pressing this button will switch on an indicator light, that is displayed on the reading table. This light is located in the centre on the reading table and indicates where the middle of the onscreen image is located. Place a pen on in the indicator light on the reading table and you will see the pen displayed in the centre of the image on your screen. Switch between internal camera and PC / external source If a PC or other external Optelec source is connected to the ClearView+, press this button to toggle between the internal camera image, Picture-in-Picture (internal camera image as a window in the PC image) or a full screen PC image. Positioning of lines/windows & Picture in Picture When line markers, window or the Picture-in-Picture are activated, turning this knob will change the position of the line markers / window / Picture-in-Picture on the screen. Positioning can either be done horizontally or vertically depending on the horizontal/vertical button . English Page 10 of 15 Page 11 of 16 Optelec Optelec User Manual ClearView+ ClearView+ User Manual 11 Specifications of the ClearView+ Focus Magnification Dimensions footprint Base unit Power supply Net frequency : Auto-focus with focus lock : 2,5 X – 60 X depending on monitor size. : 44 x 50 cm : 110 - 240 Volt AC. – 12 Volt / 8.3A max. : 50 - 60 Hz The ClearView+ PC version supports: Resolution 640 x 480 800 x 600 1024 x 768 1280 x 1024 Monitor frequency 60 – 75 Hz 60 – 75 Hz 60 – 75 Hz 60 Hz Operating conditions Temperature Humidity : +5°C to +35°C : < 70%, no condensation Storage & transport conditions Temperature : -10°C to 40°C Humidity : < 95 %, no condensation Date of issue: January 2005 Optelec Rockanje, The Netherlands. January 2005 Page 15 of 15 English Page 16 of 16 APPENDIX 4: On-Screen Display Menu – SceneEye Monitor Inputs Tips and Tricks: Improving Accessibility to Electronic Board Notes… by Brenda Bentz and Niels Nicolajsen – Page 25 of 31 On-Screen Display Menu – SceneEye Monitor Inputs If the display has inadvertently been switched from VGA input to RCA input (or vice versa) and one wishes to restore this (but the small remote control is misplaced), use the on-screen menu buttons on either side of the Power button to change the settings. To use the on-screen menu buttons to change back to the other input, follow these steps: 1. Press Menu 2. Press Up (to be in the MISC menu; its icon = a gear) 3. Press Menu (to enter) 4. Press Up (to select Signal Source) 5. Press Menu (to enter) 6. Press Up or Down (to select VGA or RCA) 7. Press Menu (to confirm; it should exit the menus and reset) OSD Language H. Position V. Position OSD Timer OSD Blending Zoom ÙÚ Position MENU Exit If the on-screen menu has been switched to Chinese – perhaps the unit has been reset to factory defaults – to change the on-screen menu back to English, follow these steps: 1. Press Menu 2. Press Up × 2 to be in the OSD menu (pictured above; its icon = a smiley face) 3. Press Menu × 2 (to enter the Language submenu) 4. Press Up or Down (to select English) 5. Press Menu (to confirm) 6. Press Auto × 2 (to exit out of all the menus) Created April 2010 by Niels Nicolajsen BEd, MEd Educational Consultant for the Visually Impaired APPENDIX 5: Software Comparison Chart Tips and Tricks: Improving Accessibility to Electronic Board Notes… by Brenda Bentz and Niels Nicolajsen – Page 27 of 31 APPENDIX 5: Software Comparison Chart Software: OS Accessible Event PC only* Radmin PC only Comments: Cost: Starting at $30/month USD Benefits: - Student can view* with an iPad, Internet-phone, MacBook, PCWindows laptop… using any web browser - renders all text as accessible; any text-to-speech (TTS) program (JAWS, WindowsEyes, etc.) can read aloud the text, as well as with a braille display (if the TTS program is capable of braille) - for low vision users, all pictures are uploaded to the webpage as well - also can be used with the Deaf as it incorporates the ability to transcribe the speaker’s words onto the webpage Drawbacks: - teacher workstation* must be a PC (Windows OS) - the web-page text rendering has difficulty displaying ‘fancy’ PowerPoint presentations that use ‘fly-in’ text (or other fancy text animations) URL: www.serotek.com Cost: Free 30-day trial; $49 USD (for each ‘lifetime’ license) Benefits: - view the teacher's computer screen on the student monitor either as a window or full screen - purported (by the company) that Radmin "outperforms all other remote PC access software in speed, usability and features" in real time Drawbacks: - in an early trial for the Access to Board Notes project, the program seemed “sluggish” in real time, with too much delay/lag-time - both teacher workstation and student computer must be a PC (Windows OS) - primarily designed as a remote IT personnel tool to perform as remote PC access URL: www.radmin.com Tips and Tricks: Improving Accessibility to Electronic Board Notes… by Brenda Bentz and Niels Nicolajsen – Page 28 of 31 APPENDIX 5: Software Comparison Chart Software: OS Comments: Cost: RealVNC Viewer PC Mac Unix Screen Stream PC only* Free version (limited OS options); $30 USD (personal use only); $50 USD (for each commercial license) Benefits: - can be installed on both Mac and/or PC computers - following initial setup/installation, to use VNC Viewer the teacher only needs to launch the program (mouse click, etc.); all settings are saved - also installed on student computer; student also launches the program and selects which teacher session to view - can also be viewed by the student on Unix computers, Mac, PC, or even iPad/iPhone Drawbacks: - requires IT personnel to install on both teacher and student computers, and requires initial setup of each session with access permissions set up URL: www.realvnc.com Cost: Free! Benefits: - only requires installation on teacher station! - following initial setup/installation, to use Screen Stream the teacher only needs to launch the program (mouse click, etc.); all settings are saved - student can view* with an iPad, Internet-phone, MacBook, PCWindows laptop… using any web browser - Very little lag-time (i.e. fast response time), especially if the student is connected to the Internet via the same internal school connection as the teacher Drawbacks: - requires IT personnel to install on teacher computer, and requires initial setup of each session with access permissions set up (e.g. port may need to be opened) - for the student to access through the web browser, the URL (uniform resource locator – i.e. the web address) is the IP (Internet protocol) address of the teacher’s computer (assigned by the school network) plus the port number; in some schools, this IP address can change from day-to-day. o Screen Stream itself can reveal what URL and port to which it is broadcasting (e.g. “http://172.28.32.144:89”, where “:89” is the port and the previous string is the teacher computer’s IP address) URL: www.nchsoftware.com Tips and Tricks: Improving Accessibility to Electronic Board Notes… by Brenda Bentz and Niels Nicolajsen – Page 29 of 31 APPENDIX 5: Software Comparison Chart Software: OS Comments: $2,300+/- CDN (for 5 user licenses, plus Cost: Bridgit Server Software) Benefits: - there is no installation required on either the teacher or students computers [aside from the initial setup of the Bridgit server]. Therefore, IT personnel are not needed at the school level – the self-executable ‘bridgit.exe’ file can run without actually installing on either computer - works on both Mac and/or PC computers SMART Bridgit PC Mac Drawbacks: - unless the Bridgit server is housed internally within the school or school district, there can be significant lag-time (several seconds to catch up to the current teacher slide); this can also slow down the teacher’s computer efficiency - each session (e.g. Block 4 Math class) requires the teacher to login to the Bridgit server and create a user session (passwordpreferred); it then requires the student to also login to the Bridgit server to view that session. - each user should remember to logout, or one ‘license’ is still in use (can potentially tie up all licenses) URL: www.smarttech.com/bridgit Cost: $850+/- CDN (teacher license + unlimited students) Benefits: - 30-day trial is available - works well to transmit the teacher’s computer screen onto the student’s; also works the other way around (for the teacher to view the student; can also lock out the student from being off-task on his/her computer SMART Sync (formerly branded SynchronEyes) Drawbacks: PC Mac - as it has more “bells and whistles” than Bridgit, it would likely require additional professional development sessions for the various classroom teachers to learn this program (especially for the less-than-techno-savvy teachers) - this software is designed for one teacher in a multimedia classroom, where all students use computers - each teacher license is expensive – although it can run with multiple students, for a student with low vision (e.g. in Junior High with multiple teachers) it would be better if the program worked with multiple teachers and only one student URL: www.smarttech.com/sync Tips and Tricks: Improving Accessibility to Electronic Board Notes… by Brenda Bentz and Niels Nicolajsen – Page 30 of 31 APPENDIX 5: Software Comparison Chart Software: OS Comments: Cost: Free (for personal, non-commercial use); $659 CDN (for commercial use) Benefits: Team Viewer PC Mac Linux iPad - although it can function as an IT personnel tool to perform remote PC access, it also works well for virtual office meetings, sharing desktops - it has a mobile app for Android or iPhone Drawbacks: - in an early trial for the Access to Board Notes project, the program seemed “sluggish” in real time, with too much delay/lag-time - requires setup on both teacher / student computers to use URL: www.teamviewer.com Cost: Free! Benefits: - in an initial trial during the Access to Board Notes project, UltraVNC ran faster than Radmin (very promising) UltraVNC Drawbacks: - designed primarily as an IT tool to take over a computer from a remote distance to diagnose or install (not as a viewing tool alone – not appropriate for the purposes of connecting a student with low vision) URL: Cost: Windows NetMeeting www.uvnc.com Free! Benefits: - included in the OS of Windows NT and XP - installs by entering “conf” in the Run option in the Start Menu - simple and easy to use PC only (XP) Drawbacks: - likely requires IT personnel to run the initial setup - both computers need to run the software, and the IP address of one or both machines is needed to connect - no longer included in Windows Vista or Windows 7 o newer software options in Windows 7 may work for connectivity regarding student with low vision – such as “Windows Meeting Space” and/or “Office Communications Online” (replacing NetMeeting) URL: www.microsoft.com Tips and Tricks: Improving Accessibility to Electronic Board Notes… by Brenda Bentz and Niels Nicolajsen – Page 31 of 31