1
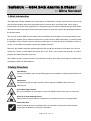
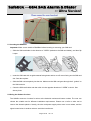
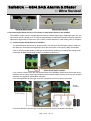
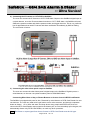
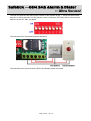
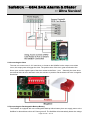
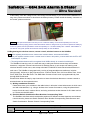
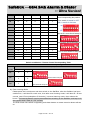
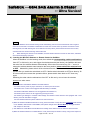
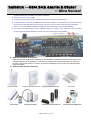
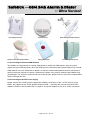
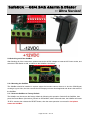
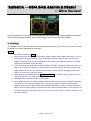
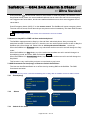
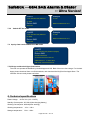
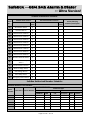
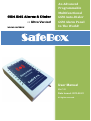
GSM SMS Alarm & Dialer -- Ultra Version! WASMS-SAFEBOX An Advanced Programmable Multifunctional GSM Auto-Dialer GSM Alarm Panel In The World! SafeBox User Manual Ver 1.0 Date Issued: 2013-02-01 All rights reserved. SafeBox ---GSM SMS Alarm & Dialer -- Ultra Version! Index 1.Brief introduction --------------------------------------3 2.Safety Directions --------------------------------------3 3.Standard Packing list ---------------------------------4 4.Main Features ----------------------------------------4 5.Installation and Connection Diagram -----------5 5.1 Inserting the SIMCard -----------------------------5 5.2 Using the Outlets for wires-------------------6 5.3Contacting the Wired Sensor,CCTV,IP Camera or Other Alarm Panel to the SafeBox ----------6 5.4Contacting the Wired Arm or Stay or Disarm Buttons or Access Control & RFID Card Reader ------------------------------------------------8 5.5Contacting the Siren -------------------10 5.6Contacting the Backup Battery ---------------10 5.7Registering the wireless sensor ---------------11 5.8Contacting the External GSM Antenna ------15 5.9Contacting the AC/DC Power Supply---------15 5.10Switching on/off the SafeBox ----------------15 5.11Mounting the SafeBox -----------------------16 5.12Reset to Factory Default ----------------------16 6.Settings--------------------------------------------------16 6.1Setup New Password-----------------------------17 6.2Setup Authorized number----------------------18 6.3Inquiry the Authorized number-----------------18 6.4Remove the Authorized Number--------------18 6.5Modify the wired zone type----------------------19 6.6Modify the SMS Alarm Content------------------------19 6.7Inquiry the SMS Alarm Content Setting-------------19 6.8Setup the Zone Attribute -------------------------------19 6.9Inquiry the Zone Attribute------------------------------20 6.10Setup the Siren Sound time--------------------------20 6.11Setup the Alarm Delay Time--------------------------20 6.12Setup the Arm Delay Time----------------------------20 6.13Enable to Alert the first Authorized Number ---21 6.14Required the SafeBox callback----------------------21 6.15Setup External Power Status Alert Feature-------21 6.16Setup Siren Response Feature ---------------------22 7.Operating Instructions --------------------------------------22 7.1Operation by Remote Controls-------------------------22 7.2Armed or Stay WITH a FREE call --------------------23 7.3SMS Commands for Arm or Disarm or Switch On/Off Siren. ----------------------------------------------23 7.4Inquiry Status and GSM Module IMEI Code--------24 7.5iOS App and Android Apps Instructions--------------24 8.Technical specifications-------------------------------------24 9. Maintenance----------------------------------------------------25 10.Warranty --------------------------------------------------------25 11.Affix Table------------------------------------------------------25 Table 1. SafeBox Installation Schedule-------------------26 Table 2. SafeBox SMS Command List---------------------27 This handbook has been designed as a guide to the installation and operation of WASMS-SafeBox GSM Alarm&Dialer. Statements contained in the handbook are general guidelines only and in no way are designed to supersede the instructions contained with other products. We recommend that the advice of a registered electrician be sought before any Installation work commences. The manufacturer, its employees and distributors, accept no liability for any loss or damage including consequential damage due to reliance on any material contained in this handbook. The manufacturer, its employees and distributors, accept no liability for GSM Network upgrading or SIMCard upgrading due to the technology specifications contained in this handbook. SMS Command List SMS COMMAND Functions & Actions AA To arm the SafeBox, in this mode, any detector triggered will alarm. BB To disarm the SafeBox, in this mode, detector triggered will not alarm. Very Important! Please fill the Installation CC To switch ON the Siren output. Schedule at Page DD To switch OFF the Siren output 26 before EE Inquire the SafeBox Status and GSM Module IMEI Code. programming it. *The commands should add Password, the format is Password+SMS Command. i.e.: if the password is 1234, then you can send 1234AA to arm, 1234BB to disarm, the AA~EE must be Caps Lock. Page 2 of 28 Ver 1.0 SafeBox ---GSM SMS Alarm & Dialer -- Ultra Version! 1. Brief introduction The GSM Alarm & Dialer SafeBox is an Ultra Version of GSM Alarm, includes multi-functions and ultra low cost and high reliability special for Residential areas, business area, commercial area, office, factory, industrial area and other Varity applications. It integrated high performance GSM Module and MCU inside, and with innovative and experienced functions and features to meet the required and potential demands in the world markets. The user can receive SMS Text and calling from the SafeBox once the alarm occurred immediately. Also, the user can remotely arm or disarm and switch on or off the siren by SMS Commands, or remotely switch the SafeBox to arm or disarm with free call from mobile phone, or remotely call in the SafeBox to listen in on-site, or send SMS Command to request the SafeBox call back. Moreover, the SafeBox supports Android Apps and iOS, though the Android and iOS Apps, the user can quickly Arm, Disarm, Inquire Status and Switch ON or OFF Siren, arm or disarm with free call, no need to program the SMS commands every time. The SafeBox equips 1 wired inputs for IP Camera Alarm Output, other alarm panel output to transfer alarm message by SMS over GSM Network. 2.Safety Directions Safe Startup Do not use SafeBox when using GSM equipment is prohibited or might bring disturbance or danger. Interference All wireless equipment might interfere network signals of SafeBox and influence its performance. Avoid Use at Gas Station Do not use SafeBox at a gas station. Power off SafeBox when it near fuels or chemicals. Power it off near Blasting Places Please follow relevant restrictive regulations. Avoid using the device in blasting places. Reasonable Use Please install the product at suitable places as described in the product documentation. Avoid signal shielded by covering the mainframe. Page 3 of 28 Ver 1.0 SafeBox ---GSM SMS Alarm & Dialer -- Ultra Version! Use Qualified Maintenance Service Maintenance can be carried out only by qualified maintainer. 3. Standard Packing List SafeBoxX1 AC/DC Adaptor X1 Remote Control X1 Wireless Door Contact X1 User Manual X1 *The Android Apps please contact the distributors, the iKeypad please download from Apple Store for iPhone. Optional Accessories: (Wired Sensors or wireless detectors) PIR Motion Sensor, Glass Break Sensor, Magnetic Window Sensor, Temperature Sensor, Infrared Beam Fence, Vibration sensor, Siren. 4. Main Features Supports Away Armed, Partial Armed(At House or Stay) or Disarmed by Remote Control, Wireless Buttons, Wired Buttons, SMS Commands, Call in with free call, Android Apps and iOS apps; Supports Android Apps and iPhone iOS apps, quickly to Arm, Disarm, Inquire Status, Switch ON or OFF Siren, Call in to arm/stay, Call in to listen in; Supports 6 Authorized Numbers, each number can be setup as receive SMS or receive call or both of them, also, each number can be setup authorized to call in to listen or call in to arm or stay the system; Supports listen in on-site through internal sensitive microphone and call back according to SMS request; Automatically send SMS Alert Alarm Message and dial to the authorized numbers when alarm occurrence; Learning code, more safe and easy to add new wireless remote keys and wireless detectors; Supports 16 Wireless Zones, can accept one learning code wireless detector in each zone, and accept unlimited PT2262/2272 fixed code wireless detectors in each zone; Supports 1 wired zones(Dry Contact Type), the input can be Normal Close(NC), Normal Open(NO), special for IP Camera alarm output or other wired sensor connection; Supports verity programmable zone attributes, includes Away(normal), At House or Stay, Entrance Zone, 24 Hours Sound Zone, 24 Hours Silent Zone, Local Zone, SOS Zone, Door Bell Zone; Page 4 of 28 Ver 1.0 SafeBox ---GSM SMS Alarm & Dialer -- Ultra Version! The SMS Alarm Content of each zone is programmable by user through SMS Commands; Supports 3 Remote Keys, each Remote Key includes one SOS Panic Button for emergency condition to ask for help; Supports Armed delay to give enough time to leave the home, the delay time is programmable by user; Supports Alarm Delay to give enough time to Disarm it when you come back home, the delay time is programmable by user; Equips one siren output for sounding while alarm occurrence to warning; The external AC power failure & recovery alert function supports 2 optional: Immediately Send SMS to user, after 30 minutes if not recovery then send SMS to user; Standby internal large capacity rechargeable battery which can standby upto 8hours after AC Power failure, also can provide power to wired siren after AC power failure; Secure - Using caller ID for identification, unknown callers are ignored; Supports Password to increase the security of the whole system; Based on the GSM communication network, no distance limitation. 5. Installation and Connection Diagram Tips: a. The backup battery was disconnected, please contact it first according to 5.6. b. After the SafeBox was switched on, it will indicate by a long Di sound, all zones’ LED will turn on once, and the zones which registered wireless sensors, wireless remote control or wireless buttons will turn on once again. In the backside of the SafeBox, please remove all of the 3 screws, and take the back cover off, then you can see the PCB. See below: Page 5 of 28 Ver 1.0 SafeBox ---GSM SMS Alarm & Dialer -- Ultra Version! 5.1 Inserting the SIMCard Important: Make sure to switch off SafeBox before inserting or removing your SIM card. 1) Slide the SIM card holder in the direction of “OPEN” (etched on the SIM card holder), and then flip it open. 2) Insert the SIM card with its gold contacts facing down and its cut-off corner facing out the SIM card slot. See above photo. 3) Slide the SIM card completely into the slot. Make sure the SIM card goes through the 2 “guides” on the SIM card slot. 4) Close the SIM card holder and then slide it in the opposite direction of “OPEN” to lock it. See above photo. 5.2 Using the Outlets for wires The SafeBox reserves 4 outlets for wires at the backside outlets and bottom outlets. The user can choose the suitable one for different installation requirements. Please use a knife or other tool to remove the obstacle plastics. Usually, the siren and power supply wires were in one outlets, and the signal control wires in another outlet to avoid the interference. Page 6 of 28 Ver 1.0 SafeBox ---GSM SMS Alarm & Dialer -- Ultra Version! Backside Wires Outlet Bottom Wires Outlet 5.3 Contacting the Wired Sensor or IP Camera or Other Alarm Panel to the SafeBox The SafeBox equips one dry contact (Normal Close or Normal Open type) digital input port, the user can connect the IP Camera or CCTV DVR or wired detector or other alarm panel to this port. When the digital input triggered by IP Camera or CCTV DVR or wired detectors or other alarm panel, it will alarm. 1) Connecting the wired Detector to SafeBox The wired detector has two wires, please contact one of them to the DIN port, another contact to the GND port. And setup the Digital input to be the correct NC or NO type by SMS Commands. (Tips: if you don’t know the NC or NO type of the Detector, please try to change the setting to NC or NO type by SMS Commands to after you finished connections.) If you need to contact more than one wired sensor to the SafeBox, please ensure all of the wired detectors are the same output type (Normal Close or Normal Open Types), when any one of these detectors are triggered, the SafeBox will alarm. If the wired detectors are NC type, then the connection must be in series, see below: if the wired detectors are NO type, then the connection must be in parallel, see above. Page 7 of 28 Ver 1.0 SafeBox ---GSM SMS Alarm & Dialer -- Ultra Version! 2) Contacting the IP Camera or CCTV DVR to SafeBox The user can connect the IP Camera or CCTV DVR Alarm Output to the SafeBox’s digital input as a wired detector, once the IP camera detect intrusion or CCTV DVR alarm, the SafeBox will send SMS to the preset numbers and dial the preset number and trigger the siren. This is very useful for lots of applications that need IP Camera and Alarm notification immediately by SMS or Dialing. The connection is below: 3) Connecting the other alarm panel output to SafeBox The user can connect the other Alarm panel’s digital output to the SafeBox’s Digital Input as a wired detector, so the user can update its alarm panel as GSM SMS Alarm. Connecting Wired Arm or Stay or Disarm Buttons or Access Control & RFID Card Reader The SafeBox is equipped with ports for Arm, Disarmed by wired buttons or RFID Card Reader for user convenience. The user can install a NO type button to arm at the entrance, and through a separate button to disarm. Or in office and store and shop where many people with RFID card, then can connect the RFID Card Reader output signal to the disarm port, so once somebody open the gate, will automatically disarm it by RFID Card Reader, no need any other operations. Tips: The Button or output signal from Access Control or RFID Card Reader must be NO type. Page 8 of 28 Ver 1.0 SafeBox ---GSM SMS Alarm & Dialer -- Ultra Version! The user can setup the Arm port as Arm function or Stay function by the 1st PIN of the 8PIN Switch, when the 1st PIN at ON side, it is Stay function, if the 1st PIN at the OFF Side, then it is Arm function, default is at the OFF Side, see below: The connections for wired buttons please see below: The connections for Access Control & RFID Card Reader please see below: Page 9 of 28 Ver 1.0 SafeBox ---GSM SMS Alarm & Dialer -- Ultra Version! 5.4 Connecting the Siren The user can connect one 9~12V rated siren, or hooter to the SafeBox’s siren output, once alarm occur, this output ports will trigger the siren. The positive wire of the siren, gets connected to the Siren+ port, and the negative port of the siren contact to the Siren – port. Generally, the siren wires are marked with red color and black color, the red color is positive and the black color wire is negative. See below: 5.5 Connecting the Rechargeable Backup Battery The SafeBox is equipped with one rechargeable backup lithium battery that can supply power to the SafeBox for about 8hours while AC Power goes off. The SafeBox will automatically detect the voltage Page 10 of 28 Ver 1.0 SafeBox ---GSM SMS Alarm & Dialer -- Ultra Version! of the battery, once the voltage is low, it will charge it automatically. If you do not use the SafeBox for a long time, please remember to disconnect the backup battery. Please install the battery connector to the socket, please see below: Notice: Must open the backside cover then you can contact the battery. Once the backup battery turn over, the SafeBox cannot work properly, please contact the external 12VDC to charge it first. If you want to replace the battery by a new one, please note the specification of the backup battery is: 3.7V lithium battery 900~ 1200mA. If the Safebox is not used for a long time, please disconnect the backup battery to save its lifetime. 5.6 Registering the wireless sensor, remote control, wireless buttons to the SafeBox Tips: a. After registering the wireless sensor, remote control or wireless buttons, must restart the SafeBox; b. After your registered a wireless sensor or remote control or button to the position, you must switch back the DIP to OFF Side except the 1st position. c. The package wireless detectors which are registered in the SafeBox already, do not need to be added again. The SafeBox is learning code, it is safe and easy to add new wireless remote keys and wireless detectors, it supports 3 remote controls and 16 Wireless Zones, it can accept one learning code wireless detector in each zone, and accept unlimited PT2262/2272 fixed code wireless detectors in each zone. The SafeBox is integrated with a variety of programmable zone attributes, includes Away(normal), At House or Stay, Entrance Zone, 24 Hours Sound Zone, 24 Hours Silent Zone, Local Zone, SOS Zone, Door Bell Zone. The SMS Alarm Content of each zone is programmable by user through SMS Commands. Please follow below the step by step instruction to learn the wireless detectors or remote controls or wireless buttons to the expected zones. 1) Writing Installation Schedule Please write down your schedule in the table below, it will make it clearl what sensor in which zone and with what attribute, e.g.: using a wireless door contact for entrance, using the photoelectric beams for wired zone in outdoor fence, and using a wireless smoke detector for fire alarm and so on. Please see the Affix table. 2) Read the Switch-Combination-Zone Number Corresponding Table The SafeBox with fixed switch-combination positions for different wireless detectors and wireless remote controls, please see Switch Positions-Zone Number Corresponding Table Structure and Switch-Combination -Remote Control Corresponding Table. Switch-combination-Zone Number Corresponding Table Zone Number Switch Position(4-8) SWTICH 4 SWTICH 5 SWTICH 6 SWTICH 7 SWTICH 8 Page 11 of 28 Ver 1.0 Notice: SafeBox ---GSM SMS Alarm & Dialer -- Ultra Version! 01 0 0 0 0 1 02 0 0 0 1 0 03 0 0 0 1 1 04 0 0 1 0 0 05 0 0 1 0 1 06 07 0 0 0 0 1 1 1 1 0 1 08 0 1 0 0 0 09 0 1 0 0 1 10 0 1 0 1 0 11 0 1 0 1 1 12 0 0 0 0 1 1 1 1 1 0 1 1 1 1 0 0 0 1 1 0 0 1 0 1 0 13 14 15 16 The value in the table for each zone corresponding the position of the switch, 0 stands for OFF side, 1 stands for ON side. . So the 01 zone should setup as the 02 zone should be setup as. The 15 zone should be setup as Switch-combination - Remote Control Corresponding Table Switch-combination - Remote Control Corresponding Table Serial Number Switch Position(2-3) SWTICH 2 SWTICH 3 01 0 1 02 1 0 03 1 1 The value is same as above-mentioned. So 01 should be setup as: , 02 should be setup as ,03 should be setup as: . 3) Enter Leaning Mode Please press the Learn button and then switch on the SafeBox, after the Safebox has been switched on, it will alert Di sound once, then after enter learning mode, it will alert Di—Di two sounds, total 3 Di sounds(about 5 Seconds), it entered learning mode, then release the button. The learning Button must be pressed before switching on the SafeBox, and kept in till the system send a total of 3 “Di” sounds. The LED of each zone which is registering a wireless detector or remote control or button will turn on. Page 12 of 28 Ver 1.0 SafeBox ---GSM SMS Alarm & Dialer -- Ultra Version! Notice: 1) The SafeBox cannot exit the learning mode automatically, the unit must be switched off and on again to enter the normal mode. The Switch-Combinations for each zone must be active by at least one switch to enter learning mode, and after learning the correct detector into this position, please switch the button back to OFF, otherwise the zone will be in learning mode all the time. 2) When learning one detector to the SafeBox, the other wireless detectors must be in OFF status, otherwise will confuse the learning operation. 4) Learning the Wireless Detector or Remote Control to SafeBox. When the SafeBox is in the learning mode, then switch the corresponding switch-combinations from OFF to ON one by one, and trigger the wireless detector(see Notice), the SafeBox will learn the code from the wireless detector automatically. When the unit sound a long “Di----” sound, it means the wireless detector was learned to the zone position, please switch the switches back to OFF. Meanwhile, please switch off the wireless detector, otherwise it will alert a “Di Di” two sounds after you switch the switch back to OFF. If before switch the switch to OFF then alert by “Di Di” two sounds, then means the operation failure, please switch them back to OFF then retry again. Switching the other switch-combinations from OFF to ON one by one to learn the wireless detectors to other zones.. Notice: a) Remote Control and Wireless Detectors activated method: For remote control, press any key to activate it, no need to press all of them. The wireless door contact can be triggered after the battery is installed; The wireless PIR Motion Detectors can be triggered when switched on; The wireless panic buttons can be triggered by pressing its button; The wireless gas leakage or wireless water leakage and wireless smoke detectors are equipped with a Test Button, press the Test Button to trigger. The other wireless detectors please reference its user instructions. b) When the wireless PIR Motion detection is setup, please remember to setup the PIR in Test Mode while learning to the SafeBox, after learned to the SafeBox, then please change PIN to Normal Mode by chaninge the Black PIN Jumpers on the PCB. c) The differences of PIR Motion Curtain Motion and Ceiling motion detector are the detection direction areas. d) When the wireless Detectors is PT2262 fixed IC code, please setup its wireless code by using some Jumpers to Page 13 of 28 Ver 1.0 SafeBox ---GSM SMS Alarm & Dialer -- Ultra Version! configure it randomly, recommend 4~6 jumpers, see below: 1) Removing the back cover carefully; 2) Locate the IC boards black jumpers, labeled A0-A7 and D0-D3, please see below figure. 3) Configured the A0~A7 and D0~D3 different from each wireless detector. If configured the A0~A7 and D0~D3 are the same, the system will treat them as the same one sensor. So if you want to add more than one wireless detector to any zone, please configure the jumpers to be the same in each of the wireless detectors. 4) Also, please check the Resistors value is 3.3M Ohm, there’re 3 Jumpers, 1.5M, 3.3M, and 4.7M. if you select incorrect value, the wireless distance is usually very short or cannot learn to the SafeBox. 5) Removing wireless accessories. After learned the wireless accessories to the SafeBox, it can be replaced by learning a new wireless detector to its position. If you want to remove the wireless detector in a specified position, then please reset to remove all wireless detectors and re -learn the other wireless detectors again. 6) Some popular wireless detectors PIR Motion Detector Door Contact Dual-Element PIR Motion Detector Garage Door Contact Ceiling PIR Motion Detector Photoelectric Beams Detector Page 14 of 28 Ver 1.0 Door Contact Microwave Dual PIR Detector SafeBox ---GSM SMS Alarm & Dialer -- Ultra Version! Gas Leakage Detector Smoke Detector Necklace Waterproof Panic Button Emergency Button Water leakage overflow detector Wireless Signal Repeater 5.7 Connecting the External GSM Antenna The SafeBox is equipped with an internal GSM Antenna, usually the GSM Signal is good enough to register the gsm network properly. But if the GSM signal is not good enough, please replace it by external GSM Antenna from your distributors or agents. Or take the external GSM Antenna and its connectors to ask any electronic engineer to replace it, please don’t replace it by yourself, otherwise the SafeBox may get damaged, The enclosure reserved one hole at the top side, please remove it and fix the external GSM Antenna through this hole. 5.8 Connecting the AC/DC Power Supply Please connect the +12VDC power supplyto the SafeBox, the Positive of the +12VDC connect to the PWR+, the negative of the 12VDC please contact to PWR - . Generally, the red color from the AC/DC Adaptor is Positive, and the black color is negative. The AC/DC Adaptor is 12V1A or 12V2A. see below: Page 15 of 28 Ver 1.0 SafeBox ---GSM SMS Alarm & Dialer -- Ultra Version! 5.9 Switching on/off the SafeBox After finishing all of the connections, please connect the AC/DC Adaptor to external AC Power socket, and switch the PSW Switch to ON, to switch on the SafeBox. See below: 5.10 Mounting the SafeBox The SafeBox should be installed in a place where the intruders cannot discover it. And the GSM Signal coverage is good. Also, the user can see the LED display to know what happened and what is the status of the SafeBox. 5.11 Reset the SafeBox to Factory Default The SafeBox can be reset to the factory default by following this operation: Switch off the SafeBox, then press the Reset Button (See below), Switch on the SafeBox, about 3Seconds later, the SafeBox will make “Di Di” 2 sounds, then release the RESET button, then the reset operation is successful. And please restart the SafeBox. Page 16 of 28 Ver 1.0 SafeBox ---GSM SMS Alarm & Dialer -- Ultra Version! After this operation, all the registered wireless detectors and wireless panic buttons and Remote Controls will be removed from the SafeBox, and all of the settings will be reset to the factory default. 6. Settings The SafeBox is an advanced multifunctional programmable controller. The user can program it by SMS Commands for various application requirements. Notice: 1. The default Password is 1234. 2. All the settings are through SMS commands, please edit the below SMS commands in your cell phone, then send to the SafeBox. (Tips: The SafeBox cannot support a PIN Code Protected SIMCard. Please ensure you have disabled the PIN Code of the SIMCard, otherwise it cannot register the GSM Network successfully.) 3. You can program the GSM Alarm & Dialer SafeBox with SMS commands using your phone. It is safe to do so because in addition to the fact that other people may not know the number of the SIM inserted in it, we also use a Password that makes it impossible for anybody, who doesn't know it, to access the system by chance. 4. Remember that commands must be CAPITAL LETTERS. It is PWD not pwd, CAP not Cap etc. Don't add spaces or any other character. 5. The pwd in the commands means the password. 6. Some GSM operators use different SMS parameters, the units can’t return the SMS confirmation as normal. It is not a product problem. Also, you can try to add the country code before the number, because every GSM Operator will automatically add the country code while sending a SMS or receive SMS or dialing, the format is not the same for dial and SMS. If some functions do not work, then please setup the country code or remove country code for different functions. see the below settings: Page 17 of 28 Ver 1.0 SafeBox ---GSM SMS Alarm & Dialer -- Ultra Version! For example: In South Africa, the country code is 0027, or +27. The user cell phone number is 13500001111 and has been assigned as a SMS Alert number, the simcard number in the panel is 13512345678. Problem 1: Alarm but the user hasn’t received the SMS Alert. Solution: Please add the country code when you setup the 13500001111 as the SMS Alert number, 002713500001111 or 2713500001111 instead of 13500001111. Problem 2: The user number can receive the SMS Alert message from alarm panel, but the alarm panel can not receive the commands from the user number. Solution: Please add country code to the simcard number in the alarm panel. Send sms command as 002713512345678 or 2713512345678 instead of 13512345678. 7. Please write down the setting list on a paper for review in future, please see the affix table at the last page, and tear down from this instruction for review. 8. If the command is incorrect, the SafeBox will return: SMS Format Error, Please check Caps Lock in Command! Or other warning message. So please check the Command, or check the 9. 10. 11. 12. 13. 14. 15. 16. input is in ENGLISH INPUT METHOD and CAPS LOCK. If the password is incorrect it will not return any SMS. When power on the SafeBox, will alert Di sound once, and all zones’ LED will turn on once, then the LED which registered wireless sensor, will turn on once again. If after more than 2 minutes the GSM Simcard still try to register the GSM Network, it is a failure, the buzzer will make “Di” once, and every 10 seconds detects the SIMCARD registering status and failure will alert by “Di” once till restart or switch off. If the communication between the MCU and GSM Module fail, the buzzer will make “DiDi” twice to warn every 10 seconds till it is switched off or restarted. If a SimCard is not installed, the Buzzer will only make one di sound to alert. And will not try and detect the SIMCard again. When alarm occur and in the delay alarm time, the buzzer will alert a “DiDi” sound, once the delay timeout the buzzer will stop to sound. Resetting the SafeBox, it will alert by a 2seconds “Di” sound by the buzzer. After you reset or learning remote control or wireless sensors, please remember to restart it, otherwise, it will not work properly. The SMS commands that you will certainly use in the GSM Alarm & Dialer SafeBox are the following: 6.1 Setup New Password pwd+P+newpassword Page 18 of 28 Ver 1.0 SafeBox ---GSM SMS Alarm & Dialer -- Ultra Version! if successful, the unit will return: new password,This is the New Password, please remember it carefully. The password is 4digits. For example, the original password is 1234, you want change it to 6666, then you can send the command below: 1234P6666 6.2 Setup Authorized number(If you GSM Operator use different number format for SMS and Dial out, then please see Notice 6, must setup as, include country code and not include country code.) Pwd+Serial Number+A+Function 1 Code+#+Function 2 code+#+Telephone Number+# Serial Number = 1~6. A is the identification character of this command. Function 1 Code =1,2,3. It is for alarm receiving attribute setting. =1 stands for when alarm occur, the SafeBox will dial as well as send SMS to this number.(The SMS Number Format must be the Same as the Dial Number Format, include or not includes Country code.) =2 stands for when alarm occur, the SafeBox only send alarm SMS to this number, doesn’t dial. =3 stands for when alarm occur, the SafeBox only dial this number, doesn’t sends SMS. Function 2 Code =1,2,3. It is for accessing SafeBox attribute setting. =1 stands for when this number dial to the SafeBox, it will be rejected after the first ring, meanwhile, the SafeBox will be changed to Stay Mode and not return SMS. This is very useful when the user come back home or office to change the SafeBox to Stay mode with a FREE call from its mobile phone! When the user leave the home or store or office, dial the SafeBox again, the SafeBox will be changed to away armed mode and return SMS: Armed to ensure the armed operation is successful. Tips: When any number with this value call in the SafeBox, the SafeBox will change from Stay to Armed or Armed to Stay, if the SafeBox in Disarmed mode, then the first time call in will change theSafeBox to Stay mode. =2 stands for when this number dial to the SafeBox, will be picked up automatically and enter into listen mode, the user can listen to on-site sounds or noise immediately through the SafeBox’s microphone. =3 stands for this number cannot access the SafeBox by dial in, will be hang up. Nor listen neither change to Stay or Arm Mode. Telephone Number: authorized number, max. 18 characters, E.g.: if you want to setup 13512345678 as the third authorized number, and the password is 1234, country code is 0027, when alarm occur this number can receive both SMS and incoming from the SafeBox, when dial to the SafeBox from this number, can change the SafeBox to Stay or Armed mode. Then you can send 12343A1#1#002713512345678# to the SafeBox. Will return: Tel1: Empty Tel2: Empty Tel3: 002713512345678-1-1 -1-1stands for function 1 code =1 and function 2 code =1 value. Tel4: Empty Tel5: Empty Tel6: Empty 6.3 Inquiry the Authorized number pwd+A+# After received this command,the SafeBox will return the SMS as abovementioned. Page 19 of 28 Ver 1.0 SafeBox ---GSM SMS Alarm & Dialer -- Ultra Version! E.g.: If you want to know the authorized number list, and the password is 1234, then you can send 1234A# to check it. 6.4 Remove the Authorized Number pwd+Serialnumber+A+# Please overwrite it with another number that you wish to change it or removed it by SMS Command. 6.5 Modify the wired zone dry contact digital input type (Default is NC) pwd+NC+# Modify the digital input to NC (Normal Close) type, if the sensor you used with this unit is NC, then you should set the unit as NC type.will return : Zone00 NC. Pwd+NO+# Modify the digital input to NO (Normal Open) type, if the sensor you used with this unit is NO, then you should set the unit as NO type. will return: Zone00 NO. 6.6 Modify the SMS Alarm Content pwd+B+ZoneNumber+# +SMS Alarm Content+# If setup successful, will return the SMS Alarm Content. B is the identification character of this command. Zone Number=00~16, 00 stands for the wired zone. 01~16 stands for the 16 wireless zones. SMS Alarm Content: When alarm occurrence, the SafeBox will send the SMS Alarm Content to the authorized numbers by SMS. Max. 40 characters and cannot be empty, otherwise the SafeBox will return : SMS Alarm Content cannot be set as empty! E,g.: if you want to receive SMS Alarm content of the wireless zone 05 is intruder breaking the windows, and password is 1234, then you can send SMS 1234B05#intruder breaking the windows#. 6.7 Inquiry the SMS Alarm Content Setting pwd+B+Zonenumber+# If setup successful, will return the zone number’s SMS Alarm Content. 6.8 Setup the Zone Attribute pwd+D+Zonenumber+#+Attribute Code+# If setup successful, will return the zone number’s Attribute code. D is the identification character of this command. Zone Number=00~16, 00 stands for the wired zone. 01~16 stands for the 16 wireless zones. Attribute Code=0~9, stands for how will the SafeBox perform when this zone is activated. =0, stands for entrance, when the Safebox is armed, this zone will delay 30 seconds before entering Armed mode, for leaving the home or office. When the user comes back from home or office, the unit will delay 20 seconds prior to alarm, in order for the user to change it to Stay or Disarm. =1, stands for outer zones , in Armed or Stay mode, when triggered will cause alarm. Page 20 of 28 Ver 1.0 SafeBox ---GSM SMS Alarm & Dialer -- Ultra Version! =2, stands for inner zones, in Stay mode if triggered will not cause alarm; in Armed mode, if triggered will cause alarm. =3, stands for spot alarm zone, in Stay mode if triggered only cause the siren to sound. Neither dial out nor send SMS out; in Armed mode if triggered will cause alarm. =4, stands for 24hours emergency zone with sounds. In any mode if triggered will cause alarm immediately with siren sounds. =5, stands for 24hours emergency silent zone. In any mode if triggered will cause alarm immediately, the siren will not sound. =6, stands for Armed Button, trigged it to make the SafeBox change to Arm Mode. =7, stands for Stay Button, triggered it to make the SafeBox change to Stay Mode. =8, stands for Disarm Button, triggered it to make the SafeBox change to Disarm mode. =9, stands for door bell button, triggered it to cause the buzzer to sound 8times. Tips: 1) When the attribute code setup as 6,7,8,9, the siren will not sound. 2) More than one zone attribute can be setup in one SMS Command but don’t exceed the SMS character limitation , e.g.: if want to setup the attributes of wired zone, 01 wireless zone, 02wireless zone, 03 wireless zones, 08 wireless zone, the password is 1234, then please send 1234D00#0#D01#1#D02#4#D03#6#D08#9# 6.9 Inquiry the Zone Attribute pwd+D+# If send successful, will return the zone attributes: 00-1;01-0;02-2;……;16-7. 6.10 Setup the Siren Sound time(Default is 180seconds) pwd+E+xxx+# # If setup successful, will return Siren ON + xxx + Seconds E is the identification character of this command. Xxx=000~999, unit is second, 3 digits. Default is 180 seconds. E,g,: if you want to setup the siren sound 60seonds when alarm occur, and password is 1234, then please send 1234E060# Tips: Only the zone attribute code that is setup as 0,1,2,3,4 will cause the siren sound while alarm occur. And the siren will sound about 20 seconds then interrupt about 2 seconds, 6.11 Setup the Alarm Delay Time(Default is 000second) pwd+F+xxx+# # If setup successful, will returnAlarm Delay + xxx + Seconds F is the identification character of this command. Xxx=000~999, unit is second, 3digits. Default is 000 second. Tips: Only the zone attribute code that is setup as 1,2,3 will delay to cause alarm while alarm occur. 6.12 Setup the Arm Delay Time(Default is 30seconds) pwd+G+xx+# # Page 21 of 28 Ver 1.0 SafeBox ---GSM SMS Alarm & Dialer -- Ultra Version! If setup successful, will returnArmed Delay + xx + Seconds G is the identification character of this command. Xxx=00~99, unit is second, 2digits. Default is 30 seconds. Tips: 1) Only the zone attribute code setup as 1,2,3 will delay to enter into Arm mode when Arming the SafeBox; 2) If the Safebox is armed by remote control, after pressing the Armed Button, and press its SOS button within 2 Seconds the SafeBox will enter into Armed Mode immediately, will not delay. 6.13 Enable to Alert the first Authorized Number when other numbers arm or disarm the SafeBox(Default is Disable) pwd+H+# # st If setup successful, will return Send Operation Code to 1 Number H is the identification character of this command. Tips: If this function is enabled, when the Authorized Number that Function 2 Code=1 (can dial in to change the status from Stay to Arm) call in the SafeBox, will send SMS to the 1st Authorized Number. If any other number armed or disarmed the SafeBox, it will send SMS to the 1st Authorized number. The SMS content is Armed By + Telephone number or Disarmed by +Telephone number. Disable this function SMS Command is pwd+J+# 6.14 Required the SafeBox callback pwd+K+# # If send successful, the SafeBox will call back the user immediately. It is special for the Authorized Number that Function 2 Code=1 (can dial in to change the status from Stay to Arm) to listen on-site. 6.15 Setup External Power Status Alert Feature(Default is 30 minutes) pwd+M+xx+# # If send successful, will return SMS. M is the identification character of this command. Xx= 00~99. Default is 30. Unit is minute Xx=00, stands for when external AC Power goes off will send SMS AC Power Goes off to all authorized numbers or send SMS AC Power Goes ON when AC Power goes on. If setup successful, will return AC Power Goes off Send SMS Immediately. Xx=01~99, stands for when external AC Power goes off more than 01~99 minutes will send SMS AC Power Goes off 01~99minutes to all authorized numbers or send SMS AC Power Goes ON when AC Power goes on. If the AC Power goes off less than 01~99 minutes then goes on, will not send SMS. If setup successful, will return AC Power Goes off Send SMS After 01~99minutes. 6.16 Setup Siren Response Feature to Arm Operation pwd+xx+# If send successful, will return SMS. # Xx= ON or xx=OFF. Default is off. Xx=ON, stands for when armed the SafeBox by remote control successful, the siren will sound 2seconds. Page 22 of 28 Ver 1.0 SafeBox ---GSM SMS Alarm & Dialer -- Ultra Version! If setup successful, will return Set Ok. Xx=OFF, stands for when armed the SafeBox by remote control successful, the siren will NOT sound. If setup successful, will return Set Ok. Tips: if armed or disarmed by phone call or SMS, the siren will not make sounds to response. 7. Operating Instructions Tips! 1. The user can arm/disarm/Stay (Partial armed) by Remote Control, Wired Button, Wireless Button, Access Control System or RFID Card Reader, Dial in, and, SMS, the user can also switch on or off the Siren by SMS Commands. 2. Mode explanation Armed: Away, In this mode, any detector triggered will alarm. It is used for away arm to activate all sensors. Stay: Partial armed, at home, in this mode, only the outer zones and emergency zones triggered will alarm, the inner zones triggered will not alarm. It is used for partial armed, e.g.: some people at home, and need to monitoring the outdoor security. Disarmed: No sensors, except the 24 Hours emergency zones triggered will alarm, all of the other zones triggered will not alarm. 3. Alarm Occurrence 1) When alarm occur, the SafeBox will send out Alarm SMS Content first, then automatically dial the authorized numbers one by one, if the call is picked up, the SafeBox will stop the siren and enter in to listen mode, cannot speak. If nobody picked up or rejected, the SafeBox will dial all of the authorized numbers 3 times in cycle then stop to dial. Meanwhile, the Safebox will enter to previous status. 2) Only the zone attribute code setup as 0,1,2,3,4 will cause the siren sound while alarm occur. And the siren will sound about 20 seconds then interrupt about 2 seconds, the time according to the setting. 3) Once any zone triggered, the corresponding LED will always stay on till Disarm or Restarting the SafeBox. 7.1 Operation by Remote Controls Press the button “ ” on the remote key or Press the wireless or wired Arm button, the SafeBox enters arm status (delay time according to the setting), Under this status, any detector triggered, the SafeBox will alarm, if answered the call, the siren will stop and can listen in the alarm area by phone. Tips: If you use the remote control to arm the SafeBox, you press the Arm Button, then press the SOS button within 2 Seconds, the SafeBox will enter Armed mode immediately, no delay. Press the button “ ” on the remote control, or press the wireless or wired Disarm button, or access control and RFID Card Reader with authorized access signal, the SafeBox disarms immediately. Under this status, any detector triggered, the SafeBox will not alarm. Except the zone attribute is the 24-Hour Emergency Zones. Page 23 of 28 Ver 1.0 SafeBox ---GSM SMS Alarm & Dialer -- Ultra Version! Press the button “ ” on the remote control or the wireless or wired Stay button, the SafeBox enters Stay(Partial Armed) status, the zones attribute had been set as outer zone and 24 hours emergency zone triggered will cause alarm, but the zone attribute had been set as inner zone triggered will not cause alarm. Press Emergency button (SOS) “!” on the remote control. The SafeBox will cause emergency alarm. The siren will not sound, but will alert the pre-set phone number immediately. The Alarm SMS Content is Remote Key SOS Help! Tips: The Alarm SMS Content for the remote control SOS button cannot be modified. 7.2 Armed or Stay WITH a FREE call from authorized phone! The SafeBox supports armed or Stay by a free call from authorized phone, after you setup the authorized number Function 2 Code as 1, then the user can use this phone number to Arm or Stay the SafeBox with a free charge call. Please refer to 6.2 Setup Authorized Number to set it up. When the SafeBox is in Disarmed mode, any authorized number can call in and will change it to Stay mode; When the SafeBox is in Stay Mode, any of the authorized numbers can call in and will change it to Armed(Away) mode, and return SMS confirmation Armed. When the SafeBox is in Armed(Away) Mode, any authorized number can call in and will change it to Stay Mode. This function is very useful while you leave or come back to your home. 7.3 SMS Commands for Arm(Away) or Disarm or Switch On/Off Siren. The User can Arm/Disarm/Switch on or off the siren by sending SMS to the SafeBox. The SMS Commands are below: Notice: The system will carry out the commands immediately (with no delay) after the SafeBox receive this SMS command. 7.3.1 Armed(Away) xxxxAA Example “xxxx” stands for the password 1234AA (4 digits). Return SMS When the Password is 1234 Armed 7.3.2 Disarm xxxxBB Example “xxxx” stands for the password 1111BB (digits). Return SMS When the Password is 1111 Disarmed 7.3.3 Switch On the Siren Page 24 of 28 Ver 1.0 SafeBox ---GSM SMS Alarm & Dialer -- Ultra Version! xxxxCC Example “xxxx” stands for the password 1111CC (4 digits). Return SMS When the Password is 1111 Siren ON. 7.3.4 Switch OFF the Siren xxxxDD Example “xxxx” stands for the password 1111DD (4 digits). Return SMS When the Password is 1111 Siren OFF. 7.4 Inquiry Status and GSM Module IMEI Code xxxxEE “xxxx” stands for the password (4 digits). Return SMS Armed or Disarmed AC Power ON or AC Power off. GSM Value is 17 or other value IMEI Code: xxxxxxxxxxxxxxxxxx 7.5 iOS App and Android Apps Instructions The user can operate the SafeBox by Android Apps and iOS. Both of them are free charge. For Android Apps, please download from our official website, and download the iKeyPad from Apple Store. The interface of these tools please see below. 8. Technical specifications Rated Voltage: 12VDC 2 A (12V~14VDC) Standby Consumption: 30~35mA (Not charging battery) Working Consumption: 400mA(Siren working) Working temperature: -10℃~+60℃ Storage temperature: -20℃~+60℃ Page 25 of 28 Ver 1.0 SafeBox ---GSM SMS Alarm & Dialer -- Ultra Version! Relative humidity: 10-90%, No condensation GSM frequency: 900/1800MHz(Default) or 850/1900Mhz (Optional) Communication protocol: GSM PHASE 2/2+ (include data service) Wired Zones: 1 (Dry Contact, NC or NO) Wired Port For Arm or Stay: 1(Dry Contact, NO) Wired Port For Disarm: 1(Dry Contact, NO) Wireless Encode: Learning code, compatibles fixed encode. Wireless Zone: 16 (can accept one learning code wireless detector in each zone, and accept unlimited PT2262/2272 fixed code wireless detectors in each zone) Remote Control: 3 Wireless Frequency: 433Mhz Wireless Distance: 100m in open air. Backup Rechargable Battery: 3.7V@900~1200mAH lithium batteries Net Weight: 0.50Kg 9. Maintenance 1) In case of failure, please contact the distributor or manufacturer. 2) If the remote control works, but the SafeBox fails to send SMS texts, switch the power of the SafeBox to off and switch it on after one minute. Test this system after another minute, or check if the settings are correct and the GSM Signals are strong enough. 3) If the SafeBox sensors work, but it cannot send SMS texts, please change SIM Card to check it. 4) If the problem cannot be solved, please contact the distributor or manufacturer. 10. Warranty 1) This system is warranted to be free of defects in material and workmanship for one year. 2) This warranty does not extend to any defect, malfunction or failure caused by abuse or misuse by the Operating Instructions. In no event shall the manufacturer be liable for any alarm system altered by purchasers. 11. Affix Table Table 1. SafeBox Installation Schedule Before installing the Safebox, please write down the installation plan first, it is very useful for saving your test and installation time. After installed successful, then tear down this Schedule for review in future. Page 26 of 28 Ver 1.0 SafeBox ---GSM SMS Alarm & Dialer -- Ultra Version! SafeBox Installation Schedule Default Value of Zones Zone No. User Defined Value of Zones Name Attr. Code 00 Wired Zone Alarm! 2 01 Entrance Alarm! 0 02 Wireless Zone 2 Alarm! 2 03 Wireless Zone 3 Alarm! 2 04 Wireless Zone 4 Alarm! 2 05 Wireless Zone 5 Alarm! 2 06 Wireless Zone 6 Alarm! 2 07 Wireless Zone 7 Alarm! 2 08 Wireless Zone 8 Alarm! 1 09 Wireless Zone 9 Alarm! 1 10 Wireless Zone 10 Alarm! 1 11 Wireless Zone 11 Spot Alarm! 3 12 Smoke Detector Alarm! 4 13 Water Leakage Alarm! 4 14 Gas Leakage Alarm! 4 15 Panic Help Alarm! 4 16 Emergency Silent Alarm! 5 SMS Alarm Content Attr. Code Sensor/Place(E.g Windeos) Description SafeBox Authorized Number Schedule SIMCard Number in the SafeBox: ___________________ Serial Number Authorized Type User Name Phone Number Alert when Alarm Occurrence SMS&Call SMS 1 2 3 4 5 6 Notice: Please mark V if for enable and X for disable. Page 27 of 28 Ver 1.0 Call Access the SafeBox Stay/Arm listen Refuse SafeBox ---GSM SMS Alarm & Dialer -- Ultra Version! Table 2. SafeBox Program and Operation SMS Command List SafeBox SMS Command List(Caps Lock) S.N. Function Description SMS Command Format Example 1 Arm(Away) pwd+AA 1234AA (Password is 1234) 2 Disarm pwd+BB 1234BB 3 Switch On The Siren pwd+CC 1234CC (Password is 1234) 4 Switch OFF the Siren pwd+DD 1234DD (Password is 1234) 5 Inquiry Status,GSM Signal, IMEI pwd+EE 1234EE (Password is 1234) 6 Setup New Password pwd+P+newpassword+# 1234P6666. Setup Authorized number pwd+Serial Number+A+Function 1 Code+#+Function 2 code#Telephone Number+# [See 6.2] 8 Inquiry the Authorized number pwd+A+# 9 Remove Authorized Number pwd+SerialNumber+A+# 10 Modify wired zone type as NC pwd+NC+# 11 Modify wired zone type as NO pwd+NO+# Modify the SMS Alarm Content pwd+B+ZoneNumber+#+ SMS Alarm Content+# 1234B05#intruder breaking the windows# 13 Inquiry the SMS Alarm Content pwd+B+Zonenumber+# 1234B01# 14 Setup the Zone Attribute pwd+D+Zonenumber+#+Attribute Code+# 15 Inquiry the Zone Attribute pwd+D+# 16 Setup the Siren Sound time pwd+E+xxx+# 1234E060#,(Default:180S) 17 Setup the Alarm Delay Time pwd+F+xxx+# 1234F999#,(Default:000S) 18 Setup the Arm Delay Time pwd+G+xx+# 1234G09#,(Default: 30S) 19 Enable Alert the 1st Authorized No. pwd+H+# 7 12 st (Password is 1234) Default is NC [See 6.8] 20 Disable Alert the 1 Authorized No. pwd+J+# 21 Required to callback pwd+K+# 22 AC Power Goes OFF Alert at once pwd+M+00+# 23 AC Power Goes OFF Alert after 01~99 minutes pwd+M+xx+# Default is 30minutes 24 Siren Response to Arm Operation pwd+ON+# Default 25 Siren NOT Response to Arm Operation pwd+OFF+# The End! www.securitywireless.co.za Support: 012-654 6209 Page 28 of 28 Ver 1.0 Default