1
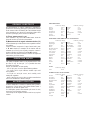
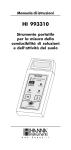
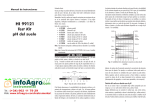
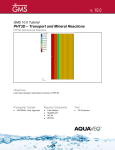
Instruction Manual
HI 99121
Soil pH Test Kit
SPECIFICATIONS
w w w . h a n n a i n s t . c o m
PRELIMINARY EXAMINATION
Dear Customer,
Thank you for choosing a HANNA instruments® product.
Please read this instruction manual carefully before using the
instrument. This manual will provide you with the necessary
information for correct use of the instrument, as well as a more
precise idea of its versatility.
If you need additional technical information, do not hesitate to email us at [email protected].
This instrument is in compliance with the directives.
Remove the test kit from the packing material and examine it
carefully to make sure that no damage has occurred during
shipping. If there is any damage, immediately notify your dealer.
Each kit includes:
• HI 99121 portable pH meter
• HI 1292D pH electrode
• pH 4.01 & pH 7.01 buffer solutions (20 mL each)
• HI 700663 cleaning solution for inorganic soil deposits
• HI 700664 cleaning solution for organic soil deposits
• HI 7051M soil preparation solution
• HI 721319 ground auger
• 3 x 1.5V AA alkaline batteries
• instruction manual
• rugged carrying case
Note: Save all packing material until you are sure that the
instrument functions correctly. All defective items must
be returned in the original packing with the supplied
accessories.
TABLE OF CONTENTS
WARRANTY
PRELIMINARY EXAMINATION ........................................... 3
WARRANTY ......................................................................... 3
SOIL pH ............................................................................... 4
ORGANIC SUBSTRATE ...................................................... 8
IRRIGATION WATER ........................................................... 8
NUTRIENT SOLUTION ........................................................ 8
pH METER SPECIFICATIONS ........................................... 11
OPERATING THE pH METER ........................................... 12
pH MEASUREMENT & CALIBRATION .............................. 13
METER SETUP ................................................................... 14
ELECTRODE CLEANING ...................................................15
BATTERY REPLACEMENT ................................................ 15
All Hanna Instruments meters are warranted for two years against
defects in workmanship and materials when used for their intended
purpose and maintained according to instructions. The probes are
warranted for a period of six months.
This warranty is limited to repair or replacement free of charge.
Damage due to accidents, misuse, tampering or lack of prescribed
maintenance are not covered.
If service is required, contact the dealer from whom you purchased
the instrument. If under warranty, report the model number, date of
purchase, serial number and the nature of the problem.
First obtain a Returned Goods Authorization number from the Customer Service department, then return the instrument with the
Authorization number included along with shipment costs prepaid.
If the repair is not covered by the warranty, you will be notified of
the charges. When shipping any instrument, make sure it is properly
packaged for complete protection.
2
3
SOIL p H
pH is the measure of the hydrogen ion concentration [H+]. Soil
can be acid, neutral or alkaline, according to its pH value.
Fig. 1 shows the relationship between the scale of pH and
types of soil. Most plants prefer a pH range from 5.5 to 7.5;
but some species prefer more acid or alkaline soils.
Nevertheless, every plant requires a particular range of pH,
for optimum growth.
Fig. 1. Types of soil according to the pH value
pH strongly influences the availability of nutrients and the presence
of microorganisms and plants in the soil.
For example, fungi prefer acidic conditions whereas most
bacteria, especially those supplying nutrients to the plants,
have a preference for moderately acidic or slightly alkaline
soils. In fact, in strongly acidic conditions, nitrogen fixing and
the mineralization of vegetable residual is reduced.
Plants absorb the nutrients dissolved in the soil water and the
nutrient solubility depends largely on the pH value. Hence, the
availability of elements is different at different pH levels (Fig.2).
Each plant needs elements in different quantities and this is the
reason why each plant requires a particular range of pH to
optimize its growth.
For example, iron, copper and manganese are not soluble in
an alkaline environment. This means that plants needing these
elements should theoretically be in an acidic type of soil.
Nitrogen, phosphorus, potassium and sulfur, on the other
hand, are readily available in a pH range close to neutrality.
Furthermore, abnormal pH values, increase the concentration
of toxic elements for plants. For example, in acid conditions,
there can be an excess of aluminum ions in such quantities
that the plant can not tolerate.
Negative effects on chemical and physical structure are also
present when pH values are too far from neutral conditions
(break up of aggregates, a less permeable and more compact
soil).
Management of the soil in relation to the pH value
Once the pH value is known, it is advisable to choose crops
that are suitable for this range (e.g. in an acid soil, cultivate
rice, potato, strawberry).
Add fertilizers that do not increase acidity (for example urea,
calcium nitrate, ammonium nitrate and superphosphate) or
lower alkalinity (e.g. ammonium sulfate).
It is recommended that a cost evaluation is made prior to
commencement of the soil pH modification. Corrective
substances can be added to modify the soil pH, however, the
effects are generally slow and not persistent. For example, by
adding lime, the effects in clay soil can last for as long as 10
years, but only 2-3 years in a sandy soil.
For an acid soil, we can use substances such as lime, dolomitic,
limestone and marl, according to the nature of the soil (Tab.1).
Soil Ameliorants
Clay soil
Silty soil
Sandy soil
CaO
30-50
20-30
10-20
Ca(OH)2
39-66
26-39
13-26
CaMg(CO3)2
49-82
33-49
16-33
Ca CO3
54-90
36-54
18-36
Tab.1. Quantity (q/ha) of pure compound necessary to increase 1 unit of pH
Fig. 2. Solubility of the elements according to varying pH
4
5
High pH levels can depend on different elements, hence, there
are different methods for its correction.
- Soils rich with limestone:
Add organic matter (this is due to the fact that non-organic
ameliorants such as sulfur and sulfuric acid might not make
economic sense due to the large quantities needed).
- Alkaline-saline soils:
Alkalinity is due to the presence of salts (in particular a high
concentration of sodium can be harmful).
Irrigation washes away salts, hence, an appropriate use of
irrigation can provide positive results (drop-irrigation being the
most recommended).
If alkalinity is caused by sodium, it is recommended to add
substances such as gypsum (calcium sulfate), sulfur or other
sulfuric compounds (Tab.2). Also in this case, a cost evaluation
is necessary.
Soil ameliorants (pure compounds)
Quantity (kg)
Calcium chloride: CaCl2 · 2H2O
85
Sulfuric acid: H2SO4
57
Sulfur: S
19
Iron sulfate: Fe2 (SO4)3 · 7H2O
162
129
Aluminum sulfate: Al2 (SO4)3
Tab.2. Quantities provide the same result as 100 kg of gypsum
Procedure for direct ground measurement
1) Dig, discarding 5 cm of topsoil
2) Perforate the soil (with HI 721319 soil drill) to a depth of
about 20 cm or more
3) If the soil is dry, moisten it with a small amount of distilled
water
4) Wash the electrode with tap water (not distilled)
5) Insert the electrode pushing it slightly into the soil to ensure
proper contact
6) Observe the measurement
7) Wash the electrode with tap water (not distilled) and (using
a finger) gently remove any soil remaining on the electrode
(avoid using a rag or cloth)
8) Repeat the procedure in different locations in the field
9) Consider the average of the measured data
6
For best result, it is advisable to measure the pH of a soil solution,
using a sample of soil and soil preparation solution HI 7051; it is
better to use this procedure if you have to test a stony field in
which you risk damaging the electrode.
Procedure for the measurement of soil solution (1:2,5)
A) Sampling
1) Extracting Soil Sample.
Take 1 sample per 1000 m2 (0.25 acre) of homogeneous
area.
Even for small areas, 2 samples are recommended (the
more the samples, the better the end-results, because the
result is more representative).
2) Avoid extracting samples from soil presenting obvious
anomalies and consider them separately.
3) Sample quantity:
Take the same quantity of soil for each sample. For example,
use bags with similar dimensions (1 bag per sample).
4) Depth of extraction:
General: dig and discard 5 cm (2") of topsoil.
Herbaceous crops: from 20 to 40 cm of depth (8" to 16").
Orchards: from 20 to 60 cm of depth (8" to 24'’).
5) Spread the soil samples on the pages of a newspaper and
let the soil dry in a shady place or put it in an oven at 40°C.
6) Crumble the dried soil and mix all the samples together to
obtain a homogeneous mixture, discarding stones and
vegetable residues.
7) From this mixture, take the soil sample for analysis.
B) Soil solution preparation and measurement
1) Sift the soil at 2 mm.
2) Weigh 10 g of soil and put it in 25 ml of soil preparation
solution HI 7051 (use the apposite beaker) or 20 g of soil per
50 ml of soil preparation solution HI 7051.
3) Mix for 30 seconds.
4) Wait for about 5 minutes.
5) Mix again and measure the pH of the solution.
7
ORGANIC SUBSTRATE
pH measurements of organic substrates is important in
greenhouses and nursery growing pots. pH should be checked
at the outset to make sure that the pH of the substrate bought
is that desired (pH can change if too much time elapses from
the date of packaging to the moment of utilization).
A) Direct measurement in pot
If the substrate is dry, add a little distilled water. Insert the
electrode into the soil and take measurement.
B) Measurement of the organic substrate solution (1:2)
Let the substrate dry and discard the coarse vegetable residues
and pebbles.
Prepare a solution composed of 1 part of mould and 2 parts
of HI 7051 solution (for example: fill the beaker with the
substrate up to 50 ml, press it gently, empty the content in
another container and add 100 ml of HI 7051 solution).
Mix for 30 seconds and then wait for 5 minutes. Mix again and
measure the pH of the solution.
IRRIGATION WATER
The quality of irrigation water is a very important factor. If the
pH value is very far from pH 7, it is possible that other
anomalies are present.
Ranges for evaluation of water quality:
- 6 to 8.5 pH: good, it can be utilized without problems.
- 5 to 6 pH or 8.5 to 9 pH: sufficient, sensible crops could
have problems.
- 4 to 5 pH or 9 to 10 pH: scarce, use it carefully, avoid
wetting the vegetation.
- pH<4 or pH>10: very scarce, there are other anomalies that
have to be identified via chemical analysis.
NUTRIENT SOLUTION
A rational fertilization is needed for optimum plants growth in
greenhouses. The pH value of the nutrient solution (water +
fertilizer) has to meet the plants need.
If a fertirrigation system with automatic pH control is used,
ensure that it is functioning properly.
Check the pH of the irrigation solution as well as any recycled
solution.
8
ORCHARD PLANTS
Preferred pH Range
Apple
Apricot
Cherry
Grapefruit
Grapevine
Lemon
Nectarine
5-6.5
6-7
6-7.5
6-7.5
6-7
6-7
6-7.5
Preferred pH Range
Orange
Peach
Pear
Plum
Pomegranate
Walnut
5-7
6-7.5
6-7.5
6-7.5
5.5-6.5
6-8
VEGETABLES AND HERBACEOUS CULTIVATIONS
Preferred pH Range
Artichoke
Asparagus
Barley
Bean
Brussels Sprout
Early carrot
Late carrot
Cucumber
Egg Plant
Lettuce
Maize
Melon
Oat
Onion
Pea
6.5-7.5
6-8
6-7
6-7.5
6-7.5
5.5-7
5.5-7
5.5-7.5
5.5-7
6-7
6-7.5
5.5-6.5
6-7
6-7
6-7.5
Preferred pH Range
Pepper
Early Potato
Late Potato
Sweet Potato
Pumpkin
Rice
Soybean
Spinach
Strawberry
String
Sugar beet
Sunflower
Tomato
Watermelon
Wheat
6-7
4.5-6
4.5-6
5.5-6
5.5-7.5
5-6.5
5.5-6.5
6-7.5
5-7.5
6-7.5
6-7
6-7.5
5.5-6.5
5.5-6.5
6-7
LAWN
Preferred pH Range
Lawn
6-7.5
GARDEN PLANTS AND FLOWERS
Preferred pH Range
Acacia
Acanthus
Amaranth
Bougainvillea
Dahlia
Erica
Euphorbia
Fuchsia
Gentian
Gladiolus
Hellebore
Hyacinth
Iris
Juniper
6-8
6-7
6-6.5
5.5-7.5
6-7.5
4.5-6
6-7
5.5-7.5
5-7.5
6-7
6-7.5
6.5-7.5
5-6.5
5-6.5
Preferred pH Range
Ligustrum
Magnolia
Narcissus
Oleander
Paulownia
Portulaca
Primula
Rhododendron
Roses
Sedum
Sunflower
Tulip
Viola
9
5-7.5
5-6
6-8,5
6-7.5
6-8
5.5-7.5
6-7.5
4.5-6
5.5-7
6-7.5
5-7
6-7
5.5-6.5
HOUSE PLANTS
Preferred pH Range
Abutilon
African violet
Anthurium
Araucaria
Azalea
Begonia
Camellia
Croton
Cyclamen
Dieffenbachia
Dracaena
Freesia
5.5-6.5
6-7
5-6
5-6
4.5-6
5.5-7.5
4.5-5.5
5-6
6-7
5-6
5-6
6-7.5
Preferred pH Range
Gardenia
Geranium
Hibiscus
Jasmine
Kalanchoe
Mimosa
Orchid
Palms
Peperomia
Philodendron
Yucca
pH METER SPECIFICATIONS
5-6
6-8
6-8
5.5-7
6-7.5
5-7
4.5-5.5
6-7.5
5-6
5-6
6-7.5
Range (*)
Resolution
Accuracy
(@20°C/68°F)
-2.00 to 16.00 pH
-5.0 to 105.0°C / 23.0 to 221.0°F
0.01 pH / 0.1°C / 0.1°F
±0.02 pH
±0.5°C up to 60°C; ±1°C outside
±1°F up to 140°F; ±2°F outside
Temperature Compensation
Automatic
pH Calibration
Automatic, 1 or 2 point
with 2 sets of memorized buffers
Probe (included)
HI 1292D pH/temperature probe
Battery Type / Life
3 x 1.5V AA (IEC LR6) / approx. 1500 hours
Auto-off
After 8 minutes of non-use
Environment
0 to 50°C (32 to 122°F); RH 100%
Dimensions
150 x 80 x 36 mm (5.9 x 3.2 x 1.4”)
Weight
210 g (7.4 oz.)
(*) The temperature range is limited to 80°C (176°F) if using the
HI1292D probe.
To clean the meter, use water only.
10
11
OPERATING THE pH METER
To connect the probe
With the meter turned off, connect the HI 1292D probe to the DIN
socket on the top of the meter by aligning the pins and pushing in
the plug. Tighten the nut to ensure a good connection. Remove
the protective cap from the probe before taking any measurements.
To turn the meter ON and check the battery status
Press the ON/OFF/MODE button until the display lights up. At
start-up, all the LCD segments are displayed for 1 second, then
the percent indication of the remaining battery life is shown for
another second (E.g. % 100 BATT). The meter then enters the
normal measuring mode.
Note: If the display needs to be checked, keep the ON button
pressed while turning the meter on. The meter will display all
segments as long as the button is pressed.
To freeze the display
While in measurement mode, press the SET/HOLD button,
HOLD appears on the secondary display and the reading will
be frozen on the LCD (E.g. pH 5.73 HOLD). Press any button
to return to normal mode.
To turn the meter OFF
While in normal measurement mode, press the ON/OFF/MODE
button. OFF will appear on the secondary display. Release the
button.
Note: The meter is provided with an acoustic signal feature, which
can be disabled using the switch located in the battery compartment.
Note: When the meter detects the absence of a temperature probe
at its input, the Automatic Temperature Compensation is turned
off, and the meter uses a default value of 25°C (77°F) for the
temperature measurement and compensation. In this condition, the secondary LCD shows 25.0°C (77.0°F) blinking.
When a probe is connected, the meter automatically returns
to the ATC mode, the ATC tag is turned on, and the temperature is shown on the secondary display.
12
pH MEASUREMENT & CALIBRATION
• Make sure the meter has been calibrated before use.
• If the probe is dry, soak it in HI 70300 storage solution for
one hour to reactivate it.
• Place the tip of the probe into the sample to be tested, stir briefly
and wait until the stability symbol on the LCD is turned off.
• The LCD shows the pH value (automatically compensated for
temperature) on the primary LCD, while the secondary LCD
shows the temperature of the solution.
• If measurements are taken in different samples successively, rinse
the probe tip thoroughly to avoid contaminations. After cleaning,
rinse the probe tip with some of the sample to be measured.
pH calibration
For better accuracy, a frequent electrode cleaning (see
also pag. 15) and meter calibration is recommended.
In addition, the instrument must be recalibrated whenever:
a) The pH electrode is replaced.
b) After testing aggressive chemicals.
c) Where high accuracy is required.
d) At least once a month.
• From normal mode, press & hold ON/OFF/MODE until OFF on
the secondary display is replaced by CAL. Release the button.
• The LCD enters the calibration mode, displaying “pH 7.01 USE”
(or “pH 6.86 USE” if the NIST buffer set was selected). After 1
second the meter activates the automatic buffer recognition feature. If a valid buffer is detected, then its value is shown on the
primary display, and REC appears on the secondary LCD. If
no valid buffer is detected, the meter keeps the USE indication
active for 12 seconds, and then replaces it with WRNG, indicating that the sample being measured is not a valid buffer.
• For a single-point calibration with buffers pH 4.01, 9.18 or
10.01, the meter automatically accepts the calibration when the
reading is stable; the meter will show on the primary display the
accepted buffer, with the message “OK 1” on the secondary
display, and an audible signal is produced. After 1 second the
meter automatically returns to the normal measuring mode.
If a single-point calibration with buffers pH 7.01 or 6.86 is desired, then after the calibration point has been accepted press
the ON/OFF/MODE button in order to return to the normal
measuring mode. After the button is pressed, the meter shows
13
"7.01" (or "6.86") - "OK 1", and an audible signal is produced.
After 1 second, the meter automatically returns to the normal
measuring mode.
Note: It is always recommended to carry out a two-point calibration for better accuracy.
• For a two-point calibration, place the probe in pH 7.01 (or pH
6.86) buffer. After the calibration point has been accepted,
the “pH 4.01 USE” message appears. The message is held
for 12 seconds, unless a valid buffer is recognized. If no valid
buffer is recognized, then the WRNG message is shown. If a
valid buffer (pH 4.01, pH 10.01 or pH 9.18) is detected, then
the meter completes the calibration procedure. When the
buffer is accepted, the LCD shows the accepted value with
the “OK 2” message on the secondary display. The meter
then returns to the normal measuring mode.
Note: When the calibration is completed, the CAL tag is turned on.
To quit calibration and to reset to the default values
• After entering the calibration mode and before the first point is accepted, it is possible to quit the procedure and return to the last
calibration data by pressing ON/OFF/MODE. The secondary LCD
displays ESC for 1 sec. and the meter returns to normal mode.
• To reset to the default values and clear a previous calibration,
press the SET/HOLD button after entering the calibration mode
and before the first point is accepted.
The secondary LCD displays CLR for 1 sec, the meter resets to the
default calibration and the “CAL” tag on the LCD disappears.
ELECTRODE CLEANING
A frequent cleaning of the pH electrode is strongly recommended to
ensure correct calibration and reliable readings.
Hanna Instruments has developed a complete series of cleaning
solutions dedicated to specific applications and kind of dirty that has
to be removed from the electrode.
In soil measurements you can choose between two different solutions accordingly to the type of tested soil:
• HI 700663 is indicated for inorganic soil deposits (as minerals,
limestone, adsorbed clays)
• HI 700664 is specific for organic soil deposits (humus)
If cleaning is performed frequently, soak the electrode in the specific
solution for a few minutes.
If the electrode has not be cleaned for a while, for a complete
removal of soil deposits, proceed as follows:
• wipe the electrode body (not bulb) with paper or soft tissue
• rub the reference with abrasive paper
• immerse into cleaning solution for at least 15 minutes.
METER SETUP
BATTERY REPLACEMENT
Setup mode allows to select the temperature unit and the pH buffer
set. To enter the Setup mode, press & hold ON/OFF/MODE until
CAL on the secondary display is replaced by TEMP and the
current temperature unit (E.g. TEMP °C). Then:
• for °C/°F selection, use the SET/HOLD button. After the temperature unit has been selected, press ON/OFF/MODE to
enter the buffer set selection mode; press ON/OFF/MODE
twice to return to the normal measuring mode.
• to change the calibration buffer set, after setting the temperature unit, the meter will show the current buffer set: “pH 7.01
BUFF” (for 4.01/7.01/10.01) or “pH 6.86 BUFF” (for 4.01/
6.86/9.18). Change the set with the SET/HOLD button, then
press ON/OFF/MODE to return to normal mode.
The meter displays the remaining battery percentage when
turned on. When the level is below 5%, the - + symbol on the
bottom left of the LCD blinks to indicate a low battery condition.
If the battery level is low enough to cause erroneous readings,
the Battery Error Prevention System (BEPS) turns the meter off.
Unscrew the 4 screws located on the back of the meter and
carefully replace the 3 AA batteries located in the battery compartment, while paying attention to their polarity. Reattach the
back making sure that the gasket is in place and tighten the 4
screws to ensure a watertight seal.
14
15
TECHNICAL SERVICE CONTACTS
Australia:
Tel. (03) 9769.0666 • Fax (03) 9769.0699
China:
Tel. (10) 88570068 • Fax (10) 88570060
Egypt:
Tel. & Fax (02) 2758.683
Germany:
Tel. (07851) 9129-0 • Fax (07851) 9129-99
Greece:
Tel. (210) 823.5192 • Fax (210) 884.0210
Indonesia:
Tel. (21) 4584.2941 • Fax (21) 4584.2942
Japan:
Tel. (03) 3258.9565 • Fax (03) 3258.9567
Korea:
Tel. (02) 2278.5147 • Fax (02) 2264.1729
Malaysia:
Tel. (603) 5638.9940 • Fax (603) 5638.9829
Singapore:
Tel. 6296.7118 • Fax 6291.6906
South Africa:
Tel. (011) 615.6076 • Fax (011) 615.8582
Taiwan:
Tel. 886.2.2739.3014 • Fax 886.2.2739.2983
United Kingdom:
Tel. (01525) 850.855 • Fax (01525) 853.668
09/05
USA:
Tel. (401) 765.7500 • Fax (401) 765.7575
MAN99121R3
Thailand:
Tel. 66.2619.0708 • Fax 66.2619.0061
For e-mail contacts and complete list of Sales and Technical
offices, please see www.hannainst.com