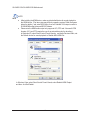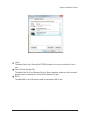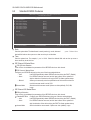
1
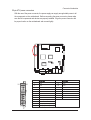
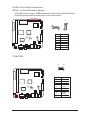
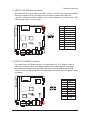
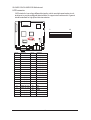
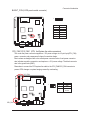
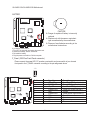
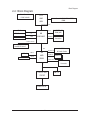
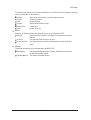
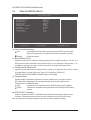
GA-2AIEL1-RH GA-2AIEL5-RH AMD® mini-ITX Motherboard USER’S MANUAL AMD® mini-ITX Motherboard Rev. 1001 * The WEEE marking on the product indicates this product must not be disposed of with user's other household waste and must be handed over to a designated collection point for the recycling of waste electrical and electronic equipment!! * The WEEE marking applies only in European Union's member states. GA-2AIEL1-RH/GA-2AIEL5-RH Motherboard Copyright © 2009 GIGA-BYTE TECHNOLOGY CO., LTD. All rights reserved. The trademarks mentioned in the manual are legally registered to their respective companies. Notice The written content provided with this product is the property of Gigabyte. No part of this manual may be reproduced, copied, translated, or transmitted in any form or by any means without Gigabyte's prior written permission. Specifications and features are subject to change without prior notice. Product Manual Classification In order to assist in the use of this product, Gigabyte has categorized the user manual in the following: For detailed product information and specifications, please carefully read the "Product User Manual". For detailed information related to Gigabyte's unique features, please go to "Technology Guide" section on Gigabyte's website to read or download the information you need. For more product details, please click onto Gigabyte's website at www.gigabyte.com.tw 2 Item Checklist..................................................................................................................4 Chapter 1 Introduction.....................................................................................................5 1-1 Considerations Prior to Installation......................................................................5 1.2 Features Summary . ............................................................................................6 1.3 Motherboard Components....................................................................................8 Chapter 2 Hardware Installation Process........................................................................9 2-1: Install Memory Modules......................................................................................9 2-2: I/O Back Panel Introduction..............................................................................10 2-3: Connectors Introduction....................................................................................14 2-4: Block Diagram...................................................................................................21 Chapter 3 BIOS Setup...................................................................................................22 3-1: Startup Screen..................................................................................................23 3-2: The Main Menu.................................................................................................24 3-3: Standard CMOS Features.................................................................................26 3-4: Advanced BIOS Features..................................................................................28 3-5: Integrated Peripherals.......................................................................................30 3-6: Power Management Setup...............................................................................32 3-7: PC Health Status...............................................................................................34 3-8: Load Fail-Safe Defaults.....................................................................................35 3-9: Load Optimized Defaults...................................................................................35 3-10: Set Supervisor/User Password.......................................................................36 3-11: Save & Exit Setup...........................................................................................37 3-12: Exit Without Saving.........................................................................................37 Exit...........................................................................................................................38 3 English Table of Contents Table of Content GA-2AIEL1-RH/GA-2AIEL5-RH Motherboard Item Checklist The GA-2AIEL1-RH/GA-2AIEL5-RH motherboard Serial ATA cable x 2 I/O Shield Kit CD for motherboard driver & utility GA-2AIEL1-RH/GA-2AIEL5-RH Quick Reference Guide * The items listed above are for reference only, and are subject to change without notice. 4 Introduction Chapter 1 Introduction 1-1 Considerations Prior to Installation Preparing Your Computer The motherboard contains numerous delicate electronic circuits and components which can become damaged as a result of electrostatic discharge (ESD). Thus, prior to installation, please follow the instructions below: 1. Please turn off the computer and unplug its power cord. 2. When handling the motherboard, avoid touching any metal leads or connectors. 3. It is best to wear an electrostatic discharge (ESD) cuff when handling electronic components (CPU, RAM). 4. Prior to installing the electronic components, please have these items on top of an antistatic pad or within a electrostatic shielding container. 5. Please verify that the power supply is switched off before unplugging the power supply connector from the motherboard. Installation Notices 1. 2. 3. 4. 5. 6. 7. 8. Prior to installation, please do not remove the stickers on the motherboard. These stickers are required for warranty validation. Prior to the installation of the motherboard or any hardware, please first carefully read the information in the provided manual. Before using the product, please verify that all cables and power connectors are connected. To prevent damage to the motherboard, please do not allow screws to come in contact with the motherboard circuit or its components. Please make sure there are no leftover screws or metal components placed on the motherboard or within the computer casing. Please do not place the computer system on an uneven surface. Turning on the computer power during the installation process can lead to damage to system components as well as physical harm to the user. If you are uncertain about any installation steps or have a problem related to the use of the product, please consult a certified computer technician. Instances of Non-Warranty 1. 2. 3. 4. 5. 6. Damage due to natural disaster, accident or human cause. Damage as a result of violating the conditions recommended in the user manual. Damage due to improper installation. Damage due to use of uncertified components. Damage due to use exceeding the permitted parameters. Product determined to be an unofficial Gigabyte product. 5 GA-2AIEL1-RH/GA-2AIEL5-RH Motherboard 1.2 Features Summary Form Factor CPU Chipset 170mm x 170mm Mini ITX form factor, 4 layers PCB. K8 BGA 1.0GHz (GA-2AIEL1-RH) K8 BGA 1.5GHz (GA-2AIEL5-RH) AMD® 690E AMD® SB600 Memory 1 x DDR2 DIMM sockets Supports up to 2GB 533/667/800 memory Supports 1.8V DDR2 DIMMs I/O Control ITE IT8720F Super I/O Expansion Slots Supports 1 PCI-E x4 (x1 bandwidth) SATA Controller Built in AMD® SB600 with RAID 0,1,10 Supports 4 SATA 2 connectors Build in AMD® 690E On-Board Graphic Relteak® ALC889A On-Board Sound Internal Connector 1 x 20-pin ATX power connector 4 x SATA connectors 2 x Serial connectors (COM) 1 x front audio connector 1 x LVDS connector 2 x USB 2.0 connectors for additional 4 ports by cable 1 x front panel connecctor 1 x System fan cable connector 1 x CPU fan cable connector 1 x CF Connector 1 x Back Light Connector 2 x Speraker Out Connector 1 x DIO Connector Rear Panel I/O 1 x SPDIF Out 1 x HDMI prot 1 x VGA port 2 x Serial ports(COM) 4 x USB 2.0 port 1 x LAN RJ45 port 1 HD Audio jack (Line-out / MIC-in / Line-in) can configure 5.1 channel output by utility 6 Introduction Hardware Monitor On-Board LAN BIOS Additional Features Enhanced features with CPU Vcore, DDR2 1.8V , +3.3V, +12V value viewing System/CPU temperature value viewing CPU shutdown when overheat Realtek RTL8111C GbE coneroller Supports WOL Award BIOS on 8Mb SPI Flash ROM Supports S1, S3, S4, S5 under Windows Operating System Supports 4-pin Fan controller 7 GA-2AIEL1-RH/GA-2AIEL5-RH Motherboard Motherboard Components (GA-2AIEL1-RH/GA-2AIEL5-RH) SATA 4 COM1 HDMI VGA SPDIF out (OPTICAL) 8 DIO_CON Audio Jack COM2 PCI-Ex4 BLIGHT_CON1 LAN COM3 CPU_FAN1 ITE Super I/O BATTERY AMD 690E CPU CLR_CMOS1 DDRll_1 ATX Power AMD SB600 LVDS_CON COM4 SATA 3 F_USB1 SATA 2 F_PANEL F_USB2 SATA 1 CF Card connector F_AUDIO1 SYS_FAN1 USB 1.3 Hardware Installation Process 2-1: Install Memory Modules Before installing the memory modules, please comply with the following conditions: 1. Please make sure the computer power is switched off before installing or removing memory modules. The motherboard supports DDR2 memory module, whereby BIOS will automatically detect memory capacity and specifications. The memory module only can be inserted in one direction. Installation Steps: Step 1. Step 2. Unlock a DIMM socket by pressing the retaining clips outwards. Aling a DIMM on the socket such that the notch on the DIMM exactly match the notch in the socket. Firmly insert the DIMMinto the socket until the retaining clips snap back in place. Reverse the installation steps if you want to remove the DIMM module. Table 1. Supported DIMM Module Type Size 256MB 512MB 1GB 2GB Organization RAM Chips/DIMM 8MB x 8 x 4 bks 8 16MB x 16 x 4bks 16 16MB x 8 x 4bks 8 132MB x 16 x 4bks 16 32MB x 8 x 4bks 8 64MB x 16 x 4bks 16 32MB x 8 x 4bks 8 64MB x 16 x 4bks 16 9 GA-2AIEL1-RH/GA-2AIEL5-RH Motherboard 2-2: I/O Back Panel Introduction 10 Hardware Installation Process Serial Port Modem can be connected to serial port. VGA Port Connect the monitor cable to this port. SPDIF Out (OPTICAL) The SPDIF optical output port is capable for providing digital audio to external speakers or compressed AC3 data to an external Dolby Digital Decoder via an optical cable. The HDMI (High-Definition Multimedia Interface) provides an all-digital audio/video interface to transmit the uncompressed audio/video signals and is HDCP compliant. Connect the HDMI audio/video device to this port. The HDMI Technology can support a maximum resolution of 1920x1080p but the actual resolutions supported depend on the monitor being used. HDMI Port LAN Port The LAN port provides Internet connection of Gigabit Ethernet with data transfer speeds of 10/100/1000Mbps. USB Before you connect your device(s) into USB connector(s), please make sure your device(s) such as USB keyboard, mouse, scanner, zip, speaker...etc. have a standard USB interface. Also make sure your OS supports USB controller. If your OS does not support USB controller,please contact OS vendor for possible patch or driver updated. For more information please contact your OS or device(s) vendors. 11 GA-2AIEL1-RH/GA-2AIEL5-RH Motherboard NOTE: After installing the HDMI device, make sure the default device for sound playback is the HDMI device. (The item name may differ by operating system. Refer the figures below for details.), and enter BIOS Setup, then set Onboard VGA output connect to D-SUB/HDMI under Advanced BIOS Features. Please note the HDMI audio output only supports AC3, DTS and 2-channel-LPCM formats. (AC3 and DTS require the use of an external decoder for decoding.) In Windows XP, select Start>Control Panel>Sounds and Audio Devices>Audio, set the Default device for sound playback to Realtek HDA HDMI Out. In Windows Vista, select Start>Control Panel>Sound, select Realtek HDMI Output and then click Set Default. 12 Hardware Installation Process Line In The default Line In jack. Devices like CD-ROM, walkman etc. can be connected to Line In jack. Line Out (Front Speaker Out) The default Line Out (Front Speaker Out) jack. Stereo speakers, earphone or front surround speakers can be connected to Line Out (Front Speaker Out) jack. MIC In The default MIC In jack. Microphone must be connected to MIC In jack. 13 GA-2AIEL1-RH/GA-2AIEL5-RH Motherboard 2-3: Connectors Introduction 8 7 34 9 10 32 1112 3 13 35 20 14 2 1 17 6 36 4 1. 2. 3. 4. 5. 6. 7. 8. 9. 10. 11. 12. 13. 14. 15. 16. 17. 18. 33 31 29 28 27 18 19 16 5 30 25 26 23 22 21 15 24 CPU Processor socket 19. BATTERY U1 AMD 690E 20. DDRII_1 U2 AMD SB600 21. AUDIO1 Realtek RTL8111C GbE LAN controlle 22. R_USB LU3 Realtek ALC889A Audio controller CU1 23. LAN U10 ITE IT8720F Super I/O controller 24. HDMI SATAII0_1 SATA Data cable connector 25. COM1 SATAII0_2 SATA Data cable connector 26. OPTICAL SATAII0_3 SATA Data cable connector 27. COM2/VGA SATAII0_4 SATA Data cable connector 28. COM3 F_USB1 Front USB cable connector 29. COM4 F_USB2 Front USB cable connector 30. JP6 F_PANEL Front panel connector 31. JP8 DIO_CON GPIO Input/Output connector 32. CF_CON F_AUDIO1 Front HDA Audio cable connector 33. CPU_FAN1 BLIGHT_CON1 LVDS panel control connector 34. SYS_FAN1 LVDS_CON LVDS connector 35. ATX PCIEX4 PCI-E x4 slot (Gen2, x1 bandwidth) 36. CLR_CMOS1 14 CMOS Battery DDR2 socket Audio port USB 2.0 ports Gigabit LAN port HDMI port Serial port S/PDIF port (Optical) Serial port and VGA port Serial port cable connector Serial port cable connector Power COM select Power COM select CF connector CPU fan cable connector System fan cable connector 20-pin ATX power connector Clear CMOS jumper Close:Clear CMOS Open:Normal CMOS setting (Default) Connector Introduction 20-pin ATX power connectors With the use of the power connector, the power supply can supply enough stable power to all the components on the motherboard. Before connecting the power connector, please make sure that all components and devices are properly installed. Align the power connector with its proper location on the motherboard and connect tightly. Pin No. 20 10 1 1 2 3 4 5 6 7 8 9 10 + 11 12 Pin No. 3.3V 3.3V GND +5V GND +5V GND Power Good 5V SB(stand by +5V) 12V +12V(Only for 24-pin ATX) 3.3V(Only for 24-pin ATX) 11 15 13 14 15 16 17 18 19 20 3.3V -12V GND PS_ON(soft On/Off) GND GND GND -5V GA-2AIEL1-RH/GA-2AIEL5-RH Motherboard SATAII0_1~4 (Serial ATA cable connectors) F_AUDIO SATA 3Gb/s can provide up to 300MB/s stransfer rate. Please refer to the BIOS setting for the SATA 3Gb/s and install the proper driver in order to work properly. F_USB F_1394 7 1 7 IR/CIR 1 IR COMB Pin No. 1 2 3 4 5 6 7 Definition GND TXP TXN GND RXN RXP GND COM3/COM4 F_USB 2 10 1 9 COMB SUR_CEN Pin No. 1 2 3 4 Power 5 6 7 8 9 10 MODEM 16 SPDIF_IO F2_1394 Definition NDCDNSIN NSOUT NDTRGND NDSRNRTSNCTSNRINo Pin F_1394 F_PANEL Connector Introduction IR/CIR F_USB1/2 (Front USB cable connectors) F_PANEL Be careful with the polarity of the front USB connector. Check the pin assignment carefully while you connect the front USB cable, incorrect connection between the cable and connector will make the device unable to work or even damage it. For optional front USB cable, please contact your local dealer. IR COMB PWR_LED 2 10 1 9 Pin No. 1 2 3 4 5 6 7 8 9 10 F_USB CLR_CMOS BIOS_WP CLR_CMOS BIOS_WP Definition Power (5V) Power (5V) USB DxUSB DyUSB Dx+ USB Dy+ GND GND No Pin NC COMB SUR_CEN CI F_AUDIO1 (Front AUDIO connector) F_PANEL If you want to use Front Audio connector, you must remove 5-6, 9-10 Jumper. In order to utilize the front audio header, your chassis must have front audio connector. Also please CLR_PWD make sure the pin assigment on the cable is the same as the pin assigment on the MB Power MODEM DPVRM F_AUDIOyou are buying support front audio connector, Smart Card Reader contact header. To find out if the chassis please your dealer. F_PANEL F1_1394 9 1 10 2 F_AUDIO SPDIF_IO Pin No. 1 2 3 4 5 6 7 8 9 10 Definition MIC_L GND MIC_R -ACZ_DEC F2_1394 Line_R GND Faudio_JD No Pin Line_L F_USB F_1394 GND F_PANEL IR/CIR GAME 17 F_PANEL IR SMB_CONN F_AUDIO (NEW) GA-2AIEL1-RH/GA-2AIEL5-RH Motherboard LVDS connector LVDS stands for Low-voltage differential signaling, which uses high-speed analog circuit techniques to provide multigigabit data transfers on copper interconnects and is a generic interface standard for high-speed data transmission. Pin No. 1 2 3 4 5 6 7 8 9 10 11 12 13 14 15 16 17 18 19 20 Definition GND +3.3V +3.3V +3.3V +3.3V +3.3V NC EDID CLK EDID DATA NC LVDS_TX_L0LVDS_TX_L0+ LVDS_TX_L1LVDS_TX_L1+ LVDS_TX_L2LVDS_TX_L2+ LVDS_TX_CLKLVDS_TX_LK+ LVDS_TX_L3LVDS_TX_L3+ Pin No. 21 22 23 24 25 26 27 28 29 30 31 32 33 34 35 36 37 38 39 40 Definition LVDS_TX_U0LVDS_TX_U0+ LVDS_TX_U1LVDS_TX_U1+ LVDS_TX_U2LVDS_TX_U2+ LVDS_TX_CLKULVDS_TX_CLKU+ LVDS_TX_U3LVDS_TX_U3+ NC NC +5V +5V +5V NC NC GND GND GND 18 2 40 1 39 Connector Introduction BLIGHT_CON (LVDS panel control connector) 1 6 Pin No. Definition 1 +12V 2 +5V 3 NC 4 BL ADJUST 5 BL ENABLE 6 GND CPU_FAN1/SYS_FAN1 (CPU fan/System fan cable connectors) The cooler fan power connector supplies a +12V power voltage via a 3-pin/4-pin(CPU_FAN) power connector and possesses a foolproof connection design. Most coolers are designed with color-coded power connector wires. A red power connector wire indicates a positive connection and requires a +12V power voltage. The black connector wire is the ground wire (GND). Remember to connect the CPU/system fan cable to the CPU_FAN/SYS_FAN connector to prevent CPU damage or system hanging caused by overheating. SYS_FAN 1 CPU_FAN 19 Pin No. 1 2 3 4 Definition GND 12V Sense Control GA-2AIEL1-RH/GA-2AIEL5-RH Motherboard BATTERY Serial ATA F_USB F_1394 CAUTION Danger of explosion if battery is incorrectly SPDIF replaced. Replace only with the same or equivalent type recommended by the manufacturer. Dispose of used batteries according to the manufacturer’s instructions. AUX_IN F1_1394 COMB CD_IN If you want to erase CMOS... 1.Turn OFF the computer and unplug the power cord. 2.Remove the battery, wait for 30 second. 3.Re-install the battery. 4.Plug the power cord and turn ON the computer. CPU_FAN SYS_FAN PWR_FAN F_Panel (2X5 Pins Front Panel connector) Please connect the power LED, PC speaker, reset switch and power switch of your chassis front panel to the F_PANEL connector according to the pin assignment above. COMB Power F2_1394 1 2 NB_FAN 9 10 WOL Pin No. 1. 2. 3. 4. 5. 6. 7. 8. 9. 10. Signal Name HDD_LED+ POWER LED+ HD_LED- POWER LED- GND POWER SW+ RES GND NC NC 20 Description Hard Disk LED Signalanode (+) Power LED Signal anode (+) Hard Disk LED Signal cathode(-) Power LED Signal cathode(-) Ground Power Button Signal anode (+) Reset Button Ground No connect Pin removed Block Diagram 2-4: Block Diagram Clock Generator ICS951464AS CPU AMD BGA Unbuffered 400/533/667/800 DDR2 DIMM HyperTransport Link HDMI I2C I/F 1X PCI-E x4 slot RGB VGA Connector NB AMD 690E BOOTSTRAPS ROM (NB) LVDS MUX LVDS Connector 1 x PCI-E Interface Gigabit LAN Realtek RTL8111C SPI ROM USB 2.0 SPI I/F SB AMD SB600 ALC889A HD Audio Codec HD Aduio I/F SATAII I/F SATA x 4 ATA 66/100/133 I/F LPC USB x 8 DMI ITE LPC SIO IT8720F COM Port A, B 21 TMP 1,2 CF Card Connector GA-2AIEL1-RH/GA-2AIEL5-RH Motherboard Chapter 3 BIOS Setup BIOS (Basic Input and Output System) records hardware parameters of the system in the CMOS on the motherboard. Its major functions include conducting the Power-On Self-Test (POST) during system startup, saving system parameters and loading operating system, etc. BIOS includes a BIOS Setup program that allows the user to modify basic system configuration settings or to activate certain system features. When the power is turned off, the battery on the motherboard supplies the necessary power to the CMOS to keep the configuration values in the CMOS. To access the BIOS Setup program, press the <Delete> key during the POST when the power is turned on. To see more advanced BIOS Setup menu options, you can press <Ctrl> + <F1> in the main menu of the BIOS Setup program. To upgrade the BIOS, use either the GIGABYTE Q-Flash or @BIOS utility. • Q-Flash allows the user to quickly and easily upgrade or back up BIOS without entering the operating system. • @BIOS is a Windows-based utility that searches and downloads the latest version of BIOS from the Internet and updates the BIOS. For instructions on using the Q-Flash and @BIOS utilities, refer to Chapter 4, "BIOS Update Utilities." • Because BIOS flashing is potentially risky, if you do not encounter problems using the current version of BIOS, it is recommended that you not flash the BIOS. To flash the BIOS, do it with caution. Inadequate BIOS flashing may result in system malfunction. • It is recommended that you not alter the default settings (unless you need to) to prevent system instability or other unexpected results. Inadequately altering the settings may result in system's failure to boot. If this occurs, try to clear the CMOS values and reset the board to default values. (Refer to the "Load Optimized Defaults" section in this chapter or introductions of the battery/ clearing CMOS jumper in Chapter 1 for how to clear the CMOS values.) 22 BIOS Setup 3-1 Startup Screen The following screens may appear when the computer boots. Award Modular BIOS v6.00PG, An Energy Star Ally Copyright (C) 1984-2007, Award Software, Inc. Motherboard Model BIOS Version GA-2AIEL-RH . . . . F1 <DEL>: BIOS Setup/Q-Flash <F9>: XpressRecovery2 <F12>: Boot Menu <End>: Qflash 04/27/2007-RS690G-SB600-6A669G02C-00 Function Key Function Keys: <TAB> : POST Screen Press the <Tab> key to show the BIOS POST screen. To show the BIOS POST screen at system startup, refer to the instructions on the Full Screen LOGO Show item on page 40. <DEL> : BIOS Setup/Q-Flash Press the <Delete> key to enter BIOS Setup or to access the Q-Flash utility in BIOS Setup. <F9> : Xpress Recovery2 If you have ever entered Xpress Recovery2 to back up hard drive data using the motherboard driver disk, the <F9> key can be used for subsequent access to XpressRecovery2 during the POST. For more information, refer to Chapter 4, "Xpress Recovery2." <F12> : Boot Menu Boot Menu allows you to set the first boot device without entering BIOS Setup. In Boot Menu, use the up arrow key < > or the down arrow key< > to select the first boot device, then press <Enter> to accept. To exit Boot Menu, press <Esc>. The system will directly boot from the device configured in Boot Menu. Note: The setting in Boot Menu is effective for one time only. After system restart, the device boot order will still be based on BIOS Setup settings. You can access Boot Menu again to change the first boot device setting as needed. <End> : Q-Flash Press the <End> key to access the Q-Flash utility directly without having to enter BIOS Setup first. 23 GA-2AIEL1-RH/GA-2AIEL5-RH Motherboard 3-2 The Main Menu Once you enter the BIOS Setup program, the Main Menu (as shown below) appears on the screen. Use arrow keys to move among the items and press <Enter> to accept or enter a sub-menu. CMOS Setup Utility-Copyright (C) 1984-2007 Award Software Standard CMOS Features Advanced BIOS Features Integrated Peripherals Power Management Setup PC Health Status Load Fail-Safe Defaults ESC: Quit F8: Q-Flash Load Optimized Defaults Set Supervisor Password Set User Password Save & Exit Setup Exit Without Saving Security Chip Configuration : Select Item F10: Save & Exit Setup Time, Date, Hard Disk Type... BIOS Setup Program Function Keys < >< >< >< > <Enter> <Esc> <Page Up> <Page Down> <F1> <F2> <F5> <F6> <F7> <F8> <F9> <F10> Move the selection bar to select an item Execute command or enter the submenu Main Menu: Exit the BIOS Setup program Submenus: Exit current submenu Increase the numeric value or make changes Decrease the numeric value or make changes Show descriptions of the function keys Move cursor to the Item Help block on the right (submenus only) Restore the previous BIOS settings for the current submenus Load the Fail-Safe BIOS default settings for the current submenus Load the Optimized BIOS default settings for the current submenus Access the Q-Flash utility Display system information Save all the changes and exit the BIOS Setup program Main Menu Help The onscreen description of a highlighted setup option is displayed on the bottom line of the Main Menu. Submenu Help While in a submenu, press <F1> to display a help screen (General Help) of function keys available for the menu. Press <Esc> to exit the help screen. Help for each item is in the Item Help block on the right side of the submenu. • If you do not find the settings you want in the Main Menu or a submenu, press <Ctrl>+<F1>to access more advanced options. • When the system is not stable as usual, select the Load Optimized Defaults item to set your system to its defaults. • The BIOS Setup menus described in this chapter are for reference only and may differ by BIOS version. 24 BIOS Setup Standard CMOS Features Use this menu to configure the system time and date, hard drive types, floppy disk drive types, and the type of errors that stop the system boot, etc. Use this menu to configure the device boot order, advanced features available on the CPU, and the primary display adapter. Use this menu to configure all peripheral devices, such as IDE, SATA, USB, integrated audio, and integrated LAN, etc. Use this menu to configure all the power-saving functions. Use this menu to configure the system's PCI & PnP resources. Use this menu to see information about autodetected system/CPU temperature, system voltage and fan speed, etc. Fail-Safe defaults are factory settings for the most stable, minimal-performance system operations. Optimized defaults are factory settings for optimal-performance system operations. Change, set, or disable password. It allows you to restrict access to the system and BIOS Setup. A supervisor password allows you to make changes in BIOS Setup. Change, set, or disable password. It allows you to restrict access to the system and BIOS Setup. An user password only allows you to view the BIOS settings but not to make changes. Save all the changes made in the BIOS Setup program to the CMOS and exit BIOS Setup. (Pressing <F10> can also carry out this task.) Abandon all changes and the previous settings remain in effect. Pressing <Y> to the confirmation message will exit BIOS Setup. (Pressing <Esc> can also carry out this task.) Provides function for secure generation of cryptographic keys,the ability to limit use of crytographic keys,as well as hardware pseudo-random number generator Advanced BIOS Features Integrated Peripherals Power Management Setup PnP/PCI Configurations PC Health Status Load Fail-Safe Defaults Load Optimized Defaults Set Supervisor Password Set User Password Save & Exit Setup Exit Without Saving Security Chip Configuration 25 GA-2AIEL1-RH/GA-2AIEL5-RH Motherboard 3-3 Standard CMOS Features CMOS Setup Utility-Copyright (C) 1984-2007 Award Software Standard CMOS Features Date (mm:dd:yy) Time (hh:mm:ss) IDE Channel 0 Master IDE Channel 0 Slave IDE Channel 2 Master IDE Channel 2 Slave IDE Channel 3 Master IDE Channel 3 Slave [None] [None] [None] [None] [None] [None] Halt On [All Errors,but keyboard] Base Memory Extended Memory 640K 239M Enter: Select : Move F5: Previous Values Fri, Apr 22 2007 22:31:24 Item Help Menu Level +/-/PU/PD: Value F10: Save F6: Fail-Safe Default ESC: Exit F1: General Help F7: Optimized Defaults Date Sets the system date. The date format is week (read-only), month, date and desired field and use the up arrow or down arrow key to set the date. y e a r. S e l e c t t h e Time Sets the system time. For example, 1 p.m. is 13:0:0. Select the desired field and use the up arrow or down arrow key to set the time. IDE Channel 0 Master/Slave IDE HDD Auto-Detection Press <Enter> to autodetect the parameters of the IDE/SATA device on this channel. IDE Channel 0 Master/Slave Configure your IDE/SATA devices by using one of the three methods below: • Auto Lets BIOS automatically detect IDE/SATA devices during the POST. (Default) • None If no IDE/SATA devices are used, set this item to None so the system will skip the detection of the device during the POST for faster system startup. • Manual Allows you to manually enter the specifications of the hard drive when the hard drive access mode is set to CHS. Access Mode Sets the hard drive access mode. Options are: Auto (default), CHS, LBA, Large. IDE Channel 2/3 Master/Slave IDE Auto-Detection Press <Enter> to autodetect the parameters of the IDE/SATA device on this channel. Extended IDE Drive Configure your IDE/SATA devices using one of the two methods below: • Auto Lets BIOS automatically detect IDE/SATA devices during the POST. (Default) • None If no IDE/SATA devices are used, set this item to None so the system will skip the detection of the device during the POST for faster system startup. Access Mode Sets the hard drive access mode. Options are: Auto (default), Large. 26 BIOS Setup The following fields display your hard drive specifications. If you wish to enter the parameters manually, refer to the information on the hard drive. Capacity Approximate capacity of the currently installed hard drive. Cylinder Number of cylinders. Head Number of heads. Precomp Write precompensation cylinder. Landing Zone Landing zone. Sector Number of sectors. Halt on Allows you to determine whether the system will stop for an error during the POST. All Errors Whenever the BIOS detects a non-fatal error the system boot will stop. (Default) No Errors The system boot will not stop for any error. All, But Keyboard The system boot will not stop for a keyboard error but stop for all other errors. Memory These fields are read-only and are determined by the BIOS POST. Base Memory Also called conventional memory. Typically, 640 KB will be reserved for the MS-DOS operating system. Extended Memory The amount of extended memory. 27 GA-2AIEL1-RH/GA-2AIEL5-RH Motherboard 3-4 Advanced BIOS Features CMOS Setup Utility-Copyright (C) 1984-2007 Award Software Advanced BIOS Features AMD K8 Cool&Quiet control Hard Disk Boot Priority First Boot Device Second Boot Device Third Boot Device Password Check HDD S.M.A.R.T. Capability Away Mode Internal Graphics Mode Frame Buffer Size Current UMA Size Enter: Select : Move F5: Previous Values [Auto] [Press Enter] [Floppy] [Hard Disk] [CDROM] [Setup] [Disabled] [Disabled] [Auto] [Auto] 128 MB +/-/PU/PD: Value F10: Save F6: Fail-Safe Defaults Item Help Menu Level ESC: Exit F1: General Help F7: Optimized Defaults AMD K8 Cool&Quiet control Auto Disabled Lets the AMD Cool'n'Quiet driver dynamically adjust the CPU clock and VIA to reduce heat output from your computer and its power consumption. (Default) Disable this function. Hard Disk Boot Priority Specifies the sequence of loading the operating system from the installed hard drives. Use the up or down arrow key to select a hard drive, then press the plus key <+> (or <PageUp>) or the minus key <-> (or <PageDown>) to move it up or down on the list. Press <Esc> to exit this menu when finished. First/Second/Third Boot Device Specifies the boot order from the available devices. Use the up or down arrow key to select a device and press <Enter> to accept. Options are: Floppy, LS120, Hard Disk, CDROM, ZIP, USB-FDD, USB-ZIP, USB-CDROM, USB-HDD, Legacy LAN, Disabled. Password Check Specifies whether a password is required every time the system boots, or only when you enter BIOS Setup. After configuring this item, set the password(s) under the Set Supervisor/User Password item in the BIOS Main Menu. Setup A password is only required for entering the BIOS Setup program. (Default) System A password is required for booting the system and for entering the BIOS Setup program. HDD S.M.A.R.T. Capability Enables or disables the S.M.A.R.T. (Self Monitoring and Reporting Technology) capability of your hard drive. This feature allows your system to report read/write errors of the hard drive and to issue warnings when a third party hardware monitor utility is installed. (Default: Disabled) 28 BIOS Setup Away Mode Enables or disables Away Mode in Windows XP Media Center operating system. Away Mode allows the system to silently perform unattended tasks while in a low-power mode that appears off (Default: Disabled) Internal Graphics Mode Auto Disabled Outputs from the onboard VGA if no PCI Express VGA card is installed. Always outputs from the PCI Express VGA card when a PCI Express VGA card is installed. (Default) Always disables the onboard VGA, whether or not a PCI Express card is installed. Frame Buffer Size Frame buffer size is the total amount of system memory allocated solely for the onboard graphics controller. MS-DOS, for example, will use only this memory for display. Options are: Auto (default), 32MB, 64MB, 128MB, 256MB, 512MB, 1024MB. Current UMA Size When Frame Buffer Size is set to Auto, this item will show the system memory size automatically allocated for the onboard graphics controller. If you manuanlly change the Frame Buffer Size, this item will show the memory size you set. 29 GA-2AIEL1-RH/GA-2AIEL5-RH Motherboard 3-5 Integrated Peripherals CMOS Setup Utility-Copyright (C) 1984-2007 Award Software Integrated Peripherals OnChip IDE Channel IDE Configuration OnChip SATA Controller OnChip SATA Type Onboard Audio Function Watch Dog Timer Select OnChip USB Controller USB EHCI Controller USB Keyboard Support USB Mouse Support Legacy USB storage detect Onboard Serial Port 1 Onboard Serial Port 2 Onboard Serial Port 3 Onboard Serial Port 4 Enter: Select : Move F5: Previous Values [Enabled] [Press Enter] [Enabled] [Native IDE] [Enabled] [Disabled] [Enabled] [Enabled] [Disabled] [Disabled] [Enabled] [3F8/IRQ4] [2F8/IRQ3] [3E8/IRQ4] [2E8/IRQ3] +/-/PU/PD: Value F10: Save F6: Fail-Safe Defaults 30 Item Help Menu Level ESC: Exit F1: General Help F7: Optimized Defaults BIOS Setup OnChip IDE Channel0 Enables or disables the integrated IDE controller. (Default: Enabled) OnChip SATA Controller Enables or disables the integrated SATA controller. (Default: Enabled) OnChip SATA Type Configures the operating mode of the integrated SATA controller. Native IDE Allows the SATA controller to operate in Native IDE mode. (Default) Enable Native IDE mode if you wish to install operating systems that support Native mode, e.g. Windows XP/2000. RAID Enables RAID for the SATA controller. Legacy IDEAllows the SATA controller to operate in Legacy IDE mode. In Legacy mode the SATA controller uses dedicated IRQs that cannot be shared with other device. Set this option to Legacy IDE if you wish to install operating systems that do not support Native mode, e.g. Windows 9X/ME SATA ->AHCI Configures the SATA controller to AHCI mode. Advanced Host Controller Interface (AHCI) is an interface specification that allows the storage driver to enable advanced Serial ATA features such as Native Command Queuing and hot plug. For more information about AHCI, please visit Intel's website. Onboard Audio Function Enables or disables the onboard audio function. (Default: Auto) If you wish to install a 3rd party add-in audio card instead of using the onboard audio, set this item to Disabled. Watch Dog Timer Select Set watch dog timer. Options are: Disable (default),20Sec,30Sec,40Sec,1Min,2Min,4Min OnChip USB Controller Enables or disables the integrated USB 1.1 controller. (Default: Enabled) USB EHCI Controller Enables or disables the integrated USB 2.0 controller. (Default: Enabled) USB Keyboard Support Allows USB keyboard to be used in MS-DOS. (Default: Disabled) USB Mouse Support Allows USB mouse to be used in MS-DOS. (Default: Disabled) Legacy USB storage detect Determines whether to detect USB storage devices, including USB flash drives and USB hard drives during the POST. (Default: Enabled) Onboard Serial Port 1~4 Enables or disables the first serial port and specifies its base I/O address and corresponding interrupt. Options are: Disable,3F8/IRQ4,2E8/IRQ3,3E8/IRQ4,2E8/IRQ3 31 GA-2AIEL1-RH/GA-2AIEL5-RH Motherboard 3-6 Power Management Setup CMOS Setup Utility-Copyright (C) 1984-2007 Award Software Power Management Setup x x x ACPI Suspend Type Soft-Off by Power button USB Wake Up from S3 HPET Support (Note) Power On By Mouse Power On By Keyboard KB Power ON Password AC Back Function Power-On by Alarm Date (of Month) Resume Time (hh:mm:ss) Enter: Select : Move F5: Previous Values [S3(STR)] [Instant-off] [Enabled] [Enabled] [Disabled] [Disabled] Enter [Soft-Off] [Disabled] Everyday 0:0:0 +/-/PU/PD: Value F10: Save F6: Fail-Safe Defaults Item Help Menu Level ESC: Exit F1: General Help F7: Optimized Defaults ACPI Suspend Type Specifies the ACPI sleep state when the system enters suspend. S1(POS) Enables the system to enter the ACPI S1 (Power on Suspend) sleep state In S1 sleep state, the system appears suspended and stays in a low power mode. The system can be resumed at any time. S3(STR) Enables the system to enter the ACPI S3 (Suspend to RAM) sleep state. (default) In S3 sleep state, the system appears to be off and consumes less power than in the S1 state. When signaled by a wake-up device or event, the system resumes to its working state exactly where it was left off. Soft-Off by Power button Configures the way to turn off the computer in MS-DOS mode using the power button. Instant-Off Press the power button and then the system will be turned off instantly. (Default) Delay 4 Sec. Press and hold the power button for 4 seconds to turn off the system. If the power button is pressed for less than 4 seconds, the system will enter suspend mode. USB Wake Up from S3 Allows the system to be awakened from ACPI S3 sleep state by a wake-up signal from the installed USB device. (Default: Enabled) (Note) Supported on Windows® Vista® operating system only. 32 BIOS Setup HPET Support (Note) Enables or disables High Precision Event Timer (HPET) for Windows® Vista® operating system. (Default: Enabled) Power On By Mouse Allows the system to be turned on by a PS/2 mouse wake-up event. Note: To use this function, you need an ATX power supply providing at least 1A on the 5VSB lead. Disabled Disables this function. (Default) Double Click Double click on left button on the PS/2 mouse to turn on the system. Power On By Keyboard Allows the system to be turned on by a PS/2 keyboard wake-up event. Note: you need an ATX power supply providing at least 1A on the 5VSB lead. Disabled Disables this function. (Default) Password Set a password with 1~5 characters to turn on the system. Any KEY Press any key on the keyboard to turn on the system. Keyboard 98 Press POWER button on the Windows 98 keyboard to turn on the system. KB Power ON Password Set the password when Power On by Keyboard is set to Password. Press <Enter> on this item and set a password with up to 5 characters and then press <Enter> to accept. To turn on the system, enter the password and press <Enter>. Note: To cancel the password, press <Enter> on this item. When prompted for the password, press <Enter> again without entering the password to clear the password settings. AC Back Function Determines the state of the system after the return of power from an AC power loss. Soft-Off The system stays off upon the return of the AC power. (Default ) Full-On The system is turned on upon the return of the AC power. Memory The system returns to its last known awake state upon the return of the AC power. Power-On by Alarm Determines whether to power on the system at a desired time. (Default: Disabled) If enabled, set the date and time as following: Date (of Month): Turn on the system at a specific time on each day or on a specific day in a month. Resume Time (hh: mm: ss): Set the time at which the system will be powered on automatically. Note: When using this function, avoid inadequate shutdown from the operating system or removal of the AC power, or the settings may not be effective. (Note) Supported on Windows® Vista® operating system only. 33 GA-2AIEL1-RH/GA-2AIEL5-RH Motherboard 3-7 PC Health Status CMOS Setup Utility-Copyright (C) 1984-2007 Award Software PC Health Status Vcore DDR2 1.8V +3.3V +12V Current System Temperature Current CPU Temperature Current CPU FAN Speed Current SYSTEM FAN Speed CPU Smart FAN Control CPU Smart FAN Mode Enter: Select : Move F5: Previous Values OK OK OK OK 32oC 45oC 3245 RPM 0 RPM [Enabled] [Auto] +/-/PU/PD: Value F10: Save F6: Fail-Safe Defaults Item Help Menu Level ESC: Exit F1: General Help F7: Optimized Defaults Current Voltage(V) Vcore/DDR2 1.8V/+3.3V/+12V Displays the current system voltages. Current System/CPU Temperature Displays current system/CPU temperature. Current CPU/SYSTEM FAN Speed (RPM) Displays current CPU/system fan speed. CPU Smart FAN Control Enables or disables the CPU fan speed control function. Enabled allows the CPU fan to run at different speed according to the CPU temperature. You can adjust the fan speed with EasyTune based on system requirements. If disabled, CPU fan runs at full speed. (Default: Enabled) CPU Smart FAN Mode Specifies how to control CPU fan speed. This item is configurable only if CPU Smart FAN Control is set to Enabled. Auto Lets BIOS autodetect the type of CPU fan installed and sets the optimal CPU fan control mode. (Default) Voltage Sets Voltage mode for a 3-pin CPU fan. PWM Sets PWM mode for a 4-pin CPU fan. 34 BIOS Setup 3-8 Load Fail-Safe Defaults CMOS Setup Utility-Copyright (C) 1984-2007 Award Software Esc: Quit : Select Item F8: Q-Flash F10: Save & Exit Setup Load Fail-Safe Defaults Standard CMOS Features Advanced BIOS Features Integrated Peripherals Power Management Setup PnP/PCI Configurations PC Health Status MB Intelligent Tweaker(M.I.T.) Load Fail-Safe Defaults Load Optimized Defaults Set Supervisor Password Set User Password Save & Exit Load Fail-Safe Defaults (Y/N)? N Setup Exit Without Saving Press <Enter> on this item and then press the <Y> key to load the safest BIOS default settings. In case system instability occurs, you may try to load Fail-Safe defaults, which are the safest and most stable BIOS settings for the motherboard. 3-9 Load Optimized Defaults CMOS Setup Utility-Copyright (C) 1984-2007 Award Software Standard CMOS Features Advanced BIOS Features Integrated Peripherals Power Management Setup PnP/PCI Configurations PC Health Status MB Intelligent Tweaker(M.I.T.) Load Fail-Safe Defaults Load Optimized Defaults Set Supervisor Password Set User Password Save & Exit Load Optimized Defaults (Y/N)? N Setup Exit Without Saving Esc: Quit : Select Item F8: Q-Flash F10: Save & Exit Setup Load Optimized Defaults Press <Enter> on this item and then press the <Y> key to load the optimal BIOS default settings. The BIOS defaults settings helps the system to operate in optimum state. Always load the Optimized defaults after updating the BIOS or after clearing the CMOS values. 35 GA-2AIEL1-RH/GA-2AIEL5-RH Motherboard 3-10 Set Supervisor/User Password CMOS Setup Utility-Copyright (C) 1984-2007 Award Software Esc: Quit : Select Item F8: Q-Flash F10: Save & Exit Setup Change/Set/Disable Password Standard CMOS Features Advanced BIOS Features Integrated Peripherals Power Management Setup PnP/PCI ConfigurationsEnter Password: PC Health Status MB Intelligent Tweaker(M.I.T.) Load Fail-Safe Defaults Load Optimized Defaults Set Supervisor Password Set User Password Save & Exit Setup Exit Without Saving Press <Enter> on this item and type the password with up to 8 characters and then press <Enter>. You will be requested to confirm the password. Type the password again and press <Enter>. The BIOS Setup program allows you to specify two separate passwords: Supervisor Password When a system password is set and the Password Check item in Advanced BIOS Features is set to Setup, you must enter the supervisor password for entering BIOS Setup and making BIOS changes. When the Password Check item is set to System, you must enter the supervisor password (or user password) at system startup and when entering BIOS Setup. User Password When the Password Check item is set to System, you must enter the supervisor password (or user password) at system startup to continue system boot. In BIOS Setup, you must enter the supervisor password if you wish to make changes to BIOS settings. The user password only allows you to view the BIOS settings but not to make changes. To clear the password, press <Enter> on the password item and when requested for the password, press <Enter> again. The message "PASSWORD DISABLED" will appear, indicating the password has been cancelled. 36 BIOS Setup 3-11 Save & Exit Setup CMOS Setup Utility-Copyright (C) 1984-2007 Award Software Esc: Quit : Select Item F8: Q-Flash F10: Save & Exit Setup Save Data to CMOS Standard CMOS Features Load Fail-Safe Defaults Advanced BIOS Features Load Optimized Defaults Integrated Peripherals Set Supervisor Password Save to CMOS and EXIT Y Password Power Management Setup (Y/N)? Set User PnP/PCI Configurations Save & Exit Setup PC Health Status Exit Without Saving MB Intelligent Tweaker(M.I.T.) Press <Enter> on this item and press the <Y> key. This saves the changes to the CMOS and exits the BIOS Setup program. Press <N> or <Esc> to return to the BIOS Setup Main Menu. 3-12 Exit Without Saving CMOS Setup Utility-Copyright (C) 1984-2007 Award Software Standard CMOS Features Advanced BIOS Features Integrated Peripherals Power Management Setup PnP/PCI Configurations PC Health Status MB Intelligent Tweaker(M.I.T.) Load Fail-Safe Defaults Load Optimized Defaults Set Supervisor Password (Y/N)? Set User Quit Without Saving N Password Save & Exit Setup Exit Without Saving Esc: Quit : Select Item F8: Q-Flash F10: Save & Exit Setup Abandon all Data Press <Enter> on this item and press the <Y> key. This exits the BIOS Setup without saving the changes made in BIOS Setup to the CMOS. Press <N> or <Esc> to return to the BIOS Setup Main Menu. 37 GA-2AIEL1-RH/GA-2AIEL5-RH Motherboard 38