1
Chapter 2
Using the Smartwizard Discovery Utility
This section leads you through the steps necessary to begin managing your GS748T Smart Switch.
It covers how to install in a network that contains a DHCP server and one without DHCP.
Network with DHCP server
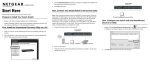
To install the switch in a network with a DHCP server, proceed as follows:
1. Connect the GS748T switch to a DHCP network.
2. Power on the switch by connecting its power cord.
3. Install the Smartwizard Discovery Utility program on your computer.
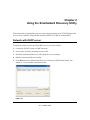
4. Start the Smartwizard Discovery utility.
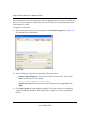
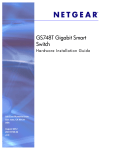
5. Click Discover for the Smartwizard Discovery to find your GS748T Smart Switch. You
should see a screen similar to that shown below.
Figure 2-1
2-1
v1.0, October 2007
Smart Switch Software User Manual GS748T
6. Make a note of the displayed IP address assigned by the DHCP server. You will need this
value to access the switch directly from a web browser (without using Smartwizard
Discovery).
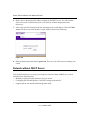
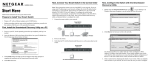
7. Select your switch by clicking on the line that displays the switch address. Then click Web
Access. The discovery utility displays a login window similar to the following:
Figure 2-2
8. Enter the default password which is password. Then, use your web browser to manage your
switch.
Network without DHCP Server
This section describes how to set up your switch in a network without a DHCP server, and is
divided into the following tasks:
• Manually assigning network parameters for your switch.
• Configuring the Network Interface Card (NIC) settings on the host PC.
• Logging into the web-based switch management utility.
2-2
Using the Smartwizard Discovery Utility
v1.0, October 2007
Smart Switch Software User Manual GS748T
Manually Assigning Network Parameters
If your network has no DHCP service, you must assign a static IP address to your switch. If you
choose, you can assign a static IP address to the switch even if your network has DHCP service.
To manually assign a static IP address to your switch:
1. Connect the GS748T Smart Switch to your existing network.
2. Power on the switch by plugging in the power cord (Default IP is 192.168.0.239).
3. Install the Smartwizard Discovery Utility program on your computer
4. Start the Smartwizard Discovery utility.
5. Click Discover for the Smartwizard Discovery Utility to find your GS748T Smart Switch. You
should see a screen similar to that shown in Figure 2-1 on page 2-1.
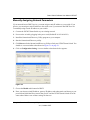
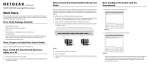
6. Click on Configuration Setting. A screen similar to that shown below appears.
Figure 2-3
7. Choose the Disable radio button for DHCP.
8. Enter your chosen switch IP address, gateway IP address and subnet mask, and then type your
password and click Set. Please ensure that your PC and the GS748T Smart Switch are in the
same subnet. Make a note of these settings for later use.
Using the Smartwizard Discovery Utility
v1.0, October 2007
2-3
Smart Switch Software User Manual GS748T
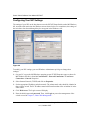
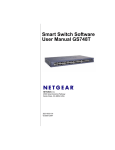
Configuring Your NIC Settings
The settings of your NIC on the host that accesses the GS748T Smart Switch, under MS Windows
OS, are made with entries into the Windows screens shown below. For comparison, the settings of
the switch are also shown although they do not appear in the Windows view.
Figure 2-4
To modify your NIC settings (you need Windows Administrator privilege to change these
settings):
1. On your PC, access the MS Windows operating system TCP/IP Properties page as shown. In
MS Windows XP this is found in Control Panel > Network Connections > Local Area
Connection > General: Properties.
2. Select Internet Protocol (TCP/IP) and click on Properties.
3. Set the appropriate IP address and subnet mask. The subnet mask value should be identical to
that set in the switch. The PC IP address must be different from that of the switch but lie in the
same subnet.
4. Click Web Access. The Login screen will display.
5. Enter the default password password. Then, click Login to proceed to management of the
switch covered in Chapter 3, “Basic Web Management”.
2-4
Using the Smartwizard Discovery Utility
v1.0, October 2007
Smart Switch Software User Manual GS748T
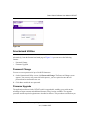
Figure 2-5
Smartwizard Utilities
Alternatively, from the Smartwizard main page of Figure 2-1 you can access the following
features:
•
Password Change
•
Firmware Upgrade
Password Change
You can set a new password of up to 20 ASCII characters.
1. On the Smartwizard Utility screen, click Password Change. The Password Change screen.
appears. You can set a new password. In this process, you are required to enter the old
password and to confirm the new one.
2. Click Set to enable the new password.
Firmware Upgrade
The application software for the GS748T switch is upgradeable, enabling your switch to take
advantage of improvements and additional features as they become available. The upgrade
procedure and the required equipment are described as follows. This procedure assumes that you
Using the Smartwizard Discovery Utility
v1.0, October 2007
2-5
Smart Switch Software User Manual GS748T
have downloaded or otherwise obtained the firmware upgrade and that you have it available as a
binary file on your computer. This procedure uses the TFTP protocol to implement the transfer
from computer to switch.
To upgrade your firmware:
1. After selecting the switch you want to upgrade, click Firmware Upgrade (see Figure 2-1).
The following screen will display:
Figure 2-6
2. Enter the following values into the appropriate places in the form
•
•
Product Assigned Firmware: The location of the new firmware file. You can click
Browse to locate the file. For example:
tftp://{tftp address}/{file name}
Upgrade Password: Enter your password; the default password is password. Click
Apply.
3. Click Start Upgrade to begin loading the upgrade. The system software is automatically
loaded to all stacking members. When the process is complete, the switch automatically
reboots.
2-6
Using the Smartwizard Discovery Utility
v1.0, October 2007
Smart Switch Software User Manual GS748T
Exit
Click Exit from the Switch Setting section to close the Smartwizard Discovery Utility program.
Using the Smartwizard Discovery Utility
v1.0, October 2007
2-7
Smart Switch Software User Manual GS748T
2-8
Using the Smartwizard Discovery Utility
v1.0, October 2007