1
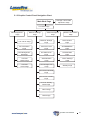
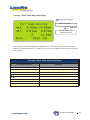
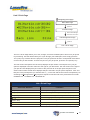
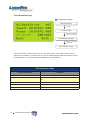
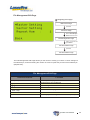
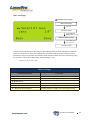
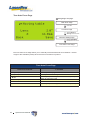
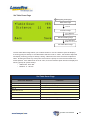
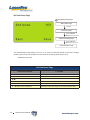
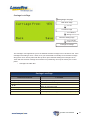
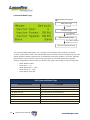
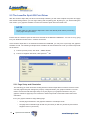
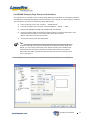
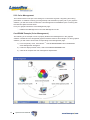
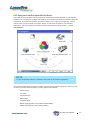
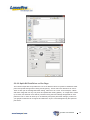
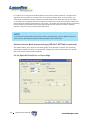
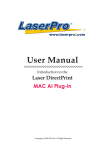
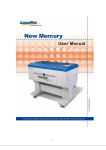
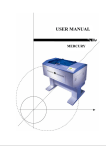
5
Chapter 5
Operating the
LaserPro Spirit GX
Using the Hardware
-
Adjusting the LCD Display Screen's Contrast Setting
-
Graphic Control Panel Overview (Description)
-
Graphic Control Panel Navigatiion Chart
-
Graphic Control Panel Function Pages
The LaserPro Spirit GX Print Driver
- Page Setup and Orientation
- Color Management
- Using the LaserPro Spirit GX Print Driver
- LaserPro Spirit GX Print Driver >> Options Page
- LaserPro Spirit GX Print Driver >> Pen Page
- Spirit GX Print Driver >> Advanced Page
- Spirit GX Print Driver >> Paper Page
- Spirit GX Print Driver >> Language Page
Spirit GX User Manual
37
Once you have installed the LaserPro USB Driver (for use with USB connection), LaserPro Print Driver,
and have connected the LaserPro Spirit GX to your computer, you will need to familiarize yourself with
the LaserPro Spirit GX’s control panel and LaserPro Print Driver. The print driver will be where specific
laser parameters for your jobs are configured, while the control panel will allow you to set repeat times,
manipulate file order, perform auto / manual focusing, and more.
5.1 Using the Hardware
5.1.1 Adjusting the LCD Display Screen’s Contrast Setting
Depending on the lighting of your immediate work area, you may need to adjust the contrast of LCD
display screen. You may increase or decrease the display screen’s contrast via the contrast
adjustment wheel found on the inside of the front cover on the bottom, right-hand side. You can
access this area by opening the top window and looking inside to the rear, right side of the work
area (as shown in the picture below).
LCD Display Screen's Contrast
Adjustment Wheel
5.1.2 Graphic Control Panel Overview
The Control Panel
The control panel on the LaserPro Spirit GX provides an easy access to all the manual controls
needed for cutting and engraving. The liquid crystal display (LCD), functional, directional and
selection buttons make navigating through the machine’s manual controls easy to do.
38
Spirit GX User Manual
LED Indicator Lights
LCD Display Screen
Function Buttons
Directional and
Selection Buttons
LED Indicator Lights
Three indicator lights on the LaserPro Spirit GX’s control panel are part of the system’s safety
interlock system.
•
Door - The door light will illuminate when either the top lid or external pass through doors on the
LaserPro Spirit GX are open or improperly closed.
•
Power - The power light will illuminate when the LaserPro Spirit GX is powered on.
•
Laser - The laser light will illuminate when the laser is active and in operation.
WARNING
• DO NOT attempt to remove or modify any component of the safety interlock system.
• If at any time, any of the access doors are open and the “laser” LED is illuminated,
IMMEDIATELY unplugs the laser system and contact GCC technical support for service
instructions.
• DO NOT operates the laser system if any component of the safety system is malfunctioning.
NOTE
There is an 8 second warm up period after the door LED is triggered for systems
equipped with Synrad laser tubes. i.e. opening the top lid or the external pass through
doors of the machine. Operator must wait for 8 seconds before the laser tube can
begin to work.
Spirit GX User Manual
39
Directional and Selection Buttons
Function (F1 / F2 / F3 / F4) – Four function buttons allow you to select various functions which
will change depending on what section of the menu you are in. Each function button’s
corresponding task will be displayed right above its respective button on the LCD display screen.
Please note that in certain menus, not every function button will always be mapped to a
corresponding action. In these situations, that particular button will not have a function.
Directional ( / / / ) – Four directional buttons allow you to navigate the selection cursor
through the control panel menu and adjust the value of specific settings. In general, the
/
directional buttons cycle through the various selections, while the
/
directional buttons adjust
the value of that particular selection.
Enter – Confirms the current selection.
Start / Stop – Allows you to start or stop engraving jobs, once those jobs have been successfully
loaded onto the system.
Delete – Provides quick access to delete the current job.
Pause – Pauses the current engraving process. Press again to resume the current process.
Auto Focus – After you have positioned your material and moved the laser carriage head to the
area you want to engrave, press this button and the system will automatically adjust the optimal
vertical focal distance for the laser.
Manual Focus (▲ / ▼) – To manually adjust the vertical focal distance between the laser head
and the material, you can use the ▲ / ▼ buttons to do so. Doing so will adjust the vertical height
(z-axis) of the worktable.
40
Spirit GX User Manual
5.1.3 Graphic Control Panel Navigation Chart
Main Work Page
Carriage / Work Table
Adjustment Page
Functions Page
File Management
Page
Machine Settings
Page
Advanced Options
Page
Machine Information
Page
Link / DLink Page
Machine Settings
Page
Save Position
Page
File Information
Page
Tune Auto Focus
Page
SmartMEMORY
Page
File Management
Edit Page
Set Table Down
Page
SmartGUARD
Page
File Edit
Raster Page
Set Red Beam
Page
Vector Settings
Page
File Edit
Vector Page
Set Carriage Lock
Page
Standby Page
Set Command Mode
Page
Set File Save Mode
Page
Set Auto-Standby
Mode Page
Others Page
Reset Page
Spirit GX User Manual
41
5.1.4 Graphic Control Panel Function Pages
When the LaserPro Spirit GX is powered on, the machine will perform a series of safety checks and
initialization routines. The LCD display screen will display the GCC copyright, LaserPro logo, and
machine initialization pages before going to the main work page.
Main Work Page
The main work page is the page that the LaserPro Spirit GX will default to upon startup and will be
the “home base” for when navigating through the various functions of the control panel. This will be
the page that is displayed when you are processing your jobs. This page contains specific job
information such as the current job’s name, Speed, Power, PPI, DPI, processing / remaining times,
and jobs loaded.
Main Work Page
Relevant Buttons
Function
F1 (Prev)
Scroll through previous jobs
F2 (Next)
Scroll through next jobs
F3 (SP)
Go to Store Position Page for SmartCENTER
F4 (Func)
Go to Functions Page
/
/
/
Directional
Go to Carriage / Work Table Adjustment Page
Start / Stop
Start / Stop the current job
Delete
Delete the current selected job
Auto Focus
Initiate the auto focus function
▲ / ▼ Manual Focus Buttons
Manually adjust the height of the work table (Z-axis)
42
Spirit GX User Manual
Carriage / Work Table Adjustment Page
Navigating to this page:
Main Work Page
press ,
or F3
,
,
,
Carriage / Work Table
Adjustment Page
The Carriage / Work Table Adjustment Page allow you to manually increase and decrease the
height of the work table (Z-axis). In addition, you can manually adjust the Y-axis and X-axis of the
laser carriage.
Carriage / Work Table Adjustment Page
Relevant Buttons
Function
F1 (Back)
Back to previous page
F3 (Down)
Manually decrease the height of the work table (Z-axis)
F4 (Up)
Manually increase the height of the work table (Z-axis)
/
Directional
/
Directional
Manually adjust the X-axis position of the laser carriage
Manually adjust the X-axis position of the laser carriage
Start / Stop
Back to main work page
Auto Focus
Initiate the auto focus function
▲ / ▼ Manual Focus Buttons
Manually adjust the height of the work table (Z-axis)
Spirit GX User Manual
43
SmartCENTER Page
Navigating to this page:
Main Work Page
press F3
SmartCENTER Page
Under SmartCENTER mode the job will begin after the system positions the carriage to the center
position between two points indicated by the user. There are two ways to activate the SmartCENTER
mode, either through driver or direct from control panel.
Enter SmartCENTER page and you can move the carriage by hand and press enter to save the
positions indicated by the red pointer. After both points are set, the carriage will move to the center
of the two entered points and the job will begin.
SmartCENTER Page
Relevant Buttons
44
Function
F1 (Back)
Back to previous page
F2 (Reset)
Reset all saved positions
F4 (Save)
Save current lens carriage position
Auto Focus
Initiate the auto focus function
▲ / ▼ Manual Focus Buttons
Manually adjust the height of the work table (Z-axis)
Spirit GX User Manual
Functions Page
The Functions Page allows you to edit file management and machine settings. From this page,
you will be able to access the File Management, Machine Setting, and Machine Information pages.
Navigating to this page:
Main Work Page
press F4
Functions Page
•
File Management Page – this page allows you to manage the files that you have loaded onto
the LaserPro Spirit GX.
•
Machine Setting Page – this page allows you to access and modify various machine settings,
including: Set Lens, Tune Auto Focus, Set Table Down, Set Red Beam, Carriage Lock, Set
Command Mode, Save Position, Flash Memory, Set File Save Mode, Set Vector Mode, Tune
Image Power, Set Laser Wattage, Set Fine Mode, Other, Reset.
•
Machine Information Page – this page allows you to view information regarding the system
such as the GCC logo, machine name, firmware version, and other information.
Functions Page
Relevant Buttons
Function
F1 (Back)
Back to previous page
F3 (Help)
Display help
F4 (Recall)
Back to previous page
/
Directional
Scroll through the menu selections
Enter
Perform the selection
Start / Stop
Back to main work page
Auto Focus
Initiate the auto focus function
▲ / ▼ Manual Focus Buttons
Manually adjust the height of the work table (Z-axis)
Spirit GX User Manual
45
File Management Page
Navigating to this page:
Main Work Page
press F4
Functions Page
Select<File Management>from the menu
File Management Page
The File Management Page allows you to manage the files that you have loaded onto the LaserPro
Spirit GX. You can scroll through your jobs, delete a selected job, delete all jobs, and go to the Link /
DLink Page to set and arrange multiple loaded jobs into a single job queue for processing.
File Management Page
Relevant Buttons
F1 (Back)
Back to previous page
F2 (Link)
Go to the Link / DLink Page
F3 (D-All)
Delete all loaded jobs
F4 (Del)
Delete the selected job
/
46
Function
Directional
Scroll through your loaded jobs
Enter
Go to the File Information Page for the selected job
Start / Stop
Go to the Main Work Page for the selected job
Auto Focus
Initiate the auto focus function
▲ / ▼ Manual Focus Buttons
Manually adjust the height of the work table (Z-axis)
Spirit GX User Manual
Link / DLink Page
Navigating to this page:
Main Work Page
press F4
Functions Page
Select<File Management>from the menu
File Management Page
press F2
Link / DLink Page
The Link / DLink Page allows you to set, arrange, and remove loaded jobs to and from a job queue
for processing. Use the directional keys to cycle through your loaded jobs, then simply press the
<F2 (Link)> key to add a file to the job queue. The job queue will be set in a sequential order based
on the order you link the files. To remove a job from your job queue, press the <F4 (DLink)> key.
The first column field (before the file name) displays the job number. The sequence for your job
queue is displayed in the two columns to the right of your file names. The first column to the right of
your job file name displays the job number of the previous file in the job queue sequence. The
second column after the file name displays that job’s next file in the job queue sequence. First and
last jobs in the job sequence you set will have a (---) in the first and second columns respectively. So
according to the image above, the job queue sequence has been set to be processed in this order:
03:Marble.cdr 01:Marble.cdr 02:Marble.cdr.
Link / DLink Page
Relevant Buttons
Function
F1 (Back)
Back to previous page
F2 (Link)
Add the currently-selected job to the job queue
F4 (DLink)
Remove the currently-selected job from the job queue
/
Directional
Scroll through your loaded jobs
Start / Stop
Back to Main Work Page
Auto Focus
Initiate the auto focus function
▲ / ▼ Manual Focus Buttons
Manually adjust the height of the work table (Z-axis)
Spirit GX User Manual
47
File Information Page
Navigating to this page:
Main Work Page
press F4
Functions Page
Select<File Management>from the menu
File Management Page
Select a job file and
press Enter
File Information Page
The File Information Page allows you to view the speed, power, DPI, and PPI settings of the
selected job. In addition, you will be able to go to the File Management Edit Page from this menu
to change raster / vector speed and power settings for the selected job.
File Information Page
Relevant Buttons
Function
F1 (Back)
Back to previous page
F4 (Edit)
Go to the File Management Edit Page for the selected
job
48
Start / Stop
Back to Main Work Page
Auto Focus
Initiate the auto focus function
▲ / ▼ Manual Focus Buttons
Manually adjust the height of the work table (Z-axis)
Spirit GX User Manual
File Management Edit Page
Navigating to this page:
Main Work Page
press F4
Functions Page
Select<File Management>from the menu
File Management Page
Select a job file and
press Enter
File Information Page
press F4
File Information Page
The File Management Edit Page allows you the choice to modify your raster or vector settings for
the selected job, as well as setting the number of times to repeat the process of the selected job
(Repeat Num).
File Management Edit Page
Relevant Buttons
F1 (Back)
Function
Back to previous page
/
Directional
Scroll through your loaded jobs
/
Directional
Cycle through the available selections
Enter
Perform the selection
Start / Stop
Back to main work page
Auto Focus
Initiate the auto focus function
▲ / ▼ Manual Focus Buttons
Manually adjust the height of the work table (Z-axis)
Spirit GX User Manual
49
File Edit Raster Page
Navigating to this page:
Main Work Page
press F4
Functions Page
Select<File Management>from the menu
File Management Page
Select a job file and
press Enter
File Information Page
press F4
File Information Page
Select < Raster
Setting> from the menu
File Edit Raster Page
The File Edit Raster Page allows you to edit the raster power and speed settings, as well as
enable or disable SmartACT for the selected job. These settings correspond to the same settings
found on the LaserPro Spirit GX print driver. This page allows you to easily adjust these values
to make immediate adjustments while processing your loaded jobs, even when you have
disconnected your computer from the LaserPro Spirit GX.
•
•
•
Raster Power: 0.0% - 100%
Raster Speed: 0.0% - 100%
SmartACT: YES / NO
File Edit Raster Page
Relevant Buttons
F1 (Back)
50
Function
Back to previous page
/
Directional
Scroll through your loaded jobs
/
Directional
Adjust the value for that selection
Start / Stop
Back to main work page
Auto Focus
Initiate the auto focus function
▲ / ▼ Manual Focus Buttons
Manually adjust the height of the work table (Z-axis)
Spirit GX User Manual
File Edit Vector Page
Navigating to this page:
Main Work Page
press F4
Functions Page
Select<File Management>from the menu
File Management Page
Select a job file and
press Enter
File Information Page
press F4
File Information Page
Select <Vector Setting
> from the menu
File Edit Vector Page
The File Edit Vector Page allows you to edit the vector pen, vector power, vector speed, and vector
PPI, and power ramp settings for the selected job. These settings correspond to the same settings
found on the LaserPro Spirit GX print driver. This page allows you to easily adjust these values to
make immediate adjustments while processing your loaded jobs, even when you have disconnected
your computer from the LaserPro Spirit GX.
•
•
•
•
•
Vector Pen: 1 - 16
Vector Power: 0.0% - 100%
Vector Speed: 0.0% - 100%
Vector PPI: 30 - 1524
Power Ramp: YES / NO
File Edit Vector Page
Relevant Buttons
Function
F1 (Back)
Back to previous page
F4 (Save)
Save your current settings
/
Directional
Scroll through your loaded jobs
/
Directional
Adjust the value for that selection
Start / Stop
Back to main work page
Auto Focus
Initiate the auto focus function
▲ / ▼ Manual Focus Buttons
Manually adjust the height of the work table (Z-axis)
Spirit GX User Manual
51
Machine Setting Page
Navigating to this page:
Main Work Page
press F4
Functions Page
Select<File Management>from the menu
Machine Setting Page
The Machine Setting Page allows you to access and modify various machine settings, including:
Set Lens, Tune Auto Focus, Set Table Down, Set Red Beam, Carriage Lock, Set Command
Mode, Save Position, Flash Memory, Set File Save Mode, Set Vector Mode, Tune Image Power,
Set Laser Wattage, Set Fine Mode, Other, and Reset.
Machine Setting Page
Relevant Buttons
F1 (Back)
Directional
/
52
Function
Back to previous page
Scroll through your loaded jobs
Enter
Perform the selection
Start / Stop
Back to main work page
Auto Focus
Initiate the auto focus function
▲ / ▼ Manual Focus Buttons
Manually adjust the height of the work table (Z-axis)
Spirit GX User Manual
Set Lens Page
Navigating to this page:
Main Work Page
press F4
Functions Page
Select<Machine
Setting>from the menu
Machine Setting Page
Select<Set Lens>
from the menu
Set Lens Page
The Set Lens Page allows you to modify the lens settings after you have changed to a different
focal lens. Remember to save your settings after you have made the proper changes. Now by
pressing the Auto Focus button, the LaserPro Spirit GX will conduct auto focus accordingly using
the new lens. The LaserPro Spirit GX’s default setting is <2.0">
•
Lens: 1.5" / 2.0" / 2.5" / 4.0"
Set Lens Page
Relevant Buttons
Function
F1 (Back)
Back to previous page
F4 (Save)
Save your current settings
/
Directional
Scroll through your loaded jobs
Start / Stop
Back to main work page
Auto Focus
Initiate the auto focus function
▲ / ▼ Manual Focus Buttons
Manually adjust the height of the work table (Z-axis)
Spirit GX User Manual
53
Tune Auto Focus Page
Navigating to this page:
Main Work Page
press F4
Functions Page
Select<Machine
Setting>from the menu
Machine Setting Page
Select<Tune Auto
Focus>from the menu
Tune Auto Focus Page
The Tune Auto Focus Page allows you to manually set the default auto focus distance / vertical
height of the worktable (Z-axis) when the Auto Focus button is pushed.
Tune Auto Focus Page
Relevant Buttons
F1 (Back)
Back to previous page
F4 (Save)
Save your current settings
/
54
Function
Directional
Manually adjust the height of the work table (Z-axis)
Start / Stop
Back to main work page
Auto Focus
Initiate the auto focus function
▲ / ▼ Manual Focus Buttons
Manually adjust the height of the work table (Z-axis)
Spirit GX User Manual
Set Table Down Page
Navigating to this page:
Main Work Page
press F4
Functions Page
Select<Machine
Setting>from the menu
Machine Setting Page
Select<Set Table
Down>from the menu
Set Table Down Page
The Set Table Down Page allows you to select whether or not the LaserPro Spirit GX displays
a warning prompt at startup. If the Table Down selection is set to <YES>, the LaserPro Spirit GX
will display a warning prompt: at startup, stating: “Table will move down and remove objects on
table”. Pressing the Enter key at this point will confirm the prompt to move the work table to its
lowest position. If the Table Down is set to <NO>, then the LaserPro Spirit GX will not display this
warning prompt at system startup.
•
•
Table Down: YES / NO
Distance: 0 - 165 mm
Set Table Down Page
Relevant Buttons
Function
F1 (Back)
Back to previous page
F4 (Save)
Save your current settings
/
Directional
Scroll through the menu selections
/
Directional
Adjust the value for that selection
Start / Stop
Back to main work page
Auto Focus
Initiate the auto focus function
▲ / ▼ Manual Focus Buttons
Manually adjust the height of the work table (Z-axis)
Spirit GX User Manual
55
Set Red Beam Page
Navigating to this page:
Main Work Page
press F4
Functions Page
Select<Machine
Setting>from the menu
Machine Setting Page
Select<Set Red
Beam>from the menu
Set Red Beam Page
The Set Red Beam Page allows you to turn on or off the red dot laser pointer on the laser carriage.
Enabling this function will indicate the exact area the engraving laser will fire upon.
• Red Beam YES / NO
Set Red Beam Page
Relevant Buttons
F1 (Back)
Back to previous page
F4 (Save)
Save your current settings
/
56
Function
Directional
Cycle Red Beam between YES / NO
Start / Stop
Back to main work page
Auto Focus
Initiate the auto focus function
▲ / ▼ Manual Focus Buttons
Manually adjust the height of the work table (Z-axis)
Spirit GX User Manual
Carriage Lock Page
Navigating to this page:
Main Work Page
press F4
Functions Page
Select<Machine
Setting>from the menu
Machine Setting Page
Select<Carriage
Lock>from the menu
Carriage Lock Page
The Carriage Lock Page allows you to set whether the laser carriage is to be locked or free. If the
Carriage Free setting is set to <YES>, then you will be able to manually move the laser carriage
along the X and Y axis by hand with the top door open. Whereas setting the Carriage Free to
<NO> will lock the laser carriage and movement or positioning can only be done by the control
panel.
•
Carriage Free YES / NO
Carriage Lock Page
Relevant Buttons
Function
F1 (Back)
Back to previous page
F4 (Save)
Save your current settings
/
Directional
Cycle Red Beam between YES / NO
Start / Stop
Back to main work page
Auto Focus
Initiate the auto focus function
▲ / ▼ Manual Focus Buttons
Manually adjust the height of the work table (Z-axis)
Spirit GX User Manual
57
Command Mode Page
Navigating to this page:
Main Work Page
press F4
Functions Page
Select<Machine
Setting>from the menu
Machine Setting Page
Select<Set Command
Mode>from the menu
Set Command Mode Page
The Command Mode Page allows you to configure vector settings when outputting in Default
or HPGL mode. Default mode is the standard Windows print driver and also recognized by the most
popular graphic software programs such as CorelDraw, Photoshop, Illustrator, and more. Whereas,
HPGL mode is a less common output format generated from some RIP applications (signage
industry). Regardless of which format you will be working with, both output formats are supported.
•
•
•
•
•
Mode: Default / HPGL
Vector Pen: 1 - 16
Vector Speed: 0.0% - 100%
Vector PPI: 0.0% - 100%
Power Ramp: YES / NO
Set Command Mode Page
Relevant Buttons
58
Function
F1 (Back)
Back to previous page
F4 (Save)
Save your current settings
/
Directional
Scroll through the menu selections
/
Directional
Adjust the value for that selection
Start / Stop
Back to main work page
Auto Focus
Initiate the auto focus function
▲ / ▼ Manual Focus Buttons
Manually adjust the height of the work table (Z-axis)
Spirit GX User Manual
Set File Save Mode Page
Navigating to this page:
Main Work Page
press F4
Functions Page
Select<Machine
Setting>from the menu
Machine Setting Page
Select<Set File Save
Mode>from the menu
Set File Save Mode Page
The Set File Save Mode Page allows you to set whether or not the LaserPro Spirit GX automatically
deletes each job file after processing. Setting File Save to <NO> will automatically and immediately
delete each job file from the LaserPro Spirit GX after the engraving or cutting process. Setting File
Save to <YES> will retain all job files on the LaserPro Spirit GX.
•
File Save: YES / NO
Set File Save Mode Page
Relevant Buttons
Function
F1 (Back)
Back to previous page
F4 (Save)
Save your current settings
/
Directional
Cycle File Save between YES / NO
Start / Stop
Back to main work page
Auto Focus
Initiate the auto focus function
▲ / ▼ Manual Focus Buttons
Manually adjust the height of the work table (Z-axis)
Spirit GX User Manual
59
Set Auto-Standby Mode Page
Navigating to this page:
Main Work Page
press F4
Functions Page
Select<Machine
Setting>from the menu
Machine Setting Page
Select<Set Fine
Mode>from the menu
Set Standby Mode Page
The Set Auto-Standby Mode Page allows you to turn ON or turn OFF the auto-standby timer. The
machine will set itself to standby mode after being idle for 20 minutes when the Auto-Standby
mode is turned ON.
•
Set Auto-Standby mode: YES / NO
Set Auto-Standby Mode Page
Relevant Buttons
F1 (Back)
Back to previous page
F4 (Save)
Save your current settings
/
60
Function
Directional
Cycle File Save between YES / NO
Start / Stop
Back to main work page
Auto Focus
Initiate the auto focus function
▲ / ▼ Manual Focus Buttons
Manually adjust the height of the work table (Z-axis)
Spirit GX User Manual
Others Page
Navigating to this page:
Main Work Page
press F4
Functions Page
Select<Machine
Setting>from the menu
Machine Setting Page
Select<Others>from the
menu
Others Page
The Others Page allows you to change various settings that correspond to the control panel. The
Language setting will allow users to change available languages displayed on the control panel.
The Unit setting will allow you to change whether the units displayed by the control panel is in the
metric or imperial system. The EOF (end of file) Alarm setting will enable or disable an audible
notification when jobs are complete. The Air Delay setting allows you to specify the delay in seconds
of the SmartAIR air-assist after the point of laser firing.
•
•
•
•
Language: ENGLISH (others dependent on Firmware)
Unit: METRIC / ENGLISH
EOF Alarm: YES / NO
Air Delay: 1-100 seconds
Tip
Depending on the material you are engraving with, your laser settings, and the
desired results, please experiment with the air delay to achieve your desired results.
Others Page
Relevant Buttons
Function
F1 (Back)
Back to previous page
F4 (Save)
/
Directional
Save your current settings
Scroll through the menu selections
/
Directional
Adjust the value for that selection
Start / Stop
Back to main work page
Auto Focus
Initiate the auto focus function
▲ / ▼ Manual Focus Buttons
Manually adjust the height of the work table (Z-axis)
Spirit GX User Manual
61
Reset Page
Navigating to this page:
Main Work Page
press F4
Functions Page
Select<Machine
Setting>from the menu
Machine Setting Page
Select<Reset>from the
menu
Reset Page
The Reset Page allows you to reset all changes made to the LaserPro Spirit GX’s Machine
Settings Page to their default settings. This does not affect the settings saved to an image file
on the computer. The User Reset setting will set all settings back to default. After any firmware
updates, you must use the System Reset setting (your previous settings are saved).
•
•
User Reset (a confirmation will pop up, press Enter to confirm and continue)
System Reset (a confirmation will pop up, press Enter to confirm and continue)
Reset Page
Relevant Buttons
F1 (Back)
Directional
/
62
Function
Back to previous page
Scroll through the menu selections
Enter
Perform the selection
Start / Stop
Back to main work page
Auto Focus
Initiate the auto focus function
▲ / ▼ Manual Focus Buttons
Manually adjust the height of the work table (Z-axis)
Spirit GX User Manual
Advanced Options Page
Navigating to this page:
Main Work Page
press F4
Functions Page
Select<Advanced
Options>from the menu
Advanced Options Page
The Advanced Options Page allows you to use various advanced options such as: Save Position,
SmartMEMORY, SmartGUARD, Vector Settings and Standby Mode.
Advanced Options Page
Relevant Buttons
F1 (Back)
/
Directional
Function
Back to previous page
Scroll through the menu selections
Enter
Perform the selection
Start / Stop
Back to main work page
Auto Focus
Initiate the auto focus function
▲ / ▼ Manual Focus Buttons
Manually adjust the height of the work table (Z-axis)
Spirit GX User Manual
63
Save Position Function
Navigating to this page:
Main Work Page
press F4
Functions Page
Select<Advanced
Options>from the menu
Advanced Options Page
Select<Save Position>from the menu
The Save Position Function allows you to save the current X-axis and Y-axis positions of the laser
carriage and sets this position to be the origin for subsequent jobs.
Tip
This is an excellent function to use when you are processing identical items or
engraving relatively smaller objects positioned away from the default start position
(top left) of the work table.
Recall Position
Navigating to this page:
Main Work Page
press F4
Functions Page
Select<Recall> by pressing F4
To recall the saved position, simply go to Functions page and press F4 again to recall the saved
position. The laser carriage will be moved to the saved position.
64
Spirit GX User Manual
SmartMEMORY Page
Navigating to this page:
Main Work Page
press F4
Functions Page
Select<Advanced
Options>from the menu
Advanced Options Page
Select<SmartMEMORY
>from the menu
SmartMEMORY Page
The SmartMEMORY Page allows you to read and write data with the optional SmartMEMORY
module installed. Selecting <Save to SmartMEMORY> will copy all current jobs on the LaserPro
Spirit GX to the SmartMEMORY module. Selecting <Load SmartMEMORY> will copy all job files
from the SmartMEMORY module to the LaserPro Spirit GX.
SmartMEMORY Page
Relevant Buttons
F1 (Back)
/
Directional
Function
Back to previous page
Scroll through the menu selections
Enter
Perform the selection
Start / Stop
Back to main work page
Auto Focus
Initiate the auto focus function
▲ / ▼ Manual Focus Buttons
Manually adjust the height of the work table (Z-axis)
Spirit GX User Manual
65
SmartGUARD Page
Navigating to this page:
Main Work Page
press F4
Functions Page
Select<Advanced
Options>from the menu
Advanced Options Page
Select<SmartGUARD
>from the menu
SmartGUARD Page
After hardware installation, please enter the function menu on the control panel to enable the
SmartGUARD fire alarm.
SmartGUARD Enable / Disable:
Press directional key (left or right) to enable the SmartGUARD device or disable it.
Sensitivity:
Press directional key (left or right) to set the sensitivity of SmartGUARD. There are five
sensitivity settings (1, 3, 5, 7, 9 seconds) that can be selected. Sensitivity is defined by the delay
time from when a fire is detected until the fire alarm alerts user, and automatically shuts down the
system. For example, if the sensor delay switch is set to the 3 second position, the SmartGUARD
will start an alarm and automatically shutdown the laser system after detecting a fire for 3
seconds.
SmartGUARD Setting Page
Relevant Buttons
66
Function
F1 (Back)
Back to previous page
F4 (Save)
Save your current settings
/
Directional
Scroll through the menu selections
/
Directional
Adjust the value for that selection
Spirit GX User Manual
Vector Mode Page
Navigating to this page:
Main Work Page
press F4
Functions Page
Select<Advanced
Options>from the menu
Advanced Options Page
Select<Vector Mode
>from the menu
Vector Setting Page
There are three options under the Vector Mode Page:
(i)
Quality Vector Mode allows you to adjust and balance vector quality and speed settings
based on your specific job. The Speedy Vector Option offers the highest output speed with
average quality, whereas Quality Vector Option offers the highest quality at a slower output
speed. Keep in mind that speed and quality are usually at a tradeoff. The Spirit GX system’s
default setting is set to <Fine Vector>.
•
(ii)
Options: Quality Vector, Fine Vector, Coarse Vector, Speedy Vector
[Slower speed / higher quality -------------------- Faster speed / lower quality]
When Enhanced Scribing mode is set to <YES>, an enhancing algorithm will be used to
produce a finer and smoother circular output.
•
(iii)
Enhanced Scribing: YES / NO
When Enhanced Cutting mode is set to <YES>, time taken to cut small objects (< 1cm) will
be increased to generate better output in shape as well as cutting quality.
•
Enhanced Cutting: YES / NO
Vector Mode Page
Relevant Buttons
Function
F1 (Back)
Back to previous page
F4 (Save)
Save your current settings
/
Directional
Cycle through Vector Mode Settings
/
Directional
Cycle between options and YES / NO
Start / Stop
Back to Main Work Page
Auto Focus
Initiate the auto focus function
▲ / ▼ Manual Focus Buttons
Manually adjust the height of the work table (Z-axis)
Spirit GX User Manual
67
Standby Page
Navigating to this page:
Main Work Page
press F4
Functions Page
Select<Advanced
Options>from the menu
Advanced Options Page
Select<Standby
>from the menu
Standby Page
The Set Standby Page allows you to turn on or off the standby mode. Enabling this function will
cause the machine to go into standby mode immediately.
•
Standby YES / NO
Set Standby Page
Relevant Buttons
Function
F1 (Back)
Back to previous page
F4 (Save)
Save your current settings
/
Directional
Cycle between options and YES / NO
Start / Stop
Back to Main Work Page
Auto Focus
Initiate the auto focus function
▲ / ▼ Manual Focus Buttons
Manually adjust the height of the work table (Z-axis)
68
Spirit GX User Manual
Machine Information Page
Navigating to this page:
Main Work Page
press F4
Functions Page
Select<Machine
Information>from the
Machine Information Page
The Machine Information Page allows you to view information regarding the system such as the
GCC logo, machine name, firmware version, and other information.
Machine Information Page
Relevant Buttons
F1 (Back)
/
Directional
Function
Back to previous page
Scroll through pages
Enter
Perform the selection
Start / Stop
Back to Main Work Page
Auto Focus
Initiate the auto focus function
▲ / ▼ Manual Focus Buttons
Manually adjust the height of the work table (Z-axis)
Spirit GX User Manual
69
5.2 The LaserPro Spirit GX Print Driver
With the LaserPro Spirit GX print driver successfully installed, you will need to adjust the printer and page
size default settings before you can begin editing and completing jobs. By doing so, you will be setting the
work area in your graphics software to match the LaserPro Spirit GX’s work table area.
NOTE
Please make sure the LaserPro Spirit GX is set to the default printer before proceeding
to the page and layout setup.
Ensure that the LaserPro Spirit GX has been selected as the DEFAULT PRINTER. You can do so by going
into your Windows Control Panel→ Printers and Faxes.
If the LaserPro Spirit GX is not selected as DEFAULT PRINTER, you may set it up through the graphics
software as well. The following example takes CorelDraw to demonstrate how to set up LaserPro Spirit GX
as the Printer.
1)
From the primary menu, click FILE→ PRINT SETUP.
2)
From the navigation bar Name, click Spirit GX → OK
5.2.1 Page Setup and Orientation
The first thing you must do before working with the LaserPro Spirit GX Print Driver will be to make
sure the page and layout settings are properly configured within your graphics software. You will
need to access and edit the Page Setup or Layout page of your graphics software to set your
graphics software’s page layout to match the LaserPro Spirit GX’s work table’s dimensions and
orientation.
From your graphic software’s Page Setup page:
70
•
Set the page orientation in the graphics software to Landscape mode.
•
Set page size horizontal length to 860 mm (34 inches) or 965 mm (38 inches) and vertical
height to 610 mm (24 inches).
Spirit GX User Manual
CorelDRAW Example (Page Setup and Orientation)
The following is an example of how to set the Page Setup and Orientation in the graphics software.
CorelDRAW is the designated graphics software used for this example. For other graphics software,
you will need to access the corresponding Page Setup page.
3)
From the primary menu, click LAYOUT → PAGE SETUP.
4)
From the navigation bar on the left, click DOCUMENT → PAGE → SIZE.
5)
Ensure that NORMAL PAPER and LANDSCAPE are selected.
6)
Ensure the Paper Width and Height dimensions match the LaserPro Spirit GX’s work
table dimensions of 860mm (34 inches) and 610mm (24 inches) or
965mm (38 inches) x 610mm (24 inches).
7)
Click OK to end the paper size adjustment.
Tip
Instead of manually selecting the Landscape and setting the Paper Width and
Height, you can simply click the Set From Printer function and CorelDraw will
automatically set the proper orientation and dimensions based on LaserPro
Spirit GX’s work table. (You MUST have the Spirit GX set as the default printer
prior to doing this.)
Spirit GX User Manual
71
5.2.2 Color Management
The LaserPro driver uses pen color settings to control laser engraver’s engraving and cutting
parameters. In addition to having your Page Setup and Orientation properly set in your graphics
software, you will also need to make sure Color Management is DISABLED prior to working with
the LaserPro Spirit GX Print Driver.
From your graphic software’s Color Management page:
•
Disable Color Management or set Color Management to Off.
CorelDRAW Example (Color Management)
The following is an example of how to properly disable Color Management in the graphics
software. CorelDraw is the designated graphics software used for this example. For other graphics
software, you will need to access the corresponding Color Management page.
1) From the primary menu, click TOOLS → COLOR MANAGEMENT and CorelDRAW’s
Color Management will appear.
2) Under the Style pull down menu, select COLOR MANAGEMENT OFF.
3) Click OK to complete the color management adjustments.
72
Spirit GX User Manual
5.2.3 Using the LaserPro Spirit GX Print Driver
Now after you have properly set the Page and Layout and Color Management of your graphics
software, you are ready to configure the details of your actual job through the LaserPro Spirit GX
Print Driver. The LaserPro Spirit GX print driver allows you to adjust your engraving / cutting
options. After you have setup your image, design, or text to be engraved in your software
application, you can access the LaserPro Spirit GX print driver by going to FILE → PRINT →
PROPERTIES.
NOTE
For this screenshot example, CorelDraw was used as the software application.
The LaserPro Spirit GX Print Driver consists of seven primary sections (pages) in which you will
be able to choose various engraving / cutting options and settings:
•
Options Page
•
Pen Page
•
Advanced Page
•
Paper Page
•
Language Page
•
Raster Page (appears only in Black & White Mode)
•
Stamp Page (appears only in Stamp Mode)
Spirit GX User Manual
73
Tip
The following sections describe the specific functions for each of the settings
found in the LaserPro Spirit GX Print Driver. If you are new to laser engraving,
it is recommended that you first familiarize yourself with the general principles of
the laser process in Section 6, especially the Vector Cutting and Raster Engraving
concepts. This will make it easier to understand the various descriptions
and terminologies used in this section.
5.2.3.1 LaserPro Spirit GX Print Driver >> Options Page
Mode Setting (OPTIONS PAGE) [DEFAULT SETTING: Black & White]
You can select from four primary mode settings, depending on your application or results you
would like to achieve.
74
Spirit GX User Manual
Black & White:
Select this mode when using clipart images or drawings with several colors, shades of gray, or
many outlines. This mode outputs in a method similar to that of a black and white laser printer.
The entire selected image will be engraved using a single set of power and speed settings (the black
pen from the PEN menu. Please refer to the next section of the manual for details regarding the
PEN functions).
The LaserPro Spirit GX print driver will interpret colored and shaded areas as different shades of
gray by producing a halftone effect while engraving. Instead of engraving only solid lines, gray /
halftone areas will be a collection of dots with varying density.
The resolution and depth of these halftone areas can be adjusted with the DPI setting found on
the Options page. Please note that selecting the Black & White mode will add a new Raster page
to the menu. The Black & White mode dithering settings can be changed from the Raster page.
(Please refer to the Raster section below for details). Experiment with different dithering settings
to attain the desired results.
Tip
The Black & White mode interprets the processed image by the varying colors
and shades. For the best results, we suggest you convert the image to a
grayscale image with your graphics software prior to engraving in the Black &
White mode.
NOTE
Selecting the Black & White mode will enable the Raster page on the LaserPro Spirit GX
Print Driver, allowing you to adjust advanced stamp-related settings.
Manual Color Fill:
Select this mode when you would like to designate specific power and speed settings and link
them to certain colors of your image. The LaserPro Spirit GX print driver allows a maximum of 16
pen parameters to be set.
3D Mode:
Select this mode to attain a sculptured 3D effect on your engraving. By using images that have a
range of gray areas, the LaserPro Spirit GX print driver can manipulate the image to give it an
added depth, by linking the laser power (depth of engraving) to specific colors. The settings can be
adjusted through the DPI setting (Options page) and PPI, power and speed settings (Pen page).
Stamp Mode:
Select this mode when you would like to engrave stamps. The stamp mode is one of the more
dynamic functions of the LaserPro Spirit GX. Due to the unique engraving nature when engraving
a stamp, the stamp production requires different operational steps than most engraving or cutting
operations.
NOTE
Selecting the Stamp mode will enable the Stamp page on the Spirit GX Print Driver,
allowing you to adjust advanced stamp-related settings.
Spirit GX User Manual
75
DPI (Options Page) [DEFAULT SETTING: 500]
DPI (dots-per-inch) represents the number of times the laser will fire over a one-inch path. This
setting determines the image resolution and quality when performing raster engraving functions.
Higher DPI settings result in cleaner and deeper engravings, but require more time to complete.
Lower DPI settings result in coarser and shallower engravings, but require less time to complete.
The LaserPro Spirit GX offers 8 DPI options: 125, 250, 300, 380, 500, 600, 760, and 1000,
experiment with different settings to get your desired effect.
Below is a chart for your convenience detailing the Set DPI (your input setting) vs. Actual DPI (your
output results).
Set
DPI
125
250
300*
380
500
600*
760
1000
Actual
DPI
127
254
381
381
508
762
762
1016
NOTE
Outputting a full-table (34" x 18") job using 300 or 600 DPI will result in a truncation error;
this is due to the large differences in set DPI vs. actual DPI output for those two particular
DPI settings. Therefore, when processing a 34" x 18" job using 300 DPI, we recommend
you move to the next higher DPI setting of 380. Similarly, for a 34" x 18" job using 600 DPI,
we recommend you use 760 DPI.
Mirror (Options Page) [DEFAULT SETTING: Unselected]
Checking this box will automatically engrave your image with a mirrored effect. This setting will flip
the image along the Y-axis from left to right and vice-versa.
Tip
When engraving a stamp, via the stamp mode, the stamp image needs to be engraved
in reverse (mirrored) for the final stamp to be correctly laid out.
B
Mirror Effect
B
Invert (Options Page) [DEFAULT SETTING: Unselected]
Checking this box automatically inverts / reverses the color of your image (the white areas become
black and vice versa). The Invert option is not available if disabled while Manual Color File mode is
selected.
76
Spirit GX User Manual
Tip
Invert mode is useful when creating a stamp in Stamp Mode, as inverting your normal
image will set the negative space to be engraved out, with the remaining positive
space (your stamp design) protruding out.
B
Invert Effect
Print Immediately (Options Page) [DEFAULT SETTING: Unselected]
Checking this will instruct the LaserPro Spirit GX to immediately begin the laser engraving process,
when you select Print from your graphic software program. If Print Immediately is not checked, then
selecting Print will transfer the job file to the LaserPro Spirit GX system and will need to be initialized
from the LaserPro Spirit GX control panel.
SmartACT (Options Page) [DEFAULT SETTING: Unselected]
SmartACT reduces the amount of time it takes to process a job, by eliminating unnecessary travel of
the laser carriage at the expense of some quality. Usually the quality loss is minimal, but will depend
on the image or design you are working with; please take some time to experiment with your
particular design to determine whether the tradeoff is acceptable. When selected, the working area
will be extended as well.
Tip
There is a greater performance gain when enabling SmartACT for designs that are
vertically longer than they are horizontally wide, as the SmartACT optimization
modifies the movement of the X-axis of the laser carriage.
File Function (Options Page):
The file function section allows you to manage various laser parameters. This section is useful
when performing duplicate jobs on a variety of objects, allowing you to save your frequently used
laser parameters and load them in the future.
•
History File: This section contains a list of the recent files you have recently created and
worked with.
•
SAVE: This function will save the current print driver parameter settings to
a file and location on your computer of your selection. (Saved parameter setting files will
be tagged with the .H2O extension)
•
LOAD: This function allows you load previously saved print driver parameters or LaserPro
parameter database.
•
ORIGINAL: This function will load the print driver’s original factory parameter settings.
•
SAVE TO DEFAULT: This function allows you to save your current print driver parameters
as the default startup settings.
•
DELETE: This function will delete the file you select from the History File section. Please
note the Delete function only removes the file from the history file section, it does not
remove the H2O file from your hard drive, if you wish to completely remove the file from
Spirit GX User Manual
77
your hard disk, then you will have to manually delete the file from your operating system.)
NOTE
If you are using Windows 2000 or XP as your operating system, then make sure you log in
with an administrator or administrator-rights account in order to properly save laser
parameter settings.
Tip
LaserPro material database settings allow you easy to load the several parameters.
If you are loading LaserPro parameter database as your operating parameter, please
direct load from several build-in parameter folders.
78
Spirit GX User Manual
5.2.3.2 Spirit GX Print Driver >> Pen Page
The LaserPro Spirit GX incorporates the use of 16 different colors to represent 16 different laser
power and speed settings when cutting and engraving. These colors are referred to as “Pens”.
Think of each pen as a designated laser setting, rather than as a color. As an example, a black
and white image will use only one power and speed laser setting (Black). An image that is made
up of black, red and blue colors will be processed using the laser settings designated for each
particular color. In order to utilize up to 16 different pens (laser parameter settings), make sure
your graphics software can recognize and utilize the 16 pen colors designated by the Spirit GX
print driver.
Spirit GX User Manual
79
If you would like to specify your own colors to designate to a particular laser setting, then all you
have to do is to double-click on that particular pen color from the pen menu and a color manager
window will open where you can select “define custom colors” to define your own color (shown in the
picture below). This is useful when your image is composed of colors that are not part of the pen
menu’s default color selection, and instead of modifying your image, you simply assign the laser
settings based on the existing colors depicted from your current image.
80
Spirit GX User Manual
NOTE
The Spirit GX print driver cannot store more than 16 pen colors or different laser
parameter settings per file.
Speed (Pen Page) [DEFAULT SETTING: 50]
The speed slider controls the laser’s speed during operation (engraving speed) with settings
ranging from 0.1 – 100%. The Spirit GX’s maximum laser processing speed is 80 inches per second,
therefore a setting of 100% speed is equivalent to 60 inches per second and a 10% speed setting
would be equivalent to 6 inches per second. Keep in mind, this is the speed the laser moves at when
cutting or engraving straight lines. The machine will automatically slow down when processing
curves.
Tip
Cutting / engraving depth and quality are determined by a combination of power and
speed. Slower speeds at higher power will produce deeper cuts and engravings,
whereas higher speeds at lower power will produce more shallow cuts and engravings.
Power (Pen Page) [DEFAULT SETTING: 50]
The power slider controls the laser’s power during operation (engraving power) with a range
setting from 1 – 100%. The percentage setting represents the power for each laser pulse fired.
PPI (Pen Page) [DEFAULT SETTING: 400]
PPI (pulses-per-inch) represents the number of times the laser pulses (fires) per linear inch,
exclusive for vector cutting. Higher PPI settings will generate deeper, overlapping laser pulses,
resulting in cleaner cuts. Lower PPI settings (lower than 150) will result in the individual laser
pulses being spread apart, resulting in a perforated effect (similar to the perforation in the paper
between mailing stamps).
If you drag the PPI slider to the furthest right (maximum), the value will change to X. This
completely disables the PPI control and continuously fires the laser non-stop, without pulsing.
Think of setting PPI to X as being equivalent to turning a water faucet on with the water continuously
flowing out. This also disables the power ramp functionality, which automatically controls the PPI
depending on the speed of the laser carriage (such as vector cutting around the corner of a square).
Tip
・ For Vector Engraving jobs, we recommend a PPI setting > 150
・ For Vector Cutting jobs, we recommend a PPI setting of > 400
Raster / Vector (Pen Page) [DEFAULT SETTING: Selected]
Checking the Raster checkbox will process only the raster functions for the areas of your design
that correspond to that particular “pen” color.
Spirit GX User Manual
81
Checking the Vector checkbox will process the vector functions for the areas of your design that
correspond to that particular “pen” color.
As an example: a particular “pen” color may be assigned to areas in your design containing color
fills (raster engraving) and very thin lines (vector cutting). By checking / unchecking the Raster
and Vector will force the driver to process / ignore the color fills / thin lines.
Vector Checked
Raster Checked
Vector Unchecked
Processes both Vector and Raster Processes only the Raster functions
for that particular color (Vector
functions for that particular color
functions ignored)
Raster Unchecked Processes only the Vector functions Does not process Vector or Raster
f o r t h a t p a r t i c u l a r c o l o r ( R a s t e r functions for that particular color
functions ignored)
Air (Pen Page) [DEFAULT SETTING: Unselected]
This checkbox controls the SmartAIR air-assist function (if you have the optional air compressor
installed). By selecting a pen color and checking this box will enable the SmartAIR air-assist
function for that particular pen color. As an example, if you are performing a combination of both
surface raster engraving job and deep vector cutting on a material such as acrylic, you may want
to enable the SmartAIR air-assist for the vector cutting sections to get the cleanest cuts. To do
this, you would simply need to select the pen color that you have assigned to the sections to be
cut and select the Air checkbox for those particular pen colors.
Auto Focus (Pen Page) [DEFAULT SETTING: Unselected]
This checkbox sets the Auto Focus for that particular job. With the Auto Focus button checked,
the Spirit GX will automatically initialize the auto focus procedure before starting the job. This will
ensure the focal distance is properly set based on the particular material you are working with
and the focal lens you have installed.
82
Spirit GX User Manual
5.2.3.3 Spirit GX Print Driver >> Advanced Page
Scaling (Advanced Page) [DEFAULT SETTING: 0]
In some cases you may find a slight output inaccuracy in the actual output compared to what you
have set in the computer. This margin of error or offset is extremely small (approximately 1/300).
What this means is that there may be a 1-unit offset for every 300 unit increments. As an example,
if you engrave a 300mm straight line, it may end up measuring only 299 mm or 301 mm in the final
output. In this case, you will want to set the scaling setting to +1/1000 or -1/1000 respectively to
compensate. A general rule of thumb is for every 300 unit increment, you will want to adjust the
slider by +1 if the final output is 1 unit increment shorter or -1 if the final output is 1 unit increment
longer than your graphic design setting.
Position Modes (Advanced Page)
[DEFAULT SETTING: Home]
These selections allow you to control the positioning of the laser head after each job completion
and before the next subsequent job.
•
Home: Resets the positioning of the laser head to the ‘home position’ (upper-right) before
and after each job.
•
Without Home: The laser head will start the next job based on the position from its graphic
application software setting, from the last position of the previous job. Upon completion of the
current job, the laser head will remain at the last position of the previous job.
•
Relative: This mode sets the current laser head position to correspond to the origin (top
left) position of the graphic software. Therefore, the laser head will process the job from its
current position relative to its setting in the graphics software.
•
Center: Sets the current position of the laser head as the center point for your subsequent
job. As an example, if the subsequent job is to vector cut a circle and you have the Position
Mode set to Center, then the Spirit GX will vector cut a circle around the initial position of the
laser head.
Spirit GX User Manual
83
SmartCENTER: The SmartCENTER mode is an enhanced version of the center mode and
will determine the center point between two objects. User can pinpoint and save two distinct
points and by moving the pen carriage using the red beam as a reference. When this mode is
selected, the machine will prompt the user to move the lens carriage to store the location of
the first position and then prompt the user to move the lens carriage again to store a second
position. Once the two positions are stored, the pen carriage will automatically position itself
to the center of the saved positions.
•
Tip
The SmartCENTER function is a quick and easy way to precisely locate the center
point between two points. A great tool for users whose jobs often require engraving
on specific locations such as on award signs and plaques.
Tip
It is highly recommended you enable the red dot laser pointer when setting / adjusting
the Position Modes, as this will ease your job positioning with enhanced accuracy.
Image Output Direction (Advanced Page) [DEFAULT SETTING: Top to Bottom]
These selections allow you to control the direction in which the system processes an engraved
image.
•
Top To Bottom: Selecting this will force the system to process the current task by moving
the laser carriage from the top to the bottom of the image (rear end to front end of the
work table).
•
Bottom To Top: Selecting this will force the system to process the current task by moving
the laser carriage from the bottom to the top of the image (front end to rear end of the
work table)
Normally, the LaserPro Spirit GX engraves from left to right, top to bottom. Selecting Bottom Up
will force the machine to start from the bottom and work its way to the rear of the working table.
Tip
In situations where the material you will be working with may produce a lot of dust
byproducts and you are utilizing the optional air extraction system, it is recommended
that you select the Bottom To Top image output direction option. This will minimize the
amount of dust byproducts lodged in the engraved sections as the air extraction
system is vented from the rear of the machine, the same direction as the image is
processed.
84
Spirit GX User Manual
Border (Advanced Page) [DEFAULT SETTING: Unselected]
In cases where you are working with a negative image (negative outline areas of your image are
engraved, rather than the positive areas), you may wish to include a border around your image.
To properly add a border, you will first need to Invert your design from the Options Page, then
check Use Border and specify a value for the thickness of the border you would like to add to
your design.
This mode is useful for engraving rubber stamps, as it allows you to create the outline around
your stamp image.
NOTE
If you wish to use the Border and Cluster function simultaneously, then the Border Thickness
value must be less than the Distance value specified in the Cluster setting.
Vector Function (Advanced Page) [DEFAULT SETTING: Normal]
•
Normal: This selection will not apply any special advanced vector function to your job. This
is the default Vector Function setting.
•
All Raster Output: This selection will instruct the print driver to process your entire image
as a raster engraving. Any vector lines within the image will be treated as raster data and
outputted as a raster engraving, similar to a dot-matrix printer.
•
Vector Sorting: When performing a vector cutting job in which your image has one vector cut
area enclosed within another vector cut area, select the Vector Sorting mode. This mode will
automatically instruct the print driver to process the inside vector image and moving outwards.
If you try to process a vector image that has multiple layers without using this mode, what may
occur is the laser engraver may process the outer vector cutting first, and any inner vector
cutting will not be possible as your centerpiece material may have dropped to the cutting
table. This setting will always automatically direct the laser to cut from the inner most vector
shape and move outwards.
•
Optimization Sorting: This is a setting that will minimize your process time. When selected,
the print driver will analyze your image and automatically determine the most efficient
processing path to process your image.
Use Cluster (Advanced Page) [DEFAULT SETTING: Unselected]
This setting allows you to change how the Spirit GX interprets and processes individual /
independent areas of an image in order to minimize job-processing times. The Cluster function is
only applicable when multiple areas of an image are broken down and isolated from each other
(areas not touching each other, blank space in-between). Another condition that must be met for the
Cluster function is that these individual areas of your design must have some X-axis overlap,
meaning that they should be to some extent side-by-side with empty spaces between them. The
distance value can be set by the user and represents the limit or cutoff point in which side-by-side
objects will be processed in Cluster mode or not. If the distance between side-by-side objects is
greater than the set distance value, then the individual areas will be processed in Cluster mode.
Conversely, if the distance between side-by-side objects is lesser than the set distance value, then
the individual areas will be processed normally (not via Cluster mode).
Spirit GX User Manual
85
An example of an image that would benefit from the Cluster function would be: 2 squares to be
engraved, side-by-side on the X-axis with a 20 cm gap in between them. In this scenario, you
would want to enable the Cluster setting and set the distance to a value less than 20. By doing
so, the laser will completely process one square and “leap-frog” to the second square, rather than
processing both squares simultaneously. The result: you shorten the processing time by minimizing
the unnecessary travel distance the laser head needs to make across the X-axis in between
squares, if they were to be processed simultaneously.
NOTE
If you wish to use the Border and Cluster function simultaneously, then the Border Thickness
value must be less than the Distance value specified in the Cluster settin
Enhanced Vector Mode (Advanced Page) [DEFAULT SETTING: Unselected]
This setting allows you to improve the cutting quality at the expense of speed. Your engraving
speed will be dropped by 50%, to maximize the cutting power. We recommend that you enable
this function when cutting thicker materials.
5.2.3.4 Spirit GX Print Driver >> Paper Page
86
Spirit GX User Manual
Paper Size (Paper Page)
The paper size represents your total work area. Ensure that the paper size is never set greater
than the Spirit GX’s work table area of 34" x 24" (860mm x 610mm) or 38" x 24" (960mm x 610mm)
with the Extend option checked. The X value represents the length and the Y value represents the
width.
NOTE
When using the optional rotary attachment system and with the Rotary Fixture option checked,
the X value represents the length of your working piece. The Y value will be changed
to Diameter, which represents the diameter of your working piece (at the position you wish to
engrave).
Unit (Paper Page) [DEFAULT SETTING: Metric (mm)]
Here you can set your preferred measurement standard in which you would like to use with the
Spirit GX print driver. You can choose between metric or imperial standards.
Image Tuning (Paper Page) [DEFAULT SETTING: 0]
In the event that you are processing extremely fine and detailed designs requiring near- microscopic
edge-to-edge precision, you will need to adjust the image tuning setting. To adjust this setting, we
recommend that you engrave a small black square design as a sample and use a magnifying glass
to view the engraved results.
When you look at your engraved test square under a magnifying glass, you may notice the edges
of your square may be slightly offset, with every consecutive engraved even or odd line protruding
past the square’s ideal edge. This occurrence may occur on the left or right side of the square and
can be compensated for by the image tuning setting. In the diagram below, the arrows refer to the
direction the laser head is moving to generate that engraved line. If the first and every other line
protrude to the left of the square’s ideal edge, you will want to set the image tuning to a negative
value. If the first and every other consecutive line protrude to the right of the square’s ideal edge,
you will want to set the image tuning to a positive value. The further the protruding lines are from
the square’s ideal edge, the larger you will need to set the Image Tuning value to compensate.
Square’s Left Edge
Square’s Right Edge (Ideal)
Spirit GX User Manual
87
The following is an example that has the proper image tuning, and demonstrates this significance
when engraving fine, small, intricate text. The following two pictures show engraved text magnified
with no image tuning (left picture) and image tuning enabled (right picture).
Extend (Paper Page) [DEFAULT SETTING: Unselected]
If you are processing a very large area requiring the maximum work table area, you will want to
enable this mode. Enabling this mode will extend the Spirit GX’s maximum work area to 38" x 24"
(960mm x 610mm), from the default 34" x 24" (860 mm x 610 mm). This function is enabled at the
expense of some quality loss, usually on the left and right edges of your full-size engraving. Usually
the quality loss is minimal and may not be apparent, depending on your design.
NOTE
With the Extend function enabled, the following functions are disabled: 3D Mode (Options
Page), Stamp Mode (Options Page), SmartACT (Options Page), Disable Skip White (Advanced),
Auto Focus (Pen Page), and Rotary Fixture (Paper Page).
Rotary Fixture (Paper Page) [DEFAULT SETTING: Unselected]
NOTE
This option is only to be used with the Rotary Attachment optional accessory properly set up. For
instructions on how to set up the Rotary Attachment, please refer to Chapter VII of this manual.
You will need to select this option when processing a job with the optional rotary attachment
system to engrave on rounded or cylindrical objects. When you have your material and rotary
attachment properly set up:
1)
88
Check the Rotary Fixture function and notice the change in the Paper Size fields Under
Paper Size, the X value represents the length of your work piece. Enter the length of
your work piece in this field.
Spirit GX User Manual
2)
Under Paper Size, the Diameter value represents the diameter of your working piece
(at the position you wish to engrave). Enter the diameter of your work piece in this field.
Again, remember the proper diameter value would be the diameter location, at the point of
engraving on your work piece.
3)
Under Rotary Parameter, the Offset value represents distance from the open end of your
work piece to the base of the padded rubber wheel. This value will be displayed on the
Spirit GX's LCD panel. Enter the proper offset value in this field.
Uninstall Driver (Paper Page)
Select this to uninstall the Spirit GX print driver. You will then need to restart your computer to
complete the process.
5.2.3.5 Spirit GX Print Driver >> Language Page
This page allows you to specify the language displayed by the Spirit GX Print Driver. Current
language options allow for: English, Spanish, French, Chinese (Simplified, Traditional), Japanese,
and German.
Spirit GX User Manual
89
5.2.3.6 Spirit GX Print Driver >> Raster Page
NOTE
The Raster Page is only available when Black & White Mode Setting is selected from the Options
Page, this page offers a number of advanced Raster Engraving output options.
Contrast (Raster Page) [DEFAULT SETTING: 0]
This provides a quick and easy way to immediately adjust the contrast of an engraved image.
Moving the slider to the Dark setting will increase the contrast levels of the engraved output,
whereas moving the slider to the Light setting will decrease the contrast levels of the engraved
output.
Tip
There are other ways to adjust an engraved image’s contrast such as: adjust the
power / speed settings or simply adjust the contrast of the image in software with the
graphic software application.
90
Spirit GX User Manual
Halftone (Raster Page) [DEFAULT SETTING: Dithering]
This option controls the way a raster-engraved image is processed. The “digital image to engraved
output” process can be processed via two methods: Dithering or Error Diffusion. Each offer additional
output options yielding different output effects, style, and quality.
•
Dithering: Interprets and outputs the raster engraving via the dithering method. This mode will
allow you to select the Pattern Type and Dithering Matrix, and Enhanced Dithering.
o
Pattern Type: Dot, Bayer, Corner, 45 Degree [DEFAULT SETTING: Dot]
Each pattern type uses a different shape and arrangement of dots to compose the shading
effect of a raster image.
The following diagram is an example of the raster effects when using the different pattern
types.
Dot
o
Bayer
Corner
Dithering Matrix: Variable depending on the Pattern Type selected. [DEFAULT
SETTING: 8x8]
This controls the resolution (dot size) and the number of dots the image is broken down
into for the dithering process. As an example, selecting 2 x 2 will shade with a 5-grade
halftone, where as an 8 x 8 Dithering Matrix will dither with a 65-grade halftone.
The following diagram is an example of the raster effects when using the different
dithering matrices.
2 x 2 Dithering
8 x 8 Dithering
2 x 2 Enhance
Dithering
8 x 8 Enhance
Dithering
Spirit GX User Manual
91
o
Enhance Dithering [DEFAULT SETTING: Unselected]
Selecting this will produce a finer dithering output.
•
Error Diffusion (Raster Page): Interprets and outputs the raster engraving via the error
diffusion method. This mode will allow you to select from three diffusion types: Floyd, Stucki,
and Jarvis.
o
Diffusion Type: Floyd, Stucki, Jarvis [DEFAULT SETTING: Floyd]
Each diffusion type presents the shade of image as different spread halftones instead of
dots to compose a raster image.
The following diagram is an example of the raster effects when using the different
diffusion types.
Floyd
Tip
Stucki
Jarvis
There is no “correct” or “best” setting when using the Raster options. The most
appropriate settings will be based on a variety of factors: your design, the material
you are engraving on, and the results you wish to achieve, etc. Please take some time
to experiment with the multitude of raster options to get the one you feel is the best for
your piece. This is where much of the fun in engraving is….experimentation!
92
Spirit GX User Manual
5.2.3.7 Spirit GX Print Driver >> Stamp Page
Producing stamps require different operational steps than your standard engraving or cutting
jobs. The Stamp page offers dynamic options allowing you to customize your stamp production
process.
NOTE
The Stamp page will only appear and be accessible when you have selected the Stamp Mode
from the Options Page.
Tip
Functions located on the other pages that are useful when making a stamp: Set
Shoulder, Pitch, Border, Invert, and Mirror.
Ridge: “Contact section”
of the stamp
Slope of ridge (Shoulder
Level)
Base of ridge (Pitch)
Spirit GX User Manual
93
6
Chapter 6
Engraving and
Cutting Techniques
Raster Engraving
Vector Cutting
Vector and Raster
3D Tips
Spirit GX User Manual
95
6.1 Raster Engraving
A laser engraver can process text, scanned image, digital picture, or design by “laser firing” grids / dots of
individual pixels into a raster image. Think of this as simply “printing” your job onto any particular material.
An example of a raster engraved piece would be a photo engraving on tile, as shown in the picture below.
6.2 Vector Cutting
A laser engraver can process text, design, and images composed of lines through continuous-firing of the
laser to cut out various shapes. When performing vector cutting operations, imagine the laser head as a
pair of scissors cutting out the lines specified in your design. An example of a vector cut piece would be a
customized dining mat, as shown in the picture below.
The Spirit GX Print Driver determines which sections should be raster engraved or vector cut based on the
outline width of that particular area or section of the design. In order to prep a particular section for vector
cutting, you will need to set that object’s fill color to white and set its outline thickness between 0.001"
(0.025mm) to 0.004" (0.1mm) via the graphics software.
96
Spirit GX User Manual
Below is an example of how to prep an area (in this case, we will use a section of text) for vector cutting.
CorelDraw will be used as the selected graphics software.
1)
With the text function, create a string of characters and select those characters by clicking on
the text.
2)
Change the text fill color of the selected characters to white by left clicking on the white color
from the CorelDraw Color Palette (located on the right hand side of the screen)
3)
Change the outline color of the selected characters outline by right clicking on the desired color
from the CorelDraw Color Palette.
4)
Change the selected characters outline thickness to the thinnest width by right clicking on the
selected text → select <Properties> → Click on the <Outline> tab and change the Width to its
thinnest dimension. Click on “OK” to apply the changes.
5)
Now your string of characters has been properly designated as an area to be vector cut. Simply
“print” your job (output the file to the Spirit) and watch as your string of characters is vector cut.
6.3 Vector and Raster
In some cases, you will want to process both raster engraving and vector cutting tasks within a single
project. For example, if you wanted to engrave a design onto a particular material and then cut a particular
shape around that engraving. The picture below is an example of engraving on a piece of cork which has
then been cut out similar to a square shape:
In these situations when there are raster engraving and vector cutting operations on a single project, the
LaserPro Spirit GX driver will interpret between raster sections and vector sections by the types of lines
and line widths of your design. Areas of your design with line widths set between 0.001" (0.025mm), 0.004"
(0.1mm) will be designated for vector cutting, and the other areas will be designated for raster engraving.
Spirit GX User Manual
97
6.4 3D Tips
When doing 3D sample on the LaserPro Spirit GX, acrylic or MDF wood are ideal materials for the
purpose. For acrylic the suggested PWR is 100%, SPD around 30% (depends on how deep you want to
cut).
The perfect image for 3D is like those shown below. When image is ready, choose 3D Effect as the output
mode in the driver. Sometimes, for materials such as acrylic, it would show better effect if you run the job
with 2nd pass with the firing laser out-of-focus. Especially with acrylic, the 2nd pass will smooth out the
surface.
For engraving wood, as it burns easily and leaves blackened surface after the 1st pass, it is necessary to
run the 2nd pass to remove the burned surface. To do that, simply fill the image with black color as the
mask (see below) and run the black mask image with PWR 100% and SPD 100%.
Create a black
image for polishing
98
Spirit GX User Manual