1
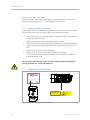
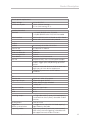
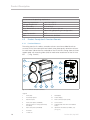
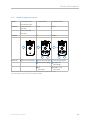
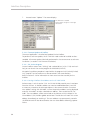
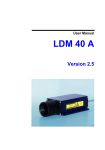
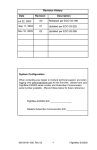
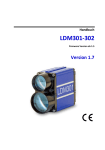
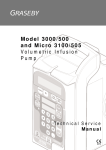
Laser Distance Meter SP LAM 301
User Manual
2
Revision 001, May 2007
Dear User
You are advised to carefully read this User Manual before you start using
the SP LAM 301 Laser Distance Meter.
This is necessary to help you exploit all the capabilities which your new
Laser Distance Meter offers.
We reserve the right to make changes or enhancements in product design
as part of ongoing technical progress.
Editorial deadline:
Documentation number:
May 2007
012861-001-98-02-0507-en
Sensor Partners BV
James Wattlaan 7
5151 DP Drunen
Holland
Phone: +31 (0) 416-378239
Fax: +31 (0) 416-377439
Web: www.sensor.nl
E-Mail: [email protected]
Revision state
Date
Revision
Explanatory note
May 2007
001
First compiled
CE
Note
No part of this User Manual may be reproduced in any way (by photographing, photocopying, microfilming or any other technique), unless written approval of Sensor Partners BV has been procured, nor may it be processed, duplicated or disseminated with the help of electronic systems.
Proper care was used in compiling this document. No liability will be accepted in
the event of damage resulting from failure to observe advisory notes or information
provided in this User Manual.
Revision 001, May 2007
3
Dear User
This document uses the following graphic, information and warning symbols to
highlight significant description parts:
Pictograms and symbols provided for reference
•
Enumeration
+
Note/Important/Important note
g
Reference to (passage of text or illustration)
Warning symbols
Warning alerts to situations involving potential danger to people’s health
if notes of this kind are disregarded.
Caution warns of potential damage to the product.
Laser warns of potential exposure to emerging visible and invisible laser radiation.
Information highlights important details.
4
Revision 001, May 2007
Content
1
2
2.1
2.2
2.2.1
2.2.2
2.3
2.4
2.5
3
3.1
3.2
3.3
4
4.1
4.2
4.3
4.3.1
4.3.2
4.4
4.5
4.5.1
4.5.2
4.5.3
4.6
4.7
4.8
4.8.1
4.8.2
5
5.1
5.1.1
5.1.1.1
5.1.1.2
5.1.1.3
5.1.2
5.1.3
5.1.4
5.2
5.2.1
5.3
5.3.1
5.3.2
5.3.3
General................................................................................................. 9
Safety Notes.........................................................................................11
Basic Information..................................................................................11
Laser Classification................................................................................11
Safety Notes Regarding Laser Class 1....................................................11
Safety Notes Regarding Laser Class 2....................................................11
Electric Power Supply Requirements......................................................11
Important Operating Advice................................................................ 12
Warning Signs & Nameplates............................................................... 12
Intended Purpose................................................................................ 13
General Product Description................................................................ 13
Conforming Use.................................................................................. 13
Non-Conforming Use/Error Sources..................................................... 14
Product Description............................................................................. 15
Scope of Delivery................................................................................. 15
Technical Data..................................................................................... 16
Product Description & Function Elements............................................. 18
Function Elements............................................................................... 18
Models & Equipment Features............................................................. 19
Mechanical Integration Requirements.................................................. 20
Connector Pin Assignments................................................................. 21
Main Connector Port (M18)................................................................. 21
SSI Port (M12)...................................................................................... 22
Profibus Port (M12).............................................................................. 22
Status Display...................................................................................... 23
Pilot Laser............................................................................................ 24
Accessories......................................................................................... 24
Adapter Plate....................................................................................... 24
Anti-Dust Tube.................................................................................... 24
Interface Description........................................................................... 25
Main Connector Port........................................................................... 25
RS232 or RS422 Interface.................................................................... 25
Communication Protocol..................................................................... 25
Wiring................................................................................................. 26
Automatic Baud Rate Detection........................................................... 27
Q1 and Q5 Switching Outputs............................................................. 27
Analog Output QA.............................................................................. 28
Trigger Input........................................................................................ 28
SSI Interface........................................................................................ 28
Specification........................................................................................ 28
Profibus Interface................................................................................ 29
ID Number.......................................................................................... 29
Connection Requirements.................................................................... 29
GSD File.............................................................................................. 29
Revision 001, May 2007
5
Content
5.3.4
5.3.5
5.3.6
5.3.7
5.3.8
5.3.9
5.3.9.1
5.3.9.2
5.3.10
5.3.11
5.3.11.1
5.3.11.2
5.3.11.3
5.3.11.4
5.3.11.5
6
6.1
6.2
7
7.1
7.1.1
7.1.2
7.2
7.2.1
7.2.2
7.2.3
7.2.4
7.2.5
7.3
7.3.1
7.3.2
7.3.3
7.4
7.4.1
7.4.2
7.4.3
7.4.4
7.4.5
7.4.6
7.4.7
7.4.8
7.4.9
7.4.10
7.4.11
6
Slave Address...................................................................................... 29
Bus Termination................................................................................... 29
Baud Rate............................................................................................ 30
Segment Length.................................................................................. 30
Electrical Connection........................................................................... 30
Profibus Firmware Installation.............................................................. 31
Preparation.......................................................................................... 31
Firmware Installation........................................................................... 31
Firmware Update via Profibus.............................................................. 34
SL4 Service Program............................................................................ 34
Setting a Profibus Slave Address on the SP LAM 301PB........................ 34
Parameter Dialog................................................................................. 35
Diag Common..................................................................................... 36
Diag Alarm.......................................................................................... 36
Service................................................................................................ 36
Starting Up.......................................................................................... 37
Preparative Action before Installation................................................... 37
Checklist on Installation Work.............................................................. 37
Measurement...................................................................................... 39
Identification....................................................................................... 39
ID Identification................................................................................... 39
ID?-Online Help................................................................................... 39
Operation Mode.................................................................................. 40
DM – Single Distance Measurement..................................................... 40
DT – Continuous Distance Measurement.............................................. 40
DF – Single Distance Measurement with External Triggering................. 40
VM – Single Speed Measurement........................................................ 40
VT – Continuous Speed Measurement................................................. 40
Status.................................................................................................. 41
TP – Internal LDM Temperature............................................................ 41
PA – All-Parameter Display................................................................... 41
HW – Hardware Diagnosis................................................................... 41
Parameter Setup.................................................................................. 41
AS – Autostart Function...................................................................... 41
PL – Pilot Laser.................................................................................... 42
PR – Reset to Factory Settings.............................................................. 42
DR – Trigger Cold Start........................................................................ 42
SF – Scale Factor.................................................................................. 43
OF - Offset.......................................................................................... 43
SO - Set Offset.................................................................................... 43
MW – Measurement Window............................................................. 43
MF – Measurement Frequency [Hz]...................................................... 44
SA – Average....................................................................................... 44
TD – External Trigger Delay [ms] & Trigger Level [Flanke]....................... 44
Revision 001, May 2007
Content
7.4.12
7.4.13
7.4.14
7.4.15
7.4.16
7.4.17
7.4.18
7.4.19
7.4.20
8
8.1
8.2
8.3
9
9.1
9.2
9.2
10
11
Exhibit 1
Exhibit 2
SE - Error Mode................................................................................... 45
Q1/Q7 – Switching Output................................................................... 45
QA – Analog Output........................................................................... 45
BR – Baud Rate.................................................................................... 46
SD – Serial Interface Termination Character.......................................... 46
TE – Serial Interface Termination Character.......................................... 47
SC - Format SSI.................................................................................... 47
BB – Field Bus Baud Rate..................................................................... 47
AB – Bus Address................................................................................ 47
Preventive Maintenance & Care............................................................ 49
User Maintenance Actions................................................................... 49
Software Update................................................................................. 49
Preventive Maintenance by Sensor Partners BV..................................... 49
Malfunction & Error Messages............................................................. 51
Malfunction........................................................................................ 51
Operating Advice................................................................................. 51
Error Messages.................................................................................... 51
EC Declaration of Conformity............................................................... 53
List of Abbreviations & Glossary........................................................... 55
Adapter Plate....................................................................................... 57
Anti-Dust Tube.................................................................................... 59
Revision 001, May 2007
7
Content
8
Revision 001, May 2007
General
1
General
The SP LAM 301 Laser Distance Meter has been developed for use in industrial applications. Its purpose is to allow non-contact measurement of distance and speed
within a great working range. Little time and no reflector is required to locate any
kind of diffusely reflecting target surface.
Available interfacing tools are RS232, RS422, SSI or Profibus, depending on the
particularly requested model. These tools are intended for easy installation and
start-up of the Laser Distance Meter. A LED display is located on the back panel to
facilitate visual tracking of the current work status during normal operation.
Compact and robust design, easy mechanical attachment, low power consumption, selectable switching outputs and options for specific user settings are the
distinguishing features of the SP LAM 301. Together they create a broad diversity of
potential applications in industrial environments.
•
Process monitoring in steel works and rolling mills
•
Fill-level measurement
•
Monitoring of moving objects
•
Positioning of cranes and loading equipment
•
Measurement of otherwise inaccessible target points, for example, inside of hollow bodies such as tubes or containers
•
Position monitoring of road vehicles and ships
Standard SP LAM 301 delivery includes integral heating, status display and a telescopic sight. Of modular setup, the Distance Meter readily accepts accessories or
custom-manufactured modules for specific applications.
Revision 001, May 2007
9
General
10
Revision 001, May 2007
Safety Notes
2
Safety Notes
2.1
Basic Information
Safety notes and operating advice must be read carefully and followed at any time
during practical use of the SP LAM 301.
There is danger of laser radiation or electric shock.
For necessary repairs, the SP LAM 301 may not be opened by anyone
other than manufacturer personnel. Unauthorized intervention will void
any claims for warranty.
Specified operating requirements (gsection 4.2) must be met.
Failure to comply with these safety notes or non-conforming product usage may
cause physical injury to the user or damage to the SP LAM 301. Connectors must
not be plugged or unplugged with the SP LAM 301 in powered state. Remember
to turn power off before you begin any kind of work for establishing connections.
2.2
Laser Classification
The SP LAM 301 is equipped with two lasers:
Laser for measurement g laser class 1
Pilot laser g laser class 2
2.2.1 Safety Notes Regarding Laser Class 1
The laser for measurement qualifies as a class 1 laser device in accordance with
standard EN 60825-1:2003-10. Laser radiation emitted by class 1 lasers is entirely
harmless to the human eye so eye damage can be ruled out for this category.
2.2.2 Safety Notes Regarding Laser Class 2
The pilot laser qualifies as a class 2 laser device in accordance with standard
IEC825-1/DIN EN 60825-1:2001-11 and as a class II device under FDA21 CFR.
In the event of accidental short-time exposure, the human eye is normally protected by its own lid-closing reflex and preventive reaction. The natural lid-closing
reflex may however be impaired by the influence of medication, alcohol or drugs.
Despite that, one should refrain from directly looking into the laser beam.
Do not point the laser beam onto people.
Warning: Class 2 laser radiation – do not look into the beam!
2.3
Electric Power Supply Requirements
For normal operation of the SP LAM 301, direct voltage supply of 10 V to 30 V is
required.
For operation with heating, direct voltage of 24 V should be available.
Use only the dedicated connector port for power supply.
Observe specified limit values for input voltages.
Outputs must not be used as inputs.
Revision 001, May 2007
11
Safety Notes
All outputs are short-circuit proof.
The LDM casing is electrically isolated from the sensor electronics. Immunity to
electrostatic discharges (ESD) is 4 kV according to EN 61000-4-2.
2.4
Important Operating Advice
To be able to exploit all capabilities and performance features and achieve a long
service life of the system, you should follow all of the following rules:
•
The SP LAM 301 must not be powered up if optical surfaces are found to be
misted up or contaminated!
•
Optical surfaces must not be contacted with bare hands!
•
Use utmost caution when removing dust or dirt from an optical component!
•
Prevent shock impacts during operation and transportation of the SP LAM
301!
•
Protect the SP LAM 301 from overheating!
•
Protect the SP LAM 301 from strong temperature variations.
•
The SP LAM 301 provides splash-proofness and dust-proofness under IP67
internal protection level.
These safety and advisory notes must be read carefully and followed
during practical use of the SP LAM 301.
2.5
Warning Signs & Nameplates
LASER RADIATION
DO NOT STARE INTO BEAM
CLASS II LASER PRODUCT
P<0,95mW
l=620 … 690 nm
EN 60825-1:
2001-11
Fig. 1: SP LAM 301 - Warning Signs & Nameplates
12
Revision 001, May 2007
Intended Purpose
3
Intended Purpose
3.1
General Product Description
The SP LAM 301 is a Laser Distance Meter for determining the distance to objects
in motion or stationary with centimeter accuracy for:
- natural surfaces with 90% reflectance in the range of 0.5 m to 300 m
- reflector surfaces (e.g. Scotchlite 3000x) from 300 m to 3000 m and
- speed measurement in the range of 0 m/s to 100 m/s (at 0.5 m to 700 m distance).
With the help of a red laser sighting point (pilot laser) a given target can be unequivocally identified. The actual range of measurement depends on the reflectivity and
the surface quality of a target being measured.
The SP LAM 301 relies on the time-of-flight-measurement principle for operation.
It is available with RS232 or RS422, depending on the Customer’s request. Product
manufacturing includes the installation of a requested configuration. Once installed, the interface cannot be replaced with another type.
(g section 4.1 Scope of Delivery)
The SP LAM 301 has two switching outputs and one external trigger input (all of
them parameterizable).
A distance measurement can be triggered:
• via RS232 interface or RS422 interface
• via Profibus DP-V0
• by an external source (in external trigger mode)
• via SSI.
The SP LAM 301 is delivered in a stable cardboard box with adequate padding
which can also be used for protected transportation of the Laser Distance Meter.
3.2
Conforming Use
•
Measurement of distance and speed and output of measured data via
RS232 or RS422 interface or SSI or Profibus
•
Special measuring functions
•
Compliance with environmental requirements, operating temperature and
storage temperature
•
Operation in industrial environments that meet IP67 internal protection
standard requirements (allowing for splashes of water and spray)
•
Operation at correct voltage level
•
Applying only specified signal levels to data lines
•
Measurement through an optically transparent medium such as glass, optical filters or plexiglass should be performed with the measuring window
function turned on.
Revision 001, May 2007
13
Intended Purpose
3.3
14
Non-Conforming Use/Error Sources
•
Operate the SP LAM 301 only in accordance with its intended purpose and
in a proper working condition.
•
Safety devices must not be defeated.
•
Information and warning signs must not be removed.
•
Repair work on the SP LAM 301 may not be performed by anyone other
than personnel from Sensor Partners BV.
•
Do not operate the SP LAM 301 in an explosive environment.
•
In order to obtain precise measurement results, make sure you follow these
rules:
-
Measurement against the sun or other strong sources of light may lead
to faulty readings.
-
Measurement of target surfaces with poor reflectance, but otherwise
surrounded by a highly reflecting environment, may lead to faulty readings.
-
Measurement of strongly reflecting surfaces may lead to faulty readings.
-
Measurement through an optically transparent medium such as glass,
optical filters, plexiglass, etc. may lead to faulty readings.
-
Rapidly changing conditions of measurement (e.g. jumps in distance)
may lead to faulty readings.
Revision 001, May 2007
Product Description
4
Product Description
4.1
Scope of Delivery
Description
Bestell-Nr.
SP LAM 301.100
RS232
012861-005-22
SP LAM 301.200
RS422
012861-009-22
SP LAM 301.101
SSI, RS232
012861-013-22
SP LAM 301.102
PB, RS232
012861-017-22
CD with Customer documentation
2m combi-cable
012840-144-24
5m combi-cable
012840-145-24
10m combi-cable
012840-146-24
“red.dot” telescope
98911
100mm anti-dust tube
012861-025-10
Adapter plate
012861-020-26
PB-In-Out, 5m cable
012840-170-24
PB-In, 5m cable jack
012840-165-24
PB-In, 10m cable jack
012840-166-24
PB-Out, 5m cable connector
012840-160-24
PB-Out, 10m cable connector
012840-161-24
Protective cap for PB jack
94366
Protective cap for PB connector
94363
Jack, 12-pole
94477
PB 12V terminating resistor
94145
PB-jack, 5-pole
94136
PB-connector 5-pole
94133
Product configuration
Integrated pilot laser, status display and heating are standard equipment items of all
SP LAM 301 models. An overview of the various models and their configuration is
contained in the following table. On special request, SP LAM 301s can also be manufactured to provide a divergence of 10 mrad and/or a measuring rate of 10 kHz.
Model
Interface (x)
Divergence (y)
Measuring rate (y) Interface (z)
Description Ordering code RS232 RS422 2 mrad 10 mrad 2 kHz
10 kHz SSI
Profibus
LAM301.100 012861-005-22
LAM301.200 012861-009-22
LAM301.101 012861-013-22
LAM301.102 012861-017-22
Table 1: Basic unit configurations
Revision 001, May 2007
15
Product Description
SP LAM xyz
301.
0 – no additional interface
1 – SSI
2 – Profibus DP
0 - 2mrad / 2 kHz
1 - 2mrad / 10 kHz
2 - 10mrad / 2 kHz
3 - 10mrad / 10 kHz
1 – RS232
2 – RS422
Fig. 2: SP LAM 301 - product identifier
4.2
Technical Data
Measuring features
Measuring principle
Measured quantity
Measuring range *1
Measuring accuracy
Measured-value resolution
Measuring time
Measured quantity
Measuring range
Measuring time
Laser-pulse-time-of-flight measurement
Distance
0.5 m to 300 m on natural surfaces*²
0.5 m to 3000 m on target board
± 20 mm (for measured-value output at 100 kHz)
± 60 mm (for measured-value output at 2 kHz)
1 mm
Standard version: 0.5 ms
Special version: 0.1 ms
Speed 3
0 ms-1 to 100 ms-1
0.1 s to 0.5 s
*1 depending on target reflectance, stray-light influences and atmospheric conditions
*2 natural, diffusely reflecting surfaces
*3 distance range to targets being measured: 0.5 m to 700 m
Laser
Laser for measurement
Laserklassifizierung
Laser beam divergence
16
Wavelength
Laser class 1 under EN 60825-1:2003-10
Standard version: 1.7 mrad
Special version: 10 mrad
905 nm (infrared, invisible)
Pilot laser
Laser classification
Wavelength
Laser class 1 under EN 60825-1:2003-10
635 nm (red)
Revision 001, May 2007
Product Description
Electric power requirements
Supply voltage
Power consumption
Interfaces/terminals
Terminals
Serial interfaces
Profibus
Profibus
Transfer rate
Ident number
Baud rate detection
Terminating resistor
Slave address
GSD file
SSI
Transfer rate
Signal input/output
Electrical isolation
LSB
MSB
Switching output
Analog output
Trigger for
device synchronization
Operating modes
Revision 001, May 2007
10 V to 30 V DC
< 5 W (without heating)
11.5 W (with heating, 24 V)
1 x 12-pole (BINDER-series 723) M18
2 x 5-pole (BINDER-series 766) M12 B-encoded
RS232 and RS422 with 9.6 kbaud to 460.8 kbaud
Format: 8N1, ASCII transmission protocol
DP-V0 slave | IEC 61158 / IEC 61784
9,6 kbaud to 12 Mbaud
0x0AA2
Automatic
External
Selectable via SSA command
LDM30AA2.GSD, class 1/2 PNO-profile encoder
Configuration of measured quantities, switching
outputs, trigger input and powering-up characteristics
Output of measured distance values or error message, query for inner device temperature
Storage of all parameters and PB address
in NVRAM
50 kHz to 1 MHz, 25 µs pause
Differential signal (RS422)
24 bits, binary or gray-encoded
1 validity bit
500 V for signal input
Bit 0
Bit 23
2 x “high-side switch” | up to 0.2 A load capacity
| sustained short circuit proof | selectable window
functions
4 mA to 20 mA
1 x trigger In/Out, up to 30 V DC load capacity |
edge and delay selectable
Single measurement | continuous measurement |
mean value | external triggering | selectable nearfield suppression and window functions
17
Product Description
Environmental & operating requirements
Operating temperature
- 40 °C to + 60 °C
Storage temperature
- 40 °C to + 70 °C
Rel. air humidity
15 % to 90 %
Phys. dimensions (L x W x H) 136 mm x 57 mm x 104 mm
Weight
About 800 g (depending on configuration)
Type of protection
IP67
EMC
EN 61000-6-2, EN 55011
4.3
Product Description & Function Elements
4.3.1. Function Elements
The casing consists of a robust, corrosion-resistant extrusion-molded aluminum
structure with a front cover plate and a back cover plate equally corrosion-resistant.
On each lateral side and on the underside of the SP LAM 301 casing there are three
support pads with mounting holes (M4) for mechanical attachment of the SP LAM
301 (g Fig. 5 and 6 ).
8
9
2
13
10
11
1
14
3
12
4
5
7
6
Fig. 3: SP LAM 301 function elements
Legend
18
1
Front tube
9
Nameplate
2
Transmitter optics
10
Status display
3
Receiver optics
11
Main connector port (M18)
4
Front cover plate (anodized)
12
Service screw
5
Receiver optics 5 Casing (aluminum,
extruded)
13
Support pads with M4 x 6 threaded
inserts
6
Back cover plate (anodized)
14
7
Pilot laser
optionale Anschlüsse (Profibus, SSI)
(g Fig.: 4)
8
11-mm rail
Revision 001, May 2007
Product Description
4.3.2 Models & Equipment Features
Model
SP LAM 301.100
SP LAM 301.200
SP LAM 301.101
SP LAM 301.102
Interface
RS232 (SP LAM
301.100)
RS232
RS232
SSI
Profibus
RS422 (SP LAM
301.200)
Interface
1
1
1
2
Terminals
11 Main connector port
4
3
5
1 Main connector port 1 Main connector port
2 M12 dummy plug 4 Profibus-IN
(M12-plug)
3 SSI
(M12-jack)
5 Profibus-OUT
(M12-jack)
Note: For reasons of sealing, plug 2 is also installed for SP LAM 301.101 (SSI)!
Fig. 4: Rear panel of the various SP LAM 301 models
Revision 001, May 2007
19
Product Description
4.4
Mechanical Integration Requirements
For integration of the SP LAM 301 Laser Distance Meter, three different versions of
mechanical attachment are available.
1.
Attachment to a
lateral surface
For attachment to a desired one of the two lateral
surfaces, the SP LAM 301 provides three support
pads (g Fig. 6, reference 1) with mounting holes
(M4 x 6)
2.
Attachment to casing
bottom
Likewise, the SP LAM 301 provides three support
pads (g Fig. 5, reference 1) with mounting holes
(M4 x 6) for attachment to the bottom face of its
casing
3.
Attachment via adap- To replace an LDM300C with an SP LAM 301, an
ter plate (replacement adapter plate is required. This plate must be screwed
of LDM300C)
to the bottom side of the SP LAM 301 (g Fig. 5,
reference 1). The adapter plate is specifically shaped
and sized to allow the SP LAM 301 to be attached to
the mechanical fixing points of an LDM300C.
Legend:
1
1
1
Support pads with M4 x 6
threaded inserts
1
Fig. 5: Mechanical fixing points on bottom face
0.5
13.5
30
90.4
123.4
17.5
thread M4
1
21.4
49.5
1
29.5
28.5
38
6.5
50
1
90.4
139.9
Legend:
1
Support pads with M4 x 6
threaded inserts
Fig. 6: Fitting dimensions of the SP LAM 301, zero-point location (dimensions in mm)
20
Zero-point of the SP LAM 301 is identical with the outer surface plane of the front
cover plate.
Revision 001, May 2007
Product Description
4.5
Connector Pin Assignments
Depending on the implemented configuration version of the various SP LAM 301
models, different terminal facilities are available for connections. All models share
the same type of main connector port (Fig. 4, reference 1).
4.5.1 Main Connector Port (M18)
The main connector port (Fig. 3, Ziffer 11) includes the terminal points for voltage
supply, for serial data communication, for the two switching outputs, one analog
output and for one trigger input.
A shielded cable must be used for connection. This cable is optionally available
from Sensor Partners BV.
K
A
B
J
C
L
H
M
G
D
F
E
weiss
white
A
TxD / RX+
braun
brown
B
RxD / RX-
grün
green
C
TRIG
gelb
yellow
D
QA
grau
grey
E
n.c. / TX-
rosa
pink
F
n.c. / TX+
blau
blue
G
VCC
rot
red
H
n.c.
schwarz
black
J
GND
violett
violet
K
Q2
grau/rosa
grey/pink
L
GND
rot/blau
red/blue
M
Q1
Color assignments of cable 796030-20-12 (Binder series 425)
Fig. 7: Terminal diagram of main connector port
Pin
Color code of combi cable
Ord.-No. 012840-14x-24
RS232
RS422
Description
A
White
TxD
RX+
RS232 send data / RS422 receive data +
B
Brown
RxD
RX-
RS232 receive data / RS422 receive data -
C
Green
TRIG
TRIG
Trigger input
D
Yellow
QA
QA
Analog output (4 … 20 mA)
E
Grey
n.c.
TX-
RS422 send data -
F
Pink
n.c.
TX+
RS422 send data +
G
Blue
VCC
VCC
Supply voltage
H
Red
n.c.
n.c.
not connected
J
Black
GND
GND
GND
K
Violet
Q2
Q2
Switching output Q2
L
Grey/pink
GND
GND
GND
M
Red/blue
Q1
Q1
Switching output Q1
Table 2: Pin assignments of main connector port
Revision 001, May 2007
21
Product Description
4.5.2 SSI Port (M12)
Connection to the SSI interface is accomplished via a 5-pole, B-encoded M12 male
connector. Shielded cables should be used for connection.
1
2
5
4
3
Fig. 8: connection diagram
4.5.3 Profibus Port (M12)
Profibusses connection is via B-encoded 5-pole M12 connectors. Shielded cabling
should be used.
2
1
5
3
4
n.c. - not connected
Fig. 9 Profibus-IN connection diagram
1
2
5
4
3
Fig. 10: Profibus-OUT connection diagram
22
Revision 001, May 2007
Product Description
4.6
Status display
Fig. 11: Status display
LED
Function
Target Reflectance
Display
Status
Off
Red blinking
Red
Yellow
Green
Green blinking
No signal
Very weak signal
Weak signal
Signal available
Good signal
Very good signal
Status Readiness for action Off
Red
Green
No operating voltage
Technical defect, operating voltage supplied
Ready for action
Q1
Switching output 1 Off
Yellow
Off
Operating voltage supplied
Q2
Switching output 2 Off
Yellow
Off
Operating voltage supplied
Link
Interface status
No field bus
Profibus error
Operating voltage supplied, Profibus inactive
Operating voltage supplied, Profibus working
Off
Red
Yellow
Green
Tabelle 3: Status display - functions
Revision 001, May 2007
23
Product Description
4.7
Pilot Laser
The pilot laser (g Fig. 2, Ziffer 7) is intended to support alignment to a given target
point during start-up action of the SP LAM 301. It qualifies as a class 2 laser device
and operates at 635 nm (red) in the visible range. The pilot laser is not aligned to
emit in a direction parallel with the measurement laser. Instead, its beam intersects
with that of the measurement laser at a distance of 75 m.
Fig. 9 shows the tolerance on pilot laser position in relation to the invisible
measurement laser as a function of the distance to an object being measured:
10 m
75 m
125 m
Fig. 12: Tolerance on pilot laser position relative to measurement laser
4.8
Accessories
4.8.1 Adapter Plate
An adapter plate can be supplied for mechanical attachment of the SP LAM 301.
Once screwed to the bottom of the SP LAM 301, it will provide various application
options, including a 1/4 -20 UNC tripod socket. (drawing g Exhibit 1)
4.8.2 Anti-Dust Tube
The purpose of the anti-dust tube is to protect the receiver channel from contamination and laterally incident steady light and potential impairment of measuring
performance. (drawing g Exhibit 2)
24
Revision 001, May 2007
Interface Description
5
Interface Description
For interfacing, the SP LAM 301 provides a main connector port (g Fig.: 3, reference 11) with RS232 or RS422 interface and an additional SSI interface (g Fig.: 4,
reference 16) or Profibus interface (g Fig.: 4, reference 18,19), depending on the
Customer’s request.
5.1
Main Connector Port
5.1.1
RS232 or RS422 Interface
5.1.1.1 Communication Protocol
-
Interface settings: asynchronous, 8 data bits, no parity, 1 stop bit
-
Commands are case-sensitive (no distinction between small lettering and capital lettering)
-
Period “.” (0x2E) serves as decimal separator for output of numbers
-
Enter (0x0D) is used as command (send command) termination character
-
With multi-value parameters, space (0x20) is used between each two values
-
A parameterization command with new parameters triggers a response command with these parameters
-
A parameterization command without new parameters triggers a response
command with (most recent) parameters
-
A parameterization command with parameters out of valid setting ranges
triggers a response command with (most recent) parameters
-
An unknown command and a faulty parameter format is quitted via “?”
(0x3f)
Communication protocol format/syntax: 7-bit ASCII
Proprietary communication protocol
Command group
Command
Description
Standard(s) Range(s)
Operation Mode
DM
DT
DF
-
-
VM
VT
TP
PA
HW
PR
DR
ASs
Single distance measurement
Continuous distance measurement
Single distance measurement with
external triggering
Single speed measurement
Continuous speed measurement
Internal device temperature in °C
All-parameter display
Hardware diagnosis
Reset to factory settings
Triggers a cold start
Autostart function
ID
MFx
Measuring frequency [Hz]
2000
ID, ID?, DM, DT, DF, VM,
VT, TP, HW, PA, MF, TD,
SA, SF, MW, OF, SE, Q1,
Q2, QA, BR, SD, TE, BB,
AB, SC, PL, AS
1 to 2000
Status
Setup parameter
Revision 001, May 2007
25
Interface Description
Command group
Command
Description
Standard(s) Range(s)
TDx y
External trigger delay [ms] and
trigger level [edge]
Mean value
Scale factor
Measuring window at beginning
and end
Distance offset
Single distance measurement and
acceptance as distance offset
Error mode for Q1, Q2 and QA
Analog output with lower and
upper limit
00.00
0
20
1
-5000.000
+5000.000
0.000
-
0 … 300.00
0 oder 1
1…30000
± 0.001 … 10
± float 32
± float 32
± float 32
-
1
1.000
300.000
0 ... 2
± float 32
± float 32
SAx
SFx
MWx y
OFx
SO
SEx
QAx y
Q1w x y z
BRx
Q1 switching output with trigger
0.000
threshold, switching range, hystere- 0.000
sis and switching state
0.000
1
Q2switching output with trigger
0.000
threshold, switching range, hystere- 0.000
sis and switching state
0.000
1
Baud rate
115200
SDx y
Output format of serial interface
Q2 w x y z
TEx
SCx
PLx
BBx
AB
0
0
Terminating character for output via 0
serial interface
SSI format
0
Pilot laser
2
Field bus baud rate
0
Bus address
0
± float 32
± float 32
± float 32
0 oder 1
± float 32
± float 32
± float 32
0 oder 1
9600, 19200, 38400,
57600, 115200, 230400
oder 460800
0…2
0…3
0…9
0…1
0…3
0
0
Table 3: Command summary table
5.1.1.2 Wiring
weiss
white
A
braun
brown
B
grün
green
C
gelb
yellow
D
grau
grey
E
rosa
pink
F
blau
blue
G
rot
red
H
schwarz
black
J
violett
violet
K
grau/rosa
grey/pink
L
rot/blau
red/blue
M
TxD
weiss
white
RxD
A
braun
brown
B
2
3
grün
green
C
gelb
yellow
D
5
grau
grey
E
rosa
pink
F
blau
blue
G
rot
red
H
schwarz
black
J
violett
violet
K
grau/rosa
grey/pink
L
rot/blau
red/blue
M
VCC
D-Sub9
GND
GND
RS232 wiring on D-Sub9
24V
(10...30V)
RX+
RXDTE
RS422
TXTX+
VCC
GND
24V
(10...30V)
RS422 wiring
Fig. 13: Wiring serial interface
26
Revision 001, May 2007
Interface Description
5.1.1.3 Automatic Baud Rate Detection
The SP LAM 301 is capable of synchronizing its baud rate to that of a remote station (e.g. PC with terminal program).
This requires space (0x20) to be permanently sent to the SP LAM 301 during a
powering-up routine. The SP LAM 301 uses its own internal evaluation procedure
to identify the baud rate the remote station is working at.
Short instructions:
1.
Turn SP LAM 301 off
2.
Remote station permanently sends space characters to SP LAM 301
3.
Turn SP LAM 301 on
4.
SP LAM 301 identifies and outputs baud rate
Once identified, a baud rate will also be preserved after turning power off!
5.1.2 Q1 and Q2 Switching Outputs
The purpose of Q1 and Q2 is to represent distance readings as logic operation data.
They report events of positive or negative excession of a preset switching range
with a certain amount of hysteresis.
Accordingly, they are perfectly suited for direct reprocessing of monitored quantities such as filling level or for detection of objects.
Parameter settings are made via the serial interface.
The command to achieve this is Q1w_x_y_z (where “_” is equivalent to space
(0x20)).
Value
Description
Specification
w
Trigger threshold
x
Switching range
x ≥ 0; x ≥ y
y
Hysteresis
y≥0
z
Switching state
z = 0 or1
Fig. 14: Switching characteristics of SP LAM 301
weiss
white
A
braun
brown
B
grün
green
C
gelb
yellow
D
grau
grey
E
rosa
pink
F
blau
blue
G
rot
red
H
schwarz
black
J
violett
violet
K
grau/rosa
grey/pink
L
rot/blau
red/blue
M
VCC
Q2
GND
24V
(10...30V)
Q1
Fig. 15: Example of SP LAM 301 switching output wiring
Revision 001, May 2007
27
Beschreibung der Schnittstellen
5.1.3 Analog Output QA
The analog output allows standardized analog data transfers from or to a remote location over greater distances using a two-wire transmission line. The current
which is injected into this line at levels from 4 mA to 20 mA is proportional to the
measured distance within a selectable distance interval. Parameter settings can be
made via the serial interface.
The command to achieve this is QAx_y (where “_” is equivalent to space (0x20)).
Parameter settings for current output in the event of measurement failure can be
made using the command SEx.
Value
Description
Specification
x
Lower limit
x≠y
y
Oberes Limit
y≠x
Fig. 16: Signal diagram of SP LAM 301 analog output
The value of output current (in mA) is calculated as follows:
x<y
x>y
white
weiss
A
brown
braun
B
green
grün
C
yellow
gelb
D
grey
grau
E
pink
rosa
F
blue
blau
G
red
rot
H
black
schwarz
J
violet
violett
K
grey/pink
grau/rosa
L
red/blue
rot/blau
M
QA
QA [mA] = 4 mA + 16
Dist. - x
mA
y-x
QA [mA] = 20 mA - 16
Dist. - y
mA
x-y
4 ... 20 mA
R < 500 Ohm
VCC
GND
24V
(10...30V)
Fig. 17: Example of SP LAM 301 analog output wiring
5.1.4 Trigger Input
The trigger input allows a single distance measurement to be triggered by an external signal that is applied as a voltage pulse. Selectable parameter settings are a
value for delay in triggering (Trigger Delay) and the edge on which triggering is to
occur (Trigger Level).
Parameter settings for trigger input can be made via the serial interface.
The command to achieve this is TDx_y (where “_” is equivalent to space (0x20)).
28
Revision 001, May 2007
Interface Description
The trigger function is enabled in DF measuring mode.
white
weiss
A
brown
braun
B
green
grün
C
yellow
gelb
D
grey
grau
E
pink
rosa
F
blue
blau
G
red
rot
H
black
schwarz
J
violet
violett
K
grey/pink
grau/rosa
L
red/blue
rot/blau
M
TRIG
VCC
GND
24V
(10...30V)
Fig. 18: Example of SP LAM 301 trigger input wiring
5.2 SSI Interface
5.2.1 Specification
Optionally, the SP LAM 301 can be equipped with an SSI data interface
(SSI=Synchronous Serial Interface).
At the request of an SSI clock generator a distance measurement cycle will start,
sending related data which are present at the shift register bit-by-bit to a controller.
Depending on the length and quality of selected data lines, actual transfer rates
may range from 50 kHz to 1 MHz with 25 µs pause time between two bit sequences. The data length is 24 bits plus one validity bit.
The format can be binary or gray-encoded.
For parameter settings via the serial interface, the SCx command is available
SCx
x=0...binary, 25 bits, one validity bit
x=1...gray, 25 bits, one validity bit
Bit sequence:
24
MSB
23
..................................
Bits 1 – 24 distance depending on preset scale factor
2
1
0
LSB
Bit 0: Error bit
5.3
Profibus Interface
5.3.1 ID Number
The SP LAM 301 has been registered under ID number 0AA2 (hex) with Profibus
Nutzerorganisation e.V. (Profibus user organization, registered society).
Revision 001, May 2007
29
Interface Description
5.3.2 Connection Requirements
The SP LAM 301 may be connected to any kind of Profibus DP structure, the requirement being that the selected Profibus DP master is capable of sending a parameterization telegram, and the master’s pertaining editing tool (typically, editing
software) will support the representation of parameters that are contained in the
respective device master file (GSD file).
5.3.3 GSD File
The GSD file is named LDM30AA2.GSD.
A GSD file includes the two files SP LAM 301.dib and SP LAM 301.bmp. These are
intended for representation of the SP LAM 301 in the editing tool. For integration
of these files, please consult the special editing tool documentation.
5.3.4 Slave Address
To facilitate multiple-participant bus communication, the Profibus slave address can
be set in a range of 0 to 125. A desired address can be set via the Profibus, using
the SSA command. For information on how to change the slave address via the
editing tool, you should consult the special editing tool documentation. Address 4
is set in as-shipped state of the SP LAM 301.
The slave address is permanently maintained in the EEPROM. It will also be preserved in the event of a voltage failure.
Where more than one slave (SP LAM 301) are to share a common Profibus, the
various slaves must be connected one after the other and be assigned different
addresses.
5.3.5 Bus Termination
For SP LAM 301 operation, an external bus terminator must be installed. Voltage
supply of 5 V required for the terminator is available at Profibus-OUT. This 5 V supply is electrically isolated from general voltage supply (VCC) and rated for a current
load up to 100 mA.
The terminating resistor is available as an accessory item.
5.3.6 Baud Rate
The SP LAM 301 has its own device for automatic detection of the following baud
rates: 9.6 / 19.2 / 93.75 / 187.5 / 500 k baud and 1.5 / 3 / 6 / 12 Mbaud.
5.3.7 Segment Length
The maximum allowed segment length between to Profibus participants depends
on the selected baud rate. The following rules on segment lengths must be fulfilled:
Baud rate [baud]
30
Segment length [m]
9.6 k – 93.75 k
1200
187.5 k
1000
500 k
400
1.5 M
200
3 M – 12 M
100
Revision 001, May 2007
Interface Description
To comply with these segment rules, use of cable type A is strongly recommended.
Distinguishing features of cable type A are:
Wave resistance
135 to 165 Ω
Capacitance per unit length
≤ 30 pf/m
Loop resistance
≤ 110 Ω/km
Cable wire diameter
> 0,64 mm
Cable wire cross-section
> 0,34 mm²
5.3.8 Electrical Connection
2
1
5
Profibus IN
3
4
1
2
Profibus OUT
3
n.c.
2
A
3
n.c.
4
B
5
Shield
1
SSI D+
2
SSI D-
3
SSI C+
4
SSI C-
5
Shield
M12-m
5
4
1
M12-f
Fig. 19: Pin assignments of M12 connector port
5.3.9 Profibus Firmware Installation
For installation of the Profibus firmware, a PC with Windows 2000 or higher, a
Profibus master from Softing, the SL4.exe service program from Sensor Partners BV
and related connection cabling are required.
5.3.9.1 Preparation
-
Install driver according to manufacturer specifications (Softing)
-
Copy SL4.EXE service program and papi.dll file to PC.
-
Provide supply of 24 V operating voltage (approximate value).
-
Establish Profibus connection between SP LAM 301 and PB master.
-
Extend PB to next PB participant or terminate PB at the SP LAM 301 with a
terminating resistor (ordering code: 94145).
-
Make sure that you use at least version 2.xx or a higher version of the SL4.EXE
program.
Revision 001, May 2007
31
Interface Description
5.3.9.2 Firmware Installation
Starting SL4.EXE
1.
Press button “Connect“
The selected board will turn active and
the ‘Go Online‘ button enabled on
successful completion.
In the event of problems, you may
click on the ‘Trace’ tab rider with the
mouse, in order to have the properties
page displayed. It provides additional
reported details on the Profibus.
2.
Press button “Go Online”
3.
Press button “Scan for Slave”
The PB master turns active on the bus.
After about two seconds, the ‘Scan
for Slave’ button is enabled. The bus
can now be browsed for slaves. A slave search always begins with address
0, omitting the master address. The
greatest involved slave address can be
defined, in order to shorten the search
procedure..
The bus will be scanned and the first
encountered SP LAM 301 selected as
slave. If a change is made in the slave
address (‘select addr:’), a diagnostic
request will be sent to the slave and
the response will display the slave’s
PNO ident
32
Revision 001, May 2007
Interface Description
4.
Select ‘Service’ Property Page. The screen displays:
5.
Click ‘Browse’ button to select the firmware file for loading (LDM_ROM.
H86). The screen displays:
6.
Actuate button ‘Check’. The result should approximately look like this:
The hardware versions must be
identical for a given file and physical assembly. The assembly must be
accessible and switchable to update
mode on the Profibus (loader available). The
currently installed firmware version is
displayed below “LDM”.
If all settings were found to be correct, the ‘Update’ button will be
enabled
.
Revision 001, May 2007
33
Interface Description
7.
Actuate button “Update”. The screen displays:
The firmware is loaded.
Status reports are given in the right
sub-screen.
5.3.10 Firmware Update via Profibus
The actual application is installed and updated via the Profibus.
To perform a software update, the SP LAM 301 need not be de-installed or disassembled. A firmware update is basically performed in the same manner as software
installation (g section 5.3.9 Firmware Installation).
5.3.11 SL4 Service Program
Once a Profibus master from “Softing” and a related driver (g Pkt. 5.3.9) are installed, you can launch the service program for LDM30PB (SL4.EXE).
No special installation procedure is required for the program itself (statically linked).
Only “papi.dll” for the Profibus must be contained in the same directory.
Refer to section 5.3.9 for information on how to activate the assembly on the
Profibus.
5.3.11.1 Setting a Profibus Slave Address on the SP LAM 301PB
Perform steps 1 to 3 of section 5.2.9. An SP LAM 301PB assembly must have been
found on the bus. Its Profibus address can now be modified between 0 and 125
as necessary to account for other participants in bus communication. To make a
new address setting, click ‘old addr:’ to have the previous address setting displayed
and click ‘new addr:’ to select a desired new address. Then actuate button ‘Set
Addr’. The new address will be transmitted to the PB slave with the help of a ‘Set
Slave Address’ (SSA) Profibus global control tool. The PB slave will work with a new
address immediately on receiving it. The new address stays permanently stored in
the EEPROM and will also be restored as the new slave address following a power
failure.
34
Revision 001, May 2007
Interface Description
5.3.11.2 Parameter Dialog
A PB master uses the GSD file to edit parameters for the slave. It must send these
at least once to the slave in order to enable the slave to operate in cyclic data exchange mode. Because the slave has been programmed with adequate tolerance, it
can be operated with only 7-byte standard PB parameters (i.e. involving no specific
user profile parameters). The SL4 generates a complete specific encoder profile set
of parameters. This parameter set will be sent to the slave immediately following a
change in date (provided that Data Exchange is active).
On pressing button “Store”, these parameters will be saved to the EEPROM to stay
permanently stored there and be restored as the starting parameters for a restart.
They will also be used if the master sends no (user) parameters. Profibus parameter settings cannot be read back! For this reason, the parameter
settings at the moment of SL4 triggering do not match the parameter settings kept
in the slave.
Parameter page 1:
Class 2 function:
Selects slave type according to encoder profile
Commissioning
Diagnostics:
Sends more than six standard diagnose bytes
(16 bytes for class 1 slave, 77 bytes for class 2 slave)
Measure Mode:
Operating (trigger) mode of laser (DF, DT)
Triggerdelay und
Level:
Transfers values directly to command TDx (only for DF
external)
Averaging:
Transfers value to command SAn (number of values for
averaging)
Measuring Frequency:
Number of measurement cycles per second (1 to 2000 or
to 1000, respectively). Is transferred to command MFnn.
Offset
A measured value can be assigned a certain offset (corrective value). This value will not be transmitted to the laser
module. Instead, it is processed in the very PB assembly.
Scale Factor:
Available scaling factors from -10.0 to +10.0
Up to five post-comma digits can be processed.
Error Mode:
Selects distance value in the event of an error.
Pilot Laser:
Turns pilot laser on, off or into blinking mode.
Measuring Window:
Defines starting point and end point of measuring window.
Diagnostic Interval:
0: sets output of diagnostic data in the case of alarms only
1 to 10000: sets output of diagnostic data at intervals of
n x 100ms.
Parameter page 2:
Alarm 1/2:
Sets switching threshold for output n in distance units.
Is transferred to command Qn.
Active Range
Alarm 1/2:
+/- range for switching outputs in distance units.
Is transferred to command Qn.
Hysteresis Alarm 1/2: +/- hysteresis for switching outputs in distance units,
is transferred to command Qn.
Active Range Level
Alarm 1/2:
Revision 001, May 2007
0 or 1 for switching outputs in active range, is transferred
to command Qn.
35
Interface Description
5.3.11.3 Diag Common
General diagnostic data fully comply with the standard profile. They are updated
with each Profibus diagnosing request.
The use of “Diag Common” data presumes availability of class 2 functionality and
a commissioning diagnostic function. In the case of errors (Enn), an alarm message
will be transmitted as Extended Diagnosis containing the full set of diagnostic data.
In order to have the current temperature and operating time values displayed, Diagnostic Interval must be set to a value unequal “0”.
A Diagnostic Interval setting of 100 will cause a 10 sec updating of data.
Please note that the laser must register and transfer a temperature value in DF
modes as a precondition for temperature output. This means that temperatures will
not be transmitted unless values were recorded.
5.3.11.4 Diag Alarm
Alarm messages by the laser module are output once in the form of EXT.DIAG.
Active alarms are marked by X instead of -. Alarms are counted, but never saved.
E98 shows problems in communication with the laser module.
Errors are reported as Ext.Diag on occurrence. This is followed by an attempt to retrigger the laser. As a result, permanently repeating errors will positively increment
the content of the related error counter.
5.3.11.5 Service
This function is intended for firmware updates of the assembly (also refer to sections 5.2.9, 5.2.10). As a precondition for updating, the assembly must be connected to the Profibus and be operational. The text field in top left position of the
service page shows necessary actions and prerequisites for updating. Once everything is prepared, the Update button can be enabled.
Use the Browse button to select a desired firmware file (e.g. SP LAM 301_V0100.
H86) on the harddrive, diskette, etc.
Use the Check button to check the
a) firmware file and
b) connected device (SP LAM 301)
for software revision, hardware revision and EEPROM layout revision.
If an SP LAM 301 was acknowledged and the file found to be no SP LAM 301
firmware file or the hardware versions not to match each other, the Update button
will remain disabled.
On clicking of the Update button, the firmware will be updated. The loader in SP
LAM 301 is activated for this purpose. It has a 0.xx software revision. The previous
firmware is deleted, and the new one is loaded and launched.
36
Revision 001, May 2007
Starting Up
6
Starting Up
6.1
Preparative Action before Installation
•
•
•
•
Remove SP LAM 301 packing with utmost caution
Check for completeness of scope of delivery
Inspect Laser Distance Meter and accessory items for visible damage
Inspect connector terminals and cabling for visible damage
6.2
Checklist on Installation Work
The table below contains a proposal for SP LAM 301 start-up work. It does not
claim to be complete. To provide specific user cabling is the responsibility of the
user and assumed to be available. It is also the user’s responsibility to make application-adapted parameter settings of the Profibus (optional), notably, of the slave
address.
No. Working step
1
Unpack SP LAM 301, inspect for visible damage
2
LMechanically fix LADM30 in working position, use three M4 threaded
holes of one of three available mounting pads of the SP LAM 301 for this
purpose (g refer to section 4.4)
3
Insert connector in main connection port and screw connector firmly on.
Make sure you do this in power-off state!
4
Install and firmly screw Profibus and SSI connectors (optional)
5
Turn on voltage supply. Status LED must light green
6
Make SP LAM 301 parameter settings via RS232/RS422
7
Direct SP LAM 301 onto target, using the sight pointer or additional sighting
device on 11mm-rail
8
Select distance measurement mode
9
Trigger distance measurement (laser turns on, measurement cycle is launched via Profibus or SSI)
10
Use visible laser (pilot laser) to sight a given target
11
Lock the SP LAM 301
12
Final visual inspection
Revision 001, May 2007
37
Starting Up
38
Revision 001, May 2007
Measurement
7
Measurement
7.1
Identification
7.1.1
ID – Identification
In response to an ID command, the SP LAM 301 outputs its manufacturing data in
this order: product type, firmware version, firmware data, firmware time, fabrication number, date of manufacture and time of manufacture.
Example:
SP LAM 301 1.1.16(R) 27.03.2007 11:31 060001 11.04.2007 08:56
7.1.2
ID? – Online Help
On triggering an ID? command, the user will be displayed an overview of all available operations and parameters. These are explained in the following sections.
Operation Mode
DM[Enter]...................single distance
DT[Enter]...................continuous distance internal trigger
DF[Enter]...................continuous distance external trigger
VM[Enter]...................single velocity
VT[Enter]...................continuous velocity internal trigger
Status
TP[Enter]...................internal temperature [°C]
HW[Enter]...................hardware status
PA[Enter]...................display parameter
Setup Parameter
AS[Enter]/ASxyz[Enter]......display/set autostart command
PL[Enter]/PLx[Enter]........display/set pilot laser
PR[Enter]...................reset parameter
DR[Enter]...................reset device
SF[Enter]/SFx[Enter]........display/set scale factor
OF[Enter]/OFx[Enter]........display/set user offset
SO[Enter]...................set user offset from distance
MW[Enter]/MWx y[Enter]......display/set measure window
MF[Enter]/MFx[Enter]........display/set measure frequency
SA[Enter]/SAx[Enter]........display/set average value
TD[Enter]/TDx y[Enter]......display/set trigger delay level
SE[Enter]/SEx[Enter]........display/set error mode
Q1[Enter]/Q1w x y z[Enter]..display/set digital output Q1
Q2[Enter]/Q2w x y z[Enter]..display/set digital output Q2
QA[Enter]/QAx y[Enter]......display/set analog output QA
BR[Enter]/BRx[Enter]........display/set baud rate RS232/422
SD[Enter]/SDx y[Enter]......display/set data format RS232/422
TE[Enter]/TEx[Enter]........display/set terminator RS232/422
BB[Enter]/BBx[Enter]........display/set baud rate bus
AB[Enter]/ABx[Enter]........display/set address bus
SC[Enter]/SCx[Enter]........display/set SSI format
Revision 001, May 2007
39
Measurement
7.2
Operation Mode
7.2.1 DM – Single Distance Measurement
The SP LAM 301 performs exactly one measurement, on completion of which it
will wait for next instructions.
The time a measurement cycle requires depends on the number of SA measurement value settings and the preset measuring frequency (MF).
7.2.2 DT – Continuous Distance Measurement
The SP LAM 301 performs continuous distance measurement until halted by a special command (RS232/RS422: Escape = 0x1B).
The output rate of measured values depends on the number of SA measuring value
settings and the preset measuring frequency (MF).
7.2.3 DF – Single Distance Measurement with External Triggering
The SP LAM 301 must be transferred to DF operating mode. It will then perform
exactly one measurement cycle on receipt of an external trigger signal and wait in
DF mode for the next trigger event to arrive.
This operating mode must be terminated with the help of a special command
(RS232/RS422: Escape = 0x1B).
Trigger events must be applied to the external trigger input. (g 5.1 Main Connector Port)
The interval between two single measurements depends on the number of preset SA measurement values, the setting for measurement frequency (MF) and the
setting for trigger delay (TD).
7.2.4 VM – Single Speed Measurement
The SP LAM 301 performs 25 single measurement cycles, on completion of which
it will use the 25 single readings to calculate a resulting speed.
The length of time, which measurement requires, depends on the number of preset
SA measurement values and the setting for measurement frequency (MF).
7.2.5 VT – Continuous Speed Measurement
The SP LAM 301 performs continuous measurement in packages of 25 single
measurement cycles. This measuring mode must be halted with a special command
(RS232/RS422: Escape = 0x1B).
The time interval between single measurements depends on the preset number of
SA measurement value and the setting for measurement frequency (MF).
40
Revision 001, May 2007
Measurement
7.3
Status
7.3.1 TP – Internal LDM Temperature
The SP LAM 301 outputs its internal temperature via the serial interface and the
Profi-bus. Temperature values are output in degrees Celsius (°C).
7.3.2 PA – All-Parameter Display
A complete list of parameters is output via the serial interface.
Example:
measure frequency[MF]...............2000(max2000)hz
trigger delay/level[TD]..............0.00msec 0
average value[SA]....................20
scale factor[SF].....................1.000000
measure window[MW]..................-5000.000 5000.000
distance offset[OF]..................1.000
error mode[SE].......................1
digital out[Q1]......................20.000 10.000 1.000 1
digital out[Q2]......................1.000 30.000 0.500 1
analog out[QA].......................1.000 300.000
RS232/422 baud rate[BR].
..............115200
RS232/422 output format[SD].
..........dec (0), value (0)
RS232/422 output terminator[TE]......0Dh 0Ah (0)
SSI output format[SC]................bin (0)
visier pointer[PL]...................2
autostart command[AS].
...............ID
7.3.3 HW – Hardware Diagnosis
Outputs a specific LDM list of characteristics and measured quantities.
7.4
Parameter Setup
Parameter settings can be made via this serial interface.
0x0D as termination character will cause the command to be transmitted to the SP
LAM 301.
For commands with one parameter, the parameter can be defined either directly or
separated by space (0x20). For commands including several parameters, each two
parameters must be separated by space (0x20).
7.4.1 AS – Autostart Function
This function defines how the SP LAM 301 will behave after a cold start. Once a
cold start was triggered, the LDM will automatically perform this command and
transmit related data via the serial interface.
Query:
AS
Set:
ASs
Parameter value
range s:
ID, ID?, DM, DT, DF, VM, VT, TP, HW, PA, MF, TD, SA, SF,
MW, OF, SE, Q1, Q2, QA, BR, SD, TE, BB, AB, SC, PL, AS
Standard:
ID
Revision 001, May 2007
41
Measurement
7.4.2 PL – Pilot Laser
PLx defines parameter settings for pilot laser behavior.
Query:
PL
Set:
PLx
Parameter value range x:
0, 1, 2, 3 (g Table 4: Values for parameter x )
Standard:
2
x
Behavior
0
Off
1
On
2
Blinking (2 Hz)
3
Blinking (5 Hz)
Tabelle 4: Values for parameter x
7.4.3 PR – Reset to Factory Settings
Resets all parameters to their factory settings,
except for the baud rate!
Parameters for firmware version 1.1.16:
measure frequency[MF]............
trigger delay/level[TD]...........
average value[SA].................
scale factor[SF]..................
measure window[MW]...............
distance offset[OF]...............
error mode[SE]....................
digital out[Q1]...................
digital out[Q2]...................
analog out[QA]....................
RS232/422 baud rate[BR].
...........
RS232/422 output format[SD].
.......
RS232/422 output terminator[TE]...
SSI output format[SC].............
visier pointer[PL]................
autostart command[AS].
............
2000(max2000)hz
0.00msec 0
20
1.000000
-5000.000 5000.000
0.000
1
0.000 0.000 0.000 1
0.000 0.000 0.000 1
1.000 300.000
115200
dec (0), value (0)
0Dh 0Ah (0)
bin (0)
2
ID
7.4.4 DR – Trigger Cold Start
DR performs a cold start of the SP LAM 301, simulating an actual voltage break
situation. This command may prove useful after changes in the autostart command.
42
Revision 001, May 2007
Measurement
7.4.5 SF – Scale Factor
SFx allows a measured output value to be scaled via parameter settings for a scale
factor x.
Query:
SF
Set:
SFx
Parameter value range x:
-10 … -0.001 und 0.001 … 10; resolution: 0.000001
Standard:
1.000000
7.4.6 OF – Offset
OF parameterizes a user-adapted offset x which is added to the measured value.
Query:
OF
Set:
OFx
Parameter value range x:
float32; resolution: 0.001
Standard:
0.000
The SP LAM 301 performs no plausibility check on a preset offset value. Accordingly, correct parameterization is the user’s responsibility!
7.4.7 SO – Set Offset
SO performs one single distance measurement, then sets it as –OF (offset).
Function SO can only be carried out. It does not represent a parameter in the actual sense of the word.
SO can be used for zeroing of applications, systems, processes, etc.
7.4.8 MW – Measurement Window
Parameterizes a metrological range by definition of a starting point x and an end
point as limits for output of measured values.
Examples of measurement window application:
• Masking out sources of interference before or behind a selected range for measurement
• Definition of a desired range for measurement
A target which is detected before or behind a preset measurement window will
create an invalid measured value output.
Query:
MW
Set:
MWx y
Parameter value range x:
float32; resolution: 0.001
Parameter value range y:
float32; resolution: 0.001
Standard:
-5000.000 ... 5000.000
The SP LAM 301 performs no check for plausibility of a preset measurement window. For this reason, it is the user’s responsibility to ensure correct parameterization!
Revision 001, May 2007
43
Measurement
7.4.9 MF – Measurement Frequency [Hz]
MF parameterizes the number x of indinvidual pulses to be emitted per second.
Query:
MF
Set:
MFx
Parameter value range x:
-1 … 2000; resolution: 1
Standard:
2000
For example, MF1000 means that 1000 individual pulses will be emitted each
second. The time to measure and, hence, the transmission of a measured result via
the serial interface additionally depend on the setting for parameter SA.
Examples:
MF1000, SA1000: measuring time = 1 s (1 measured value per second at serial interface)
MF2000, SA1000: measuring time = 0.5 s (2 measured values per second at serial interface)
MF2000, SA20000: measuring time = 10 s (1 measured value at serial interface every 10 s)
7.4.10 SA – Average
SA Parameterizes the number of single measured values to be averaged for a result
of measurement. SA is directly dependent on MF. (also refer to section 7.4.4)
Query:
SA
Set:
SAx
Parameter value range x:
1 … 30000; resolution: 1
Standard:
20
7.4.11 TD – External Trigger Delay [ms] & Trigger Level [Flanke]
TD parameterizes LDM behavior in external trigger mode (DF).
x designates the delay in triggering a single measurement, in units of a millisecond.
y designates the edge on arrival of which measurement will be triggered:
0 means that measurement is triggered on a falling edge (high-to-low transition)
1 means that measurement is triggered on a rising edge (low-to-high transition)
Query:
TD
Set:
TDx y
Parameter value range x:
0 … 300.00 msec; resolution: 0.01 msec
Parameter value range y:
0 oder 1
Standard:
0.00 msec 0
If TD x trigger events must have been received before a measurement is output.
44
Revision 001, May 2007
Measurement
7.4.12 SE – Error Mode
Parameterizes the behavior of the two switching outputs Q1 and Q2 and that of
the analog output QA in the event of failure to measure plus the state on completion of a single distance measurement.
Query:
SE
Set:
SEx
Parameter value range x:
0, 1 oder 2 (g Tabelle 5: Values for parameter x )
Standard:
1
x
Q1, Q2 (z=0)
Q1, Q2 (z=1)
QA
0
Latest value
Latest value
Latest value
1
High
Low
3 mA
2
Low
High
21 mA
Tabelle 5: Values for parameter x
The SP LAM 301 performs no check for plausibility of a selected error mode. For
this reason, correct parameterization is the user’s own responsibility!
7.4.13 Q1/Q2 – Switching Output
Q1/Q2 parameterizes the behavior of switching output Q1 or Q2. (refer to section
5.1.2)
Parameterizes a measurement range’s starting point w, on reaching of which the
output will be triggered, the length x of the measurement range, the hysteresis y
and logic behavior z.
Query:
Q1/Q2
Set:
Q1w x y z/Q2w x y z
Parameter value range w:
float32; resolution: 0.001
Parameter value range x:
float32; resolution: 0.001
Parameter value range y:
float32; resolution: 0.001
Parameter value range z:
0 oder 1
Standard:
1.000 300.000
The SP LAM 301 performs no check for plausibility of QA settings. Accordingly, it is
the user’s responsibility to ensure correct parameterization!
7.4.14 QA – Analog Output
QA parameterizes the behavior of the QA analog output. (refer to section 5.1.3)
Available for setting are the lower limit x and the upper limit y of a current range
from 4 to 20 mA.
The lower limit may both be smaller and greater than the upper limit. Accordingly,
the current range will reverse.
Revision 001, May 2007
45
Measurement
Inputs of identical limits will be ignored and not accepted.
Query:
QA
Set:
QAx y
Parameter value range x:
float32; resolution: 0.001
Parameter value range y:
float32; resolution: 0.001
Standard:
1.000 300.000
The SP LAM 301 performs no check for plausibility of QA settings. For this reason,
correct parameter settings are the user’s own responsibility!
7.4.15 BR – Baud Rate
BR facilitates conversion to other serial baud rate x.
Following a change in the baud rate, a cold start is not necessarily required.
Query:
BR
Set:
BRx
Parameter value range x:
9600, 19200, 38400, 57600, 115200, 230400 oder
460800
Standard:
115200
7.4.16 SD – Serial Interface Termination Character
SD parameterizes the format x and content y of serial interface outputs for distance
and speed measurement.
Available settings for format are decimal (ASCII), hexadecimal (ASCII) and binary.
Content means that signal strength and/or temperature are available items for output in additional to actual measured value output.
Query:
SD
Set:
SDx y
Parameter value range x:
0, 1, 2
Parameter value range y:
0, 1, 2, 3 (g Tabelle 6: Values for parameter y )
Standard:
00
SD0 y
SD1 y
SD2 y
y
Decimal
Hexadecimal
Binary
0
Measured value
Measured value
Measured value
1
Measured value + signal
strength
Measured value + signal
strength
Measured value + signal
strength
2
Measured value + signal
strength + temperature
Measured value + signal
strength + temperature
Measured value + signal
strength + temperature
Tabelle 6: Values for parameter y
46
Revision 001, May 2007
Measurement
7.4.17 TE – Serial Interface Termination Character
TE parameterizes the serial interface termination character for distance and speed
measurement.
As a necessary requirement, output format SD0 y must be set.
Query:
TE
Set:
TEx
Parameter value range x:
0 … 9; resolution 1 (g Table 7: Values for parameter x )
Standard:
115200
x
0
Hex code
Description
1
2
3
4
5
0x0D0A 0x0D
0x0A
0x02
0x03
0x09 0x20
CR LF
LF
STX
ETX
Tab
CR
6
7
8
9
0x2C
0x3A
0x3B
Space Comma Colon Semicolon
Tabelle 7: Values for parameter x
7.4.18 SC – Format SSI
SC parameterizes format x of SSI code. (refer to section 5.2)
Query:
SC
Set:
SCx
Parameter value range x:
0 or 1
Standard:
0
7.4.19 BB – Field Bus Baud Rate
Parameterizes the baud rate for field bus operation. (currently unsupported)
Query:
BB
Set:
BBx
Parameter value range x:
0
Standard:
0
7.4.20 AB – Bus Address
Parameterizes bus address x of the field bus. (currently unsupported)
Query:
AB
Set:
ABx
Parameter value range x:
255
Standard:
255
Revision 001, May 2007
47
Measurement
48
Revision 001, May 2007
Preventive Maintenance & Care
8
Preventive Maintenance & Care
8.1
User Maintenance Actions
Please note:
•
Dust on optical glass surfaces (transmitter optics, receiver optics) may be
removed using a pneumatic brush. However, do not use cleaners containing
organic solvents to wipe surfaces of this kind clean. You are advised to contact the Manufacturer in the event of stubborn contamination or soiling.
•
Isopropanol is suitable for SP LAM 301 cleaning. Remember not to use solvents for cleaning.
•
You are prohibited from opening the SP LAM 301. Failure to comply will void
any claims for warranty.
•
Do not loosen or remove any screw on the SP LAM 301.
8.2
Software Update
•
Firmware updates may not be performed by anyone other than Manufacturer personnel.
•
For user-performed Profibus firmware updates, the SL4.EXE program is
available.
8.3
Preventive Maintenance by Sensor Partners BV
In the event of necessary repair work, you should carefully pack, enclose a note
stating actual operating conditions, and ship the SP LAM 301 to your competent
dealer or to us at this address:
Sensor Partners BV
James Wattlaan 7
5151 DP Drunen
Holland
Phone: +31 (0) 416-378239
Fax: +31 (0) 416-377439
Web: www.sensor.nl
E-Mail: [email protected]
Revision 001, May 2007
49
Preventive Maintenance & Care
50
Revision 001, May 2007
Malfunction & Error Messages
9
Malfunction & Error Messages
9.1
Malfunction
Error
Cause
Action for removal
No data via RS232 or
RS422
Faulty interface configuration
Check interface configuration
Device error (external
diagnosis)
Hardware problems
Reship SP LAM 301 for
repair, contact technical
support
9.2
Operating Advice
Code Cause
Action for removal
E02
No target
Check for measuring distance
E04
Laser defect
Reship SP LAM 301 for repair, contact technical
support
9.3
Error Messages
Error
Cause
Red status LED of
status display lights
Read error message via
Reship SP LAM 301 for
RS232 or RS422 interface repair, contact technical
support
Revision 001, May 2007
Action for removal
51
Malfunction & Error Messages
52
Revision 001, May 2007
EC Declaration of Conformity
10
EC Declaration of Conformity
Revision 001, May 2007
53
EC Declaration of Conformity
54
Revision 001, May 2007
List of Abbreviations & Glossary
11
List of Abbreviations & Glossary
DF
Single distance measurement with external triggering
DM
Single distance measurement
DT
Distance tracking
VM
Single Speed Measurement
VT
Continuous Speed Measurement
GSD-Datei
SP LAM 301 master file
ID number
SP LAM 301 registration number with Profibus Nutzerorganisation e.V.
LSB
Least Significant Bit
MSB
Most Significant Bit
SSI
Synchronous Serial Interface
Revision 001, May 2007
55
List of Abbreviations & Glossary
56
Revision 001, May 2007
Exhibit 1: Adapter Plate
Exhibit 1: Adapter Plate
Revision 001, May 2007
57
Exhibit 1: Adapter Plate
58
Revision 001, May 2007
Exhibit 2: Anti-Dust Tube
Exhibit 2: Anti-Dust Tube
Revision 001, May 2007
59
60
Revision 001, May 2007