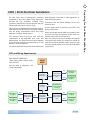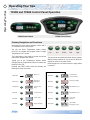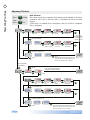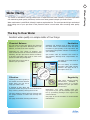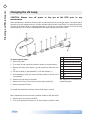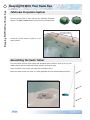
1
LTR20141001, Rev. B
6/2/14
Preparing for Your New Portable Spa
Cleaning and Maintenance
Pre-Delivery Checklist . . . . . . . . . . . . . . . . . 3
Removing and Reseating the Pillows . . . . 44
Planning the Best Location . . . . . . . . . . . . . 3
Jet Removal and Replacement . . . . . . . . . 44
Preparing a Good Foundation . . . . . . . . . . . 4
Spa Cover . . . . . . . . . . . . . . . . . . . . . . . . . . 44
230V / 50 Hz Electrical Installation . . . . . . 5
Draining Your Portable Spa . . . . . . . . . . . . 45
Filling and Powering Up Your Portable Spa 12
Winterizing (Cold Climate Draining) . . . . . 46
Priming the Pump . . . . . . . . . . . . . . . . . . . . 14
Cleaning and Replacing the Filter . . . . . . . 47
Operating Your Spa
TP400 and TP600 Control Panel Operation 16
TP800 Control Panel Operation . . . . . . . . . 25
Cal Spas Hot Tub WiFi App . . . . . . . . . . . . . 30
Vacation Care . . . . . . . . . . . . . . . . . . . . . . . 47
Cleaning Your Spa . . . . . . . . . . . . . . . . . . . 47
Changing the UV Lamp . . . . . . . . . . . . . . . . 48
Using the Entertainment System
Electrical Power Efficiency . . . . . . . . . . . . . 32
Aquatic AV AQ-DM-3B Media Locker . . . . . 49
Adjustable Jets . . . . . . . . . . . . . . . . . . . . . . 32
Aquavibe MD-350 Docking Station . . . . . . 50
LED Perimeter Lighting . . . . . . . . . . . . . . . 32
Diverter Knobs . . . . . . . . . . . . . . . . . . . . . . 33
Waterfalls . . . . . . . . . . . . . . . . . . . . . . . . . . 33
Air Venturis . . . . . . . . . . . . . . . . . . . . . . . . . 33
Hydro Streamer Waterfall . . . . . . . . . . . . . 33
Adjustable Therapy System . . . . . . . . . . . . 34
VariMax System . . . . . . . . . . . . . . . . . . . . . 34
Water Clarity
The Key to Clear Water . . . . . . . . . . . . . . . 35
Keeping Fit With Your Swim Spa
Jetstream Propulsion System . . . . . . . . . . 52
Assembling the Swim Tether . . . . . . . . . . . 52
Using the Exercise Equipment . . . . . . . . . . 53
Appendix
Replacement Parts . . . . . . . . . . . . . . . . . . . 54
Troubleshooting . . . . . . . . . . . . . . . . . . . . . 61
Limited Warranty . . . . . . . . . . . . . . . . . . . . 64
Testing and Adjusting Spa Water . . . . . . . 36
Sanitation . . . . . . . . . . . . . . . . . . . . . . . . . . 37
Bather Load . . . . . . . . . . . . . . . . . . . . . . . . . 38
Filter Cleaning . . . . . . . . . . . . . . . . . . . . . . 38
Pure Cure™ Water Sanitizer . . . . . . . . . . . . 39
Ozonator . . . . . . . . . . . . . . . . . . . . . . . . . . . 39
Cal Clarity II Bromine Generator . . . . . . . . 40
Maintenance Schedule . . . . . . . . . . . . . . . . 42
Troubleshooting Water Clarity Problems . 43
CONTACT INFORMATION
Copyright 2014 Lloyd’s Material Supply, Inc. All rights reserved. Duplication without written
consent is strictly prohibited.
Cal Spas™, Adjustable Therapy System™, ATS™, Cal Premium™, Cal Select™, Cal Stone™,
Ultimate Fitness Spa Series™, and XL Heat Exchanger™ are registered trademarks.
Due to continuous improvement programs, all models, operation, and/or specifications are
subject to change without prior notice.
LTR20141001, Rev. B
6/2/14
100-1347
For customer service, please contact
your authorized dealer immediately. If
you need additional information and/
or assistance, please contact:
LMS Customer Service Department
1462 East Ninth Street
Pomona, CA 91766.
Phone: 1-909-623-8781
Fax: 1-909-629-3890
Important Safety Instructions
1
DANGER -- Risk of accidental drowning:
DANGER -- Risk of electric shock:
Do not allow children to be in or around a spa unless
a responsible adult supervises them. Keep the spa
cover on and locked when not in use. See instructions
enclosed with your cover for locking procedures.
Install the spa at least 1.5 meters from all metal
surfaces. As an alternative, a spa may be installed
within 5 feet of metal surfaces if each metal surface
is permanently bonded by a minimum #8 AWG solid
copper conductor to the outside of the spa’s control
box.
DANGER -- Risk of injury:
The suction fittings in this spa are sized to match
the specific water flow created by the pump. Should
the need arise to replace the suction fittings, or the
pump, be sure the flow rates are compatible.
Never operate the spa if the suction fitting or filter
baskets are broken or missing. Never replace a
suction fitting with one that is rated less than the
flow rate marked on the original suction fitting.
WARNING -- To reduce the risk of injury:
The spa water should never exceed 40°C (104°F).
Water temperatures between 38°C and 40°C (100°F
and 104°F) are considered safe for a healthy adult.
Lower water temperatures are recommended for
young children and when spa use exceeds 10
minutes.
Do not permit any external electrical appliances,
such as lights, telephones, radios, televisions, and
etc., within five feet of the spa. Never attempt to
operate any electrical device from inside the spa.
Replace a damaged power cord immediately.
Do not bury the power cord.
Connect to a grounded, grounding-type receptacle
only.
The use of alcohol, drugs or medication before or
during spa use may lead to unconsciousness, with
the possibility of drowning.
Persons suffering from obesity, a medical history of
heart disease, low or high blood pressure, circulatory
system problems or diabetes should consult a
physician before using the spa.
High water temperatures have a high potential for
causing fetal damage during pregnancy. Women who
are pregnant, or who think they are pregnant, should
always check with their physician prior to spa usage.
Persons using medications should consult a physician
before using the spa since some medications may
induce drowsiness while others may affect heart rate,
blood pressure and circulation.
HYPERTHERMIA DANGER:
•
Failure to perceive heat
Prolonged exposure to hot air or water can induce
hyperthermia. Hyperthermia occurs when the internal
temperature of the body reaches a level 2°C to 4°C
(1°C to 2°C) above the normal body temperature of
37°C (98.6°F). While hyperthermia has many health
benefits, it is important not to allow your body’s core
temperature to rise above 39.5°C (103°F).
•
Failure to recognize the need to exit spa or hot
tub
•
Unawareness of impending hazard
•
Fetal damage in pregnant women
•
Physical inability to exit the spa
•
Unconsciousness
Symptoms of excessive hyperthermia include
dizziness, lethargy, drowsiness and fainting. The
effects of excessive hyperthermia may include:
WARNING: The use of alcohol, drugs, or medication
can greatly increase the risk of fatal hyperthermia.
2014 Portable Spa
LTR20141001, Rev. B
www.calspas.com
Read This First!
READ AND FOLLOW ALL INSTRUCTIONS.
Read This First!
2
WARNING: People with infectious diseases should not use a spa or hot tub.
WARNING: To avoid injury, exercise care when entering or exiting the spa or hot tub.
WARNING: Do not use drugs or alcohol before or during the use of a spa or hot tub to avoid unconsciousness
and possible drowning.
WARNING: Do not use a spa or hot tub immediately following strenuous exercise.
WARNING: Prolonged immersion in a spa or hot tub may be injurious to your health.
CAUTION: Maintain water chemistry in accordance with manufacturer’s instructions.
SAVE THESE INSTRUCTIONS.
2014 Portable Spa
www.calspas.com
LTR20141001, Rev. B
Preparing for Your New Portable Spa
3
Most cities and counties require permits for exterior
construction and electrical circuits. In addition, some
communities have codes requiring residential barriers
such as fencing and/or self-closing gates on property
to prevent unsupervised access to the property by
children under the age of 5. Your dealer can provide
information on which permits may be required and
how to obtain them prior to the delivery of your spa.
For additional operating and installation information,
please see your selling dealer.
Before Delivery
Plan your delivery route
Choose a suitable location for the spa
Lay a 5 - 8 cm concrete slab
Install dedicated electrical supply
After Delivery
Place spa on slab
Connect electrical components
Planning the Best Location
Safety First
Provide a View with Your Spa
Do not place your spa within 10 feet (3 m) of
overhead power lines.
Think about the direction you will be facing when
sitting in your spa. Do you have a special landscaped
area in your yard that you find enjoyable? Perhaps
there is an area that catches a soothing breeze
during the day or a lovely sunset in the evening.
Consider How You Will Use Your Spa
How you intend to use your spa will help you
determine where you should position it. For example,
will you use your spa for recreational or therapeutic
purposes? If your spa is mainly used for family
recreation, be sure to leave plenty of room around
it for activity. If you will use it for relaxation and
therapy, you will probably want to create a specific
mood around it.
Plan for Your Environment
If you live in a region where it snows in the winter
or rains frequently, place the spa near a house entry.
By doing this, you will have a place to change clothes
and not be uncomfortable.
Consider Your Privacy
In a cold-weather climate, bare trees won’t provide
much privacy. Think of your spa’s surroundings
during all seasons to determine your best privacy
options. Consider the view of your neighbors as well
when you plan the location of your spa.
Keep Your Spa Clean
In planning your spa’s location, consider a location
where the path to and from the house can be kept
clean and free of debris.
Prevent dirt and contaminants from being tracked
into your spa by placing a foot mat at the spa’s
entrance where the bathers can clean their feet
before entering your spa.
Allow for Service Access
Many people choose to install a decorative structure
around their spa. If you are installing your spa with
any type of structure on the outside, such as a
gazebo, remember to allow access for service. It is
always best to design special installations so that
the spa can still be moved, or lifted off the ground.
2014 Portable Spa
LTR20141001, Rev. B
www.calspas.com
Preparing for Your New Portable Spa
Pre-Delivery Checklist
Preparing for Your New Portable Spa
4
Preparing a Good Foundation
Your spa needs a solid and level foundation. The area
that it sits on must be able to support the weight
of the spa and the occupants who use it. If the
foundation is inadequate, it may shift or settle after
the spa is in place, causing stress that could damage
your spa shell or finish.
Damage caused by inadequate or improper
foundation support is not covered by the
warranty. It is the responsibility of the
spa owner to provide a proper foundation
for the spa.
Place the spa on an elevated 10 cm concrete slab.
Pavers, gravel, brick, sand, timbers or dirt foundations
are not adequate to support the spa.
We strongly recommended that you have a qualified,
licensed contractor prepare the foundation for your
spa.
If you are installing the spa indoors, pay close
attention to the flooring beneath it. Choose flooring
that will not be damaged or stained.
If you are installing your spa on an elevated wood
deck or other structure, it is highly recommended
that you consult a structural engineer or contractor
to ensure the structure will support the weight of 732
kg / m2 (150 lbs / ft2).
To properly identify the weight of your new spa
when full, remember water weighs 1 kg per liter. For
example, an average 2.4 meter (8 foot) spa holds
approximately 1892 liters of water. Using this formula,
you will find that the weight of the water alone is
1892 kg. Combined with the dry weight of the spa
you will note that this spa will weigh approximately
2267 kg when full of water.
2014 Portable Spa
www.calspas.com
LTR20141001, Rev. B
5
All 230V spas must be permanently connected
(hardwired) to the power supply. These instructions
describe the only acceptable electrical wiring
procedure. Spas wired in any other way will void your
warranty and may result in serious injury.
RCD protected circuit with no other appliances or
lights sharing the power.
This is the only acceptable electrical wiring procedure.
Spas wired in any other way will void your warranty.
See the wiring requirements below and wiring
diagrams on page 6 through page 11.
Use the tables below to determine your RCD and
wiring requirements.
Use copper wire with THHN insulation. Do not use
aluminum wire.
When wires larger than #6 AWG are required, install
a junction box near the spa and use #6 AWG wire
between the junction box and the spa.
The electrical wiring of this spa must meet the
requirements of any applicable local, state, and
federal codes. The electrical circuit must be installed
by an electrical contractor and approved by a local
building / electrical inspector.
Wire runs over 25 meters must increase wire gauge
to the next lower number. For example: A normal 50
amp RCD with three #8 AWG copper wires run over
25 meters would require you to go to three #6 AWG
copper wires.
The power supplied to the spa must be on a dedicated
RCD and Wiring Requirements
Note: SINGLE PHASE ONLY!
START
HERE
Three phase power requires 400V.
Only use 230V.
Use this table to determine your
wiring configuration.
Is this for a
fitness spa?
No
Which control
system does it
use?
601
See diagram 1
on page 6.
2100
See diagram 2
on page 7.
Yes
Is this for a
F1770E?
Yes
See diagrams 5
and 6 on pages
10 and 11.
No
See diagram 1
on page 6.
See diagram 2
on page 7.
601
2100
601
Which control
system does it
use?
No
Does it have Yes
the optional
5.5 kW heater?
Which control
system does it
use?
2100
See diagram 3
on page 8.
See diagram 4
on page 9.
2014 Portable Spa
LTR20141001, Rev. B
www.calspas.com
Preparing for Your New Portable Spa
230V / 50 Hz Electrical Installation
Diagram 1
BROWN
(Hot)
BLUE
(Neutral)
BROWN (Hot)
BLUE
(Neutral)
GREEN / YELLOW
(Ground)
BROWN
(Hot)
BLUE
(Neutral)
One 16A RCD
GREEN / YELLOW
(Ground)
Three wires:
1 brown (HOT)
1 blue (NEUTRAL)
1 yellow (GROUND)
F5 30A
2
(UNFUSED)
J12
J54
TB1
BLUE (Neutral)
2
BROWN (Hot)
24090_B
1
J43
3
3
K1
J38 J37 J48
J35 J34 J36
K3
K5
J100
K12
J101
GREEN / YELLOW (Ground)
J55
J42
J39
J41
J53
1
2
J40
J57
J56
F6 0.125A 250V
F3 10A 250V
BLOWER
J13
601 control system
J109
Preparing for Your New Portable Spa
6
J46
HEATER
2014 Portable Spa
www.calspas.com
LTR20141001, Rev. B
J35 J34 J36
K1
K5
K12
7
J100
J101
J109
GREEN / YELLOW (Ground)
K3
J46
HEATER
Preparing for Your New Portable Spa
Diagram 2
BROWN
(Hot)
BLUE
(Neutral)
BROWN (Hot)
BLUE
(Neutral)
GREEN / YELLOW
(Ground)
BROWN
(Hot)
BLUE
(Neutral)
GREEN / YELLOW
(Ground)
One 32A RCD
Three wires:
1 brown (HOT)
1 blue (NEUTRAL)
1 yellow (GROUND)
2100 control system
J46
J33
K4
J38
K2
K9
A/V CHAUD
PUMP 1
J9
J56
J57
J55
J59
J39
J10
F6 30A
J60 J41
F8 30A
J109
J51
J52
J98
1
K1
J72
J42
J3
J61
1
BLUE (Neutral)
J36
J12
J88
J62
3
4
J53
J45
J79
J54
J77
J75
J78
J110
2
J37
J4
J1
J47
2
BROWN (Hot)
GREEN / YELLOW (Ground)
F3 0.125A SLO-BLOW
4
K5
3
J58
J111
J11
2014 Portable Spa
LTR20141001, Rev. B
www.calspas.com
J36
J12
J88
J62
3
4
J53
J11
4
Diagram 3
BROWN
(Hot)
BLUE
(Neutral)
BROWN
(Hot)
BLUE
(Neutral)
BROWN
(Hot)
BLUE
(Neutral)
BROWN
(Hot)
BLUE
(Neutral)
BROWN (Hot)
BLUE
(Neutral)
GREEN / YELLOW
(Ground)
GREEN / YELLOW (Ground)
Two 16A RCDs
F5 30A
2
(UNFUSED)
2
J55
J40
1
BLUE (Neutral)
J54
J12
TB1
J42
J39
J41
J53
J57
J56
F6 0.125A 250V
2
BROWN (Hot)
3
K1
24090_B
F3 10A 250V
BLOWER
J13
601 control system
Six wires:
2 brown (HOT)
2 blue (NEUTRAL)
2 yellow (GROUND)
1
J43
3
J38 J37 J48
J35 J34 J36
K3
12VAC-B
K5
12VAC-A
J100
K12
J101
J109
GREEN / YELLOW (Ground)
Preparing for Your New Portable Spa
K5
3
J58
J111
J45
J79
J54
J77
J75
J78
J110
GREEN / YELLOW (Ground)
2
J37
J4
J1
J47
2
BROWN (Hot)
8
J72
J42
J3
J61
1
BLUE (Neutral)
J46
HEATER
K9
BLUE (Neutral)
BROWN (Hot)
J39
J10
J43
GREEN / YELLOW (Ground)
J109
F3 0.125A SLO-BLOW
K1
2
5.5 kW heater box 3
K5
J111
2014 Portable Spa
J11
www.calspas.com
LTR20141001, Rev. B
J109
F3 0.125A SLO-BLOW
K1
2
5.5 kW heater box 3
9
K5
J111
Preparing for Your New Portable Spa
Diagram 4
J11
BROWN
(Hot)
BLUE
(Neutral)
BROWN
(Hot)
BLUE
(Neutral)
BROWN
(Hot)
BLUE
(Neutral)
BROWN
(Hot)
BLUE
(Neutral)
BROWN (Hot)
BLUE
(Neutral)
GREEN / YELLOW
(Ground)
GREEN / YELLOW (Ground)
One 32A RCD
(connect to 2100 control system)
2100 control system
PUMP 1
J9
J46
J33
K4
J38
K2
K9
A/V CHAUD
One 16A RCD
(connect to 5.5 kW heater box)
J56
J57
J55
J59
J39
J10
F6 30A
J60 J41
F8 30A
J51
J52
J98
1
K1
3
J45
J79
J54
J77
J75
J78
J110
4
4
J72
J42
J3
J61
2
J37
J4
J1
J47
2
BROWN (Hot)
J36
J12
J88
J62
BLUE (Neutral)
GREEN / YELLOW (Ground)
Six wires:
2 brown (HOT)
2 blue (NEUTRAL)
2 yellow (GROUND)
F3 0.125A SLO-BLOW
1
J53
K5
3
J58
J111
J11
K9
BLUE (Neutral)
BROWN (Hot)
J39
J10
GREEN / YELLOW (Ground)
F3 0.125A SLO-BLOW
K1
2
K5
3
5.5 kW heater box
2014 Portable Spa
LTR20141001, Rev. B
J111
J11
www.calspas.com
Diagram 5
With 3.0 kW heater only
W
One 32A RCD
(connect to 2100 control system)
BROWN
(Hot)
BLUE
(Neutral)
BROWN
(Hot)
One 16A RCD
(connect to 601 control system)
BLUE
(Neutral)
BROWN (Hot)
BLUE
(Neutral)
GREEN / YELLOW
(Ground)
BROWN
(Hot)
BLUE
(Neutral)
BROWN
(Hot)
Six wires:
2 brown (HOT)
2 blue (NEUTRAL)
2 yellow (GROUND)
BLUE
(Neutral)
GREEN / YELLOW (Ground)
SWIM SIDE
2100 control system
J56
J57
J55
J59
J60 J41
J51
J52
J98
AUX**
J20
J18
115V
115V
J35
MAIN
J108 J107
J53
J44
J49
J15
3
LIGHT
10
ON S1
J40
REMOTE
J17
GND
J11
J8
AUX
J29
VAC
K7
F4 3A SLO-BLOW
J111
J45
J79
J54
J77
J75
J78
J23
SERIAL
J25 J31
3
J58
4
J27
J26 J30
J48
2
K5
J5
AUX
J91
J22
K3
2
J7
J72
J42
J3
J61
4
J110
J34
MAIN
J101
J6
3
J19
K1
J37
J4
J1
J47
2
J24
J50
K8
230V
T1
F3 0.125A SLO-BLOW
J36
J12
J88
J62
BLUE (Neutral)
K6
K12
J109
1
1
BROWN (Hot)
J43
F8 30A
24082_E
J14
J13
OZONE
J81
J39
J10
F6 30A
J32
F7 10A 250VAC
K2
J21
K9
CIRC PUMP
J38
F2 10A 250VAC
J33
K4
J46
A/V CHAUD
PUMP 1
J9
J16
AUX
FRZ
J28
GREEN / YELLOW (Ground)
J20
120V
F2 3A 250V
T1
K5
12VAC-B
J19
12VAC-A
J18
K7
J46
HEATER
J21
J24
A/V
J8
P2/BLWR
J52
J14
J47
J16
TEMP SENSORS
J23
SERIAL
LIGHT J15
K12
J50
J56
J32
3
J38 J37 J48
J35 J34 J36
J25=HTR1 J26=HTR2
J27=HTR3 J30=TEST
J31=CE HTR SEL
K4
OZONE
120V
K6
K2
240V
J43
J100
SPA SIDE
3
1
K3
J101
GREEN / YELLOW (Ground)
K1
2
ON 1
J44
CIRC
BROWN (Hot)
J55
J51
1
BLUE (Neutral)
2
J40
TB1
J54
J12
24090_B
PUMP 1
F5 30A
J42
J39
J41
J53
J57
J56
F6 0.125A 250V
2
(UNFUSED)
F3 10A 250V
BLOWER
J13
601 control system
J109
Preparing for Your New Portable Spa
10
J108
J22
EXPANDER
J33
F4 3A 250V
GND
J45
J28 AUX FRZ
J29
VAC
HTR
DISBL
2014 Portable Spa
www.calspas.com
LTR20141001, Rev. B
11
With 3.0 kW heater and 5.5 kW heater
One 32A RCD
(connect to 2100 control system)
BROWN
(Hot)
BLUE
(Neutral)
BROWN
(Hot)
BLUE
(Neutral)
BROWN
(Hot)
Two16A RCDs
(connect to 601 control system
and 5.5 kW heater)
BLUE
(Neutral)
BROWN (Hot)
BLUE
(Neutral)
GREEN / YELLOW
(Ground)
BROWN
(Hot)
BLUE
(Neutral)
BROWN
(Hot)
BLUE
(Neutral)
BROWN
(Hot)
Nine wires:
3 brown (HOT)
3 blue (NEUTRAL)
3 yellow (GROUND)
BLUE
(Neutral)
GREEN / YELLOW (Ground)
2100 control system
J56
J57
J55
J59
J60 J41
J43
J51
J52
J98
J18
J20
AUX**
J108 J107
K5
J15
LIGHT
K7
F4 3A SLO-BLOW
ON S1
J39
J43
J10
J24
GREEN / YELLOW (Ground)
J109
K6
J50
K8
J19
J34
MAIN
230V
115V
115V
J35
MAIN
J108 J107
J44
J49
J23
SERIAL
J26 J30
J48
J15
LIGHT
K7
F4 3A SLO-BLOW
J111
10
GND
J11
ON S1
J40
J29
VAC
J7
J6
3
J8
AUX
J25 J31
3
2
K5
J27
J22
K3
2
J5
AUX
J91
J101
K1
5.5 kW heater box
24082_E
J14
T1
F3 0.125A SLO-BLOW
J16
AUX
FRZ
J28
J13
K12
REMOTE
AUX**
J81
BROWN (Hot)
J32
J40
J17
J18
J21
BLUE (Neutral)
J8
AUX
10
GND
J11
K9
J23
SERIAL
J29
VAC
J7
3
J111
4
J27
J25 J31
3
J58
J5
AUX
J91
J26 J30
J48
2
J6
J53
J45
J79
J54
J77
J75
J78
J110
J35
MAIN
J22
J44
J49
F7 10A 250VAC
J16
115V
K3
2
J20
REMOTE
115V
OZONE
J40
J34
MAIN
J101
J37
J4
J1
J47
4
GREEN / YELLOW (Ground)
J8
AUX
2
J36
J12
J88
J62
J23
SERIAL
J19
K1
3
27
J50
K8
230V
T1
F3 0.125A SLO-BLOW
J72
J42
J3
J61
BLUE (Neutral)
OZONE
J109
1
BROWN (Hot)
K12
J24
24082_E
J14
J13
F8 30A
1
J5
AUX
CIRC PUMP
J81
J39
J10
F6 30A
J32
F7 10A 250VAC
K2
K6
J21
K9
F2 10A 250VAC
J38
F2 10A 250VAC
24082_E
J33
K4
J46
CIRC PUMP
PUMP 1
J9
A/V CHAUD
SWIM SIDE
J28
REMOTE
J17
J16
AUX
FRZ
33
J29
VAC
HTR
DISBL
SPA SIDE
F2 3A 250V
T1
K5
12VAC-B
J19
12VAC-A
J18
K7
J46
HEATER
J52
J8
J21
J23
SERIAL
LIGHT J15
K12
J50
CIRC
J38 J37 J48
J35 J34 J36
J51
3
K4
120V
J43
K3
K6
K2
240V
120V
3
J100
GREEN / YELLOW (Ground)
J22
K1
J44
1
J109
MP SENSORS
2
J101
A/V
J32
J47
J16
J55
24090_B
PUMP 1
1
BLUE (Neutral)
BROWN (Hot)
2
J40
J12
TB1
J54
J56
P2/BLWR
F5 30A
2
(UNFUSED)
J42
J39
J41
J53
J57
J56
J25=HTR1 J26=HTR2
J27=HTR3 J30=TEST
J31=CE HTR SEL
F3 10A 250V
F6 0.125A 250V
ON 1
J14
BLOWER
J13
601 control system
J108
EXPANDER
F4 3A 250V
GND
J45
J28 AUX FRZ
2014 Portable Spa
LTR20141001, Rev. B
www.calspas.com
Preparing for Your New Portable Spa
Diagram 6
Preparing for Your New Portable Spa
12
Filling and Powering Up Your Portable Spa
This applies to all spa owners EXCEPT those with the Cal Clarity II bromine generator. See instructions on
page 40 for bromine generator operating instructions and spa filling procedures.
1. Inspect the spa equipment.
After the spa has been placed on an approved surface and
has been correctly wired by a licensed electrician, inspect
all plumbing connections in the equipment area of your spa.
Ensure that these connections are secure and that they did
not loosen during shipment.
If your spa has gate valves, make sure they are all in the
UP or OPEN position.
Never run the spa with the gate valves closed or without
water circulating for long periods of time. Be careful not to
over-tighten the plumbing fittings.
2. Remove the cartridge from filter canister.
Unscrew the cartridge and remove it.
After you remove the filter, remove the plastic wrapper
and soak it in water for 30 minutes before you replace
it. A dry filter can allow air into the filtration system
which can cause the pump to fail to prime.
3. Fill the spa.
Place a garden hose in the filter canister and fill your spa
with regular tap water about 15 cm from the top.
If the water level is too low or too high, your spa will not
operate properly.
Always fill the spa through the filter canister! Failure
to do so may cause air to be trapped in the filtration
system and prevent the pumps from operating
properly.
Never fill your spa with soft water.
Soft water makes it impossible to maintain
the proper water chemistry and may cause
the water to foam, which will ultimately harm
the finish of the spa and void your warranty.
2014 Portable Spa
www.calspas.com
LTR20141001, Rev. B
13
4. Turn on power to the spa.
5. Prime the pump.
Your spa will perform a self-diagnostic check and go into
Priming Mode. The control panel will display either RUN
PUMPS PURG AIR --- or Priming Mode, depending on
which control panel you have.
Do the following:
1. Press the JETS or JETS 1 button once to start the pump
in low speed.
2. Press it again to switch the pump to high speed.
3. If you have other pumps, press JETS 2 or JETS 3 to
turn them on also.
Running the pumps helps the pumps prime.
After two minutes, the pump should prime. If it does not, follow the priming instructions on the next page. If it
does, continue with the next step.
6. Install the filter into the filter canister.
Make sure the filter has soaked at least 30 minutes
before you install it.
7. Adjust water chemistry.
After the spa has run for two hours, test and adjust the water chemistry. See the section on page 35 for
instructions on water clarity.
8. Let the spa heat up.
When the spa has finished priming, the heater will activate.
Put the cover on and let the spa run for two hours.
2014 Portable Spa
LTR20141001, Rev. B
www.calspas.com
Preparing for Your New Portable Spa
When the spa is filled to the correct level, turn on the
power at the RCD breaker.
Preparing for Your New Portable Spa
14
Priming the Pump
New spa owners often have difficulty the first time they
start their spa and the pump fails to prime. This can be
frustrating, but these simple instructions can help you.
The pump will not work properly while
air is trapped in it. Continuing to operate
the pump in this way will cause damage.
Sometimes air can become trapped in the pump while
filling the spa. You will know this has happened when after you have filled and started the spa, the pump does
not seem to function. You will hear the pump operating, but no water will be moving.
Starting Up: Priming Mode
After the initial start-up
sequence, the spa will enter
Priming Mode, which lasts 4
to 5 minutes. Depending on
your control panel, one of the messages shown at right will
appear.
As soon as the Priming Mode screen appears on the panel,
press the Jets or Jets 1 button once to start Pump 1 in low
speed and then again to switch to high speed. Also, select
the other pumps, to turn them on. The pumps should be
running in high speed to facilitate priming.
If the pumps have not primed after two minutes, and water
is not flowing from the jets in the spa, do not allow the
pumps to continue to run. Turn off the pumps and repeat
the process. Note: Turning the power off and back on again
will initiate a new pump priming session.
Exit
Jets 1
Jets 2
Jets 3
Circ
Priming Mode
Sometimes momentarily turning the pump off and on will
help it to prime. Do not do this more than five times. If the pumps will not prime, shut off the power to the
spa and call for service.
Important: A pump should not be allowed to run without priming for more than two minutes. Under NO
circumstances should a pump be allowed to run without priming beyond the end of the 4 to 5 minute priming
mode. Doing so may cause damage to the pump and cause the system to energize the heater and go into
an overheat condition.
Exiting Priming Mode
You can manually exit Priming Mode by pressing an Up or Down button. Note that if you do not manually
exit the priming mode as described above, the priming mode will be automatically terminated after 4 to 5
minutes. Be sure that the pumps have been primed by this time.
Once the system has exited Priming Mode, the top-side panel will momentarily display the set temperature
but the display will not show the temperature yet. This is because the system requires approximately one
minute of water flowing through the heater to determine the water temperature and display it.
2014 Portable Spa
www.calspas.com
LTR20141001, Rev. B
15
Preparing for Your New Portable Spa
Bleeding Air from the Pump
If you have tried priming the pump several times
unsuccessfully using the control panel, you can
bleed the air from the pump manually.
1. Shut off the power to the spa.
2. Using a Phillips screwdriver, remove the
front panel from the spa and locate the
pump.
3. Close the gate valve on the discharge side
of the pump (if your spa is installed with
one.)
4. Turn the bleeder valve counter clockwise
with a small pair of pliers until the air has
been released from the pump.
5. If this is unsuccessful, loosen the union nut
on side of the pump with channel locks.
When air is bled out, tighten the nut.
6. Turn on power to the spa and press the
JETS button. If there is still air trapped in
the pump, repeat steps 2 through 5 until
the pump primes.
2014 Portable Spa
LTR20141001, Rev. B
www.calspas.com
Operating Your Spa
16
Operating Your Spa
TP400 and TP600 Control Panel Operation
TP400 Control Panel
TP600 Control Panel
Primary Navigation and Functions
Navigating the entire menu structure is done with 2
or 3 buttons on the control panel.
You can use either Temperature button (Warm
and Cool) to navigate and program where a single
Temperature icon is shown.
The Light Button is also used to choose the various
menus and navigate each section.
Typical use of the Temperature buttons allows
changing the Set Temperature while the numbers are
flashing in the LCD.
Pressing the LIGHT button while the numbers are
flashing will enter the menus.
Main screen
Start here
READY
RANGE
Then press:
SET
Press 2X
Press 4X
SET
Warm
Cool
RANGE
Light
The menus can be exited with certain button presses.
Waiting several seconds in any screen will allow the
display to revert to the main screen.
Most changes are not saved unless the Light button
is pressed.
Lock the display
(restrict operation)
Press 5X
Adjust the set
temperature
Press 6X
Set temperature
ranges
Press 7X
Select heat mode
Press 8X
Hold mode (standby)
SET
Adjust filtration cycle 1
1
Adjust filtration cycle 2
2
SETREADY
Press 3X
Aux
RANGE FLTR1
Press once
SET
Jets
Set time of day
Press 9X
Set personal
preferences
Flip (invert display)
Press 10X
System utilities
(for diagnostics only)
2014 Portable Spa
www.calspas.com
LTR20141001, Rev. B
17
Press the WARM or COOL buttons to adjust the set temperature.
Press
Once
Then
Press
As
Needed
RANGE
SET
Set Temp
will show
and flash
SET
When the temperature stops flashing, the spa will heat to the new set temperature
when required. The temperature can be set between 15.5°C and 40°C (60°F and
104°F).
RANGE
SET
READY
RANGE
Press the Temp buttons to
change the temperature.
RANGE
FLTR1
Main Screen
Setting Dual Temperature Ranges
Press
Once
Then
Press
Once
You can set two temperature range settings with independent set temperatures.
The High Range is shown in the display by an “up” arrow and the Low Range with
a “down” arrow. The ranges can be used for different reasons, the most common
being a “ready to use” setting versus a “vacation” setting. (See “Vacation Setting
below.) Each range maintains its own set temperature that you program according
to your needs. This way, when a range is chosen, the spa will heat to the set
temperature programmed to that range.
High Range can be set between 26.5°C and 40°C (80°F and 104°F).
Low Range can be set between 10°C and 37°C (50°F and 99°F).
The example below shows setting the Low Range temperature.
SET
RANGE
SET
RANGE
Select High Range or Low
Range. Toggle the Range
arrows on the display.
SET
RANGE
FLTR1
Set Temp will
show and flash
SET
RANGE
FLTR1
SET
RANGE
READY
FLTR1
Press a Temp Button
repeatedly to change the
temperature.
RANGE
FLTR1
Main Screen
Vacation Setting
Set the spa to operate in the Lower Range temperature choice before you go on vacation.
1. Press the Temp button. The “Set Temp” will show
and flash.
2. Press the Light button. “TEMP” will show on the
display, which give you the choice of High Range
or Low Range.
3. To set the Low Range, press the Light button,
then press the Temp button. The “Set Temp” will
show and flash.
4. Press the Temp
temperature.
buttons
to
adjust
the
5. Press the Light button or wait several seconds to
return to the main screen.
2014 Portable Spa
LTR20141001, Rev. B
www.calspas.com
Operating Your Spa
Adjusting the Set Temperature
Operating Your Spa
18
Setting the Heat Mode
Press
Once
Then
Press
Twice
SET
There are two heat modes: READY Mode and REST Mode.
READY Mode: In order for the spa to heat, a pump needs to circulate water
through the heater. The pump that performs this function is known as the
“heater pump.”
he heater pump can be either a 2-Speed Pump 1 or a circulation pump. If the
T
heater pump is a 2-Speed Pump 1, READY Mode will circulate water every 1/2
hour, using Pump 1 Low, in order to maintain a constant water temperature,
heat as needed, and refresh the temperature display.
This is known as “polling.”
READY
SET
READY
REST
Toggle between
READY and REST
RANGE
REST Mode: REST Mode will only allow heating
during programmed filter cycles. Since polling does not
occur, the temperature display may not show a current
temperature until the heater pump has been running
for a minute or two.
FLTR1
Main Screen
Ready-in-Rest Mode
READY/REST appears in the display if the spa is in Rest Mode and Jet 1
is pressed. When the spa is being used, it will heat to set temperature.
While Pump 1 High can be turned on and off, Pump 1 Low will run until set
temperature is reached, or 1 hour has passed. After 1 hour, the system will
revert to Rest Mode. This mode can also be reset by entering the Mode
Menu and changing the Mode.
REST
READY/ REST RANGE
RANGE
Press Jets 1
Main Screen
Setting Time
Press
Once
Then
Press
3x
SET
Setting the time of day is important for determining filtration times and other
background features. 24-hour time display can be set under the PREF menu.
Note: This system does NOT display the time of day. The default
display on the Main Screen is the current water temperature.
Displaying time of day is not a selectable feature.
SET
P
P
SET
Set hour
SET
P
P
Set minutes
READY
RANGE FLTR1
Main Screen
Flip (Invert Display)
Press
Once
Then
Press
4x
Inverting the display allows you to be able to read the control panel while you
are in the spa.
SET
SET
Press Temp button to
flip the display
READY
RANGE
FLTR 1
Main Screen
2014 Portable Spa
www.calspas.com
LTR20141001, Rev. B
19
Press
Then
Press
Once
The control can be locked to prevent unwanted use or temperature adjustments.
You can lock the set temperature or the control panel.
Locking the temperature allows Jets and other features to be used, but the Set
Temperature and other programmed settings cannot be adjusted.
5x
Locking the panel prevents the controller from being used, but all automatic
functions are still active.
TO LOCK SET TEMPERATURE
SET
SET
SET
SET
READY
You can toggle between ON and OFF
using the Warm and Cool buttons
Press Light button to
lock control panel
RANGE FLTR1
Main screen
The set temperature
has been locked
TO LOCK THE CONTROL PANEL
SET
SET
SET
READY
You can toggle between ON and OFF
using the Warm and Cool buttons
Unlocking the control
While pressing and holding the
WARM Button, press the LIGHT
button twice.
READY
RANGE FLTR1
Main screen
The control panel
has been locked
RANGE FLTR1
READY
Press and
hold
Press
twice
RANGE
FLTR1
Main screen
Hold Mode
Press
Once
Then
Press
6x
Hold Mode is used to disable the pumps during service functions like cleaning or
replacing the filter. (See page 38 for instruction on cleaning the filter.)
Hold Mode will last for 1 hour unless the mode is exited manually.
READY
Timer will count down for 60 minutes
RANGE FLTR1
Main Screen
2014 Portable Spa
LTR20141001, Rev. B
www.calspas.com
Operating Your Spa
Locking the Control
Operating Your Spa
20
Adjusting Filtration
Press
Once
Then
Press
7x
Main Filtration
Filter cycles are set using a duration. Each setting can be adjusted in 15-minute
increments. Filter Cycle 1 and Filter Cycle 2 (if enabled) are set to the same
duration.
If Filter Cycle 2 is enabled, Filter 2 will appear in the LCD. If Filter 2 is disabled,
Filter 1 will appear.
*****
1
FLTR1
SET
FLTR1 P
FLTR1
SET
Shows start
time
P
Sets start
hour
SET
FLTR1 P
Sets
minutes
SET
FLTR1
P
Sets 15- minute
increments
to show RUN HRS
If you wait
several seconds,
it will revert to
original setting.
*****
FLTR1
FLTR1
SET
FLTR1
SET
Sets Filter 1
length in hours
FLTR1
Selects part
of an hour
SET
FLTR1
Sets 15-minute
increments
to show F1 ENDS xx:xx
A
to set
READY
Note: Waiting several seconds will lose any
new Filter 1 Start Time and Run Hours and
revert to the previous Filter 1 settings.
to set
RANGE FLTR1
Main Screen
Press Light button
to select Filter 2
to set
2
SET
FLTR 2
SET
FLTR 2
*****
If you wait several seconds, it
will revert to original setting.
READY
RANGE FLTR1
Main Screen
to set
*****
SET
FLTR 2
FLTR 2 P
Shows start
time
FLTR 2 P
SET
Sets start
hour
SET
FLTR 2 P
Sets
minutes
SET
FLTR 2 P
Sets 15- minute
increments
to show RUN HRS
*****
FLTR 2
FLTR 2
FLTR 2
SET
Sets Filter 2
length in hours
SET
FLTR 2
Selects part
of an hour
SET
FLTR 2
Sets 15-minute
increments
to show F2 ENDS xx:xx
A
to set
to set
READY
Note: Waiting several seconds will lose any new
Filter 2 On/Off, Start Time and Run Hours and
revert to the previous Filter 2 settings.
RANGE FLTR1
Main Screen
2014 Portable Spa
www.calspas.com
LTR20141001, Rev. B
21
Press
Once
Then
Press
9x
This allows you to set the following preferences for system operation:
•
Change the temperature between Fahrenheit and Celsius
•
Change the clock between 12-hour and 24-hour display
•
Turn periodic reminders (like “CLEAN FILTER”) on or off
to set
SET
SET
Toggle Fº en Cº
SET
to set
SET
Toggle 12-hour clock
and 24-hour clock
SET
SET
Toggle Yes and No
to set
Utilities
This menu feature is for system information only and is used mainly for repair and troubleshooting.
Other Spa Systems
Several spa functions operate in the background and require no action or maintenance from you. This is for
your information only.
Pumps
Press the “Jets 1” button once to turn pump 1 on
or off, and to shift between low- and high-speeds if
equipped. If left running, the pump will turn off after
a time-out period. The pump 1 low-speed will time
out after 30 minutes. The high-speed will time out
after 15 minutes.
panel, however the high speed may be started.
On non-circ systems, the low-speed of pump 1 runs
when the blower or any other pump is on. If the spa
is in Ready Mode, Pump 1 low may also activate for
at least 1 minute every 30 minutes to detect the spa
temperature (polling) and then to heat to the set
temperature if needed. When the low-speed turns
on automatically, it cannot be deactivated from the
The ozonator will run with the circulation pump during
filtration cycles.
Circulation Pump
The circulation pump will come on when the system
is checking temperature (polling), during filter cycles,
during freeze conditions, or when another pump is
on.
Purge Cycles
In order to maintain sanitary conditions, secondary
Pumps and/or a Blower will purge water from
their respective plumbing by running briefly at the
beginning of each filter cycle.
2014 Portable Spa
LTR20141001, Rev. B
www.calspas.com
Operating Your Spa
Setting Preferences
Operating Your Spa
22
Diagnostic Messages
Message
Meaning
RUN PMPS PURG AIR
Priming Mode
---F - ---C
Water Temperature Is Unknown
Action Required
Priming Mode lasts 4 minutes, but
you can exit it earlier by pressing
Each time the spa is powered up, it will
any Temp button. The heater is not
enter Priming Mode. The purpose of
allowed to run during Priming Mode.
Priming Mode is to allow the user to run
each pump and manually verify that the NOTE: If your spa has a Circ Pump,
pumps are primed (air is purged) and it will turn on with Jets 1 in Priming
water is flowing. This typically requires Mode. The Circ Pump will run by itself
observing the output of each pump when Priming Mode is exited.
separately, and is generally not possible
in normal operation.
None
After the pump has been running for
1 minute, the temperature will be
displayed.
42F TOO COLD
Too Cold - Freeze Protection
None.
A potential freeze condition has been
detected, or the Aux Freeze Switch has
closed, and all pumps and blower are
activated. All pumps and blower are ON
for at least 4 minutes after the potential
freeze condition has ended, or when
the aux freeze switch opens. In some
cases, pumps may turn on and off and
the heater may operate during Freeze
Protection.
WATR TOO HOT
Water is Too Hot
SFTY TRIP ----
Safety Trip - Pump Suction
Blockage
HTR FLOW LOSS ----
Heater Flow Is Reduced
HTR FLOW FAIL ----
Heater Flow is Reduced
None. System will auto reset when
the spa water temp is below 42°C
One of the water temp sensors has
(108°F ). Check for extended pump
detected spa water temp 43.5°C (110°F)
operation or high ambient temp.
and spa functions are disabled.
Drain or filter may be covered, creating
a blockage. Clear the blockage and
reset by pressing any button on the
The Safety Trip error message indicates
topside panel.
that the vacuum switch has closed. This
occurs when there has been a suction
problem or a possible entrapment
situation avoided. (Note: not all spas
have this feature.)
Check for low water level, suction flow
restrictions, closed valves, trapped
There may not be enough water flow
air, too many closed jets and pump
through the heater to carry the heat
prime. Heater start up will begin
away from the heating element.
again after about 1 minute.
Check for low water level, suction flow
restrictions, closed valves, trapped
There is not enough water flow through
air, too many closed jets and pump
the heater to carry the heat away from
prime. Heater start up will begin
the heating element and the heater has
again after about 1 minute.
been disabled.
2014 Portable Spa
www.calspas.com
LTR20141001, Rev. B
23
Meaning
Heater May Be Dry
HTR DRY ----
Heater Is Dry
HTR TOO HOT ----
Heater Is Too Hot
PRES BTTN TO RSET
----
Spa Needs To Be Reset
102F SNSR BAL- ANCE
Sensor Balance Is Poor
Action Required
Check for low water level, suction flow
restrictions, closed valves, trapped
Possible dry heater, or not enough water
air, too many closed jets and pump
in the heater to start it. The spa is shut
prime. Press any button to reset the
down for 15 min.
heater start-up.
Check for low water level, suction flow
restrictions, closed valves, trapped
There is not enough water in the heater
air, too many closed jets and pump
to start it. The spa is shut down.
prime. Press any button to reset the
heater start-up.
Check for low water level, suction flow
restrictions, closed valves, trapped
One of the water temp sensors has
air, too many closed jets and pump
detected 48°C (118°F) in the heater and
prime. Press any button to reset when
the spa is shut down.
water is below 42°C (108°F).
This message may appear with other
messages.
Press any button on the topside
control to reset.
Call for service.
The temperature sensors MAY be out of
sync by 1°C or 2°C (2°F or 3°F).
SNSR SYNC ---- CALL
FOR SRVC ----
Sensor Balance is Poor
SNSR A ---- CALL FOR
SRVC
Sensor Failure
SNSR B ---- CALLFOR
SRVC
NO COMM
The temperature sensors ARE out of
sync.
Call for service. Note: This message
can be reset from the topside panel
with any button press.
Call for service.
A temperature sensor or sensor circuit
has failed.
No Communications
Call for service.
The control panel is not receiving
communication from the system.
102°T
°F or °C is replaced by °T
Call for service.
The control system is in Test Mode.
STUK PUMP ----
A Pump Appears To Be Stuck ON
Water may be overheated.
POWER DOWN THE SPA. DO NOT
ENTER THE WATER. Call for service.
HOT FALT ---- CALL FOR A Pump Appears To Be Stuck ON
POWER DOWN THE SPA. DO NOT
SRVC ---ENTER THE WATER. Call for service.
A pump appears to have been stuck ON
when spa was last powered.
2014 Portable Spa
LTR20141001, Rev. B
www.calspas.com
Operating Your Spa
Message
HTR MAY BE DRY ---WAIT ----
Operating Your Spa
24
2014 Portable Spa
www.calspas.com
LTR20141001, Rev. B
25
Operating Your Spa
TP800 Control Panel Operation
The Main Screen
Spa Status
When the spa has finished priming, you will see
the Main Screen. Important information about spa
operation can be seen quickly from the Main Screen.
The most important features can be accessed from
this screen.
•
•
Setting Your Language Preference
You can set the TP800 control panel to one of six
languages: English, French, Spanish, German,
Italian, and Czech.
On the main screen, select Settings, then scroll
down to Preferences, and then select Language.
The actual water temperature can be seen in
large text and the desired, or Set Temperature,
can be selected and adjusted.
After you have made your selection, return to
Preferences and select Temp Display to change
the temperature display from Fahrenheit to
Celsius.
Time-of-day, ozone operation and filter operation
status are shown, along with other messages
and alerts.
•
Temperature Range (High or Low) is indicated in
the upper right corner.
•
A Lock icon is visible if the panel or settings are
locked.
Navigation
There are four selections you can
make on the Main Screen:
Set temperature - Press the left arrow
button to change the Set Temperature
number to white. The Set Temperature
can then be adjusted with the up and
down buttons. Pressing the Select
button or the Right Arrow button will
save the new set temperature.
After you have done this, return to the main menu.
The examples shown in this manual assume
you have selected English as your language
preference.
Water Temperature
Desired Temperature
Left, Right, Up, Down,
and Select Buttons
Pump and Heat
102°F
Status
Temperature Range
Set: 104°F
8:32 PM
Ozone
Filter 1
High Range
Spa
Scenes
Settings
Ready in Rest Mode
Heating
Messages
Menus
Lock Indicator
2014 Portable Spa
LTR20141001, Rev. B
www.calspas.com
Operating Your Spa
26
Menu selections - The three menu choices on the
right, Spa, Shortcuts, and Settings, can be selected
and the screen will change to show more detailed
controls or programming functions. They will be
discussed further in this section.
Messages
At the bottom of the screen, messages may appear
at various times. Some of these messages must be
dismissed by the user (see page 29).
Spa Screen
The Spa Screen shows all available equipment to control, as well as other
features, like Invert, in one easy-to-navigate screen. The display shows
icons that are related to the equipment installed on a particular spa model,
so this screen may change depending on the installation.
The navigation buttons are used to select an individual device. The device
that is chosen is highlighted with a white outline and the text under the icon
changes to white. Once a device is selected, it can be controlled using the
center Select Button.
Back
Jets 1
Jets 2
Jets 3
Light
Invert
Ready in Rest Mode
Heating
Some devices, like pumps, may have more than one ON state, so the icon
will change to reflect the state that the equipment is in. Below are some
examples of 2-speed Pump indicators.
If the Spa has a Circ Pump, a Circ Pump Icon will appear to indicate its activity, but outside of Priming Mode,
the Circ Pump cannot be controlled directly. NOTE: The icon for the pump that is associated with the heater
(Circ or P1 Low) will have a red glow in the center when the heater is running.
Shortcuts
Settings Screen
The Settings Screen is where all programming and other spa behaviors
are controlled.
This screen has several features that can be acted on directly. These
features include Temp Range, Heat Mode, and Invert Panel. When one
of these items is highlighted, the Select Button is used to toggle between
two settings. All other menu items (with an arrow pointing to the right) go to
another level in the menu.
Jets 1
Settings Jets 2
Back
Light
Temp Range High
Back
Ready
in
Rest
Mode Ready
Heat
Mode
HeatingTime of Day
Jets 3
Filter Cycles
Light Cycle
Invert Panel Normal
Lock
Setting Time of Day
Setting the time of day is important for determining filtration times and
other background features. “Set Time” will appear on the Main Screen if
no time of day is set.
Time of Day
12 :00 PM
10:05
PM
12 HR
Back
Save
Cancel
2014 Portable Spa
www.calspas.com
LTR20141001, Rev. B
27
This system incorporates two temperature range settings with independent
set temperatures. The specific range can be selected on the Settings screen
and is visible on the Main Screen in the upper right corner of the display.
Settings
Back
These ranges can be used for various reasons, with a common use being
a “ready to use” setting vs. a “vacation” setting. Each range maintains its
own set temperature as programmed by the user. This way, when a range is
chosen, the spa will heat to the set temperature associated with that range.
Temp Range High
Ready
Heat Mode
Time of Day
Filter Cycles
Light Cycle
Invert Panel Normal
Lock
High Range can be set between 26.5°C and 40°C (80°F and 104°F). Low
Range can be set between 10°C and 37°C (50°F and 99°F). More specific Temp Ranges may be determined
by the Manufacturer. Freeze Protection is active in either range.
Selecting Heat Modes – Ready vs. Rest
In order for the spa to heat, a pump needs to circulate water through
the heater. The pump that performs this function is known as the “heater
pump.”
Settings
Back
The heater pump can be either a 2-speed pump (Pump 1) or a circulation
pump. If the heater pump is a 2-Speed Pump 1, Ready Mode will circulate
water every 1/2 hour, using Pump 1 Low, in order to maintain a constant
water temperature, heat as needed, and refresh the temperature display.
This is known as “polling.”
Temp Range High
Ready
Heat Mode
Time of Day
Filter Cycles
Light Cycle
Invert Panel Normal
Lock
Rest Mode will only allow heating during programmed filter cycles. Since polling does not occur, the
temperature display may not show a current temperature until the heater pump has been running for a minute
or two. While Pump 1 High can be turned on and off, Pump 1 Low will run until set temperature is reached,
or 1 hour has passed.
Circulation Mode
If the spa is configured for 24HR
circulation, the heater pump generally runs
continuously. Since the heater pump is
always running, the spa will maintain set
temperature and heat as needed in Ready
Mode, without polling. In Rest Mode, the
spa will only heat to set temperature during
programmed filter times, even though the
water is being filtered constantly when in
Circulation Mode.
Filter Cycles
Back
Filter Cycle 1
Starts at 12:00 AM
Runs 0 HR 0 Min
Ends at 12:00 AM
Filter Cycle 2 NO
Starts at 12:00 AM
Runs 0 HR 0 Min
Ends at 12:00 AM
Filter Cycles
Back
Save
Cancel
Filter Cycle 1
Starts at 6:15 AM
Runs 3 HR 0 Min
Ends at 9:15 AM
Filter Cycle 2 NO
Starts at 12:00 AM
Runs 0 HR 0 Min
Ends at 12:00 AM
Ready-in-Rest Mode
READY/REST appears in the display if the spa is in Rest Mode and the Jets
1 Button is pressed. It is assumed that the spa is being used and will heat
to set temperature. While Pump 1 High can be turned on and off, Pump 1
Low will run until set temperature is reached, or 1 hour has passed. After 1
hour, the System will revert to Rest Mode. This mode can also be reset by
entering the Settings Menu and changing the Heat Mode.
39°C
Set: 40°F
8:32 PM
Ozone
Filtre 1
Haute Gamme
Spa
Scènes
Paramètres
Prêt/Repos
Chauffage
2014 Portable Spa
LTR20141001, Rev. B
www.calspas.com
Operating Your Spa
Setting Dual Temperature Ranges
Operating Your Spa
28
Setting Filter Cycles
Filter cycles are set using a start time and a duration. Each setting can be adjusted in 15-minute increments.
The panel calculates the end time and displays it automatically.
Filter cycle 2 is off by default, but can be selected for use if desired.
Locking and Unlocking the Control Panel
The control can be restricted to prevent unwanted use or temperature
adjustments.
Locking the Settings allows jets and other features to be used, but
the set temperature and other programmed settings cannot be
adjusted.
Back
Back
Lock
Lock
Settings
Settings
Panel
Panel
OFF
OFF
OFF
OFF
When settings are locked, there is a reduced selection of menu items.
These include Set Temperature, Invert, Lock, Utilities, Information
and Fault Log. They can be seen, but not changed or edited.
Locking the Panel prevents the controller from being used, but all
automatic functions are still active.
Locking and Unlocking -- Use the
navigation buttons from the Lock Screen.
The Lock and Unlock Sequence is the same
for both Panel Lock and Settings Lock.
Press:
Twice
Then
Press:
Once
Additional Settings
Light Cycle
If Light Cycle does not appear in the Settings
Menu, the light timer feature is not enabled by the
manufacturer. When available, the light timer is OFF
by default. The settings can be edited the same way
as filter cycles.
Invert Panel
Selecting Invert Panel will flip the display and the
buttons so the panel can be easily operated from
inside or outside the hot tub.
40°C
40°C
High Range
High Range
Set: 40°C
Set: 40°C
8:32 PM
8:32 PM
Ozone
Ozone
Filter 1
Filter 1
Unlock
Unlock
Ready in Rest Mode
Ready in Rest Mode
Heating
Heating
Lock
Lock
Settings
Settings
Panel
Panel
OFF
OFF
Back
Utilities
ON
Back
ON
This menu feature is for system information only and
is used mainly for repair and troubleshooting.
Preferences
This allows you to set the following preferences for
system operation:
•
Change the language on the control panel
•
Change the temperature between Fahrenheit
and Celsius
Hold
Hold Mode is used to disable the pumps during
service functions like cleaning or replacing the filter.
(See page 38 for instruction on cleaning the filter.)
•
Change the clock between 12-hour and 24-hour
display
•
Turn periodic reminded (like “CLEAN FILTER”) on
or off
Hold Mode will last for 1 hour unless the mode is
exited manually.
Information
This menu feature is for system information only and
is used mainly for repair and troubleshooting.
2014 Portable Spa
www.calspas.com
LTR20141001, Rev. B
29
Message
Meaning
---F - ---C
Water temperature is unknown. After the pump has been running for
one minute, the temperature will be displayed.
Possible freezing condition
A potential freeze condition has been detected, or the Aux Freeze Switch
has closed. All water devices are activated. In some cases, pumps may
turn on and off and the heater may operate during Freeze Protection.
This is an operational message, not an error indication.
The water is too hot
The system has detected a spa water temp of 43.5°C (110°F) or more,
and spa functions are disabled. System will auto reset when the spa
water temp is below 42°C (108°F). Check for extended pump operation
or high ambient temp.
Water flow is low
There may not be enough water flow through the heater to carry the
heat away from the heating element. Heater start up will begin again
after about 1 min. See “Flow Related Checks” below.
Water flow has failed
There is not enough water flow through the heater to carry the heat
away from the heating element and the heater has been disabled. See
“Flow Related Checks” below. After the problem has been resolved, you
must press any button to reset and begin heater start up.
The heater may be dry
Possible dry heater, or not enough water in the heater to start it. The
spa is shut down for 15 min. Press any button to reset the heater startup. See “Flow Related Checks” below.
The heater is dry
There is not enough water in the heater to start it. The spa is shut down.
After the problem has been resolved, you must clear the message to
restart heater start up. See “Flow Related Checks” below.
The heater is too hot
One of the water temp sensors has detected 48°C (118°F) in the heater
and the spa is shut down. You must clear the message when water is
below 42°C (108°F). See “Flow Related Checks” below.
Sensors are out of sync
The temperature sensors MAY be out of sync by 1°C or 2°C (2°F or
3°F). Call for service.
Sensors are out of sync -Call for service
The temperature sensors ARE out of sync. The fault above has been
established for at least 1 hour. Call for service.
Sensor A Fault, Senor B Fault
A temperature sensor or sensor circuit has failed. Call for service.
Communications error
The control panel is not receiving communication from the System. Call
for service.
°F or °C is replaced by °T
The Control System is in Test Mode. Call for service.
Flow-Related Checks
Check for low water level, suction flow restrictions, closed valves, trapped air, too many closed jets and
pump prime. On some systems, even when spa is shut down by an error condition, some equipment may
occasionally turn on to continue monitoring temperature or if freeze protection is needed.
2014 Portable Spa
LTR20141001, Rev. B
www.calspas.com
Operating Your Spa
Diagnostic Messages
Operating Your Spa
30
Cal Spas Hot Tub WiFi App
This optional feature is available for use with any smart device (Android™ or iPhone™). You must have the wifi
module installed in your spa in order to use the app.
This feature is only available for spas with the BP501 or BP2000 control box.
1
Stand-alone app
Range:
Range limit:
About 20 feet
Limited to the range
of the wi-fi module
HOW TO CONNECT TO IT:
Install the app on your phone or device -- see the following section “Installing the app”.
2
App with home network, no internet access
Range:
Range limit:
About 50 feet
Limited to the range of your
home router’s signal
HOW TO CONNECT TO IT:
Install the app on your phone or device -- see the following section “Installing the app”.
Internet
3
App with home network with internet
access, using Cloud connection or other
hotspot connection
Range:
Range limit:
3G or 4G
Worldwide
Limited to 3G / 4G / hotspot
availability
Wi-fi
Local hotspot
HOW TO CONNECT TO IT:
1. Install the app on your phone or device -- see the following section “Installing the app”.
2. Exit the app and go to wi-fi settings on your phone.
3. Select and enable your local router.
4. Start the app. After you connect, select Settings on the home screen.
5. On the Settings screen, select Advanced, then on the Advanced screen, select Wi-fi Settings.
6. On the Wi-fi screen, select WPA. Then select the name of your home route from the drop-down menu.
7. Enter the SSID and Key for your router, the tap Save and select OK twice.
8. Close the app and re-start it to connect to your home network.
If you have any trouble connecting, go to www.balboawatergroup.com/bwa
and download the PDF document “Setting Up Your Wi-fi”.
Your
spa
Wi-fi
signal
Phone or
other
device
Your home
network
router
Internet cloud
connection
Local wi-fi
connection
2014 Portable Spa
www.calspas.com
LTR20141001, Rev. B
31
Go to the Apple app store or Google Play and search for the free spa app using the key words
“Cal Spas Hot Tub.” Select the app. The icon for the app will appear on your device as shown
at left.
Make sure you enable wifi on your phone before you run the app.
On the wi-fi connections screen on your device, a network will appear called “BWGSpa_xxxxxx_”. (The x’s
represent the wi-fi module’s local address and is unique for every spa.) Once you are connected to the BWG
Spa network, start the bwa app and follow the prompts on the screen. (Your start screen maybe different.)
1. Press the app button on the main
screen of your device.
2. Connect to the spa’s wifi signal.
3. When connected, you will be
taken to the main app screen.
4. You are now directly connected to
your hot tub and can control all
the hot tub functions via the app.
Using the app
When the app has been installed, it will provide you with instant access and control of your spa wherever you
connect within the spa’s Wi-Fi range.
The controls are visually oriented and require little explanation. You can find more in-depth instructions in the
Wi-Fi Setup Guide at the Balboa web site:
http://www.balboawatergroup.com/bwa
Troubleshooting connection problems
You should have few problems connecting with the bwa wifi app. However, if you are unable to connect
quickly and easily to the spa’s wifi source, try doing the following.
•
Enable on your device. This is the most likely reason you may not be able to connect to the app. Check
your devices wifi settings and try connecting again.
•
Power cycle the spa. Shut off power to the spa for 30 second and turn it back on. Wait until the spa has
gone through its complete set-up routine before you try to connect with the wifi app.
•
Wait until the spa has completely primed. When you turn on the spa, it will go through a priming routine,
which is followed by temperature polling, where no temperature is shown on the control panel. As soon
as a temperature appears, you can connect with the wifi app.
•
If you use your home network router, it MUST be close enough to the spa in order for the spa’s wi-fi signal
to reach the router. If you have connectivity problems, you may need to relocate your router closer to
your spa or consider adding a wireless signal booster to your router.
2014 Portable Spa
LTR20141001, Rev. B
www.calspas.com
Operating Your Spa
Installing the app
Operating Your Spa
32
Electrical Power Efficiency
Your new spa comes equipped with an electric heater.
Following the directions listed below will ensure the
most efficient operation:
NOTE: This method is only for spa usage under two
hours a week.
•
Keep the spa’s operating temperature 3°C (5°F)
below the desired usage temperature when not
in use. One or two hours before use, set the
temperature to the desired temperature.
•
If the spa usage exceeds two hours a week, the
set temperature should remain at the desired
usage temperature.
•
The air venturis should be used sparingly. When
open, water temperature drops quite rapidly and
can also dissipate chemicals.
Adjustable Jets
Almost all of the jets in your spa are adjustable.
Rotating the face of an adjustable jet to the left
(counter-clockwise) will decrease the amount of
water flow through the jet. Rotating the face of an
adjustable jet to the right (clockwise) will increase
the amount of water flow through the jet. (See
example shown below.)
Neck jets adjust in the opposite directions (counterclockwise to increase, clockwise to decrease).
Allowing the water temperature to lower more than
5.5°C (10°F) below the desired usage temperature
and reheating it prior to usage will cause the heater
to operate longer than it normally would maintaining
the desired temperature. Doing this will increase your
operating cost and makes your heater work more than
necessary.
LED Perimeter Lighting
Press the LIGHT button on the topside control panel
to turn the spa light on. If your spa has perimeter
LED lights, they will also light up at the same time as
the spa light.
The perimeter lights operate in three modes:
1. Cycle: The first time you press the LIGHT button,
the lights will cycle through all the colors in this
order:
White
Cyan
Magenta
Blue
Yellow/green
Green
Red
To cycle through the different color choices, press
the button repeatedly. Each time you press the
button, you advance to the next color.
2. Flashing white: When you have cycled through
all the colors, the next time you push the LIGHT
button, the LED lights will flash white.
3. Fading cycle: The next time you push the
LIGHT button, the lights will gradually fade from
one color to the next in the order shown above.
Spas with exterior corner LED lighting work in the
same modes as described above but do not light up
when the interior perimeter lights are yellow/green,
green or red.
2014 Portable Spa
www.calspas.com
LTR20141001, Rev. B
33
Operating Your Spa
Diverter Knobs
Diverter knobs are the larger knobs located around the top of your spa.
They allow you to divert water through jets from one side of the spa to the
other, or in most cases from floor jets to wall jets. This is accomplished by
rotating the diverter knob to the left (counterclockwise), decreasing the
amount of water flow through a section of jets. To increase the amount
of water flow through the other section of jets, rotate the handle to the
right (clockwise).
Waterfalls
Some spa series include optional waterfalls. When the booster pump is
on, turn the knob near the waterfall. Water will immediately start flowing
through it.
Air Venturis
Air venturis are the smaller knobs located around the top of your spa.
Each one will let you add a mixture of air with the jet pressure. This
is accomplished by rotating the air venturi knob to the left (counterclockwise) to increase the amount of airflow through the jets. To decrease
the amount of airflow through the jets, rotate the handle to the right
(clockwise).
Hydro Streamer Waterfall
Your spa may include two to eight streamer waterfalls. When the booster pump is on, turn the 1” diverter
knob to adjust the rate of flow to the waterfall jets.
The waterfall jet faces are not adjustable. Do not turn the jet faces because you may accidentally remove
them.
Always shut off water to the hydro streamer jets
before you place the cover on the spa. Water
from the hydro streamer jets sprays in
an arc that is higher than
the top surface of the
spa. When water from
the hydro streamer sprays
the bottom of the cover, it
will collect and run to the
edge of the spa and drip
over the top.
2014 Portable Spa
LTR20141001, Rev. B
www.calspas.com
Operating Your Spa
34
Adjustable Therapy System
Pump On / Off Button
Press this button once to turn on the ATS pump. The
POWER ON light on the control panel will appear. Press
this button a second time to turn off the ATS pump.
The ATS pump must be on before you can use any
other features of this system.
Pulse Mode
Button
Press this button once
to turn on the Pulse
Mode. The first time it
is pressed, the orange
LED in position number
1 will light, indicating
the number one pulse
mode. Each press of
either the Up or Down
button will move the orange LED up or down to the
next pulse mode. Allow one second between each
button press. Pressing the button quickly may cause
improper operation. To turn the Pulse Mode off and
return to normal pump operation, press the Pulse
Mode button a second time.
Up / Down Buttons
These buttons allow you to cycle through seven
massage modes. Each mode offers a different pulsating
massage. Some modes are faster than others, so just
cycle through them to find the massage you like best.
Time Reset
Pulse Mode will normally run for 15 minutes then
automatically shut off. For another 15-minute session,
press the Pump On / Off button and the Pulse
Mode button. A light will blink and the pump will run
on high-speed mode as part of a 15-minute cool down
period. After that, the pump will stop automatically
and the LED light on the panel will continue to blink
for one minute then shut off automatically. After the
second 15-minute session, the system will run through
a cool down cycle for up to two hours. In this cool
down mode, the you will only be able to operate the
pump (by again pressing the Pump On / Off button).
However, the massage mode will remain off until the
cool down mode is completed.
to turn off the ATS pump, the press the Pulse Mode
button once. The power light will flash to indicate
Pulse Mode has been reset.
7
Gentle & powerful alternating bursts
6
Quick powerful, continuous bursts
5
3 gentle bursts followed by 1 vigorous burst
4
Swift rolling bursts
3
Accelerated continuous bursts
2
Medium continuous burst
1
Low rolling bursts
VariMax System
This feature is available with Velocity spas only.
The VariMax system offers a wide range of speeds.
The control can be set to a continuous high speed
or low speed, or in between.
The VariMax system also has a Wave Mode that
automatically ramps from high speed to low speed,
then back up to high speed. It then repeats.
Press the ON / OFF / WAVE button to turn it on.
The LED will appear when the pump is on.
To manually control the speed control, press the
ON / OFF / WAVE button to turn on the VariMax
system and press the SPEED UP or SPEED DOWN
buttons to change the speed.
Resetting Pulse Mode
Pulse Mode will shut off for two hours unless reset.
During this time the pump will run at a maximum
speed. To reset Pulse Mode, press the Pump On / Off
2014 Portable Spa
www.calspas.com
LTR20141001, Rev. B
35
This section is intended for new spa owners with no experience with water chemistry. Everyone’s experience
with maintaining water quality is different, but there are some general concepts you need to know.
Water maintenance is not difficult, although it requires regular attention. The most important thing to understand
about taking care of your spa water is that preventive action is much easier than correcting water quality
issues.
The Key to Clear Water
Excellent water quality is a simple matter of four things:
Regularity Balance
Chemical
Filtration
Sanitation
Ing et augait alit esto dolut dio doleniam quat am vel etue
You will need to test and adjust the chemical
vendiam quis duip ea ating et utem quam, sendit, velesequibalance
ofniscil
your
spanonumsan
water. utatin
Although
this
is not
sit am dunt
ilit alit
utat num
voloreril
difficult,
it dionull
needsumsandio
to be done
regularly.
in ut pratie
consed
dolumsandit at. Rat,
consequi tinim ilisi bla feuis euguerc ilisi.
Ing et augait alit esto dolut dio doleniam quat am vel etue
Sanitizers
kill bacteria and viruses and keep
vendiam quis duip ea ating et utem quam, sendit, velesequithe
water
clean.
A low sanitizer level will allow
sit am dunt niscil ilit alit nonumsan utatin utat num voloreril
microbes
growumsandio
quicklyconsed
in the
spa water.
We
in ut pratieto
dionull
dolumsandit
at. Rat,
recommend
either
chlorine
consequi tinim using
ilisi bla feuis
euguerc
ilisi. or bromine as
Depending on your choice of sanitizer, you
Em verit
nulluptat
minibh
elestio numneed
toiliqui
testendiam
the level
of lamcore
calcium
hardness,
total
sandip eraesectem diatio ercing ea cortis delissed dunt
alkalinity,
and pH. Spa owners with a Cal Clarity
utpatisi.
II bromine generator also need to check total
Ut vel ut wissolids
atis nonullut
augait lore dolore erci te ea
dissolved
and augiam
phosphates.
your
sanitizer.
Em verit iliqui endiam nulluptat lamcore minibh elestio num-
sandip
eraesectem
diatio
ea cortis
delissed
duntto
Spa
owners
with
an ercing
ozonator
also
need
utpatisi.
add sanitizer, although their requirements are
Ut vel ut wis atis nonullut augiam augait lore dolore erci te ea
different.
consequat.
consequat.
See
pageer36
learn
how to
Met prate
sit to
dolor
iriureetuer
si.
balance
your spamagna
water.
Feummy nullamcore
ad dio er
pratie
dionull
umsandio
tio
r
lea r
C
To ate
W
ity
Yo
n
consed
A
clogged or dirty filter will
dolumsandit at. Rat, consequi tinim ilisi bla feuis euguerc ilisi.
cause the heater and pump to work harder than
Em verit
iliqui to,
endiam
nulluptat
lamcore minibh
numthey
need
possibly
causing
them elestio
to fail.
sandip eraesectem diatio ercing ea cortis delissed dunt
utpatisi.
The
spa’s heating system will only function with
the
of water
flowdolore
through
the
Ut velproper
ut wis atisamount
nonullut augiam
augait lore
erci te ea
consequat.
system.
Met prate
sit for
dolor
iriureetuer
si. Feummy
nullamcore
See
pageer38
filter
cleaning
instructions.
magna ad dio er sequamconum nis eu feugiamet, vent et
wisis ero dolore dip exeraestie estie vel inisci elisl ut diat, cons
aut alit lut lore tin hent adiam iustrud molor sustis essit wiscilit wisi.
lar
Chem
ica
ey
K
ur
S an
it
The Cal Clarity II bromine
et wisis ero dolore dip exeraestie estie
generator
does
NOTautrequire
vel inisci elisl ut
diat, cons
alit lut
sanitizer.
See
page
40 molor
for a
lore tin hent
adiam
iustrud
description
of its
sustis essit wiscilit
wisi.use.
n
Ing et augait
alit filter
esto dolut
dio doleCleaning
your
regularly
is
niam quat am vel etue vendiam quis
the easiest and most effective
duip ea ating et utem quam, sendit,
single
thing you can do to
velesequisit am dunt niscil ilit alit nonkeep
your
clear.
umsan utatin water
utat num
voloreril in ut
ce
alan
lB
ra
Filt
Sanitation
Filtration
sequamconum nis eu feugiamet, vent
io
at
sequamconum nis eu feugiamet, vent
et wisis ero dolore dip exeraestie estie
vel inisci elisl ut diat, cons aut alit lut
lore tin hent adiam iustrud molor
sustis essit wiscilit wisi.
See
page 37 to learn how to
Met prate er sit dolor iriureetuer si.
use
sanitizer.
Feummy
nullamcore magna ad dio er
Chemical Balance
Regularity
Ing et augait alit esto dolut dio doleu
Clear
water
regular
R eg
niam quat
am velrequires
etue vendiam
quis
maintenance.
Establish
duip ea ating et utem
quam, sendit,a
velesequisitbased
am dunt on
niscilailit alit
nonroutine
regular
umsan utatinfor
utatyour
num voloreril
in ut
schedule
spa water
pratie dionull umsandio consed
maintenance.
dolumsandit at. Rat, consequi tinim
ilisi bla feuis euguerc
Maintaining
yourilisi. water quality helps the
enjoyment
yournulluptat
spa and
extends
spa’s
Em verit iliquiof
endiam
lamcore
minibh your
elestio numsandip
diatio
ercing eafrom
cortis neglect
delissed dunt
life
by eraesectem
preventing
damage
and
utpatisi. abuse.
chemical
Ut vel ut wis atis nonullut augiam augait lore dolore erci te ea
See
page 42 for the schedule of recommended
consequat.
maintenance.
Met prate er sit dolor iriureetuer si. Feummy nullamcore
magna ad dio er sequamconum nis eu feugiamet, vent et
wisis ero dolore dip exeraestie estie vel inisci elisl ut diat, cons
aut alit lut lore tin hent adiam iustrud molor sustis essit wiscilit wisi.
2014 Portable Spa
LTR20141001, Rev. B
www.calspas.com
Water Clarity
Water Clarity
Water Clarity
36
Testing and Adjusting Spa Water
You have two types of testing methods to choose from:
• The reagent test kit is a method which provides a high level of accuracy. It is available in either liquid or
tablet form.
• Test strips are a convenient testing method commonly used by spa owners.
Balancing the Total Alkalinity
Balancing the Calcium Hardness
Total alkalinity (TA) is the measure of the total
levels of carbonates, bicarbonates, hydroxides, and
other alkaline substances in the water. TA can be
considered a “pH buffer”. It is the measure of the
ability of the water to resist changes in pH level.
Calcium hardness (CH) is a measure of the total
amount of dissolved calcium in the water. Calcium
helps control the corrosive nature of the spa’s water
and is why soft water is not recommended. The low
calcium content of soft water is very corrosive to the
equipment and can cause staining of the spa shell.
The recommended total alkalinity is 80 - 120
ppm.
If the TA is too low, the pH level will fluctuate widely
from high to low. Low TA can be corrected by adding
an alkalinity increaser
If the TA is too high, the pH level will tend to be too
high and may be difficult to bring down. High TA can
be corrected by adding an alkalinity decreaser.
When the TA is balanced, it normally remains stable,
although adding water with high or low alkalinity will
raise or lower the TA level.
The recommended calcium hardness is 150 200 ppm.
If the CH is too low, add a calcium hardness
increaser.
If the CH is too high, dilute the spa water with soft
water.
When the CH is balanced, it normally remains stable,
although adding soft water or very hard water will
raise or lower the CH level.
Balancing the pH
The pH level is the measure of the balance between acidity and alkalinity.
If the pH is too low, it can cause corrosion of metal fixtures and the heating element. Low pH can be corrected
by adding a pH decreaser.
If the pH is too high, it can cause scaling by allowing metals or minerals to form deposits and stain spa
surfaces. High pH can be corrected by adding a pH increaser
Ideal Water Chemistry
Ideal Range (ppm)
Testing For:
Minimum
Maximum
Total Alkalinity
80
120
Calcium Hardness
150
200
pH
7.2
7.6
2014 Portable Spa
www.calspas.com
LTR20141001, Rev. B
37
Sanitizers kill bacteria and other organic waste by breaking them down to nonharmful levels and are filtered out. Before you fill your spa, you need to decide
which chemical sanitizer you wish to use. Consult your Cal Spas dealer for the
right decision with regards to your lifestyle and spa usage.
We recommend either bromine or chlorine as your sanitizer. Both work well
when maintained regularly.
Do not use a sanitizer
with the Cal Clarity II
bromine generator. See
page 40 for instructions
on its use.
DO NOT use trichlor. Trichlor is very acidic and the hot temperature of the spa causes it to
dissolve too quickly. It will cause damage to your spa and will void your warranty.
Whichever plan you decide on, follow it completely and don’t take shortcuts. It will provide you with clean, safe,
clear spa water with a minimum of effort. Spa owners with an ozonator still need to use a chemical sanitizer.
See page 39 for a description of how the ozonator works.
Using Chlorine as a Sanitizer
If you choose to use chlorine as a sanitizer, only use
granulated chlorine, not liquid chlorine.
Shocking the Water
Once a week, check the chlorine level using either
a test strip or a reagent kit. See the table on the
following page for the ideal range.
In addition to using a chemical sanitizer, you will
periodically need to shock the water. Shocking the
water helps remove burned-out chemicals, bacteria,
and other organic material from your spa’s water
and improves your sanitizer’s effectiveness.
Add one or two tablespoons granulated chlorine to
the spa water weekly. Note that chlorine dissipation
rate will be faster at higher water temperatures and
slower at lower temperatures.
Do not use chlorinating shock, which will damage
your spa’s jets and pump seals. Only use an oxidizer
shock. It can be used with either chlorine or bromine
sanitizers.
When you add chlorine, open all of the jets and run
the spa at high speed with the cover open for at
least 30 minutes.
Add one ounce of oxidizer shock once a week, after
heavy bather loads, or if water has a strong odor.
Follow the maintenance schedule on page 42.
Using Bromine as a Sanitizer
Bromine is a very effective sanitizer that produces
low chemical odors. Unlike chlorine, it can break
down bacteria and other impurities to a safe level
with a low burn-out rate.
Bromine is available in both granulated and tablet
form. Use granulated sodium bromide to establish
your bromine base. Use tablets to maintain it.
When you begin with fresh water, add 2 ounces of
granulated bromide. Open all of the jets and run the
spa at high speed with the cover open for at least
30 minutes. This is your base bromine level as the
tablets will take a while to dissolve.
Place three or four bromine tablets in your chemical
floater.
Follow the maintenance schedule on page 42.
Spa must be running with all of the jets on high for
30 minutes with the cover open. If necessary, repeat
oxidizer shock in 30 minute intervals.
Do not use shock with the Cal Clarity
II bromine generator. See page 40 for
instructions on its use.
Testing For:
Ideal Range
(ppm)
Minimum Maximum
Chlorine level
Without ozonator
3.0
5.0
With ozonator
2.0
4.0
Without ozonator
6.7
11.0
With ozonator
5.7
10.0
Bromine level
2014 Portable Spa
LTR20141001, Rev. B
www.calspas.com
Water Clarity
Sanitation
Water Clarity
38
Bather Load
“Bather Load” is the term used to describe the number of people using a spa, combined with the length of
usage, and the frequency of usage. All these factors have a great effect on the spa water. The higher the bather
load, the more chemicals need to be added and a longer filtration time will be needed.
Recommendations are designed for spas with average bather load (3 to 4 people, 15 minutes of usage, three
times a week at 100 degrees) If your bather load exceeds these guidelines, and you experience water quality
problems, increase the amount of filtration first, (go to the next higher filtration number) then if water quality is
still not adequate, consult the advice of your Cal Spas dealer for additional chemical or system recommendations.
Be sure to give them your bather load information.
Filter Cleaning
The filter is the part of your spa that removes the debris from the water and needs to be cleaned on a regular
basis to maximize your spa’s filtering performance and heating efficiency.
In addition to spraying off the filter weekly to remove surface debris, your filter should be deep cleaned
periodically to dissolve scale and particles that get lodged deep within the filter fibers and impede the filtration
process. Even if the filter looks clean, scale and particles can clog the fibers and prevent water from flowing
through the filter resulting in the most common spa problem—no heat, caused by a dirty filter.
We recommend you clean your filter once a month and replace it once a year or as necessary.
It is extremely important that you never run the spa without a filter. There is a possibility that
debris may be sucked into the plumbing through the filter well.
Set the spa in Hold Mode before you remove the filter. Hold Mode pauses all spa operations for
60 minutes for service functions like cleaning or replacing the filter. See page 19 or page 28 for
instructions on using Hold Mode.
Cleaning the filter
1. Remove the filter by unscrewing it and pulling it up and out.
2. Place the dirty filter into a bucket of water deep enough to cover the filter. Add 8 oz of liquid filter cleaner
to the bucket of water.
Note: It is a good idea to keep a spare filter to use in the spa while the dirty filter is being deep cleaned.
This way, you can rotate the filters and both will last longer.
3. Soak the filter for a minimum of 24 hours.
4. Spray the filter with a water hose. Spray each pleat carefully.
5. Reinstall the filter. Do not overtighten.
2014 Portable Spa
www.calspas.com
LTR20141001, Rev. B
39
The Pure Cure™ water sanitizer is an optional water purification system installed at the factory. It eradicates
germs in the water that are resistant to chlorine-based chemicals using high intensity UV light. Although the water
sanitizer works automatically with your spa, you will still need to test for chlorine or bromine and occasionally
replenish it to return the sanitizer level to the baseline.
For spas without a circulation pump, pump 1 will run at low speed and the water sanitizer will run during
filtration.
For spas with a circulation pump, the water sanitizer will run with the circulation pump.
The spa’s control system is factory-programmed with one filter cycle that will run in the evening when energy
rates are often lower. The time and duration of the filter cycle can be set according to your needs. In addition,
a second filter cycle can be enabled. Filtration time may need to be increased with heavy bather load.
See instructions for setting filtration cycles on page 20 or page 28.
The water sanitizer is virtually maintenance-free. Once a year the UV light needs to be replaced. See page
48 for instructions. However, the water sanitizer is not a user-serviceable item and maintenance
must be performed by a spa technician. Have your service technician consult the manufacturer’s
instruction and service manual.
Ozonator
The ozone generator releases ozone into the spa water. You will still need to test for chlorine or bromine and
occasionally replenish it to return the sanitizer level to the baseline.
For spas without a circulation pump, pump 1 will run at low speed and the ozonator will run during filtration.
For spas with a circulation pump, the ozonator will run with the circulation pump.
The spa’s control system is factory-programmed with one filter cycle that will run in the evening when energy
rates are often lower. The time and duration of the filter cycle can be set according to your needs. In addition,
a second filter cycle can be enabled. Filtration time may need to be increased with heavy bather load.
See instructions for setting filtration cycles on page 20 or page 28.
2014 Portable Spa
LTR20141001, Rev. B
www.calspas.com
Water Clarity
Pure Cure™ Water Sanitizer
Water Clarity
40
Cal Clarity II Bromine Generator
The Cal Clarity II bromine generator automatically generates and releases free bromine into the spa water. You
will still need to test for bromine and occasionally adjust it to return the bromine level to the baseline.
Starting the Spa with Fresh Water
This applies to spa owners with the Cal Clarity II bromine generator ONLY.
Prior to filling a spa for the first time, or after
a routine draining, you will want to follow
this start-up plan to extend water life
and performance.
1. Fill the spa to the proper water
level with normal tap water. (Do
not use soft water.) See page
12 for filling instructions.
2. Turn on the spa and allow it to
prime. See page 14 for priming
instructions.
3. Turn on the jets.
4. Press the Boost button to turn on
the Cal Clarity II system. The red ON
light should appear steady. If it blinks,
make sure the jets are running.
5. Press and hold the Prog button for two seconds.
When the flashing number appears, press
the Prog button a second time. An animation
will appear, then a number showing the total
dissolved solids (TDS) level will be shown.
6. Add Bromicharge™ to the spa water. Use the
table below to determine how much you should
use.
7. Let the spa run for 15 minutes. Leave it
uncovered during this time.
Spa Capacity
Amount of
BromiCharge™
Gallons
Liters
Pounds
Kilograms
300
1135
3.6
1.6
400
1515
4.8
2.2
450
1700
5.4
2.5
500
1890
6
2.7
Use 1.2 lbs. per 100 gallons, or .5 kg per
378 liters.
8. Check the TDS level again (described in step 5).
9. Set the Maintenance level. Press and hold the
Prog button for two seconds. A number will flash
showing the Maintenance Mode bromine level.
Press the UP or DOWN buttons to raise or lower
it. Press the Boost button to return Maintenance
Mode.
Use the table below to determine which level to
start at.
Spa capacity
Gallons
Liters
Maintenance level
300 - 400
1135 - 1515
10
400 - 500
1515 - 1890
15
> 500
> 1890
20
10. Put cover on spa and let spa run for 24 hours to
allow it to heat to desired temperature.
11. After 24 hours, check TDS level again (as described
in step 5). TDS should be between 3 - 5 ppm. If it
is too low, raise it in increments of 5 (as described
in step 9).
2014 Portable Spa
www.calspas.com
LTR20141001, Rev. B
41
Operating Modes
Before entering the spa, the bromine level should
be tested. The bromine generator can only produce
bromine when:
Maintenance Mode
Maintenance Mode is the “everyday” mode and is
automatically on when the system is activated. Its
primary function is to keep the bromine level at a
stable and acceptable range when the spa is not
being used.
•
the spa is running,
•
Bromicharge™ has been added, and
•
the bromine generator is in the proper mode.
1. ON / Maintenance Mode
Press the Boost button briefly while the jets are
running. The system will activate in Maintenance
Mode and the word ON will appear on the display.
2. Adjusting the Maintenance Mode
To adjust the Maintenance Mode bromine level, press
and hold the Prog button for two seconds. A number
will flash showing the Maintenance Mode bromine
level. Press the UP or DOWN buttons to raise or
lower it. After seven seconds, the number will stop
flashing, meaning the bromine level is active. Press
the Boost button to return Maintenance Mode.
3. Boost Mode
The Boost Mode is used each time you use the spa.
Press the Boost button once to activate the Boost
Mode. A number with a dash before and after it
will flash for about five seconds showing the boost
level. This number corresponds to the number of
bathers. While the number is flashing, press the UP
or DOWN buttons to raise or lower it. When the
number stops flashing, the system will remain in
Boost Mode.
4. Using the Diagnostic Mode
Press and hold the Prog button for two seconds.
When the flashing number appears, press the Prog
button a second time. An animation will appear, and
within 10 seconds the TDS level will be shown.
5. Turning OFF
Press and hold the Boost button for two seconds.
The system will shut off and the word OFF will
appear on the display.
Adding BromiCharge™ to the Water
BromiCharge™ is the chemical additive used with
the Cal Clarity II. It can be added anywhere in the
spa by simply pouring it from the container. Do not
breathe or get into your eyes.
Boost Mode
Use the Boost Mode each time you use the spa.
Boost Mode increases the bromine generation rate
to attack pollutants in the water. Activating the
Boost Mode when you enter the spa will prevent
inadequate bromine levels and will regenerate your
bromine to the proper residual level.
Diagnostic Mode
The Diagnostic Mode indicates the Bromicharge™
salt level of your spa. This is a useful tool when
adding BromiCharge™ to the water. Keep the TDS
level indicators in the green zone and value between
11 and 14 for optimal performance.
Testing the Water
In addition to testing the water for levels of calcium,
alkalinity, and pH, you also need to test for bromine
and total dissolved solids (TDS).
See page 36 for instructions on testing the water
and for Ideal Water Chemistry levels.
The bromine level should be maintained between
3-5 ppm and can be tested with a DPD test kit, or
bromine test strips, found at any spa/pool store.
If the bromine generator does not produce enough
bromine, make sure the recommended level of 1440
ppm of Bromicharge™ salt is still present in the spa
water. The bromine generator can test the water
using the Diagnostic mode. This is described in the
“Operating Modes” section above.
If the bromine level is too high, remove a small
amount of spa water until the bromine level is
between 3-5 ppm. For more immediate results,
dilution with fresh water will lower the bromine
level.
Ideal Range
Minimum
Maximum
1300
1600
Bromine (ppm)
3
5
TDS level
11
14
BromiCharge™ (ppm)
2014 Portable Spa
LTR20141001, Rev. B
www.calspas.com
Water Clarity
Cal Clarity II Settings
Water Clarity
42
Maintenance Schedule
Each time you refill the spa
Follow the section “Filling and Powering Up Your Portable Spa” on
page 12.
Prior to each use
Test the spa water using either test strips a reagent test kit. Adjust
chemical levels as necessary.
Once a week
Test the spa water using either test strips a reagent test kit. Adjust
chemical levels as necessary.
If your water source is high in calcium, add stain and scale
preventer.
Once a month
Deep clean your spa’s filter. (Follow filter cleaning instruction at
beginning of this section)
Every two to four months
Change the spa water. How often you change the water depends
on how much you use the spa. When you change the water, you
will need to:
Once a year
•
Clean and polish the acrylic surface (see page 47)
•
Clean and treat the spa cover and pillows (see page 44)
•
Deep clean the filter (see page 38)
•
Refill your spa (see page 12)
Replace filter cartridges if the pleats appear frayed.
If you use the Cal Pure UV water sanitizer, you will need to replace
the UV lamp (see page 48 for UV lamp maintenance)
2014 Portable Spa
www.calspas.com
LTR20141001, Rev. B
43
Water Clarity
Troubleshooting Water Clarity Problems
Problem
Cloudy Water
Probable Causes
Possible Solutions
•
Dirty filter
•
Clean filter
•
Excessive oils / organic
matter
•
Shock spa with sanitizer
•
Improper sanitization
•
Add sanitizer
•
Suspended particles /
organic matter
•
Adjust pH and/or alkalinity to recommended
range
•
Overused or old water
•
Run jet pump and clean filter
•
Drain and refill the spa
•
Excessive organics in water
•
Shock spa with sanitizer
•
Improper sanitization
•
Add sanitizer
•
Low pH
•
Adjust pH to recommended range
•
Chloramine level too high
•
Shock spa with sanitizer
•
Low pH
•
Adjust pH to recommended range
Musty Odor
•
Bacteria or algae growth
•
Shock spa with sanitizer – if problem is
visible or persistent, drain, clean and refill
the spa
Organic buildup /
scum ring around
spa
•
Buildup of oils and dirt
•
Wipe off scum with clean rag – if severe,
drain the spa, use a spa surface and tile
cleaner to remove the scum and refill the spa
Algae Growth
•
High pH
•
Shock spa with sanitizer and adjust pH
•
Low sanitizer level
•
Shock spa with sanitizer and maintain
sanitizer level
•
Low pH
•
Adjust pH
•
Low sanitizer level
•
Shock spa with sanitizer and maintain
sanitizer level
•
Unsanitary water
•
•
Free chlorine level above 5
ppm
Shock spa with sanitizer and maintain
sanitizer level
•
Allow free chlorine level to drop below 5 ppm
before spa use
•
Total alkalinity and/or pH
too low
•
Adjust total alkalinity and/or pH
•
High iron or copper in
source water
•
Use a stain and scale inhibitor
•
High calcium content in
water – total alkalinity and
pH too high
•
Adjust total alkalinity and pH – if scale
requires removal, drain the spa, scrub off the
scale, refill the spa and balance the water
•
Use a stain and scale inhibitor
Water Odor
Chlorine Odor
Eye Irritation
Skin Irritation / Rash
Stains
Scale
2014 Portable Spa
LTR20141001, Rev. B
www.calspas.com
Cleaning and Maintenance
44
Cleaning and Maintenance
Removing and Reseating the Pillows
You can remove the pillows for
cleaning and maintenance quickly and
easily. This method works for all types
of pillows.
Grab the lower edge of the pillow with
both hands firmly and pull up. As you
do this, the pillow inserts will pop out
of the holes.
Reseat the pillows by aligning the pillow
inserts with the holes and striking the
pillow hard enough to insert the pegs
back into the holes.
Jet Removal and Replacement
Jets can be easily removed for cleaning.
Grasp the outer rim of the jet and turn
it counter-clockwise. The jet will unscrew
from the fitting until it is free.
To replace the jet, place it in the fitting
and turn it clockwise until it is snug in
place. Do not overtighten the jet.
Spa Cover
Important! Keep the spa covered when not in use!
•
•
•
•
Covered spas will use less electricity in maintaining
your set temperature.
Covering your spa will protect your spa’s finish
from the sun’s ultraviolet rays.
You are required to keep the spa covered to
maintain warranty coverage.
Covering your spa helps prevent children from
drowning in the spa.
See the manual enclosed with your cover for
instructions on mounting the locks and how to lock
and unlock the cover.
In addition, while the spa cover is rigid, it is not
designed to support any weight. Therefore, as a safety
precaution and to preserve the life of your cover, you
must not sit, stand, or lie on it, nor should you place
objects of any kind on top of it.
2014 Portable Spa
www.calspas.com
LTR20141001, Rev. B
45
Your spa should be drained every four to six months, and refilled with fresh tap water. The following is the
recommended method for draining your spa.
For spas with cabinet mounted drain:
1. Turn off the power at the breaker.
2. Remove all filters.
3. Pull the knob out about 5cm until it snaps into
place.
4. Unscrew the cap.
6. Place the other end of the garden hose where
you would like the water to drain to.
7. Pull the hose outward about 1.5cm to start water
flow. Push inward to shut off water flow.
5. Hook up the female end of a garden hose to the
drain fitting.
8. Let spa drain completely.
9. Push the hose inward about 1.5cm, then remove
the garden hose.
10. Replace the cap.
11. Push the knob in about 5cm until it snaps back
into place.
2014 Portable Spa
LTR20141001, Rev. B
www.calspas.com
Cleaning and Maintenance
Draining Your Portable Spa
Cleaning and Maintenance
46
For spas with drain inside the spa:
1. Turn off the power at the breaker.
2. Remove all filters.
3. Using a Phillips screwdriver, remove the screws to
the access panel and open it.
4. Locate hose ending with the ¾” hose-bib fixture.
5. Unscrew the cap.
6. Hook up the female end of a garden hose to the
drain fitting.
7. Place the other end of the garden hose where you
would like the water to drain to.
8. Turn the valve on the hose-bib fixture to open the drain.
9. Let spa drain completely, then remove garden hose.
10. Turn the valve on the hose-bib fixture to close the drain.
11. Replace the cap.
Winterizing (Cold Climate Draining)
In many areas of the country, the temperature drops below 0°C (32°F). We recommend that you always have
your spa full of water and running at normal spa temperatures (26.7°C to 37.8°C or 80°F to 100°F). This will
help reduce the risk of freezing in your spa and your spa’s equipment.
Warning: If you find the need to drain your spa, be aware of the potential of freezing in your
spas equipment and plumbing. Even if the directions below are followed perfectly, there is no
guarantee that your spa will not suffer freeze damage.
Freeze damage is not covered by your warranty.
1. Open all filter covers.
2. Remove the filter baskets and filters.
3. Drain your spa completely as described in the instructions
above.
4. Vacuum water from the spa’s main drain fitting with a wet/
dry vacuum.
5. Remove drain plugs from the front of the pumps.
6. Disconnect the unions from both sides of the pump.
7. Blow any remaining water out of the jets and equipment
area with the wet/dry vacuum.
8. Cover your spa with a good spa cover and an all-weather
tarp to ensure that neither rain nor snow enters the spa.
NOTE: All manifolds are plumbed in series directly to the main drain (see example at right), making it easier to
remove water and reducing the possibility of freeze damage.
2014 Portable Spa
www.calspas.com
LTR20141001, Rev. B
47
Filtration is one of the most important steps you can take to ensure clean, clear water. It is far less expensive to
fix water clarity problems by filtering your spa than by using excessive amounts of chemicals, excessive filtration
times, or by water replacement.
See the section “Filter Cleaning” on page 38 for more information.
Vacation Care
You can leave your spa unattended for up to two weeks if you follow these instructions.
ALWAYS lock your cover using the cover locks if you plan to be away from home and the spa is
filled with water.
1. Select the Low Range temp choice used for vacation mode. (See instructions on page 17 or page 27 for
vacation setting.)
2. Following the water quality instructions starting on page 36, adjust the pH.
3. Shock the water (add either chlorine or bromine sanitizer).
4. When you return, check and adjust the pH and shock the water.
If you will not be using your spa for longer than 14 days and a spa maintenance service is not available, we
strongly recommend you drain or winterize your spa.
Cleaning Your Spa
Spa Cover and Pillows
Due to the constant punishment your spa cover and pillows receive, you should protect them by applying
a vinyl and leather cleaner as part of your monthly maintenance plan. Use a product that is specifically
designed to protect spa covers and pillows from chemical and ultraviolet light damage without leaving an
oily residue behind that is normally associated with common automotive vinyl protectants.
Warning: Do not use automotive vinyl protectants on spa covers or pillows. These products are generally
oil-based and will cause severe water clarity issues that are difficult to correct.
Spa Shell
Each time you drain your spa, before you refill it you should clean your spa shell with an all-purpose cleaner
and apply a coat of surface protectant.
Use a low detergent, non-abrasive cleaner specifically formulated to clean the spa without damaging its
acrylic finish.
Use a non-oil based surface protectant that is specifically formulated to protect the spa’s finish from the
chemicals and minerals associated with normal spa use.
2014 Portable Spa
LTR20141001, Rev. B
www.calspas.com
Cleaning and Maintenance
Cleaning and Replacing the Filter
Cleaning and Maintenance
48
Changing the UV Lamp
CAUTION: Always turn off power to the spa at the RCD prior to any
maintenance.
Note: Periodically you should the check the light on the transformer for the UV light system. The transformer is
mounted in the spa equipment area in a water resistant enclosure with a door. When it is operating normally,
the light will be green. When it requires maintenance, it will be red. This usually happens when the UV lamp
needs replacing. The UV lamp is a wearable part that needs replacing about once a year.
1
Water-proof strainer
To remove the UV lamp
1. Disconnect power.
2
Aluminum nut
3
Lamp socket and lead wire
2. Turn water off and open down stream of system to relieve pressure.
4
Germicidal UV lamp
3. Remove the water-proof strainer (1) and unscrew the aluminum nut
(2).
5
Rubber O-ring
6
Quartz thimble
4. Pull out the lamp (4) approximately 2” from the chamber (7).
7
Chamber
5. While holding the lamp end, remove the lamp socket (3) from the end
now exposed.
8
Clip
9
Ballast
6. Remove the lamp from the chamber.
7. Remove the O-ring (5) from the end of the quartz thimble (6).
See page 64 for part numbers for
replacement parts.
8. Remove the quartz thimble.
To reinstall the replacement UV lamp, follow these steps in reverse.
When replacement UV lamp has been installed, conduct a final leak check:
1. Restore power to the spa at the RCD.
2. Turn on the pump and let water run for five minutes to check for leaks.
2014 Portable Spa
www.calspas.com
LTR20141001, Rev. B
Using the Entertainment System
The instructions contained in this manual describe
only basic functions. See the manufacturer’s operating
instructions for other features and functions. We
strongly recommend that you read the manufacturer’s
instructions prior to operating this unit.
Observe the following
entertainment system:
precautions
for
your
•
Make sure that hands are dry before coming in
contact with this or any electronic option.
•
Always close the protective door.
Although the marine grade entertainment system is
encased in a plastic housing with weather seals, the
system is water resistant and NOT waterproof.
You must take every precaution to keep this system
dry!
Water damage is not covered by Cal Spas or the
manufacturer’s warranty.
Aquatic AV AQ-DM-3B Media Locker
The Aquatic AV docking station has very basic features. It will play any audio device with a 3.5mm headphone
plug. This device does not use a remote and does not offer Bluetooth connectivity.
The device requires a short connector (NOT PROVIDED) with two 3.5mm
connector jacks that attach from your audio device to the inside of the
locker.
Power button
To open the locker, slide the latch up to unlock
the door.
Press the power button inside the locker. The red
LED will turn on.
Plug a 3.5mm connecter into your audio device
and to the inside of the locker.
3.5mm audio jacks
NOTE: This connector is NOT provided
with the Aquatic AV locker.
Use the Velcro strap to keep your device
secure inside the locker while it is in use.
While your audio device is in the locker, close
the door and slide the lock to keep it secure
and water tight. If this is done properly, it
will protect your audio device.
The front panel has basic controls for
controlling the audio only. All other functions,
such as track selection, must be controlled
from your audio device.
Volume
UP
Volume
DOWN
2014 Portable Spa
LTR20141001, Rev. B
www.calspas.com
Using the Entertainment System
Some spas may be equipped with an optional
entertainment system. Each spa equipped with an
audio/visual system is delivered with the manufacturer’s
operating instructions in a clear plastic bag.
49
Using the Entertainment System
50
Aquavibe MD-350 Docking Station
The Aquavibe docking station can be used with an iPhone, iPad, any device with a 3.5mm audio output
(headphone jack), or any Bluetooth capable device. These instructions contain brief descriptions of commonly
used features and functions. For more in-depth information on the Aquavibe MD-350, see the user’s manual
that was included in the docking station.
Pairing the Remote Control
1. Press and hold the MODE button
on the remote control until “PAIR”
appears in its display.
2. While still holding the MODE
button on the remote control,
press the RESET button in
the interior of the waterproof
compartment.
RDM
TRACK
RPT
MODE
VOL
SEL
Reset
Hold
Charge Only
Aux In 1
RDM
RPT
SEL
VOL
MODE
3. If the pairing is successful, the
dock will restart and “PAIR” will
disappear from the remote’s
display. Release the MODE button
on the remote control.
VOL
iPHONE or iPOD
1. Open the waterproof door and pull out the 30-pin connector.
2. Plug the connector into the Apple device.
RDM
MODE
RPT
SEL
3. Secure the Apple device with the mounting straps.
4. Close the waterproof door.
Aux In 1
Charge Only
5. Press the MODE button until “IPOD” appears in the display.
6. Use the controls on the locker door the operate the iPod
functions.
The unit will automatically switch to the “IPOD” mode when
the IPHONE or IPOD is initially connected to the 30-pin connector.
If your Apple device uses a lightning connector, a lightning
adapter will plug into the 30-pin connector and will allow you
to operate the device normally.
If you use the USB cable that came with your Apple device and
plug it into the Charge Only socket, it will only charge the Apple
device. It will not control the device.
30-Pin
Connector
You can also use the Aquavibe remote to
operate the Apple device. See remote operation on the next page.
2014 Portable Spa
www.calspas.com
LTR20141001, Rev. B
51
1. Open the waterproof door and plug a 3.5mm cable (not
supplied) into the docking station and then into the device.
3.5mm
Cable
RDM
MODE
SEL
RPT
2. Plug a USB cable (not supplied) into the docking station and
then into the device.
Charge Only
Aux In 1
3. Secure the device with the mounting straps.
USB
Cable
4. Close the waterproof door.
5. Press the MODE button until “AUX IN1” appears in the
display.
6. Use the controls on the entertainment center to adjust the
volume.
The USB cable does not have to be connected for proper operation. Connecting the USB cable will only charge the device. No
data transfer will occur. If cables are not being used,
remove the cable from the waterproof compartment.
The unit will not automatically switch to “AUX IN1”
NOTE: These connectors
mode when the device is initially connected to the
are NOT provided with
3.5mm cable. Select “AUX IN1” using the MODE butthe Aquavibe locker.
ton. The entertainment center will not control the
device. It just allows for the audio from the device
to play through the entertainment center.
USB cable for your
phone or audio
player
3.5mm audio jacks
Pairing Bluetooth Devices
1. Open the Bluetooth setup program on the mobile
device and activate the Bluetooth feature.
2. Press the
center.
button to turn on the entertainment
3. From you mobile device scan for available devices.
Select ”AQUAVIBE” to connect to the unit.
4. When the mobile device has been paired
appear in the entertainment center’s display.
TRACK
MODE
Aux In 1
VOL
SEL
Charge Only
will
5. Press the MODE button until “BT AUDIO” appears in
the display. Bluetooth audio from your mobile device
can now be played through the entertainment center.
Note 1: A previously paired Bluetooth mobile device will
automatically connect to the entertainment center when
“BT AUDIO” is selected using the MODE button (if it is
within range).
Note 2: If the Bluetooth mobile device is already paired
with the entertainment center, select “AQUAVIBE” on your
phone and touch “Connect”.
Display
2014 Portable Spa
LTR20141001, Rev. B
www.calspas.com
Using the Entertainment System
Using a Device with 3.5mm Audio Output
Keeping Fit With Your Swim Spa
52
Keeping Fit With Your Swim Spa
Jetstream Propulsion System
Use the control panel to start and stop the Jetstream Propulsion
System. The Jets and Aux buttons control the top and bottom jets.
Use the air venturi valves to inject air in the
water streams.
Assembling the Swim Tether
The swim tether pole has three pieces and assembles easily. Slide the ends of the top and
middle sections into the middle and bottom sections as shown at right.
Insert the tether in the anchor hole when you are ready to use it.
Buckle the strap around your waist. It is easily adjustable and can accommodate most sizes.
2014 Portable Spa
www.calspas.com
LTR20141001, Rev. B
53
Using the Exercise Equipment
This equipment attaches to the exercise anchors located on the spa walls.
Connecting the Exercise Equipment
The drawings below show different ways the exercise kit can be connected depending on the exercises you
wish to do.
For 12 and 14 foot spas:
For 16 and 17 foot spas:
The exercise kit for 12 and 14 foot spas contains:
The exercise kit for 16 and 17 foot spas contains:
•
•
•
•
•
•
•
•
•
•
•
•
Two
Two
Two
Two
Two
Two
hand grips
ankle braces
6” elastic bands
18” elastic bands
25” elastic bands
rowing bars
When attaching the
rowing bar, place the
hook into the eye pad
as shown.
Two
Two
Two
Two
Two
Two
6” bands with
hand grips
hand grips
ankle braces
18” elastic bands
25” elastic bands
56” elastic bands
rowing bars
56” bands
with hand grips
18” band
Elastic bands attach
to the eye pad as
shown.
25” bands
25” bands
18” band
All elastic bands can be connected to
the end of the spa and used with
either hand grips or ankle braces.
All elastic bands can also be used with
either hand grips or ankle braces.
2014 Portable Spa
LTR20141001, Rev. B
www.calspas.com
Keeping Fit With Your Swim Spa
IMPORTANT: Always consult your physician before starting any exercise activity or program. The Ultimate
Fitness series spas feature rubber exercise bands. When stretched, these bands create a high tension
condition. Improper use or failure to connect the exercise bands properly may cause injury. Always inspect all
of the exercise equipment prior to beginning any exercise. Do not use any damaged equipment.
Appendix
54
Appendix
Replacement Parts
Please visit www.quickspaparts.com
to order your replacement parts.
Note: All Cal Spa models use screw-in jet inserts where
removable jets are used. (The River Jet and Old Faithful
jets do not have removable jet inserts.)
Jets
Jets
ELE 2” Euro No Eyeball
MM 3” Mini Storm Massage
PLUCS2295021SL
PLUCS2297061SL-8
ED 2” Euro Directional
PLUCS2295051SL
MFD 3.5” Maxi Jet Directionsl
PLUCS2295091SL
NJD 2” Directional Neck Jet 100% Shut Off
PLUCS2255041SL
PSD 5” Power Storm
MED 3” XL Cluster Storm Directional
PLUCS2295131SL
PLUCS2295031SL
mfd 3” Micro Jet Directional
PLUCS2295061SL
PSR 5” Power Storm Riffed
PLUCS2295141SL
2014 Portable Spa
www.calspas.com
LTR20141001, Rev. B
55
Appendix
Jets
Pillows
PST 5” Power Storm Wagon Wheel
PLUCS2295191SL
Cascade Pillow No
Insert Black
ACC01401031
T 5” Tornade Adjustable
PLUCS2295201SL
Infinity Pillow
Ribbed Black
ACC01401051
Infinity Pillow Plain
Black
ACC01401061
River Jet Assembly Black 210-5101CS
PLU210-5101SCS
Water Diverter Valves
Diverter Valve 2” with
Swoosh Logo Black
(CS6003038-1)
PLU21300461
Diverter Valve 1” with
Swoosh logo Black
(CS6004231)
Old Faithful Jet Black
PLU21300451
PLU21703739
Diverter Valve 1½” On/
Off ASSY (600-4601)
PLU21100045
2014 Portable Spa
LTR20141001, Rev. B
www.calspas.com
Please visit www.quickspaparts.com
to order your replacement parts.
Appendix
56
Air Control Valve
Weir Skimmers
Air Control with Swoosh
Logo Black CS6603508-1
Weir Skimmer Gate
Large Black
PLU21300501
PLU21600294
Waterfalls
Waterfall 12-3/8”
W/ Logo, LED
(Round) Textured
(CS675952T8L-1) ‘14
Filters
All filters are anti-bacterial threaded cartridges.
25 Sq Ft
50 Sq Ft
75 Sq Ft
FIL11100303
FIL11100202
FIL11100212
PLU21800828
Waterfall 123/8” No Logo, LED
(Round) Textured
(CS675953T8L-1) ‘14
PLU21800829
Hydro Stream Waterfall
PLU21800623
Pure Cure™ UV Water Sanitizer
Pure Cure complete
system
Drains
Drain Super Hi Flo Suction
2½” Black (640-3581LGV)
PLU21400146
LIT16000380
Germicidal UV lamp
(T515)
LIT16000381
Low Profile Drain ¾” Black
(640-0511)
Rubber O-ring
(D24.5)
PLU21400401
LIT16000384
Bottom Drain Filtration
Return Assembly
PLU21400215
Quartz thimble
(24.5X350)
LIT16000383
Ballast (UV-3)
LIT16000382
Weir Skimmers
Weir Skimmer Gate
Small Black
PLU21600284
2014 Portable Spa
www.calspas.com
LTR20141001, Rev. B
Please visit www.quickspaparts.com
to order your replacement parts.
Appendix
Pure Cure™ UV Water Sanitizer
LED Lights
Clips
LED Light, 12 LED
LIT16000385
LIT16100206
Lights
Light Assembly Complete
LIT16000150
Exercise Equipment
Exercise Kit for 16 Foot and
17 Foot Spas
EXC12000007
Light Mini 2” Diameter
LIT16000151
Exercise Kit Attachment
Plate
EXC11000065
LED Lights
Small Controller Daisy
Chain
LIT16100218
Replacement Cabinet Panels
The complete selection of replacement cabinets for
all models is very extensive and too lengthy for this
owner’s manual. To order replacement panels for
your spa, visit www.quickspaparts.com.
Large Controller
LIT16100241
Quad LED Daisy Chain
Assembly
LIT16100211
Dual LED Daisy Chain
Assembly
LIT16100212
7 LED 2” Light Daisy Chain
with Stand-Off
LIT16100214
2014 Portable Spa
LTR20141001, Rev. B
57
www.calspas.com
Please visit www.quickspaparts.com
to order your replacement parts.
Appendix
58
Covers
All spa covers are designed with a tapered height, angling
downward from the center to the sides to drive off rain and prevent
water from pooling.
Basic
4” - 2.5”
1.0 Lb. foam
Covers - all sizes except 7 foot and 8
foot spas
The covers listed below are filled with either 1 lb. or 1.5 lb. foam.
Size
54” x 78”
64” x 84”
Fits spa models
Z-524L
Z-536L
Z-536L-VP
Type
Basic
Basic
Basic
72” x 72”
triangle
Z-628T
Standard
76” x 84”
78” x 84”
78” round
93” x 130”
Z-630B
Z-630L, Z630B
Z-630L-VP, Z630B-VP
Z-515R
P-970N
Basic
Basic
Basic
Standard
Standard
4” - 2.5”
1.5 Lb. foam
Part numbers
Gray
COV5478BAS42G1.0
Slate
COV5478BAS42S1.0
Black
COV5478BAS42B1.0
Gray
COV6484BAS42G1.0
Slate
COV6484BAS42S1.0
Black
COV6484BAS42B1.0
Gray
COV7272TRBAS42G1.0
Slate
COV7272TRBAS42S1.0
Black
COV7272TRBAS42B1.0
Gray
COV7272TRSTD53G1.5
Slate
COV7272TRSTD53S1.5
Black
COV7272TRSTD53B1.5
Gray
COV7684BAS42G1.0
Slate
COV7684BAS42S1.0
Black
COV7684BAS42B1.0
Gray
COV7884BAS42G1.0
Slate
COV7884BAS42S1.0
Black
COV7884BAS42B1.0
Gray
COV78RDBAS42G1.0
Slate
COV78RDBAS42S1.0
Black
COV78RDBAS42B1.0
Gray
COV93130STD53G1.5
Slate
COV93130STD53S1.5
Black
COV93130STD53B1.5
2014 Portable Spa
www.calspas.com
LTR20141001, Rev. B
Please visit www.quickspaparts.com
to order your replacement parts.
93” x 132”
93” x 171”
93” x 200’
Fits spa models
E-947E
FS-1420, FS-1439
FS-1640, FS-1770
Type
Standard
Standard
Standard
Part numbers
Gray
COV93132STD53G1.5
Slate
COV93132STD53S1.5
Black
COV93132STD53B1.5
Gray
COV93171STD53G1.5
Slate
COV93171STD53S1.5
Black
COV93171STD53B1.5
Gray
COV93200STD53G1.5
Slate
COV93200STD53S1.5
Black
COV93200STD53B1.5
2014 Portable Spa
LTR20141001, Rev. B
www.calspas.com
Appendix
Size
59
Please visit www.quickspaparts.com
to order your replacement parts.
Appendix
60
Covers - 7 foot and 8 foot spas
Seven foot and eight foot spa covers listed below are available
with the following tapers and foam densities:
Basic
10,25 cm - 6,25 cm (4” - 2.5”)
0,4 kg foam (1.0 lb)
Standard
12,75 cm - 7,6 cm (5” - 3”)
0,7 kg foam (1.5 lb)
Deluxe
12,75 cm - 7,6 cm (5” - 3”)
0,9 kg foam (2.0 lb)
Size
Fits spa models
Taper and type
Part numbers
Gray
Z-731L, Z-731B
Basic
Gray
C-750L, C-750B
C-750L-Lxi, C-750B-Lxi
Standard
E-758L, E-725B
Rust
Slate
Black
V-700L
P-760L, P-760B
Slate
Black
Z-731L-VP, Z-731B-VP
84” x 84”
(7 foot spas)
Rust
Gray
Deluxe
Rust
Slate
Black
Gray
Basic
93” X 93”
(8 foot spas)
V-800L
Slate
Black
C-850L, C-850B, C-850L-Lxi,
C-850B-Lxi
E-862, E-864L, E-864B
Rust
Gray
Standard
Rust
Slate
Black
P-860L, P-860B, P-880L,
P-880B
Gray
Deluxe
Rust
Slate
Black
2014 Portable Spa
www.calspas.com
LTR20141001, Rev. B
61
Symptom
Possible Causes
Possible Solutions
System / Power Problems
System does not work
Power is turned off
Reset spa
Control pad and spa
equipment do not
operate
No electrical power to spa
Turn on or reset the RCD breaker. If
this does not solve the problem, have a
qualified electrician check the electrical
service.
The 20 or 30A fuse, depending on
the system, has blown
Contact your dealer
Spa is trying to heat up
Check the temperature setting is in
Standard mode
Spa is in filter cycle
Normal. No adjustment necessary
Spa is in Standard mode
Check setting
Control panel displays
a message
An error may have has occurred
See Diagnostic Messages on page 22 or
page 29 for message code meanings
RCD breaker trips
repeatedly
Improper wiring to spa or RCD
breaker is defective
Consult with a qualified electrician
There is a defective component on
the spa
Contact your dealer
Heating mode not selected
See control panel instructions on pages
through
Water level is too low
Add water to correct level
No electrical power to spa
Turn on or reset the RCD circuit breaker.
If this does not solve the problem, have
a qualified electrician check the electrical
service.
Heater is defective
Contact your dealer
Gate valve is partially or fully closed
Open gate valves. Note: Never operate
your spa with the gate valves closed!
Thermostat has been turned down
Set control panel to a higher temperature
Insufficient filtration time
Increase filtration time
Water level is too low
Add water to correct level
No electrical power to spa
Turn on or reset the RCD circuit breaker.
If this does not solve the problem, have
a qualified electrician check the electrical
service.
Dirty filter cartridge
Clean filter cartridge
Gate valves closed
Open gate valves
Spa cover improperly positioned
Align spa cover
Filtration time is set too long
Reduce filtration cycles, especially during
summer months
The spa does not turn
off
Heat Problems
Spa does not heat
Spa gets warm but
does not get hot
Spa gets too hot
2014 Portable Spa
LTR20141001, Rev. B
www.calspas.com
Appendix
Troubleshooting
Appendix
62
Symptom
Possible Causes
Possible Solutions
Water Problems
Water is not clean
For all water clarity problems, see page 35.
High water
consumption
Very high evaporation or heavy
splashing
Use the cover and refill as necessary
Low water stream
from the jets
Running in FILTER mode - slow
speed
Select high speed jets
Block wall suctions or skimmer
Clean the wall suction/skimmer. Remove
blockage
Dirty filter
Clean filter and replace
Jets are closed
Open jets
Valves closed
Open valves
Pump has airlock
Remove airlock by priming spa (page 14)
Jets are closed
Open jets
Power switched off, system off
Reset power
Pump is defective
Contact your dealer
Pump fluctuations
Low water. Check level on skimmer flap
Check the connections and empty
the hoses
Close or turn off empty cycle if necessary
No water stream from
the jets
Water leakage from
below the spa
Water Pressure Problems
Jets surge on and off
Water level is too low
Add water to normal level
Jets are weaker than
normal or do not work
at all
Jet valves are partially or fully closed
Open jet valves
Filter cartridge is dirty
See Cleaning the Filter
Air is trapped in the pump
Open the air bleed valve on each pump’s
housing and allow air to bleed out of the
system. Be sure to tighten each air bleed
valve as soon as water starts to flow.
The suction fittings are blocked
Remove any debris that may be blocking
the suction fittings
Gate valve is closed
Open gate valves. Note: Never operate your
spa with the gate valves closed!
Air control not open
Open the control
Jet spout opening not fixed properly
Check jet spout openings
Jet spout opening missing
Check jets and replace as necessary
Light bulb has burned out
Replace light bulb
Lighting system is defective
Contact your dealer
Air and Jets Problems
No airstream from the
jets
Light Problems
Standard spa light does
not work
Pump Problems
2014 Portable Spa
www.calspas.com
LTR20141001, Rev. B
63
Possible Causes
Possible Solutions
Pump runs constantly –
will not shut off
Problem with circuit board
Contact your dealer
Noisy pump
Water level is too low
Add water to normal level
Block wall suctions or skimmer
Clean the wall suction/skimmer
Damaged or worn-out motor block
Contact your dealer
Clogged floor suction or skimmer
Clean floor suction or skimmer
Leakage of air into suction line
Contact your dealer
Debris is inside pump
Contact your dealer
Gate valves are closed
Open gate valves. Note: Never operate your
spa with the gate valves closed!
Damaged or worn motor bearings
Contact your dealer
Improper or defective wiring
Contact your dealer
Pump turns off during
operation
Automatic timer has completed its cycle Start the cycle again
Pump has overheated due to the vents
on the equipment door being blocked
Clear items away from vents
The pump motor is defective
Contact your dealer
Pump has a burning
smell while running
Damaged or worn motor bearings
Contact your dealer
Pump does not work
Power may be turned off
Reset power
Pump has over heated
Let cool for one hour
Incorrect or faulty wiring of electrical
supply
Contact your dealer
Switch is off
Auto reset after the motor has cooled down
House circuit breaker tripped or in OFF
position
Reset circuit breaker
Motor overload condition
Motor overload will reset automatically. If
problem persists, contact your dealer
Damaged electrical cord
Contact your dealer
Pump cord not plugged in
Plug pump cord into red receptacle
RCD tripped or in OFF position
Reset RCD
Contact your dealer
2014 Portable Spa
LTR20141001, Rev. B
www.calspas.com
Appendix
Symptom
Appendix
64
Limited Warranty
This Limited Warranty is extended to the original purchaser of a Cal Spa brand portable spa manufactured after
January 1, 2014 and installed for residential use outside the United States of America and Canada. This warranty
begins on the date of delivery of the spa, but in no event later than one year from the date of manufacture.
This warranty applies only to these spa lines:
Shell Structural
Warranted against water loss due to defects in the spa shell.
Shell Finish
Warranted against blistering, cracking, or delaminating of the interior
surface of the spa shell.
Pure Heat™ Heater
Warranted to be free from defects in materials and workmanship.
(Optional feature for Connect)
Equipment and Controls
Electrical equipment components – specifically limited to the pumps
and control system – are warranted against malfunctions due to
defects in workmanship or materials.
Plumbing
Warranted against leaks due to defects in workmanship or materials.
Cabinet - synthetic, fiberglass, or wicker
Warranted against defects in workmanship or materials. Normal wear and
weathering of the finish will occur naturally over time and are not defects.
Hercules™ Cabinets and panels
Lifetime guarantee against defects in workmanship or materials. Normal
wear and weathering of the finish will occur naturally over time and are not
defects. Applies to Patio series only.
Warranties for Other Components
The fuses, headrests, cabinet finish, and filters are
warranted to be free of defects in workmanship and
material at the time of delivery. The factory installed
Pure Cure water purification system is warranted
against malfunction due to defects in workmanship or
material for one year from the original date of delivery
except the UV bulb and quartz tube. The UV bulb
and quartz tube are warranted for ninety (90) days
from the original date of the spa delivery. All stereorelated components (receiver, speakers, sub-woofer,
stereo media locker, power supply, wireless remote
control etc.) are warranted against malfunction due to
defects in workmanship or material for one year from
the original date of delivery. All other factory-installed
components not mentioned specifically, including, but
Patio
Connect
Escape,
Platinum,
Fitness
5 years
5 years
7 years
3 years
5 years
5 years
N/A
5 years
5 years
3 years
3 years
5 years
3 years
3 years
5 years
1 year
1 year
3 years
Lifetime
guarantee
N/A
N/A
not limited to the wood frame, jets, diverter valves,
LED lighting systems, filter lids, and mechanical
components, are warranted against malfunction due
to defects in workmanship and material for two years
from the original date of delivery.
Genuine Cal Spas Parts & Accessories
This Limited Warranty is void if Cal Spas (the
“Manufacturer”) or its designated representative
determines that the spa has been subjected to
damage or failure due to installation of aftermarket
parts that are not genuine Cal Spas branded parts and
accessories. This disclaimer includes, but is not limited
to filters, UV bulbs, ozone systems, salt systems,
repair parts and other accessories. Genuine Cal Spas
brand parts and accessories are built to our highest
2014 Portable Spa
www.calspas.com
LTR20141001, Rev. B
65
Performance
This warranty begins on the date of delivery of the spa,
but in no event later than one year from the date of
manufacture. To obtain service in the event of a defect
covered by this Limited Warranty, notify your Cal Spa
dealer or Cal Spas (the “Manufacturer”) as soon as
possible and use all reasonable means to protect the
spa from further damage. Upon proof of purchase,
a designated service representative will correct the
defect subject to the terms and conditions contained
in this Limited Warranty. There will be no charge for
parts or labor to repair the defect, although providing
access to affect the repair is your responsibility as
the spa owner. Freight charges for replacement
parts is the responsibility of the spa owner. You may
be assessed reasonable repairman travel mileage
charges. In the event that the spa is removed to a
repair facility for repair and reinstalled, the cost of
removal and reinstallation will be your responsibility
as the spa owner. If the Manufacturer determines that
repair of the covered defect is not feasible, it reserves
the right to provide a replacement spa instead, equal
in value to the purchase price of the original spa. In
such an event, reasonable costs for removal of the
original spa, shipping costs from the factory for the
replacement spa and delivery and installation of the
replacement will be your responsibility as the spa
owner. The replacement spa will carry the balance
of the original spa’s warranty. Spa covers are not
included. This warranty ends either by specified time
frame, owner-transfer, relocation, or installation of any
component other than by manufacturer.
Warranty Limitations
This Limited Warranty is void if: Cal Spas (the
“Manufacturer”) or its designated representative
determines that the spa has been subjected to
alteration, neglect, misuse or abuse, or freight damage
caused by the common carrier; any repairs have
been attempted by anyone other than a designated
representative; or if the failure is caused by accident,
acts of God or other causes beyond the control of
the Manufacturer. Neglect, misuse and abuse include
any installation, operation or maintenance of the
spa other than in accordance with the instructions
contained in the owner’s manual provided with the
spa, including but not limited to the failure to maintain
proper water chemistry and chemical balance and the
use of abrasive or improper cleaners or non-genuine
parts and accessories. This Limited Warranty does not
provide coverage for the insulating cover, any item
attached to or installed on the spa after the date of
manufacture, or for gaining access to any component
for repair or replacement. Spa units in commercial use
are excluded from any coverage whatsoever. The spa
owner accepts liability for repair work performed by
anyone other than the Manufacturer or a designated
Cal Spa representative.
Limitations
The Manufacturer disclaims all warranties, expressed or
implied, in fact or in law, to the extent allowed by your
State’s Law, including the warranty of merchantability
and fitness for use, except as stated specifically
herein. All warranty service must be performed by the
Manufacturer or its designated representative using
authorized Cal Spa parts. No agent, dealer, distributor,
service company or other party is authorized to change,
modify or extend the terms of this limited warranty
in any manner whatsoever. The Manufacturer will not
be responsible for any statements or representations
made in any form that go beyond, are broader than,
or are inconsistent with any authorized literature or
specifications furnished by Cal Spas.
Disclaimers
The Manufacturer and its representatives shall not
be liable for any injury, loss, cost or other damage,
whether incidental or consequential, arising out of
any defect covered by this limited warranty, including
without limitation, loss of use of the spa and cost for
removal of defective product even if the Manufacturer
was advised of the possibility of damage. The liability
of the Manufacturer under this limited warranty, if
any, shall not exceed the original amount paid for the
defective product. Coverage under this limited warranty
shall commence as of the original date of delivery
and the duration of such coverage shall not extend
for any reason whatsoever beyond the stated time
periods. These disclaimers shall be equally applicable
to any service provided by the Manufacturer and its
designated representatives.
Legal Rights
This Limited Warranty gives you specific legal rights.
You may also have other rights that vary from state
to state. Some states do not allow limitations on how
long an implied warranty lasts, so this limitation may
not apply to you.
2014 Portable Spa
LTR20141001, Rev. B
www.calspas.com
Appendix
standards of quality, durability and performance, and
they are designed to work with your Spa to ensure
optimal performance and function.
Locating the product serial number
The serial number of your Cal Spa is located on a metal plate attached to
the lower right front panel of the spa.You will need this number to properly
register your spa and activate coverage. Write this information in the space
provided below.
Cal Spa Model: ________________________________________________
Cal Spa Serial Number: _________________________________________
Date Purchased: _______________________________________________
Date Installed: ________________________________________________
Cal Spa Dealer’s Phone Number: __________________________________
Cal Spa Dealer’s Address: _ ______________________________________
CONTACT INFORMATION
For customer service, please contact your authorized
dealer immediately. If you need additional information
and/or assistance, please contact:
LMS Customer Service Department
1462 East Ninth Street
Pomona, CA 91766.
Phone: 1-909-623-8781
Fax: 1-909-629-3890
www.calspas.com
Please visit www.quickspaparts.com
to order your replacement parts.