1
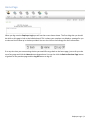
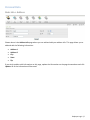
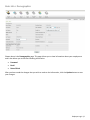
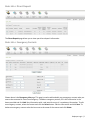
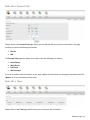
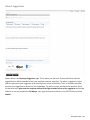
>
Employee Login
User Manual
Table of Contents
Home Page .............................................................................................................................................................. 3
Personal Data ......................................................................................................................................................... 3
Basic Info > Address ............................................................................................................................................ 3
Basic Info > Demographics .................................................................................................................................. 4
Basic Info > Direct Deposit .................................................................................................................................. 5
Basic Info > Emergency Contacts ........................................................................................................................ 5
Basic Info > Personal Info .................................................................................................................................... 6
Basic Info > Taxes ................................................................................................................................................ 6
Benefits > Beneficiaries ....................................................................................................................................... 7
Benefits > Dependents ....................................................................................................................................... 8
Benefits > Enrollment Info .................................................................................................................................. 9
Equipment Info .................................................................................................................................................. 10
Compliance > I-9 Processing.............................................................................................................................. 10
HR Center .............................................................................................................................................................. 11
Company Holidays ............................................................................................................................................. 11
EEO Reporting ................................................................................................................................................... 11
Employee Counseling ........................................................................................................................................ 12
Employment Forms ........................................................................................................................................... 12
Filing Cabinet ..................................................................................................................................................... 13
Performance Review ......................................................................................................................................... 13
Picture Upload ................................................................................................................................................... 14
Submit Suggestions ........................................................................................................................................... 15
Time Off Center .................................................................................................................................................... 16
Accrual & Time Off Request ............................................................................................................................ 16
Accrual & Time Off Approval/Denial ............................................................................................................... 17
Payroll Center ....................................................................................................................................................... 18
Time Sheets ..................................................................................................................................................... 18
Pay Checks ....................................................................................................................................................... 18
Scheduling Center ................................................................................................................................................ 19
Schedule .......................................................................................................................................................... 19
Reports Center...................................................................................................................................................... 19
Census ............................................................................................................................................................... 19
COBRA Event Tracking ....................................................................................................................................... 20
Education History .............................................................................................................................................. 20
Employee Life Events ........................................................................................................................................ 20
Employee Life Events Report ............................................................................................................................ 21
Pay History......................................................................................................................................................... 21
Employee Login | 2
Employee Onboarding ......................................................................................................................................... 22
Welcome Instructions ....................................................................................................................................... 22
Employee Information....................................................................................................................................... 23
Federal W-4 ....................................................................................................................................................... 24
(EEOC) Census ................................................................................................................................................... 25
Direct Deposit Request...................................................................................................................................... 25
Employee Handbook ......................................................................................................................................... 26
Summary ........................................................................................................................................................... 26
Employee Login | 3
Home Page
When you log onto the Employee Login you will see the screen shown above. The first thing that you should
do while on this page is look at the bulletin board. This is where your employer can display a message for you
to view and it will show up in the box provided. You can also click on the message for more information.
If at any time that you are accessing the site you would like to go back to the home page, just scroll up to the
top of any page and click the Home button shown above. You can also click the Back to Previous Page button
to go back to the previous page and the Log Off button to log off.
Employee Login | 4
Personal Data
Basic Info > Address
Shown above is the Address Info page where you can add and edit your address info. This page allows you to
add and edit the following information:
•
•
•
•
•
Address 1
Address 2
City
State
Zip
If you wish to add or edit information on this page, update the information on the page shown above and click
Update. All of the information will be saved.
Employee Login | 5
Basic Info > Demographics
Shown above is the Demographics page. This page allows you to view information about your employment
and it also allows you to edit the following information:
•
•
•
Password
Email
Date of Birth
After you have made the changes that you wish to make to the information, click the Update button to save
your changes.
Employee Login | 6
Basic Info > Direct Deposit
The Direct Deposit page allows you to view your direct deposit information.
Basic Info > Emergency Contacts
Shown above is the Emergency Info page. This page is used to add and edit your emergency contacts who you
want to be contacted in case of an emergency. To add an emergency contact, fill in the information in the
boxes provided and click Add. Any information with a red asterisk next to it is mandatory information. To edit
an emergency contact, select the contact and click the Select button. Edit the information and click Save. To
delete an emergency contact select the box next to the name of the contact and click Delete.
Employee Login | 7
Basic Info > Personal Info
Shown above is the Personal Info page where you can add and edit your personal information. The page
provides you with the following information:
•
•
Gender
SSN
The Personal Info page also allows you to add or edit the following information:
•
•
•
•
Home Phone
Work Phone
Cell Phone
Marital Status
If you wish to add or edit information on this page, update the information on the page shown above and click
Update. All of the information will be saved.
Basic Info > Taxes
Shown above is the Taxes page which allows you to view your tax information.
Employee Login | 8
Benefits > Beneficiaries
Shown above is the Beneficiary page. This page allows you to view your beneficiaries’ information, edit
beneficiaries’ information, delete beneficiaries, and also add new beneficiaries. The following information is
provided on this page:
•
•
•
•
•
•
•
•
•
•
Last Name
First Name
Middle Name
Gender
Beneficiary Prefix
Beneficiary Suffix
Date of Birth
Birth State
Relationship
SSN
Add Beneficiary: If you would like to add a new beneficiary, click the Add Beneficiary link and fill out the
information that is asked for. Any information that has a red asterisk next to it is mandatory information.
When you are done filling out the form, click Add/Edit Beneficiary.
Delete Beneficiary: If you would like to delete a beneficiary, click the Delete button next to the beneficiary.
When a message pops up asking if you are sure that you want to delete the beneficiary, click OK.
Employee Login | 9
Edit Beneficiary: If you would like to edit the Beneficiary, click the pencil next to the beneficiary and make
your changes. Any information that has a red asterisk next to it is mandatory information. When you are
done, click Add/Edit Beneficiary.
Benefits > Dependents
Shown above is the Dependent Info page. This page allows you to view your dependent’s information, edit
dependent’s information, delete dependents, and also add new dependents. The following information is
provided on this page:
•
•
•
•
•
•
•
•
•
•
•
•
•
•
•
Benefit Selected
Relationship
Last name
First Name
Middle Name
Gender
SSN
Date of Birth
Medical provider #
Doctor’s name
Dental Provider #
Vision Provider #
Full-Time Student
School Hours
School
Employee Login | 10
•
•
•
•
•
•
•
Address
City
State
Zip
Use Employee Address
Qualified Tax Dependent
Child/Court Appointed
Add Dependent: If you would like to add a new dependent, click the Add Dependent link and fill out the
information that is asked for. Any information that has a red asterisk next to it is mandatory information.
When you are done filling out the form, click Add/Edit Dependent.
Delete Dependent: If you would like to delete a dependent, click the Delete button next to the dependent.
When a message pops up asking if you are sure that you want to delete the dependent, click OK.
Edit Dependent: If you would like to edit the dependent, click the pencil next to the dependent and make your
changes. Any information that has a red asterisk next to it is mandatory information. When you are done,
click Add/Edit Dependent.
Benefits > Enrollment Info
Shown above is the Benefit Enrollment Summary where you can view employee, dependent, and beneficiary
enrollments and allocations by clicking on the corresponding tabs. This page also provides you with a link to
print the application for the benefits offered.
Employee Login | 11
Equipment Info
Shown above is the Equipment Info page. This page provides you with a list off all of the current company
equipment that you have or have had loaned out to you. The page lists the following information:
•
•
•
•
Property Issued
Serial Number
Date Issued
Date Returned
Compliance > I-9 Processing
Shown above is the I-9 Processing page. The I-9 Form is used to document that each new employee hired
after November 6, 1986 is authorized to work in the United States. Please verify that your name, address,
maiden name (if applicable), date of birth and social security number are complete and correct. Check your
citizenship status and, if applicable, complete any additional required fields. Electronically sign the form using
your username. When you have finished, click Save to save your input.
Employee Login | 12
HR Center
Company Holidays
Shown above is the Company Holidays page that gives you a list of all holidays that your employer recognizes.
You can also Export the list of holidays to an Excel spreadsheet by clicking the Export button.
EEO Reporting
Shown above is the EEO Reporting page where you can update your EEO information. To edit the information,
fill in the information in the boxes provided and then click Update.
Employee Login | 13
Employee Counseling
The Employee Counseling page is used to view written warnings provided to you by your employer or
supervisor. You can view the warnings on this page and you can also sign the warning using your electronic
signature.
Employee Login | 14
Employment Forms
The Employment Forms page is used to view and sign employment forms provided to you by your employer
or supervisor. To view a form, select the form from the drop down menu and then click Save for Review/Add
Documents. Then click Print EE Form and the form will open up in a new screen that you can read and if you
wish to print it, you can also print it from this page. After you have finished reading the form, sign the form
using your username and password and then click Digital Signature Update. The date that you signed the form
will appear on the right hand side of the screen.
Employee Login | 15
Filing Cabinet
If your employer has uploaded a file in the File Cabinet made available to you, these files will appear here. To
view the document, select the file name.
Performance Review
Shown above is the Performance Review page where you can view and rate your performance. To view your
current performance reviews, click Current Reviews. To view your completed performance reviews, click
Completed Reviews. To view employer and supervisor reviews and rate yourself, click on the title of the
performance review and you will be able to perform each of these tasks.
Employee Login | 16
Picture Upload
Shown above is the Performance Review page where you can view and rate your performance. To view your
current performance reviews, click Current Reviews. To view your completed performance reviews, click
Completed Reviews. To view employer and supervisor reviews and rate yourself, click on the title of the
performance review and you will be able to perform each of these tasks.
Shown above is the Picture Upload page where you can add a photo of yourself to be used on an employee ID
and also for your employer or supervisors review. You can use this page to print an employee ID by clicking the
Print Employee ID link.
Employee Login | 17
Submit Suggestions
Shown above is the Employee Suggestion page. This is where you will come if you would like to submit a
suggestion that will be viewable to both your employer and your supervisor. To submit a suggestion, select
what the purpose of your suggestion is by checking one or more of the boxes. Then, in the boxes provided,
describe your suggestion to the best of your knowledge. Try and be as clear and detailed as possible. Check
the box that says I agree that the company shall have the right to make full use of my suggestion and choose
whether or not you would like to CC Manger. Last, type the characters shown in the CAPTCHA box and click
Submit.
Employee Login | 18
Time Off Center
Accrual & Time Off Request
When you would like to request time off this is where you come. If you would like to view your current
balance, select the Time Off Policy and click Show Current Balance and the amount of hours that you have
available. Next, select the First Day of Time Request and then select the End Date. Click Continue.
Next you will see the screen shown above. Choose how many hours you are requesting off in the box
provided. If you wish to provide more information to your supervisor, use the box provided to insert your text.
Last, if you would like to be contacted by a supervisor, check the box. When have finished, click Submit.
Employee Login | 19
Accrual & Time Off Approval/Denial
To view whether your request was approved or denied go to the Accrual & Time Off Approval/Denial page.
Here you can view if your requests were approved, denied, or pending. You can choose to view the
information by date or by vacation type. You can also click Show Approved to view only approved requests,
Show Pending to view only pending requests, Show Disapproved to view only disapproved requests, Show
Canceled to view only canceled requests, or you can click Show All to view all requests. You can also choose to
show or hide the following columns:
•
•
•
•
Vacation Type
Requested Date
Comments
Balance at Request
To view the details of a request or cancel the time off click View Detail found on the right hand side of the
screen. Here you can view all details about your request or click Cancel Time Off to cancel the request.
Employee Login | 20
Payroll Center
Time Sheets
The Time Sheets page is used to view your previous punches for the current and previous pay periods. You can
Review Punches, Show Audit Report, and view a Custom Report. You also use this page to approve your time
card by clicking Notify Payroll Approval.
Pay Checks
Shown above is the Pay Checks page that is used for viewing and printing previous checks. If you would like to
view your previous paychecks, select the Check Date from the drop down menu and click Show Check. If you
would like to print a check from a previous check date, click Print Check.
Employee Login | 21
Scheduling Center
Schedule
Shown above is the Schedule that is used to view when you are scheduled to work. To view only your schedule
click My Schedule. To view everyone’s schedule click Everyone’s Weekly Schedule. If you would like to
exchange a shift with another employee click Exchange Shift. After you have submitted your request to
change a shift with another employee you can view the request and status of you requests under the
Exchange Requests link. If you would like to print the schedule, click Print.
Employee Login | 22
Reports Center
Census
The Employee Census page is used to view your employee census. If you would like to print the census, click
Printable Version. If you would like to export the information to an Excel spreadsheet, click Export.
COBRA Event Tracking
The COBRA Event Tracking report lists any COBRA events submitted throughout your employment history.
Check with your HR department to verify that your company is using the system sponsored COBRA
administration. If you would like to print the report, click Printable Version. If you would like to export the
information to an Excel spreadsheet, click Export.
Education History
The Education History report lists your education history. If you would like to print the report, click Printable
Version. If you would like to export the information to an Excel spreadsheet, click Export.
Employee Login | 23
Employee Life Events
The Employee Life Events page is used to submit employee life events. To submit a new life event, select the
life event from the drop down menu. Document the date that the event occurred. Upload a document if
necessary and record the date that the documents uploaded. When you have finished click Save.
Employee Life Events Report
The Employee Life Events Report page is used to view any life event that you submitted and the whether or
not the event has been approved. If you would like to print the report, click Printable Version. If you would
like to export the information to an Excel spreadsheet, click Export.
Employee Login | 24
Pay History
Shown above is the Pay History page. This page is used to view your previous pay history. This page displays
the following information:
•
•
•
•
•
•
•
•
•
•
•
•
Rate Code
Start Date
End Date
Rate
Salary
Rate Per
Shift
Department
Physician
Function
Location
Job Code
Employee Onboarding
After an employee is hired, the first thing that they should do is log into the employee portal with the username and
password they were given in their welcome email and complete the employee onboarding. There are multiple steps in
the onboarding process. The steps that are most important are as follows:
•
•
•
•
•
•
•
Welcome Instructions
Employee Information
Federal W-4
(EEOC) Census
Direct Deposit Request
Employee Handbook
Summary
Additional forms can be added to the onboarding if the employer wishes so each company’s onboarding may look a little
different.
Employee Login | 25
Welcome Instructions
This is where you would read the welcome instructions. These instructions will guide you on how to successfully
complete the onboarding process. After each page, you would save, sign using your electronic signature if asked, and
then click Next Step. On the right side of the screen there is a summary of each step in the onboarding process. After
each step has a check mark in the box it has been completed.
Employee Information
This is where you will fill out your personal information. Each field marked with a red asterisk is a mandatory field and it
must be filled in order to move on.
Employee Login | 26
Federal W-4
Shown above is the W-4 page. Fill out all of the highlighted boxes. You could also open up the Form W-4 link where you
would be able to view instructions on how to fill out the form and you are also given a blank form for your review.
Employee Login | 27
(EEOC) Census
Shown above is the Equal Employment Opportunity Report Data Form. You can choose whether or not you want to
supply this information but you must electronically sign this page even if you do not want to participate.
Direct Deposit Request
The direct deposit page allows you to set up a direct deposit for your paycheck. You can also set up you direct deposit to
go to more than one account. Each field marked with a red asterisk is mandatory and must be filled out to continue.
Employee Login | 28
Employee Handbook
This is where you can read and electronically sign your employee handbook. Your personal employee handbook would
be uploaded here for you to read and sign.
Summary
This page gives a summary of all of the pages that were signed and the dates and times that they were signed. After you
have completed all of the steps in the onboarding process and each page is signed they can click Finish to finish the
onboarding process. All of pages that you have submitted will be uploaded to the employer module for their review.
Employee Login | 29