1
TEMPPO Designer (IDATG)
Version 16.0
User´s Guide - Part I
How to Do Model-based Testing
July 2014
Copyright © 2014 Atos IT Solutions and Services GmbH
Microsoft, MS, MS-DOS, MFC, Microsoft Visual Studio and Windows are trademarks of Microsoft Corporation.
The reproduction, transmission, translation or exploitation of this document or its contents is not permitted without explicit written
approval. Offenders will be liable for damages. All rights reserved, including rights created by patent grant or registration of a utility
model or design.
Right of technical modification reserved.
Publisher:
Atos IT Solutions and Services GmbH
SI SOL TES
Siemensstrasse 92
1210 Vienna, Austria
User´s Guide - Part I
Edition 16.0
TEMPPO Designer (IDATG)
Document Management
Document Management
History of changes
Version
Status
Date
Person resp.
Reason for Change
1.0
Ready
20.10.98
S.Mohacsi
Creation
8.0
Ready
09.02.01
S.Mohacsi
New IDATG Version V8.0
8.1
Ready
27.04.01
S.Mohacsi
New IDATG Version V8.1
8.2
Ready
01.06.01
S.Mohacsi
New IDATG Version V8.2
9.0
Ready
30.09.01
S.Mohacsi
New IDATG Version V9.0
9.1
Ready
11.01.02
S.Mohacsi
New IDATG Version V9.1
10.0
Ready
02.09.02
S.Mohacsi
New IDATG Version V10.0
10.1
Ready
01.07.03
S.Mohacsi
New IDATG Version V10.1
10.2
Ready
17.10.03
S.Mohacsi
New IDATG Version V10.2
11.0
Ready
09.07.04
S.Mohacsi
New IDATG Version V11.0
11.1
Ready
17.09.04
S.Mohacsi
New IDATG Version V11.1
11.2
Ready
31.03.05
S.Mohacsi
New IDATG Version V11.2
11.3
Ready
27.07.05
S.Mohacsi
New IDATG Version V11.3
12.0
Ready
06.12.05
S.Mohacsi
New IDATG Version V12.0
12.1
Ready
15.05.06
S.Mohacsi
New IDATG Version V12.1
12.2
Ready
02.10.06
S.Mohacsi
New IDATG Version V12.2
12.3
Ready
14.05.07
S.Mohacsi
New IDATG Version V12.3
12.4
Ready
01.10.08
S.Mohacsi
New IDATG Version V12.4
14.0
Ready
10.08.10
S.Mohacsi
New IDATG Version V14.0
14.1
Ready
23.02.11
S.Mohacsi
New IDATG Version V14.1
15.0
Ready
30.06.12
S.Mohacsi
New IDATG Version V15.0
16.0
Ready
31.07.14
S.Mohacsi
New IDATG Version V16.0
[;]
Document was created using the following tools:
Microsoft Office WinWord 2010
Microsoft Visio 2010
Corel Paintshop Pro 10.0
15.09.2014
Page I
User´s Guide - Part I
Edition 16.0
TEMPPO Designer (IDATG)
Contents
Contents
1
2
Introduction ................................................................................................................... 6
1.1
Validity of the manual .............................................................................................. 6
1.2
Relationship with other documents .......................................................................... 6
1.3
Target group ............................................................................................................ 6
1.4
Structure of the manual ........................................................................................... 6
Overview of IDATG........................................................................................................ 7
2.1
Supported Test Categories ...................................................................................... 7
2.2
Supported Platforms ................................................................................................ 7
2.3 Basic Terms............................................................................................................. 8
2.3.1
Task ................................................................................................................. 8
2.3.2
Step .................................................................................................................. 8
2.3.3
Window............................................................................................................. 9
2.4 Test Process using IDATG .................................................................................... 10
3
4
Installation and Startup .............................................................................................. 12
3.1
System requirements ............................................................................................. 12
3.2
Installation instructions .......................................................................................... 12
3.3
License Installation ................................................................................................ 13
3.4
Startup ................................................................................................................... 14
3.5
De-installation ........................................................................................................ 15
Graph-Oriented Test ................................................................................................... 16
4.1
Definitions .............................................................................................................. 16
4.2 General Workflow .................................................................................................. 17
4.2.1
Creating a Project ........................................................................................... 17
4.2.2
Specifying Textual Requirements ................................................................... 17
4.2.3
Defining the Hierarchical Task Model ............................................................. 17
4.2.4
Defining Task Flows ....................................................................................... 18
4.2.5
Defining the Step Details ................................................................................ 18
4.2.6
Generating Test Cases ................................................................................... 18
4.2.7
Converting Test Cases ................................................................................... 18
5
Data-Oriented Test ...................................................................................................... 20
5.1 Creating Test Data ................................................................................................ 20
5.1.1
Generating Test Data Using the Equivalence Class Method........................... 20
5.1.1.1
Boundary Value Analysis ......................................................................... 21
5.1.2
Generating Test Data Using CECIL ................................................................ 22
5.1.2.1
Vehicle Insurance Example ..................................................................... 22
5.1.3
Importing Test Data ........................................................................................ 24
5.1.4
Specifying Test Data Manually ....................................................................... 24
5.2 Creating Data-Based Task Flows .......................................................................... 24
5.2.1
Basics ............................................................................................................. 24
5.2.2
Generating 1 Separate Test Case for each Data Record ............................... 25
15.09.2014
Page II
User´s Guide - Part I
Edition 16.0
5.2.3
6
TEMPPO Designer (IDATG)
Contents
Using more than 1 Data Record in the same Test Case ................................. 25
Random Test ............................................................................................................... 27
6.1
Introduction ............................................................................................................ 27
6.2
IDATG Task Structure for Random Testing ........................................................... 27
6.3 IDATG Building Block Structure for Random Testing ............................................. 28
6.3.1
Building Block Requirements .......................................................................... 28
6.3.2
Describing Window Behavior .......................................................................... 29
6.3.3
Using Test Data .............................................................................................. 30
6.4 Test Case Generation............................................................................................ 31
6.4.1
Random Test Options ..................................................................................... 31
6.4.1.1
Coverage Goals....................................................................................... 31
6.4.1.2
Exit Criteria .............................................................................................. 32
6.4.1.3
Search Strategy ....................................................................................... 32
6.4.1.4
Tips & Tricks for Random Test Options ................................................... 33
7
Transition Test ............................................................................................................ 34
7.1 Workflow ............................................................................................................... 34
7.1.1
Defining the GUI Behavior .............................................................................. 34
7.1.2
Specifying the Semantics of the GUI .............................................................. 35
7.2 Integrity Rules for Transition Diagrams .................................................................. 35
7.3
8
Transition Types .................................................................................................... 35
GUI Testing .................................................................................................................. 37
8.1 Workflow ............................................................................................................... 37
8.1.1
Recording the GUI Layout .............................................................................. 37
8.1.2
Completing the Static GUI Information ........................................................... 37
8.1.3
Assigning Task Steps to GUI Objects ............................................................. 37
8.2 Window Types ....................................................................................................... 37
8.2.1
Check Boxes .................................................................................................. 38
8.2.2
Child Windows ................................................................................................ 39
8.2.3
Combo Boxes ................................................................................................. 40
8.2.4
Custom Windows............................................................................................ 41
8.2.5
Dialog Boxes .................................................................................................. 41
8.2.6
Group Boxes................................................................................................... 43
8.2.7
Headers .......................................................................................................... 43
8.2.8
Images............................................................................................................ 43
8.2.9
Input Fields ..................................................................................................... 43
8.2.10 Links ............................................................................................................... 44
8.2.11 List Boxes and List Views ............................................................................... 45
8.2.12 Main Windows ................................................................................................ 46
8.2.13 Menus ............................................................................................................. 46
8.2.14 Menu Items ..................................................................................................... 46
8.2.15 Push Buttons .................................................................................................. 47
8.2.16 Radio Buttons ................................................................................................. 47
8.2.17 Static Texts ..................................................................................................... 48
8.2.18 Tab Controls ................................................................................................... 48
8.2.19 Tables............................................................................................................. 49
8.2.20 Tool Bars ........................................................................................................ 49
8.2.21 Tree Controls .................................................................................................. 50
8.3 Web Testing .......................................................................................................... 51
15.09.2014
Page III
User´s Guide - Part I
Edition 16.0
8.3.1
8.3.2
9
10
TEMPPO Designer (IDATG)
Contents
Recording Webpages ..................................................................................... 51
Running Scripts for Web Testing .................................................................... 53
Multi-User Support ...................................................................................................... 54
9.1
Working with Sub Projects ..................................................................................... 54
9.2
Editing the Master Project ...................................................................................... 54
9.3
Merging a Sub Project with its Master .................................................................... 55
9.4
Transferring Data between Sub Projects ............................................................... 55
Test Case Generation ............................................................................................. 56
10.1
Graph-oriented Test Cases ................................................................................ 56
10.2
Data-oriented Test Cases .................................................................................. 56
10.3
Random Test Cases .......................................................................................... 57
10.4
Transition Test Cases ........................................................................................ 57
10.5
Output Formats .................................................................................................. 58
10.5.1 Plain Text ....................................................................................................... 58
10.5.2 Universal File .................................................................................................. 58
10.5.3 QuickTest Professional (HP) .......................................................................... 58
10.5.3.1 Importing a QTP Object Repository ......................................................... 58
10.5.3.2 Editing Window Properties for QTP ......................................................... 60
10.5.3.3 Exporting Test Scripts for QTP ................................................................ 62
10.5.3.4 Trouble Shooting: .................................................................................... 63
10.5.4 Ranorex Studio ............................................................................................... 64
10.5.4.1 User Code in Ranorex ............................................................................. 64
10.5.4.2 Editing Window Properties for Ranorex ................................................... 64
10.5.5 Silk Test (MicroFocus) .................................................................................... 65
10.5.6 TestPartner (MicroFocus) ............................................................................... 66
10.5.7 WinRunner (HP) ............................................................................................. 66
10.5.8 XML for ESA Test Commander ...................................................................... 68
10.5.9 XML for TEMPPO Test Manager .................................................................... 68
10.5.10
Excel File for HP Quality Center .................................................................. 68
10.6
Resolving Window Recognition Problems .......................................................... 68
10.6.1 Finding Correct Tags ...................................................................................... 68
10.6.2 Window Properties used in Tags .................................................................... 68
11
Interfaces to Test Management .............................................................................. 70
11.1
Interface to TEMPPO Test Manager .................................................................. 70
11.1.1 Opening IDATG directly from TEMPPO Test Manager ................................... 70
11.1.2 Transferring data to TEMPPO Test Manager via XML interface ..................... 71
11.2
Interface to HP ALM - Quality Center ................................................................. 71
11.3
12
HTML / WinWord Interface ................................................................................ 72
Formal Specification Language ............................................................................. 74
12.1
Designators ........................................................................................................ 74
12.2
Event Language ................................................................................................. 75
12.2.1 Click................................................................................................................ 76
12.2.2 Type ............................................................................................................... 76
12.2.3 Input ............................................................................................................... 77
12.2.4 Select ............................................................................................................. 78
15.09.2014
Page IV
User´s Guide - Part I
Edition 16.0
TEMPPO Designer (IDATG)
Contents
12.2.5 Check ............................................................................................................. 79
12.2.6 Expand ........................................................................................................... 80
12.2.7 Position ........................................................................................................... 80
12.2.8 Scroll .............................................................................................................. 80
12.2.9 Close .............................................................................................................. 81
12.2.10
Wait ............................................................................................................ 81
12.2.11
Verify........................................................................................................... 81
12.2.11.1 Verifying the value of a window ............................................................... 82
12.3
Condition Language ........................................................................................... 84
12.3.1 Introduction ..................................................................................................... 84
12.3.2 Types.............................................................................................................. 84
12.3.3 Operators ....................................................................................................... 84
12.3.4 Operands ........................................................................................................ 85
12.3.5 Formal Syntax Description .............................................................................. 86
12.4
Action Language ................................................................................................ 88
13
Literature ................................................................................................................. 90
14
Glossary................................................................................................................... 91
15.09.2014
Page V
User´s Guide - Part I
Edition 16.0
TEMPPO Designer (IDATG)
Introduction
1 Introduction
This manual describes the use of TEMPPO Designer Version 16.0. The tool is also called IDATG
(Integrating Design and Automated Test Case Generation). For historical reasons and to avoid
confusion with other components of the TEMPPO framework, only the term IDATG will be used in
the following.
1.1 Validity of the manual
•
•
This user manual is valid for IDATG V16.0.
For information about the test-execution tools QuickTest, Ranorex, SilkTest, TestPartner,
and WinRunner please refer to the respective user guides.
1.2 Relationship with other documents
•
•
•
The second part of this User's Guide contains a detailed description of the windows in the
IDATG user interface.
A tutorial containing a step-by-step description of the IDATG method is also available.
The tool IDATG provides online help that gives a detailed description of its functionality. The
help text is based on this document.
1.3 Target group
This user manual is recommended for
• Test managers
• Test case designers
• Testers
• GUI Designers
What prior knowledge is the reader expected to have?
• Basic knowledge about: GUI design, task modeling, state-transition diagrams, test case
design.
1.4 Structure of the manual
Chapter 1 contains some general facts about this manual.
Chapter 2 gives an overview of the IDATG method.
Chapter 3 deals with the installation procedure.
Chapter 4 explains the recommended workflow for creating graph-oriented test cases.
Chapter 5 explains the additional steps for creating data-oriented test cases.
Chapter 6 presents the benefits of random testing.
Chapter 7 explains the workflow for transition testing.
Chapter 8 deals with the peculiarities of testing graphical user interfaces.
Chapter 9 shows how multiple users can work on the same IDATG project.
Chapter 10 deals with the test case generation and execution process.
Chapter 11 describes the interfaces to test management.
Chapter 12 describes the formal language for defining events, conditions and actions.
A bibliography and a glossary conclude the user guide.
15.09.2014
Page 6
User´s Guide - Part I
Edition 16.0
TEMPPO Designer (IDATG)
Overview of IDATG
2 Overview of IDATG
•
•
•
•
•
•
The IDATG (Integrating Design and Automated Test Case Generation) specification technique
and tool is designed for the specification of hierarchical sequence diagrams and the
automated generation of test cases.
IDATG includes a set of editors for the formal specification of test sequences, test data,
semantic constraints and user interfaces.
The formal specification can be exported in XML, HTML or MS WinWord format.
The IDATG-tool is open for different GUI-builders and platforms. GUI-information can be
recorded directly from the screen. GUI objects can be linked to steps in the sequence
diagrams simply by pointing at a screenshot.
A powerful test case generator is able to create test scripts in a general format that can be
converted for GUI test execution tools like QuickTest, Ranorex, SilkTest, TestPartner, and
WinRunner. For API testing, it is possible to export the generated test cases as plain text e.g.
as Tcl script..
IDATG can be easily integrated with test management tools.
2.1 Supported Test Categories
IDATG is used for black-box testing, which means that the source code of the application is not
required for testing. While the original purpose of IDATG has been the support of automated GUI
testing, the tool can also be applied for different forms of API testing. The following types of test
cases are generated:
•
•
•
•
Graph-oriented test cases based on hierarchical sequence diagrams ("task model"). This
method can be used for both GUI and API testing. By defining frequently performed test
sequences as "building blocks", the maintainability and clearness of the specification can be
significantly improved. IDATG supports both step coverage (C0) and step connection coverage
(C1).
Data-oriented test cases that aim at covering a set of valid and/or invalid data records. Test
data can be defined manually, be imported from an external source, or be generated
automatically according to the equivalence class or CECIL method. Subsequently, individual
data fields can be connected with steps in a sequence diagram.
Random test cases that are an important complement to test cases created with systematic
test design methods. Typically, random test cases are rather long and tend to discover defects
that are hard to detect with other methods (e.g. memory leaks, crashes caused by unforeseen
user behaviour etc.)
Transition test cases that cover the dynamics and semantics of the GUI. They can be used
for stand-alone testing of single dialogs or for integration testing.
2.2 Supported Platforms
IDATG runs under Microsoft Windows (98/NT/2000/XP/Vista/7). However, the test scripts that are
generated by IDATG can be executed under other operating systems as well.
The IDATG GUI Spy currently supports the following GUI builders:
• Visual C++, Visual Basic, .NET, HTML, Java, Delphi.
Data for other GUI builders can be imported from QuickTest object repositories. This includes:
• SAP, WPF, Oracle
Please note that in addition to IDATG a test execution tool is required that has to support the
desired platform and GUI builder.
15.09.2014
Page 7
User´s Guide - Part I
Edition 16.0
TEMPPO Designer (IDATG)
Overview of IDATG
2.3 Basic Terms
Before continuing to explore this user guide, it is necessary to understand a few basic terms that
are used throughout the following:
2.3.1 Task
Originally, the term task was used in IDATG for sequence diagrams that represented the workflow
of typical user tasks. Today, these sequence diagrams are used in a more general way and can
represent any sequence of steps that is relevant to testing.
We can distinguish 2 types of tasks:
•
•
A sequence diagram depicting a complete test scenario is called use case task. During
the generation, IDATG starts at the initial step of the use case task and tries to find a valid
path to its end.
Use case tasks usually consist of building block tasks that can be re-used and
parameterized. Naturally, building blocks can contain other building blocks.
2.3.2 Step
The basic term of the IDATG language is the step. A step can either be an atomic step
containing a single test instruction or represent an entire building block task. Atomic steps
can be described by the following information:
• The test command. For GUI testing, the test command is also called event, because it
usually represents a user input that triggers the step (e.g. a mouse click).
• The semantic conditions that must be fulfilled before the step can be executed (e.g., a
certain button must be enabled).
• The actions executed during the step (e.g. a window opens or a button becomes
disabled).
• For GUI testing, the start and destination window of the step (in other words, the focus
position before and after the step).
• For API testing, it may be necessary to define the test driver that will execute the test
command.
• The expected results are defined indirectly by introducing verify steps that contain test
commands that compare the actual results with the expected ones.
During your work with IDATG, you will encounter different forms of steps:
•
•
•
Task Steps
For graph-oriented and data-oriented testing, the sequence of steps is determined by you.
You can define it in a task flow diagram.
Transitions
IDATG also supports another test method called transition testing in which you do not define a
certain step sequence. You just enter individual steps and IDATG determines a proper
sequence based on the semantic information you provide for the steps (only applicable for
GUI testing)
Test Steps
IDATG can generate automatically various types of test cases that - naturally - also consist of
steps. Like tasks, test cases can be displayed as a sequence diagram.
15.09.2014
Page 8
User´s Guide - Part I
Edition 16.0
TEMPPO Designer (IDATG)
Overview of IDATG
2.3.3 Window
The term window is used here as equivalent for GUI object. Thus, dialogs, buttons, input
fields, static texts etc. are all equally seen as windows. Each window may contain an
unlimited number of child windows. This point of view corresponds to the structure of most
operating systems (e.g. MS Windows).
15.09.2014
Page 9
User´s Guide - Part I
Edition 16.0
TEMPPO Designer (IDATG)
Overview of IDATG
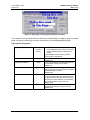
2.4 Test Process using IDATG
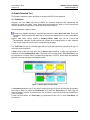
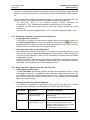
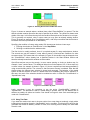
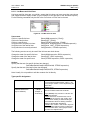
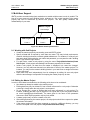
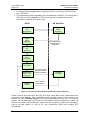
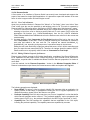
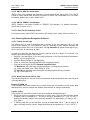
The following diagram shows the sequence of activities when applying IDATG in a project.
Mandatory
Activities
Create
IDATG
Project
Optional
Activities
Specify
Requirements
Import GUI
Info from Test
Execution Tool
Record GUI
Info with
IDATG GUI Spy
Complete
Static GUI
Information
Define
Hierachical
Task Model
Define or
Import Data
Model
Define
Task Flows
Generate
Test Data
Assign Task
Steps to GUI
Objects
Define
Step Details
Correct and
Maintain
Test Spec.
Generate
Test Cases
Convert and
Export Test
Cases
IDATG
Test Execution
Tool
Run Tests
and Evaluate
Results
Figure 1 – Test Process using IDATG
15.09.2014
Page 10
User´s Guide - Part I
Edition 16.0
TEMPPO Designer (IDATG)
Overview of IDATG
1. A new IDATG project is created.
2. The required functions of the application can be described in textual form inside IDATG.
Alternatively, it is also possible to link to an external requirements specification.
3. Based on the textual requirements and the desired test types, a hierarchical task model is
defined in IDATG. Large tasks are split into re-usable building blocks.
4. For each task, the sequence of steps is defined as a task flow. Steps can either be atomic or
represent a building block.
5. Test data can be imported from a file or be defined manually. However, the most effective way
is to use IDATG's state-of-the-art data generation algorithms.
6. As soon as a GUI prototype is available, you can record GUI information with the IDATG GUI
Spy directly from the screen which saves a large amount of the specification effort.
Alternatively, you can also import GUI information from a test execution tool like HP
QuickTest. This method is particularly useful for GUIs not supported by the IDATG GUI Spy.
7. The imported static GUI information is checked and where necessary completed by altering
the names and tags of GUI objects.
8. The steps of the task flows can be assigned to specific GUI objects.
9. The details of each step are defined. These include e.g. the test instruction, semantic
conditions and the test data.
10. Based on the specification created in the previous steps, IDATG is able to generate graphoriented and data-oriented test cases.
11. All test cases can be converted into various formats and are exported.
12. The test cases are executed by an appropriate tool. For GUI testing, IDATG supports
QuickTest (HP), WinRunner (HP), Ranorex Studio, SilkTest (MicroFocus), and TestPartner
(MicroFocus). These tools start the application, simulate user actions like mouse clicks
according to the generated test scripts and check whether the actual results match the
expected ones.
The test report produced by the test execution tool has to be evaluated by the tester. In case
of an error, the tester has to determine its origin (implementation error, specification error, test
execution problem...). Appropriate steps have to be taken to fix the problem.
13. If changes or expansions are made to the tested application, it is very important to update the
specification and task model accordingly. Instead of maintaining the test cases manually, a set
of new test cases can be generated very effectively with IDATG.
15.09.2014
Page 11
User´s Guide - Part I
Edition 16.0
TEMPPO Designer (IDATG)
Installation and Startup
3 Installation and Startup
3.1 System requirements
•
•
•
•
Hardware:
Operating system:
Free memory space required:
Additional software required
for GUI testing:
Pentium PC, min. 1 GHz recommended, 32 or 64 bit
Windows 98/NT/2000/XP/Vista/7
256 MB
HP QuickTest Professional OR
HP WinRunner OR
MicroFocus TestPartner OR
MicroFocus SilkTest (only 4Test-based versions) OR
Ranorex Studio
3.2 Installation instructions
1. Make sure you are logged in with administrator rights before installing new software.
2. Run the self-extracting file Setup.exe that installs the IDATG files to your harddisk and creates
shortcuts in the start menu. On some operating systems (e.g., Windows 7), you have to
explicitly start Setup.exe with administrator rights. If you're asked whether the program should
be allowed to modify your system's configuration, answer 'Yes'.
3. Only if you want to run your tests with HP´s WinRunner, you have to perform the following
steps before the test scripts can be executed:
3.1. Install WinRunner (please refer to the WinRunner documentation for instructions)
3.2. Move the directories idatginit and idatglib that can be found in your Idatg\WinRunnerAddIn
directory into the lib directory of WinRunner.
3.3. Open the file script in the dat\tslinit directory of WinRunner with a text editor and insert the
following line directly after the set_class_map commands:
call "idatginit" ();
WinRunner Root Directory --|
dat --|
|
|
tslinit --|
|
|
script
lib --|
idatginit --|
idatglib ---
15.09.2014
Page 12
User´s Guide - Part I
Edition 16.0
TEMPPO Designer (IDATG)
Installation and Startup
3.3 License Installation
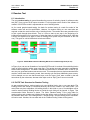
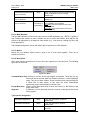
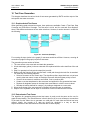
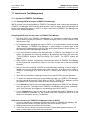
Before you are able to use IDATG, you need a valid license for your computer. The license is PCspecific and usually restricted to a certain version of IDATG and a limited period of time.
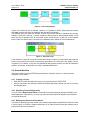
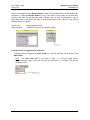
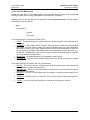
Figure 2 - Key Manager
To receive a license, just follow 3 simple steps:
• Make sure you are logged in with administrator rights before installing the license.
• Start the Key Manager. On some operating systems (e.g., Windows 7), you have to explicitly
start KeyManager.exe with administrator rights. If you're asked whether the program should be
allowed to modify your system's configuration, answer 'Yes'.
• Step 1 - Press ‘Generate’. A string will be generated that contains encoded information
identifying your PC. This string is called System Information String (SIS).
• Step 2 - Copy the string into an e-mail and send it to the IDATG support. (Just select the string
with the mouse, press Ctrl+C to copy it and Ctrl+V to paste it into your e-mail).
• Step 3 - You will receive a reply e-mail containing your license key. Copy the key into the Key
Manager and press ‘Validate’. After confirming an information message your license will be
installed.
If you wish to use IDATG on different PCs, please run the Key Manager on each of them to
generate an individual SIS for each computer.
You can start the Key Manager at any time to view information about the installed license or to
install a new one. If you should experience problems with your license or you need an update, do
not hesitate to contact the support.
15.09.2014
Page 13
User´s Guide - Part I
Edition 16.0
TEMPPO Designer (IDATG)
Installation and Startup
3.4 Startup
You can start IDATG by executing IDATG.EXE or clicking on the IDATG icon in your start menu.
The following command line parameters can be specified (particularly useful for the integration
with a test management tool):
-c
-d name=value
-e exepath
-g
-k keyboard
-m method
-p projectpath
-port portnumber
-q
-r rootpath
-s scriptpath
-sitemppo
-w startwindow
15.09.2014
Automatically convert all test cases of the project using the last settings. May
only be used in combination with the -p option.
Set the value of a designator. May only be used in combination with the -p
option. name must be the name of an existing global attribute and has to be
written without '#' characters. The -d option can be used more than once in a
command line.
The path to the tested application's executable file or for web testing the
URL of the tested page. (used for test case conversion)
Automatically generates test cases for the whole project using the test
method specified with the -m option (default: step coverage). May only be
used in combination with the -p option.
Set the keyboard type. This option is only relevant to converting test scripts
into WinRunner format. Possible values are us for US-American keyboards
or ge for German keyboards.
Choose the method for test case generation. Possible values are: G1 (1
graph-oriented test case), GS (cover all steps), GC (cover all connections),
DV (cover valid data records), DI (cover invalid data records), DA (cover all
data records), R (random test), T (transition test). Does only make sense in
combination with the -g option.
The project file specified by projectpath is opened automatically. Please
specify the complete path to the project's main XML file e.g., "C:\Program
Files\Idatg\Project_MyProject.xml"
May only be used in combination with the –sitemppo option. Over this port
TEMPPO Test Manager and IDATG communicate via a socket. Default port:
60666
Automatically quit IDATG after performing the other command line options
(provided that no error occurred). May only be used in combination with the p option.
The directory rootpath is used as a prefix for the path to the tested
application's executable file and working directory. (used for test case
conversion)
The generated test scripts are saved to the directory scriptpath. (used for
test case conversion)
IDATG is called from TEMPPO Test Manager. TEMPPO Test Manager and
IDATG communicate via a socket connection. The port number for the
socket must be defined by the –port option.
Set the window with the ID startwindow as start window of the project. May
only be used in combination with the -p option. The window must exist, be
visible and enabled, and must have no parent.
Page 14
User´s Guide - Part I
Edition 16.0
TEMPPO Designer (IDATG)
Installation and Startup
Example:
idatg.exe -p "C:\Idatg\Projects\MyProject.xml" -d MyAtt=newValue -g -m GS -c -s C:\temp\Idatg -q
Automatically opens the project MyProject, sets the value of the global attribute MyAtt to
newValue, generates test cases for the project that cover all steps, then converts them into the
directory C:\temp\Idatg and afterwards closes IDATG.
3.5 De-installation
To uninstall the program you simply have to call the file UNWISE.EXE.
15.09.2014
Page 15
User´s Guide - Part I
Edition 16.0
TEMPPO Designer (IDATG)
Graph-Oriented Test
4 Graph-Oriented Test
This chapter explains the basic principles of working with IDATG task diagrams.
4.1 Definitions
Originally, the term Task was used in IDATG for sequence diagrams that represented the
workflow of typical user tasks. Today, these sequence diagrams are used in a more general way
and can represent any sequence of steps that is relevant to testing.
We can distinguish 2 types of tasks:
A sequence diagram depicting a complete test scenario is called Use Case Task. During the
generation, IDATG starts at the initial step of the use case task and tries to find a valid path to
its end.
Use case tasks usually consist of Building Block Tasks that can be re-used and
parameterized. Naturally, building blocks can contain other building blocks. In many respects,
they can be compared to functions in a programming language.
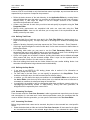
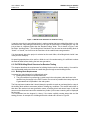
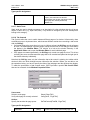
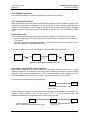
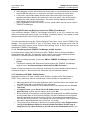
The Task Flow of a task is a directed graph without cycles that represents a sequence of steps. It
may have various branches.
A Step inside a task flow may either be an atomic step containing a single test instruction or
represent an entire building block task. In the latter case, the step is also called Sub Task. It can
be compared to a function call in a programming language. In IDATG, atomic steps are displayed
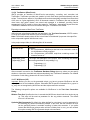
light blue, whereas sub tasks are displayed yellow.
Figure 3 - Atomic Steps and Sub Tasks
A Connection between step A and step B means that step B should be executed immediately
after step A. Step A is called the Predecessor of B and B the Successor of A. Each step can
have an arbitrary number of predecessors and successors representing different possibilities to
perform the task.
A task flow has exactly one Start Step (no predecessors) and one or more Final Steps (no
successors).
15.09.2014
Page 16
User´s Guide - Part I
Edition 16.0
TEMPPO Designer (IDATG)
Graph-Oriented Test
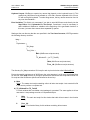
Figure 4 - Task Flow (Example)
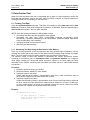
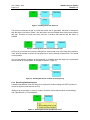
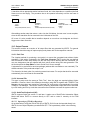
Cycles in the task flow are not allowed. However, it is possible to define yellow steps (sub tasks)
as Loops in which case they are displayed with a double-lined border.
The simplest way is to define the number of times the sub task should be repeated (any number
between 1 and 100). However, it is also possible to define loops for data-oriented testing. In this
case, the loop is repeated once for each valid and/or invalid record in a data set. In the example
below, loops are used to enter 5 persons into a database and to delete all of them afterwards.
Figure 5 - Task with Loops
A sub task that is used as a loop can contain other loops. However, you should be aware that the
length of the resulting test cases as well as the generation time could grow very rapidly if you're
not careful. For instance, a loop with 100 repetitions that contains another loop with 80 repetitions
results in a test case in which the inner loop is repeated 8000 times!
4.2 General Workflow
The basic workflow for using IDATG has already been outlined in section 2.4 and will now be
described in more detail:
4.2.1 Creating a Project
• Start IDATG via the Windows start menu or by executing the file IDATG.EXE.
• Open a new project and select the default GUI builder and output format you wish to use (may
be changed later).
4.2.2 Specifying Textual Requirements
You can use the Requirement Editor to describe the requirements that should be fulfilled by the
tested application. Alternatively, you may only enter the requirement IDs together with the path to
an external document.
4.2.3 Defining the Hierarchical Task Model
The basis for specifying the task model is the software requirements specification that should exist
in every project. It contains a detailed description of all tasks (functions) that the software has to
perform from the user perspective.
15.09.2014
Page 17
User´s Guide - Part I
Edition 16.0
TEMPPO Designer (IDATG)
Graph-Oriented Test
However, IDATG is not limited to only functional test cases. In principle, any test case that can be
represented by a sequence of steps can be processed.
• Define the basic structure of the task hierarchy in the Application Editor by creating folders
and sub-folders that group the tasks e.g. according to the test method or their type (use case /
building block). It also might be helpful to use the chapter structure of the software
requirements specification as a basis.
• Create a use case task for each item you wish to test and specify its properties using the Task
Properties Editor.
• Specify which requirements are associated with each use case task using the Task
Requirement Editor. Later on, this will allow you to keep track of the requirements that are
already covered by test cases.
4.2.4 Defining Task Flows
• Define the task flow of each use case task in the Task Flow Editor by drawing steps (e.g.,
Login-DoSomething-Logout). The steps may later on be assigned to windows or building block
tasks.
• Instead of drawing frequently used step sequences like "Enter Username - Enter Password Click Login" again and again for each use case task, it is far more convenient to define them as
building block tasks.
• For building block tasks you may want to use the Task Parameters Editor to define
parameters that can be set to different values every time the task is used. For the building block
"Login" the parameters will probably be "Username" and "Password".
• Cycles in the graph are not allowed. However, building block tasks can be defined as Loops
which means that they can be executed multiple times. Loops can be repeated either a
specified number of times or for each record in a data set.
• Note that building block tasks can be further divided into even smaller building blocks. Just
remember: Modularization brings clearness and maintainability!
4.2.5 Defining the Step Details
•
•
•
•
If you want to use IDATG for GUI testing, please refer to section 8.1 for information on
assigning a step to a GUI object.
For each step in the task flows, you can specify its properties in the Step Editor. These
include a meaningful name, the test command and its duration (delay).
In addition, you can define the step's pre-conditions in the Condition Editor and its effects in
the Action Editor. Note that only those actions have to be defined that have an influence on
commands or conditions in subsequent steps of the task flow.
In most fields it is possible to refer to a designator rather than providing a concrete value (e.g.
Input(#@Login:Username#) instead of Input(“Value”)). During test case generation, all
designators will be replaced by their current value.
4.2.6 Generating Test Cases
From the task model the Test Case Generator is able to generate test cases that cover all steps
and connections of a use-case task. It also detects specification errors like conditions that can
never be fulfilled. After the generation, you can open the test cases in the Test Case Editor.
4.2.7 Converting Test Cases
Before the generated test cases can be executed, they have to be converted into a tool-specific
format.
• Select the desired task or folder and call the Test Case Converter. All test cases for the object
are converted and written to the selected target directory. If you selected the option "Plain
15.09.2014
Page 18
User´s Guide - Part I
Edition 16.0
TEMPPO Designer (IDATG)
Graph-Oriented Test
Text", IDATG exports the test commands without further translation which can be useful e.g.
for generating Tcl scripts. For GUI testing, the following files are generated:
A GUI Map containing a description of all GUI objects
Test scripts containing the test cases in the tool-specific language
A main script that calls all other scripts
15.09.2014
Page 19
User´s Guide - Part I
Edition 16.0
TEMPPO Designer (IDATG)
Data-Oriented Test
5 Data-Oriented Test
Apart from test sequences that can be expressed with a graph it is also important to define the
input data that should be used for the tests. IDATG provides a number of powerful features for
creating this data and for including it in the task flows.
5.1 Creating Test Data
Using the Application Editor tab page "Test Data" it is possible to define data sets and the data
fields they consist of. Data fields correspond to columns in a data table. Rows are represented by
data records that include 1 value for each data field.
IDATG offers the following methods for defining data records:
• Generating test data using the equivalence class method
• Generating test data using CECIL (Cause-Effect Coverage Incorporating Linear
boundaries), a powerful combination of the Cause/Effect, Multi-Dimensional Equivalence
Class and Boundary Value methods
• Importing test data from an external source
• Specifying test data manually
5.1.1 Generating Test Data Using the Equivalence Class Method
Since it is usually impossible to test a component with every possible input combination, various
methods are used to reduce the number of test data while still revealing a high number of program
faults. The most common way for finding test data is the equivalence class method.
The definition range of each input variable is partitioned into various equivalence classes
according to the following rule: An equivalence class or equivalence partition is a contiguous
value range consisting of values that cause equivalent outputs or for which apply the same
calculation rules. Classes containing valid input data are usually named Vn while invalid classes
are named In.
Procedure:
1. Determine definition ranges per variable
2. Refine equivalence classes for each variable
3. Implement positive test cases
Create data records by taking 1 representative value from a valid equivalence class of
each variable. Repeat until all valid classes are covered.
4. Implement negative test cases
Create data records by taking 1 representative value from an invalid equivalence class and
all other values from valid equivalence classes until all classes are covered. Combining 2
or more invalid values in a record is not allowed because the values' effects may cancel
each other out. Repeat until all invalid classes are covered.
Example:
int MyFunc(int a, int b)
{
if (a<0) return -1; // error
else if (a<20) return sqrt(a); // square root(a)
else return a / b;
}
15.09.2014
Page 20
User´s Guide - Part I
Edition 16.0
TEMPPO Designer (IDATG)
Data-Oriented Test
Step 1: The definition range of a and b is [MININT-MAXINT].
Step 2: The ranges can be further divided into the following equivalence classes:
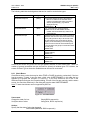
Class ID
Range
Expected Output
I1_a
[MININT..-1]
-1
V1_a
[0..19]
sqrt(a)
V2_a
[20..MAXINT]
a/b
V1_b
[MININT .. -1]
a/b
I1_b
0
undefined (division by zero)
V2_b
[1 .. MAXINT]
a/b
Variable a
Variable b
Step 3: Create valid data records until all valid classes are covered
Record ID
a
b
V1
0
MININT
V2
20
MAXINT
Step 4: Create invalid data records until all invalid classes are covered. Do not combine 2 invalid
values.
Record ID
a
b
I1
MININT
MININT
I2
20
0
IDATG provides a convenient Equivalence Class Editor that allows you to define classes and
representative values for each data field. After this information has been entered for each data
field in a set, IDATG's Test Data Generator can automatically create a set of data records that
fulfill specified test coverage criteria.
5.1.1.1 Boundary Value Analysis
The boundary value analysis is an extension of the equivalence class method. It relies on the fact
that many programming errors can be detected by concentrating on the boundaries of each
equivalence class (e.g. writing i<0 instead of i<=0). Boundary values can be entered in the
Equivalence Class Editor and are considered during record generation if the corresponding
option is chosen.
15.09.2014
Page 21
User´s Guide - Part I
Edition 16.0
TEMPPO Designer (IDATG)
Data-Oriented Test
5.1.2 Generating Test Data Using CECIL
The previous example has shown how the simple EC method can help to find effective test data
for a set of independent input variables. Unfortunately, in many cases this simple method cannot
be applied, because the input variables are not independent of one another. For instance, a
triangle can only be constructed of three sides where each sum over two sides must be greater
than the third.
In such cases, we are dealing with multi-dimensional ECs. The number of "dimensions" depends
on the number of interdependent input variables. IDATG is the only tool that can deal with such
complex specifications in a satisfying way by using its unique CECIL method. (Cause-Effect
Coverage Incorporating Linear boundaries)
5.1.2.1 Vehicle Insurance Example
The IDATG package includes a detailed example which illustrates the usage of the CECIL
method. It consists of an IDATG project "Projects\Project_Insurance.xml" and an application
"\bin\Insurance.exe".
Problem Description
We want to test an application that calculates the annual insurance premium for a vehicle
(Motorcycle, Car, or Van).
The basic premium depends on the engine power (in HP) and the vehicle type:
< 25 HP
25 - 49 HP
>= 50 HP
Motorcycle
50 €
75 €
100 €
< 60 HP
60 - 99 HP
>= 100 HP
Car
100 €
200 €
300 €
Van
200 €
400 €
600 €
For person groups with a higher accident risk, the premium is 20% higher. These groups are: all
persons older than 65 years, men younger than 25, and women younger than 21.
Only persons aged between 21 and 65 are allowed to drive a van. To drive a car or motorcycle, a
person must be at least 18.
Problem Analysis
In this example, we have 4 input variables: the vehicle Type, the HP, the Age, and the Gender.
We note that there are 3 distinct types of effects that all affect the end result (= the insurance
premium):
• The Baseprice which depends on the Type and the HP
• The Extracharge which depends on the Age and the Gender
• Invalid combinations that depend on the Age and the Type.
Baseprice and Extracharge are provisional results required for calculating the final end result and
are called Effect Variables in CECIL.
Step 1: Define Data Structure
Using the Data Set Editor and Data Field Editor, it is very easy to define the 4 input variables
and their ranges. Since the CECIL method involves a mathematical algorithm, only numeric input
variables can be used. However, it is quite easy to represent enum types as numbers
(0=Motorcycle,1=Car, 2=Van; 0=Male, 1=Female).
15.09.2014
Page 22
User´s Guide - Part I
Edition 16.0
TEMPPO Designer (IDATG)
Data-Oriented Test
Step 2: Define Causes and Effects
Next we have to express the textual description as formal conditions. In IDATG this can
conveniently be done in the Data Effects Editor. It allows the user to define cause/effect pairs
plus the effect variables they affect.
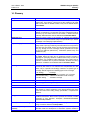
Effect-ID
Condition (Cause)
Effect
SMALL_BIKE
MEDIUM_BIKE
BIG_BIKE
SMALL_CAR
MEDIUM_CAR
BIG_CAR
SMALL_VAN
MEDIUM_VAN
BIG_VAN
OLD_PERSON
YOUNG_MALE
YOUNG_FEMALE
NORMAL_MALE
NORMAL_FEMALE
I_TOO_YOUNG
I_VAN_TOO_YOUNG
I_VAN_TOO_OLD
Type = 0 AND HP < 25
Type = 0 AND HP >= 25 AND HP < 50
Type = 0 AND HP >= 50
Type = 1 AND HP < 60
Type = 1 AND HP >= 60 AND HP < 100
Type = 1 AND HP >= 100
Type = 2 AND HP < 60
Type = 2 AND HP >= 60 AND HP < 100
Type = 2 AND HP >= 100
Age > 65
Gender = 0 AND Age < 25
Gender = 1 AND Age < 21
Gender = 0 AND Age >= 25 AND Age <= 65
Gender = 1 AND Age >= 21 AND Age <= 65
Age < 18
Type = 2 AND Age < 21
Type = 2 AND Age > 65
baseprice = 50 €
baseprice = 75 €
baseprice = 100 €
baseprice = 100 €
baseprice = 200 €
baseprice = 300 €
baseprice = 200 €
baseprice = 400 €
baseprice = 600 €
extracharge = 20%
extracharge = 20%
extracharge = 20%
extracharge = 0%
extracharge = 0%
Invalid
Invalid
Invalid
Table 1 - Causes and Effects for the Vehicle Insurance example
•
•
•
•
•
All conditions that affect the same effect variable should be mutually exclusive. For instance,
"Age > 65" and "Age < 70" would have overlapping value ranges.
It is not necessary to include the definition ranges of the input variables in the conditions (this
has already been done in the Data Field Editor). For instance, OLD_PERSON: "Age > 65"
automatically assumes "Age < 999".
It is not necessary to explicitly exclude invalid cases - this is done automatically. For instance,
SMALL_BIKE: "Type = 0 AND HP < 25" automatically assumes that I_TOO_YOUNG: "Age <
18" is not true at the same moment.
It is possible to refer to effects that have already been defined using the format %EffectName.
For instance, you may write #Age# > 65 AND NOT (%MEDIUM_BIKE).
All conditions must be linear in nature. This means that it must be possible to transform them
into the form "a*var1 + b*var2 + K < n" where a,b,.. n are constant numbers. In particular, it is
not allowed to multiply or divide two variables (5 * Age < HP is allowed, HP * Age < 5 is not).
Step 3: Generate Data Records
After the effects have been defined, IDATG's Test Data Generator can automatically create a set
of data records that covers all effects and their multi-dimensional boundaries.
The basic algorithm works like this:
• Choose 1 effect for each effect variable (e.g., SMALL_BIKE for the variable baseprice and
OLD_PERSON for the variable extracharge).
• Combine the conditions of these effects (e.g., Type = 0 AND HP < 25 AND Age > 65).
Mathematically speaking, the conditions define a multi-dimensional space which can be
seen as a multi-dimensional equivalence class.
• Search the boundaries of this space by using a sophisticated linear programming
algorithm. Try to find the minimum and maximum value in the space for each variable. (for
this example, the solution is trivial, but the algorithm can also handle complex conditions)
15.09.2014
Page 23
User´s Guide - Part I
Edition 16.0
•
TEMPPO Designer (IDATG)
Data-Oriented Test
To reduce the number of test data, discard boundaries that include no unique variable
values (e.g., (0,0,66,0), (24,0,66,0), (0,0,999,0), (24,0,999,1) can be reduced to (0,0,66,0),
(24,0,999,1) without losing any unique values).
In order to avoid defect masking, 2 invalid effects may not be combined. Instead, 1 invalid effect is
taken and combined only with valid effects (this is only possible if the conditions do not contradict
each other).
5.1.3 Importing Test Data
Another easy way for getting test data is importing it from an external file. Each row in the file is
added to the Records folder of the data set. It is assumed that all imported data records contain
valid data. IDATG supports e.g. tab-separated files or .csv files. In case of a new data set, data
fields are automatically created and named after the column names in the header line.
In case of an existing dataset, it is checked whether its data fields correspond to the columns in
the file. If not, an error message appears and the user has to update the data field structure before
continuing.
5.1.4 Specifying Test Data Manually
It is also possible to define data records manually using the Data Records Editor. This method
requires the most effort, but can be helpful to test special data combinations that cannot be
covered by the generator.
5.2 Creating Data-Based Task Flows
Regardless whether the test data has been generated, imported or specified manually, it is
necessary to create a connection between the data and the task flow. In particular, it has to be
specified in which steps the data is used.
It is also important to decide whether a separate test case should be generated for each data
record or if more than one record should be used in one test case.
5.2.1 Basics
• Drawing data-oriented task flows
We recommend to divide a data-oriented use case task in at least 2 building blocks: An Input
block for entering the data and a Verify block that checks the results. Typically, the Verify block
will contain a conditional branch for each possible program reaction (in other words, for each
equivalence class of the input data). The Demo project included in the IDATG setup illustrates
the basic concept.
•
Creating references to test data in steps
The value of a data field in the current record can be referenced using the following designator
syntax:
#~DataSet:DataField#
For instance, #~Person:Age# refers to the value of the field Age in the current record of the
data set Person. Like all other designators data references can be used in step events,
commands, conditions etc.
Data sets also have two pre-defined designators that refer to properties of the current data
record: #~DataSet:$id# and #~DataSet:$valid#.
15.09.2014
Page 24
User´s Guide - Part I
Edition 16.0
TEMPPO Designer (IDATG)
Data-Oriented Test
Typically, the Input building block will contain step events like Input(#~Person:Age#), while the
branches in the Verify block will have conditions like #~Person:$valid# AND #~Person:Age# >
18.
If you used the CECIL method for generating test data, you can even include references to the
effects (#~DataSet:~EffectName#) and effect variables (#~DataSet:@VarName#):
− The Verify_Error block in the Insurance example contains conditions like
#~Insurance:~I_TOO_YOUNG# that distinguish the different kinds of invalid data.
− In addition, the step Verify_Premium has an event that actually calculates the correct
premium (!):
Verify(VALUE, (#~Insurance:@baseprice# * (100 + #~Insurance:@extracharge#)) / 100)
5.2.2 Generating 1 Separate Test Case for each Data Record
• Assigning a task to a data set
The first step is to assign a use case task to a specific data set. After selecting a data set in
the Task Properties Editor, the task icon includes a small data symbol
that makes it
distinguishable from normal use case tasks. When generating test cases, IDATG will try to
create a test case for each record of the selected data set.
•
Generating Test Cases for each Data Record
After a data-oriented task has been defined, it is possible to generate test cases for it. Just
select the task, open the Test Case Generator and check the option "Data-oriented Test".
You can also select whether you want to cover all valid and/or all invalid records of the data
set assigned to the task.
IDATG will generate 1 test case for each record (provided that all records satisfy at least 1
condition in the Verify block). All designators inside the task flows - including the references
to test data - will be replaced by the current designator values.
5.2.3 Using more than 1 Data Record in the same Test Case
• Defining Data-oriented Loops
The Sub Task Editor provides the possibility to define entire sub tasks as loops. If a loop
is assigned to a data set, it is repeated for each valid and/or invalid data record in this set.
If you define an Input and a Verify building block as shown in "Drawing data-oriented task
flows" above and combine these 2 blocks into a loop, it is e.g. possible to fill an entire data
base in one single test case.
•
Changing the Data Record Pointer Manually
It is possible to manipulate the generator's internal pointer that defines the currently
selected record of a data set. The following Actions can be used for this purpose:
Action Name
Arguments
Description / Example :
GotoDataRecord
Dataset (DataSetName)
RecordID (String)
Move the record pointer of the data set to the
selected record.
e.g. GotoDataRecord(#~Person#, "v01")
NextDataRecord
Dataset (DataSetName)
RecordType (V, I, or A)
Move the record pointer of the data set to the
next record of the selected type (V=Valid,
I=Invalid, A=All). If there are no more records,
the pointer is reset to the first one.
e.g. NextDataRecord(#~Person#, v)
15.09.2014
Page 25
User´s Guide - Part I
Edition 16.0
ResetDataRecord
•
TEMPPO Designer (IDATG)
Data-Oriented Test
Dataset (DataSetName)
RecordType (V, I, or A)
Reset the record pointer of the data set to the
first record of the selected type (V=Valid,
I=Invalid, A=All).
e.g. ResetDataRecord(#~Person#, i)
Generating Test Cases
In the Test Case Generator do NOT check the option "Data-oriented Test" but select
"Graph-oriented Test" instead. "Data-oriented Test" should only be used if you want to
generate 1 test case per record.
15.09.2014
Page 26
User´s Guide - Part I
Edition 16.0
TEMPPO Designer (IDATG)
Random Test
6 Random Test
6.1 Introduction
The term random testing in general describes the process of selecting inputs for software under
test (SUT) from a given set of inputs at random. For this purpose some model of the software is
needed. In IDATG the model is represented as a set of building blocks.
As for normal graph-oriented testing, the basis for random testing is a task flow model of the
software under test and its specification. However, for random testing no use case tasks are
required so that the model consists only of building blocks. The random test case generation tries
to find a path through these blocks. That is, it tries to start at one step in the beginning of a
building block and then find a sequence of steps that lead out of this first building block. After that
is done, the algorithm tries again to enter a building block (which may be the same as the first
one). This goes on until all defined exit criteria are fulfilled.
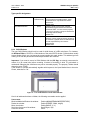
Figure 6 - IDATG Model with three Building Blocks and a walk through them (in red)
In Figure 6 you can see an illustration of a simple IDATG model. It consists of three building blocks
(each of them beginning with a green start step). The random test case generation generated a
random walk through them. This walk is marked with red arrows for illustration here. In IDATG you
can see your generated random test case as usual. This example shows a simple automated teller
machine, which starts with inserting a card, then entering a pin and then withdrawing some money.
In this example one can see that several steps, such as “Insert_Card” were covered by the test
case shown by the red arrows, whereas other steps such as “Eject_Card” were not covered.
6.2 IDATG Task Structure for Random Testing
As was mentioned above, random testing only uses building blocks, but no use case tasks. The
building blocks that should be combined randomly have to be located in the same folder. This
main folder may have subfolders. All building blocks in this folder or one of its subfolders will be
used for random testing. Building blocks not inside the main folder will be ignored. In Figure 7 the
recommended folder structure is shown. The folder “RandomTesting” is the main folder for
random testing and contains two building blocks that will be used to create the IDATG model of
the software under test. The building block in “AuxiliaryFolder” and the building block “NotUsed2”
will not be used. Likewise, the use case task in the “RandomTesting” folder will be ignored.
15.09.2014
Page 27
User´s Guide - Part I
Edition 16.0
TEMPPO Designer (IDATG)
Random Test
Figure 7 - IDATG Folder Structure for Random Testing
It may be convenient to use building blocks in random testing that have sub-building blocks. In the
case that these sub-building blocks should not be used as “stand-alone” building blocks, one can
just put them in a different folder than the “RandomTesting” folder. This is shown in Figure 7 with
the folder “AuxiliaryFolder”. The building block “NotUsed1” may be used as a sub-building block in
“Used1” or “Used2”, but it will never be used alone in the random test case generation.
If in the example above the project is selected as the main folder, all building blocks inside it are
used (all in the example).
No special properties have to be set for a folder to use it for random testing. It is sufficient to select
the desired folder before starting the test case generation.
6.3 IDATG Building Block Structure for Random Testing
This chapter describes the requirements for building blocks used for random testing. It is useful to
view a generated random test case as a walk that goes through several building blocks.
6.3.1 Building Block Requirements
In general, two requirements for building blocks exist:
1. Building blocks shall not contain dead ends
2. The pre-conditions for performing a certain step in the real system under test have to be
specified very thoroughly in the IDATG model. It must not be possible that a step sequence
is generated that is impossible in the real system.
The first requirement states that it should always be possible to reach an end step (that is a step in
the building block without successors) without violating any conditions. The reason behind this is,
that when the random test case generation enters a building block and cannot leave it, this test
case must be closed and cannot be extended any further (in this case a warning will be displayed
for the user).
This requirement can be dropped, in theory, if the tester explicitly creates steps that end the
testing process. An example for a building block with a dead end is shown in Figure 8.
15.09.2014
Page 28
User´s Guide - Part I
Edition 16.0
TEMPPO Designer (IDATG)
Random Test
Figure 8 - Building Block with dead end
The second requirement is that no invalid test cases can be generated. Consider for example a
step that clicks on a button “Delete”, then this button must be clickable when the test case reaches
this step. Therefore at some point there must be a condition that ensures that this button is
enabled.
Figure 9 - Building Block with incorrect reachable step
In Figure 9 you can see an incorrect building block. Assume that none of the steps has conditions.
Then, after the window is closed, the last step tries to use the already closed window. This should
not be possible.
You can also specify conditions at the beginning of a building block that define the requirements
that must hold for several paths. An example is shown in Figure 10.
Figure 10 - Building Block with condition at the beginning
6.3.2 Describing Window Behavior
A detailed specification of the GUI behavior is required for random testing with IDATG (unless of
course the system under test has no GUI).
Whenever an event opens or closes a window, the action of that step should be set accordingly
with “OpenWindow” or “CloseWindow”.
Figure 11 - Building Block with OpenWindow action
15.09.2014
Page 29
User´s Guide - Part I
Edition 16.0
TEMPPO Designer (IDATG)
Random Test
Figure 12 - Building Block with CloseWindow action
Figure 11 shows an example where a window (here called “PlayerListEditor”) is opened. The fact
that the window remains open after the step is specified by an action. The yellow box shows some
details of the step. In this case the step has the condition that requires the window to be not open.
This is generally not required, since in some cases you may open an already existing window.
Figure 12 shows an example for a CloseWindow action, with the pre-condition that the window to
be closed must exist (see below for an alternative).
Specifying the condition of a step using certain GUI elements can be done in two ways:
1. Entering the window as “Start Window” in the Step Editor.
2. Defining a condition that the window exists.
The first choice is usually preferred, since it is required anyway if a step manipulates a window.
The second one may be needed if a step without events is used and has conditions for other
successor steps. This means that in the example in Figure 12 the condition may be dropped, since
the “CloseWindow” action already has a specified window in the Start Window section and
therefore already knows that this window must be usable.
Open/Close actions may not be enough. In some cases opening or closing a window may, for
example, “reset” certain values. This additional behavior must be captured, too, if other steps rely
on those values. An example is shown in Figure 13. Here a complete test case was generated by
using several building blocks. The outcome is that first some element is selected. After that the
window where the element was selected is closed and reopened. The behavior of the tested
system is that the selection is reset to a default value thus invalidating the previous selection. In
this case, the reset of the selection should be modeled as action in either the “CloseWindow” or
“OpenWindow” step.
Figure 13 - Invalidation by reset
Lastly, sometimes it may be convenient to use the action “OpenModalDlg” instead of
“OpenWindow”. The difference is that if a modal dialog is opened, then only this window and its
children are usable, all others are inactive. One should not forget to close such modal dialogs as
usual with “CloseWindow”.
6.3.3 Using Test Data
If you want the random test case to choose entries from a test data set randomly, simply add a
building block containing the action “NextDataSet” and no condition. This block will be built into the
generated test cases an arbitrary number of times, thus ensuring that not always the same data
record is used.
15.09.2014
Page 30
User´s Guide - Part I
Edition 16.0
TEMPPO Designer (IDATG)
Random Test
6.4 Test Case Generation
The user workflow for random testing is as follows:
1. Select the folder containing the building blocks for random testing (this may be the project
folder itself)
2. Select “Generate Test Cases” from the menu or via the toolbar.
3. In the Test Case Generation Dialog, choose “Random Test” and press "Random Test
Options;"
4. Choose the Random Test Options (see below)
5. Start the test case generation with “OK”.
Figure 14: Parameters for random testing (with default values)
6.4.1 Random Test Options
6.4.1.1 Coverage Goals
Here you can specify what the random test case generator should cover.
Building Blocks is the simplest coverage goal, which just says that the algorithm should try to
enter each block at least once, but not necessarily exhaustively cover each block.
Steps & Connections is the default coverage goal which tells the algorithm to cover all steps and
connections at least once.
15.09.2014
Page 31
User´s Guide - Part I
Edition 16.0
TEMPPO Designer (IDATG)
Random Test
Building Block Pairs is the most difficult coverage goal to fully achieve. Its meaning is that all
pairs of building blocks should exist in the final test case in direct succession. This means for
example for the blocks 1 and 2 that the algorithm should try to create a test case where 1-1, 1-2,
2-1 and 2-2 are contained. Please note that in general this is impossible due to conditions.
Assume that block 1 opens a window and block 2 closes it, then 2-2 may not be possible.
Percentage to cover signifies how much of the chosen coverage goal should be covered by the
algorithm. If the chosen coverage is reached, the process stops. Usually 90-100 percent is
chosen, but for some cases (unreachable steps in the model) a lower percentage might be better
suited.
Recommendation: Steps and Connections
6.4.1.2 Exit Criteria
Here one can specify the number of test cases and their length.
Iterations without coverage increase is an important parameter for random testing. Simply put it
is the amount of “freedom” the random generator has. The lower the value, the more deterministic
the result will be. Its precise meaning is how many steps the algorithm may add randomly to a test
case even if they do not contribute to a coverage goal. If this number is reached, then the
algorithm switches to a search strategy. Note that if no search strategy was chosen, then this
parameter is meaningless. If there are very large building blocks in the model with many steps in a
sequence, one should increase this parameter.
Max Test Cases is the number of test cases to generate. If the chosen coverage goal is reached
before this number of test cases is created, then the algorithm stops.
Max Test Case Length the maximum number of steps in a single test case. One should not set
this value too low, since a random test case generator needs more tries than a purely deterministic
one. A rough guideline is to use the number of steps in the model multiplicated by a factor of 3-8.
The factor should be set higher if the model is more complex (uses many conditions, has many
different paths in each block) and lower if the model is simple.
Timeout is the timeout in seconds.
Recommendation: 1 Test case, Test case length approx: (number of steps in model x 5),
Iterations without coverage increase: 50.
6.4.1.3 Search Strategy
Here one can choose the search strategy to be applied in case the random generator fails to reach
any uncovered elements in the model.
Random Depth First Search searches exhaustively within a certain bound. This usually improves
the coverage by a reasonable amount. Medium running time.
Exploration of adjacent Building Blocks Simple strategy, which explores blocks exhaustively
with often good results. Short running time in general.
Construct Path to uncovered Element Sophisticated strategy, which searches for uncovered
elements and tries to construct a path. Has a long running time. Should only be used in
conjunction with both other strategies.
Continue after failed search Defines whether the random generator should continue if the search
fails.
15.09.2014
Page 32
User´s Guide - Part I
Edition 16.0
TEMPPO Designer (IDATG)
Random Test
Recommendation: Disable only "Construct Path to uncovered Element" due to its long running
time. For very simple models one may disable all search strategies.
6.4.1.4 Tips & Tricks for Random Test Options
Problem
Low coverage (general tips)
Low coverage in a large model
Low coverage in a small model
with complex conditions
Too short test cases
15.09.2014
Suggestion
Increase Max Test Case Length
Increase Max Test Cases
Enable more Search Strategies
Increase Search Strategy Depth
Look for unreachable steps by checking step conditions
Increase Iterations without Coverage Increase
Decrease Iterations without Coverage Increase
Disable Search Strategies
Page 33
User´s Guide - Part I
Edition 16.0
TEMPPO Designer (IDATG)
Transition Test
7 Transition Test
Apart from defining entire test sequences with task flow graphs it is also possible to specify a set
of individual state transitions. Based on the pre-conditions and effects (actions) that have been
defined for each transition, IDATG is able to generate a valid sequence automatically. The highly
complex generation algorithm has even been patented.
The first versions of IDATG supported only the transition test method. However, while the
generation algorithm is very powerful, it requires a certain skill level for the user to create an
appropriate specification. Also, it can only be used for GUI testing, but not for API testing. Today,
in most projects the graph-based task flow method is sufficient. Nevertheless, the traditional
transition test method is still supported. Many steps in the workflow are the same as for graphbased testing, therefore only the differences have been described in detail:
7.1 Workflow
In order to obtain a consistent GUI specification we recommend the following procedure:
7.1.1 Defining the GUI Behavior
•
•
•
•
Record the GUI layout with the GUI Spy and complete the static GUI information as described
in section 8.1.
Define the start window of the application, i.e. the window that you see when you start the
application. This window must not have a parent and must be visible and enabled. You can
select the start window in the Application Editor.
Specify, how the application can be terminated. Just draw a transition from the object that
closes your application (e.g., an ’Exit’ button) back to the same object and associate it with the
action ‚CloseApplication‘. If you do not have a trigger window like an ’Exit‘ button, you can also
specify a transition that is triggered by a key combination. Most applications can be terminated
by pressing <Esc>, <Alt-x> or similar key combinations.
Specify how windows can be opened and closed by drawing transitions associated with
‚OpenWindow‘ and ‚CloseWindow‘ actions. Dialogs should be opened with ‚OpenModalDialog’,
if the user cannot use other windows while the dialog is open. Three requirements must be
fulfilled before a test case can be generated for a window:
1. It must be existing. This is true, if the window is opened explicitly with ‚OpenWindow‘ or if its
parent window is existing and the openMethod is set to ‚Parent‘. (Which signifies that if the
parent exists, the window is also existing).
2. It must be visible. This is true, if the window is opened explicitly with ‚OpenWindow‘ or if the
attribute #WindowID:$Visible# is set to true. Note: If the parent is invisible, the child is also
invisible, but if the parent is visible, the child is not necessarily visible!
3. It must be enabled. This is true, if the window is opened explicitly with ‚OpenWindow‘ or if
the attribute #WindowID:$Enabled# is set to true. Note: If the parent is disabled, the child is
also disabled, but if the parent is enabled, the child is not necessarily enabled!
•
•
If you do not specify a ‚CloseWindow‘ action, IDATG assumes that the window remains
opened. This may be a problem, if the window is a systemmodal dialogbox. ‚Systemmodal‘
means that no other windows can be used while this window is open. Be sure to define a
‚CloseWindow‘ action for all systemmodal dialogboxes to avoid problems during test case
generation. ‚CloseWindow‘ actions are unneccessary in a ‚CloseApplication‘ transition.
After you have specified all these basic transitions that simply serve for navigation through the
GUI, it may be helpful to let IDATG generate test cases to check, if the specification is
consistent up to this point. If a test case could be generated for each transition, we can start to
define the semantics of the application.
15.09.2014
Page 34
User´s Guide - Part I
Edition 16.0
TEMPPO Designer (IDATG)
Transition Test
7.1.2 Specifying the Semantics of the GUI
•
Now comes the most challenging part of the GUI specification, the definition of transitions that
depend on certain semantic conditions or that have certain semantic effects. Try to keep in
mind how IDATG generates test cases: it always searches for possibilities to fulfill the
conditions you enter. Conditions that only depend on the contents of GUI objects are trivial to
solve, e.g. to fulfill #Name# != “”, IDATG knows exactly what to do (enter a value in the field
‚Name‘). However, there is no uniform way to solve conditions that depend on other attributes,
so you have to make sure that there is a way to solve them. For example, if you entered a
condition # WindowID:CreateMode# = TRUE, but did not specify how the designator
CreateMode can be set to true, it is impossible to generate a test case. But if you somewhere
defined a transition with the action SetAttribute(#WindowID:CreateMode#, TRUE), a solution
can be found.
7.2 Integrity Rules for Transition Diagrams
Before generating transition coverage test cases, please observe the following pre-conditions:
• A start window and at least one end transition (that has the action CloseApplication) are
defined for the application.
• From the application´s start window it must be possible to reach all other windows that have
state transitions. Likewise, it must be possible from all windows to reach an end transition
(Don´t forget to close modal dialogs!).
• Note that a transition may only be executed if its start window is opened, enabled and visible
and if all its conditions are fulfilled. Of course, the destination window of a transition must also
be opened, enabled and visible after the transition.
• It must be possible to fulfill all specified conditions either by executing transitions with
appropriate actions or by entering values into fields.
7.3 Transition Types
Depending on the hierarchical relationship of the start and destination window, various transition
types can be distinguished. A thin arrow from window A to window B signifies that A is the parent
of B, a bold arrow with a number represents a transition and its type.
Figure 15 - Overview of Transition Types
15.09.2014
Page 35
User´s Guide - Part I
Edition 16.0
TEMPPO Designer (IDATG)
Transition Test
Since it is possible to open a Window Editor in each of the hierarchy levels, most transitions are
displayed in 2 different Window Editors. First, in the editor for the parent of the start state,
second in the editor for the start state itself. Likewise, there are also 2 possibilities to select a
state: Either click on the state in the editor of its parent window or click on the top in the editor of
the state itself. For example:
Parent layer:
Start state layer:
Normal transition arrow.
Transition from the top to a window symbol.
Transitions that are triggered by a menu item
Transitions that are triggered by menu items are a special case and can be drawn in the
Menu Editor
Note: The menu item itself is not really a state, it is just the trigger (event)
for the transition. Menu items can only be the start state of a transition, but not the
destination state.
15.09.2014
Page 36
User´s Guide - Part I
Edition 16.0
TEMPPO Designer (IDATG)
GUI Testing
8 GUI Testing
8.1 Workflow
In addition to the activities described in chapter 4.2, the following steps are required for testing
graphical user interfaces:
8.1.1 Recording the GUI Layout
• The IDATG database contains pre-defined information about the most common GUI Builders.
If your application uses a different GUI Builder or some self-defined window classes, you can
specify them in the GUI Builder- and Window Class Editor. However, first you have to make
sure that your test execution tool is able to recognize these GUI objects correctly. The fact that
IDATG recognizes a certain GUI object does not imply that the test execution tool will
recognize it, too.
• If you already have a GUI prototype of your application, you can use the GUI Spy to record all
of its windows. This method is very effective and saves a lot of work. A special AddIn is
available for recording Java GUI´s.
• If you're using HP QuickTest, you can import QuickTest object repositories directly into IDATG.
This is especially useful for GUI technologies not supported by the IDATG GUI Spy.
8.1.2 Completing the Static GUI Information
•
•
•
If you do not have a GUI prototype, missing windows can be added manually in the Window
Editor. Common windows like Message Boxes can be generated easily with the Window
Wizard.
Depending on the window type, you can define various features with the Window Properties
Editor. For instance, you may want to replace the proposed window ID by a more intelligible
name. It is also particularly important to define a correct tag that will allow the test execution
tool to recognize the window. In most cases, IDATG generates an appropriate tag
automatically, but there may be a few special cases that require manual editing. (Please refer
to chapter 10.6 for more information) You can also define the initial value of windows that take
user input like input fields or check boxes.
The window hierarchy of the application may be changed in the Application Editor by
dragging child windows over their new parents.
8.1.3 Assigning Task Steps to GUI Objects
• As soon as the GUI layout is available, it is possible to assign the steps of the task flows to
GUI objects using the toolbar button 'Assign Object to Step'.
• Instead of filling out the field 'Test Commands' in the Step Editor, you may enter one of the
pre-defined user actions in the field 'Event' (Click, Input etc).
8.2 Window Types
This section describes the different window types supported by IDATG and the particularities that
have to be observed during the GUI specification. It also provides a handy overview of all events,
conditions and actions that can be used for each type.
15.09.2014
Page 37
User´s Guide - Part I
Edition 16.0
TEMPPO Designer (IDATG)
GUI Testing
The following table lists the designators that can be used for most window types:
Designator Name
#WindowID:$Caption#
Type
(String)
Description
The text that appears as part of the window to
label it. To make one of the letters in the
caption of a window the hotkey, precede it
with an ampersand (&). (e.g. &File is
displayed as File)
Default: Empty.
#WindowID:$Exist#
(Bool)
True, if the window is currently existing.
Default: True for the start window and the
children that are activated by it, false for all
other windows.
Specifies the first control of a group of controls in
which the user can move from one control to the
next by using the arrow keys. All controls in the
tab order after the first control with the Group
property set to False belong to the same group.
The next control in the tab order with Group set
to True ends the first group of controls and starts
the next group.
Default: False.
#WindowID:$Group#
(Bool)
#WindowID:$Tabstop#
(Bool)
Specifies that the user can move to this control
with the TAB key.
Default: True.
#WindowID:$Visible#
(Bool)
Determines whether or not the window is visible.
Default: True.
#WindowID:$Enabled#
(Bool)
Determines if the window is enabled.
Default: True.
Note that this section only points out the type-specific features of each window type. There is a
number of general operations that can be used for (almost) all window types. For instance, the
events Click and Type or the action SetAttribute can be used in most cases.
8.2.1 Check Boxes
Check Boxes have a value that may be either TRUE or FALSE (checked or unchecked). If the box
has the property Tri-state, it can also have a third value UNDETERMINED. In this state the box
appears to be grayed and checked. It is used e.g., if you have selected a set of files in the
Windows Explorer and open the Properties dialog. If some of the files are read-only and the others
are not, the check box Read-only in the dialog will have the state UNDETERMINED.
Note: Tri-state check-boxes are not supported by SilkTest.
Figure 16 - Check Box States
User events:
Change the state of a box:
Verify the state of a box:
Check(BOOL expression)
Verify(Value, BOOL expression)
Actions:
Specify that the state of a box has changed:
SetCheckBox(#BoxID#, BOOL expression)
15.09.2014
Page 38
User´s Guide - Part I
Edition 16.0
TEMPPO Designer (IDATG)
GUI Testing
Type-specific designators:
#CheckBoxID#
(Bool or
The current state of the check box, can be
“undetermined“) accessed with SetCheckBox(Name, Value).
“Undetermined” is only allowed for tristate
check boxes.
Default: False.
#CheckBoxID:$Auto#
(Bool)
Creates a check box that, when selected,
automatically toggles between checked and
unchecked states. You must set this property
to True if you are using a group of check boxes
with Dialog Data Exchange.
Default: True.
#CheckBoxID:$TriState#
(Bool)
Creates a three-state check box. A three-state
check box can be grayed as well as checked or
not checked. A grayed check box indicates that
the state represented by the control is
undetermined.
Default: False.
8.2.2 Child Windows
The type Child Window should only be used for child frames of a MDI main frame. For instance,
the Window Editor of IDATG is a child window of the main IDATG window. Child windows usually
have a titlebar of their own, but cannot be moved outside their main window. This window type has
nothing to do with the parent/child relationships between the windows!
Important: If you want to record a Child Window with the GUI Spy, we strongly recommend to
restore it to its normal size before recording it instead of recording it while it is minimized or
maximized! Otherwise the child frame may not be recorded properly. The property Titlebar should
always be set to TRUE!
If the window is opened automatically together with its parent, the Open Method has to be set to
Parent, otherwise to Call.
Figure 17 - Two Child Windows inside a Main Window
Like for all windows that have a titlebar, the following commands can be applied:
User events:
Minimize/Maximize/Restore the window:
Resize the window:
Move the window:
Scroll the client area of the window:
Close the window:
15.09.2014
Position(MINIMIZE|MAXIMIZE|RESTORE)
Position(RESIZE, Width, Height)
Position(MOVE, X, Y)
Scroll(Pages, V|H)
Close
Page 39
User´s Guide - Part I
Edition 16.0
TEMPPO Designer (IDATG)
GUI Testing
Actions:
Specify that the window has been opened: OpenWindow(#WindowID#)
Specify that the window has been closed: CloseWindow(#WindowID#)
Type-specific designators:
#ChildWndID:$Titlebar#
(Bool)
#ChildWndID:$SystemMenu#
(Bool)
If True, the window has a titlebar.
Default: True.
If True, the window has a system menu that can
be opened with the right mouse button.
Default: True.
8.2.3 Combo Boxes
Combo Boxes combine the qualities of an input field with that of a list box. Their value is the
contents of the input field. The value type may be STRING, NUM or DATE.
Figure 18 - Combo Box
Important: Combo boxes with BoxType Droplist only have a list, but no input field and thus no
value. Some events and actions are not applicable for them.
User events:
Enter a specific text into the input field:
Click on a specific list item:
Click on the last list item:
Verify the contents of the input field:
Verify the text of a specific list item:
Verify the text of the last list item:
Verify which text is currently selected:
Input(STRING, NUM or DATE expression)
Select(NUM expression, [Clicks])
Select(LAST, [Clicks])
Verify(Value, STRING, NUM or DATE expr.)
Verify(Value, NUM expr., STRING expr.)
Verify(Value, LAST, STRING expr.)
Verify(Selection, STRING expr.)
Actions:
Specify that the text of the input field has changed:
SetComboBox(#BoxID#, STRING, NUM or DATE expression)
Type-specific designators:
#ComboBoxID#
15.09.2014
(String, Num or The current contents of the edit field of the box,
Date)
can be accessed with SetComboBox(Name,
Value)
Default: Empty.
Page 40
User´s Guide - Part I
Edition 16.0
#ComboBoxID:$BoxType#
TEMPPO Designer (IDATG)
GUI Testing
Specifies the type of combo box. This property
(“Simple“,
“Dropdown“ or can have one of the following values:
Simple:
“Droplist“)
Creates a simple combo box that combines an
edit-box control which takes user input with a
list control. The list is displayed at all times, and
the current selection in the list is displayed in
the edit-box control.
Default): Creates a drop-down
Dropdown (D
combo box. This type is the same as a simple
combo box, except the list is not displayed
unless the user clicks a drop-down arrow at the
right of the edit-box control portion of the
combo box.
Drop List: This type is similar to the
drop-down style, but the edit-box control is
replaced by a static-text item which does not
take user input that displays the current
selection in the list.
#ComboBoxID:$Sort#
(Bool)
Sorts the contents of the combo box
alphabetically.
Default: True.
8.2.4 Custom Windows
All windows that have a classname unknown to the GUI Spy are recorded as Custom Windows.
Most applications contain a lot of custom windows that are necessary for the program logic but are
of little importance to the user (and the tester). They may also appear if the GUI programmers
have introduced new window classes of their own instead of using the ones provided by the GUI
builder. You can define their type later using the menu ‘Change Window Type’ or (even better)
define the type before recording in the Window Class Editor.
If a custom window has a titlebar, the available designators, events and actions are the same as
for Child Windows.
8.2.5 Dialog Boxes
Dialog Boxes are a basic component of most GUIs and are used for various purposes. The most
common type has a titlebar of its own and is used to display other controls (e.g., a Message Dialog
or Properties Dialog).
Sometimes dialog boxes are also used without a titlebar, e.g. as page of a tab control or inside a
frame window. If the window is opened automatically together with its parent, the Open Method
has to be set to Parent, otherwise to Call.
The property System Modal is particularly important. It has to be set to TRUE if the other windows
of the application cannot be used while the dialog is open. In this case it also has to be specified
how the dialog can be closed by drawing a transition with a CloseWindow action. Example: Error
Message.
Please make sure that these properties are always set correctly!
15.09.2014
Page 41
User´s Guide - Part I
Edition 16.0
TEMPPO Designer (IDATG)
GUI Testing
Figure 19 - Dialog Box containing other Dialogs as Tab Pages
The available events and actions are the same as for Child Windows. In addition, there is a special
action for opening a dialog box as system modal dialog: OpenModalDialog(#DialogID#)
Type-specific designators:
#DlgID:$Style#
(“Overlapped“,
”Popup“ or
”Child“ )
Overlapped: Creates an overlapped window.
An overlapped window is always a top-level
window and should have a caption and a
border.
Default): Creates a pop-up window.
Popup (D
Child: Creates a child window.
#DlgID:$Titlebar#
(Bool)
#DlgID:$SystemMenu#
(Bool)
If True, the window has a titlebar.
Default: True.
If True, the window has a system menu that can
be opened with the right mouse button.
Default: True.
#DlgID:$SystemModal#
(Bool)
Creates a system-modal dialog box, which
prohibits switching to another window or program
while the dialog box is active.
Default: False.
#DlgID:$Control#
(Bool)
#DlgID:$ControlParent#
(Bool)
Creates a dialog box that works well as a child
window of another dialog box, much like a page
in a property sheet. This style allows the user to
tab among the control windows of a child dialog
box, use its accelerator keys, and so on.
Default: False.
Allows the user to navigate among the child
windows of the dialog by using the TAB key.
Default: False.
15.09.2014
Page 42
User´s Guide - Part I
Edition 16.0
TEMPPO Designer (IDATG)
GUI Testing
8.2.6 Group Boxes
Group Boxes are used to group a set of controls visually together. They become only important for
the GUI specification if they contain radio buttons, because without group boxes IDATG cannot
determine which radio buttons belong together. If a group box contains radio buttons, its value is
determined by the caption of the selected radio button and the following operations are allowed:
Figure 20 - Group Box containing 2 Radio Buttons
User events:
Select a radio button:
Verify that a specific radio button is selected:
Actions:
Specify that the selection has changed:
Select(“RadioButtonCaption”)
Verify(Value, “RadioButtonCaption”)
SetRadioGroup(#GroupID#, “RadioButtonCaption”)
Type-specific designators:
#GroupBoxID#
(Radio Button
Caption)
The caption of the currently checked radio button
in the group. The radio button must be
positioned inside the group box. Group Boxes
that do not contain radio buttons have no value.
Can be accessed with SetRadioGroup(Name,
Value)
Default: Empty.
8.2.7 Headers
Headers are mostly used in list views to display the title of the list columns. Clicking on a column
header usually sorts the list according to the elements in this column. Apart from that they do not
have any special features.
Figure 21 - List View with Header
8.2.8 Images
This window type is used for all kinds of icons, bitmaps or web images (exception: the type "Link"
is used for clickable web images). In many GUI builders like Visual C++ and Java images are
implemented as a special kind of static text object and even have the same classnames as
ordinary texts (e.g., Static or JLabel). In case an image object consists of both an icon and a text it
is possible to use the event Verify(CAPTION, "ImageCaption") to analyze the text.
8.2.9 Input Fields
Input Fields are very important in most GUIs, because they allow the user to enter a value. The
value type may be STRING, NUM or DATE.
15.09.2014
Page 43
User´s Guide - Part I
Edition 16.0
TEMPPO Designer (IDATG)
GUI Testing
User events:
Enter a specific text into the input field:
Verify the contents of the input field:
Input(STRING, NUM or DATE expression)
Verify(Value, STRING, NUM or DATE expr.)
Actions:
Specify that the text has changed: SetInputField(#FieldID#, STRING, NUM or DATE expr.)
Type-specific designators:
#InputFieldID#
(String, Num or The current contents of the input field, can be
Date)
accessed with SetInputField(Name, Value)
Default: Empty.
#InputFieldID:$Multiline#
(Bool)
Creates a multiline edit-box control. When the
multiline edit-box control is in a dialog box, the
default result of pressing the ENTER key is to
choose the default button.
Default: False.
#InputFieldID:$WantReturn#
(Bool)
Specifies that a carriage return be inserted when
the user presses the ENTER key while typing
text into a multiline edit-box control in a dialog
box. If this style is not specified, pressing the
ENTER key has the same effect as pressing the
dialog box’s default push button. This style has
no effect on a single-line edit-box control.
Default: False.
#InputFieldID:$ReadOnly#
(Bool)
Prevents the user from typing or editing text in
the edit box.
Default: False.
#InputFieldID:$Number#
(Bool)
Prevents the user from typing non-numeric
characters.
Default: False.
8.2.10 Links
Links are used in HTML documents for navigating between different web pages. IDATG
distinguishes 3 different types:
• Normal text links identified by underlined text and the key word <A> in the HTML source.
WinRunner expects the classname html_text_link.
• Clickable images denoted by <A><IMG><\A> in the HTML source. They are depicted as a blue
rectangle in IDATG. WinRunner expects the classname html_rect.
• Hotspots inside an image defined by a <MAP><AREA><\MAP><IMG useMap> construct. In
IDATG, these hotspots are recorded as children of the image and get the classname
html_area. They are also depicted as a blue rectangle. Since WinRunner does not support
hotspots, a click on the appropriate coordinate of the image (i.e. the center of the hotspot) is
generated instead.
Type-specific designators:
#Link:$URL#
15.09.2014
(String)
The URL (web address) the link points to.
Default: http://.
Page 44
User´s Guide - Part I
Edition 16.0
TEMPPO Designer (IDATG)
GUI Testing
8.2.11 List Boxes and List Views
List boxes and list views are very similar, except that list views can have more than one column
and support different display modes (a good example is the right part of the Windows Explorer).
For the following commands only the text in the first column of a list view is relevant.
Figure 22 - List Box and List View
User events:
Click on a specific list item:
Click on the last list item:
Click on a specific text:
Verify the text of a specific list item:
Verify the text of the last list item:
Verify which text is currently selected:
Select(NUM expression, [Clicks])
Select(LAST, [Clicks])
Select(STRING expression, [Clicks])
Verify(Value, NUM expression, STRING expression)
Verify(Value, LAST, STRING expression)
Verify(Selection, STRING expression)
The following events can only be used if the list items are check boxes:
Change the state of a specific list item:
Change the state of the last list item:
Change the state of a specific text:
Check(NUM expression, BOOL expression)
Check(LAST, BOOL expression)
Check(STRING expression, BOOL expression)
Actions:
Specify that the text of a specific list item has changed:
SetListBox/SetListView(#ListID:$RowNr#, STRING expression)
Specify that the text of the last list item has changed:
SetListBox/SetListView(#ListID:$LAST#, STRING expression)
Note: Usually it is not possible to edit the contents of a list directly.
Type-specific designators:
#ListID:$x#
#ListBoxID:$Selection#
(only for ListBoxes)
15.09.2014
(String)
(“Single“,
“Multiple“ or
“Extended“)
The current contents of row number x, can be
accessed with SetListBox(Name, Value). x can
be any integer number or LAST representing the
last list item.
Default: Empty.
Determines how items in a list box can be
selected. Possible values are as follows:
Single (D
Default): Only one item in a list box can
be selected at a time.
Multiple: More than one list-box item can be
selected, but the <SHIFT> and <CTRL> keys
have no effect. Clicking or double-clicking an
unselected item selects it. Clicking or doubleclicking a selected item deselects it.
Extended: The <SHIFT> and <CTRL> keys can
be used together with the mouse to select and
deselect list-box items, select groups of items,
and select non-adjacent items.
Page 45
User´s Guide - Part I
Edition 16.0
TEMPPO Designer (IDATG)
GUI Testing
#ListViewID:$SingleSelection#
(only for ListViews)
(Bool)
Allows only one item at a time to be selected. By
default, multiple items may be selected.
Default: False.
#ListBoxID:$Sort#
(only for ListBoxes)
(Bool)
Sorts the contents of the list box alphabetically.
Default: True.
#ListViewID:$Sort#
(only for ListViews)
Sorts the icons in the list in the following order:
(“None“,
Default): No sort applied.
“Ascending“ or None: (D
“Descending“) Ascending: Sorts items based on item text in
ascending order.
Descending: Sorts items based on item text in
descending order.
8.2.12 Main Windows
The type Main Window is used for the main frame of a MDI application (e.g., IDATG). Typically, it
has a titlebar and contains a menu, toolbars and one or more child frames. Note that the top
window of an application is not always a main window (e.g., it can also be a dialog box like in the
Demo application).
The available designators, events and actions are the same as for Child Windows.
8.2.13 Menus
Menus are only abstract objects used to group a set of menu items together. There are no
operations for them.
8.2.14 Menu Items
Menu items are the constituents of a menu, they are organized in a tree structure. The following
types can be discerned:
Figure 23 - Menu
Command Menu Item Clicking on an item of this type triggers a command. These are the only
items that can be the start state of a transition (however, not the destination
state). They do not have children. Some command menu items behave like
a check box or radio button. In this case, the event Check(BOOL
expression) may be used instead of a simple Click.
Popup-Menu Item Clicking on this item opens a list of other menu items (i.e. the children of the
popup menu item)
Separator
A separator is just a horizontal line that is used to visually group other menu
items together.
Type-specific designators:
#MenuItemID:$Separator#
(Bool)
#MenuItemID:$Checked#
(Bool)
#MenuItemID:$Popup#
(Bool)
15.09.2014
If True, the menu item is a separator.
Default: False.
If True, the menu item is checked.
Default: False.
If True, the menu item is a pop-up menu (a
submenu).
Page 46
User´s Guide - Part I
Edition 16.0
TEMPPO Designer (IDATG)
GUI Testing
Default: True for top-level menu items on a
menu bar; otherwise False.
Note: $Visible is not applicable for menu items. Use $Enabled instead.
Ampersands (&) in the caption are used in MFC to express short keys, but are not really part of
the caption.
E.g. (‘&New’ in a resource file creates the menu item ‘New’ with the short key <Alt-N>)
8.2.15 Push Buttons
Push Buttons are very common GUI elements and are the start states of most steps. However,
they do not require any special operations in IDATG. A simple Click is enough in most cases.
Type-specific designators:
#PushButtonID:$DefaultButton#
(Bool)
If True, the control is the default button in the
dialog box. The default button is drawn with a
heavy black border when the dialog box first
appears and is executed if the user presses
ENTER without choosing another command in
the dialog box.
Default: False.
8.2.16 Radio Buttons
Radio Buttons never appear single, they always form a group that is usually surrounded by a
group box. Checking one radio button causes all other buttons in the group to become unchecked.
Therefore the caption of the checked radio button in the group is seen as its value. The individual
radio buttons do not have a value of their own. E.g. you have to use #Sex_GRP# = “Female”
instead of #Female# = TRUE (Sex_GRP is the ID of the radio group, Female the caption of the
radio button)
Important: If a group of radio buttons is not surrounded by a group box, this is not only a
weakness in the GUI design, but also a serious problem for some test execution tools. Therefore
IDATG requires that all radio buttons must be surrounded by a group box and that two distinct
groups of radio buttons must not lie within the same group box. If you have to specify a GUI where
this rule has been violated, please ask the GUI designers to change the layout. If this should not
be possible, you can draw appropriate group boxes around the buttons in IDATG. However, in this
case there is no guarantee that the radio buttons will be recognized correctly by the test execution
tool.
Note: Radio Buttons do not have a value. The checked radio button in a radio group is determined
by the value of the surrounding Group Box. The available operations are listed under ‘Group
Boxes’.
15.09.2014
Page 47
User´s Guide - Part I
Edition 16.0
TEMPPO Designer (IDATG)
GUI Testing
Type-specific designators:
#RadioButtonID:$Auto#
(Bool)
When the user selects a radio button with this
property, the radio button is selected
automatically and all other radio buttons in the
same group are cleared (deselected).
Default: True.
8.2.17 Static Texts
Static texts are used to display messages or as description for other windows that do not have a
caption of their own (e.g., input fields, lists). They cannot be changed by the user. Bitmaps also
belong to this category.
8.2.18 Tab Controls
Tab Controls allow the user to switch between different pages of a window. Unfortunately, there
are different ways to implement them, which causes different results when recording a tab control
with the GUI Spy:
• If all pages exist at the same time (only one is visible at a time), the GUI Spy records all pages
at once. The disadvantage is that the pages overlap and the IDATG user may get confused by
the display in the Window Editor. The solution is to look at the window hierarchy in the
Application Editor and to open the Window Editor for each individual page.
• If the pages are created dynamically, the GUI Spy only records one page at a time. This is less
confusing but more work because each page has to be recorded and placed at the right spot in
the window hierarchy individually.
Note that the GUI Spy sees only the information that a tab control is existing, but neither which
choices it offers nor which dialogs become visible after the selection. Before you are able to use
the operations below, you have to specify the titles of the tab pages and the windows they display.
To make the specification of tab controls easier, IDATG provides a special Tab Control Editor
that can be accessed via the Window Properties Editor.
Figure 24 - Tab Control with 3 Pages
User events:
Switch to a tab page:
Verify which page is currently selected:
Select(“PageTitle”)
Verify(Value, "PageTitle")
Actions:
Specify that another tab page opens:
SetTabControl(#TabID#, “PageTitle”)
Type-specific designators:
#TabCtrlID#
15.09.2014
(String)
The title of the currently selected tab page, can
Page 48
User´s Guide - Part I
Edition 16.0
#TabCtrlID:$Focus#
#TabCtrlID:$MultiLine#
TEMPPO Designer (IDATG)
GUI Testing
be accessed with SetTabControl(Name, Value).
Default: Empty.
Can be one of the following values:
(“Default“,
Default): Specifies that the user can use
“OnButtonDow Default (D
the
keyboard
to give the input focus to a tab in
n“ or “Never“)
the control.
On Button Down: Specifies that a tab receives
the input focus when clicked.
Never: Specifies that a tab never receives the
input focus when clicked.
(Bool)
Displays multiple rows of tabs.
Default: False.
8.2.19 Tables
The window type Table can be used for all kinds of two-dimensional arrays and grids. The cells of
a table can be accessed individually by using their column and row number in the form
#TableID:$row,column#. Note that WinRunner starts counting with 0, whereas SilkTest starts with
1. Most tables require a special plug-in that enables the test execution tool to recognize them.
Figure 25 - Table
User events:
Click on a specific table cell:
Enter a text into a table cell:
Verify the text of a table cell:
Click(Row, Column, [Button], [Clicks])
Input(Row, Column, STRING expression)
Verify(Value, Row, Column, STRING expression)
Actions:
Specify that a table cell has changed:
SetTableCell(#TableID:$Row,Column#, STRING expr.)
Type-specific designators:
#TableID:$x,y#
(String)
The current contents of the table cell in row x
and column y. It can be accessed with
SetTableCell(Name, Value). x and y can be any
integer number.
Default: Empty.
8.2.20 Tool Bars
Tool Bars usually contain a set of buttons or other controls that allow the user to trigger certain
commands. Unfortunately, the strange design of many new Microsoft ® applications makes these
controls invisible to both the IDATG GUI Spy and the test execution tools. Therefore it is
recommended to test via the menu instead whenever possible.
15.09.2014
Page 49
User´s Guide - Part I
Edition 16.0
TEMPPO Designer (IDATG)
GUI Testing
If you are using WinRunner, you can also try to use the following event, even if the tool bar
buttons are not recognized: Click(ButtonIndex, [Button]). In many cases this produces satisfying
results.
Figure 26 - Tool Bar containing “Buttons” and Combo Boxes
8.2.21 Tree Controls
Trees are used to display a set of hierarchically structured items. To access an individual item, you
have to write the names of all its parent nodes starting from the root node separated by ‘|’ (e.g.,
Root Node|Expanded Node|Leaf).
Figure 27 - Tree Control
User events:
Select an item:
Expand a tree node [+]:
Collapse a tree node [-]:
Select(STRING expression, [Clicks])
Expand(STRING expression, 1)
Expand(STRING expression, 0)
The following event can only be used if the tree items are check boxes:
Change the state of an item:
Check(STRING expression, BOOL expression)
Type-specific designators:
#TreeCtrlID:$HasButtons#
(Bool)
#TreeCtrlID:$EditLabels#
(Bool)
15.09.2014
Displays plus (+) and minus (-) buttons next to
parent items. The user clicks the buttons to
expand or collapse a parent item’s list of child
items.
Default: False.
Allows the user to edit the labels of tree view
items.
Default: True.
Page 50
User´s Guide - Part I
Edition 16.0
TEMPPO Designer (IDATG)
GUI Testing
8.3 Web Testing
IDATG provides a number of powerful features that allow you to generate test cases for
webpages:
• Interface to MS Internet Explorer that allows you to record webpages directly from the screen
with the GUI Spy.
• Java Interface for recording Java Applets contained in a webpage (see User's Guide Part II)
• Specific representation of links and other HTML objects in the Window Editor.
• Generation of GUI maps and scripts suited for web testing.
8.3.1 Recording Webpages
IDATG uses the COM interface of Internet Explorer to retrieve information about the displayed
objects. Thanks to the cooperation of the Microsoft support it was even possible to overcome
certain access restrictions in HTML frames.
We are proud to say that it is not necessary that you open the IE after IDATG like it is required by
some execution tools. The user does not even notice that a different interface is used when he
drags the cursor of the GUI Spy into a webpage. The objects under the cursor are highlighted in
red like all other windows on the screen, even if they are inside a frame or if the page is scrolled!
To avoid difficulties, please use IE Version 5.5 or higher. Netscape or other browsers are not
supported. The same applies to IE windows that are embedded in other applications (e.g. online
help). Note that these restrictions only apply to recording - the generated scripts can also be used
for testing with other browsers.
Which objects are recorded?
IDATG records all HTML objects that are relevant for GUI testing like links, input elements, frames
and images. Static texts and formatting elements like HTML tables are ignored to keep the amount
of data manageable for the user. Objects that are smaller than 3 pixels are also ignored.
The following table gives a short overview over the recorded objects and their representation in
IDATG. Unlike WinRunner, IDATG is even able to record hotspots inside an image (AREAs).
When exporting WinRunner scripts, a click on the appropriate coordinate of the image is
generated.
Since IDATG requires that Radio Buttons must be surrounded by a Group Box, an appropriate box
is created automatically. Of course, this has no negative effect on the WinRunner scripts.
HTML Tag
A
AREA
BUTTON
FRAME, IFRAME
IMG
INPUT (button)
INPUT (checkbox)
INPUT (file)
INPUT (image)
INPUT (radio)
INPUT (text)
SELECT (height <= 30)
SELECT (height > 30)
TEXTAREA
15.09.2014
IDATG Window Type
Link
Link
Push Button
Custom Window
Image, Link (if clickable)
Push Button
Check Box
Input Field
Image
Radio Button,
Group Box
Input Field
Combo Box
List Box
Input Field
Classname
html_text_link
html_area
html_push_button
html_frame
html_rect
html_push_button
html_check_button
html_file
html_rect
html_radio_button,
html_group
html_edit
html_combobox
html_listbox
html_textarea
Page 51
User´s Guide - Part I
Edition 16.0
15.09.2014
TEMPPO Designer (IDATG)
GUI Testing
Page 52
User´s Guide - Part I
Edition 16.0
TEMPPO Designer (IDATG)
GUI Testing
Recording a complete webpage
If you wish to record all HTML objects in a webpage, just select ‘Record complete webpage’
before dragging the mouse over the IE window. After recording, the webpage itself will be
represented by a custom window with classname html_frame. The recorded objects will be placed
into this frame as children.
8.3.2 Running Scripts for Web Testing
If you have generated test cases for a web application and wish to convert them into scripts, check
‘Web Test’ in the Test Case Converter. Instead of the path to the executable like for normal
applications, you have to enter the internet address (URL) of the webpage. When running your
scripts, the Internet Explorer will be opened automatically showing the page you specified. If you
wish to test with other browsers, change the web_browser_invoke command in the script
accordingly.
The utmost deliberation has been used to guarantee that all objects contained in the generated
GUI Maps are recognized without problems. Sometimes the classname or caption of an object
may seem quite strange after recording it with IDATG, but usually the test execution tool expects it
this way.
15.09.2014
Page 53
User´s Guide - Part I
Edition 16.0
TEMPPO Designer (IDATG)
Multi-User Support
9 Multi-User Support
IDATG provides a master/sub project mechanism to enable multiple users to work in parallel. The
idea is to have commonly used building blocks, windows etc. in a central repository (the master
project) that can be referenced by various sub projects. This also greatly enhances the
maintainability of your tests.
Master Project
Test Manager
Sub Project 1
Sub Project 2
Sub Project n
Tester 1
Tester 2
Tester n
Figure 28 - Master / Sub Project Structure
9.1 Working with Sub Projects
•
•
•
•
•
Create the master project by constructing a normal IDATG project.
Specify all data that is required by more than one tester. This may include requirements,
windows, building block tasks, test data, global attributes etc. For instance, if nearly all your
test cases begin with entering a user name and password, you may want to add a building
block 'Login' and the login window.
For each tester, create a sub project by using the menu 'Project|Administration|Create
Sub Project'. A sub project automatically has the same properties as its master.
Inside a sub project, all data from the master is displayed, but cannot be changed.
However, you may add new data and use references to items of the master project. For
instance, you may use the master's building blocks in your task flows or assign its windows
to your task steps.
Each tester may work independently from his colleagues by editing his own sub project
while the test manager is responsible for keeping the master project up to date.
9.2 Editing the Master Project
In order to avoid data inconsistencies, the following points have to be considered:
• New data may always be added to the master project.
• Existing data may only be deleted if it has not been referenced in a sub project. Otherwise
a warning is issued when the sub project is next opened.
• Do not change IDs / names of objects that have been referenced in a sub project. For
instance, renaming the task Login to SignOn is not a good idea if your sub project contains
an event Input(#@Login:Username#). The same goes for the name of the parameter
Username. Other object properties may be freely edited.
• A master project may not have a master of its own.
• After editing and saving the master project, all sub projects should be re-opened to update
the relevant information.
• If the master project itself has been renamed or moved to a different directory, you may
enter the new path in the sub project's Project Administration Dialog.
15.09.2014
Page 54
User´s Guide - Part I
Edition 16.0
TEMPPO Designer (IDATG)
Multi-User Support
9.3 Merging a Sub Project with its Master
Sometimes it may be required to merge the master project with one of its sub projects into a single
file. In this case, just open the sub project and use the menu 'Project|Administration|Merge with
Master Project'. The immediate effect is that all master data now belongs to the current project
and becomes writeable. You may now use the 'Save' function to save the merged project to the
ex-sub project file or 'Save As' to create a new file. The original master file is not affected by this
procedure.
9.4 Transferring Data between Sub Projects
Using the function 'Project|Import|Project Data' it is possible to transfer all kinds of project data
between projects. For instance, it is possible to select and copy building blocks, requirements, or
windows if they are needed in another sub project.
15.09.2014
Page 55
User´s Guide - Part I
Edition 16.0
TEMPPO Designer (IDATG)
Test Case Generation
10 Test Case Generation
This chapter describes the various kinds of test cases generated by IDATG and the output of the
tool-specific test case conversion.
10.1 Graph-oriented Test Cases
When generating graph-oriented test cases, three options are available: Create 1 Test Case, Step
Coverage and Connection Coverage. The first case is trivial, and for most task flow diagrams,
there is little difference between the two other selections. However, it can be relevant in a case like
the following:
Figure 29 - Task Flow (Example)
For covering all steps (nodes in the graph), 3 test cases would be sufficient. However, covering all
connections (edges in the graph) requires 4 test cases.
The generation process works as follows:
1. The user selects a use case task and starts the generation.
2. All sub task steps (yellow) in the use case task are replaced with the entire task flow of the sub
task.
3. Step 2 is repeated until only atomic steps (blue) are left.
4. Starting with the first step of the use case task, a valid path through the task flow is searched.
For each step, the following happens:
• Select a successor of the current step. The algorithm prefers steps that have not yet been
used in other test cases. In case of doubt the successor with the highest priority is used.
• Check if the successor's conditions are fulfilled, if not try another path.
• Create a new test step based on the successor and append it to the generated test case.
• Replace all designator names in the step's test commands etc. with the current values.
• Simulate all actions defined for a step e.g. by setting a designator to a new value.
5. When the final step of the use case task is reached, the new test case is completed.
6. Steps 4+5 are repeated until all steps or connections of the use case task are covered.
10.2 Data-oriented Test Cases
The algorithm for generating data-oriented test cases is pretty much the same as the one for
graph-oriented testing. The main difference is that it does not try to cover all steps or connections
of the task flow but rather tries to generate one valid path for each data record that has been
defined. Ideally, the records of a data set should be designed in a way so that all
steps/connections of the associated use case task are covered anyway.
15.09.2014
Page 56
User´s Guide - Part I
Edition 16.0
TEMPPO Designer (IDATG)
Test Case Generation
10.3 Random Test Cases
For detailed information on random test generation, please refer to chapter 6.
10.4 Transition Test Cases
Apart from defining entire test sequences with task flow graphs it is also possible to specify a set
of individual state transitions. Based on the pre-conditions and effects (actions) that have been
defined for each transition, IDATG is able to generate a valid sequence automatically. The highly
complex generation algorithm has even been patented. The goal is to test all transitions at least
once.
Problem Description
When searching for a test case that includes a specific transition T, IDATG has to find 2 paths:
• A path P1 beginning in the initial state of the GUI and ending in a state where all conditions for
T are fulfilled
• A path P2 beginning in the state produced by T and ending in a final state of the GUI (i.e. the
test case ends with a CloseApplication action)
To produce a valid test case, the 2 paths have to be connected with the transition T:
Initial State
Final State
Path P1
Transition T
Path P2
Figure 30 - Structure of a Transition Test Case
Searching a Path that fulfills a certain Condition
Most transitions depend on semantic conditions, for example a certain window has to be active
before the transition can be tested. As we know, IDATG enables the developer to express a wide
range of complex semantic dependencies in a GUI. These dependencies are a problem for TCG,
since considerable effort is necessary in order to create semantically correct test cases.
Let us assume for example the following transition:
State 3
State 4
Condition: #Delete:$Enabled# = TRUE
Action: (none)
Before testing this transition, it is necessary that the Delete button is enabled. In our example, the
button is initially disabled. Thus, the first step for TCG is to find a transition that sets
#Delete:$Enabled# to the required value and to add it to the test case.
State 2
Condition: #Name# != ""
Action: SetAttribute(#Delete:$Enabled#, TRUE)
15.09.2014
State 3
State 4
Condition: #Delete:$Enabled# = TRUE
Action: (none)
Page 57
User´s Guide - Part I
Edition 16.0
TEMPPO Designer (IDATG)
Test Case Generation
A transition with an appropriate action has been found, but it also depends on a condition (the field
Name must not be empty). The procedure has to be repeated recursively until the test case is
executable.
State 1
State 3
State 2
Condition:
(none)
Action:
SetInputField(#Name#,“Smith”)
Condition:
State 4
Condition:
#Name# != ""
#Delete:$Enabled# = TRUE
Action:
Action:
SetAttribute(#Delete:$Enabled#,TRUE)
(none)
After adding another step that enters a value into the field Name, the test case is now complete,
since the first transition can be executed in the initial state of the GUI.
Of course it is also possible that a transition depends on more than one designator and that it
triggers more than one action.
10.5 Output Formats
This section contains an overview of all output files that are generated by IDATG. For general
information about the usage of capture-replay tools please refer to the respective manuals.
10.5.1 Plain Text
The simplest method for producing a test script is to export the generated tests without further
translation. If this option is selected in the Test Case Converter, IDATG copies the user-defined
test commands for each step directly into the test script. When defining the test commands you
may use designators that are replaced with their actual values during test case generation. See
the section about the Step Editor in User's Guide Part II for an example.
A separate file is produced for each test package (window with own titlebar or use case task). The
default extension of the produced scripts is .txt.
This format is the best option for producing manual test cases. For scripts that shall be executed
automatically, the next format is recommended.
10.5.2 Universal File
This type is pretty much the same as "Plain Text", since the tests are exported without further
translation. However, there is the difference that when using IDATG together with TEMPPO Test
Manager, the test cases are marked as "Universal File" and can be run automatically from within
TEMPPO Test Manager. This can be used for producing automated scripts that are not executed
by a GUI testing tool but by a tool that uses some other interface to access the system under test.
10.5.3 QuickTest Professional (HP)
IDATG supports QuickTest version 11 and later. It makes use of QuickTest's Automation Object
Model that allows IDATG to connect directly to QTP and to control it remotely via its COM
interface.
10.5.3.1 Importing a QTP Object Repository
As an alternative to using the built-in GUI-Spy of IDATG, GUI info can be imported directly into
IDATG from an Object Repository recorded with QTP. This is particularly useful in the following
cases:
15.09.2014
Page 58
User´s Guide - Part I
Edition 16.0
•
•
TEMPPO Designer (IDATG)
Test Case Generation
For testing GUI technologies that are supported by QTP, but not by the IDATG GUI Spy
(e.g., SAP, WPF)
For guaranteeing optimal compatibility of the GUI description with QTP. The chance that a
GUI object is correctly identified by QTP during a test run is increased if the original
information recorded by QTP itself is used.
IDATG
HP QuickTest
Initialize
QTP
Configuration
Record
Object
Repository
Import
Object
Repository
Object Repository
including window
coordinates
Complete
GUI
Information
Assign Task
Steps to
GUI Objects
Generate
Test Cases
Convert Test
Cases + Obj.
Repository
Update
GUI Info
Test Scripts, Object
Repository without
window coordinates
Execute
Test Cases
New / updated
Requirements
Figure 31 - Process for working with an imported QTP Object Repository
Please note that unlike the IDATG GUI Spy, QTP does usually NOT record coordinate and size
information for the windows. Thus, screenshots of the imported windows could normally not be
shown in the IDATG Window Editor (since all imported windows have size zero). To avoid this
problem, the recording options of QTP have to be modified so that the properties x, y, width, and
height are recorded for all window types (there are a few exceptions for which abs_x and abs_y
have to be used instead of x and y). For your convenience, IDATG can configure QTP
automatically.
15.09.2014
Page 59
User´s Guide - Part I
Edition 16.0
TEMPPO Designer (IDATG)
Test Case Generation
Note that the coordinate and size information is only used for creating a graphical representation
of the windows in IDATG. It will not be used for identifying the windows in QTP, since coordinatebased identification is very insecure and error-prone.
The following steps are necessary to import a QTP Object Repository:
• Make sure that QTP is correctly installed on your system including any add-ins required for
the application you want to test (e.g., Java, Web).
• Start QTP once and activate the required add-ins, but do NOT select the Siebel add-in as it
seems to cause problems. Then close QTP.
• BEFORE recording an Object Repository, you have to initialize the QTP recorder settings
so that the properties x, y, width, and height are recorded for all window types. This can be
done very easily by clicking the menu 'Project|Import from HP QuickTest|Initalize QTP
Object Repository Options' in IDATG. This step has only to be done once.
• Open QTP and create a new Object Repository by recording the desired windows. Please
refer to the QTP user guide for more information. Save the Repository as .tsr file.
• In IDATG, choose 'Project|Import from HP QuickTest|Import QTP Object Repository'.
Select the desired .tsr file. IDATG tries to connect via the COM interface to the QTP Object
Repository Utilities. If successful, all GUI objects contained in the .tsr file will be imported
into IDATG.
• The .tsr file may now be deleted, since IDATG will generate a new one anyway (without the
coordinate and size info).
• In case you wish to reset the QTP settings to their original state, just use the IDATG menu
'Project|Import from HP QuickTest|Reset QTP Object Repository Options'.
Note: Since menu items are not recorded by QTP, they cannot be imported. Menus have to be
recorded with the IDATG GUI Spy or drawn by hand in the Menu Editor.
10.5.3.2 Editing Window Properties for QTP
QTP supports a wide range of possibilites for identifying GUI objects. Since a simple tag string in
IDATG would not be sufficient for that purpose, a special editor is available that allows to edit the
QTP properties of a window in more detail.
It can be reached via the 'QTP PropertiesJ' button in the Window Properties Editor. If QTP is
selected as output format and QTP properties are defined for the selected window, the button
becomes visible and replaces the Tag field.
15.09.2014
Page 60
User´s Guide - Part I
Edition 16.0
TEMPPO Designer (IDATG)
Test Case Generation
Figure 32 - QTP Properties Editor
The following properties are displayed:
• QTP Name The name used for identifying the window in QTP. Can be freely selected and is
independent from the IDATG Window ID.
• QTP Class The internal QTP class to which the window is mapped (e.g., WebButton,
WinTreeView etc.). The value entered here must be a valid QTP class name.
• Environment The GUI technology which depends on the QTP Class and cannot be edited
directly (e.g. "Web" for WebButton, "Standard Windows" for WinTreeView).
• Ordinal Identifier and Value If two or more GUI objects have exactly the same identification
properties, they can be distinguished by their position in the parent window ("Location"), the
internal ordering ("Index") or the "CreationTime" (only for Browsers). If required, choose one
of these settings and enter the corresponding number in the nearby field. Note that when
counting ordinal values QTP starts with 0, not with 1.
The other Identification Properties may be different for each window and are displayed in a list.
Editing these properties works in much the same way as in the Attributes Editor.
• Each property consists of a Name and Type. Allowed QTP types are STRING, NUMBER,
BOOL (0 = False, -1 = True), and I2 (a special type of integer that is only used in rare
cases).
• A property can either have a Constant Value or a dynamic value defined by a Parameter.
In all exported repositories, 3 standard parameters are defined that can be used freely.
They are called param1, param2, param3.
• The box 'Regular Expression' may be checked to indicate that the Value shall be
interpreted by QTP as a regular expression. This can be useful, e.g., to specify strings that
are changing dynamically.
15.09.2014
Page 61
User´s Guide - Part I
Edition 16.0
•
•
•
•
TEMPPO Designer (IDATG)
Test Case Generation
The box 'Used for Basic Identification' determines if QTP uses this property for simple
identification of the window. If it is not checked, this means that either QTP does not use
the property at all or that it uses its Smart Identification algorithm.
Please refer to the QTP help for finding out which properties are supported by each QTP
class. In IDATG, you are free to enter any data for the QTP properties, but you are
responsible yourself for making sure that the data is correct.
Unlike QTP, IDATG displays ALL recorded properties, also the ones that are normally
hidden by QTP. So do not be surprised if the list is longer than the one shown in QTP.
At the moment, the "Smart Identification" feature of QTP cannot be edited directly in
IDATG. However, Smart Identification data will be stored for windows imported from QTP
and written to the QTP Object Repository generated by IDATG.
Setting Parameter Values in a Test Script
Before using a parameterized object, the value of the parameter needs to be set:
• In the Task Flow Editor, insert a step with the following Commands for Test Script
directly before the step in which the object is used:
Repository.Value ("<paramName>") = "<value>"
Example:
Repository.Value ("param1") = "my text"
Browser("MyPage").Link("ParametrizedLink").Click
Assuming that the object ParametrizedLink has a property text assigned to param1, QTP
will search for a link with the text my text and click it.
• The same parameter can be reused and changed multiple times in a test case if required.
10.5.3.3 Exporting Test Scripts for QTP
After generating test cases, IDATG can convert them into complete test scripts including Object
Repository in QTP format. To make this work, a few points have to be considered:
• Make sure that QuickTest is correctly installed on your system including any add-ins
required for the application you want to test (e.g., Java, Web).
• Before the conversion, make sure that all QuickTest windows are closed. If a process is
hanging (QTPro.exe, QTAutomationAgent.exe, or any other process starting with "QT"),
stop it using the Windows Task Manager.
• Start the conversion in IDATG's Test Case Conversion Dialog. Check 'Show QuickTest
Window during Conversion' if you wish that QTP shall be visible. This is recommended
for being able to read any messages that QTP might show. You can also choose if IDATG
shall 'Leave QuickTest open after Conversion', e.g. if you want to run the test
immediately afterwards.
• A window informing you about the status of the conversion appears. First, IDATG tries to
connect via the COM interface to the QTP Object Repository Utilities. If successful, the
object repository is created and imported into QuickTest.
• Then, IDATG tries to connect via the COM interface to the main QTP application. If
successful, QTP is launched and controlled remotely by IDATG.
• Launching QTP may take a while, especially if many add-ins have to be loaded. If QTP
message boxes appear, check "do not show this message again" and close them.
• Once QTP is running, each test case is exported as a QuickTest "Test".
15.09.2014
Page 62
User´s Guide - Part I
Edition 16.0
TEMPPO Designer (IDATG)
Test Case Generation
The following directory structure is created by IDATG:
Idatg --|
Projectname --|
_Object_Repository --|
|
|
QTPRepository_Projectname.tsr
|
|
|
QTPRepository_Projectname.xml
|
TestPackageID --- (Window or Task ID)
|
TestCaseID--|
(QTP script structure)
The _Object_Repository directory contains the following files:
• QTPRepository_Projectname.xml - The object repository as XML file. This file is written by
IDATG and contains information in text format.
• QTPRepository_Projectname.tsr - After QTP has imported the XML file, it saves the
information in its proprietary TSR format.
For each test package (use case task of window with own titlebar), IDATG creates a separate
directory. Within the test package, there is a sub-directory for each test case. QTP saves each
test as a complicated set of files and directories in a proprietary format.
10.5.3.4 Trouble Shooting:
•
•
•
•
I am getting the message "QuickTest interface could not be initialized": Make sure
that QTP is properly installed and that a valid license is available. Check if QTP can be
started manually on your machine.
I am getting the message "An open instance of QuickTest has been found": If you
find open QTP windows on your screen, close them. If no QTP windows are visible, QTP
has probably crashed. In this case, start the Windows Task Manager and kill all processes
starting with "QT".
QuickTest does not recognize any web objects in IE: QTP can only recognize web
objects in IE if you open IE after QTP. The reason is that the QTP agent needs to initialize
its connection to IE. Once you have done this, you are free to close & reopen QTP, it is not
necessary to reopen IE every time.
QuickTest keeps crashing: For reasons unknown, QTP sometimes crashes without
warning. As we are not in any way related to HP, we have no influence on this undesirable
behavior. However, we have found that the following workarounds often help:
o Make QTP invisible during the conversion by unchecking 'Show QuickTest
Window during Conversion'
o Choose only the add-ins that are absolutely necessary when starting QTP. It seems
that certain add-in combinations can cause problems. For instance, loading the
Siebel add-in seems to have severe side effects.
o QTP is very sensitive to errors in object repositories. Be careful when defining QTP
object properties in IDATGr. For instance, if you define a property that doesn't exist
for the current object type, QTP crashes as soon as you click on this object in the
Repository Editor or try to run a script using this object.
15.09.2014
Page 63
User´s Guide - Part I
Edition 16.0
TEMPPO Designer (IDATG)
Test Case Generation
10.5.4 Ranorex Studio
A first version of an interface to Ranorex Studio has recently been developed and supports the
export of test cases for simple Win32 applications. It is planned to expand the interface in the near
future in order to support other GUI technologies as well.
10.5.4.1 User Code in Ranorex
Apart from pre-defined Actions in Ranorex like "Mouse" or "Set Value", there is an Action "User
Code" which gives the user the possibility to add arbitrary code in C#. This code is expected by
Ranorex in the file <Recording name>.UserCode.cs. IDATG makes use of this feature in 2 cases:
1. for IDATG events that cannot be translated directly into a single Ranorex Action. Examples are
selecting an item from a list or clicking a specific table cell. In such cases, IDATG copies the
appropriate C# functions (e.g., SelectComboBoxItem) from the file <IDATG installation
folder>\RanorexAddIn\UserCodeMethods.txt into the Ranorex user code file for the current test
case/recording.
2. for steps where the field 'Commands for Test Script' has been filled out by the user in the
IDATG Step Editor. In this case, a new C# method containing the commands is created for
each step and added to the user code file. The methods are named UserMethod_1(),
UserMethod2(), etc. according to the sequence of user-defined steps in the test case.
Editing the user code file directly in Ranorex makes little sense, since it will be overwritten next
time you export the test cases with IDATG. Therefore, all changes should be made in IDATG.
Please make sure to only specify valid C# code as 'Commands for Test Script'.
10.5.4.2 Editing Window Properties for Ranorex
Ranorex uses a flexible concept for GUI object identification, consisting of the RanoreXPath and a
list of capabilities for each object. Since a simple tag string in IDATG would not be sufficient for
that purpose, a special editor is available that allows to edit the Ranorex properties of a window in
more detail.
It can be reached via the 'Ranorex PropertiesJ' button in the Window Properties Editor. If
Ranorex is selected as output format, the button becomes visible and replaces the Tag field.
Figure 33 - Ranorex Properties Editor
The following properties are displayed:
• RanoreXPath This string is used to uniquely identify GUI elements within an application. Its
syntax provides a wide range of possibilities including the use of regular expressions. For
detailed information, please refer to the Ranorex user guide.
• Preferred Capability Each GUI object may have one or more "capabilites" or roles that define
which Ranorex methods can be used on it. The "preferred capability" can be compared to the
window type in IDATG (e.g., the preferred capability for the IDATG type "input field" is "text").
• Capability List This field contains ALL capabilites that are applicable for the GUI object,
including the preferred capability. The capability names are separated by commas.
15.09.2014
Page 64
User´s Guide - Part I
Edition 16.0
TEMPPO Designer (IDATG)
Test Case Generation
10.5.5 Silk Test (MicroFocus)
Please note that IDATG only supports older SilkTest versions that are using 4Test as scripting
language. Newer versions using Visual Basic are currently NOT supported.
Starting at the root directory that the user specified in the Test Case Converter, IDATG generates
the following directory structure:
Idatg --|
Projectname --|
Includes
|
Test_Suite
The Includes directory contains the following files:
• Incl.inc - The master include file containing a list of all other includes. It is referenced by all
test scripts.
• Idatglib.inc - A file containing IDATG-specific functions that are called from the generated
test scripts. It can be used for adding user-defined functions that set a certain application
base state or recover from errors. Please consult the SilkTest documentation for more info
on functions that are called automatically when entering/leaving a script or test case (e.g.,
ScriptEnter, TestcaseEnter). Note: this file is not overwritten if it already exists to avoid that
your user-defined functions are lost.
• MainWin.inc - the window definition of the application’s start window
• WindowID.inc - one file for each remaining window with own titlebar. It contains the window
definition.
The following files can be found in the Test_Suite directory:
• Main.pln - The master test plan containing calls to all other test scripts. Just execute this
file if you want to perform a complete test.
• WindowID.pln - one file for each window with own titlebar. This is the test plan that calls all
test cases for this window.
• WindowID.t - one file for each window with own titlebar. It contains the test cases for this
window.
• TaskID.pln - one file for each use case task. This is the test plan that calls all test cases for
this task.
• TaskID.t - one file for each use case task. It contains the test cases for this task.
15.09.2014
Page 65
User´s Guide - Part I
Edition 16.0
TEMPPO Designer (IDATG)
Test Case Generation
10.5.6 TestPartner (MicroFocus)
IDATG provides an interface to MicroFocus’s test-scripting, -recording, and -execution tool
TestPartner. TestPartner provides test creation by both visual tests (screenshot-based) and test
scripts. Test scripts are written in Visual Basic and can be automatically recorded from the actions
of the user on a given application’s GUI. All elements created in TestPartner (like test scripts and
visual tests, also called “Assets”) are stored and managed in a database, providing version
management. IDATG is able to convert test cases for TestPartner, automatically import them into
TestPartner’s database and run them without having the TestPartner GUI started.
Exporting test cases to MicroFocus TestPartner
Within the test script directory that the user specified in the Test Case Converter, IDATG creates
a new project output-folder with the name of the active project.
Note: If that folder already exists, all files in that folder will be deleted! (to prevent old output files
to be re-imported together with the new ones).
In the project-output-folder, the following files will be created:
File
Content description
TESTSUITE.xml
Contains
• the <Projectname>_MAIN script that has to be executed in order to
run all testcases recently exported
• the <Projectname>_INCLUDES script that containing custom VB
functions of IDATG
Testpackage_A.xml
Testpackage_B.xml
;
The single test packages of the project, each containing the several
test cases generated for that package, e.g.
Testpackage_A_1,
Testpackage_A_2
;
After successful conversion, the TestPartner Database Dialog shows up, where you can specify
whether to import the converted test scripts automatically into TestPartner’s database. For detailed
information on this dialog, please refer to User's Guide Part II.
10.5.7 WinRunner (HP)
Important: Before you can run the generated scripts, you have to prepare WinRunner with the
steps described in the installation chapter. Otherwise IDATG-specific commands like m_report or
m_verify are not recognized by WinRunner and the scripts cannot be executed.
The following tool-specific options are available for WinRunner in the Test Case Conversion
Dialog:
Window Time-Out: Specifies the time in seconds that WinRunner should wait for a window to pop
up. This value will be used as parameter for the set_window command. The default
time-out is 20 seconds.
Optimize Wait Commands: By default, the delay defined for a test step is used as parameter for
the following set_window command if possible. In this case, the test continues as soon
as the specified window is available resulting in faster test execution. If you prefer
instead that WinRunner always waits until the full delay time is over, you can uncheck
this option causing IDATG to generate simple wait commands.
15.09.2014
Page 66
User´s Guide - Part I
Edition 16.0
TEMPPO Designer (IDATG)
Test Case Generation
Keyboard Layout: WinRunner expects key names that depend on the keyboard layout (!) This
means that a WinRunner script created on a PC with a German keyboard won't run on a
PC with an English keyboard. To make things worse, the key names cannot be found in
any user documentation...
Extra Variables: This field is only necessary if you wish to enter WinRunner-code directly into the
Step Editor field 'Commands for Test Script'. Sometimes it may be necessary to
define additional WinRunner variables at the beginning of the generated functions. In
this case, just enter there names here separated by spaces.
Starting at the root directory that the user specified in the Test Case Converter, IDATG generates
the following directory structure:
Idatg --|
Projectname --|
Gui_Maps
|
Test_Suite --|
Main (WinRunner script structure)
|
TP_WindowID --- (or TP_TaskID)
|
Main (WinRunner script structure)
|
Func_Lib (WinRunner script structure)
The directory Gui_Maps contains a GUI map for each top-level window called WindowID.gui.
Due to the special requirements of WinRunner the script structure is a bit more complicated than
for SilkTest. Each bold directory in the figure represents a WinRunner test script that consists of a
file script and the WinRunner-specific sub-directories db and exp.
a) Main
Script - The master test script containing calls to all other test scripts. Just execute this file
if you want to perform a complete test.
b) TP_WindowID or TP_TaskID
For each window with own titlebar a test package is generated. The same applies to all use
case tasks. A test package consists of 2 separated scripts:
I.
Main
Script - The main test script for this window that calls all test cases in the function
library.
II.
Func_Lib
Script - The function library for this window containing all test cases.
15.09.2014
Page 67
User´s Guide - Part I
Edition 16.0
TEMPPO Designer (IDATG)
Test Case Generation
10.5.8 XML for ESA Test Commander
IDATG is part of the intelligent test framework of the European Space Agency ESA. Thus, IDATG
is able to export special XML files that are suited for ESA's Test Commander tool. For further
information, please refer to User's Guide Part II.
10.5.9 XML for TEMPPO Test Manager
IDATG includes a convenient interface to TEMPPO Test Manager. For detailed information,
please refer to section 11.1.2.
10.5.10 Excel File for HP Quality Center
For details on how to export IDATG test cases to HP Quality Center, please refer to section 11.2.
10.6 Resolving Window Recognition Problems
10.6.1 Finding Correct Tags
The window tag is a kind of description that is required by the test execution tool to find the
window on the screen. It is very important to enter a correct tag for each window, otherwise the
generated test scripts won’t run! In most cases, the Tag Generator will create correct tags for you,
so you don’t have to define them by hand
In some rare cases the test execution tool may report an error like “Object XY not found”. The
following procedure will resolve this problem:
• Open the ‘GUI Map Editor’ if you are using WinRunner or the ‘Record Window Declarations’
dialog if you are using SilkTest.
• Open the affected window in your application
• ‘Learn’ or ‘record’ the object that has not been recognized correctly
• Copy the correct tag into IDATG’s Window Properties Editor.
For WinRunner, this is the entire ‘physical description’ including the curly braces:
e.g. {class: edit, MSW_class: "!Edit", MSW_id: 1014}
For SilkTest it is the entire object description including keywords like tag or parent:
e.g. tag "[TextField]$1014"
10.6.2 Window Properties used in Tags
The following list gives an overview of the most important window properties that are used as parts
of the tag description:
Numeric ID (MSW_id)
In MS Windows-GUIs each window has a numeric ID that can convenienty be used as tag. Note
that this doesn’t work for windows with titlebars, because their ID changes dynamically.
Caption (Label)
If the window has some kind of name or title, it can easily be identified through it.
• WinRunner does not recognize numeric IDs of menu items. Tags are case-sensitive. Single
characters can be replaced by a ‘.’, but only if the tag is preceded by a ‘!’ (e.g. “!ID.TG”). ‘*’
signifies an arbitrary number of the previous character. For abbreviation you have to use ‘.*’
(e.g. “!IDA.*”).
• In SilkTest, tags are not case-sensitive and can be abbreviated with a ‘*‘ (but be careful, all
tags in a window must be unique!). Single characters can be replaced by a ‘?’ (e.g. “ID?TG”).
15.09.2014
Page 68
User´s Guide - Part I
Edition 16.0
TEMPPO Designer (IDATG)
Test Case Generation
Attached Text
If the window doesn’t have a caption of its own (e.g., input field), the caption of a static text or
group box in the proximity of the window can be used as tag. Note that the meaning of the term
‘proximity’ differs greatly depending on the test tool. Thanks to the cooperation of HP, IDATG uses
the original WinRunner algorithm. For Java, SilkTest´s “attached text” algorithm contains serious
bugs and cannot be used (especially for radio groups).
Index (Location)
This feature is particularly useful if there is more than one window with the same properties. In this
case, the windows can be numbered from top left to bottom right thus enabling a unique
identification. Note that SilkTest starts counting with 1 while WinRunner starts counting with 0.
Coordinates (x,y)
This alternative should only be used if no other method seems to work, since the coordinates of an
object may change dynamically and depend on factors like the screen resolution.
15.09.2014
Page 69
User´s Guide - Part I
Edition 16.0
TEMPPO Designer (IDATG)
Interfaces to Test Management
11 Interfaces to Test Management
11.1 Interface to TEMPPO Test Manager
11.1.1 Opening IDATG directly from TEMPPO Test Manager
IDATG includes a convenient interface to TEMPPO Test Manager. After creating task packages in
TEMPPO Test Manager, IDATG can be called directly in order to design tasks and generate test
cases. When saving the project in IDATG, all data is sent back to TEMPPO Test Manager and
stored in the TEMPPO database.
Designing IDATG tasks and test cases via TEMPPO Test Manager
•
For using IDATG from TEMPPO Test Manager, it is necessary to activate the so-called
IDATG mode, by ticking the checkbox “TEMPPO Designer (IDATG)” in tab “General” of the
test structure’s root.
•
As a preparation for designing test cases in IDATG, it is recommended to create so-called
“Task Packages” in TEMPPO Test Manager. A task package is a special type of test
package that is displayed with a blue icon and has the same attributes as a test case. You
can create any kind of task package hierarchy.
•
If you have finished creating some task packages in TEMPPO Test Manager, you can
design and generate test cases by selecting a task package and calling the menu item
“Tools=>TEMPPO Designer (IDATG)=>Design Test Cases”. The IDATG window will
appear.
•
When IDATG is opened, it displays the task packages defined in TEMPPO Test Manager
as blue folders and automatically creates a use case for each leaf in the task package
hierarchy.
•
Now you have the possibility in IDATG to create task flows consisting of several steps. Of
course, you can also create building block tasks. However, since they are not visible in
TEMPPO Test Manager, they have to be put in ordinary yellow folders, not in the blue
ones.
•
If the user has finished the modeling process, he can start IDATG's test case generator.
•
To import the designed tasks and the generated test cases into TEMPPO Test Manager,
the user just has to press the "Save" button in IDATG. TEMPPO Test Manager receives
the updated IDATG project and refreshes its test structure accordingly.
•
For a manual test case only the generated steps are displayed in TEMPPO Test Manager.
When you open the "Test Steps" tab in TEMPPO Test Manager, the columns "Instruction",
Input", and "Expected" are mapped to corresponding step fields in IDATG:
•
For an automated test case also the path to the generated test script is displayed. A test
case is treated as automated, if it has at least once been exported by IDATG as a test
script for an automation tool (e.g. TestPartner).
Rules and restrictions for TEMPPO Test Manager folders in IDATG
• In order to maintain the consistency with the test structure of TEMPPO Test Manager, the
two topmost blue folders of the task hierarchy may not be edited in IDATG.
• Building block tasks may not be put in blue folders
• A use case may only be put in empty blue folders. If a blue folder already contains a use
case, no other folders or use cases may be inserted.
15.09.2014
Page 70
User´s Guide - Part I
Edition 16.0
•
•
•
TEMPPO Designer (IDATG)
Interfaces to Test Management
When dragging "normal" yellow folders into a blue folder, it is checked whether its contents
complies with the above rules. If successful, the folder is converted into a blue folder.
A use case in a blue folder always has the same name as the folder (except special
characters and blanks that are removed from the use case name). If one of the names is
changed, the other changes automatically. The names are also adapted automatically
when dragging an item into a blue folder.
While it is possible to create use cases in "normal" yellow folders, they will not be visible in
TEMPPO Test Manager.
Restoring IDATG tasks and IDATG test cases from TEMPPO Test Manager
If the connection between TEMPPO Test Manager and IDATG is lost (e.g. because the user
aborts it by pressing the button Cancel in the window “Connection Status”), it is possible to avoid
data loss by storing the current IDATG project as XML file.
To restore this data, the menu item “Restore Designed Test Cases” can be used in TEMPPO Test
Manager. This will cause IDATG to open a file dialog, where the previously saved XML file
containing the IDATG project can be selected. After pressing "Save" in IDATG the data can be
transferred to TEMPPO Test Manager.
11.1.2 Transferring data to TEMPPO Test Manager via XML interface
As an alternative to calling IDATG directly from within TEMPPO, there is also the possibility to
transfer data using XML files. This approach can be useful if the tools are installed on different
machines or if the direct interface cannot be used for some other reason.
•
•
When converting test cases, just choose 'XML for TEMPPO Test Manager' as Output
Format.
The tests are saved as XML file and can now be imported into TEMPPO Test Manager
using the menu 'Test Structure|Import Structure|From XML DocumentJ'
Please note that test cases are only marked as 'Automated' if you have already exported them as
automation scripts for a test execution tool. Otherwise, they are marked as 'Manual'.
11.2 Interface to HP ALM - Quality Center
Exporting test cases to HP ALM - Quality Center (HPQC) is possible via the Excel Add-in of
HPQC. This is particularly useful for manual tests, but also possible for automated ones.
•
•
•
•
•
Make sure that the HP ALM Client Registration Add-in and Excel Add-in are installed. See
the HPQC Excel Add-in User Guide for more information.
In IDATG, choose the task(s) for which test cases should be exported and click ‘Convert
Test Cases’.
As Output Format, choose 'Excel File for HP Quality Center'. Also select the 'Test
Script Directory' in which the files shall be saved. Press 'OK'.
Due to a notorious Excel problem, importing data that contains both non-ASCII characters
and line breaks within a cell is almost impossible. Non-ASCII characters can be imported
from tab-separated text files, but not from CSV files. Line breaks can be imported from
CSV files, but not from text files. The following trick solves this dilemma: IDATG stores the
test cases in tab-separated text files but uses the .csv ending.
This confuses Excel sufficently to prevent it from messing with the data. Double-click the
.csv file in the Windows Explorer or drag it into Microsoft Excel. Do NOT open it
using Excel’s File->Open function or you will use all line breaks within a cell. If you
15.09.2014
Page 71
User´s Guide - Part I
Edition 16.0
•
•
•
change the file in Excel and want to save it, do NOT choose any CSV or TXT format but
.xlsx.
Select columns A-H in the rows you wish to export (but do not select the header row).
Choose the menu 'Tools|Export to HP ALM' or the equivalent cormand in your version of
Excel. See the HPQC Excel Add-in User Guide for details.
When the Excel Add-in asks you to map the columns to fields in HPQC, choose the
following:
Excel Column
A
B
C
D
E
F
G
H
•
TEMPPO Designer (IDATG)
Interfaces to Test Management
HPQC Field
Subject
Test Name
Description
Type
Status
Step Name (Design Steps)
Description (Design Steps)
Expected (Design Steps)
Associated IDATG Data
Task Folder Hierarchy
Task Name + Number
Task Description
"MANUAL" or "WR-AUTOMATED"
Always set to "Imported"
Task Step Name
Task Step Instruction
Task Step Expected Result
The test cases are exported and should now be visible in HPQC. You may have to press
'Refresh' in HPQC before the changes are displayed.
If you have updated the test cases in IDATG, just repeat the procedure. As long as the folder and
task names did not change, the existing tests will simply be updated in HPQC. Otherwise, they will
be imported as new tests into HPQC.
11.3 HTML / WinWord Interface
Whenever you want to get a detailed documentation of your project, IDATG provides a powerful
feature: It is possible to export the entire GUI specification as HTML files including screenshots
as JPGs! Just press the menu ‘Generate | Generate HTML Documentation’ to reach the HTML
generator.
Figure 34 - HTML Generator
Use the ‘Browse...’ button to specify the target directory. Please note that all other .htm files in
this directory will be deleted! If you wish that the documentation should include screenshots, check
the box. Don´t worry if a bunch of Window and Task Flow Editors opens on your screen – this is
necessary for recording the screenshots. After the generation, these editors will close
automatically.
Which files are generated?
IDATG_Title.htm
The start page for your new HTML documentation
IDATG_GlobalAtt.htm
A list of the project's global attributes
IDATG_Hierarchy.htm
The window hierarchy in the form of a tree
IDATG_Metacond.htm
A list of the project´s meta conditions
IDATG_Project.htm
General project information
15.09.2014
Page 72
User´s Guide - Part I
Edition 16.0
IDATG_Req.htm
IDATG_Task.htm
IDATG_TC.htm
WND_WindowID.htm
WND_WindowID.jpg
TASK_TaskID.htm
TASK_TaskID.jpg
TC_TestcaseID.htm
TC_TestcaseID.jpg
Logo.jpg
TEMPPO Designer (IDATG)
Interfaces to Test Management
A list of the project's global requirements
Task hierarchy in the form of a tree
Test case hierarchy in the form of a tree
For each window with own title bar, lists of all children and transitions
are generated. They contain detailed information about properties,
attributes, conditions and actions.
For each window with own title bar, a screenshot including transitions
is generated as a handy JPG file!!
For each task a list of all steps containing detailed information is
generated.
For each task, an image of the task flow is generated as JPG file.
For each test case a list of all steps containing detailed information is
generated.
For each test case, an image of the step sequence is generated.
The IDATG Logo that is used on the start page.
How can I convert the HTML files to WinWord?
While the HTML format has many advantages, its non-linear structure makes is difficult to get an
overview. If you want the entire documentation in one single file that can easily be printed, it is
recommended to convert it to a Microsoft ® WinWord file.
The installation package of IDATG contains a WinWord macro that performs this task for you. Just
follow these steps:
1. Copy Html2Word.doc into the same directory where the HTML files have been placed.
2. Open the document in MS WinWord. If you should get a macro warning, select Activate
macros.
In WinWord, press Extras|Macro|Macros... and execute the macro Collect_HTML_Files. This
macro collects all HTML files in the directory and creates a well-structured WinWord document
named GUI_Specification.doc. The document also contains the screenshots as well as page
numbers and a table of contents!
15.09.2014
Page 73
User´s Guide - Part I
Edition 16.0
TEMPPO Designer (IDATG)
Formal Specification Language
12 Formal Specification Language
This chapter describes how the behavior and semantics of an application can be formally defined.
12.1 Designators
As has already been pointed out the basic concept of the IDATG language is the step. In order to
describe a step, we need to define its trigger event, the pre-conditions and the effects (actions) of
the step. However, it is quite evident that we also need some possibility to refer to variables and
the properties of GUI objects.
Designators can be seen as variables that can be used in events, conditions and actions. They
have a defined initial value which may change in the course of the generation process. All
designators are written between ‘#’ characters to avoid confusion with strings or operator names.
IDATG knows the following types of designators:
• Global Attributes
User-defined global variables can be edited with the Attributes Editor. They do not belong to a
specific object and can be accessed with #:AttributeName#
• User-defined Window Attributes
User-defined attributes for windows can be edited like global variables with the Attributes Editor.
Their name is preceded by the Window ID: #WindowID:AttributeName#
• Pre-defined Window Attributes
Pre-defined attributes for windows like #WindowID:$Enabled#, #WindowID:$Visible# etc. They
always begin with a ‘$’ sign, are imported automatically when using the GUI Spy and can be
edited afterwards in the Window Properties Editor. A detailed list that shows which pre-defined
attributes are available for each window type can be found in chapter 8.
• Window Values
The value (contents) of windows, like input fields or radio groups. To access this value, simply use
the format #WindowID#. The initial value of a window can be edited in the Window Properties
Editor.
• Task Parameters
If a task has parameters, their values can be accessed using #@TaskName:ParameterName#. In
contrast to all other designators, the parameters of a task are only visible within the steps of the
task itself. Not surprisingly, the default value can be set in the Task Parameters Editor.
• Test Data
For data-oriented testing, you can refer to a certain field of a data set using the syntax
#~SetName:FieldName#. During test case generation, the designator will be replaced by the value
of this field in the current data record. The default value can be fixed in the Data Field Editor.
The ID and validity of the current data record can be referenced using the pre-defined attributes
#~SetName:$id# (String) and #~SetName:$valid# (Boolean).
If you used the CECIL method for generating test data, you can even include references to the
effects (#~SetName:~EffectName#) and effect variables (#~SetName:@VarName#):
Please note that is it not necessary for you to learn the various formatting rules by heart, IDATG
provides a "Browse Designators" feature that handles this for you.
15.09.2014
Page 74
User´s Guide - Part I
Edition 16.0
TEMPPO Designer (IDATG)
Formal Specification Language
12.2 Event Language
X
X
X
X
X
TreeControl
X
X
ToolBar
X
X
Text
X
Table
X
TabControl
ListView
X
RadioButton
ListBox
X
PushButton
Link
X
MenuItem
InputField
X
X
Menu
Image
X
X
MainWindow
Header
ComboBox
X
GroupBox
X
X
DialogBox
X
X
CustomWindow
Check
Click
Close
Expand
Input
Position
Scroll
Select
Type
Verify
Wait
ChildWindow
Event
CheckBox
Each mouse click or keyboard input that triggers a step is called an Event. IDATG provides a
simple language that allows you to express these trigger events. When exporting test cases, the
events are translated into the language expected by the selected GUI test execution tool. For API
testing or for operations that are not covered by IDATG's event language, you can also enter test
commands in the target language directly. The following table contains an overview that shows
which functions can be used for the respective window types:
X
X
X
X
X
X
X
X
X
X
X
X
X
X
X
X
X
X
X
X
X
X
X
X
X
X
X
X
X
X
X
X
X
X
X
X
X
X
X
X
X
X
X
X
X
X
X
X
X
X
X
X
X
X
X
X
X
X
X
X
X
X
X
X
X
X
X
X
X
X
X
X
X
X
X
X
X
X
X
X
X
X
X
X
X
X
X
X
X
X
X
The event can be entered in the Step Editor and always refers to the start window of the step.
Depending on the function and the window type, several arguments have to be passed to the
function. Optional parameters are enclosed by [ ] in the following.
The event language is not case-sensitive (Click and click are the same). However, it may be
important to use the correct case in string constants that are directly passed to the capture-replay
tool (e.g. Select(”McDonald”) may not be the same as Select(”mcdonald")).
Complex Arguments
In many cases, you may use complex expressions as arguments for an event. For instance, if you
want to copy the contents of input field #Field1# into #Field2#, you can draw a transition from
#Field2# and give it the event Input(#Field1#). The same language as for conditions and action
arguments is used for this kind of arguments.
Other examples:
Check(NOT #CheckBox1#) Set a check box to the contrary value of another check box
Verify(Value, #sum1# + #sum2#) Verify that a field contains the sum of 2 other fields
String Concatenation
You can use the string concatenation operator ‘&’ to connect two or more arguments. The result is
always a string, although the arguments may have any type.
Examples:
Input(“Number: ” & #Field1#”)
If the current value of #Field1# was 25, the result would be Input(“Number: 25”)
Verify(Value, “Full name: ” & #FirstName# & #LastName#)
This would result in something like Verify(Value, “Full name: Michael Randall“)
15.09.2014
Page 75
User´s Guide - Part I
Edition 16.0
TEMPPO Designer (IDATG)
Formal Specification Language
12.2.1 Click
The function Click represents a mouse click on a window. The click can either be executed with
the left (L) or right (R) mouse button and may either be a single (1) or double (2) click. The default
is a single click on the left button. If you are using WinRunner, you may specify the index of a
certain toolbar button. For tables, the row and column number have to be specified.
Click([Button], [Clicks], [X, Y])
Button: L = left button, R = right button, default = L
Clicks: 1 = single click, 2 = double click, default = 1
X,Y: Coordinates relative to the upper left corner of the window (in pixels). Useful if you
want to click on an object that cannot be recognized by the test execution tool (e.g. in a
drawing area).
Examples: Click, Click(R), Click(L, 2), Click(L, 1, 20, 30)
For Toolbars: (only working for WinRunner, but not for SilkTest!)
Click(ButtonIndex, [Button])
ButtonIndex: The numeric index of the toolbar button that should be clicked. The buttons
are counted starting from the left. Note that WinRunner starts counting with 0.
Button: L = left button, R = right button, default = L
Example: Click(0), Click(2, R)
For Tables:
Click(Row, Column, [Button], [Clicks])
Example: Click(2, 3, L, 2)
Note: For selecting a specific element from a list or checking a check box, the respective functions
should be used instead of Click.
12.2.2 Type
Type means pressing a key or a combination of keys on the keyboard. For entering text into a
field, Input should be used instead.
•
•
•
•
•
Special key names (more than one character long) have to be written between <angled
brackets> e.g. <Enter>. The brackets are not necessary for simple keys like a,3,$ etc.
If two or more keys should be pressed SEQUENTIALLY, just write them one after the
other: e.g. Type (“<Alt>x”)
If two or more keys should be pressed SIMULTANEOUSLY, you have to combine them
with ‘-‘: e.g. Type (“<Alt>-x”)
It is allowed to combine both forms in one Type event: e.g. Type (“<Alt>-xy”) means “press
‘Alt’ and ‘x’ simultaneously, then release both keys and press ‘y’ ”.
The following characters have to be preceded by a backslash (\): "-\
Examples: Type("A"), Type("<Esc>"), Type("\""), Type ("<Ctrl>-<Alt>-x"), Type (“a-bc”)
15.09.2014
Page 76
User´s Guide - Part I
Edition 16.0
TEMPPO Designer (IDATG)
Formal Specification Language
List of key names:
Function and Cursor Keys:
Esc, F1-F12, PrtScr, ScrlLock, Pause
Ins, Del, Home, End, PgUp, PgDn
Left, Right, Up, Down
Control Keys:
Note: If it is important whether the left or right key on the keyboard is pressed,
add L or R to the name of the key, otherwise just use the simple name.
Shift, ShiftL, ShiftR
Ctrl, CtrlL, CtrlR
Alt, AltL, AltR, AltGr (on German keyboards)
Win, WinL, WinR, Menu (additional keys for Win95)
Main Keyboard:
Backspace, Tab, CapsLock, Enter
All other main keys can be expressed by the character itself.
Numeric Keypad:
NumLock
#/
#*
#-
#8
#Up
#9
#PgUp
#+
#4
#Left
#5
#6
#Right
#1
#End
#2
#Down
#3
#PgDn
#7
#Home
#0
#Ins
#Enter
#.
#Del
12.2.3 Input
Input signifies text input into a field or table cell. For tables, the row and column number have to be
specified. The following characters have to be preceded by a backslash (\): "\
For Input Fields and Combo Boxes:
Note that Input is not allowed for Combo Boxes that have the style DROPLIST.
Input(Value)
Value: The value that is entered into the field. It may be any STRING, NUM or DATE
expression, but must match the type of the field. For instance, you cannot enter a STRING
expression into a NUM field.
Examples: Input("MyText"), Input(#age# + 3)
For Tables:
Input(Row, Column, Value)
15.09.2014
Page 77
User´s Guide - Part I
Edition 16.0
TEMPPO Designer (IDATG)
Formal Specification Language
Value: The value that is entered into the table cell. Can be any STRING expression.
Example: Input(2, 3, "MyText")
12.2.4 Select
Select means clicking on a specific item that is contained in a window. Depending on the type of
window, different parameters are expected. The following characters have to be preceded by a
backslash (\): "\ (for TreeControls also |)
For Tab Controls:
Select("PageTitle")
PageTitle: The title of a tab page. The page must have been specified in the Tab Control
Editor before.
Example: Select("General Options")
For Group Boxes (Radio Groups):
Select("RadioButtonCaption")
RadioButtonCaption: The caption of a radio button. The button must be positioned inside
the group box.
Example: Select("Female")
For Combo Boxes, List Boxes, List Views:
You may either specify the selected item using its position or its text.
Select(Position, [Clicks])
Position: The position (index) of the item in the list. Can be any NUM expression or LAST
for the last item in the list. Note that WinRunner expects a 0-based index, while SilkTest
starts counting with 1.
Clicks: 1 = single click, 2 = double click, default = 1
Select(Text, [Clicks])
Text: The text of the item. Can be any STRING expression.
Clicks: 1 = single click, 2 = double click, default = 1
Examples: Select(3), Select(LAST), Select("MyItem"), Select(#Field1#), Select(1, 2)
15.09.2014
Page 78
User´s Guide - Part I
Edition 16.0
TEMPPO Designer (IDATG)
Formal Specification Language
For Tree Controls:
Select(Item, [Clicks])
Item: The path to the selected item starting from the root of the tree in the form
"Item1|Item2...|Itemn". The hierarchy levels are separated by '|'. Can be any STRING
expression.
Clicks: 1 = single click, 2 = double click, default = 1
Examples: Select("RootItem"), Select("Grandparent|Parent|Child", 2), Select(#Field1#)
12.2.5 Check
Check sets a check box to a specific value. In contrast to a simple Click a mouse click is only
performed if the box does not already have the desired value. Tri-state check boxes may also be
set to a state called "dimmed" or "undetermined" (the box is displayed checked and grayed).
For Check Boxes and Menu Items:
Check(Value)
Value: Any BOOL expression or UNDETERMINED.
Example: Check(TRUE), Check(#Age# > 18)
For List Boxes and List Views:
In some applications check boxes are used as list items. You may either specify the item using its
position or its text. Note: It depends on how these items are implemented whether the test
execution tool will be able to access them or not!
Check(Position, Value)
Position: The position (index) of the item in the list. Can be any NUM expression or LAST
for the last item in the list. Note that WinRunner expects a 0-based index, while SilkTest
starts counting with 1.
Value: Any BOOL expression or UNDETERMINED.
Check(Text, Value)
Text: The text of the item. Can be any STRING expression.
Value: Any BOOL expression or UNDETERMINED.
Examples: Check(1, TRUE), Check(LAST, FALSE), Check(“MyItem”, UNDETERMINED)
For Tree Controls:
Check(Item, Value)
Item: The path to the checked item starting from the root of the tree in the form
"Item1|Item2...|Itemn". The hierarchy levels are separated by '|'. Can be any STRING
expression.
Value: Any BOOL expression or UNDETERMINED.
Examples: Check("RootItem", TRUE), Check("Grandparent|Parent|Child", FALSE)
15.09.2014
Page 79
User´s Guide - Part I
Edition 16.0
TEMPPO Designer (IDATG)
Formal Specification Language
12.2.6 Expand
Expand is used for TreeControls and signifies expanding or collapsing the tree by clicking on the
[+] or [-] symbol of a tree item. The following characters have to be preceded by a backslash (\): "\|
Expand(Item, Expand)
Item: The path to the expanded item starting from the root of the tree in the form
"Item1|Item2...|Itemn". The hierarchy levels are separated by '|'. Can be any STRING
expression.
Expand: 0 = collapse item, 1 = expand item
Examples: Expand("RootItem",1), Expand("Grandparent|Parent|Child", 0), Expand(#Field1#, 1)
12.2.7 Position
Position can be used to change the size and position of a window. This is only possible if the
window has a titlebar of its own.
Position(MINIMIZE)
Minimizes the window to an icon.
Position(MAXIMIZE)
Maximizes the window so that it fills the entire screen.
Position(RESTORE)
Restores size and position of the window after it has been minimized or maximized.
Position(RESIZE, Width, Height)
Resizes the window to the new width and height (in pixels).
Position(MOVE, X, Y)
Moves the upper left corner of the window to the new position (in screen coordinates).
Examples: Position(MINIMIZE), Position(RESIZE, 100, 200), Position(MOVE, 10, 20)
12.2.8 Scroll
Scroll can be used to scroll the client area of a window. It can be used for all window types that
may have a scrollbar: Child Window, Custom Window, Dialog Box, Input Field, List Box, List View,
Main Window, Table and Tree Control.
Note: This event is not necessary for SilkTest, because this tool scrolls GUI objects into view
automatically.
Scroll(Direction, Clicks)
Direction: V = scroll in vertical direction, H = scroll in horizontal direction.
Clicks: The number of clicks on the scrollbar. Can be any number between -10000 and
+10000 (a negative number means scrolling left/up, a positive number means scrolling
right/down). Note that the number of clicks necessary to reach a specific object may vary
depending on the size of the window or the number of list items.
Examples: Scroll(V, 1), Scroll(H, -10)
15.09.2014
Page 80
User´s Guide - Part I
Edition 16.0
TEMPPO Designer (IDATG)
Formal Specification Language
12.2.9 Close
Close is used to close a window by simulating a click on the X symbol in the titlebar. Naturally, the
window must have a titlebar. Close should always be used instead of Type(“Ctrl-F4”) or Type(“AltF4”), because otherwise some test execution tools show strange behavior.
Close
Closes the window. There are no parameters.
Example: Close
12.2.10 Wait
This command causes the test execution tool to wait until a window reaches a certain state. It is
possible to wait until the window becomes enabled or until a certain text is displayed. Wait can
only be used if the window is already displayed. If you want to wait for a window to appear on the
screen, use the field 'Delay' in the Step Editor instead.
Wait(Timeout, ENABLED, Value)
Timeout: The maximum time to wait in milliseconds (0-3600000). If the window does not
become enabled after this time, an error is reported by the test execution tool.
Value: Any BOOL expression
Example: Wait(5000, Enabled, TRUE)
Wait(Timeout, CAPTION, Text)
Timeout: The maximum time to wait in milliseconds (0-3600000). If the text does not match
after this time, an error is reported by the test execution tool.
Text: Any STRING expression
Example: Wait(1, Caption, "OK")
For Input Fields and Combo Boxes:
Wait(Timeout, VALUE, Text)
Timeout: The maximum time to wait in milliseconds (0-3600000). If the value does not
match after this time, an error is reported by the test execution tool.
Text: Any STRING expression
Example: Wait(30000, Value, "Smith")
12.2.11 Verify
Verify events can be used to define additional verification steps e.g., in a task flow.
Verify(EXISTS)
Verify if a window is existing. Can be used for all window types except menus and Java
group boxes. Currently not working for SilkTest.
Example: Verify(Exists)
Verify(ENABLED, Value)
Value: Any BOOL expression
Verify if a window is enabled or not. Can be used for all window types except menus and
Java group boxes.
15.09.2014
Page 81
User´s Guide - Part I
Edition 16.0
TEMPPO Designer (IDATG)
Formal Specification Language
Example: Verify(Enabled, TRUE)
Verify(CAPTION, Text)
Text: Any STRING expression
Verify if a window has a certain caption (not the same as the value!). Can be used for all
window types except menus and Java group boxes
Example: Verify(Caption, "OK")
Verify(FOCUS)
Verify if a window has the input focus
Can be used for all window types except menus and menu items. Also not allowed for
windows with titlebar and windows without a parent.
Note: MicroFocus TestPartner doesn’t support Focus-Verifications for HTML GUI elements.
Verify-Focus steps for HTML GUI elements are skipped in test cases converted to the
TestPartner format!
Example: Verify(Focus)
Verify(SELECTION, Text)
Text: Any STRING expression
Verify if a certain text is currently selected in a list. Can be used for combo boxes, list
boxes and list views.
Example: Verify(Selection, "student")
12.2.11.1 Verifying the value of a window
For Check Boxes:
Verify(VALUE, Value)
Value: Any BOOL expression
Verify the status of a check box. The value UNDETERMINED may only be used for tri-state
check boxes.
Example: Verify(Value, TRUE)
For Input Fields and Combo Boxes:
Verify(VALUE, Value)
Value: The value that is entered into the field. It may be any STRING, NUM or DATE
expression, but must match the type of the field. For instance, you cannot verify if a
STRING field contains a NUM expression.
Verify if the window contains the text. Cannot be used for combo boxes that have style
"Droplist". You can verify the selection or the text of a list item instead.
Example: Verify(Value, "Smith")
For Combo Boxes, List Boxes, List Views:
Verify(VALUE, Position, Text)
Position: The position (index) of the item in the list. Can be any NUM expression or LAST
for the last item in the list. Note that WinRunner expects a 0-based index, while SilkTest
starts counting with 1.
Text: Any STRING expression
Verify if the list item at the given position has the specified text.
15.09.2014
Page 82
User´s Guide - Part I
Edition 16.0
TEMPPO Designer (IDATG)
Formal Specification Language
Examples: Verify(Value, 0, "student"), Verify(Value, LAST, "worker")
For Group Boxes:
Verify(VALUE, "RadioButtonCaption")
Verify if the button with this caption is currently selected. The button must be positioned
inside the group box.
Example: Verify(Value, "Female")
For Tab Controls:
Verify(VALUE, "PageTitle")
Verify if the tab page with this title is currently selected. The page must have been
specified in the Tab Control Editor before.
Example: Verify(Value, "General Options")
For Tables:
Verify(VALUE, Row, Column, Text)
Text: Any STRING expression
Verify if the specified table cell contains the text
Example: Verify(Value, 2, 3, "MyText")
15.09.2014
Page 83
User´s Guide - Part I
Edition 16.0
TEMPPO Designer (IDATG)
Formal Specification Language
12.3 Condition Language
12.3.1 Introduction
This section describes the expression syntax required for the condition parser.
Expressions are used for different purposes in IDATG:
1. the formulation of conditions for a step in the Condition Editor
2. the definition of arguments for actions in the Action Editor
3. the definition of arguments for events in the Step Editor
4. the definition of task parameters in the Sub Task Editor
The same syntax is used for all cases in order to keep the effort for getting familiar with the
program as low as possible.
The parser accepts both upper and lower case letters, the usage of space characters between
operator and operands is not necessary but possible, depending on the style preferred by the
user. The same applies to brackets, they are only necessary to change the priority of operators.
For example, ‘5 + 3 * 2’ would return 11, while ‘(5 + 3) * 2’ gives 16.
The parser considers the mathematical and logical priority rules. In general, the numerical
operations are executed first, then the comparisons and at last the logical operations.
Therefore no brackets are needed for ‘10 = 5 * 2 AND 3 > -5’. Expressions are written in infixnotation, which means that binary operators stand between their two operands and unary
operators before the operand. (e.g. 5 + 3, NOT #Dialog1:$Visible#).
There are no limitations regarding the complexity of the expression or the number of used
brackets.
If you use expressions to formulate conditions they always have to return a BOOL value, since a
condition can only be TRUE or FALSE.
Argument expressions have to return the type of value, that is required for the specific action.
12.3.2 Types
The condition parser of IDATG knows four basic types for values:
•
NUM -
an integer value (32 bit)
•
BOOL -
a boolean value, may be TRUE or FALSE
•
STRING -
a string (max. length = 255 characters)
•
DATE -
a valid date value in format DD.MM.YYYY
The year may range from 0100 to 9999.
12.3.3 Operators
The operators accepted by the parser can be divided into four classes:
Logical Operators:
The basic program version knows the standard operators AND, OR, XOR and NOT.
OR is an ‘inclusive OR’, which is TRUE when at least one of its operands is TRUE.
15.09.2014
Page 84
User´s Guide - Part I
Edition 16.0
TEMPPO Designer (IDATG)
Formal Specification Language
XOR is an ‘exclusive OR’, that returns TRUE if exactly one operand is TRUE and the
other one FALSE.
Comparison Operators:
Operands can be compared using the operators =, !=, <, >, <= and >=.
While the last four are only allowed for numerical expressions and dates, the equal (=)
and not equal (!=) signs can be used for all types.
The program decides automatically, whether to perform a mathematical or a string
comparison.
There is no distinction between upper and lower case letters, so “TExt = text“ would
return TRUE.
Numerical Operators:
You can use the basic mathematical operators +, -, * and /.
Note that all numbers are integers and division results may get truncated.
The character ‘-’ can also be used as a unary operator for negations
(e.g. -(5+3)).
12.3.4 Operands
There are three possible types of operands:
Constant values:
The notation depends on the type of the value.
• NUM values are written as usual (45, -3),
• BOOL values are TRUE or FALSE
• STRINGs are written between quotation marks (“text“, “Jerry Steiner“). A
backslash (\) causes the next character to be interpreted as text (e.g. “te\”xt”)
• DATE values are written as DD.MM.YYYY (e.g. 08.03.1994, 29.02.2000)
Designators (Variables):
Designators can be addressed by writing the name between ‘#’ characters
(e.g. #Name#). It is important that each designator has the type required by the
expression operators.
For example, it is not possible to compare the designator #HumanResources:Mode#
with the constant value 5, if it has been defined as a STRING variable.
For further information, please consult the section about designators.
Composed expressions:
Since there is no complexity limitation for expressions, it is possible to use operands
that are composed expressions and contain operators themselves.
For example, ‘#Name# = "Mr. Holmes“’ may be passed to any
logical operator and ‘(#Age# * 3) + 5’ to any numerical or
comparison operator.
15.09.2014
Page 85
User´s Guide - Part I
Edition 16.0
TEMPPO Designer (IDATG)
Formal Specification Language
12.3.5 Formal Syntax Description
Semantic Condition:
<Boolean Expression>
Boolean Expression:
TRUE
FALSE
<Boolean Designator>
|
|
|
<Boolean Expression> AND <Boolean Expression>
<Boolean Expression> OR <Boolean Expression>
<Boolean Expression> XOR <Boolean Expression>
NOT <Boolean Expression>
|
|
|
|
<Boolean Expression> = <Boolean Expression>
<Arithmetic Expression> = <Arithmetic Expression>
<String Expression> = <String Expression>
<Date Expression> = <Date Expression>
<Boolean Expression> != <Boolean Expression>
<Arithmetic Expression> != <Arithmetic Expression>
<String Expression> != <String Expression>
<Date Expression> != <Date Expression>
|
|
|
|
|
|
|
|
<Arithmetic Expression> < <Arithmetic Expression>
<Date Expression> < <Date Expression>
<Arithmetic Expression> > <Arithmetic Expression>
<Date Expression> > <Date Expression>
<Arithmetic Expression> <= <Arithmetic Expression>
<Date Expression> <= <Date Expression>
<Arithmetic Expression> >= <Arithmetic Expression>
<Date Expression> >= <Date Expression>
|
|
|
|
|
|
|
|
Arithmetic Expression:
<Number>
<Arithmetic Designator >
<Arithmetic Expression> + <Arithmetic Expression>
<Arithmetic Expression> - <Arithmetic Expression>
<Arithmetic Expression> * <Arithmetic Expression>
<Arithmetic Expression> / <Arithmetic Expression>
- <Arithmetic Expression>
( <Arithmetic Expression> )
String Expression:
<String>
<String Designator >
( <String Expression> )
15.09.2014
|
|
|
|
|
|
|
|
|
Page 86
User´s Guide - Part I
Edition 16.0
TEMPPO Designer (IDATG)
Formal Specification Language
Date Expression:
<Date>
<Date Designator >
( <Date Expression> )
|
|
Number:
[0-9]+
( <Number> )
|
String:
“[a-z0-9]*“
( <String> )
|
Date:
DD.MM.YYYY
( <Date> )
|
Boolean Designator:
#<Name of a boolean attribute>#
( <Boolean Designator> )
|
Arithmetic Designator:
#<Name of a numeric attribute>#
( <Arithmetic Designator> )
|
String Designator:
#<Name of a string attribute>#
( <String Designator> )
|
Date Designator:
#<Name of a date attribute>#
( <Date Designator> )
|
Priority of operators (in descending order):
( ) (Brackets), - (Sign), NOT, /, *, - (Minus), +, >=, <=, >, <, !=, =, AND, XOR, OR
15.09.2014
Page 87
User´s Guide - Part I
Edition 16.0
TEMPPO Designer (IDATG)
Formal Specification Language
12.4 Action Language
Actions are simple functions like calling a window, setting a designator to a new value etc. and are
necessary to obtain a complete specification of the GUI behavior. Depending on the type of
function, they can have various arguments. Arguments have the same syntax as conditions and
can therefore also be complex expressions.
For example: SetInputField(#Age#, 5 + (3 * #Aboutbox:Calls#)).
The contents of windows is set with special actions like SetInputField(Name, Value),
SetRadioGroup(Name, Value) etc. Other designators can be set to a new value with the action
SetAttribute(Name, Value).
The following actions are available:
Action Name
Arguments
Description / Example :
Open the window which is defined by the ID.
The window is made visible and enabled
automatically.
e.g. OpenWindow(#HumanResources#)
OpenWindow
Name (WindowID)
OpenModalDialog
Name (DialogBoxID)
Open the Dialog Box which is defined by the
ID as a modal dialog which means that no
other windows can be used while this window
is open (except its own children). The window
is made visible and enabled automatically.
e.g. OpenModalDialog(#NameMissing#)
CloseApplication
None
Close the current application, the end of
every test case. At least one transition with
this action has to be defined!
e.g. CloseApplication()
CloseWindow
Name (WindowID)
Close the window which is defined by the ID.
e.g. CloseWindow(#HumanResources#)
GotoDataRecord
Dataset (DataSetName)
RecordID (String)
Move the record pointer of the data set to the
selected record.
e.g. GotoDataRecord(#~Person#, "v01")
NextDataRecord
Dataset (DataSetName)
RecordType (V, I, or A)
Move the record pointer of the data set to the
next record of the selected type (V=Valid,
I=Invalid, A=All). If there are no more records,
the pointer is reset to the first one.
e.g. NextDataRecord(#~Person#, v)
ResetDataRecord
Dataset (DataSetName)
RecordType (V, I, or A)
Reset the record pointer of the data set to the
first record of the selected type (V=Valid,
I=Invalid, A=All).
e.g. ResetDataRecord(#~Person#, i)
SetAttribute
Name (Designator)
Value (Undetermin. Type)
Set the value of an attribute. The type of the
value depends on the attribute.
e.g. SetAttribute(#IDD_HUMAN:DBEmpty#, True),
SetAttribute(#IDD_HUMAN:$caption#, "Personal Data")
15.09.2014
Page 88
User´s Guide - Part I
Edition 16.0
Action Name
TEMPPO Designer (IDATG)
Formal Specification Language
Arguments
Description / Example :
SetCheckBox
Name (CheckBoxID)
Value (Bool or
‘Undetermined’)
Set the value of a Check Box to True or
False. Tri-State Check Boxes can also be set
to the state Undetermined.
e.g. SetCheckBox(#PHD#, True)
SetComboBox
Name (ComboBoxID)
Value (String, Num or
Date)
Set the value of a Combo Box.
e.g. SetComboBox(#Profession#, “student”)
SetInputField
Name (InputFieldID)
Value (String or Num or
Date)
Set the value of an Input Field.
e.g. SetInputField(#Name#, “Lewis”)
SetListBox
Name (ListBoxID:$row)
Value (String)
Set the value of a row in a List Box. The row
number can be an arbitrary integer.
e.g. SetListBox(#Listbox1:$3#, “text”)
SetListView
Name (ListViewID:$row)
Value (String)
Set the value of a row in a List View. The row
number can be an arbitrary integer.
e.g. SetListView(#Listview1:$3#, “text”)
SetRadioGroup
Name (GroupBoxID )
Value (RadioCaption)
Set the value of a Radio Group. Note: The
value is the caption of the active radio button.
e.g. SetRadioGroup(#Sex_GRP#, “Male”)
SetTabControl
Name (TabControlD)
Value (String)
Set the value of a Tab Control. The value is
the title of the tab page that should be
selected.
e.g. SetTabControl(#Tab1#, “Page1”)
SetTableCell
15.09.2014
Name
(TablelD:$row,column)
Value (String)
Set the value of a single cell in a Table. The
position of the cell has to be specified by the
row and column number which may be
arbitrary integers.
e.g. SetTableCell(#Table1:$2,4#, “text”)
Page 89
User´s Guide - Part I
Edition 16.0
TEMPPO Designer (IDATG)
Literature
13 Literature
IEEE COMPSAC’98
IDATG: An Open Tool for Automated Testing of Interactive Software
IEEE ICIPS’98
Intelligent Test Case Generation for Graphical User Interfaces
QUALITY WEEK’98
IDATG: Integrating Design and Automated Test Case Generation
MERCURY’99
IDATG: Intelligent GUI Test Case Generation
ICSTEST’03_1
Mohacsi S.: Minimizing Test Maintenance Costs through Automated Test
Case Generation
ICSTEST’03_2
Pill, D.: Avoiding the Oxymoron of Programming Tests
ICSTEST’05
Mohacsi S.: A Unified Framework for API and GUI Test Automation
QA&TEST'06
Mohacsi S.: Test Automation in Space Projects
IEEE ICST'08
Beer A., Mohacsi S.: Efficient Test Data Generation for Variables with
Complex Dependencies
VALID 2010
Mohacsi S., Wallner J.: A Hybrid Approach for Model-based Random
Testing
EuroSTAR 2012
Mohacsi S.: "15 Years of Evolving Model-Based Testing - An Experience
Report "
QUEST 2014
Mohacsi S.: “Model-Based Testing – the Key to Efficient Test Automation”
15.09.2014
Page 90
User´s Guide - Part I
Edition 16.0
TEMPPO Designer (IDATG)
Glossary
14 Glossary
Acceptance Test
See User Test
Action
Actions express the changes of the GUI that are produced by a
certain step. For instance, a step may set the contents of an input
field to a new value or disable a button. They can be defined with the
Action Editor.
AUT
Application under Test
The dynamic behavior of a GUI is represented by a state-transition
diagram. A stimulus (e.g. mouse click, key entry) changes the state of
the GUI (e.g. the focus moves on the screen, a button becomes
enabled). State transitions can be defined with the Window Editor.
Behavior of the GUI
Black-box Test
Black-box testing refers to the practice of verifying the expected
behavior of a component based solely on its specification (i.e. without
knowledge of its underlying implementation).
Capture/Replay Tool
A tool that is able to capture user actions, save them in test scripts,
replay these scripts (by interacting with associated GUI-components)
and verify the test results. Errors can only be found if they affect the
GUI (e.g. through an error message). IDATG generates test scripts
for the tools SilkTest (MicroFocus), TestPartner (MicroFocus), and
WinRunner (HP).
Condition
A step can depend on one or more semantic conditions that have to
be fulfilled before the step can be performed. IDATG provides a
language for specifying semantic conditions that is easy to learn and
very intuitive. It is possible to make references to the current state or
contents of windows and to perform arithmetic, Boolean and string
operations. Conditions can be defined with the Condition Editor.
Coverage
The test coverage expresses which percentage of the application is
covered by test cases. It is a criteria for the completeness of a test
phase, only if a specific test strategy is linked to a specific type of
coverage. IDATG supports the following types of test coverage:
Test strategy
Coverage
Graph-oriented testing Step (C0) and connection (C1) coverage
Data-oriented testing Valid and invalid data record coverage
Transition testing
Transition coverage
DAO
Data Access Objects, a widely used database interface.
DAPI
Database Application Programming Interface
DB
Defect
Database
A defect is a situation, where the software does not perform as the
user expects. In case of a defect it is not relevant whether the cause
of the error stems from coding, design, specification, or requirements
definition.
Designator
Designators can be seen as variables that can be used in events,
conditions and actions. Most of them represent the contents or certain
properties of GUI elements. Examples: #WindowID:$Enabled#,
#WindowID:MyVariable#
Event (State-Transition Diagram)
Each state transition is triggered by an event (e.g. mouse click, key
entry). Events are defined in the Step Editor.
Framework (Development
Process)
A framework is a setting of basic principles and concepts that
describes what the development of interactive systems should be
15.09.2014
Page 91
User´s Guide - Part I
Edition 16.0
TEMPPO Designer (IDATG)
Glossary
focused on. It provides a number of perspectives for development
and defines the relationships between those perspectives.
Functional Test
See Task-Oriented Test
GUI
GUI Map
Graphical User Interface
A file containing information about the layout and properties of GUI
objects. Capture/replay tools require a GUI Map for executing a test
script.
GUI Spy
A tool that is able to record GUI objects and their properties directly
from the screen. A GUI Spy is used e.g., in IDATG for importing
layout information and in capture/replay tools for generating the GUI
Map.
HTML
Hyper Text Markup Language
HW
Hardware
ID
Identification
IDATG
Integrating Design and Automated Test case Generation
IE
Integration Test
Internet Explorer, popular internet browser from Microsoft
The testing of modules, programs, subsystems and even systems to
prove that they interact properly. The common link among modules,
programs, subsystems, etc. is that they can both share data globally
and locally defined data through specially designed and constructed
interfaces [Mosley, 2000].
JDK
Java Development Kit
JRE
Java Runtime Environment
JVM
Java Virtual Machine
MB
Meta-Condition
Megabyte (1.048.576 byte)
If a condition appears more than once in the GUI specification, it can
be defined as a meta-condition. A M.C. can be used in other
conditions like a macro simply by referring to its ID. They can be
defined with the Meta Condition Editor.
MFC
Microsoft Foundation Classes, a set of pre-defined C++ classes that
can be used for implementing a MS Windows GUI.
MHz
Module Test
Megahertz (million cycles per second)
The purpose of unit (module) testing is to prove that the individual
units of the software function as they were intended. The software
developer who built the unit under test should conduct the unit test
[Mosley, 2000].
ODBC
Open DataBase Connectivity
PC
Personal Computer
QTP
HP QuickTest Professional, Capture/Replay Tool for automatic test
execution.
The fundamental regression testing objective is to assure that all
application system features remain functional after the introduction of
corrections and enhancements of the production system. A second
objective is to test any new corrected, or enhanced system features.
A third objective is to assure that the system documentation is kept
current [Mosley].
Regression Test
SilkTest (MicroFocus)
Capture/Replay Tool for automatic test execution.
SIS
System Information String containing data that uniquely identifies your
15.09.2014
Page 92
User´s Guide - Part I
Edition 16.0
TEMPPO Designer (IDATG)
Glossary
PC. Generated by the IDATG Key Manager.
TEMPPO Designer
Synonym for IDATG
TEMPPO Test Manager
Test Execution, Managing, Planning and rePorting Organizer. A
popular test management tool.
State-Based Test
See Transition Test
State
In IDATG, every window is seen as a state. The active state is
determined by the current focus position, it changes as the user
navigates through the GUI. Child windows can be seen as sub-states,
parent windows as super-states.
State Transition
See Transition
State-Transition Diagram
A dynamic model represented as a diagram consisting of states and
transitions. In IDATG, a state-transition diagram is used to represent
the GUI behavior.
Step
The step is the basic term of the IDATG language and signifies a
transition from one state of the GUI to another.
A step can be described by the following information:
• The event that triggers the step (usually a user input e.g., a
mouse click).
• The semantic conditions that must be fulfilled before the step can
be executed (e.g., a certain button must be enabled).
• The actions executed during the step (e.g. a window opens or a
button becomes disabled).
• Start and destination window of the step (in other words, the
focus position before and after the step).
There are 3 different types of steps: Transitions, Task Steps and Test
Steps
SW
System Test
Software
See Task-Oriented Test
Tag
A label for the identification of GUI-elements by the capture/replay
tool. Tags are generated automatically by IDATG.
Task
A task is a functional requirement of the specified GUI. Tasks are
usually listed in the software requirements specification, where they
are organized in a hierarchical tree structure.
Task-Oriented Test
During task-oriented (functional, system) testing, the application is
seen from the users´s perspective. Task-oriented test cases are
based on the software requirements specification.
Task Coverage
Specifies the percentage of an application´s tasks that are covered by
test cases.
Task Flow
The task flow of a task is a directed graph without cycles that shows
the sequence of steps that is necessary to perform the task. If there is
more than one possibility to fulfill a task, the graph can have various
branches.
Task Step
A single step of a task flow. It may either represent an atomic user
action like clicking a button or refer to a complete sub task.
TC
Test Case
TCG
Tcl
Test Case Generation
Tool Command Language
Test Case
According to the standard 610.12-1990 by IEEE a test case is defined
15.09.2014
Page 93
User´s Guide - Part I
Edition 16.0
TEMPPO Designer (IDATG)
Glossary
as follows:
A set of inputs, execution conditions, and expected results developed
for a particular objective, such as to exercise a particular program
path or to verify compliance with a specific requirement.
TestPartner (MicroFocus)
Capture/Replay Tool for automatic test execution.
Test Step
A single step of a test case. Each test step represents a user action
on a certain GUI object.
Test Case Execution
The execution of a test case by a human user or capture/replay tool
followed by the verification of the results.
Test Case Generator
A tool that automatically generates test cases based on a formal
specification of a system.
Test Package
A test package (TP) is a set of test cases that logically belong
together. For instance, a TP may contain all test cases for a certain
task and its sub tasks. TPs help to group test cases into a clear test
structure. When IDATG converts test cases into WinRunner or
SilkTest scripts, this structure is reflected by the generated files and
directories.
Transition
A type of → Step. In contrast to task steps, a transition is not part of a
task flow. When generating test cases, IDATG tries to find a valid
sequence of transitions rather than using the pre-defined sequences
represented by the task flows.
Transition Coverage
Specifies the percentage of an application´s state transitions that are
covered by test cases.
Transition Test
The aim of transition testing is to cover each state transition at least
once. Before a transition can be tested, all conditions that have been
defined for it have to be fulfilled.
TSC
Test Support Center
UI
Unit Test
User Interface
See Module Test
User/Acceptance Test
Acceptance testing is a type of system testing to demonstrate that the
system meets the user requirements. It is a validation process.
Visual C++
The Microsoft development tool for C++. It includes a collection of
pre-defined classes (MFC) for implementing MS Windows GUIs.
Window
Graphical User Interfaces consist of objects called windows. There is
no generally accepted definition for this term, therefore it is often used
with different meanings. For instance, according to the notation of the
capture/replay tool WinRunner only the top-level parts of the GUI are
called ‘windows‘, while the others are called ‘objects‘. On the other
hand, MS Windows uses the term ‘window‘ for all parts of the GUI,
regardless of their position in the GUI’s hierarchy. This means that
dialogs, buttons, input fields, and even static texts are equally seen as
windows. This point of view is not only simpler but also reflects better
the internal functionality of today’s operating systems. Therefore, also
the IDATG formalism denotes all types of GUI objects as windows.
WinRunner (HP)
WR
A capture/replay tool for automatic test-case execution
15.09.2014
Page 94