1
User Manual
Edition January 2015
Copyright © Atos IT Solutions and Services GmbH 2015
Microsoft, MS, MS-DOS and Windows are trademarks of Microsoft Corporation.
The reproduction, transmission, translation or exploitation of this document or its content is not permitted
without express written authority. Offenders will be liable for damages. All rights reserved, including rights
created by patent grant or registration of a utility model or design.
Right of technical modification reserved.
Contents
1
Overview............................................................................................ 9
2
Introduction..................................................................................... 10
The Test Process................................................................................... 11
3
Description of Use ............................................................................ 14
3.1 The Test Process Phases ................................................................ 14
3.1.1 Test Planning .......................................................................... 14
3.1.1.1 Writing the Test Plan .......................................................... 14
3.1.1.2 Writing the Project Plan ...................................................... 14
3.1.1.3 Defining Test Case Attributes............................................... 15
3.1.1.4 Baseline / Import Requirements ........................................... 15
3.1.2 Test Design............................................................................. 15
3.1.2.1 Working with Projects ......................................................... 16
3.1.2.1.1 Creating a Project .......................................................... 16
3.1.2.1.2 Opening an Existing Project ............................................ 17
3.1.2.2 Building the Test Structure .................................................. 18
3.1.2.2.1 Creating a test structure................................................. 18
3.1.2.2.2 Opening a Test Structure ................................................ 20
3.1.2.2.3 Reopen a test structure .................................................. 21
3.1.2.2.4 Importing an RTF-formatted document............................. 21
3.1.2.2.5 Import Test Cases from Excel ......................................... 28
3.1.2.2.6 Build manually .............................................................. 30
3.1.2.2.7 XML Import................................................................... 31
3.1.2.3 Extending the Test Structure ............................................... 33
3.1.2.3.1 Adding Test Packages .................................................... 34
3.1.2.3.2 Categorizing Test Packages ............................................. 37
3.1.2.3.3 Referring to documents .................................................. 39
3.1.2.3.4 Referring to requirement numbers or names ..................... 43
3.1.2.4 Designing Test Cases .......................................................... 47
3.1.3 Test Case Implementation ........................................................ 55
3.1.3.1 Implementing Test Steps .................................................... 55
3.1.3.1.1 Preconditions and Postconditions ..................................... 55
3.1.3.1.2 Test Steps .................................................................... 56
3.1.3.1.3 Test Creation Assistant ................................................... 57
3.1.3.1.4 Keyboard edit mode ....................................................... 58
3.1.3.1.5 Adding more columns .................................................... 58
3.1.3.1.6 Upload / paste / reference images ................................... 60
3.1.3.1.7 Automated test cases ..................................................... 61
3.1.3.2 Reworking the Test Structure .............................................. 67
3.1.4 Test Case Execution ................................................................. 67
3.1.4.1 Starting Test Execution ....................................................... 68
3.1.4.1.1 New: Based on current test structure ............................... 70
3.1.4.1.2 New: Based on a predecessor ......................................... 76
3.1.4.1.3 Copy: Based on an existing test suite ............................... 80
3.1.4.1.4 Special: Based on an existing test suite with restrictions to
test results81
3.1.4.1.5 Manual Test Execution ................................................... 82
3.1.4.1.6 Plan ............................................................................. 86
3.1.4.1.7 Test Result Attributes ..................................................... 87
3.1.4.1.8 Previous Results ............................................................ 87
3.1.4.1.9 Enter new bug entry ...................................................... 88
3.1.4.1.10 Automated Test Execution ............................................ 92
3.1.4.1.11 Mixed Test Execution.................................................... 93
3.1.4.1.12 Setting several results .................................................. 93
3.1.4.2 Pausing and Continuing Test Execution ................................. 94
3.1.4.3 Editing Test Cases during Test Execution .............................. 94
3.1.4.3.1 Adding new test cases during test case execution .............. 97
3.1.4.3.2 Adding and changing test packages during test case execution97
3.1.4.4 Finding Bug IDs ................................................................. 98
3.1.4.5 Finishing Test Execution ...................................................... 98
3.1.4.6 Creating More Test Suites ................................................... 98
3.1.4.7 Test case execution with an exported test suite ..................... 99
3.1.4.7.1 Export a test suite ......................................................... 99
3.1.4.7.2 Test case execution with an exported test suite ................ 101
3.1.4.7.3 Importing test results ................................................... 101
3.1.4.7.4 Unlocking the test suite ................................................. 103
3.1.5 Evaluation ............................................................................. 103
3.1.5.1 Analysis ........................................................................... 103
3.1.5.1.1 Analysis with previous test suites ................................... 106
3.1.5.2 Requirement analysis ........................................................ 107
3.1.5.3 Analysis by Bug ID (project) ............................................... 110
3.1.5.4 Analysis by Bug ID (test suite)............................................ 111
3.1.5.5 Progress charts ................................................................. 111
3.1.5.5.1 Creation Progress ......................................................... 111
3.1.5.5.2 Execution Progress ....................................................... 113
3.1.5.6 Reporting ......................................................................... 122
3.1.5.6.1 New / Edit ................................................................... 123
3.1.5.6.2 Report of several test suites........................................... 133
3.1.5.6.3 Chart Settings .............................................................. 137
3.1.5.6.4 Previewing and Saving .................................................. 138
3.1.5.6.5 Sample Charts ............................................................. 140
3.1.5.6.6 Report Templates ......................................................... 142
3.1.5.7 Import from another projects ............................................. 142
3.1.5.8 Export to XML ................................................................... 142
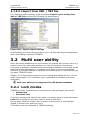
3.1.5.9 Import from XML / TRP file ................................................. 143
3.2 Multi user ability .......................................................................... 143
3.2.1 Lock modes ........................................................................... 143
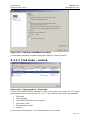
3.2.1.1 Find locks – unlock ............................................................ 144
3.2.1.2 Showing a lock state ......................................................... 145
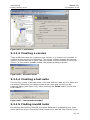
3.2.1.3 Creating a version ............................................................. 146
3.2.1.4 Creating a test suite .......................................................... 146
3.2.1.5 Finding invalid locks .......................................................... 146
3.2.2 Refreshing ............................................................................. 147
3.2.2.1 Refreshing manually .......................................................... 147
3.2.2.1.1 Reloading the whole test structure / test suite ................. 147
3.2.2.1.2 Refreshing recursively ................................................... 147
3.2.2.1.3 Refreshing on certain user actions .................................. 148
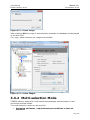
3.3 General principles and user prompting ............................................ 148
3.3.1 Inline images ......................................................................... 148
3.3.2 Multi-selection Mode ............................................................... 149
3.3.2.1 Multi-selection .................................................................. 150
3.3.2.2 Multi selection merge (of unchanged TPs and TCs) ................ 155
3.3.2.3 Display of assigned attributes and requirements ................... 156
3.3.2.3.1 Test Structure .............................................................. 156
3.3.2.4 Multi selection merge (of changed TPs and TCs) .................... 160
3.3.2.4.1 Test Suite .................................................................... 162
3.3.2.4.2 Filter in multi-selection mode ......................................... 162
3.3.2.5 Setting new assignments ................................................... 164
3.3.2.6 Move Ownership ............................................................... 167
3.3.2.7 Delete ............................................................................. 168
3.3.2.8 Set test results ................................................................. 169
3.3.3 Hyperlinks and Uploads ........................................................... 170
3.3.3.1 Creating hyperlinks ........................................................... 170
3.3.3.2 Edit hyperlinks .................................................................. 177
3.3.3.3 Remove hyperlinks ............................................................ 177
3.3.3.4 Download an upload .......................................................... 177
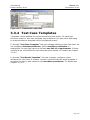
3.3.4 Test Case Templates ............................................................... 178
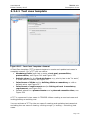
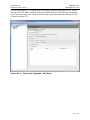
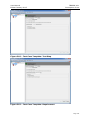
3.3.4.1 Test case template ............................................................ 179
3.3.4.1.1 Create new test case..................................................... 182
3.3.4.1.2 Unlock/save existing test case........................................ 183
3.3.4.1.3 Test case template and filter .......................................... 183
3.3.4.2 Test result templates ......................................................... 183
3.3.5 Attribute activation ................................................................. 184
3.3.6 Requirement (Structure) activation ........................................... 185
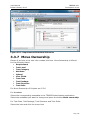
3.3.7 Move Ownership ..................................................................... 186
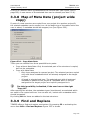
3.3.8 Map of Meta Data (project wide copy) ....................................... 187
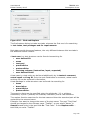
3.3.9 Find and Replace .................................................................... 187
3.3.9.1.1 Find (Test Case / Test Package) ..................................... 189
3.3.9.1.2 Replace (Test Case / Test Package) ................................ 189
3.3.10
Apply / Discard .................................................................... 190
3.3.11
Newsboard .......................................................................... 190
3.3.12
Versioning........................................................................... 192
3.3.13
Compare............................................................................. 197
3.3.14
Filter .................................................................................. 199
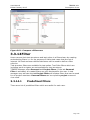
3.3.14.1 Predefined filters .............................................................. 199
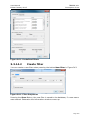
3.3.14.2 Create filter ..................................................................... 200
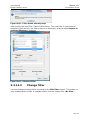
3.3.14.3 Change filter .................................................................... 201
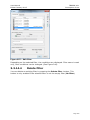
3.3.14.4 Delete filter ..................................................................... 202
3.3.14.5 Defining the filter criterion ................................................. 203
3.3.14.6 Edit filter criterion ............................................................ 205
3.3.14.7 Export filter ..................................................................... 206
3.3.14.8 Import filter ..................................................................... 206
3.3.15
Test structure XML Export ..................................................... 206
3.3.16
Test structure XML Update .................................................... 206
3.3.16.1.1 Update process........................................................... 207
3.3.17
Test Suite XML Export / Import ............................................. 208
3.3.17.1 Export............................................................................. 208
3.3.17.2 Import ............................................................................ 209
3.3.17.2.1 Import characters of other fonts ................................... 210
3.3.18
Export Test Suite to DOORS .................................................. 210
3.3.18.1 Effects in DOORS ............................................................. 213
3.3.19
Test Suite Scheduler ............................................................ 215
3.3.19.1 Create/Edit Scheduler ....................................................... 215
3.3.19.2 Delete Scheduler .............................................................. 216
3.3.19.3 Import Scheduler ............................................................. 217
3.3.19.4 Run Scheduler ................................................................. 217
3.3.19.5 Protocol of Scheduler ........................................................ 219
3.3.20
Task lists ............................................................................ 220
3.3.21
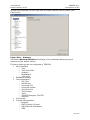
Settings .............................................................................. 222
3.3.21.1 Global settings ................................................................. 222
3.3.21.1.1 User Interface ............................................................ 222
3.3.21.1.2 Logging ..................................................................... 223
3.3.21.2 TEMPPO Test Manager Settings .......................................... 223
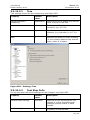
3.3.21.2.1 Tree .......................................................................... 225
3.3.21.2.2 Test Step Cells ........................................................... 225
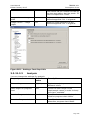
3.3.21.2.3 Analysis ..................................................................... 226
3.3.21.2.4 Newsboard................................................................. 227
3.3.21.2.5 Test suite .................................................................. 228
3.3.21.2.6 Database ................................................................... 228
3.3.21.2.7 Test Automation ......................................................... 231
3.3.21.2.8 JUnit ......................................................................... 237
3.3.21.2.9 TEMPPO Designer (IDATG) ........................................... 238
3.3.21.2.10 Ranorex ................................................................... 239
3.3.21.2.11 Commands ............................................................... 239
3.3.21.2.12 Change Management ................................................. 240
4
TEMPPO Manager ........................................................................... 245
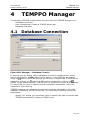
4.1 Database Connection .................................................................... 245
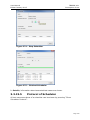
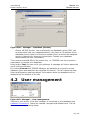
4.2 User management ........................................................................ 246
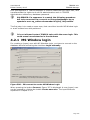
4.2.1 MS Window login .................................................................... 247
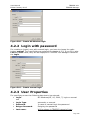
4.2.2 Login with password ............................................................... 248
4.2.3 User Properties....................................................................... 248
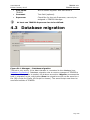
4.3 Database migration ...................................................................... 249
5
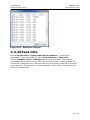
TEMPPO Administrator ................................................................... 250
5.1 Database Connection .................................................................... 250
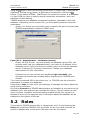
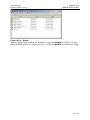
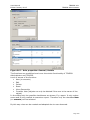
5.2 Roles .......................................................................................... 251
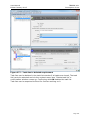
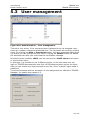
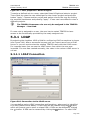
5.3 User management ........................................................................ 254
5.3.1 LDAP ..................................................................................... 255
5.3.1.1 LDAP Connection ............................................................... 255
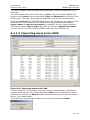
5.3.1.2 Importing users from LDAP ................................................ 256
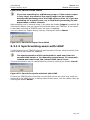
5.3.1.3 Synchronizing users with LDAP ........................................... 257
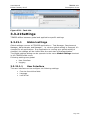
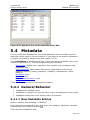
5.4 Metadata..................................................................................... 258
5.4.1 General Behavior .................................................................... 258
5.4.1.1 New Metadata Entries ........................................................ 258
5.4.1.2 Delete Metadata Entries ..................................................... 259
5.4.1.3 Move ownership ................................................................ 259
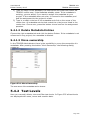
5.4.2 Test Levels ............................................................................ 259
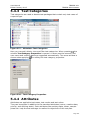
5.4.3 Test Categories ...................................................................... 261
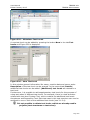
5.4.4 Attributes .............................................................................. 261
5.4.4.1 Copy and rename of UDA ................................................... 263
5.4.5 Uploads ................................................................................. 264
5.4.6 Requirement Structures........................................................... 265
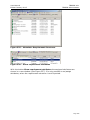
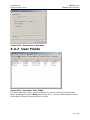
5.4.7 User Fields ............................................................................. 268
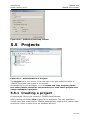
5.5 Projects ...................................................................................... 269
5.5.1 Creating a project ................................................................... 269
5.5.2 Copying a project ................................................................... 271
5.5.3 Deletions ............................................................................... 271
5.5.4 Test Suites: check consistency, unlock ...................................... 271
5.5.5 Assign Metadata ..................................................................... 271
5.5.6 Move Ownership ..................................................................... 272
5.5.7 Freeze, Unfreeze .................................................................... 273
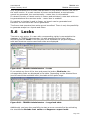
5.6 Locks .......................................................................................... 274
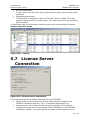
5.7 License Server Connection ............................................................ 275
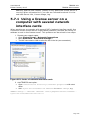
5.7.1 Using a license server on a computer with several network interface
cards 276
6
JUnit .............................................................................................. 277
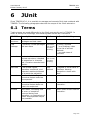
6.1 Terms ......................................................................................... 277
6.2 Configuration ............................................................................... 278
6.3 Import JUnit test cases ................................................................. 279
6.3.1 Description and steps .............................................................. 279
6.3.2 References to JUnit test cases .................................................. 284
6.4 Update JUnit test cases ................................................................. 286
6.4.1 Description and steps .............................................................. 287
6.4.2 References to JUnit test cases .................................................. 291
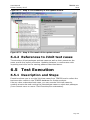
6.5 Test Execution ............................................................................. 291
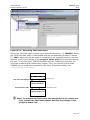
6.5.1 Description and Steps ............................................................. 291
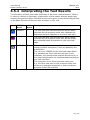
6.5.2 Interpreting the Test Results .................................................... 293
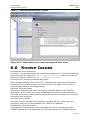
6.6 Known Issues .............................................................................. 294
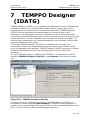
7
TEMPPO Designer (IDATG) ............................................................ 296
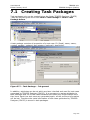
7.1 Creating Task Packages ................................................................ 297
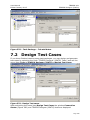
7.2 Design Test Cases ........................................................................ 298
7.3 Updating Test Cases ..................................................................... 301
7.4 Restore Designed Test Cases ......................................................... 301
8
Command Line ............................................................................... 302
9
Plug-ins ......................................................................................... 304
9.1 Plug-in: Version Change Listener.................................................... 304
10
Literature .................................................................................... 305
11
Terms.......................................................................................... 306
12
Abbreviations .............................................................................. 308
13
Appendix ..................................................................................... 309
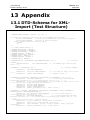
13.1 DTD-Schema for XML-Import (Test Structure) .............................. 309
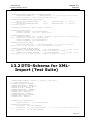
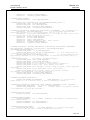
13.2 DTD-Schema for XML-Import (Test Suite) .................................... 310
13.3 DTD-Schema for XML-Import (Results) with CLI ............................ 312
13.4 DTD-Schema for XML-Export (User Profile) with CLI ...................... 312
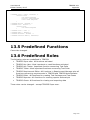
13.5 Predefined Functions .................................................................. 313
13.6 Predefined Roles ....................................................................... 313
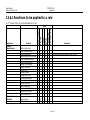
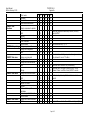
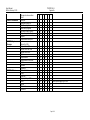
13.6.1
Functions to be applied to a role ............................................ 314
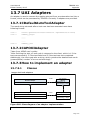
13.7 UAI Adapters ............................................................................ 317
13.7.1
CDefaultAutoToolAdapter ...................................................... 317
13.7.2
CAPOXIAdapter ................................................................... 317
13.7.3
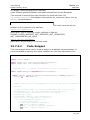
How to implement an adapter ............................................... 317
13.7.3.1 Classes ........................................................................... 317
13.7.3.2 Code Snippet ................................................................... 318
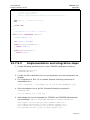
13.7.3.3 Implementation and integration steps ................................. 319
14
Index .......................................................................................... 321
User Manual
Edition January 2015
1
TEMPPO V6.1
Overview
Overview
Managing the test process involves a large number of engineering disciplines like
project management, risk management, high and low level design, development,
and metrics collection. Normally testers manage their test cases with Word tables
or Excel sheets. The main disadvantages are that test cases cannot be
maintained easily, groups of test cases cannot be divided flexibly, no statistics
can be provided automatically, etc.
TEMPPO (Test Execution, Management, Planning and rePorting and Organizer)
was developed to make the test process and test management easier and to
provide methods for test case design and development as well as test case
execution and integration of test automation tools.
TEMPPO consists of
TEMPPO Test Manager: the test management application
TEMPPO Requirement Manager: the requirement management
application
TEMPPO Designer: the application for test case and test data generation
TEMPPO Administrator: the application for meta data maintenance
TEMPPO Manager: the application for database migration
The main parts of TEMPPO Test Manager are:
Editing and administrating automated and manual test cases including
version control
Integration of automated test case execution with WinRunner, SilkTest,
TestPartner, QuickTest Professional, Ranorex or any other tool that
supports a command line interface
Flexible manual test case execution (even with unplugged notebooks)
Professional analysis, statistics and reporting
This manual described the way of working with TEMPPO Test Manager.
Page 9
User Manual
Edition January 2015
2
TEMPPO V6.1
Introduction
Introduction
When we talk about testing, we consider a test case to be the basic unit of
discussion. A test case is defined by:
1. a descriptive name (e.g. "Create new customer account")
2. a single, well delineated test goal (e.g. "create a new customer account in
the data base")
3. a sequence of test steps (e.g. "1. Log in, 2. Open customer creation
dialog, ..."),
consisting of instruction, input data and expected result.
Additionally, attributes may be defined for test cases, like
1. test situation (does it test a normal operation or an error condition)
2. state (is the test case still in work or ready for execution)
3. priority (how important is it to execute this test case before the product is
released)
4. type (manual, i.e. test steps have to be performed by a human operator, or
automated)
Page 10
User Manual
Edition January 2015
TEMPPO V6.1
Introduction
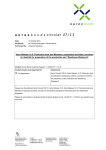
The Test Process
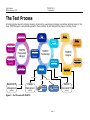
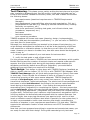
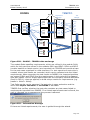
All testing activities deal with planning, designing, implementing, executing and managing a sometimes quite big amount of test
cases. TEMPPO supports a well-defined approach to these activities. We can distinguish five phases in the test process:
Engineering
Baseline / View
Engineering
Analysis
Prioritize
Engineering
Elicitate/
Specify
Plan
Test issues
Model
Use cases
Design
Test structure
TEMPPO
Requirement
Manager
Evaluation
Analysis &
Reports
TEMPPO
Test Manager
TEMPPO
Designer
Execute
Test results
Generation
Test cases
Test cases
Bug entry / Bug ID
Test cases
Requirements
Management
(external)
Generation
Test data
Implement
Test cases
Engineering
Import / Update
Import / Update
Change
Management
Test cases
Offline Test
execution
Model
Detailed
specification
Offline Test
execution
(external)
Execute
Automated TC
(external)
Figure 1 - Test Process with TEMPPO
Page 11
User Manual
Edition January 2015
TEMPPO V6.1
Introduction
Test Planning. This phase covers mainly writing the test plan and a project
plan, typically in a planning tool like MS project. A test plan template can be
found in the TEMPPO installation directory under /doc and it takes into account
the following issues:
test requirements (baselined requirements in TEMPPO Requirement
Manager)
test management (responsibilities, planning and organization, CM, etc.)
preparations for the test (e.g. setting up the test infrastructure, creating
test aids, conventions, etc.)
tests to be performed (including test goals, end-of-test criteria, test
procedures, sequences, etc.)
test cases
test documentation
error reporting procedure
TEMPPO supports the issues test cases (planning, design, implementation,
execution) and test documentation (evaluation), i.e. you can refer to TEMPPO in
your test plan for these topics.
Although your testing activities just started in the phase of test planning, you
might already anticipate the situation as it will be at the beginning of the test
case execution or evaluation phase: by that time you will have a lot of test
cases. However you have to consider now, how test cases should be designed, to
make it easy to
1. select a specific subset of your test cases for test execution
2. verify the test goals or end-of-test criteria
For this purpose a test case in TEMPPO can have several attributes, which enable
flexible filtering and the creation of analysis charts and reports under specific
aspects. And you should check during the test design phase whether the
attributes provided by default are sufficient. Otherwise, you would define
additional ones such that your needs will be fulfilled.
Test design. Test design is either done with TEMPPO Designer (available as
Add-on, please refer to chapter 3.3.21.2.9) or with TEMPPO Test Manager. With
TEMPPO Test Manager you will think about organizing your (future) test cases
in some way. Since a simple list of dozens of items is not easy to survey, a
hierarchical grouping of test cases seems adequate. TEMPPO supplies the
concept of test packages, which may contain test cases or, for building up
hierarchical structures, again test packages. The whole tree of test packages and
test cases is called test structure. According to the various implementation
levels during a development process – from coding the components and
assembling them (integration) to completing the system – the test process has
various test levels, where you may test the stand-alone components (module
test), “the growing application” (integration test) and finally the complete system
(system test). Furthermore your customer might execute an acceptance test for
verifying whether the delivered product agrees with the ordered features. You
have to decide, how many test structures you want to build: one for all test
levels or different ones for different test levels. Especially for the system test, it
is highly recommended to build a test structure that closely resembles the
structure of chapters in your requirement specification. For that sake, TEMPPO
supports the automatic creation of test structures out of RTF-formatted text
documents.
Now that you have prepared everything to organize and execute test cases, you
are ready to start with their design. During test case design only test case
Page 12
User Manual
Edition January 2015
TEMPPO V6.1
Introduction
names, test goals and the links to the requirements are fixed. This is useful,
because you will quickly get an overview of the number of test cases and their
distribution to test packages. And it is still early enough to set corrective
measures if e.g. the number of planned test cases turns out to be way too high
(or even too low). For a high rate of error finding it’s suggested to make use of
well-tried test case design methods like Equivalence Class Partitioning or
Boundary Value Analysis (for details refer to /2/ ).
Test Case Implementation. In this phase, three main tasks have to be
accomplished: (i) writing manual test cases (test step definition), (ii) writing
automated test cases (test script programming), (iii) implementing test
frameworks. Only the first task can be covered by a test management tool like
TEMPPO. For test script programming, several tools exist on the market. The role
of TEMPPO in this context is to provide a connection between a test case
designed within a test package and the implementation of its test steps as a test
script on the file system. The implementation of test frameworks is completely
outside the scope of TEMPPO.
Test Case Execution. Now you can reap the benefits of hard test case
implementation work and you are ready to create collections of test cases for
test execution (so called test suites) by means of combining the attributes
defined above. So the appropriate test cases can be filtered from the pool of all
available ones. Therefore the number of test cases of a test suite is always a
subset of those of the corresponding test structure. For each test structure you
can create as many test suites as you like. E.g. you have the possibility to
separate test execution tasks by creating special test suites for each tester.
Accordingly it is important to write a good test plan, especially to plan attributes,
which are used here (see planning phase). If you recognize in the execution
phase, that there is an attribute missing, this will cost some time to add it for
each test case.
Evaluation . This is the final phase of your test cycle. After executing the
tests and recording their results, you will analyze them and provide reports,
which illustrate your testing activities and the quality of the tested product. For
this reason TEMPPO offers features, which allow the creation of analysis charts
and detailed, customizable reports of test structures and test suites.
Page 13
User Manual
Edition January 2015
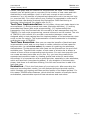
3
TEMPPO V6.1
Description of Use
Description of Use
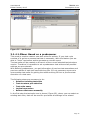
3.1 The Test Process Phases
As stated in the introduction chapter, the whole process of testing software
products can be split up into five phases:
1. Test Planning
2. Test Design
3. Test Case Implementation
4. Test Case Execution
5. Evaluation
The following chapters describe in detail, how the tasks of these phases can be
solved more efficiently by using the TEMPPO test management tool. During all
chapters a pseudo system test for the MS Windows Notepad application will
illustrate the usage of TEMPPO more clearly.
3.1.1 Test Planning
The definition phase covers the tasks of
Writing the Test Plan
Writing the Project Plan
Defining Test Case Attributes
Baselining / Importing requirements
3.1.1.1 Writing the Test Plan
The test plan is a process document and writing is outside the scope of TEMPPO.
However, it’s the base document for all test topics during the development
process and covers subjects like test requirements, test management, test
documentation, test goals, end-of-test criteria, etc. Its contents are obligatory
for all members of the test team.
3.1.1.2 Writing the Project Plan
As an output of the test plan a Project Plan (e.g. MS Project) is written that
contains tasks for all test activities. Input for the plan is given by the
general budget for testing activities
estimated number of test cases to be developed
number of resources, milestones
estimated effort of executing a test case
bug analysis
regression testing (testing fixed bugs) effort
Page 14
User Manual
Edition January 2015
TEMPPO V6.1
Description of Use
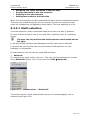
3.1.1.3 Defining Test Case Attributes
After the implementation phase you will have a lot of test cases (even in small
projects) and it’s very likely, that you want to have just a few of your test cases
bundled for test execution, because
you don’t have the time to execute all of them and therefore you decide to
execute the high priority ones only.
there are several testers, each of which should execute several test cases.
Furthermore we could consider, that you want to get a survey of your test cases
or test results under certain criteria. For example it could be interesting for you,
how many test cases have the implementation state ready (which means,
they can be executed).
how many high priority test cases are failed.
TEMPPO offers features for both situations, namely the filtering of test cases for
test execution (see 3.1.4.1) and the creation of analysis charts (see 3.1.5.1). But
for being able to use these features, it is indispensable to define attributes. The
following test case attributes are predefined in TEMPPO:
Type (Manual, Automated)
Situation (Regular, Error)
Priority (Top, High, Medium, Low)
State (Designed, In Work, Ready for Review, Ready, Approved)
Test case type (Verification, Validation)
Test Level (Module Test, Integration Test, System Test, Acceptance Test,
Regression Test)
In most cases the predefined attributes will fulfill your needs and you just have
to decide, which ones to use (defined in the test plan). If you cannot come along
with them, you have the possibility to define your own ones, so called user
defined attributes. For detailed information on how this is done in TEMPPO, see
5.4.4.
3.1.1.4 Baseline / Import Requirements
SiTEMPPO Requirement Manager is used for requirement engineering or for
importing and updating your requirements in TEMPPO’s database from external
tools like DOORS or RequisitePro.
If the requirements are ready for test case creation the requirements are
baselined using also the view concept. The requirement engineer defines a filter
from requirement attribute (e.g. All requirements that are implemented and of
high priority) and freezes that requirements to a baseline.
On the other hand the requirement engineer imports and later updates the
requirements from the external tools.
For details refer to TEMPPO Requirement Manager’s User Manual.
3.1.2 Test Design
Test
Design covers the tasks of
Working with Projects
Building the Test Structure
Extending the Test Structure (adding more test packages)
Designing Test Cases (test case design)
Page 15
User Manual
Edition January 2015
TEMPPO V6.1
Description of Use
3.1.2.1 Working with Projects
A project is the starting point in TEMPPO and contains one or more test
structures. You can either start by creating a new project or opening an existing
one. Deleting a project can only be done with the TEMPPO Administrator (see 5).
If you are an advanced user, you can skip this step and directly choose a
previously opened test structure in the Test Structure menu (see 3.1.2.2.3).
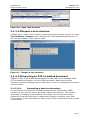
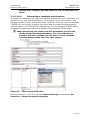
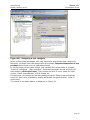
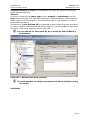
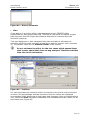
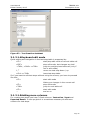
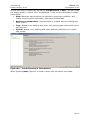
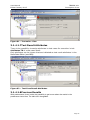
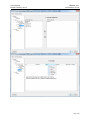
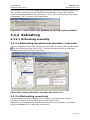
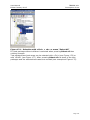
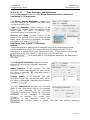
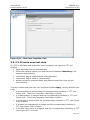
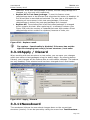
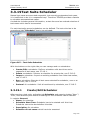
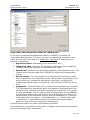
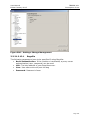
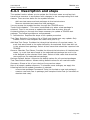
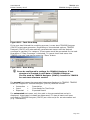
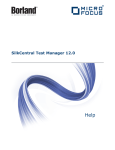
3.1.2.1.1 Creating a Project
A new project can only be created in TEMPPO Administrator. Log on to TEMPPO
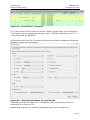
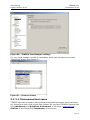
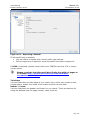
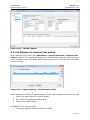
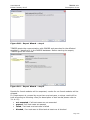
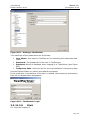
Administrator and choose the tab Projects. Then press the button “New”. Figure
2 is displayed.
Project properties contains 4 tabs:
-General
-Roles
-Test Case Template
-Test Result Template
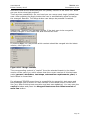
In the tab ”General” user specifies a unique name, description and the
possibility to determine if the testers have to add a mandatory comment for each
save operation of a test case.
In the tab “Roles” the test manager configures the roles for each tester. If a
user has no role in a project, he won’t see it.
In the tab “Test Case Template” the test manager appoints defines a basic test
case. He can configure standard attributes, define mandatory attributes or
determines if a test case has to be at least one link to a requirement. If these
conditions are not fulfilled the test case cannot be saved. For details see chapter
5.5.1.
In the tab “Test Result Template” the test manager configures result
attributes for test case. If a tester records a result and a test result template is
activated, he has to add a value for the mandatory attribute. For details see
chapter 3.3.4.2.
After pressing the button “OK”, the user is asked if he wants to assign
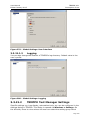
immediately meta data. If the user presses “Yes”, Figure 345 is shown.
Page 16
User Manual
Edition January 2015
TEMPPO V6.1
Description of Use
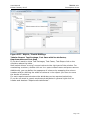
Figure 2 - Project Properties – TEMPPO Administrator
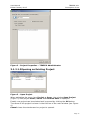
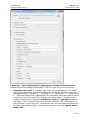
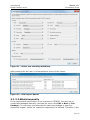
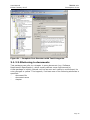
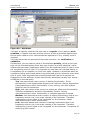
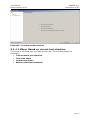
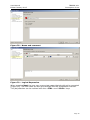
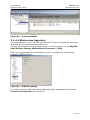
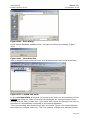
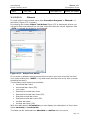
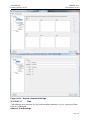
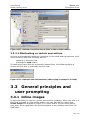
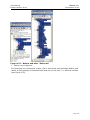
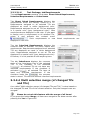
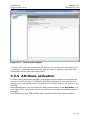
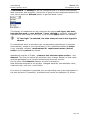
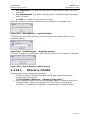
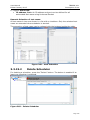
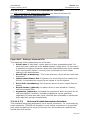
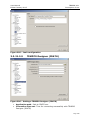
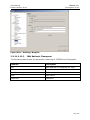
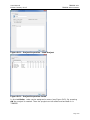
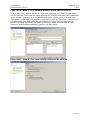
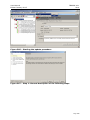
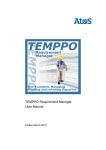
3.1.2.1.2 Opening an Existing Project
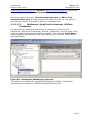
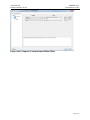
Figure 3 - Open Project
When activating the menu item Project > Open, the window Open Project
(Figure 3) with project name, owner and creation date is displayed.
Exactly one project can be selected and is opened by clicking the OK button.
The name of the project is shown in the title bar of the main window (see Figure
4)
Cancel closes the window and no project is opened.
Page 17
User Manual
Edition January 2015
TEMPPO V6.1
Description of Use
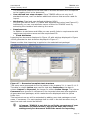
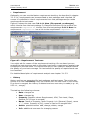
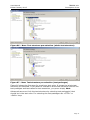
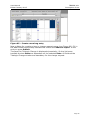
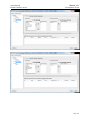
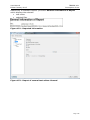
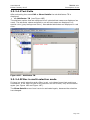
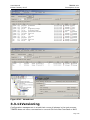
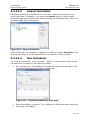
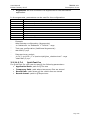
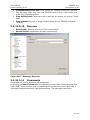
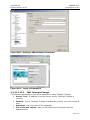
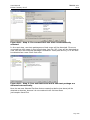
Figure 4 - Main Window (project opened)
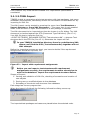
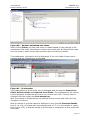
3.1.2.2 Building the Test Structure
A test structure contains test packages and test cases, which can refer to
requirements. This can be established in 2 ways (and/or):
Referring to (chapters) in documents
Referring to requirement numbers or names
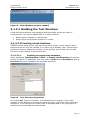
3.1.2.2.1 Creating a test structure
TEMPPO allows opening only one test structure at a time, which means, that a
test structure can only be created, if no other one is already open. Furthermore
test structures are related to projects, so the project, which shall own the test
structure to be created, must be open too.
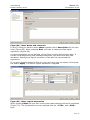
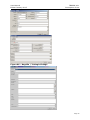
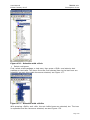
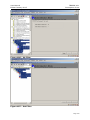
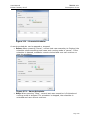
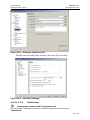
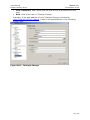
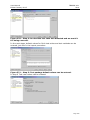
3.1.2.2.1.1
Creating an empty test structure
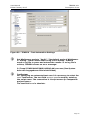
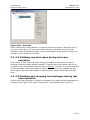
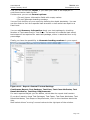
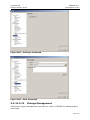
When activating Test Structure > New… > Empty Test Structure the window
shown in Figure 5 is displayed. You may enter a name and a description. Also a
test level has to be related to the new test structure.
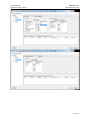
Figure 5 - Test Structure Properties
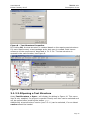
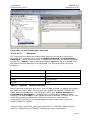
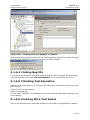
By clicking OK, Figure 6 is shown. The test structure is opened in the main
window. In the title bar of the test structure its name, test level and version are
displayed. In the left pane an empty tree is displayed and in the right part the
test structure properties are documented.
Page 18
User Manual
Edition January 2015
TEMPPO V6.1
Description of Use
Figure 6 - Empty Test Structure (General)
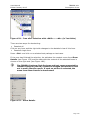
3.1.2.2.1.2
Creating a test structure based on a requirement
structure
This feature allows you to create the same structure like in a requirement
structure. For each requirement a test package and a dummy test case is created
plus automatic link to the requirement.
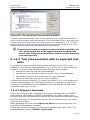
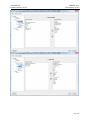
When activating Test Structure > New… > Based on a requirement
structure the window shown in is displayed. All requirement structures are
shown which are assigned to the opened project and checked in (see also Figure
7).
Figure 7 – Select Requirement Structure
After selecting one requirement structure another window is shown, see Figure 8.
You may enter a name and description. Also a test level has to be related to the
new test structure.
Page 19
User Manual
Edition January 2015
TEMPPO V6.1
Description of Use
Figure 8 – Test Structure Properties
By clicking OK, the test structure is created based on the requirement structure:
For each requirement, a test package and a test case is created. Both have a
reference to the requirement, described in 3.1.2.3.4. The test structure is
opened in the main window, see Figure 9.
Figure 9 – Generated Test Structure
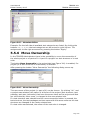
3.1.2.2.2 Opening a Test Structure
Using Test Structure > Open... will display the dialog in Figure 10. This menu
item is only enabled, if a project is opened. Exactly one item can be selected and
will be opened after pressing the button Open.
Additionally a test structure version (see 3.3.11) can be selected, if a non latest
version should be loaded.
Page 20
User Manual
Edition January 2015
TEMPPO V6.1
Description of Use
Figure 10 - Open Test Structure
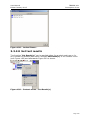
3.1.2.2.3 Reopen a test structure
A faster way to open a test structure (and the according project as well) is to use
Test Structure > Reopen, which displays the 4 last opened test structures. It
will only be enabled, if no project is open.
Figure 11 - Reopen a test structure
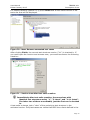
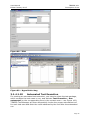
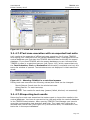
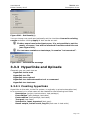
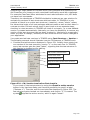
3.1.2.2.4 Importing an RTF-formatted document
TEMPPO is able to generate test packages and test cases from headings within
RTF-formatted documents. You can either generate a basic test structure
containing just test packages and no test cases or even a complete test structure
with test cases.
3.1.2.2.4.1
Generating a basic test structure
If requirements are specified in Software Requirement Specification (SRS)
documents, they can be used to generate a basic test structure. The obvious
advantage of creating a test structure according to the structure of a base
document is that the test case-to-requirement relation is evident every time.
This enables the test responsible to easily verify, which requirements are covered
by test cases.
Page 21
User Manual
Edition January 2015
TEMPPO V6.1
Description of Use
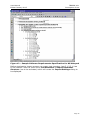
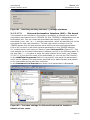
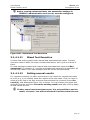
Figure 12 – Sample Software Requirements Specification for MS Notepad
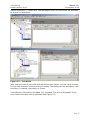
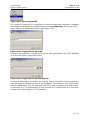
Before starting the import process, an empty test structure (see 3.1.2.2.1) has
to be created. Then the menu item Test Structure > Import Document
Structure has to be activated, which will cause the Import Settings dialog to
be displayed.
Page 22
User Manual
Edition January 2015
TEMPPO V6.1
Description of Use
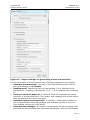
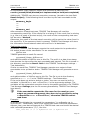
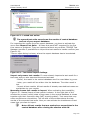
Figure 13 - Import Settings for generating a basic test structure
For the generation of a basic test structure following settings can be applied:
Generate document path: The path of the imported document is set for
each test package in tab Details.
Heading mask: Specify the name of the heading (if it is different to the
standard one: [Heading | Überschrift] 1,2,3,…). It is initialized with “Heading
#”.
Limit test structure depth to: If checked, limits the imported document
hierarchy to the specified level. This means, that headings with a level higher
than the specified will not be imported.
Generate numbers and start with: If checked, a hierarchical numbering
will be generated for each test package and added as a prefix to its name
(like heading numbering in MS Word).
Generate test packages: If checked, test packages will be generated. Test
packages will be generated from document paragraphs, which are formatted
Page 23
User Manual
Edition January 2015
TEMPPO V6.1
Description of Use
with the standard formats “Heading 1” – “Heading 9” (or “Überschrift 1” –
“Überschrift 9” in German documents). Their hierarchical position in the test
structure will correspond to the heading level in the document.
Import description: enabled, if checkbox ‘”Generate Test Packages” is
checked. If checked, the test package description will be imported. Tables and
graphics are not considered.
All other settings are not relevant when generating a basic test structure and will
be explained later.
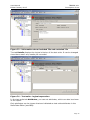
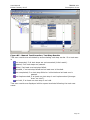
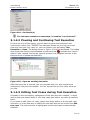
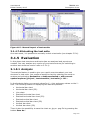
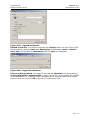
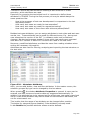
Importing the document displayed in Figure 12 with settings displayed in Figure
13 will generate the test structure displayed in Figure 14.
Please consider that importing is applied on the selected test
package!
Figure 14 - Generated basic test structure
Headings above level 3 (e.g. 3.4.1.1 – 3.4.1.4) were not imported, due to
limiting the test structure depth to 3. A numbering was added to the test
package names, because of checking generate numbers and start with. A
reference to the imported document was applied to all generated test packages,
which made them be displayed with the yellow folder icon.
TEMPPO generates test packages for the whole document structure. Of course
you’ll never create any test case for chapters like Introduction, Annex ... so you
should delete the corresponding test packages.
Such an initial test structure may be extended by adding more test packages, if
necessary. For each package that is a leave in the test structure tree, at least
one test case should be defined.
TIP for an import: If an rtf-document gets very huge (e.g.
embedded graphical objects: 50MB), TEMPPO is not able to
read in such a huge WORD document. Replace all the graphical
Page 24
User Manual
Edition January 2015
TEMPPO V6.1
Description of Use
objects with “nothing” and the import of this rtf document will
work!
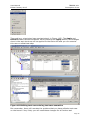
3.1.2.2.4.2
Generating a complete test structure
In certain circumstances you may have already written down your test cases in a
document (e.g. test case specification). This happens if you don’t have a “test
management tool” other than a text editor. When the time has come to introduce
TEMPPO to your project, obviously you don’t want to create the test structure
and test cases in your document a second time. For this purpose TEMPPO offers
an additional importing feature that enables the generation of test cases.
When generating test cases from RTF documents, you mix the
phases design and implementation. It’s very important to
consider this fact, because you still have to carry out tasks
from the design phase after test case import!
Figure 15 – Test Case Specification
Like described in 3.1.2.2.4.1 open the Import Settings by activating Test
Structure > Import Document Structure.
Page 25
User Manual
Edition January 2015
TEMPPO V6.1
Description of Use
Figure 16 - Import Settings for generating a complete test structure
Additionally to the settings illustrated in Figure 13 you can do the following:
Generate test cases: If checked, test cases will be generated. Test cases
will be generated from document paragraphs, which are formatted with the
standard formats “Heading 1” – “Heading 9” (or “Überschrift 1” – “Überschrift
9” in German documents). Additionally the paragraph after the heading which
should become a test case must contain a test step table. This table must
contain columns which describe instruction, input and expected output of
test steps. These columns may have arbitrary headers, like “Anweisung” for
the instruction (see Figure 16). Furthermore you can suppress the generation
of empty test steps in case of empty table rows by checking “ignore empty
table rows”.
Page 26
User Manual
Edition January 2015
TEMPPO V6.1
Description of Use
The hierarchical position of the test case in the test structure will correspond
to the heading level in the document.
User defined test step columns: Since TEMPPO offers not only the 3
standard columns, user can define additional columns that are also used for
import.
Attributes: Fixed and user defined attributes (UDA)
For both you add for each TC a table with attribute and value (see Figure 15).
Additionally you can map attribute names of Word to TEMPPO one’s by
activating the checkbox and entering the name.
Requirements
In addition to attributes and UDAs you can specify links to requirements with
requirement structure name and the requirement ID.
Fixed Attributes
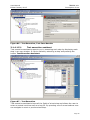
Importing the document displayed in Figure 15 with settings displayed in Figure
16 will generate the test structure displayed in Figure 17.
Please consider that importing is applied on the selected test package!
Figure 17 – Generated complete test structure
Test cases were generated due to the tables in the chapters 2.1.1.1 and 2.1.1.2.
The data in column Action was used for test step Instruction, the data in
column Output for Expected, the image for column Action Image. The column
Comments was ignored. A reference to the imported document was applied to
all generated test packages, which made them be displayed with the yellow
folder icon.
This test structure can still be extended by adding more test packages or test
cases, if necessary. For each package that is a leaf in the test structure tree, at
least one test case should be defined.
Of course, TEMPPO is not able to verify the correctness of your
document. So please ensure, that you’ve done the correct
settings and your document fulfills the needs for importing,
Page 27
User Manual
Edition January 2015
TEMPPO V6.1
Description of Use
such as headings formatted with “Heading 1” – “Heading 9” (or
“Überschrift 1” – “Überschrift 9” in German documents) and
proper test step tables.
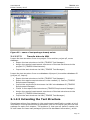
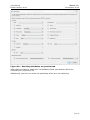
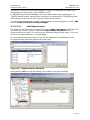
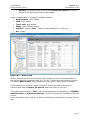
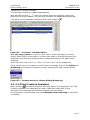
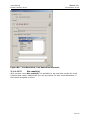
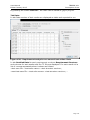
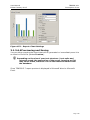
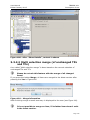
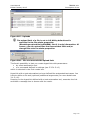
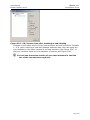
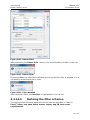
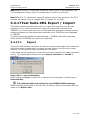
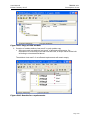
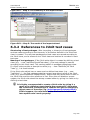
3.1.2.2.5 Import Test Cases from Excel
TEMPPO is able to import test cases from an Excel list. First you have to save
your Excel file as csv and select a test package.
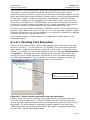
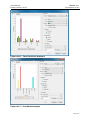
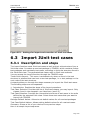
Figure 18 - Menu - Import Test Cases from Excel
When activating the menu Test Structure -> Import Structure -> From CSV
Figure 20 is displayed. In that dialog you can assign Excel columns to TEMPPO
attributes. They are automatically selected, if their names match.
Mandatory attributes: Name and User Defined ID have to be assigned,
otherwise an import cannot be performed.
Fixed attributes like test goal, state…: can be assigned to any Excel attributes.
Attribute values have to be identically. If they’re different, the default value will
be set.
If the owner is selected and the user is not available in TEMPPO, the current
importer is used as owner.
Test step: The 3 attributes Instruction, Expected, Input can be assigned with
exactly 1 step.
User Defined Attributes: Any UDAs can be assigned with Excel attributes. If a
value to be assigned doesn’t exist, it will be created automatically.
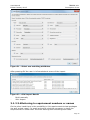
If 2 or more values have to be assigned to an attribute,
separate it in Excel with “;#”
If an user defined attribute is deactivated for the test structure, it is not
displayed as a TEMPPO attribute.
Requirements: Since requirements are arranged in requirement structures,
they can also be imported as well. For each requirement structure a column can
be defined. A test case can be linked to more requirement IDs separated by “;#”.
Limitations:
Deactivated requirement structures are not considered.
If a requirement is not in a view, it cannot be linked to a TC.
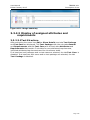
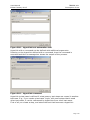
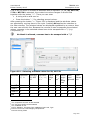
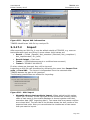
In the following example an Excel file with 3 TCs is shown:
Page 28
User Manual
Edition January 2015
TEMPPO V6.1
Description of Use
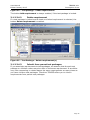
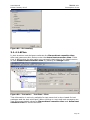
Figure 19 - Excel file for TC import
A TC can consist of more lines due to the number of test steps. In this case the
Test Case ID can be repeated or remain empty. TEMPPO recognizes a new TC, if
a new Test Case ID identified.
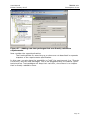
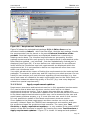
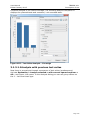
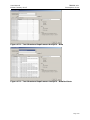
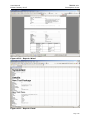
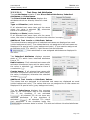
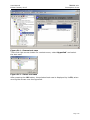
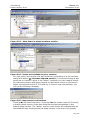
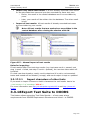
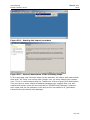
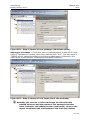
After selecting the csv file from above the following dialog is displayed. Matching
attribute names are preselected.
Figure 20 – Matching attributes are preselected
After that you have to select the 2 mandatory fields (see above) which are
necessary for importing TCs.
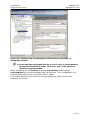
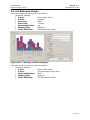
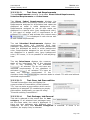
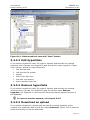
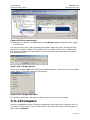
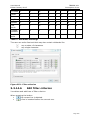
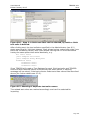
Additionally you have to select the attributes which are not matching:
Page 29
User Manual
Edition January 2015
TEMPPO V6.1
Description of Use
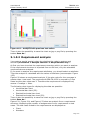
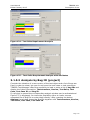
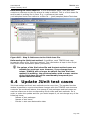
Figure 21 - Select non matching attributes
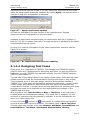
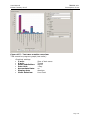
After pressing OK the user is informed about errors of the import.
Figure 22 - CSV Import Result
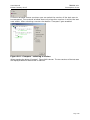
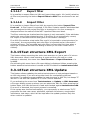
3.1.2.2.6 Build manually
If the requirement specification is not imported to TEMPPO, the user has to
create test packages manually (activate the menu item Edit > New > Test
Package). It is strongly recommended for each test package to specify a
document chapter, where the respective requirement is defined. Therefore in the
Page 30
User Manual
Edition January 2015
TEMPPO V6.1
Description of Use
next chapters only a test structure based on a requirement specification is
considered.
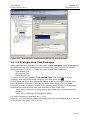
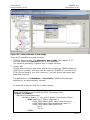
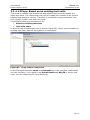
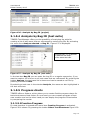
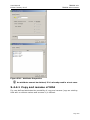
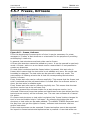
3.1.2.2.7 XML Import
TEMPPO is able to generate a whole test structure with test packages, test cases,
metadata (requirements, attributes) and all the information of test cases etc. by
importing an XML file.
The XML-Import can be started by pressing the menu item Test Structure >
Import Structure > From XML Document…. This menu item is only enabled
when a test structure is open and selected or a test package is selected.
The XML-document to be imported can then be chosen in a file dialog. The XML
document is checked against the DTD (Document Type Definition) (See 13.1).
Your XML file has to have the first line
<!DOCTYPE TEMPPO_EXCHANGE SYSTEM "Test-structure.dtd" > whereas Teststructure.dtd is the DTD file (See 13.1). Otherwise the import will fail.
In your TEMPPO installation directory there is a subdirectory XML,
where you’ll find the DTD (Test-structure.dtd) together with an
XML example.
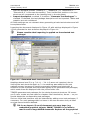
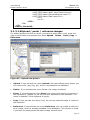
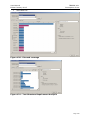
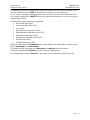
Before the importing process can start, you have to decide if the requirement
assignments should be imported, too.
Figure 23 – Import with requirement assignments
Before you can import a test structure with requirement
assignments correctly, the requirement structure already has to
exist in the database. Import the requirement structure before.
Stages of Import:
1. Parsing and validation of XML-file, checking of semantics and creation of
new objects
2. Saving new or modified objects to the database
3. Reloading of the whole test structure from database
Each stage has its own progress bar.
When the import is finished, the following information dialog comes up:
The imported test packages and cases are placed below the selected node.
Page 31
User Manual
Edition January 2015
3.1.2.2.7.1
TEMPPO V6.1
Description of Use
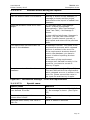
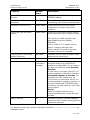
Possible errors during the import:
Errors
Reaction
XML file doesn’t match DTD schema.
Nothing is written to the database, a
message is shown and the project
status before the import is loaded from
database.
Required attribute exists but is zerolength.
a) Test case name, Test package
name: a name is generated
automatically ("New Test Package",
"New Test Case"). No Message is
shown.
b) User defined attributes: Message is
shown. The user can continue the
import (invalid element ignored) or
stop import and return to the previous
state.
The requirement structure can’t be
found in the database.
A message is shown. The name of the
requirement structure which released
an error is written in the error file.
If the requirement structure doesn’t
exist in the database, you have to
import it before importing the test
structure.
If the name of the requirement
structure isn’t defined correctly in the
input file, you have to correct it.
Now try it again.
A requirement can’t be found in
database.
A message is shown (see Figure 24).
The user defined id of the requirement
which released an error is written in the
error file. Please correct the name in
the input file and then try it again.
Figure 24 – Information message – error with requirements
3.1.2.2.7.2
Special cases
Special cases
Reaction
Name of test package, test case or
user-defined ID exists.
Unique name is generated like “ 1”, “
2”. No message is shown. (See Figure
25)
Test level, category, attribute name or
values doesn’t exist.
Object is created. No message is
shown.
Attribute name exists, new value in
XML file
Value is added to attribute
Page 32
User Manual
Edition January 2015
TEMPPO V6.1
Description of Use
Figure 25 – name of test package already exists
3.1.2.2.7.3
Transfer data via XML
Import the test structure from one project P1 to another project p2, same
database
Export the test structure via XML (TEMPPO Test Manager)
Assign the needed requirement structures of the test structures to the
project P2 (TEMPPO Administrator)
Import the test structure via XML (TEMPPO Test Manager)
Import the test structure from one database d1(export) to another database d2
(project p2, import)
Export the test structure via XML (TEMPPO Test Manager)
Export the requirement structures in the needed (!!) version (TEMPPO
Requirement Manager)
Import the requirement structures via XML into database d2 (TEMPPO
Requirement Manager)
Check In the requirement structures (TEMPPO Requirement Manager)
Assign the needed requirement structures of the test structures to the
project P2 (TEMPPO Administrator)
Import the test structure via XML (TEMPPO Test Manager)
3.1.2.3 Extending the Test Structure
Sometimes quite a few chapters in the requirement specification contain a lot of
information. During test structure generation you will of course get just one test
package for each such chapter. The problem is, that you will have to create a lot
of test cases for these test packages (due to the abundant information), which
Page 33
User Manual
Edition January 2015
TEMPPO V6.1
Description of Use
will lead to a badly arranged test structure. The solution is to split them up. Such
a refinement can be done by adding further test packages.
3.1.2.3.1 Adding Test Packages
New sub-test packages can be added by activating the menu item Edit > New >
Test Package or Edit > New > Test Package before. A new child node is
created below or before the selected one and a new name has to be entered. The
default name is New Test Package.
Let’s consider the following example:
The test structure is created manually. The requirement Search
Functions consists of 2 sub-requirements, each described in exactly one
chapter. Therefore, 2 sub-test packages are necessary that refer to these
requirements.
Figure 26 - Create new test package
In Figure 27 such a test package Search Functions was identified and split up
into Search Up and Search Down. A reference to the document containing the
description (e.g. a use case document) of the respective requirement was applied
to the new test packages, which made them be displayed colored yellow.
Page 34
User Manual
Edition January 2015
TEMPPO V6.1
Description of Use
Figure 27 - Adding new test packages that are directly related to
requirements
Now consider the opposite situation:
The functionalities for searching up or down are not described in separate
chapters of the requirements specification.
In this case, you also have the possibility to “split” the requirement (e.g. “Search
Functions”) into two test packages. This is the suggested way to create a “good”
test structure. Test packages will keep their red color, since there is no chapter
that is directly related to them.
Page 35
User Manual
Edition January 2015
TEMPPO V6.1
Description of Use
Figure 28 –Adding new test packages without direct relations to
document chapter
You can add test packages that do or don't refer to requirements
in random hierarchical order. It is up to you, if the structure
remains comprehensible.
When activating the tab Details, a special precondition and a special
postcondition for this test package may be specified. This is suggested, if all
contained test cases have a common “setup” phase.
In the table below all preconditions and postconditions of the parent test
packages are listed.
Page 36
User Manual
Edition January 2015
TEMPPO V6.1
Description of Use
Figure 29 – Precondition and Postcondition for test package
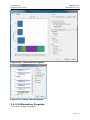
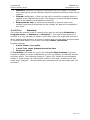
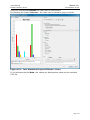
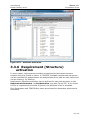
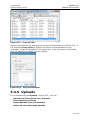
3.1.2.3.2 Categorizing Test Packages
After creating a test package you can select a test category. Here all categories
are available that are connected to the current test level (for further details of
test categories see 5.4.3.). These are some typical test categories:
Task-Based Test
GUI-Layout Test
State-Based Test
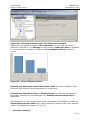
In Figure 30 the test category Task-Based Test” was assigned to a test
package. After assigning a test category the node looks like .
At first sight assigning test categories seems to be superfluous, because they
have no further influence on the test structure than being a flag for a test
package. A closer inspection makes their purpose plain. Firstly, you can obtain
statistical information from your test structure or test suite, like:
“How many functional or performance test cases does my test structure
contain?”
“How many functional test cases are failed?”
For further details on analyses see 3.1.5.1.
Secondly, you are able to create test suites based on test categories, e.g. one for
all functional test cases (see 3.1.4.1).
Page 37
User Manual
Edition January 2015
TEMPPO V6.1
Description of Use
Figure 30 - Assigning a test category
When creating test packages, you may determine appropriate test categories.
Normally you start test case design with the chapter Required functions of the
product that should cover all task-based tests.
In further steps of test case design, you identify GUI-layout tests in chapter
“External interfaces – User interface”. Such test packages should be given the
test category GUI-layout test. They pursue the aim to cover tests for input
syntax, check completeness of GUI-masks etc.
Furthermore you categorize the test packages below “Other product features
required” that cover mandatory quality attributes like performance, mass or
stress test.
The result of the steps above is displayed in Figure 31.
Page 38
User Manual
Edition January 2015
TEMPPO V6.1
Description of Use
Figure 31 – Complete Test Structure with Test Categories
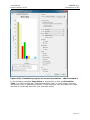
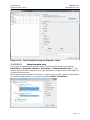
3.1.2.3.3 Referring to documents
Test packages can refer to a chapter in some document (e.g. Software
Requirement Specification), which usually defines some requirement(s).
A test package is initially colored red, but as soon as it refers to a document, its
color changes to yellow. This happens, if at least one of the following attributes is
specified:
document file
document name
chapter
Page 39
User Manual
Edition January 2015
TEMPPO V6.1
Description of Use
Figure 32 - Test package without reference to a document, name or
chapter
First of all you create a new test structure or open an existing one. After this the
test structure can be filled in the following ways:
Importing an RTF-formatted document
Import Test Cases from Excel
TEMPPO is able to import test cases from an Excel list. First you have to save
your Excel file as csv and select a test package.
Figure 18 - Menu - Import Test Cases from Excel
When activating the menu Test Structure -> Import Structure -> From CSV
Figure 20 is displayed. In that dialog you can assign Excel columns to TEMPPO
attributes. They are automatically selected, if their names match.
Mandatory attributes: Name and User Defined ID have to be assigned,
otherwise an import cannot be performed.
Fixed attributes like test goal, state…: can be assigned to any Excel attributes.
Attribute values have to be identically. If they’re different, the default value will
be set.
If the owner is selected and the user is not available in TEMPPO, the current
importer is used as owner.
Page 40
User Manual
Edition January 2015
TEMPPO V6.1
Description of Use
Test step: The 3 attributes Instruction, Expected, Input can be assigned with
exactly 1 step.
User Defined Attributes: Any UDAs can be assigned with Excel attributes. If a
value to be assigned doesn’t exist, it will be created automatically.
If 2 or more values have to be assigned to an attribute, separate it in Excel with
“;#”
If an user defined attribute is deactivated for the test structure, it is not
displayed as a TEMPPO attribute.
Requirements: Since requirements are arranged in requirement
structures, they can also be imported as well. For each requirement
structure a column can be defined. A test case can be linked to more
requirement IDs separated by “;#”.
Limitations:
Deactivated requirement structures are not considered.
If a requirement is not in a view, it cannot be linked to a TC.
In the following example an Excel file with 3 TCs is shown:
Figure 19 - Excel file for TC import
A TC can consist of more lines due to the number of test steps. In this case
the Test Case ID can be repeated or remain empty. TEMPPO recognizes a
new TC, if a new Test Case ID identified.
After selecting the csv file from above the following dialog is displayed. Matching
attribute names are preselected.
Page 41
User Manual
Edition January 2015
TEMPPO V6.1
Description of Use
Figure 20 – Matching attributes are preselected
After that you have to select the 2 mandatory fields (see above) which are
necessary for importing TCs.
Additionally you have to select the attributes which are not matching:
Page 42
User Manual
Edition January 2015
TEMPPO V6.1
Description of Use
Figure 21 - Select non matching attributes
After pressing OK the user is informed about errors of the import.
Figure 22 - CSV Import Result
Build manually
XML-Import
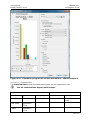
3.1.2.3.4 Referring to requirement numbers or names
On the other hand there is the possibility to link requirements to test packages
(as well as test cases). In some projects it might be necessary to track the
requirements or rather their IDs from defining until executing test cases.
Page 43
User Manual
Edition January 2015
TEMPPO V6.1
Description of Use
But before linking those to test packages it might be necessary to define and
assign them for the project (see chapter 5.4.6).
In TEMPPO Requirement Manager you can create requirement structures. In
TEMPPO Administrator requirement structures are assigned to TEMPPO projects.
After that you can link the test cases to these requirements.
You have two possibilities to relate requirements to test packages or cases: Add
and/or inherit from parent test packages.
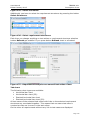
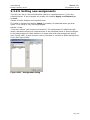
3.1.2.3.4.1
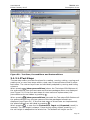
Add Requirement
For adding a requirement you press the button Add requirement and Figure 33
is shown. At first you have to select the requirement structure and its
requirements are listed. The requirement selection dialog allows you to link one,
more or all requirement(s) to the package.
If more requirements are linked, they will be displayed in alphabetical order.
All requirements selected before are shown grey.
Figure 33 - Requirements: Selection
After pressing OK the requirement(s) are linked to the test package.
Page 44
User Manual
Edition January 2015
TEMPPO V6.1
Description of Use
Figure 34 - Test package - linked requirements
The button Add requirement is always enabled, if the test package is locked.
3.1.2.3.4.2
Delete requirement
If a test package is locked and at least one linked requirement is selected, the
button Delete requirement is enabled.
Figure 35 - Test Package - Delete requirement(s)
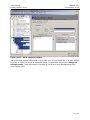
3.1.2.3.4.3
Inherit from parent test packages
If you associate requirements to test packages, we assume that the sub test
package or children nodes may also refer to the same requirement. It would be
very time consuming to relate always the same requirements as many times as
you have children test packages. Therefore TEMPPO offers you to inherit
requirements from parent test packages.
Page 45
User Manual
Edition January 2015
TEMPPO V6.1
Description of Use
Figure 36 – Requirement: Inherited
Figure 36 shows the selected test package 3.5.1.1 Editor Pane and an
activated checkbox inherit, which has the effect, that the test package inherits
the requirements from its parent or its parent External interfaces of the
product. Inherited requirements are displayed disabled so no selecting or
deleting can be done. The inherited requirements are grouped by the test
package names and within each group by the requirements in alphabetical order.
After that the enabled – not inherited – but also alphabetically ordered part is
displayed (see Figure 36). If a user defines one requirement for two different
levels within the inheritance tree both requirements are displayed within the
requirement list. It is not possible to define one requirement more than once
within one inheritance level.
You might ask about the reason of linking the requirements to the tests and test
packages. The answer is quite easy and will improve your whole process. On one
hand you can analyze your test structure regarding to test coverage (e.g. how
many test cases are related to the each requirement) and on the other hand you
can make a statement about the quality of the SUT (e.g. how many bugs are
related to a special requirement?).
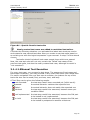
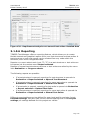
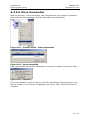
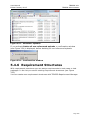
3.1.2.3.4.4
Apply requirement updates
Requirement structures and test structures live in fully separated environments.
So it can be that a latest test structure version works with a not latest
requirement structure version. This is always the case after an update of a
requirement structure. An automatic update of the current test structure version
to the latest requirement structure version may not be wanted by the user and
would cause problems anyway, e.g. if more than one user work on this version.
It’s only possible to update to the latest requirement structure version.
So an update to the latest requirement structure version can only be made
manually initiated. Open the TEMPPO test management environment and open
the project and open the project and test structure. The menu item Test
Structure > Apply requirement updates… is only enabled if the main/LATEST
version of the test structure is opened. By Pressing the menu Test Structure >
Apply requirement updates… Figure 37 is shown. All assigned and updated
Page 46
User Manual
Edition January 2015
TEMPPO V6.1
Description of Use
requirement structures are shown in the list. Select the requirement structures
when the assignments should be updated. By clicking Apply, the test structure is
checked in and then propagation is executed.
Figure 37 – Apply requirement updates
All links are changed to the new version of the requirements: Deleted
requirements are unassigned from the test cases.
Updating a requirement structure does not cause that a task list is created, a
task list (3.3.19) is created internally if the test structure is updated to the latest
requirement structure version.
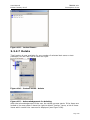
If there is no implicit propagation to the latest requirement structure version,
Figure 38 is shown.
Figure 38 – No requirement structure for updating
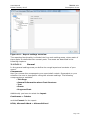
3.1.2.4 Designing Test Cases
Since there is an integration of TEMPPO Test Manager and TEMPPO Designer
(IDATG) there are 2 possibilities for designing test cases. On the one hand the
traditional one with TEMPPO Test Manager and the one with TEMPPO Designer
(IDATG) (see chapter 7).
The last step of the design phase is the design of test cases. Note that test case
design does not include the implementation (writing test steps or test scripts).
The conceptual work of test case design has to be accomplished outside of
TEMPPO. E.g. if you apply an equivalence partitioning technique, you will usually
create a table with classes of input values and test cases covering different
combinations of those. A unique name must be applied to the resulting test cases
and they are ready to be inserted into the appropriate test package in the
TEMPPO test structure.
With the menu item Test Structure > New > Test Case, a new test case is
created below the selected test package. This menu item is enabled, if a test
structure is opened and a test package is selected. It can be activated by the
menu or a right mouse click.
A new child node
(manual) or
(automated) is created below the selected
one and a new name has to be entered. The default name is New Test Case.
The test cases tab consists of the tabs General, Attributes, Preconditions and
Postconditions, Test Steps, Automated, Requirements, History,
Page 47
User Manual
Edition January 2015
TEMPPO V6.1
Description of Use
Execution History and Plan. During design you just use General, Attributes
Requirements and Plan.
General:
You have to specify the name, type (either manual or automated) and the
goal of the test case. The test case developer should be able to implement test
steps based on this description. The automation tab is only enabled, in case of
automated test cases.
Furthermore a User Defined ID is suggested by the system that can be edited.
In many projects, requirements get unique IDs. It is recommended to use these
IDs (plus some serial number) as test case IDs.
You can search for test cases by ID or name by with TEMPPO’s
find feature.
Figure 39 – Manual Test Case, General
It is also possible to design automated test cases without having
any script.
Attributes
Page 48
User Manual
Edition January 2015
TEMPPO V6.1
Description of Use
Figure 40 – Attributes
You have to specify, whether the test case is a regular one or tests an error
condition. A regular test case pursues the aim to test a specified requirement.
On the other hand an error case checks the application if e.g. a faulty input is
rejected.
You may also select the purpose of test case execution: for verification or
validation.
Furthermore you can select a value of the attribute priority, which mirrors the
topic of risk oriented testing. Each test case is given a priority attribute, which
reflects the test case’s importance either from the customer point of view or from
the complexity point of view. It is important to note that risk oriented testing is
no substitute for a complete run of all test cases. However it should be taken as
a guideline telling which tests have to be performed prior to shipment even when
time is short. After shipment the remaining tests still have to be carried out.
Suggestion for the definition of test case priority attributes (usually they should
be defined in the test plan):
Top: test case whose main concern is testing functionality. If this
functionality is not implemented properly the customer may be disgruntled.
Interrelationship to other functionality is very strong, such that system
behavior may be concerned.
High: test case whose main concern is testing an often used functionality.
Therefore misbehavior would be immediately evident. Strong
interrelationship to other functionality or complex algorithm involved.
Medium: test case whose main concern is testing functionality that is not
frequently used or not in the main interest of the customer. Therefore
misbehavior is more likely to be “accepted” by the customer. Weak
interrelationship to other functionality
Low: test case whose main concern is testing functionality that is not
frequently used or not in the main interest of the customer. Therefore
misbehavior is more likely to be “accepted” by the customer. Complexity of
underlying SW is small.
Page 49
User Manual
Edition January 2015
TEMPPO V6.1
Description of Use
You also have to specify a working or development state for the test case. This
is necessary for reporting, analysis, and creating test suites. For example, the
test manager wants to create a test suite only with test cases that are ready
for test execution. If such an attribute does not exist or has a wrong value, the
test execution will fail. The working state consists of the following values:
Designed: The test case is created and the data in the tabs General,
Attributes, Requirements are specified. This state was introduced for the
purpose of supporting test teams that separate the work into designing and
implementing test cases. This is the default state of a newly created test
case.
In Work: The test case already contains test steps, but is not ready
implemented
Ready for Review: This state is not obligatory; it can be used for projects,
where test specification reviews are mandatory.
Ready: The test case is already implemented, reviewed and can be used
for test case execution.
Approved: This state is optional and mostly used for automated test
cases. Sometimes a test case is ready for execution, but fails due to errors
in the test script. If a test case is executable as specified in its test steps /
test script, it gets the state approved.
Additional test levels can be defined for using one test structure for different
test levels. For example if you have a test case for the standard test level
“System Test” (defined when creating the test structure, see 3.1.2.2.1) and want
to use the test case in a test execution for an acceptance test, you can achieve
this by adding Acceptance Test as an additional test level for this test case. For
the execution of the acceptance test, you would then specify this test level as a
filter criterion for your test suite (see 3.1.4.1).
Additionally you can set attributes specified in the Meta Data Editor (see 5.3),
which can also be used for creating a test suite.
By specifying a sub-string in the Find field you can easily navigate to the
attribute(s) to be related to the test case. Multi select allows “moving” several
values to the right part of the window (see Figure 41).
Figure 41 – Attribute value selection
The test case design and the test design phase as a whole are finished when the
test cases are designed and obsolete test packages are removed (do not forget
to do that).
The tasks of designing and developing (implementation phase) test cases are
sometimes overlapping, especially if designer and implementer is the same
person or you import a complete test structure (see 3.1.2.2.4.2).
Page 50
User Manual
Edition January 2015
TEMPPO V6.1
Description of Use
Requirement
Optionally you can use the feature requirement tracking. As described in chapter
3.1.2.3.4, requirements can be associated to test packages and inherited. Of
course it is possible to inherit requirements from test packages and/or relate
requirements to test cases.
Figure 42 shows the test case 3.4.1.1.1 New (file opened, no changes),
which inherits from the test package 3.4 Required functions of the product the
requirements ComponentA R3 inherits from the test package 3.4.1.1 New the
requirement ComponentA R2 has a link to the requirement ComponentC R3
Figure 42 - Requirement: Test case
You might ask for reason of the requirement tracking. On one hand you can
analyze the test structure and on the other hand such a requirement analysis can
be applied to the test suite. For test structures you can create an analysis about
the quality of your test coverage. For test suites the quality of requirements can
be visualized.
For detailed description of requirement analysis see chapter 3.1.5.2.
History
History entries are generated for test packages and test cases. The entries are
shown in an own tab History. Only the entries until the last check-in are shown.
If an item is merged, the history is deleted and one new entry is made (e.g.: All,
V35.1.1., merge).
The tab has the following columns:
Date: changed on
User: changed by
Property: possible values: Requirement, UDA, Test Level, Steps,
General, All (if item is merged)
Name: Name of Property; when Property is in (General, Steps), name
= “–“, when Property is (All), name is Version of merged Item
Action: possible values: add, change, delete, merge
Info: additional comment for changing reason
Page 51
User Manual
Edition January 2015
TEMPPO V6.1
Description of Use
Version: of history entry. With button Display all entries all history
entries of all test structures can be loaded
Action is depending on Property (possible values):
Requirement: add, delete
UDA: add, delete
Test Level: add, delete
Steps: add, change, delete
General: change; Info = Name, User defined ID or Test goal
All: merge
Figure 43 – History tab
Within current test structure version, the number of history entries loaded (x)
can be configured in settings (see 3.3.21.2.4). If there are more history entries,
the button Search next is still enabled und the next x lines could be loaded.
It also possible to view all history entries of all test structure versions by
pressing the button Display all entries and save them to CSV file.
The additional comment (“Info”) can be configured to be mandatory in TEMPPO
Administrator -> Project properties. For each project this mandatory flag can
be set.
If the mandatory flag is set on, a history comment is popped up on apply (Figure
44).
Page 52
User Manual
Edition January 2015
TEMPPO V6.1
Description of Use
Figure 44 – History comment
Plan
Since testing is a project within a development project TEMPPO offers
possibilities for test project planning. TEMPPO do not wants to replace project
planning tools like MS Project but presents features for resource and test
execution planning.
Test case designers or test managers have also the task to estimate the
execution effort for each test case as well as to appoint a tester (who executes
it). The default value for the Planned Tester is the creator.
Do not estimate the effort for the test cases which passes! Most
time testers spend their time on bug analysis! Therefore add that
time also to the estimation.
Figure 45 - Tab Plan
For each test case the execution effort is entered in the format of hours and/or
minutes. On test package and test structure level the values are displayed
accumulated. After designing all test cases test manager clicks on test structure
root, select tab Plan and gets immediately the estimated execution effort for all
test cases (see Figure 46).
Page 53
User Manual
Edition January 2015
TEMPPO V6.1
Description of Use
Figure 46 - Planned execution time for whole test structure
Additionally the designer enters a Planned tester for each test case who is
planned to execute it. For Analysis of test structure Planned Tester is available
to view whereas the analysis of different Test execution efforts makes no
sense.
Figure 47 - Chart "Planned Tester"
Planned test execution time and Planned Tester can also be used for test
structure filter and the logical expression of a test suite.
Planned test execution time and Planned Tester can also be reported for
test cases, whereas for test packages only Planned test execution time is
applicable.
Both attributes can be viewed in test suite, that offers the possibility to enter an
Actual test execution time which can be applied to latest version as a learned
lesson. For details see chapter 3.1.4.1.5.2.
Execution History
Page 54
User Manual
Edition January 2015
TEMPPO V6.1
Description of Use
This tab shows only executed results over the complete version tree of the test
structure. For each test suite the following attributes are displayed:
Test Suite, Version, Result, Bug ID, Tester, Tested
Figure 48 - Execution History (only executed results)
If you want see all information for this test case over all test suites, you have to activate the
button Load Information for not executed test cases (see Figure 49).
Figure 49 - Execution History (executed and not executed)
3.1.3 Test Case Implementation
The implementation phase covers the tasks of
Implementing Test Steps
Reworking the Test Structure
implementing test frameworks (not covered by TEMPPO Test Manager)
implementing test scripts for automation (not covered by TEMPPO Test
Manager)
3.1.3.1 Implementing Test Steps
You continue your work in the tabs Test Steps and Automation of the test case
tab.
3.1.3.1.1 Preconditions and Postconditions
You have to consider, which preconditions must be fulfilled before the test steps
can be carried out during test execution. You specify this textually in the
precondition table of the tab test steps. Additionally you can see the
preconditions defined in the parent-test packages.
Additionally, you can also define postconditions, which mut be fulfilled after test
steps execution. You specify this textually in the postcondition table of the tab
test steps. You can see the postconditions defined in the parent-test packages,
too.
Page 55
User Manual
Edition January 2015
TEMPPO V6.1
Description of Use
Figure 50 - Test Case, Preconditions and Postconditions
3.1.3.1.2 Test Steps
The test step editor provides functions for creating, moving, cutting, copying and
pasting one or more test steps within a test case or test structure wide to other
test cases. The column layout can be individually adapted by moving and hiding
columns.
When pressing
(show preconditions) above the Test steps-Edit-Buttons all
the preconditions from the test case and the test packages above are displayed
(see Figure 51). If the first test steps of a test case are implemented, the
preconditions can be hidden by pressing .
When pressing
(show preconditions) beneath the Test steps-Edit-Buttons all
the postconditions from the test case and the test packages beneath are
displayed (see Figure 51). If the first test steps of a test case are implemented,
the postconditions can be hided by pressing .
When pressing , a new line for Instruction, Input and Expected (result) is
inserted. The cell height is always 3 lines during editing. When pressing Apply
the cell height is adapted to the whole line. The default cell height can be
Page 56
User Manual
Edition January 2015
TEMPPO V6.1
Description of Use
configured in TEMPPO settings.
The test step number is created automatically.
With the two arrows ( , ) you can reorder steps by selecting a step and
pressing the proper button. The test step numbers are updated automatically.
Test steps can be deleted by selecting them and pressing
.
Figure 51 - Test Case, Test Step Editor
With cut, copy, paste you copy or move one or more test steps (via multi
select) either within a test case or to other test cases in the test structure. By
selecting a test step and pressing the corresponding button you apply these
functions.
Even the short cuts <Ctrl>+X, <Ctrl>+C, and <Ctrl>+V are supported.
If the mouse cursor is located over the column headings, a menu for hiding and
displaying the columns is popped up when pressing the right mouse button.
Figure 52 – Context menu for column hiding/displaying
3.1.3.1.3 Test Creation Assistant
When pressing
or double clicking a test step Figure 53 is displayed. The Test
Creation Assistant can especially be used to edit text fields with a long
description and navigate up and down between the test steps.
If the last step is opened and you press Navigate down test step, a new step
is inserted.
Page 57
User Manual
Edition January 2015
TEMPPO V6.1
Description of Use
Figure 53 - Test Creation Assistant
3.1.3.1.4 Keyboard edit mode
Quick editing and navigation in the test step table is supported by:
<F2>
start/stop edit mode of current table cell
<ESC>
stop edit mode, but changes are lost!
<TAB>, <Shift>+<TAB>
jump to next/previous table cell (only if
not in edit mode)
,
move one test step down / up
<Ctrl>+<TAB>
leave test step table
So if you want to edit test steps without using the mouse, you have to proceed
like this:
<F2>
start edit mode
Make your changes in the current cell
<F2>
stop edit mode
<TAB>
jump to next table cell
<F2>
start edit mode
...
and so on
3.1.3.1.5 Adding more columns
For creating test steps you have 3 fixed columns: Instruction, Input and
Expected Result. In test projects it is sometimes necessary to add more
columns for test steps.
Page 58
User Manual
Edition January 2015
TEMPPO V6.1
Description of Use
Figure 54 - New Columns in test steps
There are 2 possibilities to add columns:
1. TEMPPO Administrator, Tab Metadata, User Fields (See chapter 5.4.7.
You can create new Uploads directly in the database.
You have the possibility to define text or image columns.
2. Import XML
On the other hand you may have an XML file (created by TEMPPO Designer
(IDATG) or yourself), that you want to import to TEMPPO. If you follow the
DTD (can be found in your XML directory), you can import test cases with
additional columns.
The definitions in tab MetaData, User Fields (TEMPPO Administrator
application) are automatically created.
An example of such an XML file is shown below:
<?xml version="1.0" encoding="ISO-8859-2"?>
<!DOCTYPE TEMPPO_EXCHANGE SYSTEM "Test-structure.dtd">
<TEMPPO_EXCHANGE>
<TP name="HumanResources">
<TC name="Search_T1" test_goal="Transition Test" situation="Error">
<STEP instruction="" input="" expected="">
<USR_FIELD name="Actor" value="Sean Connery"/>
<USR_FIELD name="ExecutionRequest" value=""/>
<USR_FIELD name="Data" value="line 1
line 2
line 3"/>
</STEP>
Page 59
User Manual
Edition January 2015
TEMPPO V6.1
Description of Use
<STEP instruction="" input="" expected="">
<USR_FIELD name="Actor" value="Sean Connery"/>
<USR_FIELD name="ExecutionRequest" value=""/>
<USR_FIELD name="Data" value="line 1
line 2
line 3"/>
</STEP>
</TC>
</TP>
</TEMPPO_EXCHANGE>
3.1.3.1.6 Upload / paste / reference images
For adding pictures to such a column you have to select such a cell, press the
right mouse button and activate the menu Upload, Delete, Paste, Copy or
Reference.
Figure 55 - Upload new picture
Upload: If you activate the menu Upload a file open dialog opens where you
can select a file (jpg, png, gif), which is uploaded to the database.
Delete: If you activate the menu Delete, the image is deleted.
Paste: If you activate the menu Paste, the screen shot which is currently in
the clipboard is “pasted” to the cell and also uploaded to the database. The
menu is disabled, if the clipboard is empty.
Copy: If you activate the menu Copy, the current selected image is copied to
the clipboard.
Reference: If you activate the menu Reference, you can create a reference
to an image, which is already uploaded in the database. This function is used,
if you have to paste/upload the same image several times.
Page 60
User Manual
Edition January 2015
TEMPPO V6.1
Description of Use
Figure 56 - TEMPPO Test Manager settings
For very large images a viewer is integrated, which can be started by double
clicking the image: See Figure 57.
Figure 57 - External viewer
3.1.3.1.7 Automated test cases
TEMPPO can also be used to administrate automated test cases. Here test steps
are stored as a test script on the files system. On one hand TEMPPO supports the
tools WinRunner and QuickTest Professional of HP (http://www.hp.com),
SilkTest of Microfocus and TestPartner of Microfocus
Page 61
User Manual
Edition January 2015
TEMPPO V6.1
Description of Use
(http://www.microfocus.com), Ranorex (http://www.ranorex.com) and on the
other hand there is a Universal Automation Interface (UAI).
With the context menu item Test automated test case (or Edit > Test
automated test case) the test case can be started on trial, i.e. the result of
test case isn’t saved. The result is shown in a message box.
3.1.3.1.7.1
WinRunner, QuickTest Professional, SilkTest,
TestPartner
For specifying an automated test case it is necessary to enter the tool
(WinRunner, QuickTest Professional, SilkTest, TestPartner), the file name of the
script plus path (a file selection dialog is opened). The text field Script Data is
used for passing parameters to the automation script. Currently, only SilkTest
uses this feature.
Figure 58 - Automated (WinRunner) test case
The paths to the WinRunner, QuickTest Professional, SilkTest, TestPartner
executables are specified in TEMPPO settings(see Figure 59).
Page 62
User Manual
Edition January 2015
TEMPPO V6.1
Description of Use
Figure 59 - TEMPPO - Test Automation Settings
Set WinRunner mode to “Verify”. The default mode of WinRunner
is "Debug", which means that no log file is written. TEMPPO
needs a log file to parse and extract the results. If no log file is
written, TEMPPO shows an error message:
C:\Temp\TEMPPO18072005112300\db\crvx.asc (Das System
kann den angegebenen Pfad nicht finden)
TestPartner
For specifying an automated test case it is necessary to select the
tool TestPartner. The text field Script Data is used for entering
the script name. The convention is <script name>@<Testpartner
project name>.
The text field file is obsolete.
Page 63
User Manual
Edition January 2015
TEMPPO V6.1
Description of Use
Figure 60 - Create TestPartner test case
3.1.3.1.7.2
Ranorex
For importing test cases and folders from Ranorex you have to select test
structure root, activate the menu item Import structure -> from Ranorex
Document… and a open file dialog is displayed where you can select a Ranorex
project file (.csproj). After pressing the button open the file is imported and
test cases and test packages are generated. The following table shows the
mapping:
Ranorex
TEMPPO
Test suite
Test structure or part of it
Test case
Test Case
Folder
Test package
Record
None
Table 1 - Ranorex - TEMPPO mapping
After importing a Ranorex test suite, you can add, change, or delete test cases in
the Ranorex studio. When finished you can update the existing TEMPPO test
cases and test packages by activating the menu item Update structure ->
from Ranorex Document…, selecting the corresponding .csproj file and
pressing the button Open. If the update process is started, in Figure 61 you can
select the properties (attributes, attribute inheritance, requirements,
requirement inheritance) of test packages and test cases which should be
retained after the update.
You can import test cases, add meta information in TEMPPO, change them in
Ranorex, update them in TEMPPO and keep the meta information.
Page 64
User Manual
Edition January 2015
TEMPPO V6.1
Description of Use
Figure 61 - Retaining existing test case / package attributes
3.1.3.1.7.3
Universal Automation Interface (UAI) - File based
The purpose of this interface is to provide a possibility to manage test cases of
proprietary automation tools in TEMPPO. By this, TEMPPO is independent from an
automation tool. You can create an automated test case by specifying any
executable (.exe, .bat, .pl,....) and the parameters, which are handed over to the
executable for test case execution. The test case result is written to a file,
TEMPPO parses this file and sets the result within the test suite appropriately.
First of all you have to set some general parameters in the TEMPPO settings.
For creating such a test case you have to select UniversalFile (Figure 62 - Test
case settings for Universal Automation Interface) and fill in the following data. In
the text field File you have to enter the path (without drive letter, see chapter
3.3.21.2.7.2) and the file name of the executable (or you use the File Chooser).
In the Additional Arguments field you can specify command line parameters,
which will be added to the arguments specified in the Administrator and passed
to the executable during test case execution.
In the Command Line Preview the whole list of parameters is displayed.
UniversalFile
Figure 62 - Test case settings for Universal Automation Interface
Results of test cases:
Page 65
User Manual
Edition January 2015
TEMPPO V6.1
Description of Use
All executables must create an output that contains at least this line:
result=(passed|failed|blocked|not implemented|on hold|not completed)
Additionally, TEMPPO can store an execution summary (stored to the text field
Result Output), if the following block is written by the test executable to the
output:
summary_begin
....
....
....
summary_end
After execution of each test case, TEMPPO Test Manager will read the
corresponding result file. If the whole file is missing or if the result line is missing
(e.g. due to a crash of the test script), the result of the corresponding test case
will be set to "blocked".
Otherwise, the result of the test cases' execution will be set to the value found in
the result file. If the summary block is present, TEMPPO Test Manager will store
the information found between start and end line in its data base.
Getting the output:
By default, TEMPPO Test Manager expects the result output to be produced on
the stdout stream of the executable. For an executable
MyExec.exe
TEMPPO generates a result file named
yyyymmdd_hhmm_MyExec.out
and redirects stdout of MyExec.exe to this file. The prefix is a date-time stamp
that denotes the time when the test executable was started. This file is stored in
the directory specified as Result Path in the TEMPPO Test Manager settings –
Test Automation.
Similar to result files, TEMPPO Test Manager expects error output of test
executables to be printed to stderr. TEMPPO Test Manager will generate an error
file
yyyymmdd_hhmm_MyExec.err
and redirect stderr of MyExec.exe to this file. The file is put to the directory
specified as Error Path in the TEMPPO settings – Test Automation.
If the script does not write to stdout or stderr, the user can use the built-in
variables <<ResultFile>> and <<ErrorFile>> in the arguments settings. The
variables will be replaced at execution time by the paths specified in the TEMPPO
Test Manager Settings plus the file names generated by TEMPPO Test Manager
(see above).
If the executable expects the file name for the result or error
output as command argument, they have to be specified by using
<<ResultFile>> or <<ErrorFile>>, otherwise TEMPPO cannot
read them.
Example:
All scripts should take the command line parameters "/o myResults.res /e
myErrors.err". Additionally, each script should take some individual parameters.
Assume, test_case.bat corresponds to a TEMPPO test case and should be started
with individual parameters "/f /i", like this:
test_case.bat /f /i /o myResults.res /e myErrors.err
Page 66
User Manual
Edition January 2015
TEMPPO V6.1
Description of Use
In this case, the user specifies the general settings for all test cases in the
TEMPPO Test Manager Settings:
Arguments:
/o <<ResultFile>> /e <<ErrorFile>>
and the individual settings in the TEMPPO test case automation tab:
File:
\temppo\test_case.bat
Additional Arguments:
/f /i
If we assume a drive letter setting "U:\", the preview window shows a full
command line like this:
U:\temppo\test_case.bat /f /i /o <<ResultFile>> /e <<ErrorFile>>
where <<ResultFile>> and <<ErrorFile>> will be replaced with generated file
names (including the paths specified in the Administrator) at execution time.
For example <<ResultFile>> will be replaced with:
C:\Documents and Settings\atw1t5q2\Result\20021202_1723_test_case.out
3.1.3.2 Reworking the Test Structure
Possibly you will have to rework your test structure after a review or due to
changes of the software under test.
Editing of the test structure is supported by the Cut / Copy / Paste functionality
Edit > Cut / Copy / Paste
which even allows you to copy or move around complete test structure subtrees. By using
Edit > Order > Move Up / Move Down
you can change the order of test packages or test cases as well.
Edit and evaluation functionalities are also available over the
context menu.
3.1.4 Test Case Execution
Test execution is an issue, which must to some extent be connected with
configuration management (CM) concepts like checking in a version and making
it reproducible for later reference. If you are unfamiliar with CM terminology,
please refer to chapter 3.3.11.
In an ideal world you would first make your planned test cases ready for
execution, somehow conserve their state by means of CM functionality, execute
them on your test object and record results. In reality, however, it often happens
during test execution that you encounter a faulty test case. Such faults are
mostly caused by undocumented changes in requirements or they slipped
through quality control after test case implementation. Naturally you’ll want to
correct a faulty test case before executing it - and your test management tool
should support this action. A different aspect is that other test cases which were
already executed should certainly not be editable any more. Otherwise you could
run into the problem of accidentally changing or even deleting a test step that
already has a recorded result.
TEMPPO Test Manager supports these seemingly contradictory needs with its
versioning mechanism, which is implicitly used for test execution. When you
create a test suite, TEMPPO Test Manager automatically checks in your current
Page 67
User Manual
Edition January 2015
TEMPPO V6.1
Description of Use
test structure. This means that its state (test packages, test cases, test steps) is
conserved: no further editing is possible within this version and it can be
restored any time in future. To give you the flexibility of still being able to correct
faulty test cases during test execution, another action is performed automatically
at test suite creation. A branch containing a new editable version of the test
structure is created (you are prompted for a descriptive name), and your new
test suite is connected to it. TEMPPO allows you to edit test cases in this branch
as long as no result has been recorded for any of their test steps. From then on,
no further editing is possible and thus your test results cannot get lost.
Of course you can still edit test cases in a different version of your test structure,
typically in the latest version on the main line. In your next test execution, again
a branch off the main line will be created for you, and the corrections you applied
there will be visible in the new test suite.
The complex matters of test execution are explained in greater detail in the
following chapters.
3.1.4.1 Starting Test Execution
Before the first test execution, there exists usually just one version of the test
structure, version "1" on the main line. In TEMPPO, every last version gets the
label "latest", signaling that the test structure in this version is checked out for
editing. The version tree can be displayed any time by selecting Test Structure
> Versions.... Although you never get directly in touch with the version tree
during the course of test execution, references to it will be made frequently in
the following paragraphs. This is necessary in order to illustrate as clearly as
possible what is going on "behind the scenes" as you proceed.
Latest test structure version in the main
line.
This version is checked out for editing.
Figure 63 - Initial version tree before any test execution
Usually, when you think of starting a new test execution, you don't want all of
your test cases to take part in it. Some of them may not be fully worked out,
others may test features that are not yet available in the current version of your
test object. For the purpose of selecting a proper subset of your test cases,
TEMPPO provides the concept of test suites. By means of a logical expression,
you can filter out the desired test cases.
Page 68
User Manual
Edition January 2015
TEMPPO V6.1
Description of Use
A new Test Suite is created by activating Test Execution > New. This will cause
the wizard shown in Figure 64 to be displayed. There are 4 possibilities to create
a test suite:
New: Based on test structure pre-selection, applying a condition, and
finally removing some test cases, that won't be executed.
Based on a predecessor: new test suite is chained with an existing test
suite (chain)
Copy: Based on an existing test suite, only copying test suite selections to
the new one.
Special: Based on an existing test suite, defining restrictions on certain
test results.
Figure 64 - Test Suite wizard: Introduction
When pressing Next Figure 65 is shown, where you can select one mode.
Page 69
User Manual
Edition January 2015
TEMPPO V6.1
Description of Use
Figure 65 - Creation mode selection
3.1.4.1.1 New: Based on current test structure
This mode is the usual way to create a test suite. The following steps are
necessary:
Test structure pre-selection
Test suite name
Logical expression
Remove test cases manually
Page 70
User Manual
Edition January 2015
TEMPPO V6.1
Description of Use
Figure 66 – New: Test structure pre-selection (whole test structure)
Figure 67 - New: Test structure pre selection (test packages)
Figure 66 shows the first step for creating a test suite. It shows the whole test
structure pre-selected. If you want to consider a whole test structure with all the
test packages and test cases for test execution, you press simply Next.
Advanced users can limit the test structure by selecting test package(s) that
should be in the test suite. For selecting the test packages use <CTRL> or
<Shift> keys.
Page 71
User Manual
Edition January 2015
TEMPPO V6.1
Description of Use
Figure 68 - New: Name and comment
In the 2nd step you have to enter name together with a description for the test
suite (Figure 68). When pressing Next you have to determine the logical
expression (Figure 69).
A logical expression can be defined, which filters out the desired test cases. It
can be constructed using test package categories, test levels and test case
attributes. Specifying a logical connector in the last line can extend the
expression.
If you have already defined a filter for your test issue you can select it and press
the button Apply. The filter’s logical expression is applied.
Figure 69 - New: Logical expression
When pressing Next the user can remove test cases that should not be executed
(Figure 70). The (de)selection can be realized with the <CTRL> and <Shift>
keys.
Page 72
User Manual
Edition January 2015
TEMPPO V6.1
Description of Use
For default handling (before V3.3) press Finish and all test cases remain in the
test suite that will be displayed.
Figure 70 - New: Remove unwanted test cases
After clicking Finish, the current test structure version ("V1") is checked in. If
you could open the version tree browser now, you would encounter the following
situation:
Figure 71 - Version tree after test suite creation
Immediately after test suite creation, three versions with
identical test structures exist: "1", "2 latest" and "1.1.1 latest".
The latter two of them are editable, just the first one is checked
in.
A test suite is always just a "view" of the underlying test structure in the
activated version. Only test cases are visible that fulfill the criteria defined in the
Page 73
User Manual
Edition January 2015
TEMPPO V6.1
Description of Use
logical expression. Furthermore, test packages where no test cases are selected
at all are not displayed.
Figure 72 - Test Suite
Now that you have a test suite with all desired test cases, you are ready to start
for the test execution and recording of results. Depending on the test cases, test
execution is manual, automatic or mixed.
The selection information (included TPs, excluded TCs) will be displayed, if the
root node of the test suite is selected (see Figure 73).
Page 74
User Manual
Edition January 2015
TEMPPO V6.1
Description of Use
Figure 73 - Information about included TPs and excluded TCs
The tab Details displays the logical criterion of the test suite. It can be changed
since there aren’t any results yet recorded.
Figure 74 - Test suite - logical expression
In the test suite tab Attributes, you can set attributes, which can also be shown
in the report.
Only attributes can be chosen that are indicated as test suite attributes in the
Meta Data Editor (see 5.3).
Page 75
User Manual
Edition January 2015
TEMPPO V6.1
Description of Use
Figure 75 - Attributes
3.1.4.1.2 New: Based on a predecessor
This mode is used to create a new test suites for sprints. If your test cycle
consists of 4 sprints a summarized test is necessary. With this feature you are
able to “chain” test suites and to generate an overall report.
The test suite will be created on a branch of the current selected test structure
version. Therefore it is possible to set a predecessor test suite and all possible
settings are pre-selected.
With defining predecessors, you get information of previous test executions and
previous results of each test case with bug IDs. It’s not necessary anymore to
open another test suite for getting the result and bug ID from a previous test
execution of a test case.
The following steps are necessary to do:
Select an existing test suite
Test structure pre-selection
Test suite name
Logical expression
Remove test cases manually
In the first step the test suite tree is shown (Figure 82), where you can select an
existing test suite, that will be used for pre-select all settings in the wizard.
Page 76
User Manual
Edition January 2015
TEMPPO V6.1
Description of Use
Figure 76 - Select a test suite
Figure 77 shows the first step for creating a test suite. It shows the whole test
structure and the test packages are pre-selected like the predecessor.
If you want to consider a whole test structure with all the test packages and test
cases for test execution, select the root node and press Next.
Figure 77 – Test structure pre-selection (test packages
In the 3rd step you have to enter name together with a description for the test
suite (Figure 78). When pressing Next you have to determine the logical
expression (Figure 79) which is pre-selected like the predecessor.
Page 77
User Manual
Edition January 2015
TEMPPO V6.1
Description of Use
Figure 78 – Name and comment
Figure 79 – Logical Expression
When pressing Next the user can remove test cases that should not be executed
(Figure 80). The test cases are also pre-selected like the predecessor was set.
The (de)selection can be realized with the <CTRL> and <Shift> keys.
Page 78
User Manual
Edition January 2015
TEMPPO V6.1
Description of Use
Figure 80 – Remove unwanted test cases
After clicking Finish, the new test suite is created based on the settings of the
predecessor test suite. Now that you have a test suite with all desired test cases,
you are ready to start for the test execution and recording of results.
The predecessor information will be displayed, if the root node of test suite is
selected and tab Predecessor is activated.
Figure 81 - Predecessor
The predecessors of a test suite can be changed with the buttons Insert Into
Chain, Remove Chain and Remove From Chain. The predecessors are sorted
by the sequence so that the last row is the current test suite. The sort can be
changed with the combo box Sort bottom-up.
With the change of predecessors the settings of the current test suite can’t be
changed in common.
Now all results of one test case are displayed in the new tab Previous Results
(see 3.1.4.1.8). All results can be analyzed (see 3.1.5.1.1) and written to report
(see Figure 155), so that all results of a test case in a sequence of test suites can
be shown.
Page 79
User Manual
Edition January 2015
TEMPPO V6.1
Description of Use
3.1.4.1.3 Copy: Based on an existing test suite
This mode is used to copy a test suite and repeat a test run with exactly the
same test cases. The copied test suite will be created on a branch of the current
selected test structure version. Therefore it is possible to copy test suites from
prior version to later ones and vice versa.
The following steps are necessary to do:
Select an existing test suite
Test suite name
In the first step the test suite tree is shown (Figure 82), where you can select an
existing test suite, that will be copied to a new branch.
Figure 82 - Copy: Select a test suite
In the final step test suite name and comment are to be specified. Additionally
you can configure, if you want to get Actual Result and Bug ID of source test
suite. You can retest bug fix more efficiently.
Page 80
User Manual
Edition January 2015
TEMPPO V6.1
Description of Use
Figure 83 - Copy: Enter name and comment
3.1.4.1.4 Special: Based on an existing test suite with
restrictions to test results
This mode is a special one that solves a problem that arises in many projects.
Normally after test case execution you’ll have a test suite with passed and failed
test cases and therefore bugs in the SUT that have to be fixed in future versions.
For testing such a new version, it can be decided to test only the test cases that
failed in the previous test execution.
In TEMPPO you are supported by the special mode that provides you to copy a
certain test suite with the restriction of test results.
The following steps are to do:
Select an existing test suite
Test suite name
Test cases with special results
For the first 2 steps see 3.1.4.1.3.
In the 3rd step you can select test case results that will filter the test suite. Only
the selected ones will be in the new test suite.
Page 81
User Manual
Edition January 2015
TEMPPO V6.1
Description of Use
Figure 84 - Special: Restrict test suite
Newly created test cases are added to restricted test suites.
Consider the following situation: you activated the latest test structure version
and created a new manual test case. Now you create a new test suite based on
an existing one with the logical expression: type=manual. In step 5 of the wizard
choose
Test suite should include all test cases except those which are passed.
Now, the new test suite will not only contain the “failed” test cases of the
previous test suite, but also the newly created test case, although its result is
“not executed”!
3.1.4.1.5 Manual Test Execution
For every test case, you process its test steps. The sequence of test cases and
test steps is arbitrary, you may proceed in any order that suites your needs best.
For easier navigation from one test case to another, the buttons on top of the
test suite tree can be used (first, previous, next, and last).
A Test Step can be given the following results.
not executed:
the test step hasn’t been executed yet (initial result)
passed:
the actual behavior matches the expected one
failed:
the actual behavior does not match the expected one
blocked:
the test step couldn’t be executed, because some precondition failed
not implemented the test step couldn’t be executed, because the SW part
to be tested is not implemented.
on hold
the test step couldn’t be executed, because the SW part
to be tested is postponed to another milestone.
Page 82
User Manual
Edition January 2015
TEMPPO V6.1
Description of Use
Figure 85 - Manual Test Execution, Test Step Results
Test case results are calculated by accumulating test step results. So a test case
is
not executed, if all test steps are not executed (initial result).
passed, if all test steps are passed.
failed, if at least one test step failed.
blocked, if no test step failed and at least one is blocked.
not completed, if no test step failed or is blocked and at least one is
passed.
not implemented, if at least one test step is not implemented (stronger
than "on hold").
on hold, if at least one test step is on hold.
Test case results are displayed within square brackets following the test case
name.
Page 83
User Manual
Edition January 2015
TEMPPO V6.1
Description of Use
Figure 86 - Test Execution, Test Case Results
3.1.4.1.5.1
Test execution assistant
Test execution assistant supports you in executing each step by displaying each
step in an own window. It can be called by selecting a step and pressing the
button Test Execution Assistant.
Figure 87 - Test Execution
Test execution assistant shows all the fields of a test step and allows the user to
enter an actual result as well as a bug ID. By pressing one of arrow buttons user
can navigate to next or previous test step.
Page 84
User Manual
Edition January 2015
TEMPPO V6.1
Description of Use
Figure 88 - Test Execution, Test Execution Assistant
3.1.4.1.5.2
Set result(s)
With context menu Set result(s) it is possible to set test case results for multi
selected test cases. Additionally you can set values for test result attributes, if
test result template is active.
Page 85
User Manual
Edition January 2015
TEMPPO V6.1
Description of Use
Figure 89 - Set result(s)
3.1.4.1.6 Plan
In test structure test designers estimate the Planned test execution time.
After test case execution testers enter the Actual test execution time. If this
time is different to the plan value you can apply that value to the latest version
as new Planned test execution time by pressing the Merge button.
Figure 90 - Test suite – Test Case - Plan
That information is not only available for test cases but is also viewed for test
packages and the test suite itself. When clicking on root node test managers can
view the accumulated values for Planned test execution time and Actual test
execution time for whole test suite.
Page 86
User Manual
Edition January 2015
TEMPPO V6.1
Description of Use
Figure 91 - Test suite - Plan
3.1.4.1.7 Test Result Attributes
There is the possibility to assign attributes to test cases for execution in tab
Attributes TR of a test case result.
Only attributes can be chosen that are indicated as test result attributes in the
Meta Data Editor (see 5.3).
Figure 92 – Test Case Result Attributes
3.1.4.1.8 Previous Results
With predecessors, there is also the possibility to get known about the results in the
predecessor test suites. The table isn’t changeable.
Page 87
User Manual
Edition January 2015
TEMPPO V6.1
Description of Use
Figure 93 – Previous Results
3.1.4.1.9 Enter new bug entry
An actual behavior, and in case of errors a bug ID can be recorded for each test
step and for each automated test case, too.
The bug ID would point to a problem report in a bug tracking tool like Bugzilla,
IBM Telelogic Change, IBM Rational Clearquest or JIRA.
Before you can generate a bug automatically, you have to configure the corresponding
settings in TEMPPO settings.
Figure 94 - TEMPPO settings
For creating a new bug select the corresponding cell (bug ID, step#) and press the button
Create a new bug entry (see Figure 95).
Page 88
User Manual
Edition January 2015
TEMPPO V6.1
Description of Use
Figure 95 – Create a new bug entry
Now a dialog for creating a bug or change request opens (see Figure 96). Fill in
the data of the bug and may activate the combo box Add test report. In the
end you press Submit.
The panel for Telelogic Change is displayed dynamically. So the list boxes
beneath the box State are dependent on the selected State. All fields at the
Telelogic Change window are mandatory for the change request.
Page 89
User Manual
Edition January 2015
TEMPPO V6.1
Description of Use
Figure 96 – Bugzilla / Telelogic Change
Page 90
User Manual
Edition January 2015
TEMPPO V6.1
Description of Use
Figure 97 – Clearquest
Now the report is added to the tracking tool and in the column Bug ID you find
the hyperlink to your report (see Figure 99).
Limitation: With IBM Rational Clearquest’s interface it is not
possible to attach directly the test report
Page 91
User Manual
Edition January 2015
TEMPPO V6.1
Description of Use
Figure 98 - JIRA
Figure 99 – Hyperlink to bug
3.1.4.1.10
Automated Test Execution
For starting an automated test execution, you have to select the test package,
which contains the test cases to run, and activate Test Execution – Run
automated (or the corresponding item in the context menu – see Figure 100).
TEMPPO Test Manager will then sequentially invoke the proper automation tool
for each test case and fetch the result obtained by the tool after the automated
run.
Page 92
User Manual
Edition January 2015
TEMPPO V6.1
Description of Use
Before running automated tests, the automation settings in
TEMPPO’s administration tool (see 4) must be configured.
Figure 100 - Automated Test Execution
3.1.4.1.11
Mixed Test Execution
A mixed test suite contains both manual and automated test cases. The test
execution doesn’t differ from the one described above, but is just a mixture of
them.
If a test package contains both manual and automated test cases and Run
automated is invoked on it, only the automated test cases will be executed. All
manual test cases in this test package must be carried out afterwards.
3.1.4.1.12
Setting several results
For regression testing it is often convenient to set results for several test cases
at once; e.g. if you already know the results of the test cases. First you have to
select a (sub) tree in the test suite and then activate the (context) menu Set
result(s), and afterwards Figure 101 is shown. You can choose one result and
optionally set the checkbox Overwrite existing results and after clicking Apply
all test results are set.
If other users have locked test cases, it is not possible to set the
result, of course. You will be informed if results couldn’t be set.
Page 93
User Manual
Edition January 2015
TEMPPO V6.1
Description of Use
Figure 101 - Set Result(s)
If a test case contains no test steps, it remains “not executed”.
3.1.4.2 Pausing and Continuing Test Execution
If there are a lot of test cases, you will want to pause test execution and
continue at a later time. TEMPPO Test Manager allows you to close your test
suite any time you like. Later on, you can reopen it by activating Test
Execution > Open. The dialog shown in Figure 102 will be displayed. This dialog
also shows the version-tree extended by the test suite ( ) beneath the version
where it was created. During the opening process, the adequate version of the
test structure is loaded automatically.
Figure 102 - Open an existing test suite
After the test suite is opened, you can proceed with your test execution as
described in the previous chapter. You can repeat this cycle as many times as
you like.
3.1.4.3 Editing Test Cases during Test Execution
As stated in the introductory paragraphs of the test execution chapter, it might
well be that you detect faults in your test cases just before you want to execute
them.
If you want to edit (also cut, copy, paste) test steps before or during test case
execution, it is the best way to select the test case and call the menu item Edit
test case. The test structure is highlighted and the test case is automatically
selected.
Page 94
User Manual
Edition January 2015
TEMPPO V6.1
Description of Use
Then add e.g. a test step (see new test step 4 in Figure 103). The Apply and
Discard buttons become enabled. When pressing the Apply button, the changes
done in the test structure will be applied to the test suite and you can execute
this new or edited test step.
Figure 103 Editing test cases during test case execution
But remember, there still remains the problem that you have edited a test case
on the branch. Very likely you will need these changes for all further test
Page 95
User Manual
Edition January 2015
TEMPPO V6.1
Description of Use
executions that will be branched from the (latest) version of the main line. What
can you do to solve that problem?
There are two possibilities: On one hand you can merge each single (edited) test
case. After pressing the Apply button the user is automatically asked to merge
the changes. Remark: The Merge button can always be pressed if enabled.
Additionally TEMPPO Test Manager checks, if the test case to be merged is
already changed in the mean time and informs the user:
If pressing Yes, you may select which content should be merged into the latest
version, see Figure 104.
Figure 104 - Merge content
The corresponding content is “copied” from the selected branch to the latest
version of the main line, which means that the current version of this test case
parts (general, attributes, test steps, automation requirements, plan) in
main latest is overwritten.
For advanced TEMPPO users there is a possibility to merge ALL test cases and
test packages from a branch or main version to the latest version of the main
line (e.g. after finishing test execution and test case updating). You can open the
version window and press the Merge all test cases into latest version of
main line button.
Page 96
User Manual
Edition January 2015
TEMPPO V6.1
Description of Use
Figure 105 – Versions
After pressing the merge button, a warning window comes up, that asks you, if
you are sure to go on. If you commit this window, the latest version will be
checked in and checked out again. Then all test cases of the branch version are
copied to this checked out version.
3.1.4.3.1 Adding new test cases during test case
execution
As a matter of fact new test cases have to be added to test case execution,
although that test phase already started. Therefore such test cases have to be
created in the corresponding test structure (branch) versions. If the pre-selection
of test packages (sub-trees) and the logical expression when creating the test
suite match, the test cases appear in the test suite (after reloading the whole
tree).
3.1.4.3.2 Adding and changing test packages during test
case execution
During test case execution it might be necessary to create new test packages on
a branch (see Figure 106) and use them also in the latest version later on.
Page 97
User Manual
Edition January 2015
TEMPPO V6.1
Description of Use
Figure 106 - Creating new test package on branch
After pressing the Apply button the user automatically asked if he wants to apply
the new test package or changes on it to the latest version.
3.1.4.4 Finding Bug IDs
If you have the problem of finding bug IDs and do not remember the test cases,
you activate the menu item Find and Replace. For more details see 3.3.9.
3.1.4.5 Finishing Test Execution
After all of the test cases in your test suite have their results recorded, you have
two choices:
check in the current version
leave it checked out
(in this case, TEMPPO Test Manager will prohibit editing test cases, because they
have results)
3.1.4.6 Creating More Test Suites
Here is an example with more test suites for more than one application release.
Page 98
User Manual
Edition January 2015
TEMPPO V6.1
Description of Use
Figure 107 - An extra branch for each test execution
Typically, each test execution has its own branch which is directly beneath the
main line and contains just one test suite. This is because faults in test cases are
usually corrected in the main line of the version tree (versions 1, 2, 3, 4 in the
example). If every new test execution branches directly off the main line, it will
always have the most up-to-date definitions of test cases.
Grouping test executions within a common branch is possible, yet
not recommended due to the suggested procedure described
above. Only highly experienced users should consider departing
from this approach.
3.1.4.7 Test case execution with an exported test
suite
In projects for certain domains tests can't be executed in the office on the
desktop PC, but must be executed offline (e.g. in a test-car for the automotive
domain). For this purpose TEMPPO provides features, which enable:
to export a test suite into an export database
execute test cases and store the test results in this export database
afterwards import the test results into the origin database
remove a test suite from such an export database
Consider the following situation: You have a test team of 2 or more testers and
have a central database. For test case execution it is necessary to unplug the
notebook or workstation from the database (LAN) and execute the test cases
somewhere else (e.g. in a car).
3.1.4.7.1 Export a test suite
First of all you have to be connected to the central database with the TEMPPO
Administrator. After starting TEMPPO Test Manager you select project, test
structure and open the test suite containing the test cases to be executed offline.
Note that a set filter is concerned for export, which means that only the visible
test suite is exported!
When activating the menu item Export Test Suite the exporting process to a
local MS Access database is started.
At first you select the directory for the export database (see Figure 108). The
default database name is TEMPPO_export.mdb.
Page 99
User Manual
Edition January 2015
TEMPPO V6.1
Description of Use
Figure 108 – Save dialog
If the export database already exists, you get the following message (Figure
109):
Figure 109 – Overwrite file
After successful export the test suite with activated root node looks as follows:
Figure 110 - Locked test suite
In the tab Export Info all exports (of course more than one are possible) of this
locked test suite are listed. Even the test packages are marked locked, which
means that the item is read-only. Test cases also cannot be changed, but can be
executed on workstations connected to the central database.
The corresponding test structure will also be locked. Figure 111 shows that also
test cases are marked read-only. The only possible change is to add test results.
Page 100
User Manual
Edition January 2015
TEMPPO V6.1
Description of Use
Figure 111 - Locked test structure
3.1.4.7.2 Test case execution with an exported test suite
Let’s continue the example of offline test case execution: You’ll close TEMPPO
and unplug your notebook from the central database (LAN). Unplugged from the
central database you first start the TEMPPO Administrator and select the export
database. If you start TEMPPO with the export database you are informed that
TEMPPO is open in a restricted manner (see Figure 112), which means that only
the Test Execution, Find and Evaluation functionality is available and only the
test suite window is opened. Test structures are not displayed in that restricted
mode.
Figure 112 – Warning: TEMPPO in a restricted manner
During test case execution the following values/text fields can be changed:
Result Output: Result text for the whole test case.
Actual Result: For each test step
Bug ID
Results: Test results for each step (passed, failed, blocked, not executed)
3.1.4.7.3 Importing test results
Returning from test case execution the testers want to import the results to the
central database. You have to connect to the LAN and select the central database
in the TEMPPO Administrator. After opening TEMPPO Test Manager you have to
open the corresponding test structure and suite. The (read-only) test suite is
marked with a small lock (see Figure 113) and colored blue, if it matches to the
test suite in the export database.
Page 101
User Manual
Edition January 2015
TEMPPO V6.1
Description of Use
Figure 113 - Locked test suites
The opened test suite now shows the results of central database
and not of your export database.
For importing the results from the export database, you have to activate the
menu item Import Test Suite. All tests that were NOT executed for the first
time cause no problems. They are imported without any conflicts. TEMPPO Test
Manager provides 3 possibilities to import the test results to handle conflicts (see
Figure 114).
Then an open-dialog is shown, where the export database has to be selected.
Figure 114 - Test Suite Import Settings
Import only newer test results: If a user already imported a test result for a
test case and you also executed the same test case
- Earlier, the result in the central database won’t be overridden by yours.
- Later, your result will be written into the database. The other result is
lost.
- Import all test results: All test results of already executed test cases are
overwritten by your results
Manually choose test results to import: When activating that possibility,
Figure 115 - Manual import of test results is shown. In the right part of the
window the current (result) state of test cases in the central database is shown
together with their execution date (NOT importing date!). Test cases that may
cause conflicts are colored blue. The left side of the window shows the test
results of the exported test suite. Now you can activate the checkboxes of test
cases that you want to import.
Note: All test results that are marked are overwritten in the
central database after closing the window with OK.
Page 102
User Manual
Edition January 2015
TEMPPO V6.1
Description of Use
Figure 115 - Manual import of test results
3.1.4.7.4 Unlocking the test suite
As a last resort, it is possible to manually unlock a test suite (see chapter 5.5.4).
3.1.5 Evaluation
In this phase test structures and test suites are analyzed and reports are
created. You may analyze any version of your test structure (for switching to
another test structure version refer to 3.3.11).
3.1.5.1 Analysis
The analysis feature is used to give you a quick overview about your test
structure or test suite. You create an analysis chart by selecting the node to
analyze and activating Evaluation > Analyse selected > with current
opened explorer [project | test structure | test suite] > All....
In the Analysis dialog you can set values for X – Axis and group values on the Y Axis. The following charts for displaying the data are possible:
Horizontal bar chart
Horizontal bar chart (3D)
Line chart
Stacked horizontal bar chart
Stacked horizontal bar chart (3D)
Stacked vertical bar chart
Stacked vertical bar chart (3D)
Vertical bar chart
Vertical bar chart (3D)
There is also the possibility to save the chart as .jpg or .png file by pressing the
button Save As…
Page 103
User Manual
Edition January 2015
TEMPPO V6.1
Description of Use
Additionally in most analyses you save your settings as favorites. You can create
new, overwrite existing and delete favorites.
Figure 117 and Figure 117 show an analysis from a test structure and a test
suite, displaying the number of test cases for each priority grouped by the state.
Page 104
User Manual
Edition January 2015
TEMPPO V6.1
Description of Use
Figure 116 – Test Structure Analysis
Figure 117 –Test Suite Analysis
Page 105
User Manual
Edition January 2015
TEMPPO V6.1
Description of Use
A special analysis is the result coverage: The following analysis compares or
displays the planned tests and executed / not executed tests.
Figure 118 - Test Suite Analysis - Coverage
3.1.5.1.1 Analysis with previous test suites
Now there is an analysis through a sequence of test suites (predecessors).
Activate Evaluation > Analyse selected > with current opened explorer >
All... and Figure 119 opens. In the Analysis dialog you can set group values on
the Y – Axis and chart type.
Page 106
User Manual
Edition January 2015
TEMPPO V6.1
Description of Use
Figure 119 – Analysis with previous test suites
There is also the possibility to save the chart as jpg or png file by pressing the
button Save As…
3.1.5.2 Requirement analysis
You create a special analysis chart by selecting the node to analyze and
activating Evaluation > Analyse selected -> Requirements only....
At first you have to select the requirement structure which you want to analyze.
If the requirement structure is imported from an RM tool, only the selectable
requirements are analyzed.
If you want to analyze the requirement attributes, you should select an attribute.
Then the analysis is calculated with the values of attribute (see example: Figure
125).
Figure 120 shows a requirement analysis, if the plan value for the coverage is
greater than 1 test case. The requirement GEN-FN-0030 is covered by 2 test
cases but the plan value was 3. Therefore the requirement is displayed red,
means: Coverage = false.
The following chart types for displaying the data are possible:
Horizontal bar chart
Horizontal bar chart (3D)
Stacked horizontal bar chart
Stacked horizontal bar chart (3D)
There is also the possibility to save the chart as jpg or png file by pressing the
button Save As…
Figure 121, Figure 124, and Figure 123 show an analysis from a requirement
structure, displaying the number of assignments from a requirement to test
cases. The test cases linked to the requirements are displayed as
Chart
Numbers
Page 107
User Manual
Edition January 2015
TEMPPO V6.1
Description of Use
Test case IDs
Figure 120 - Planned coverage
Figure 121 - Test Structure Requirement Analysis
Page 108
User Manual
Edition January 2015
TEMPPO V6.1
Description of Use
Figure 122 - Test Structure Requirement Analysis - Data
Figure 123 - Test Structure Requirement Analysis - Detailed Data
Page 109
User Manual
Edition January 2015
TEMPPO V6.1
Description of Use
Figure 124 - Test Suite Requirement Analysis
Figure 125 – Test Suite Requirement Analysis with Attributes
3.1.5.3 Analysis by Bug ID (project)
Consider the situation of a new version of the test object and a list of bugs are
fixed in order to retest, but you do not know the test cases or test structures.
TEMPPO Test Manager offers the possibility to load or enter a list of bug IDs and
display the linked information: Test structure, Version, Test Suite, Test
Case, Test Case ID and Bug ID.
If a project is opened the corresponding analysis window can be activated and
Figure 127 is displayed. You have the possibility either to load a comma
separated file of Bug IDs or enter them directly. After pressing the button
Analyse the window shows the Bug IDs together with Test structure, Version,
Test Suite, Test Case, Test Case ID.
Page 110
User Manual
Edition January 2015
TEMPPO V6.1
Description of Use
Figure 126 - Analysis by Bug ID (project)
3.1.5.4 Analysis by Bug ID (test suite)
TEMPPO Test Manager offers you the possibility of analyzing the suite for
creating a list of test cases that are referenced by certain bug IDs. By activating
the menu item Analyse selected -> Bug ID, Figure 127 is displayed.
A bug ID like "1?" is reported
in different test steps
of the same test case
Figure 127 - Analysis by Bug ID (test suite)
In the text box Bug ID you can enter the bug ID or a regular expression, if you
want to create a list of more or all test cases that are referenced. By pressing the
button Analyse, the test case list is shown and can be saved as csv file by
pressing the button Save.
By selecting a test case in the window Analysis, the cases are also highlighted in
the test suite tree.
3.1.5.5 Progress charts
TEMPPO offers a feature, which allows you to create flexible progress charts for
test structures and test suites. On one hand you can compare progress of test
case creation and on the other hand you can display the progress of test suites
by comparing the results.
3.1.5.5.1 Creation Progress
If a test structure is opened and menu item Creation Progress is activated,
Figure 128 is shown. By pressing the button Select Test Structures Figure 129
Page 111
User Manual
Edition January 2015
TEMPPO V6.1
Description of Use
is displayed, where you can select from the test structure version tree with the
mouse together with <CTRL> pressed the versions to be displayed.
If you want to display several consecutive versions you have to select the first
one, keep holding the <SHIFT> key and select the last one in the tree (normal
selecting behavior).
The following chart types are available:
Horizontal bar chart
Horizontal bar chart (3D)
Line chart
Stacked horizontal bar chart
Stacked horizontal bar chart (3D)
Stacked vertical bar chart
Stacked vertical bar chart (3D)
Vertical bar chart
Vertical bar chart (3D)
With the radio button Orientation you can display the description of the x-axis
either vertically or horizontally.
The data can be switched from absolute to relative and vice versa.
Using the checkboxes States the chart can be customized.
By pressing the button Save As… the chart can be saved as jpg or png file.
Page 112
User Manual
Edition January 2015
TEMPPO V6.1
Description of Use
Figure 128 - Test Creation Progress
Figure 129 - Select Test Structures
3.1.5.5.2 Execution Progress
There are 3 analysis available:
Page 113
User Manual
Edition January 2015
TEMPPO V6.1
Description of Use
Standard: Execution progress of test suites can be created. For several
test suites which can be selected results and planned values a chart can be
created.
Filtered: Additionally, a filter can be set for execution progress which is
applied on all selected test suites. This analysis is slower because all data
have to be loaded from database for filtering.
Requirements only: A requirement analysis of several suites over
several requirement structures can be created. All data will cumulated to
one chart.
3.1.5.5.2.1
Standard
You create an analysis chart of several test suites by activating Evaluation >
Progress charts -> Execution -> Standard..., if at least a test structure is
opened. It is only possible to create a test suites chart of a single test structure.
When opening that analysis, the chart is empty and you can select the test suites
in a window that opens if you press the button Select Test Suites.
Possible settings:
X-axis: Tester, Test suites
Y-axis: Test cases, Planned execution time
Group by: Result
If Test Suites is selected for x-axis, the checkbox Show 0 values is greyed,
because it makes no sense. Additionally you can (un)display all obsolete results
and plan values. The following example - Figure 130– shows the accumulated
values of 2 test suites. All 2 test suites contain 134 in sum, therefore 134 test
cases were “planned”. 124 test cases were executed and 10 test cases were not
executed.
Page 114
User Manual
Edition January 2015
TEMPPO V6.1
Description of Use
Figure 130 - Execution progress of several test suites – chart example 1
In the following example Test Suites is selected for x-axis and Execution
Time. You can see that the “Planned execution time” is much higher than the
actual one (sum of passed and failed). A test manager can also observe a large
amount of remaining test time (not executed ones).
Page 115
User Manual
Edition January 2015
TEMPPO V6.1
Description of Use
Figure 131 - Execution progress of several test suites – chart example 2
3.1.5.5.2.1.1 Detailed data
Tab Detailed data shows the data table which can be exported to csv.
Not all combinations display valid values
Input values
Output values
x-axis
y-axis
Group by
Action x-axis
Action y-axis
Test Suite
Test Case
-
Test case IDs
Result per test
suite
Test Suite
Execution
Time
-
-
-
Tester
Execution
Time
-
-
-
Page 116
User Manual
Edition January 2015
Tester
3.1.5.5.2.2
TEMPPO V6.1
Description of Use
Test Case
-
Test case IDs
Result per tester
Filtered
If a test suite is opened and menu item Execution Progress > Filtered… is
activated, Figure 133 is shown.
By pressing the button Select Test Suites Figure 132 is displayed, where you
can set a filter and select from the test suite tree with the mouse together with
<CTRL> pressed the suites to be displayed.
Figure 132 – Select Test Suites
If you want to display several consecutive versions you have to select the first
one, keep holding the <SHIFT> key and select the last one in the tree (normal
selecting behavior).
The following chart types are available:
Horizontal bar chart
Horizontal bar chart (3D)
Line chart
Stacked horizontal bar chart
Stacked horizontal bar chart (3D)
Stacked vertical bar chart
Stacked vertical bar chart (3D)
Vertical bar chart
Vertical bar chart (3D)
With the radio button Orientation you can display the description of the x-axis
either vertically or horizontally.
The data can be switched from absolute to relative and vice versa.
Page 117
User Manual
Edition January 2015
TEMPPO V6.1
Description of Use
Using the checkboxes Results the chart can be customized.
By pressing the button Save As… the chart can be saved as jpg or png file.
Figure 133 – Text Execution Progress Filtered - Chart
If you activate the tab Data, the values are displayed as table and be saved as
CSV file.
Page 118
User Manual
Edition January 2015
TEMPPO V6.1
Description of Use
Figure 134 – Test Execution Progress Filtered – Data
3.1.5.5.2.3
Requirements only
You create a requirement analysis chart of several test suites by activating
Evaluation > Progress charts -> Execution -> Requirements only..., if at
least a test structure is opened. It is only possible to create a test suites chart of
a single test structure.
When opening that analysis, the chart is empty and you can select the test suites
in a window that opens if you press the button Select Test Suites.
Page 119
User Manual
Edition January 2015
TEMPPO V6.1
Description of Use
Figure 135 - Select test suites
Additionally you have to select the requirement structures by pressing the button
Select Structures.
Figure 136 - Select requirement structures
Each time you change anything on test suites or requirement structure selection
button Refresh get enabled. If you press button Refresh chart is refreshed.
Figure 137 - Requirement analysis over several test suites: Chart
Tab chart:
The following chart types are available:
Horizontal bar chart
Horizontal bar chart (3D)
Stacked horizontal bar chart
Stacked horizontal bar chart (3D)
All test cases of the selected test suites with links to the selected requirement
structures are cumulated together. This means that one same test case is
counted as often as it occurs in the test suites.
On the other all requirements without any link to test cases are displayed.
Page 120
User Manual
Edition January 2015
TEMPPO V6.1
Description of Use
By pressing the button Save As… the chart can be saved as jpg or png file.
Tab Data:
In tab Data number of test results are displayed as table and exported to csv.
Figure 138 - Requirement analysis over several test suites: Data
In tab Detailed Data for each requirement a column Requirement Structure
and columns for test results with the TC IDs are displayed. For each result cell a
list of comma separated values is shown as follows:
<test case ID>-<test suite name>-<test structure version>,
<next test case ID>-<test suite name>-<test structure version>,...
Page 121
User Manual
Edition January 2015
TEMPPO V6.1
Description of Use
Figure 139 - Requirement analysis over several test suites: Detailed Data
3.1.5.6 Reporting
TEMPPO Test Manager offers a reporting feature, which allows you to create
flexible textual and graphical reports from your test structures and test suites. A
test structure or test suite report can be created from any node within the
structure, even from a single test case.
Reports on current select node (root, TP, TC) in a test structure or test suite can
be opened via the context menu Report selected.
Reports of several test structures versions or test suites are called by the menu
item Evaluation -> Progress charts.
The following reports are possible:
If a test structure is opened, reporting for test structure is opened via
Evaluation > Report selected > Opened Test Structure.
If a test structure is opened, reporting for more test suites is opened via
Evaluation > Report selected > Several Test Suites.
If a test suite is opened, reporting for test suite is opened via Evaluation
> Report selected > Opened Test Suite.
If a test structure is opened, reporting for more test suites is opened via
Evaluation > Report selected > Several Test Suites.
Different report settings can be defined for user level and for projects. In tab
Personal settings, the user sees its own defined settings and in tab Project
settings, all settings defined for this project are visible.
Page 122
User Manual
Edition January 2015
TEMPPO V6.1
Description of Use
Figure 140 – Report settings
With the buttons on the right side, you can add, change and remove settings:
New / Edit
see 3.1.5.6.1
Delete
Setting(s) are deleted.
Copy to other settings
Copy the selected setting(s) to other settings.
Example: Select a setting in tab personal setting and press button. In tab project
setting, the copied setting is added.
Import from another project
see 3.1.5.7
Export to XML file
see 3.1.5.8
Import from XML or TRP-file
see 3.1.5.9
With the buttons below, you can save the report to directory or create a preview.
Pressing Save Report, a file dialog opens where the directory has to be defined
and then report is created.
3.1.5.6.1 New / Edit
When pressing the button New or Edit a new window opens, for set the
properties for creating a report (see Figure 141).
Page 123
User Manual
Edition January 2015
TEMPPO V6.1
Description of Use
Figure 141 – Report settings overview
The reporting functionality is divided into four main setting areas, where each of
them again is subdivided into several parts. The areas are described in the
following chapters.
3.1.5.6.1.1
General
In the general settings area you define the rough layout and contents of your
report.
Components
Here you choose the components your report shall contain. Dependent on your
selection the tree is changed for doing the relevant settings. The following
components are available:
- Title Page
- General Information about Test Structure
- Text
- Charts
- Progress Chart
Additionally you have to select the layout:
Continuous or Tabular
and the Format for the report:
HTML, Microsoft Word or Microsoft Excel
Page 124
User Manual
Edition January 2015
TEMPPO V6.1
Description of Use
Figure 142 – Reporting: General
If Microsoft Excel is selected,
you can define a header and a footer within the settings.
Inline images aren’t reported, since Microsoft Excel doesn’t support it.
If HTML is selected, reports known from prior TEMPPO versions (5.6 or lower)
can be saved.
Please, consider that Microsoft Word limits the width of pages to
22 inches (http://support.microsoft.com/?scid=kb%3Benus%3B95109&x=14&y=10)
Title Page
You can customize the title page of your report here, which can contain a title,
project name, status, the name of the author and the current date.
Header / Footer
You can customize the header and footer for you report. There are buttons for
using the defined keys for page number, date, time etc.
Page 125
User Manual
Edition January 2015
TEMPPO V6.1
Description of Use
Figure 143 – Report: General Settings
3.1.5.6.1.2
Text
Text settings are relevant for the textual data contained in your report and how
they are displayed.
General Text Settings:
Page 126
User Manual
Edition January 2015
TEMPPO V6.1
Description of Use
First you can choose the Layout, if you want your data to be displayed in
continuous text or table format.
Furthermore you can set Format options:
- (Do not) ignore information fields with empty values
- (Do not) generate heading numbers
You can limit the size of your report by defining the depth absolutely. You can
use the slider to limit the reported test structure or test suite tree depth to a
fixed level.
You can add Summary information about your test package by checking
Number of Test cases and/or Test Steps. The amount of contained test cases/
test steps will be reported for each test package, either in absolute form or by
percentage.
Finally you have the possibility to Generate heading numbers in your report.
Figure 144 – Report: General Textual Settings
Continuous Report: Test Package, Test Case, Test Case Attributes, Test
Result Attributes, Test Step, Requirements
For each reported object you can define, which data the report shall contain.
If you don’t want to show Test Packages, Test Cases, Test Case Attributes, Test
Result Attributes, Test Steps or Requirements, click on the checkbox above the
lists.
Multi select allows “moving” several values to the right part of the window.
Page 127
User Manual
Edition January 2015
TEMPPO V6.1
Description of Use
Page 128
User Manual
Edition January 2015
TEMPPO V6.1
Description of Use
Page 129
User Manual
Edition January 2015
TEMPPO V6.1
Description of Use
Figure 145 – Report, Textual Settings
Tabular Report: Test Package, Test Case with its attributes,
Requirements and Test Step
If you don’t want to show Test Packages, Test Cases, Test Steps click on the
checkbox above the table.
Multi select allows “moving” several values to the right part of the window. For
unselecting a column, double-click on it or open context menu and press remove.
Additionally you can define the sequence of columns by swapping the column
headers and for defining the width of columns in the report you have to move
the border of columns.
For each requirement structure the attributes can be reported selectively.
If you do not want to report requirement attributes in general right click on
header and deselect “Requirement attributes”.
Page 130
User Manual
Edition January 2015
TEMPPO V6.1
Description of Use
Page 131
User Manual
Edition January 2015
TEMPPO V6.1
Description of Use
Page 132
User Manual
Edition January 2015
TEMPPO V6.1
Description of Use
Figure 146 – Tabular Report
3.1.5.6.2 Report of several test suites
When selecting the menu item Evaluation > Report selected > Several Test
Suites, Figure 147 is displayed. Reports for several test suites are test structure
wide. Therefore such a personal report setting can only be provided to other test
structure users.
Figure 147 - Report setting - test structure wide
When
creating or editing a report setting, Figure 148 is displayed, where you can
Select the test suites of a test structure
Set a filter for these test suites and
Specify the report itself
Limitations: It is only possible
to specify tabular reports as Excel or HTML.
Page 133
User Manual
Edition January 2015
TEMPPO V6.1
Description of Use
to select Result – current and Result – current and history for a test
case
Figure 148 - Report of several test suites: Settings
Figure 149 - Report of several test suites: suite selection
Page 134
User Manual
Edition January 2015
TEMPPO V6.1
Description of Use
Figure 150 - Report of several test suites: Filter
Page 135
User Manual
Edition January 2015
TEMPPO V6.1
Description of Use
Additionally to standard reports you select General Information of Report
which displays the selected
test suites
selected filter
Figure 151 - Reported information
Figure 152 - Report of several test suites: General
Page 136
User Manual
Edition January 2015
TEMPPO V6.1
Description of Use
3.1.5.6.3 Chart Settings
In the charts settings area you can customize the charts added to your report,
which represents the data of your test structure or your test suite in a graphical
way.
It is possible to add more charts to your report by right
mouse click on chart and activate Add new chart. By
selecting a chart, right mouse click and activating Remove
chart, a chart can be removed except the last one. By
selecting a chart, right mouse click and activating Rename
chart or double click, a char can be renamed.
Data Selection:
Choose units for the y- and x-axis and optionally a value subdivision.
Y-axis: sum of test packages, sum of test cases (default) or sum of test
steps can be displayed.
X-axis: test packages of first level, designer, date, priority, situation,
state, type, test levels and result (only for test suite report) can be applied.
If date is selected, the time period considered must be specified.
Furthermore the time unit can be adjusted (day, week, month, year).
Group by: is used for subdividing the values displayed on the y-axis. The
selection possibilities are the same as for x-axis.
Chart: The following charts are available: Horizontal Bar Chart, Horizontal
Bar Chart (3D), Line Chart, Stacked Horizontal Bar Chart, Stacked
Horizontal Bar Chart (3D), Stacked Vertical Bar Chart, Stacked Vertical Bar
Chart (3D), Vertical Bar Chart, Vertical Bar Chart (3D)
Orientation:
You can choose the orientation of the labels on the x-axis.
Representation:
Data can be represented absolutely or relatively (use option buttons at bottom
right). If Accumulate is activated, data on y-axis is displayed accumulated.
Time Settings:
If you select in x-axis and/or Group by a date / time attribute, you can configure
the chart by setting a start and an end date. Additionally the units (days, weeks,
months or years) can be set.
Page 137
User Manual
Edition January 2015
TEMPPO V6.1
Description of Use
Figure 153 – Report: Chart Settings
3.1.5.6.4 Previewing and Saving
You can either preview the report that will be generated or immediately save it to
an Word or Excel-file (Button Preview).
Depending on the size of your test structure / test suite and
network speed, the generation of the report (preview or file)
may take a while, because a lot of data must be loaded from
the database.
Since TEMPPO 5.7 report preview is displayed in Microsoft Word or Microsoft
Excel.
Page 138
User Manual
Edition January 2015
TEMPPO V6.1
Description of Use
Figure 154 – Report: Word
Figure 155 – Report: Excel
Page 139
User Manual
Edition January 2015
TEMPPO V6.1
Description of Use
3.1.5.6.5 Sample Charts
Test case creation progress (test structure):
Graphical settings
Y-axis:
Sum of test cases
X-axis:
Created
Group by:
State
Date-Unit:
1 Month
Accumulate Data:
yes
Display data:
absolute
Chart Selection:
3D Stacked Bar Chart
Figure 156 - Test case creation progress
Test case creation overview (test structure):
Graphical settings
Y-axis:
Sum of test cases
X-axis:
Test packages of first level
Value subdivision: State
Display data:
absolute
Chart Selection:
3D Stacked Bar Chart
Page 140
User Manual
Edition January 2015
TEMPPO V6.1
Description of Use
Figure 157 - Test case creation overview
Test execution progress graph
Graphical settings
Y-axis:
X-axis:
Value subdivision:
Date-Unit:
Accumulate Data:
Display data:
Chart Selection:
(test suite):
Sum of test cases
Tested
Result
1 Day
no
absolute
Line Chart
Page 141
User Manual
Edition January 2015
TEMPPO V6.1
Description of Use
Figure 158 - Test execution progress graph (within one Test Suite)
3.1.5.6.6 Report Templates
Some report templates are provided in your TEMPPO installation directory. These
are mainly templates for
Test plan and
Test execution report
3.1.5.7 Import from another projects
You can import report settings from another project. You have to press the
button Import report setting from another project then the following window
opens:
Figure 159 – Import from other project
Select a report setting and then this setting is added to the actual setting.
3.1.5.8 Export to XML
For exchange you can export your report settings to an XML file. Press the button
Export report setting to XML file and then a file dialog opens. After selecting
the path and file name, press Save. Then the file is exported to XML.
Page 142
User Manual
Edition January 2015
TEMPPO V6.1
Description of Use
3.1.5.9 Import from XML / TRP file
For importing report settings, press the button Import report setting from
XML or TRP file and then the following file dialog opens:
Figure 160 – Import report settings
In the file dialog you can set the type of file to .trp or .xml. After selecting a file and pressing
open, report setting is imported to TEMPPO.
3.2 Multi user ability
Multi user ability establishes an environment for working with several users in a
parallel way on the same test structure or suite. It prevents unintentional
overriding of changes, manages the synchronization between viewed and stored
data and avoids inconsistency, if multiple users work on the same database.
Moreover it provides features to facilitate the collaboration in a team working on
the same TEMPPO Project.
Chapter 3.2.1 describes the behavior when locking and editing an item. On the
other hand chapter 3.2.2 illustrates the 2 possibilities of refreshing (manual,
automatic).
Multi user ability is not supported for MS Access databases.
3.2.1 Lock modes
TEMPPO provides 2 possibilities of locking items (test packages, test cases):
Manual lock
Automatic lock
If you are working with manual lock mode, you always have to press the button
Lock before having the exclusive right to work on that item.
On the other hand you simply have to select an item and it is automatically
locked, if another user does not lock it.
This feature can be configured in TEMPPO settings:
Page 143
User Manual
Edition January 2015
TEMPPO V6.1
Description of Use
Figure 161 - Settings->Database->Locking
The following chapters are describing the locking in manual mode!
3.2.1.1 Find locks – unlock
Figure 162 - Test structure - Find locks
In principle TEMPPO differs between 2 locks: User locks (e.g. select a TP, TC) and
locks caused from exports (see 3.1.4.7.1). The following lock types are possible:
Test case
Test package
Test result (test case in test suite)
Test suite (root)
Test structure (root)
Version
Locks can be found either in the test structure or test suite
Page 144
User Manual
Edition January 2015
TEMPPO V6.1
Description of Use
Test structure:
When activating the menu item Find locks (menu test structure), Figure
162 is displayed. By selecting one or more locks and pressing the button
Unlock selected elements locks can be removed.
Test suite:
When activating the menu item Find locks (menu test suite), Figure 162
is displayed. By selecting one or more locks and pressing the button
Unlock selected elements locks can be removed.
If the corresponding user that still believes in his locked items presses the button
Save, he will get the following message, that the lock have be removed in the
meantime.
Figure 163 - Lock deletion message
When closing the window by pressing OK, he can only discard his changes!
3.2.1.2 Showing a lock state
The locking state of the item is shown by:
Special padlock icon (green: locked by the current user, yellow: locked by
another user or due to an exported test suite).
Tool Tip “Locked by <user>
Page 145
User Manual
Edition January 2015
TEMPPO V6.1
Description of Use
Figure 164 - Lock button
3.2.1.3 Creating a version
There a different ways for creating a new version, e.g. check in of a version or
creating a new branch (for test suite). During the creation process the current
version is locked so that no other user can create a version based on the same
version. Is the version already locked, the following dialog is shown.
Figure 165 – Version locked
3.2.1.4 Creating a test suite
You can only create a new test suite, if the test structure and all of its items are
not locked. Otherwise you cannot create a test suite and you will get the
following dialog (see Figure 166), after pressing the Finish button on the test
suite wizard:
Figure 166 - Test structure locked
3.2.1.5 Finding invalid locks
On starting and quitting TEMPPO, the whole database is checked for any locks
which were set by you. Normally there should be no one left. But if there is one
Page 146
User Manual
Edition January 2015
TEMPPO V6.1
Description of Use
(see Figure 167), this is an invalid lock, which can have two reasons: Either you
are currently running a second TEMPPO Test Manager, or your last TEMPPO
session terminated abnormally (crash etc.). If so, you should confirm the dialog
by pressing “Yes” to remove all invalid locks.
Figure 167 – Locks found in the database on starting/quitting TEMPPO
3.2.2 Refreshing
3.2.2.1 Refreshing manually
3.2.2.1.1 Reloading the whole test structure / test suite
You can reload the whole test structure / test suite by pressing the reload button
on top of the tree (see Figure 168). This has the same effect as manually
reopening the test structure / test suite.
Figure 168 - Button Reload for reloading the whole tree
3.2.2.1.2 Refreshing recursively
You can refresh an item including all sub-items by selecting the “refresh
recursive” function in the context menu (see Figure 169).
Attention: The selected item with all sub-items will be completely (re)loaded
from the database, so it may take a long time.
Page 147
User Manual
Edition January 2015
TEMPPO V6.1
Description of Use
Figure 169 - Refresh recursive menu (also in the context menu)
3.2.2.1.3 Refreshing on certain user actions
An item is automatically refreshed (including its lock state and the presence of all
direct children) after the following actions:
selecting in the tree view
pressing the Lock button
If these actions are done on an actually deleted item, the following dialog is
shown and the item is removed from the view.
Figure 170 - Deleted item information (after trying to select or to lock)
3.3 General principles and
user prompting
3.3.1 Inline images
In any text fields you can mix up text with pictures (images). When you click in a
text field, followed by right mouse button, you can activate the menu item
Insert image and a window (Figure 171) opens where you can either select
png, bmp, jpg or jpeg files from the files system or any existing ones from the
data base.
Page 148
User Manual
Edition January 2015
TEMPPO V6.1
Description of Use
Figure 171 - Insert image
After pressing OK the image is automatically uploaded to database and displayed
in the text field.
Cut, copy, paste functions on images are possible.
Figure 172 - Inline images
3.3.2 Multi-selection Mode
TEMPPO offers a feature for multi select test packages and test cases in test
structures and test suites.
The multi-selection mode can be used for:
Assigning attributes / requirements preconditions in the test
structure
Page 149
User Manual
Edition January 2015
TEMPPO V6.1
Description of Use
Assigning test result attributes in the test suite
Moving ownership in the test structure
Deleting in the test structure
Setting test results in the test suite
When the multi-selection mode is activated the items aren’t locked automatically.
They are only locked during the time for saving. If items are locked by other
users the changes are not applied to these items. They are displayed in a list.
3.3.2.1 Multi-selection
The multi-selection mode is activated when more than one item is selected.
If a user selects at least 2 items, the right side (=detailed view) is completely
empty.
The user can only activate the multi-selection mode when he has
the right.
In an opened test structure test packages and test cases can be selected.
In a test suite only the test case can be selected. Multi-selection for test
packages is not possible.
A multi-selection can be done by using different keys:
Select all
For selecting all, press <Ctrl> and <A>. The user can also activate the context
menu Select All (Figure 173) or the menu item Edit Select All.
Figure 173 – context menu – “Select All”
The whole sub tree of the selected test structure or test package(s) can be
selected (see Figure 174).
Page 150
User Manual
Edition January 2015
TEMPPO V6.1
Description of Use
Figure 174 – Selection with <Ctrl> + <A> or menu “Select All”
If a test package without children is selected when pressing Select all then
nothing changes.
Test packages and test cases can be selected with <Ctrl> (see Figure 176) or
with <Shift> (see Figure 177). After pressing Select all sub trees of the test
packages and the selected test cases are marked (see example at Figure 175)
Page 151
User Manual
Edition January 2015
TEMPPO V6.1
Description of Use
Figure 175 – Before and after “Select all”
Select non contiguous
For selecting non contiguous, press <Ctrl> and select test packages and/or test
cases. A test package is selected itself and not its sub tree, i.e. without children
(see Figure 176).
Page 152
User Manual
Edition January 2015
TEMPPO V6.1
Description of Use
Figure 176 – Selection with <Ctrl>
Select contiguous
First, select a test package or test case, then press <Shift> and select a test
package or test case. The items from the first selected item to the last item are
selected, but only the visible items are selected, see Figure 177.
Figure 177 – Selection with <Shift>
With pressing <Shift> and <Alt> the not visible items are selected, too. The tree
is expanded and the items are selected, see and Figure 178.
Page 153
User Manual
Edition January 2015
TEMPPO V6.1
Description of Use
Figure 178 – Tree after selection with <Shift> + <Alt> (in Test Suite)
There are two ways for deselecting:
Deselect all
Click on any item and the right side changes to the detailed view of this item.
Deselect single item
Press <Ctrl> and click on a selected test package or test case.
If the user has finished his selection, he activates the context menu item Show
Details (see Figure 179) and the tabs with the content of the selected items is
shown on the right side (see Figure 180).
The TEMPPO Designer Task Package and test cases generated by
TEMPPO Designer (IDATG) cannot be changed and therefore also
not in multi selection mode. If such an artifact is selected, the
menu item Show Details is deactivated!
Figure 179 – Show Details
Page 154
User Manual
Edition January 2015
TEMPPO V6.1
Description of Use
Figure 180 - After “Show Details”, content is shown
3.3.2.2 Multi selection merge (of unchanged TPs
and TCs)
A so called “Multi selection merge” is done based on the current selection of
unchanged TPs and TCs.
Please do not mix this feature with the merge of all changed
items!
If you press the button Merge, all items are merged to the latest version after
pressing the Yes in Figure 180.
Figure 181 – Merge information
After finishing merge a result summary is displayed to the user (see Figure 182).
It is not possible to merge an item, if its father item doesn’t exist
in the latest version.
Page 155
User Manual
Edition January 2015
TEMPPO V6.1
Description of Use
Figure 182 - Merge summary
3.3.2.3 Display of assigned attributes and
requirements
3.3.2.3.1 Test Structure
After activating the menu item Edit > Show Details two tabs Test Package
and Test Case are displayed. Tab Test Package with the sub-tabs General
and Requirements and tab Test Case with the sub-tabs Attributes and
Requirements that contain 3 sub-tabs for own attributes/requirements,
inherited attributes/requirements and the inheritance state.
If at least two test packages and no test case are selected, the tab Test Case is
disabled. If at least two test cases and no test package are selected, the tab
Test Package is disabled.
Page 156
User Manual
Edition January 2015
3.3.2.3.1.1
TEMPPO V6.1
Description of Use
Test Case, tab Attributes
The tab Attributes contains 3 tabs Direct linked Attributes, Inherited
Attributes and Inheritance.
Tab Direct linked Attributes displays the
attributes which are directly linked to a test
case.
Type and Situation (radio buttons):
If all selected test cases have set the same
value, the value is selected ( ), otherwise
there is no selection ( ).
Priority and State (combo boxes):
If all selected test cases have set the same
value, the value is displayed, otherwise the selection is empty (
).
Additional Test Levels and Attribute Values:
The values that are assigned to all selected test cases are displayed as usual
(white background color). The values that are not assigned to all test cases are
displayed in a special color (grey background color). If you want to assign such
an attribute to all TCs, select it, right mouse click and activate
. Such attributes or new assigned attributes are displayed in
red color.
Tab Inherited Attributes displays common
state of TCs which have inherited attributes
from a TP.
Radio buttons: If all selected test cases with
activated inheritance have set the same value,
the value is selected ( ), otherwise there is
no selection ( ).
Combo boxes: If all selected test cases with
activated inheritance have set the same value,
the value is displayed, otherwise the selection
is empty (
).
Additional Test Levels and Attribute Values:
The values that are assigned to all selected test cases are displayed as usual
(white background color). The values that are not assigned to all test cases are
displayed in a special color (grey background color)
The tab Inheritance displays the common
state of the inheritance flag of the selected
TCs. If the checkbox is not activated
(
), all selected TCs do not have any
inherited attributes. If the checkbox is
activated (
), all selected TCs inherit
their attributes. If the checkbox looks like
the common state is mixed: TCs with and without inherited attributes.
Page 157
User Manual
Edition January 2015
3.3.2.3.1.2
TEMPPO V6.1
Description of Use
Test Case, tab Requirements
The tab Requirements contains 3 sub-tabs: Direct linked Requirements,
Inherited Requirements and Inheritance.
Tab Direct linked Requirements displays the
requirements which are directly linked to a test case.
Requirements assigned to all selected test cases are
displayed as usual in white background color.
Requirements assigned to not all test cases are
displayed in a special color (grey background color).
If you want to assign such a requirement to all
selected TCs, select it and activate the context menu
. It is displayed in red color as well
as new linked requirements.
The tab Inherited Requirements displays the
requirements which are inherited from test
packages. Requirements assigned to all selected test
cases are displayed as usual in white background
color. Requirements assigned to not all test cases
are displayed in a special color (grey background
color). Of course, it is not possible to edit anything
here.
The tab Inheritance displays the common
state of the inheritance flag of the selected
TCs. If the checkbox is not activated
(
), all selected TCs do not have any
inherited requirements. If the checkbox is
activated (
), all selected TCs have at
least one inherited requirement. If the
checkbox looks like
the common state is mixed: TCs with and without
inherited requirements.
3.3.2.3.1.3
Test Case, tab Precondition
The tab Precondition does not display the
common state of Precondition of the selected
TCs. You can enter a precondition which can be
applied to all selected TCs containing an empty
precondition. Additionally you can set a flag
“Override existing Precondition”.
3.3.2.3.1.4
Test Package, tab General
This tab is reduced to the combo box for test
category. If all selected test packages have
set the same value, the value is displayed. If
there are test packages with different test
categories, an entry with Several Categories is selected. If there is no
selection, an empty entry is selected.
Page 158
User Manual
Edition January 2015
3.3.2.3.1.5
TEMPPO V6.1
Description of Use
Test Package, tab Attributes
The tab Attributes contains 3 tabs Direct linked Attributes, Inherited
Attributes and Inheritance.
Tab Direct linked Attributes displays the
common state of all selected TPs that have
not set the inherit flag.
Type and Situation (radio buttons): If all
selected TPs without inherit flag have set the
same value, the value is selected ( ),
otherwise there is no selection ( ).
Priority and State (combo boxes): If all
selected TPs without inherit flag have set the
same value, the value is displayed, otherwise
the selection is empty (
).
Additional Test Levels and Attribute
Values:
The values that are assigned to all selected test TPs are displayed as usual
(white background color). The values that are not assigned to all TPs are
displayed in a special color (grey background color). If you want to assign such
an attribute to all TPs, select it, right mouse click and activate
. Such attributes or new assigned attributes are displayed in
red color.
Tab Inherited Attributes displays common
state of TPs which have inherited attributes
from a TP.
Radio buttons: If all selected TPs with
activated inherit flag have set the same value,
the value is selected ( ), otherwise there is
no selection ( ).
Combo boxes: If all selected TPs with
activated inherit flag have set the same value,
the value is displayed, otherwise the selection
is empty (
).
The tab Inheritance displays the common
state of the inheritance flag of the selected
TPs. If the checkbox is not activated
(
), all selected TPs do not inherit any
attributes. If the checkbox is activated
(
), all selected TPs inherit their
attributes. If the checkbox looks like
the common state is mixed: TPs with and without attribute
inheritance.
Page 159
User Manual
Edition January 2015
3.3.2.3.1.6
TEMPPO V6.1
Description of Use
Test Package, tab Requirements
The tab Requirements contains 3 sub-tabs: Direct linked Requirements,
Inherited Requirements and Inheritance.
Tab Direct linked Requirements displays the
requirements which are directly linked to a TP.
Requirements assigned to all selected TPs are
displayed as usual in white background color.
Requirements assigned to not all TPs are displayed
in a special color (grey background color). New
requirements are displayed in red color. If you want
to assign such a requirement to all selected TPs,
select it and activate the context menu
. Such requirements or new
displayed in red color.
linked
requirements
are
The tab Inherited Requirements displays the
common state of selected TPs which inherit their
requirements. Requirements assigned to all selected
TPs are displayed as usual in white background
color. Requirements assigned to not all TPs are
displayed in a special color (grey background color).
Of course, it is not possible to edit anything here.
The tab Inheritance displays the common
state of the inheritance flag of the selected
TPs. If the checkbox is not activated
(
), all selected TPs do not have any
inherited requirements. If the checkbox is
activated (
), all selected TPs have at
least one inherited requirement. If the
checkbox looks like
the common
state is mixed: TPs with and without inherited requirements.
3.3.2.4 Multi selection merge (of changed TPs
and TCs)
A so called “Multi selection merge (of changed TPs and TCs)” is done based on
the changed TPs and TCs of the current selection. Only the changed ones are
merged!
Please do not mix this feature with the merge of all items!
If you press the button Merge, all items are merged to the latest version after
pressing the Yes in Figure 183.
Page 160
User Manual
Edition January 2015
TEMPPO V6.1
Description of Use
Figure 183 – Merge information
After finishing merge a result summary is displayed to the user.
It is not possible to merge an item, if its father item doesn’t exist
in the latest version.
Figure 184 - Merge summary
Page 161
User Manual
Edition January 2015
TEMPPO V6.1
Description of Use
3.3.2.4.1 Test Suite
After activating the menu Edit > Show Details the tab Attributes TR is
displayed.
tab Attributes TR (see Figure 185)
The attribute values that are assigned to all selected test cases are displayed as
usual. The attribute values assigned to not all test cases are displayed in a
special color (grey background color). New added attributes are displayed in red
color.
Figure 185 – Attributes TR
3.3.2.4.2 Filter in multi-selection mode
If there is a multi-selection and a filter is set, only those items that match are
considered. If the items of the multi-selection are still shown, they are selected
again (see Figure 186 and Figure 187).
The Show Details menu item has to be activated again, because the selection
has changed.
Page 162
User Manual
Edition January 2015
TEMPPO V6.1
Description of Use
Figure 186 – No filter
Figure 187 – Set Filter
Page 163
User Manual
Edition January 2015
TEMPPO V6.1
Description of Use
3.3.2.5 Setting new assignments
The user can set or remove attributes values or requirements to / from the
selected items. If any changes are made, the buttons Apply and Discard get
enabled.
Values of radio buttons and combo boxes:
If a value is set and the button Apply is pressed, all selected items get that
value. If no value is set, nothing changes.
Values in lists:
“Common values” can be set and removed. The assignment of additional test
levels, attribute values and requirements to the selected items is done analogue
to the assignment of these values to a single item with the assignment dialog
(see Figure 188). A new common value is written in red with a white background
color (see Figure 189).
Figure 188 – Assignment dialog
Page 164
User Manual
Edition January 2015
TEMPPO V6.1
Description of Use
Figure 189 – New common values
“Not common values” displayed in grey can only be removed. But if a user wants
to apply a “grey” value to all selected items, he activates the button Assign to
all test cases. Then this value is written in red with a grey background color
(see Figure 190).
Page 165
User Manual
Edition January 2015
TEMPPO V6.1
Description of Use
Figure 190 – Assign to all test cases
If the button Apply is pressed, all common values (white background color and
red foreground color) are set for the selected items. All values that have been
removed on the GUI will be removed from the selected items.
Changes are not applied to locked items, which are displayed in a list (see Figure
191).
Figure 191 – Locked Items…
If the button Discard is pressed, all changes in all tabs will be discarded.
Page 166
User Manual
Edition January 2015
TEMPPO V6.1
Description of Use
3.3.2.6 Move Ownership
Now the function “move ownership” can be applied for any number of selected
test cases and test packages, but the right has to be considered.
Figure 192 – Context menu – Move Ownership
Figure 193 – Move ownership
After the process moving the ownership, a summary is shown (see Figure 194).
Figure 194 - Summary
If the user doesn’t have the right to move the ownership of foreign items or the
item is locked, a list of items is displayed (see Figure 195). These items aren’t
changed.
Page 167
User Manual
Edition January 2015
TEMPPO V6.1
Description of Use
Figure 195 – Locked Items…
3.3.2.7 Delete
This function is now available for any number of selected test cases or test
packages, but the user has to have the right.
Figure 196 – Context menu - delete
Figure 197 – Acknowledgement for deleting
After the acknowledgement of the user the delete process starts. If the items are
locked or the user doesn’t have the right to delete “foreign” items, a list of these
items which couldn’t be removed is displayed (see Figure 198).
Page 168
User Manual
Edition January 2015
TEMPPO V6.1
Description of Use
Figure 198 – Locked Items…
3.3.2.8 Set test results
The function “Set Result(s)” can be applied either for a whole sub tree or for
any number of selected test cases. Activate Set Result(s) in the context menu
(see Figure 199) and afterwards Figure 200 is shown.
Figure 199 – Context menu – Set Result(s)
Page 169
User Manual
Edition January 2015
TEMPPO V6.1
Description of Use
Figure 200 – Set Result(s)
You can choose one result and optionally set the checkbox Overwrite existing
results and after clicking Apply all test results are set.
If other users have locked test cases, it is not possible to set the
result, of course. You will be informed if results couldn’t be set
(see Figure 201).
If a test case contains no test steps, it remains “not executed”.
Figure 201 – Information message
3.3.3 Hyperlinks and Uploads
Generally you can mark text as
Hyperlink to the web
Hyperlink to a file
Hyperlink to an upload
Hyperlink to a test automation tool or command
Hyperlink to a test case
3.3.3.1 Creating hyperlinks
Hyperlinks to the web, to the file system, to uploads, to a test automation tool,
to a command or to a test case can be created for the following text fields
Description (project, test structure, test package)
Precondition (test package, test case)
Postcondition (test package, test case)
Test goal (test case)
Instruction, input, expected (test case)
Result output, actual result, bug ID (test case in test suite)
Page 170
User Manual
Edition January 2015
TEMPPO V6.1
Description of Use
Figure 202 - Menu hyperlink
For creating a hyperlink it is necessary to select at least one character in editable
text fields and activate the context sensitive menu Hyperlink (see Figure 202),
which opens the Hyperlink window (see Figure 203).
Figure 203 - Hyperlink to the web
You have the possibility to enter a link to the web (specified by an HTTP address)
or to the file system (see Figure 204).
Figure 204 - Hyperlink to the file system
In case of changing drive letters, moving file shares and other similar problems it
may be better to upload the files to the database. For referencing an upload you
have 2 possibilities: you can upload a new file or use an existing one and create
a reference on it. The philosophy of this concept is to upload a file only once and
create more references on it (if necessary).
Page 171
User Manual
Edition January 2015
TEMPPO V6.1
Description of Use
Figure 205 - Upload properties
Upload a new file: You have to activate the Upload button to open Figure 205
for specifying a special name and description. Additionally owner, creation
date, size, the number of references and the type are displayed.
Figure 206 - Hyperlink database
Use an existing upload: You have to activate tab database and press button
create reference to uploaded file to open Figure 207, which shows all uploads
of the database. For creating a new reference on an existing upload you simply
have to select it and click OK in Figure 207 and Figure 206.
Page 172
User Manual
Edition January 2015
TEMPPO V6.1
Description of Use
Figure 207 - Uploads
The upload limit of a file is set to 0.5 MB by default and is
specified in the file admin.properties
(dbsettings.upload.limit=500000). But it is only information. Of
course, you can upload files that exceed that limit and/or
change this value in admin.properties.
Figure 208 – File size exceeds the upload limit
The fourth possibility is that you create hyperlinks with parameters:
by a test automation tool
or a command defined in settings (see 3.3.21.2.10)
which is selected in the first combo box.
Hyperlink with a test automation tool are defined like automated test cases. You
have to define a file and (optional) additional arguments (for more details see
3.1.3.1.6).
Pressing on the hyperlink defined with a test automation tool, executes the link
and then a message box is shown with the result.
Page 173
User Manual
Edition January 2015
TEMPPO V6.1
Description of Use
Figure 209 – Hyperlink test automation tool
Hyperlink with a command can be defined with additional arguments.
Pressing on the hyperlink defined with a command, then the command is
executed and then a message box shows the output of the process.
Figure 210 – Hyperlink command
Hyperlink to test case is defined if a test case or test steps are reused in another
test case. E.g., if you create a test case “Login” with some steps that is used
other test cases, it can be referenced by hyperlinks from other test cases.
First of all you create a step, and select the text that becomes a hyperlink:
Page 174
User Manual
Edition January 2015
TEMPPO V6.1
Description of Use
Figure 211 - Source test case
Then click right mouse button for context menu, select Hyperlink” and select
the test case.
Figure 212 - Select test case
After pressing the OK button, the selected test case is displayed by its ID, when
moving the mouse over the hyperlink.
Page 175
User Manual
Edition January 2015
TEMPPO V6.1
Description of Use
Figure 213 - Referenced Test case ID
If you click on the hyperlink, the “destination” test cases is selected
automatically. Additionally a Back button (see Figure 214) is shown to return to
the “source” test case.
Page 176
User Manual
Edition January 2015
TEMPPO V6.1
Description of Use
Figure 214 –Referenced test case with “Back” button
3.3.3.2 Edit hyperlinks
If you select a hyperlink (web, file system, upload) and activate the context
sensitive menu (mouse over hyperlink) and choose the menu hyperlink, Figure
204 is shown, where you can change the
link into the web
link into the file system
upload
link for the auto tool
link with a command
link to another test case
3.3.3.3 Remove hyperlinks
If you select a hyperlink (web, file system, upload) and activate the context
sensitive menu (mouse over hyperlink) and choose the menu Remove
hyperlink, the hyperlink is removed. But take care that an upload remains in
the database.
To remove obsolete uploads, see chapter 5.4.5
3.3.3.4 Download an upload
If you select a hyperlink (upload) and activate the context sensitive menu
(mouse over hyperlink) and choose the menu Download, Figure 215 is shown to
select a directory for the file download.
Page 177
User Manual
Edition January 2015
TEMPPO V6.1
Description of Use
Figure 215 - Destination selection
3.3.4 Test Case Templates
Templates can be defined for test structures and test suites. For each test
structure exactly 1 test case template can be defined. For test suites belonging
to a test structure a template can be configured as well.
In the tab “Test Case Template” the test manager defines a basic test case. He
can configure standard attributes, define mandatory attributes or
determines if a test case has to be at least one link to a requirement. If these
conditions are not fulfilled the test case cannot be saved. For details see chapter
3.3.4.1
In the tab “Test Result Template” the test manager configures result
attributes for test case. If a tester records a result and a test result template is
activated, he has to add values for the mandatory attributes. For details see
chapter 3.3.4.2.
Page 178
User Manual
Edition January 2015
TEMPPO V6.1
Description of Use
3.3.4.1 Test case template
Figure 216 – Test Case Template: General
A Test Case template (TCT) supports testers to create and update test cases in
complete manner. For a TCT you can define
Mandatory fields (user has to enter a test goal, precondition,
postcondition, see Figure 216 and Figure 218
Default values for the fixed attributes, e.g. priority has to be “In work”,
if a test case is created, see Figure 217
Inheritance of UDAs and/or defining UDAs as mandatory or with a
default value, see Figure 217
Inheritance of requirements and/or linking at least 1 mandatory
requirement, see Figure 219
Default values for a planned tester and a planned execution time, see
Figure 220
A TCT is concerned in two cases in TEMPPO: When creating a new test case and
locking/editing an existing one.
You can activate a TCT for the use case of creating and updating test cases but
excluding the use case of viewing: clicking trough (= locking – unlocking) test
cases.
Page 179
User Manual
Edition January 2015
TEMPPO V6.1
Description of Use
You can activate a TCT (check) also for viewing existing test cases. E.g., if you
activate the TCT after creating some test cases that do not fulfill the conditions
and view them later, you cannot click another test case without fulfilling the TCT
(=leave a locked TC).
Figure 217 – Test Case Template: Attribute
Page 180
User Manual
Edition January 2015
TEMPPO V6.1
Description of Use
Figure 218 – Test Case Template: Test Step
Figure 219 – Test Case Template: Requirement
Page 181
User Manual
Edition January 2015
TEMPPO V6.1
Description of Use
Figure 220 – Test Case Template: Plan
3.3.4.1.1 Create new test case
If a TCT is activated and a new test case is created, the values of TCT are
applied:
fixed attributes are set automatically.
UDAs with default values (but without ticked checkbox Mandatory) are
assigned automatically
inheritance flag of requirements is (de)activated
inheritance flag of UDAs is (de)activated
default values for planned tester and planned execution time are set
automatically
The new created test case can only be saved (button Apply, clicking another test
case),
if a precondition is entered and the corresponding checkbox in TCT (see
Figure 218 – Test Case Template: Test Step) is ticked
if a postcondition is entered and the corresponding checkbox in TCT (see
Figure 218 – Test Case Template: Test Step) is ticked
if a test goal is entered and the corresponding checkbox in TCT (see Figure
216) is ticked
if at least one requirement is linked and the corresponding checkbox in
TCT (see Figure 219) is ticked
if an UDA plus value is assigned and the corresponding checkbox in TCT
(see Figure 217) is ticked.
Page 182
User Manual
Edition January 2015
TEMPPO V6.1
Description of Use
3.3.4.1.2 Unlock/save existing test case
An existing test case can be unlocked/saved without message,
if a precondition is entered and the corresponding checkbox in TCT (see
Figure 218) is ticked.
if a postcondition is entered and the corresponding checkbox in TCT (see
Figure 218) is ticked.
if a test goal is entered and the corresponding checkbox in TCT (see Figure
216) is ticked.
if checkbox Inherit in tab Requirement is activated and the
corresponding checkbox in TCT (see Figure 219) is ticked.
if at least one requirement is linked and the corresponding checkbox in
TCT (see Figure 219) is ticked.
if checkbox Inherit in tab Attributes is activated and the corresponding
checkbox in TCT (see Figure 217) is ticked.
If an UDA plus value is assigned and the corresponding checkbox in TCT
(see Figure 217) is ticked.
If a TCT is activated and a test case with missing e.g. default
attribute values is edited, those are not added automatically!
3.3.4.1.3 Test case template and filter
If
a TCT is activated and
a filter is set and
a new TC should be created and
the test case don’t fulfill the filter criterion
the test case cannot be created. You have to set the filter to “No filter” and
start again the creation progress.
3.3.4.2 Test result templates
A test result template supports you in test case execution. You can define a test
result as mandatory or set a default value, if a result is recorded.
Page 183
User Manual
Edition January 2015
TEMPPO V6.1
Description of Use
Figure 221 – Test result template
In Figure 221, test result attributes are defined. If you record a test result “TR1
= Release1” is assigned automatically and you have to specify a value for TR2.
Otherwise the test case cannot be saved.
3.3.5 Attribute activation
In some cases, attributes shouldn’t be assigned to test cases anymore because
they are invalid in future. In TEMPPO, available attributes can be restricted for
assignments, but assignments from past are still visible and can be used e.g. for
filtering.
Attribute activation can be defined for each test structure in tab Attributes, see
also Figure 222. If the check box for an attribute is greyed, the attribute is set in
template.
Only Superusers and TEMPPO Key Users are allowed to deactivate attributes.
Page 184
User Manual
Edition January 2015
TEMPPO V6.1
Description of Use
Figure 222 – Attribute activation
3.3.6 Requirement (Structure)
activation
In some cases, requirements shouldn’t be assigned to test cases anymore
because they are invalid in future. In TEMPPO, available requirement structures
can be restricted for assignments, but assignments from past are still visible and
can be used e.g. for filtering.
Requirement Structure activation can be defined for each test structure in tab
Requirement Structure -> (De)Activation, see also Figure 222. If the check
box for a requirement structure is greyed, the attribute is set in template.
Only Superusers and TEMPPO Key Users are allowed to deactivate requirement
structures.
Page 185
User Manual
Edition January 2015
TEMPPO V6.1
Description of Use
Figure 223 - Requirement Structure Activation
3.3.7 Move Ownership
Owner of an item is the user who creates this item. Move Ownership is offered
for the following items:
Requirement
Test Level
Test Category
Attribute
Upload
User Fields
Test Case
Test Package
Test Structure
Test Suite
For Move Ownership of Projects see 5.5.6.
For Metadata:
Select the corresponding metadata in the TEMPPO Administrator application.
Select the metadata you want to change and press the button Move ownership.
For Test Case, Test Package, Test Structure and Test Suite:
Select the item and click the menu item
Page 186
User Manual
Edition January 2015
TEMPPO V6.1
Description of Use
A list of all TEMPPO users is presented to the current user (see Figure 324 on
page 259). A new owner of the selected item can be chosen (see also 5.5.6).
3.3.8 Map of Meta Data (project wide
copy)
If parts of a test structure are copied from one project A to another project B,
the related metadata can be copied, too. At the beginning of the paste action the
user is asked, if metadata should be mapped, too (see Figure 224).
Figure 224 – Copy Meta Data
There you can choose from three possibilities to paste:
Copy without Meta Data: Only the selected part of the structure is copied,
but not the metadata.
Copy with Meta Data:
o Only those assigned to opened project: The selected part are copied
only with those metadata which are already assigned to the target
project.
o All used in selected sub tree: The selected part with all assigned
metadata is pasted to the project B. Metadata which is not yet
assigned to the target project are implicitly assigned to it.
The third possibility is disabled, if the user has not the right
“Copy All”.
After opening the window, the metadata types (checkboxes) are selected which
are used in the copied sub tree. You can also un-/ select each metadata which
should be pasted.
By clicking OK the items are added to the test structure.
3.3.9 Find and Replace
TEMPPO offers a find and replace mechanism. By pressing F3 or activating the
menu item Edit > Find and Replace Figure 225 is shown.
Page 187
User Manual
Edition January 2015
TEMPPO V6.1
Description of Use
Figure 225 – Find and Replace
The find/replace dialog includes two tabs, whereas the first one is for searching
in test cases, test packages and for requirements.
Both tabs provide the same features, the only different between this two tabs is
the different search-content.
A test case in a test structure can be found via searching for
user defined ID
name
test goal
precondition
postcondition
test step columns (instruction, input, expected)
user defined fields.
A test case in a test suite can be found additionally by its tester’s comment,
actual result and bug ID. Only the text fields tester’s comment, actual result
and bug ID can be replaced in test suites.
A test package in a test structure can be found via searching for
name
description
precondition
postcondition.
The search criteria can be specified using the wildcards * (0..n arbitrary
characters) or/and ? (exactly one arbitrary character) and is case sensitive.
The replace function searches for the test case and then the searched part will be
replaced to the entered name.
Example: You want to change the name of the test cases. The part “Test Case”
should be changed to the German name “Testfall”, so you select “Name” in
Search in and write in the text field for “Test Case”. In the Replace with –
text field you write “Testfall”.
Page 188
User Manual
Edition January 2015
TEMPPO V6.1
Description of Use
A searching direction can be chosen, too. The searching algorithm starts from the
selected node in the tree. Is the tree root selected, the whole tree is searched
whatever direction is selected.
Additionally you can decide between Simple or Whole word search in
combination w/o Case Sensitive mode.
3.3.9.1.1 Find (Test Case / Test Package)
There are three possibilities for finding test case(s)/ package(s):
Find Next: With clicking Find Next the first test case/package is searched
and selected in the tree. The first occurrence is marked, too. With the next
click, the next occurrence is marked. If there are no more occurrences in
the test case, the next test case/package would be searched. If there is no
element (anymore) a message is shown (see Figure 226).
Find Next Test Case/package: With clicking Find Next Test
Case/Package the first test case/package is searched selected in the tree.
The first occurrence is marked, too. With the next click, the next test
case/package is searched. If there is no element (anymore) a message is
shown (see Figure 226).
Figure 226 – No more occurrences found
List occurrences: With the button List occurrences the searching result is
shown in a list (see
Figure 227). When clicking a test case/package in the list, this
requirement is selected in the tree.
The button Replace all changes to Replace all occurrences when the
window List occurrences is opened. If you click Replace all
occurrences, all items of List occurrences are replaced.
If you click on Replace all (closed List occurrences window), all tree
items according to the search direction are replaced.
Figure 227 – List occurrences
3.3.9.1.2 Replace (Test Case / Test Package)
There are also two possibilities for replacing:
Replace: At first a test case/package is searched and selected. The user
has to click again for replacing the occurrence and then the next one is
Page 189
User Manual
Edition January 2015
TEMPPO V6.1
Description of Use
searched. If the test case/package is locked, the test case/package isn’t
changed, e.g. the next one is searched.
Replace All in Test Case/package: To use this feature a test
case/package have to be selected first otherwise the button is disabled. At
first a test case is searched and selected. The user has to click again for
replacing all occurrences in this test case/package. If the test
case/package is locked, the test case/package isn’t changed.
Replace All: The selected field of all test cases/packages is changed
which contains the text. After replacing all, a message is shown (see
Figure 228) with the number of replaced test case and number of test
case/package which couldn’t be replaced, because of locks, etc.
Figure 228 – Replace result
The replace – functionality is disabled, if the user has not the
right for changing test case(s) in test structure / test suite.
3.3.10 Apply / Discard
When working with test structures or test suites, you can save your changes
within test cases or test packages using the button Apply. By pressing button
Discard, your changes will be undone after a confirmation message. The buttons
are only enabled, if the selected node has been changed since it was loaded.
Figure 229 - Apply / Discard
3.3.11 Newsboard
The newsboard informs the user about changes done on the current test
structure (version). It can be opened by calling the menu item Test Structure Page 190
User Manual
Edition January 2015
TEMPPO V6.1
Description of Use
> Newsboard. In Settings it can be configured that is it shown automatically
after opening a test structure. Since time is going on and newsboard doesn’t poll,
user has to press the Refresh button to get the latest “news”.
The display of newsboard can be configured by setting last login, last hour,
last day last week or user defined. If user defined is selected, a date with
calendar and text fields for time (hh, mm) and the Apply button are editable.
If “last login” is selected, the time stamp of user’s last logout is
chosen!
If a newsboard entry is activated, the corresponding requirement is selected
automatically, except if one was deleted. In the newsboard table the action
(new, changed, deleted), requirement ID, requirement name, date of
action, and the person are shown.
Newsboard consists of 2 tabs, <name of test structure plus version> and
General. The first one shows all activities (new, change, delete) on test cases
and test packages in the current selected test structure version.
On the other hand General displays all other information:
New attribute assigned to the project, changed attribute, new attribute value,
new test suite, new user, new version.
If an item of newsboard is selected, the corresponding one is also highlighted in
the test structure (if possible). A deleted item cannot be displayed, of course.
Page 191
User Manual
Edition January 2015
TEMPPO V6.1
Description of Use
Figure 230 – Newsboard
3.3.12 Versioning
Configuration management is a task that covers all phases in the test process.
TEMPPO does not have a connection to current CM tools like ClearCase or MKS.
Page 192
User Manual
Edition January 2015
TEMPPO V6.1
Description of Use
Supporting a large palette of CM tools from a very powerful but expensive one
like ClearCase to a cheap one with restricted functionality would be a challenge.
For example ClearCase offers attributes for each administration unit; VSS does
not have such commands.
Therefore, the developers of TEMPPO decided to implement an own solution for
maintaining versions of test structures with test cases. In TEMPPO it is only
possible to check in an entire test structure (=baseline), where “whole” means
the hierarchical order of all test packages and test cases as well as their data. In
contrast to other CM tools where check in and check out are separate steps,
checking in a test structure in TEMPPO will check it out again, i.e. a new editable
version is created automatically. Naturally you have the possibility to restore any
version of the test structure that has been checked in. Versioning is meaningful
when you have to change / extend your test structure due to version changes of
your application.
You create and activate versions in TEMPPO using Test Structure – Version....
The following example should illustrate how the CM features of TEMPPO work.
1. Consider the test structure displayed in Figure 231. Initially there exists just
one version of the test structure, version "1" on the main line. In TEMPPO,
every last version gets the label "latest", signaling that the test structure in
this version is checked out for editing.
Edit properties of selected version
Check in active version
Activate selected version
Merge all test cases into latest version of main line
Change tree style
Figure 231 - CM, Version tree before first check in
If you check in the test structure by using the Check in active version
button in the Versions dialog you have the possibility to specify a label
(“Release 1”). Then the version tree looks like displayed in Figure 232. The
test structure gets checked out immediately and version “2” is created. The
symbol
signals the active version, which is again “latest”.
Page 193
User Manual
Edition January 2015
TEMPPO V6.1
Description of Use
Figure 232 - CM, Version tree after checking in and labeling
Changes in the latest version of the test structure will now not affect “Release
1”. E.g. when inserting a new test package and test case, the new items are
only available in the latest version of the test structure (see Figure 233). In
the prior versions items are not available, of course (see Figure 234)
You can see the active version of your test structure in the title
bar of the test structure explorer.
Page 194
User Manual
Edition January 2015
TEMPPO V6.1
Description of Use
Figure 233 – New items in latest structure version
Figure 234 - Items not available in prior versions
You can restore the version of a test structure by activating it in the versions
dialog with button
(Activate selected version). You cannot change a test
structure in a version, which is not “latest”. However you can create a branch
of a structure version and apply changes to that latest version in the branch.
When you activate version 2 (V2) and try to insert a new test package, you
will get the following message:
Figure 235 - New branch confirmation
Pressing No will abort the action. Pressing Yes will create a new V2.2 branch,
a branch-latest version of the test structure and the test package in this
branch-latest version. The “latest” version in the branch will automatically be
activated and can be edited like the latest version in the main line (usually
Page 195
User Manual
Edition January 2015
TEMPPO V6.1
Description of Use
called main-latest). One version can have several branches, which can be
created in the same manner.
Figure 236 - CM, Branch
After working on a branch, it is necessary sometimes to merge the results of
a branch version (e.g.: V2.2.1 Branch) to the latest version of the main line
(e.g.: V3 latest). There are 2 possibilities of merge support in TEMPPO. On
one hand you can merge a whole test structure to the latest version of the
main line, whereas the latest version will be checked-in before copying the
branch. The additional version of the main line is necessary in order to keep
the possibility of recovering the test structure of the main line. When pressing
the merge button, the following question will appear.
Figure 237 - Merge whole test structure
If you proceed, the version of the current branch version is “copied” to lastest
version of the main line. The current version applied label remains activated.
Currently there is no visual representation for merges in the version dialog,
like the merge arrows you would see in other CM tools.
On the other hand there is an individual merge that allows merging single test
cases.
Page 196
User Manual
Edition January 2015
TEMPPO V6.1
Description of Use
Figure 238 Test case merge
If working on a branch an additional button Merge appears besides Lock, Apply
and Discard
the current test case. After pressing the button Apply the user is automatically
asked if he wants to apply the changes on the latest version (V3). Additionally
the message shows the information, if the same test case was also changed in
the latest version!
Figure 239 - Merge advice
If the user presses Yes, the following window appears, where the user can select
which parts of the test case will be merged.
Figure 240 - Merge selection
If nothing is selected, test case is latest version remains unchanged!
3.3.13 Compare
Version management also includes comparing a test case with a another one. If
you select a test case in the current version of a test structure and activate the
menu item Compare
Page 197
User Manual
Edition January 2015
TEMPPO V6.1
Description of Use
a version window comes up where you can select the version of the test case to
be compared. The versions window does only show the versions in which the test
case exists. After selecting a version the button “Compare” gets enabled.
Figure 241 - Compare - selecting a version
When pressing the button “Compare”, Figure 242 is shown. The two versions of the test case
are displayed with their differences in red color.
Page 198
User Manual
Edition January 2015
TEMPPO V6.1
Description of Use
Figure 242 - Compare- differences
3.3.14 Filter
Users can see their test structures and test suites in a filtered way by creating
and selecting filters i.e. for the purpose of hiding test cases that are not of
interest. All fixed and user-defined attributes can be used to define a filter
criterion.
Test structure filters are available for test suites. Test Suite filters which are
including result or tester are not available for test structures.
TEMPPO Manager offers Personal and Project filters. If the tab Personal
Filter is activated, all created filters are only displayed for the user. A test
manager may activate the tab Project Filter and creates filters that can be used
for all project members. Personal filters can be copied to project ones and
vice versa.
3.3.14.1
Predefined filters
There are a lot of predefined filter which are useful for each user.
Page 199
User Manual
Edition January 2015
TEMPPO V6.1
Description of Use
Figure 243 - Predefined filters
3.3.14.2
Create filter
You can create a new filter when pressing the button New filter in Figure 243.
Figure 244 - Filter Properties
Pressing the Save-Button, the new filter is saved to the database, if a new name
was entered. Otherwise the information window comes up:
Page 200
User Manual
Edition January 2015
TEMPPO V6.1
Description of Use
Figure 245 - Filter name already used
After saving the new filter, Figure 246is shown. The new filter is inserted and
selected in the list box, the filter criterion is displayed, and the table Impact to
selected Window is updated.
Figure 246 - Selected filter
3.3.14.3
Change filter
You can change existing filters by pressing the Edit filter button. This button is
only enabled when a filter is selected that is not the empty filter (No filter).
Page 201
User Manual
Edition January 2015
TEMPPO V6.1
Description of Use
Figure 247 – Edit filter
Depending on the selected filter, the conditions are displayed. Filter name is read
only, filter conditions can be changed. (See Figure 244)
3.3.14.4
Delete filter
You can delete an existing filter by pressing the Delete filter -button. This
button is only enabled if the selected filter is not the empty filter (No filter).
Page 202
User Manual
Edition January 2015
TEMPPO V6.1
Description of Use
Figure 248 - Delete Filter
After activating the Delete filter -button, the reconfirmation window comes up:
Figure 249 - Delete filter
If pressing Yes, the information window comes up and the filter is deleted, if it is
not used by a test structure or suite.
Figure 250 - Filter deleted
After deleting a filter, the No filter is highlighted in the list box.
3.3.14.5
Defining the filter criterion
The values of the following attributes can be used as described in Table 2:
Fixed4, UDAs, test case name, owner, tester, bug ID, test result,
requirements
Page 203
User Manual
Edition January 2015
TEMPPO V6.1
Description of Use
First of all you have to choose an attribute and an operator (=, !=, IN, NOT IN).
If IN or NOT IN is selected, the combo-box value changes to a text field
together with the button “…”. There you can enter
A string with a wild card or
Press the button “…” for selecting several values.
After pressing the button “…” Figure 251 is displayed and the attribute values
are selected by moving them to the right. Pressing OK applies the selection to
the filter window. The selected values are displayed separated by a comma. Now
the user can edit this line. Because the comma is used to separate the selected
values, commas in the selected values have to be escaped with a “\” (e.g.
Component\,3).
No blank is allowed, commas has to be escaped with a “\”!
Figure 251 - Selecting attribute values for IN, NOT IN
Attribute
s
Fixed I4
Fixed II
5
Fixed III
UDA
6
Operator
=, !=
Operator
IN, NOT
IN
Operator
<,>, <=,
>=
Value
edita
ble1
Valu
e
set2
Value
proje
ct
assig
ned
Wild
card
allowed
Test
Struct
ure
Y
N
N
N
N
-
N
Y
Y
Y
N
Y
Y
-
Y
Y
Y
Y
N
N
Y
-
N
Y
Y
Y
N
Y
Y
Y
Y
Y
3
1
Yes, if operators IN, NOT IN are selected
Yes, if a set of values can be selected
3
Yes, if editable is Yes.
4
Fixed I: Situation, Test Case Type, Additional Test Level, Type
5
Fixed II: Test Level, Test Category, Requirement
6
Fixed III: Priority, State
2
Page 204
User Manual
Edition January 2015
TEMPPO V6.1
Description of Use
TC name
Y
N
N
Y
N
-
Y
Y
Owner
Y
Y
N
Y
Y
Y
Y
Y
Tester
Y
Y
N
Y
Y
Y
Y
N
BugID
Y
Y
N
Y
Y
-
Y
N
Updater
Y
N
N
N
N
-
N
Y
Test
result
Y
Y
N
N
N
-
N
N
Created,
Updated
Y
N
Y
N
N
-
-
Y
Require
ment
Y
Y
N
Y
Y
Y
Y
N
Table 2- Attributes meanings
The user can write free text that may also contain wildcards like
“*”
any number of characters
“?”
any single character
Figure 252 - Filter criterion
3.3.14.6
Edit filter criterion
You delete and add lines of filter criterion.
When pressing the button
the current line is deleted.
a line is inserted before the current one.
Page 205
User Manual
Edition January 2015
3.3.14.7
TEMPPO V6.1
Description of Use
Export filter
It is possible to export filters to XML and import them again. Via (multi) selection
of filter and pressing the button Export filters to XML filter are saved to an xml
file.
3.3.14.8
Import filter
It is possible to import filters from XML by pressing the button Import filter
from xml. A filter import is rejected, if the filter contains specific attributes that
are not assigned to the project the filter is imported to. An error message is
displayed where the names of the NOT imported filters are listed.
The filter contents are checked and the import is only successful, if the attributes
match the ones of the selected project. If the filter is not syntactically correct,
the import is cancelled and the user gets an information message.
If an XML file contains a test suite filter and it is imported to a test structure (or
vice versa), the corresponding test suite filter is imported and an information
window is shown. The imported test suite filter is shown the first time when a
test suite is opened and the filter dialog is called (or the filter combo box is
clicked).
3.3.15 Test structure XML Export
This feature allows exporting the entire test structure or just a part of it into an
XML document. When a test structure is open and the root node or a test
package is selected, the menu item Test Structure – Export Structure… is
enabled.
On activating this menu item a file open dialog is displayed. When pressing the
button Save the test structure is saved as XML file based on teststructure.dtd.
3.3.16 Test structure XML Update
This feature allows updating the entire test structure or test packages based on
an XML document, if you are using other tools for manipulating the test
structure. The update process adapts the test structure to XML file, but keeps TC
ids and TP ids and real updates of TCs and TPs are detected.
If you activating the menu item Test structure -> Update -> XML document,
a file open dialog comes up where you can select the XML file. After pressing the
button Open, the XML document is read and checked against teststructure.dtd.
If an error is detected, the import process is cancelled.
If the syntax was checked successfully, you can specify to retain some TP/TC
properties like test case name, attributes, attribute inheritance, requirement
inheritance, test steps, which will be kept after the update process. Only the
other content is updated.
Page 206
User Manual
Edition January 2015
TEMPPO V6.1
Description of Use
Figure 253 – Select properties to be retained
After pressing OK the test structure is checked of any user locks. If a user has
locked an item the test structure can’t be checked-in and the update process is
cancelled with a corresponding message.
If there aren’t any locks the test structure is checked-in with label “Checked in
by XML update” and the new latest version is completely locked during the
update process.
If you update only a part of a test structure, the selected TP and
root TP of XML have to be the same, otherwise the update is not
started.
3.3.16.1.1
Update process
The update process is done as follows: The XML structure becomes the new test
structure. Each item is recursively compared with itself in the latest test
structure version by its ID.
If the item has been changed, the changes are applied and “Updated” and
“Updator” are written. History is written like current behavior. If a mandatory
history comment is configured for that project, it will be ignored.
If the item hasn’t been changed, nothing happens.
Reorder: If an item is “reordered”, it keeps the new order, but neither
“Updated” nor “Updator” is written.
Changed TCs: Detected changes: Name, test goal, attributes, planning
attributes, fields for automated TCs, new attribute assignments, deleted attribute
assignments, new requirement assignments, and deleted requirement
assignments.
If a change in test steps is detected, all steps of XML file are applied.
Changed TPs: Detected changes: Name, description, test category change
(new, delete, change), document path, document name, document chapter, new
attribute assignments, deleted attribute assignments, new requirement
assignments, and deleted requirement assignments.
Page 207
User Manual
Edition January 2015
TEMPPO V6.1
Description of Use
New TPs: If a new TP is detected, whose ID doesn’t exist in test structure, the
TP is created. No history entry is created (like a “create” on the GUI).
New TCs: If a TC is detected, whose ID doesn’t exist in test structure, the TC is
created. No history entry is created (like a “create” on the GUI).
3.3.17 Test Suite XML Export / Import
This feature allows exporting the entire or a part of a test suite into an XML
document, fill in some test execution data and import that information to
TEMPPO. E.g. some users may have complicated test automation tools/scenarios
whose test cases can’t be started and executed from TEMPPO but are managed
in TEMPPO.
Therefore those test cases are administrated in TEMPPO, and after executing
them outside of TEMPPO the results are imported.
3.3.17.1
Export
The export XML feature can either be used to execute automated TCs somewhere
offline and export results later or export the test suite to an XML file for other
matters. In this case the test suite shouldn’t be locked.
A test suite can be exported if a test suite is already opened, any node (test suite
root or TP) is selected and the menu item Export test suite -> to XML is
activated.
Figure 254 - Lock confirmation
After entering a name, the XML file is stored to the file system (conforming to
testsuite.dtd).
The testsuite.dtd can be found in your TEMPPO/XML directory
After exporting a test suite to an XML file, all exports (also to the export DB) are
listed in the Export Info.
Page 208
User Manual
Edition January 2015
TEMPPO V6.1
Description of Use
Figure 255 – Export XML information
TEMPPO identifies an XML file by a unique ID.
3.3.17.2
Import
After exporting an XML file, it may be edited outside of TEMPPO, e.g. users or
test automation tools are filling in some values. Valid values are:
Result = (Failed | Passed | Not_executed | Blocked | Not_completed |
Not_implemented | On_hold)
Result Output = Plain text
Tester = (MS Windows account or a defined user account)
Tested = DDMMYY HH:MM:SS
If other values are changed, they will be ignored.
Importing an XML file can be started by activating the menu item Import Test
suite -> from XML. The import is independent from the selected node.
TEMPPO detects the part to be imported.
The following possibilities are offered for importing:
Figure 256 – XML Import
Manually choose test results to import: When activating this option,
Figure 257 is shown. In the right part of the window the current (result)
state of test cases in the central database is shown together with their
execution date (NOT importing date!). Test cases that may cause conflicts
are colored blue. The left side of the window shows the test results of the
exported test suite. Now you can activate the checkboxes of test cases
that you want to import.
Page 209
User Manual
Edition January 2015
TEMPPO V6.1
Description of Use
Import only newer test results: If a user already imported a test result
for an automated test case and you also executed the same test case
o Earlier, the result in the central database won’t be overridden by
yours.
o Later, your result will be written into the database. The other result
is lost.
Import all test results: All test results of already executed test cases
are overridden by your results
Note: All test results that are marked are overridden in the
central database after closing the window with OK.
Figure 257 – Manual import of test results
Rules for importing:
If test results differ from test step results (e.g. test case result = passed, test
step 1 result = failed, test step 2 result = passed), the new test case result will
be failed.
If a test case has already a result, result output and it is set to not executed,
tester and tested will be deleted (=empty) and result output is kept or updated.
3.3.17.2.1
Import characters of other fonts
If you want to import Chinese or Arabic characters the xml header has to be
<?xml version=”1.0” encoding=”UTF-8”?>
For more information see http://de.wikipedia.org/wiki/UTF-8 and http://www.utf8.com/
3.3.18 Export Test Suite to DOORS
This feature allows exporting Test Suite Results – of test cases where
requirements from DOORS Requirement Structures are linked – to DOORS.
Page 210
User Manual
Edition January 2015
TEMPPO V6.1
Description of Use
DOORS
TEMPPO
Baseline
Requirement
Manager
Sales [1.0]
DEV1 [1.0]
DEV1 [1.0]
Req1
Req1
PLM1 [1.0]
Req2
Req1
Req3
Req1
Req2
Req2
Req3
Req3
Req4
DEV2 [2.0]
Req5
Req1
import / update
Req2
Req3
Test
Manager
Test Structure
[V3.1.1]
TC1
TC2
TC3
Req2
DEV2 [2.0]
Req1
import / update
Req3
Req2
TC4
TC5
TC6
Req3
Copy of DEV1
Req1
Test Suite
Req2
TC1
Req3
TC2
export
Copy of DEV2
TC3
TC4
Req1
TC5
Req2
TC6
Req3
Figure 258 – DOORS – TEMPPO data exchange
The module Sales specifies requirements, which are refined in the module PLM1,
which for their part are refined in the modules DEV1 and DEV2. DEV1 and DEV2
(certain baseline or latest version) are imported into TEMPPO and provide a base
for the test cases organized in a test structure. For test execution a test suite is
created, where test results are recorded, which can be reflected onto the linked
requirements. When exporting the test results to DOORS, the imported modules
are copied (DEV1 and DEV2) and the requirements in the copies will be flagged
with test results. Since a single requirement can be covered by several test cases
(Req2 in DEV1), rules are applied, to build unique results for requirements (e.g.
passed + failed = failed).
Test Suite results can be exported, if a test suite is open and active and the
menu item Export test suite -> to DOORS is activated.
TEMPPO first verifies, whether the test suite contains any test cases linked to
requirements imported from DOORS. If no linked requirements can be found, the
user is informed via a message and the process is aborted:
Figure 259 – Information Message
If there are linked requirements, the user is guided through the wizard.
Page 211
User Manual
Edition January 2015
TEMPPO V6.1
Description of Use
Figure 260 – Export Wizard – step 1
TEMPPO starts the communication with DOORS and searches for the affected
module(s) / baseline(s) in the DOORS database. Before starting the export,
TEMPPO gives an overview:
Figure 261 – Export Wizard – step 2
Results for found modules will be exported; results for not found modules will be
skipped.
If a requirement is covered by more than one test case, a unique result will be
built according to following rules (for description of test results please refer to
3.1.4.1.5):
not executed, if all test cases are not executed
passed, if all test cases are passed
failed, if at least one test case is failed
blocked, if no test case is failed and at least one is blocked
Page 212
User Manual
Edition January 2015
TEMPPO V6.1
Description of Use
not completed, if at least one test case is passed and all others are not
executed
not implemented, if at least one test case is not implemented (stronger
than “on hold”)
on hold, if at least one test case is on hold
When the export is finished, the user will be informed via message box.
Figure 262 – Message box – export finished
The Export can be canceled at any time by clicking the cancel button in the
progress monitor.
Figure 263 – DOORS Export – progress monitor
The User is asked for confirmation then and if he confirms, the export is stopped.
Figure 264 – Doors Export- confirm cancel.
3.3.18.1
Effects in DOORS
Following steps will be processed during export:
1. Creation of folder for test execution data (if not already existing) according to
following naming convention:
\Test\Results\<Version> - <Name of Test Suite>
2. Copy of affected DOORS modules (corresponding baseline or latest version) to test
execution folder if copies do not already exist. The module is constructed by
<subfolder 1>-<subfolder 2>-<subfolder n>-<module name>-<baseline name>
Page 213
User Manual
Edition January 2015
TEMPPO V6.1
Description of Use
Figure 265: Copy of DEV module
3. Creation of module attribute “test result” in each module copy
Write test result into attribute “test result” of affected requirements. If a
requirement is covered by more than one test case, a unique result will be built
according to rules described above.
The attribute “test result” of not affected requirements will remain empty.
Figure 266: Results for requirements
Page 214
User Manual
Edition January 2015
TEMPPO V6.1
Description of Use
3.3.19 Test Suite Scheduler
Manual test cases are executed sequential, but executing automated test cases,
it is insufficient to do it in a sequential way. Therefore TEMPPO provides a feature
to schedule automated test cases.
A scheduler includes general information, a start time and an ordered selection of
test cases which has to be executed.
For each test suite several schedulers can be defined. The test suite has to be
opened and tab “Scheduler” has to be activated:
Figure 267 – Test Suite Scheduler
With the buttons on the right side you can manage and run schedulers:
Create/Edit a scheduler: Define a scheduler with start time and a
sequence of test cases, see 3.3.19.1.
Delete a scheduler: Remove a scheduler for a test suite, see 3.3.19.2.
Import a scheduler: Import an existing scheduler from other test suites,
see 3.3.19.3.
Run a scheduler: Execute all test cases selected for scheduler, now or at
start time, see 3.3.19.4.
Protocol of a scheduler: Visit all results set by scheduler, see 3.3.19.5.
3.3.19.1
Create/Edit Scheduler
After opening a test suite, activating tab Scheduler and pressing button “New” /
“Edit”, new window opens where all settings for the scheduler can be defined:
In register General:
Name: for scheduler
Scheduler Start Time: Scheduler has to be started until this time.
Scheduler cannot be started after this date.
Description: for scheduler
Selection of test cases: which has to be executed
Page 215
User Manual
Edition January 2015
TEMPPO V6.1
Description of Use
In register Advanced:
IP address, Port: An IP address and port can be defined for all
automated test cases using Universal Socket.
Remark: Selection of test cases:
All test cases in tree are shown in a list with a checkbox. Only the selected test
cases are executed when scheduler is started.
The execution of test cases can be ordered with the buttons beside the table.
Figure 268 – New Scheduler
3.3.19.2
Delete Scheduler
For deleting a scheduler, press the “Delete” button. The button is enabled if at
least one scheduler is selected.
Figure 269 – Delete Scheduler
Page 216
User Manual
Edition January 2015
3.3.19.3
TEMPPO V6.1
Description of Use
Import Scheduler
Instead of creating a scheduler from the scratch, importing schedulers from
other test suites is possible. If you press the Import-button, a new window
opens with the whole version tree. After selecting the scheduler which has to be
imported, OK has to be pressed.
Figure 270 – Import Scheduler
After clicking OK, the scheduler is displayed in table at register Scheduler. Only
existing test cases in current test suite can be applied to new scheduler.
3.3.19.4
Run Scheduler
For running a scheduler, press “Execute” – button. A new window opens where
scheduler can be started in two different modes:
Run at start time: The scheduler is locked and waits until start date. The
scheduler starts working at defined start date.
Figure 271 – Execute Scheduler at Start Date
Execute scheduler manually: The scheduler is locked and starts executing
test cases immediately.
Page 217
User Manual
Edition January 2015
TEMPPO V6.1
Description of Use
Figure 272 – Execute Scheduler
A running scheduler can be paused or stopped:
Pause: When pressing “Pause”, current test case execution is finished, the
scheduler stops executing test cases and running mode is “pause”. If the
scheduler is paused, scheduler remains locked and user can continue or
stop the scheduler.
Figure 273 – Pause Scheduler
Stop: When pressing “Stop”, current test case execution is finished and
running mode is stopped. If a scheduler is stopped, the scheduler is
unlocked and user cannot continue.
Page 218
User Manual
Edition January 2015
TEMPPO V6.1
Description of Use
Figure 274 – Stop Scheduler
Figure 275 – Finished Scheduler
In Details, information about executed test cases are shown.
3.3.19.5
Protocol of Scheduler
All test case executions of a scheduler can be shown by pressing “Show
Scheduler Protocol”.
Page 219
User Manual
Edition January 2015
TEMPPO V6.1
Description of Use
Figure 276 – Scheduler Protocol
3.3.20 Task lists
After Test Structure > Apply requirement updates…, a task list is
generated. It can be viewed via menu Test Structure > Task Lists
All the changed, new and deleted requirements are listed. The lists are
represented by a tree structure. Each list consists of one or many entries. All
entries are marked as open the first time they are stored in the DB. If the user
clicks an entry, the test case (or test package) of this entry is selected in the
test structure window.
Page 220
User Manual
Edition January 2015
TEMPPO V6.1
Description of Use
Figure 277 - Task due to deleted requirement
Task lists can be deleted in the task list window if all tasks are closed. The task
list has to be selected and via the context menu item “Delete task list” a
confirmation window comes up. Confirming with OK deletes the task list.
Task lists can be exported to Excel for further working on it.
Page 221
User Manual
Edition January 2015
TEMPPO V6.1
Description of Use
Figure 278 – Task List
3.3.21 Settings
TEMPPO differs between global and application specific settings.
3.3.21.1
Global settings
Global settings concern all TEMPPO applications – Test Manager, Requirement
Manager, Administrator and Manager – i.e. when a global setting is changed, it’s
changed for all applications. If an application is running an a global setting is
changed, the change will be visible after the next start of that application.
The global settings dialog can be opened via the menu Global Settings shortcut
in the TEMPPO start menu.
Following settings are global:
User Interface
Logging
3.3.21.1.1
User Interface
The user interface can be configure via following settings:
Font size for multi-line fields
Language
Look & Feel
Page 222
User Manual
Edition January 2015
TEMPPO V6.1
Description of Use
Figure 279 – Global Settings: User Interface
3.3.21.1.2
Logging
You can also change the location of TEMPPO’s log directory. Default value is the
user’s profile.
Figure 280 – Global Settings: Logging
3.3.21.2
TEMPPO Test Manager Settings
Specific settings e.g. tree display, automation tools, etc. can be configured in the
settings dialog in TEMPPO. This dialog is opened via Windows > Settings. On
the left side, there is a tree where the user can select the setting group which
Page 223
User Manual
Edition January 2015
TEMPPO V6.1
Description of Use
should be configured. On the right side all single settings can be edited (see
Figure 281).
Figure 281 – Settings
Via button Restore Defaults all settings of the selected setting group are
restored to the default values.
Following settings can be configured in TEMPPO:
User Interface
o Tree
o Test Step Cells
o Analysis
o Newsboard
o Test suite
Database settings
Test automation:
o Silk Test
o WinRunner
o Universal File
o Universal Socket
o QuickTest Pro
o Test Partner
o JUnit
o TEMPPO Designer (IDATG)
o Ranorex
Commands
Change Management
o Bugzilla
o IBM Telelogic Change
o IBM Rational Clearquest
o JIRA
Page 224
User Manual
Edition January 2015
3.3.21.2.1
TEMPPO V6.1
Description of Use
Tree
Tree settings which can be changed are, see Figure 282.
Property
Default
value
Description
Display automatic
numbering
deactivated
Switches on/off to display the internal
order of items in the tree.
Recursive
activated
Switches on/off to show the order
recursive, e.g. 10.7.03.
Delimiter
.
Specifies the delimiter for order
numbers (e.g. delimiter in 10.7.3 is
.).
Base
1
Specifies the base for order numbers,
i.e. the number added to the internal
order, which is 0 based.
Figure 282 – Settings: Tree
3.3.21.2.2
Test Step Cells
For the test step cells some settings can be changed, see Figure 283.
Property
Default
value
Description
Refresh when resizing
activated
Multiline height
52
Switches on/off refreshing the row
heights in a multi line table when
changing column widths or table
bounds.
Sets the minimum height of the edited row
(in pixels) in a multi line table.
Page 225
User Manual
Edition January 2015
TEMPPO V6.1
Description of Use
Image column – image
width
-1
Image column – image
height
100
You cannot set the number of lines for
the test step editor, but the pixels. 52
pixel correspond to 3 lines.
Maximum width of thumbnail of a user
defined image field. If it’s -1 its ignored.
Maximum height thumbnail of a user
defined image field. If it’s -1 its ignored.
Figure 283 – Settings: Test Step Cells
3.3.21.2.3
Analysis
You can change the settings for analysis:
Property
Default
value
Description
Color settings
slightly
For charts, analysis you can select
different colors
Label length for progress
chart
100
Limits the label length of the
requirement names in order to keep
the chart “readable”
Creation Progress Label
Version
Specifies the text to be displayed on
creation progress chart labels.
Execution Progress Label
Date
Specifies the text to be displayed on
execution progress chart labels.
Page 226
User Manual
Edition January 2015
TEMPPO V6.1
Description of Use
Figure 284 – Settings: Analysis
3.3.21.2.4
Newsboard
You can configure, if Newsboard window is automatically opened, if a test
structure is opened.
Page 227
User Manual
Edition January 2015
TEMPPO V6.1
Description of Use
Figure 285 – Settings: Newsboard
3.3.21.2.5
Test suite
You specify, if test suites are sorted by name or date in the open dialog.
Figure 286 - Settings: Test suite
3.3.21.2.6
Database
For the settings of database see Figure 287.
Page 228
User Manual
Edition January 2015
TEMPPO V6.1
Description of Use
Property
Default
value
Description
Show DSN Chooser on
Startup
deactivated
Switches on/off a DB chooser on
TEMPPO startup.
DSN Chooser Timeout
(seconds)
5
Sets the timeout (in seconds) for
committing the chooser automatically.
Switches on/off to lock…
deactivated
Lock whole test structure before
checking-in in case of test suite
creation.
Check new test structure
version
deactivated
Check for new test structure version
when saving an item in latest version
This setting is used together with
deactivated previous setting.
Example:
User1: edits a TC in latest version
User2: creates new test suite
User1: saves TC and the new test
structure version is reloaded.
Check Locks in Test Suite
before Exporting
activated
Switches on/off check of locks in test
suite before exporting it.
Locking mode
automatic
Sets the locking mode
Loading mode
Parallel
(unlimited
threads)
When opening or refreshing a test
structure there is a possibility to
speed up loading data. If you want to
do that, you have to select Parallel.
Parallel:
If you work on a single client PC it is
recommended to select the checkbox
Unlimited number of threads. For
loading time CPU usage goes up.
If you work on a terminal server it is
recommended to specify a number of
threads. Please ask SiTEMPPO team
to specify the best value for your test
environment.
Serial:
Data is loaded serialized. Only
recommended when a small amount
of data.
History entries
10
Number of history records loaded at
once from DB. Further records can be
loaded on demand.
Recommendations:
For parallel mode, the number of threads should be 2*number of processors on
database server.
Page 229
User Manual
Edition January 2015
TEMPPO V6.1
Description of Use
The setting for closing unused database connections depends on usage of
TEMPPO:
If you are opening frequently different test structure or versions, then you
should define a longer duration. Then opened database connections are
reused and no additional resources are needed permanently for
connecting/disconnecting to database.
For example: 30 minutes
If you are working only in one test structure version for a long time, then
you can define a short duration. Opened database connections are closed
and used resources are released.
For example: 10 minutes
Page 230
User Manual
Edition January 2015
TEMPPO V6.1
Description of Use
Figure 287 – Settings: Database
3.3.21.2.7
Test Automation
3.3.21.2.7.1
WinRunner and SilkTest
Page 231
User Manual
Edition January 2015
TEMPPO V6.1
Description of Use
Figure 288: Test Automation (SilkTest, WinRunner)
If you plan to manage automated test cases in TEMPPO, you define the
automation settings here. First of all you have to choose the automation tool,
which will run your test cases. For WinRunner, SilkTest the meaning of the
settings is as follows:
Application Path: Executable of the automation tool.
Temporary Path: Directory for temporary automation files created by
TEMPPO during the execution of automated test cases.
Result Path: Directory for result files created by the automation tool. The
created result files are read from TEMPPO for obtaining the automation
results.
Result Viewer: The result viewer is for opening and viewing the result
files. It depends on the result file format, which viewer can be taken (use
a text editor e.g. notepad for WinRunner result files, use QuickTest
Professional Result Viewer for QuickTest, use SilkTest for SilkTest result
files).
Arguments: The automation tool is called via its command line interface.
This field shows the arguments which are passed to the automation tool
during the call. Normally the default arguments should fulfill your needs
for test automation, but for special cases the arguments can be adapted
(study the command line specification of the automation tool first!). For
the definition of the argument you can use the parameters <<TestFile>>
(automation file to execute), <<ResultBaseDir>> (= Result Path) and
<<ResultDir>> (generated directory for results during automation).
Attention: Not every tool supports all parameters!
Use the Default button to restore the default arguments
If the check box in the bottom of the tab is checked, the temporary automation
files will be deleted after automation.
Page 232
User Manual
Edition January 2015
3.3.21.2.7.2
TEMPPO V6.1
Description of Use
Universal File Automation Interface
For UFAI (Universal File Automation Interface) you have to activate the
automation tab and select Universal File.
Figure 289 – Settings: Universal File
The meanings of the parameters are as follows:
Drive Letter is that letter, where path of all test executables start. For
each test case a path has to be added without a letter drive. In this way it
is possible to support scenarios, where test executables have to be started
from varying drive letters. You only have to change the Drive Letter
setting in the Administrator.
Result Path (mandatory): This is the directory, where all the result files
are stored.
Upload result files to DB: if checked, the result files will be loaded into
the db; if unchecked the result file are stored in the file system.
Error Path: (mandatory): The directory where all error output files are
stored.
Result Viewer (optional): An editor which is best suited for viewing
result and output files.
Arguments (optional): Command line arguments which are valid for all
test executables. Contrarily individual arguments can be specified
separately for each test case. Note, that the test executable is called with
both argument strings concatenated.
3.3.21.2.7.3
Universal Socket Automation Interface
This interface allows test automation via a socket connection. I.e. when starting
a test execution, TEMPPO will establish a local socket connection on a specified
port, send the path to the script to execute over this socket and read the test
results from this socket.
Page 233
User Manual
Edition January 2015
TEMPPO V6.1
Description of Use
Via an adapter implementation it’s possible to handle the tool specific format of
the delivered result output.
For configuration of USAI (Universal Socket Automation Interface) you have to
activate the automation tab and select Universal Socket.
Figure 290 – Settings: Universal Socket
The meanings of the parameters are as follows:
Drive Letter is that letter, where path of all test executables start. For
each test case a path has to be added without a letter drive. In this way it
is possible to support scenarios, where test executables have to be started
from varying drive letters. You only have to change the Drive Letter
setting in the Administrator.
Application path must point to the executable, which will be launched by
TEMPPO, if a socket connection is not possible when test execution was
started. After starting the application, TEMPPO will wait a defined delay (to
give the application enough time to startup), before retrying to open the
socket connection. This delay is 5 seconds per default.
The IP address from the host where the application is running has to be
specified. If the host isn’t the local host (127.0.0.1) the application path
cannot be configured. The reason for this limitation is that it is not possible
to launch an application on a remote computer without any additional
software.
At port number the socket connection for automation will be opened.
Adapter is the tool specific implementation for the handling of results
received via the socket, to convert it into a format understandable by
TEMPPO. Select here the implementation for your tool. For more
information on adapter implementations see 13.7.
Page 234
User Manual
Edition January 2015
TEMPPO V6.1
Description of Use
Arguments are the command line arguments for the automation
application.
In the arguments, parameters can be used for the configuration:
Parameter
Purpose
%dbtcid%
internal unique database id for the test case
%dbtsid%
internal unique database id for the test suite
%tcid%
user defined id of test case
%tca%
test case name
%tst%
test structure name
%tsu%
test suite name
%prj%
project name
%ver%
Version
%file%
automation file
Example:
Administrator configuration (Arguments):
-tc %dbtcid% -ts %dbtsid% -f “%file%” –args
Test case configuration (Additional Arguments):
atw108s2;3;xyz
Data sent over socket:
-tc 213 –ts 1158 –f “x:\test scripts\jlms_checkout.xml” –args
“atw108s2;3;xyz”
3.3.21.2.7.4
QuickTest Pro
For QuickTest Pro you have to specify the following parameters:
Application Path: path to QTPro.exe
Temporary Path: path where temporary files are stored
Result Path: path where all the result runs are stored
Result viewer: path to QTReport.exe
Page 235
User Manual
Edition January 2015
TEMPPO V6.1
Description of Use
Figure 291 – Settings: QuickTest Pro
TEMPPO uses the data table iterations from the QTP test case:
Figure 292 – QTP Run Settings
3.3.21.2.7.5
TestPartner
TestPartner requires .NET Framework 2.0
For Compuware TestPartner you have to activate the automation tab and select
TestPartner.
Page 236
User Manual
Edition January 2015
TEMPPO V6.1
Description of Use
Figure 293 – Settings: TestPartner
The meanings of the parameters are as follows:
User Name: User name in TestPartner for executing the automated test
cases.
Password: The password for the user in TestPartner.
Database: Name of database when logging in to TestPartner (see Figure
293)
Temporary Path: Has to be set for storing TestPatner’s temporary data.
Use the Default button to restore the default arguments.
If the check box in the bottom of the tab is checked, the temporary automation
files will be deleted after automation.
Figure 294 – TestPartner Login
3.3.21.2.8
JUnit
For Junit see chapter 6.
Page 237
User Manual
Edition January 2015
TEMPPO V6.1
Description of Use
Figure 295 – Junit configuration
3.3.21.2.9
TEMPPO Designer (IDATG)
Figure 296 – Settings: TEMPPO Designer (IDATG)
Application path: Path to IDATG.exe
Connection time out: Time for connecting successfully with TEMPPO
Designer (IDATG)
Page 238
User Manual
Edition January 2015
Communication time out: Time out for an existing connection without
any activities. After that time out TEMPPO sends a ping / heart beat and
waits the Ping waiting time
Ping waiting time: Maximal time to wait for an answer on a ping / heart
beat.
Ping repeats:Number of pings / heart beats sent to TEMPPO Designer
(IDATG)
3.3.21.2.10
TEMPPO V6.1
Description of Use
Ranorex
Result path: Path to directory of the result file(s)
Result viewer: Application to open result file(s)
Figure 297 – Settings: Ranorex
3.3.21.2.11
Commands
Commands are used for hyperlinks with parameters.
By pressing the New Command on the right side you can create a new command (see
Figure 298). Then a new tree node is created with the new command (see Figure 299). A
command is defined by its name, path and arguments. The name has to be unique.
Page 239
User Manual
Edition January 2015
TEMPPO V6.1
Description of Use
Figure 298 – Settings: Command
Figure 299 – New Command
3.3.21.2.12
Change Management
Select the change management tool which is used in TEMPPO for adding bugs to
test steps.
Page 240
User Manual
Edition January 2015
TEMPPO V6.1
Description of Use
Figure 300 – Settings: Change Management
3.3.21.2.12.1
Bugzilla
The following parameters have to be specified if using Bugzilla:
Basic Authentication: If the checkbox is activated, a proxy server
authentication (user, password) can be used.
URL: The http address of your Bugzilla server.
User: User name who will post the bug
Password: Password of user
Page 241
User Manual
Edition January 2015
TEMPPO V6.1
Description of Use
Figure 301 – Settings: Bugzilla
3.3.21.2.12.2
IBM Rational Clearquest
The following table shows the parameter matching of TEMPPO and Clearquest:
TEMPPO
Clearquest
URL
Web address of Cleaquest for login
Connection
Database
User Repository
Schema repository
User
User name
Password
Password
Page 242
User Manual
Edition January 2015
TEMPPO V6.1
Description of Use
Figure 302 – Settings: IBM Rational Clearquest
Figure 303 – Login to Clearquest
3.3.21.2.12.3
IBM Telelogic Change
The following parameters have to be specified if using Telelogic Change:
Server, Port: IP address or server name, where Telelogic Change is
running.
Context: If your Telelogic Change is located at context, you have to add it
here.
Database: only the name of the database
File of list box entries: path to the config-file of list boxes with its
dependencies.
Page 243
User Manual
Edition January 2015
TEMPPO V6.1
Description of Use
User, Password: User name who will post a bug, and password of the
user.
Role: Role of the user in Telelogic Change
Example: If the web address of your Telelogic Change is located at
http://158.92.135.211/change, it has to be separated like in the following
screen shot:
Figure 304 – Telelogic Change
Page 244
User Manual
Edition January 2015
4
TEMPPO V6.1
TEMPPO Manager
TEMPPO Manager
The following TEMPPO configurations are done with the TEMPPO Manager tool:
Database connection
User management (create a TEMPPO super user
Database migration
4.1 Database Connection
Figure 305: Manager – Database (Oracle)
In this tab you can define various database connection configurations, where
each is identified by a DSN (Data Source Name). A new DSN can be created
using the button, which will prompt you to enter a unique DSN. A DSN can be
deleted by clicking the
button. A DSN can be renamed by clicking the
button. If you delete all DSNs, TEMPPO will not be able to connect to a database!
For each DSN you have to specify several connection parameters, which are
explained in the following.
TEMPPO supports two database management systems, selectable in the field
database. Depending on the chosen one, you must specify several connection
parameters:
Access: For Access you just simply have to specify the path to Access mdb.
TEMPPO automatically creates an ODBC entry.
Page 245
User Manual
Edition January 2015
TEMPPO V6.1
TEMPPO Manager
Figure 306 – Manager – Database (Access)
Oracle, MS SQL Server: You must specify the database name (SID), the
schema name (ask your database admin), the name or IP address of the
database server (Host) and the port number (Port) at which the database
server is listening for incoming connections. Contact your database
administrator for this information.
The currently selected DSN is the active one, i.e. TEMPPO uses its connection
parameters to connect to a database.
Using button Test you can verify your settings. A message will inform about the
result of the verification.
By clicking Connect the TEMPPO Manager will establish a connection to the
database (user and password are required for Oracle). This will cause the tabs
Users and Migration getting enabled. Information about the database will be
displayed on the bottom of the tab.
4.2 User management
Figure 307: Manager – User management
This tab is only active, if the test manager is connected to the database (see
Database Connection). Users are created, changed and deleted here. The list
shows all currently existing users.
Page 246
User Manual
Edition January 2015
TEMPPO V6.1
TEMPPO Manager
User management in TEMPPO Manager is used to create the first super user, who
has afterwards the rights to do all the administrative work in TEMPPO
Administrator without any database password.
SQLSERVER: if a superuser is created, the following procedure
has to be executed via a console or EnterpriseManager by an
sysadmin: exec sp_addsrvrolemember N’$(sid)’,N’sysadmin’
The first step is to create a super user, that can either be with MS Window login
or a self created one with password.
It is not allowed to start TEMPPO twice with the same login. This
could cause inconsistencies in the database
4.2.1 MS Window login
For creating a (super) user with MS Windows login, you have to connect to the
database without activating the checkbox Login manually.
Figure 308 – DB connect to create MS Window Login
When pressing the button Connect, Figure 307 is displayed. A new (super) user
can be created by clicking the button Create new user. The input fields are
explained in chapter 4.2.3.
Page 247
User Manual
Edition January 2015
TEMPPO V6.1
TEMPPO Manager
Figure 309 – Create MS Window login
4.2.2 Login with password
For creating a (super) user with manual login, you have to choose the radio
button manual. The input fields are explained in chapter 4.2.3. If you fill-in also
Last and First name, they will be displayed in TEMPPO Test Manager instead of
the Login.
Figure 310 – Create manual login
4.2.3 User Properties
For specifying a user the following data has to be entered:
Login:
MS Windows(NT, XP, 2000, 7) login or manual
one
Login Type:
automatic or manual
Password:
In case of manual login the password
Retype Password:
Retyping the password
Last name:
Will be shown in TEMPPO instead of login
Page 248
User Manual
Edition January 2015
First name:
TEMPPO
Comment:
Superuser:
TEMPPO V6.1
TEMPPO Manager
Will be shown together with last name in
Text field (optional)
Check Box for the role Superuser, can only be
assigned in TEMPPO Manager
At least one TEMPPO Superuser has to be defined.
4.3 Database migration
Figure 311: Manager – Database migration
This tab is only active, if the Administrator is connected to the database (see
Database Connection). Database migration due to version changes of TEMPPO is
done here. If migration is needed, the buttons are active. Migrate processes the
built in migration script, with button Save the migration script can be saved to a
file (SQL-script for Oracle, VB-Script for Access). The saved script must then be
executed outside of TEMPPO.
Page 249
User Manual
Edition January 2015
5
TEMPPO V6.1
TEMPPO Administrator
TEMPPO
Administrator
The following configuration settings are defined with the TEMPPO Administrator
tool:
Database connection
Test automation settings
Roles
User management (except TEMPPO Superuser)
Metadata
Projects
License server connection
Configuration settings are written into the admin.properties file,
which is read by TEMPPO on application startup. Therefore
TEMPPO must be restarted, before any configuration changes
take effect.
You may start more than one TEMPPO Administrator application.
However: take into account that all Administrator applications
write to the same admin.properties file.
5.1 Database Connection
Figure 312: Administrator – Database (Oracle)
In this tab you can define various database connection configurations, where
each is identified by a DSN (Data Source Name). A new DSN can be created
Page 250
User Manual
Edition January 2015
TEMPPO V6.1
TEMPPO Administrator
using the button, which will prompt you to enter a unique DSN. A DSN can be
deleted by clicking the
button. A DSN can be renamed by clicking the
button. If you delete all DSNs, TEMPPO will not be able to connect to a database!
For each DSN you have to specify several connection parameters, which are
explained in the following.
TEMPPO supports two database management systems, selectable in the field
database. Depending on the chosen one, you must specify several connection
parameters:
Access: For Access you just simply have to specify the path to Access mdb.
TEMPPO automatically creates an ODBC entry.
Figure 313 – Administrator – Database (Access)
Oracle, MS SQL Server: You must specify the database name (SID), the
schema name (ask your database admin), the name or IP address of the
database server (Host) and the port number (Port) at which the database
server is listening for incoming connections. Contact your database
administrator for this information.
Furthermore you can activate the checkbox Login manually, that
activates the manual login window before displaying the TEMPPO main
window.
The currently selected DSN is the active one, i.e. TEMPPO uses its connection
parameters to connect to a database.
Using button Test you can verify your settings. A message will inform about the
result of the verification.
By clicking Connect the TEMPPO Administrator will establish a connection to the
database (user and password are required for Oracle). This will cause the tabs
Users, Projects, Migration and Roles getting enabled (if the user logged in is
allowed to do so by his assigned roles. Information about the database will be
displayed in the bottom of the tab.
5.2 Roles
The access to TEMPPO functionality is managed by roles. In the following tab
Roles the predefined TEMPPO roles are listed. On the one hand roles can be
edited or adapted and on the other side new roles can be created.
Page 251
User Manual
Edition January 2015
TEMPPO V6.1
TEMPPO Administrator
Figure 314 – Roles
Adding, editing and deleting are allowed. In the tab General you can fill in the
name and description or change the icon. In the tab Details the rights are listed.
Page 252
User Manual
Edition January 2015
TEMPPO V6.1
TEMPPO Administrator
Figure 315 – Role properties: General/ Details
The functions are predefined and cover the whole functionality of TEMPPO
Administrator and TEMPPO.
Level of access of the function:
New (or execute)
Edit
Delete
Read
Move Ownership
Consider User (objects can only be deleted if the user is the owner of the
object)
In the dialog only the possible checkboxes are shown. E.g. report: It only makes
sense and is only possible to execute a report. Therefore only the checkbox New
(or execute) can be selected.
By this way roles can be created and adapted due to user demands.
Page 253
User Manual
Edition January 2015
TEMPPO V6.1
TEMPPO Administrator
5.3 User management
Figure 316: Administration – User management
This tab is only active, if the connected user is allowed to by his assigned roles.
Users are created, changed and deleted here. The list shows all currently existing
users. By clicking the New or Properties button, the user properties dialog pops
up, where you can change the user name. Clicking the Delete button will delete
the selected user after you confirmed the verification message.
By selecting the checkbox LDAP, you can connect to a LDAP server and import
or synchronize users.
In principal, it is possible to use 2 different logins, on the one hand user can
login to TEMPPO automatically with their MS Windows account and on the other
side you can create user logins named as you like. Such “manual” logins need a
password.
The same functions with the exception of role assignment are offered in TEMPPO
Manager, for details see chapter 4.2,
Page 254
User Manual
Edition January 2015
TEMPPO V6.1
TEMPPO Administrator
Figure 317: User properties- Roles & Rights
To assign a defined role to a user, select tab Roles & Right and select a project.
Then check the roles the user should get for the chosen project and press the
button “apply”. Choose another project and assign roles to the user by clicking
the required checkboxes and pressing “apply”. A user can have different roles in
different projects.
The TEMPPO Superuser role can only be assigned in the TEMPPO
Manager – Users tab.
If a new role is assigned to a user, the user has to restart TEMPPO to have
access to the functionality provided by the newly assigned role.
5.3.1 LDAP
By selecting the checkbox LDAP a field for configuring LDAP connections is shown
(see Figure 244). After a successful connect you can import users from a LDAP
server or you can synchronize the existing TEMPPO users with the LDAP server.
For imported users you can see the LDAP server from which the user was
imported. If a user was created manually, the value in the column LDAP server is
not set.
5.3.1.1 LDAP Connection
Figure 318: Connection to the LDAP server
You can define various LDAP connection configurations, where each is identified
by a DSN (Data Source Name). A new DSN can be created using the
button,
which will prompt you to enter a unique DSN. A DSN can be deleted by clicking
the
button. A DSN can be renamed by clicking the
button. For each DSN
Page 255
User Manual
Edition January 2015
TEMPPO V6.1
TEMPPO Administrator
you have to specify several connection parameters, which are explained in the
following.
You must specify the name of the server (Host), the port number (Port), the
domain name (Base) and the user data (User and Password) to connect to the
LDAP server. The login name must be specified in the form of Domain\User.
By clicking Connect the TEMPPO Administrator will establish a connection to the
LDAP server. If the connect to the LDAP server was successful the buttons
Import users and Synchronize users are enabled. You can import users by
clicking the button Import users. By clicking the button Synchronize users
you can synchronize the existing TEMPPO users with the LDAP server.
5.3.1.2 Importing users from LDAP
Figure 319: Importing users from LDAP
You can search for a last name, first name, login, windows group, department,
location and a country. By clicking the button Clear you can delete the search
preferences. Clicking the Search button will perform the search and the result is
shown in the table below.
The search can be cancelled at any time by clicking the button Cancel.
Page 256
User Manual
Edition January 2015
TEMPPO V6.1
TEMPPO Administrator
Figure 320: Cancel a LDAP search
If you are searching for a Windows group or if the search output
is very large, the result of the search might not be complete,
because the performance of the LDAP server varies. So if you are
searching for a specific user, try to find him by searching for the
department or other criterias.
After selecting one or several users in the table the button Import is enabled. By
clicking this button you can import the selected users into TEMPPO. If you select
a user that is already a TEMPPO user, the user is updated.
You can cancel the import at any time by clicking the button Cancel.
Figure 321: Cancel the import from LDAP
5.3.1.3 Synchronizing users with LDAP
A LDAP search for all TEMPPO users is performed and if they were found the first
name and the last name are updated.
The synchronization will be performed for each user from the
current LDAP server or for manually created users. If a manually
created user was found, the column LDAP server is set.
The synchronization can be cancelled at any time by clicking the button Cancel.
Figure 322: Cancel the synchronization with LDAP
If there are TEMPPO users with the current LDAP server as origin that could not
be found in the LDAP server, a dialog shows these users. You can delete users by
clicking the button Delete.
Page 257
User Manual
Edition January 2015
TEMPPO V6.1
TEMPPO Administrator
Figure 323: Result of the synchronization with LDAP
5.4 Metadata
You can customize Metadata for the whole database, which provides a pool of
data that can be used in various projects. If you want to use special metadata in
a project, you have to assign them (see chapter 5.5.5).
The tab Metadata is divided into 6 tabs (if the tabs are not enabled, you do not
have the right to see it). The following values are predefined:
Test Levels: module test, integration test, system test, acceptance test,
regression test
Test Categories: state-based, GUI-layout, task-based, performance,
resource, security, safety, portability, reliability, maintenance, reuse,
usability.
Attributes: none
Uploads: none
Requirement Structure: none
User Fields: none
These tabs are described in the following chapters.
5.4.1 General Behavior
Metadata are database wide.
Metadata in a project can only be used, if they are assigned to the project.
Metadata names have to be unique within all projects.
5.4.1.1 New Metadata Entries
How to create a new metadata in TEMPPO?
First select the corresponding tab (test level, test category, attributes, uploads,
requirements user fields) and click .
There are two possibilities now:
Page 258
User Manual
Edition January 2015
TEMPPO V6.1
TEMPPO Administrator
1) Type the name of the Metadata, the description and press the button OK.
TEMPPO verifies now, if the Metadata already exists. If the metadata is
existing, you are asked, if you want to assign this metadata to your
project. If the metadata does not exist, it is saved to the metadata pool
and the assignment to the project is made.
2) Type in a match criterion of the metadata and click on the arrow of the
combo box. All metadata entries that match the criterion are listed in the
combo box. Choose one, press the button ok and confirm the assignment
question.
5.4.1.2 Delete Metadata Entries
Choose the right metadata tab and click the button Delete. If the metadata is not
referenced in any project, the metadata is deleted.
5.4.1.3 Move ownership
In the TEMPPO Administrator there is the possibility to move the ownership of a
metadata. After pressing the button “Move Ownership” the following dialog
comes up.
Figure 324: Move Ownership
The new owner of the metadata can be chosen.
5.4.2 Test Levels
Here you can add, delete, view and filter test levels. In Figure 325 all test levels
are displayed with name, owner and creation date.
Page 259
User Manual
Edition January 2015
TEMPPO V6.1
TEMPPO Administrator
Figure 325 – Metadata: Test Levels
A new test level can be added by pressing the button New in the tab Test
levels and Figure 326 is displayed.
Figure 326 – New Test Level
In this window general information like name, creation date and owner and a
Description of the test level can be entered. In the second tab (Details)
additional test levels can be added. (Additional) test levels are related to a
test level.
Furthermore, it is possible to add supplementary test levels for the purpose of
using test cases in different test levels. For example, there is a test structure
related with test level System Test, which contains the additional test levels
Acceptance and Regression Test. Each test case in this test structure can now be
assigned to one or both of the additional test levels (see 3.1.2.4).
It’s not possible to delete test levels, which are already used in
projects (test structures or test cases).
Page 260
User Manual
Edition January 2015
TEMPPO V6.1
TEMPPO Administrator
5.4.3 Test Categories
Test categories are used to denote test packages that contain only test cases of
a special type.
Figure 327 – Metadata: Test Categories
Here you can add, delete, view and filter test categories. When pressing , the
window Test Category Properties is opened. A name must be entered, and
user name and creation date are suggested automatically. The same window is
shown when applying
for editing the test category properties.
Figure 328 – Test Category Properties
5.4.4 Attributes
Attributes are applied to test cases, test results and test suites.
They can be applied in addition to the standard attributes (owner, creation date,
priority, and working state). Such attributes like working state, tester, sample
phase etc. help the test manager to realize his objectives of the test plan.
Page 261
User Manual
Edition January 2015
TEMPPO V6.1
TEMPPO Administrator
Therefore it should be planned before creating a test structure or a test
execution, which attributes are used.
Especially for pursuing the test objectives it is important to define these
attributes in TEMPPO. During the test process you may be asked always the
same questions like:
How is the progress of test case development in comparison to the last
day/week/month?
How many test cases are ready for test execution?
How many test cases are ready for regression testing?
How many test cases of the current test suite are passed/failed?
Besides test case attributes, you can assign attributes to test suites and test case
results, too. These attributes can be used for different issues. E.g., during test
case execution the version of the SUT (= software under test) sometimes
changes. But the test manager wants to know which test cases were executed
with which SUT version or which SUT versions are used in the test suite.
Moreover, predefined attributes provides the users from making mistakes when
writing the necessary information.
Attributes are also used for filtering, analyzing and reporting the test structure or
the test suite.
Figure 329 – Metadata: Attributes
Here, you can add, delete, view and fiter attributes. In the master screen, the
selection grouped by type can be changed by the box above.
When pressing , the window Attribute Properties is opened. A name can be
entered, and user name and creation date are suggested automatically. In
addition, the attribute has to be categorized for a test case, test suite or/and test
result. A test suite attribute may also be used for test execution attributes, but
not for a test case’s one.
This implies that the usage of an attribute can be changed after creation.
The boxes for categorizing are disabled, if the attribute is already used.
In tab Details the possible attribute values must be defined.
Page 262
User Manual
Edition January 2015
TEMPPO V6.1
TEMPPO Administrator
Figure 330 – Attribute Properties
An attribute cannot be deleted, if it’s already used in a test case.
5.4.4.1 Copy and rename of UDA
For user defined attributes the possibility of copy and rename (copy an existing
UDA with or without values and rename it) is offered.
Page 263
User Manual
Edition January 2015
TEMPPO V6.1
TEMPPO Administrator
Figure 331 – Copy of UDA
Rename the attribute by changing the name of the attribute (see Figure 332). If
the checkbox Copy values is clicked, the values of the attribute to copy
(example: values of “Milestone”) are copied too. If the checkbox is not clicked,
only the attribute is copied (not the values).
Figure 332 – Copy and Rename
5.4.5 Uploads
If you activate the tab Uploads (Figure 333), you can
-
Upload new files without any reference
View uploads properties
Delete uploads from the database
Delete all non-referenced uploads
Page 264
User Manual
Edition January 2015
TEMPPO V6.1
TEMPPO Administrator
Figure 333 – Metadata: Uploads
If you activate Delete all non-referenced uploads, a confirmation window
(see Figure 334) is displayed, before deleting all non-referenced uploads.
Figure 334 – Confirmation window
5.4.6 Requirement Structures
With requirement structures you can assign requirements to test cases or test
packages. In the list you see all existing requirement structures (see Figure
335).
You can create new requirement structures with TEMPPO Requirement Manager.
Page 265
User Manual
Edition January 2015
TEMPPO V6.1
TEMPPO Administrator
Figure 335 – Metadata: Requirement Structures
Figure 336 – Show requirement attributes
With the button Show requirement attributes the assigned attributes are
shown in a new window (see Figure 337). It’s only possible to un/assign
attributes, when the requirement structure is not imported.
Page 266
User Manual
Edition January 2015
TEMPPO V6.1
TEMPPO Administrator
Figure 337 – Requirement attributes
With a double click on an attribute (tab attributes) the properties of the
attribute are shown (see Figure 338). It’s not possible to change the requirement
attribute, because it’s imported from DOORS or RequisitePro.
Page 267
User Manual
Edition January 2015
TEMPPO V6.1
TEMPPO Administrator
Figure 338 – Properties of attribute
5.4.7 User Fields
Figure 339 – Metadata: User Fields
For test steps new columns can be defined for test structures and test suites.
When pressing the button New (see Figure 340), you can select between a text
and image column for test structure or suite.
Page 268
User Manual
Edition January 2015
TEMPPO V6.1
TEMPPO Administrator
Figure 340 – Additional test step column
5.5 Projects
Figure 341 – Administration of Projects
The Project tab is only active, if the user has a role with sufficient rights. A
TEMPPO Superuser has access to all projects.
If allowed due to role privileges, you can create and copy projects, delete
test suites, labels, branches, test structures or even entire projects and
assign metadata to projects.
5.5.1 Creating a project
A new project can only be created in TEMPPO Administrator.
After pressing the button New, Figure 342 is displayed. The user specifies a
unique name and a description. TEMPPO automatically supplies the creation date
and owner, which is taken from the Windows account.
Page 269
User Manual
Edition January 2015
TEMPPO V6.1
TEMPPO Administrator
Figure 342 – Project Properties – New Project
Figure 343 – Project Properties: Roles
In the tab Roles, roles can be assigned to users (see Figure 343). By pressing
OK the project is created. Then the project can be edited and worked on in
TEMPPO.
Page 270
User Manual
Edition January 2015
TEMPPO V6.1
TEMPPO Administrator
5.5.2 Copying a project
A new project can only be copied in TEMPPO Administrator.
If a project selected and the button Copy current project is pressed, Figure
342 is displayed.
Figure 344 - Copy project confirmation
The user is asked whether he wants to copy the current selected project including all
assigned meta data except requirement structures. If the user presses Yes, the project
including assigned users plus meta data except requirement structures is copied.
5.5.3 Deletions
The delete button is active, if a node (project, test structure (version), test suite)
in the tree is selected. By clicking it, the corresponding object is deleted after
you confirmed the verification message.
You cannot delete the main latest label or any latest label in a
branch!
5.5.4 Test Suites: check consistency,
unlock
The buttons Check Consistency of a selected test suite and Unlock selected
test suite are active, if a test suite is selected.
Furthermore it is possible to unlock a whole test suite/structure. In case of
problems during exporting and importing test suites it may happen that
references remain in the central database. To solve these problems it is
necessary to unlock the test suite. Figure 341 shows the locked test suite Test
Suite for export. The Lock button becomes enabled when the test suite is
selected.
If you unlock a test suite/structure no more imports are possible.
After that, exported test suites are of no more use and can be
deleted from the Export Database.
5.5.5 Assign Metadata
For a chosen project all kinds of metadata (test level, test category, attributes,
uploads, requirement structures, user fields) can be assigned to the project.
Metadata is defined project spanning. The assignment is made per project.
Page 271
User Manual
Edition January 2015
TEMPPO V6.1
TEMPPO Administrator
Figure 345 – Metadata Editor
Example: On the left side all available test categories are listed. By clicking the
buttons >>, >, <,<< the test categories can be moved to right list box. The
assignments on the right are saved by pressing the button “Apply”.
5.5.6 Move Ownership
In the TEMPPO Administrator there is the possibility to move the ownership of
the whole project or of parts of it. A part of a project is a test structure or a test
suite.
The button Move Ownership in the project tab (see Figure 341) is enabled, if a
project (or a test structure or a test suite) is selected.
After pressing the button “Move Ownership” the following dialog comes up.
Figure 346 – Move Ownership
The new owner of the project (or part of it) can be chosen. By clicking “ok” and
a project was selected, the owner of all items of the project (test structure, test
package, test case, test suite) that have the same owner as the project and that
are not locked by other users, is changed to the new selected one.
If a test structure was selected and the move ownership button is pressed, the
test structure, the test packages and test cases with the same owner as the test
structure are changed to the newly selected one.
If a test suite was selected, the owner of the test suite is changed.
Page 272
User Manual
Edition January 2015
TEMPPO V6.1
TEMPPO Administrator
5.5.7 Freeze, Unfreeze
Figure 347 – Freeze, Unfreeze
From the development process point of view it may be necessary for a test
manager to “freeze” a test structure or a test suite for the purpose of providing
and keeping it read-only.
In general, test structures and test suites can be frozen.
A frozen test structure cannot be edited any more. It can be opened in read-only
mode. A freeze- action on a non-latest version means that it is not possible to
create any branches.
If a test suite is selected and the freeze button is pressed, this test suite is
frozen which means that the test suite is not editable any more. No results can
be added or changed. The test suite can be opened in read-only mode. The
precondition of freezing a test suite is that the corresponding test structure
version is frozen.
Every frozen test suite can be unfrozen explicitly. This means that the frozen test
suite is selected and the unfreeze button is clicked. After the unfreeze action is
done, the test suite is editable again.
Every frozen test suite can be unfrozen implicitly too. This means that the test
structure version has to be unfrozen first.
If the user pressed the unfreeze button for a test structure version, he is
informed if there are frozen test suites and that these frozen test suites (and the
test structure version) will be unfrozen, too. The user can unfreeze all or cancel
the action.
If a frozen test structure or test suite is selected, the ‘freeze’ button changes its
text in icon and bubble help to “unfreeze”. By pressing the button the test
structure or test suite can be made editable. The default TEMPPO Superuser and
the Key User role get the rights to freeze / unfreeze test structure versions
and/or test suites.
Frozen test structures can be exported. Frozen test suites cannot be exported.
No import to frozen test structures/test suites is possible. A new test suite can
Page 273
User Manual
Edition January 2015
TEMPPO V6.1
TEMPPO Administrator
only be generated from a frozen test structure in any branch version, but not in
the main version. If a main version is frozen and activated, a new test suite
cannot be generated, the new test suite – menu item is not enabled.
If a branch version or latest version is frozen and activated, a new test suite can
be generated and the new test suite – menu item is enabled.
If a version is checked in and is frozen, no branch can be generated and
therefore no new test suite can be generated.
The frozen test structure/test suite cannot be edited. There is only the possibility
to generate analysis or reports and filters.
5.6 Locks
This tab is only active, if a user with corresponding rights is connected to the
database In TEMPPO Administrator it is also possible to find locks. When
activating the tab Locks in the left part of the windows the projects together
with test structure versions and test suites are displayed.
Figure 348 – TEMPPO Administrator – Locks
If you select any item of the tree and press the button Find locks, the
corresponding locks are displayed in the table. Depending on the selected item
(and of course the available locks) the table will be quite large.
Figure 349 – TEMPPO Administrator – Large lock table
Additionally you have the possibility to start a more concrete find by activating
the checkboxes Exclude test suites and Suppress export locks.
Page 274
User Manual
Edition January 2015
TEMPPO V6.1
TEMPPO Administrator
Exclude test suites:
If you want to see the locks of a project without test suites, activate that
checkbox
Suppress export locks:
If a test suite is exported to XML or DB, each item is locked. This may
cause an large amount of locked item. You hide those items by activating
that checkbox.
Locked items can be unlocked by selecting any them and pressing the button
Unlock selected items.
Figure 350 – Unlock
5.7 License Server
Connection
Figure 351: License server connection
The licensing mechanism allows two ways of using TEMPPO:
local license: a valid license file (license.dat) must be located in the
TEMPPO installation directory (e.g. c:\programme\temppo 5.4).
license server: an existing license server is specified in this tab (for
installing a license server see chapter JLMS Installation in the TEMPPO
Installation Guide). You must specify the name of the machine (or IP
Page 275
User Manual
Edition January 2015
TEMPPO V6.1
TEMPPO Administrator
address) and the port number (usually 2000) where the license server is
running. When connected to it, you can see information about it in the
sub-tabs Server info, License usage, Log.
5.7.1 Using a license server on a
computer with several network
interface cards
When working on a computer with several NICs (network interface cards) the
connection to the license server might cause problems, because the wrong IP
address is sent to the license server. This problem can be solved in two ways:
1. Reorder your network cards:
Open Control Panel – Network Connections
Menu Extended – Extended Settings…
The NIC connected to LAN must be the first in the list (see screenshot)
Figure 352: Order of network interface cards
2. Add TEMPPO start option:
Open <Installation Directory>\launcher.properties with a text
editor
Add –Djava.rmi.hostname=<IP address> to TEMPPO.vmargs, e.g.
TEMPPO.vmargs = -Xms128m –Xmx256m –DentityExpansionLimit=1000000 –
Djava.rmi.hostname=158.226.235.13
Page 276
User Manual
Edition January 2015
6
TEMPPO V6.1
JUnit
JUnit
Since TEMPPO V3.0, it is possible to manage and execute JUnit test methods with
TEMPPO. The following paragraphs describe the scope of the JUnit extension.
6.1 Terms
Testing terms are used differently in the JUnit community and in TEMPPO. In
order to clarify the meanings, the following table serves as a reference.
TEMPPO
Description
JUnit
Defined in JUnit by
Test
structure
The entire tree of test
packages and test cases
-
-
Test
package
A hierarchy of test packages test suite a) suite() method
(not exactly
and test cases
in an arbitrary class
the same
b) the list of all test
meaning)
methods
in a sub-class of
TestCase
test suite
A subset of test cases from
the test structure, intended
for execution in a certain
test. Contains recorded test
results.
Test suite as above
test case
A set of test inputs,
execution conditions, and
expected results developed
for a particular objective.
Test
method
a method in a sub-class of
TestCase. Naming
convention: starts with
“test”.
Passed
Test result, indicating that
the actual output matches
the expected.
-
-
Failed
Test result, indicating that
the actual output does not
match the expected.
Failure
return code of test method
invocation.
Blocked
Test result, indicating that
Error
an error or exception
occurred during test
execution; no comparison of
actual and expected output
was possible.
(not exactly
the same
meaning)
return code of test method
invocation.
Page 277
User Manual
Edition January 2015
TEMPPO V6.1
JUnit
Table 3 – Terms used in TEMPPO and JUnit
6.2 Configuration
Two configurations are necessary to use the JUnit extension: test collector and
classpath. The configuration is done in the TEMPPO application via menu
Windows > Options, once for the whole TEMPPO session. The classpath is
entered in the “Arguments” field in the usual format:
-cp path1;path2;...
As in the JUnit framework, it must point to both the JUnit tests and the Java
classes under test. The test collector is the part of the JUnit extension, which
searches for JUnit test cases in the specified classpath. Following test collectors
are available:
SimpleTestCollector:
searches for JUnit classes in files matching the
pattern
classFileName.endsWith(“.class”) &&
classFileName.indexOf(‘$’) < 0 &&
classFileName.indexOf(“Test”) > 0
LoadingTestCollector:
searches for JUnit classes by instantiating all
*.class files in the classpath and verifying if:
class.containsSuiteMethod() ||
(
class.extends(junit.framework.Test) &&
class.isPublic() &&
class.hasPublicConstructor()
)
Page 278
User Manual
Edition January 2015
TEMPPO V6.1
JUnit
Figure 353 – Settings for import and execution of JUnit test cases
6.3 Import JUnit test cases
6.3.1 Description and steps
The import function reads JUnit test cases as well as their suite structure from a
JUnit test class. It creates a new test package in TEMPPO, which contains further
test packages and eventually test cases, according to the suite structure found in
the JUnit test class. The generated test cases refer to JUnit test methods.
You can access the import function through the TEMPPO menu
Tools>JUnit>Import... This menu is activated only when an item in the test
structure is selected that can host a new test package, i.e. a test package or the
root node of the test structure.
A wizard guides you through the steps necessary to import the JUnit test cases.
The following steps are encompassed:
1. Introduction: Explains the steps of the import procedure
Test Class Selection: Provides the list of JUnit test classes you may import. Only
classes found in the classpath are listed here (see 6.2).
Test Case Selection: Provides the hierarchical structure of test cases in the suite
defined by the selected JUnit class. Select those test cases that you want to
import into TEMPPO.
Package Default Values: Allows to set default values for all new test packages
Test Case Default Values: Allows setting default values for all new test cases.
Summary: Shows a list of your choices from previous steps.
Here is a sample import sequence.
Page 279
User Manual
Edition January 2015
TEMPPO V6.1
JUnit
Figure 354 – Starting the import procedure
Figure 355 – General description of the following steps.
In the next step, the JUnit test class can be selected. All classes with names that
start with “All Tests” are shown with a folder icon, all other classes get a sheet
icon. This is in conformance with the TestRunner of the original JUnit distribution.
The icons are to some extent misleading because they suggest that only test
classes with folder icons will be converted to TEMPPO test packages. However,
each class that can be selected in this step will be converted to a (potentially
hierarchically structured) test package.
Page 280
User Manual
Edition January 2015
TEMPPO V6.1
JUnit
Figure 356 – Step 2: A JUnit test class can be selected, by which a JUnit
test suite is defined.
After clicking next, the test collector specified in the Administrator (see 6.2)
starts searching for JUnit test classes. JUnit allows having nested test suites (one
test suite containing others) and it also allows naming two or more test suites
having the same parent test suite identically, e.g.
All Junit Tests
junit.samples.VectorTest
junit.samples.money.MoneyTest
Framework Tests
Framework Tests
Framework Tests
Framework Tests
Since TEMPPO will create a Test Package for each JUnit test suite and TEMPPO
does not allow identical names of items with the same parent, a warning
message will be raised, if the test collector finds test suites named like described
above (for further details see 6.3.2).
Figure 357: Warning of duplicate test suite names
The related test suites are marked accordingly and can’t be selected for
importing.
Page 281
User Manual
Edition January 2015
TEMPPO V6.1
JUnit
Figure 358 – Step 3: All or a subset of JUnit test cases can be selected.
Page 282
User Manual
Edition January 2015
TEMPPO V6.1
JUnit
Figure 359 – Step 4: Test package default values can be entered.
In the next step, default values for JUnit test methods (i.e. TEMPPO test cases)
can be entered. Note that the same tabs as for TEMPPO test cases are presented
in the wizard. However, it is not possible to enter values in the “General” tab.
The reason is that the only possible input field would be “Test Goal”, and there is
no meaningful text that could be entered there. Since the test goal must be
specific for each individual test case, it does not make sense to define one
common (and therefore abstract) goal for all test cases.
Figure 360 – Step 5: Test case default values can be entered.
Page 283
User Manual
Edition January 2015
TEMPPO V6.1
JUnit
Figure 361 – Step 5: The summary of the import wizard.
Figure 362 -: Step 5: The result of the import wizard.
6.3.2 References to JUnit test cases
Structuring of test packages: After importing, a hierarchy of test packages
and test cases according to the hierarchy of the suites defined in the JUnit test
class is created. The new test packages and test cases are named according to
the JUnit items, and a reference to a JUnit class and method is recorded in each
test case.
Naming of test packages: If the JUnit suite object is created by defining a test
class (e.g. ...new TestSuite(SimpleTest.class);), the test package is named
according to this JUnit class. The naming pattern is package.subpackage.class.
If a JUnit suite provides a descriptive name (e.g. ...new TestSuite(“All JUnit
Tests”);), it is used instead.
If the JUnit suite object has no name and no defined test class (e.g. ...new
TestSuite(); ), the test package gets the current java object name of the JUnit
suite (e.g. junit.framework.Suite@12345). Notice that this name doesn’t refer to
the JUnit suite and thus the reference is lost. Since this will disable a proper
update, the JUnit suite should be always created either by giving it a name or by
defining a test class.
It is highly recommended to create a JUnit suite by giving it a
name or by defining a test class in the constructor. Otherwise
the referenced Test Package in TEMPPO will get the temporary
object name of the suite (e.g. junit.framework.Suite@12345).
If this happens, the reference to the JUnit suite is lost and a
later update won’t work properly!
Page 284
User Manual
Edition January 2015
TEMPPO V6.1
JUnit
Figure 363 – Step 5: Names of test packages (JUnit test suites).
Naming of test cases: A JUnit test case is implemented as a method of a subclass of TestCase and usually has a name starting with “test”. The test cases in
TEMPPO will be named according to the JUnit method name, followed by the
class name in parentheses: testMethod(SubClassOfTestCase).
Figure 364 – Step 5: Names of test cases (JUnit test methods).
Basically you are free to edit and change the automatically
created structure and the names of test packages and test
cases. However, the update function (see below) relies on the
names to maintain the relationship to the JUnit test classes.
Page 285
User Manual
Edition January 2015
TEMPPO V6.1
JUnit
Referencing the JUnit class file: In the Automation panel, each test case
contains a reference to the file where its code is defined. This is a JUnit class file
and its path is written like in Java. E.g., a reference that reads
junit.samples.VectorTest refers to a class file ...\junit\samples\VectorTest.class.
Figure 365 – Step 5: Reference to the JUnit class file.
Referencing the JUnit test method: In addition, each TEMPPO test case
knows the name of its JUnit test method. This information is kept in the Script
Data field of the Automation panel (see above).
The values of the JUnit class file and the test method name are
editable for each test case. However, if you change these
values, TEMPPO will no longer be able to find the JUnit test
method. In addition, the synchronization with a newer version
of the JUnit class file will be considerably hampered (see
update function below).
6.4 Update JUnit test cases
JUnit test suites and their test methods evolve over time. The update function
makes it possible to synchronize these changes with the TEMPPO test structure
contents. As mentioned above, the names of test packages and test cases are
used as references to the corresponding JUnit suites and test methods. So in
order to make the update work as you would expect it, do not change any of the
following items:
Names of test packages
Names of test cases
Entries in test case Automation tabs
Page 286
User Manual
Edition January 2015
TEMPPO V6.1
JUnit
6.4.1 Description and steps
The update function allows you to update the JUnit test cases as well as their
hierarchical structure in accordance with changes in the corresponding JUnit test
classes. There are two tasks for the update function:
Add new test cases and test packages to the test structure
Remove obsolete test cases and test packages
You can access the update function through the TEMPPO menu
Tools>JUnit>Update... This menu is activated only when a test package is
selected. There is no means to update the whole test structure at once.
A wizard guides you through the steps necessary to update a TEMPPO test
package. The following steps are encompassed:
2. Introduction: Explains the steps of the update procedure
Test Class Selection: Provides a list of JUnit test classes you may update. Only
classes found in the classpath are listed here (see 6.2).
Add New Test Cases: Provides the hierarchical structure of new test cases, i.e.
such that were found in the suite defined by the selected JUnit class but not
in the selected test package. Select all test cases that should be imported into
TEMPPO.
Remove Obsolete Test Cases: Provides the hierarchical structure of obsolete test
cases, i.e. such that were found in the selected test package but not in the
suite defined by the selected JUnit class. Select all test cases that should be
removed from the selected test package.
Package Default Values: Allows to set default values for all new test packages
Test Case Default Values: Allows setting default values for all new test cases.
Summary: Shows a list of your choices from previous steps.
Here is a sample update sequence. To simulate some changes, we apply the
following before the update procedure is started:
remove test package Framework Tests (to simulate a new test package)
create a new test case in package junit.samples.VectorTest (to simulate an
obsolete test case)
Page 287
User Manual
Edition January 2015
TEMPPO V6.1
JUnit
Figure 366 – Starting the update procedure
Figure 367 – Step 1: General description of the following steps.
Page 288
User Manual
Edition January 2015
TEMPPO V6.1
JUnit
Figure 368 – Step 2: The correct JUnit test class is automatically
selected.
In the next step, new test packages and test cases will be detected. Since we
removed two test cases in the import step (see Fig. 90), they will be detected as
new. We also removed test package Framework Tests (see above), so it will also
be detected as a new JUnit test suite.
Figure 369 – Step 3: Two new test cases and a new test package are
detected automatically.
Now, the test case ObsoleteTestCase that we created just before (see above) will be
detected as obsolete, because it is not contained in the JUnit test class
junit.samples.VectorTest.
Page 289
User Manual
Edition January 2015
TEMPPO V6.1
JUnit
Figure 370 – Step 4: An obsolete test case was detected and we mark it
for being removed.
In the next steps, default values for JUnit test suites and test methods can be
entered, just like in the import procedure.
Figure 371 – Step 5: Test package default values can be entered.
In step 6 Test case values can be entered.
Page 290
User Manual
Edition January 2015
TEMPPO V6.1
JUnit
Figure 372 – Step 5: The summary of the update wizard.
Figure 373 – Step 5: The result of the update wizard.
6.4.2 References to JUnit test cases
The structure of test packages and test cases as well as their names are the
same as with the import procedure. Updating behaves in conformance with
importing and relies on the naming patterns described above.
6.5 Test Execution
6.5.1 Description and Steps
Execution allows you to run the JUnit test cases from TEMPPO and to collect the
test execution results in the TEMPPO database for further analysis.
Like any other automated test cases, you can execute JUnit test cases by
creating a test suite and running the selected test cases or whole test packages
(from context menu or menu: Test Execution/Run automated).
Page 291
User Manual
Edition January 2015
TEMPPO V6.1
JUnit
Figure 374 – Executing JUnit test cases.
Running a JUnit test case involves three levels of execution: (1) TEMPPO, where
the JUnit test case class is instantiated and the corresponding method is called,
(2) JUnit, where the actual result is compared to the expected result in the test
method, and (3) the classes of the program under test that is executed during
the test. To run the tests, TEMPPO provides its own TestRunner that calls the
JUnit test methods and collects their results. Thus, for executing JUnit tests,
TEMPPO can be used interchangeably with other JUnit test runners, like
junit.swingui.TestRunner.
TEMPPO
Test Runner
Call JUnit test method
Return test result
JUnit Framework
Call method to test
Return calculated value
Program Under Test
Note: To execute the JUnit tests, the classpath has to contain not
only contain the JUnit test classes but also the classes of the
program under test.
Page 292
User Manual
Edition January 2015
TEMPPO V6.1
JUnit
6.5.2 Interpreting the Test Results
The execution of JUnit test cases yields one of the three results listed in Table 4.
In case of a failure or blockage, a description of the reason and the stack trace
showing the position where the failure occurred is given in the Result Output field
in the panel General of the test case as shown in Fig. 108.
Icon
TEMPPO
Result
JUnit
Result
Description
PASSED
-
The test case was executed and the actual result
returned by the program under test matched the
expected result as specified in the JUnit test case.
FAILED
Failure
The test case was executed and the actual result
returned by the program under test did not match
the expected result as specified in the JUnit test
case.
BLOCKED
Error
The execution of the test case had errors and no
results could be compared. There are basically two
possibilities:
The call from TEMPPO to the JUnit test class failed.
E.g. because the JUnit class did not exist in the
classpath, the specified test method did not exist, or
the class/method were not implemented according to
the JUnit interface
The execution of the JUnit test case had errors.
E.g. the JUnit test case or the program under test
threw an (uncaught) exception or even the whole
program under test crashed.
Page 293
User Manual
Edition January 2015
TEMPPO V6.1
JUnit
Table 4 – Possible test execution results
Figure 375 – Failed test case: result message and stack trace
6.6 Known Issues
Unsupported JUnit extensions
Currently, only standard JUnit test classes are supported, i.e. JUnit test cases are
expected to be an instance of junit.framework.TestCase and JUnit suites are
expected to be an instance of junit.framework.TestSuite.
Performance of removing obsolete test cases
When a larger number (more than 10) of obsolete test cases was selected for
removing in the Update wizard, you may experience a delay of more than 30
seconds after finishing the wizard dialog.
Malicious JUnit test cases
Executing a malicious test case may have a negative effect on the TEMPPO
application, which runs in the same VirtualMachine as the JUnit test execution.
Currently no means are provided for setting an execution timeout or to manually
cancel the test execution.
Reloading JUnit classes
Once the unit test classes were loaded by the Java VM (e.g. when they are
executed), they will not be reloaded until TEMPPO is restarted.
Classpath for JUnit test cases
The classpath containing the JUnit test cases can only be set once for each
TEMPPO session and not separately for each test structure or TEMPPO project.
Page 294
User Manual
Edition January 2015
TEMPPO V6.1
JUnit
If the classpath contains two class files with the same fully qualified name the file
with the newest build date will be loaded.
Anonymous inner classes
By statically creating the tests using anonymous inner classes that are not
public, the tests from this suite will not be executeable by TEMPPO. With a JUnit
TestRunner, this construction works because there JUnit suites are executed as a
whole whereas TEMPPO tries to instantiate and execute each test case by itself.
Sample code:
public class MyTestPkgWithStatSuite extends TestCase {
public MyTestPkgWithStatSuite(String name) {super(name);}
public static Test suite() {
TestSuite suite= new TestSuite(“MyTestPkgWithStatSuite”);
suite.addTest( new MyTestPkgWithStatSuite(“testSomethingRight”) {
protected void runTest() { testSomethingRight(); }
} );
return suite;
}
public void testSomethingRight() {assertTrue(true)}
}
Page 295
User Manual
Edition January 2015
TEMPPO V6.1
TEMPPO Designer (IDATG)
7 TEMPPO Designer
(IDATG)
TEMPPO Designer (IDATG) is your gateway to professional and cost-efficient test
automation. While up to now test teams had to spend a huge effort for the
implementation and maintenance of automated test cases, TEMPPO Designer
(IDATG) aims at generating test cases based on a simple model of the
application. The advantage is obvious: Instead of having to write test scripts
from scratch and manually adapt each of them whenever there is a change in the
tested application, all that is needed now is keeping the model up-to-date. The
costs for test maintenance are reduced dramatically thus leading to shorter test
cycles and better product quality.
The unique TEMPPO Designer (IDATG) tool combines user-friendly test
specification editors with a patented test case generator that employs a wide
range of systematic test methods. TEMPPO Designer (IDATG) supports a number
of popular GUI testing tools but can also generate scripts for other test
interfaces.
For using TEMPPO Designer (IDATG) from TEMPPO, it is necessary to tick the
checkbox TEMPPO Designer (IDATG) on tab General of the test structure’s
root.
Figure 376 – TEMPPO Designer (IDATG)
As a preparation for designing test cases in TEMPPO Designer (IDATG) it is
necessary to create so-called Task Packages in TEMPPO. A task package is a
special type of test package that has got an ID and the same attributes as a test
case. You can create any kind of task package hierarchy.
Page 296
User Manual
Edition January 2015
TEMPPO V6.1
TEMPPO Designer (IDATG)
7.1 Creating Task Packages
Task packages only can be created below the folder TEMPPO Designer (IDATG)
Tasks by activating the menu item New->Task Package or New->Task
Package before.
A task package contains all properties of a test case: ID (fixed), name, owner,
created, updator, updated, test category (optional), description.
Figure 377 – Task Package – Tab general
In addition, attributes can be set which are later inherited and used for test cases
generated by TEMPPO Designer (IDATG). It is necessary to assign attributes to
task packages and not to test cases because test cases may be generated more
than once. Each time test cases are generated again, all the previous information
will be lost. Therefore the meta information of test cases generated by TEMPPO
Designer (IDATG) is stored in task packages.
Page 297
User Manual
Edition January 2015
TEMPPO V6.1
TEMPPO Designer (IDATG)
Figure 378 – Task Package – Tab attributes
7.2 Design Test Cases
If you have finished creating some task packages, you can design and generate
test cases by selecting the node “TEMPPO Designer (IDATG) Tasks” and call the
menu item Tools->TEMPPO Designer (IDATG)->Design Test Cases.
Figure 379 - Design Test cases
After activating the menu item Design Test Cases the window Connection
Status (Figure 380) and TEMPPO Designer (IDATG) itself are displayed.
Page 298
User Manual
Edition January 2015
TEMPPO V6.1
TEMPPO Designer (IDATG)
Figure 380 – Connection Status
TEMPPO Designer (IDATG) offers a huge number of features for test design, test
generation, and applying several test design methods. For detailed information
see the TEMPPO Designer (IDATG) User’s Guide.
The following screen shots illustrate a simple example of designing a task flow
with several steps. When TEMPPO Designer (IDATG) is opened, it displays the
task packages defined in TEMPPO and automatically creates a use case for each
leaf in the task package hierarchy The user has now the possibility of creating
task flows consisting of several steps.
The following figure shows a modeled task flow consisting of some steps. A
(task) step consists of several attributes like name, description, expected result,
commands for test script, conditions etc. All this information will be used in the
generated test cases. Figure 382 displays a sample step.
Figure 381 – Design Test Cases
Page 299
User Manual
Edition January 2015
TEMPPO V6.1
TEMPPO Designer (IDATG)
Figure 382 – Task Flow Step
If the user has finished the modeling process, he can start TEMPPO Designer
(IDATG)’s test case generator. Depending on the selected options, TEMPPO
Designer (IDATG) will automatically generate test cases until the desired
coverage is reached. For instance, 2 test cases would be generated for the task
flow above if “Step Coverage” is selected. To import these test cases into
TEMPPO, the user just has to press the “Save” button.
Figure 383 – Save dialog
It can be configured in settings for TEMPPO Designer, if test
structure is checked-in with data of TEMPPO Designer.
The file used by TEMPPO Designer (IDATG) is saved in TEMPPO
for each test structure version.
For manual test cases, the generated steps are displayed in TEMPPO. TEMPPO
fields are mapped to TEMPPO Designer (IDATG) fields as follows:
Instruction =
Description
Input
=
Commands for Test Script
Expected
=
Expected Result
For automated test cases, only the path to the generated test script is
displayed. A test case is treated as automated, if it has at least once been
exported by TEMPPO Designer (IDATG) as a test script for an automation tool
(e.g. TestPartner).
Page 300
User Manual
Edition January 2015
TEMPPO V6.1
TEMPPO Designer (IDATG)
tbd
Figure 384 – Test cases generated by TEMPPO Designer (IDATG)
7.3 Updating Test Cases
Chapter 7.2 describes the creation of task packages and the design and
generation of test cases with TEMPPO Designer (IDATG).
Of course, it is possible to change the existing task packages or to add new ones
by calling TEMPPO Designer (IDATG) again.
7.4 Restore Designed Test
Cases
If the connection between TEMPPO and TEMPPO Designer (IDATG) is lost (e.g.
because the user aborts it by pressing the button Cancel in the window
Connection Status), it is possible to avoid data loss by storing the current
TEMPPO Designer (IDATG) project as XML file.
To restore this data and transfer it to TEMPPO, the menu item Restore
Designed Test Cases can be used. This will cause TEMPPO Designer (IDATG) to
open, to load the XML file and to synchronize it with the task package structure
received from TEMPPO. By pressing “Save” the data can be transferred back to
TEMPPO.
Page 301
User Manual
Edition January 2015
8
TEMPPO V6.1
Command Line
Command Line
TEMPPO offers following command line parameters:
Remark: No blanks are allowed between commas!
-open <project,test
structure,[version],[test suite]>
, separated list of values, where the names
for project, test structure must be specified
and TEMPPO is opened with the latest
version of the test structure.
Optionally a special version and a test suite
can be entered in order to open
immediately a test structure version or a
test suite.
-run <project,test
structure,version,test suite> [ -exit ]
, separated list of values, where the names
for project, test structure, version and test
suite must be specified. All automated test
cases in the specified test suite will be
executed. Optionally TEMPPO is closed with
the –exit parameter.
-export_teststructure <project,test
structure,version,export file>
, separated list of values, where the names
for project, test structure, version and
export file must be specified. The whole test
structure is exported to the denoted file
(XML format).
-export_testsuite <project,test
structure,version,test suite,export
file>
, separated list of values, where the names
for project, test structure, version, test
suite and export file must be specified. The
whole test suite is exported to the denoted
file (XML format).
-check_locks
Checks, if there are locks by current user.
Considered in conjunction with option
“export_teststructure” and
“export_testsuite”
-copy_testsuite <project,test
structure,version,existing test
suite,new test suite name,flag actual
result,flag bugid>
, separated list of values, where the names
for project, test structure, version, existing
test suite, new test suite name and flag
'actual result' and 'bug id' must be specified
with 'true' or 'false'. A new test suite is
created with settings of existing test suite.
Optionally you can configure, if you want to
get ‘actual result’ and ‘bug ID’ of source test
suite for retesting bug fix more efficiently.
-profile <user,password> [ -file
<file> ]
, separated list of values, where the user
and password must be specified.
The user profile is exported to standard out
Page 302
User Manual
Edition January 2015
TEMPPO V6.1
Command Line
or to an XML-file (parameter –file).
-results <xml-file>
updates the results of test cases which are
described in the xml-file. For the xml-file
the DTD has to be used, see 13.3.
-report < project,test
structure,[version],[test
suite],[filter],report setting,file>
, separated list of values, where the names
for project, test structure, version, test
suite name, filter, report setting, file must
be specified and TEMPPO is opened with the
specified version of the test structure (and
optional a filter and test suite) and writes a
report based on a report setting to the
specified file.
Remark:
If there are a personal and project setting
with the same name, the personal one is
taken.
If there are a personal and project filter
with the same name, the personal one is
taken.
The file is specified only by name. The
extension is specified by report type.
-file <file>
specifies a file (path + name). Only
considered in conjunction with option
“profile”.
-exit
closes TEMPPO after test execution. Only
considered in conjunction with option “run”
-help
print this message
-hide
hides TEMPPO during test execution. Only
considered in conjunction with option “run”
-license
print information for license request
Use the batch file TEMPPO.bat in the installation directory for running TEMPPO
with command line options:
TEMPPO.bat –export_teststructure "my project,the test
structure,V12,export.xml"
Page 303
User Manual
Edition January 2015
9
TEMPPO V6.1
Plug-ins
Plug-ins
TEMPPO offers a plug-in mechanism which automatically loads the implemented
Java interface packed into a jar file. Each plug-in must be deployed in its own jar
file and must be installed in the directory <TEMPPO installation
directoy>\plugins.
A jar file always contains a manifest file which must contain at least the property
Plugin-Class, which must provide the fully qualified name of the class
implementing the plug-in. It’s needed for loading the class.
Example for content of a manifest file:
Manifest-Version: 1.0
Plugin-Name: My First Plugin
Plugin-Version: 0.1
Plugin-Author: Muster Max
Plugin-Class: temppo.plugin.api.MyPlugin
9.1 Plug-in: Version Change
Listener
A TEMPPO plug-in must implement the Plugin interface or one of its subinterfaces.
Plugin is the super-interface for all plug-ins. It serves methods for basic plug-in
information and load and unload handling (e.g. loading and saving plug-in
settings).
VersionListenerPlugin is the interface for a concrete plug-in which can be
used. It extends Plugin and serves as a hook for version change notification.
The plug-in developer has to implement a class-file packed into a jar file which
extends VersionListenerPlugin. This class-file has to be implemented in the
package temppo.plugin.api.
After starting TEMPPO the listener is registered and the actions of the plug-in are
executed when the version is changed in TEMPPO (e.g. by activating another
version of test structure, by creating a new test suite …).
Page 304
User Manual
Edition January 2015
TEMPPO V6.1
Literature
10 Literature
/1/ Installation Guide
TEMPPO V6.0 installation and startup guide
March 2012
/2/ Glenford J. Myers
The Art of Software testing
USA: John Wiley & Sons, Inc. 1979
ISBN: 0-471-04328-1
Page 305
User Manual
Edition January 2015
TEMPPO V6.1
Terms
11 Terms
Administration unit
This term denotes any object/data that is managed in a configuration
management tool. Typical administration units are files or directories.
Branch
A linear sequence of versions is called a branch. It is possible to split off the main
branch and create a new sequence of versions, independent from the main
branch.
Check In / Out
As soon as an administration unit has been entered into the CM tool, it may only
be changed, if a new version is created for it. The act of making it editable is
called checking out. After an administration unit is checked out, any editing
operations are allowed for it.
A new version is created when the unit is checked in. No further edition on this
version is possible.
CM
Configuration Management: “Configuration is the process of identifying and
defining the items in the system, controlling the change of these items
throughout their lifecycle, recording and reporting the status of items and change
requests, and verifying the completeness and correctness of items” [IEEE Std729-1983]
Label
In virtually any CM tool, it is possible to attach a name to a version number. By
doing so, it is possible to make the version history of administration units usable.
Even after many successive versions, these important states can be easily found
and restored by means of their descriptive label.
Main line / Main branch
The linear sequence of versions starting at the initial version.
Merge
Merging from version V1 to V2 means to take over changes in V1 to V2.
Test Case
„A set of test inputs, execution conditions, and expected results developed for a
particular objective, such as to exercise a particular program path or to verify
compliance with a specific requirement.“ [IEEE Std-610.12-1990]
Test Case Design
Constructing test cases according to special methods (e.g. equivalence class) in a
way such that from the description of the test package and from the requirement
specification test cases can be derived independently.
Test Category
Category
Test Level
Level of the test: e.g. system test, acceptance test.
Test Package
Set of test packages and test cases.
Test Step
Single instruction for testing (usually with expected result).
Page 306
User Manual
Edition January 2015
TEMPPO V6.1
Terms
Test Structure
The entire tree of test packages and test cases.
Test Suite
A subset of test cases from the test structure, intended for execution in a certain
test + their recorded test results.
Version
A version denotes a certain state of an administration unit at a certain time.
There are two kinds of versions: (i) checked in version, which can't be changed
any more, and (ii) checked out versions.
Usually, versions follow a decimal notation scheme, starting with "0" or "1". For
each new version, the version number is incremented.
Version Tree
A tree representation of all versions (including all branches) of an administration
unit.
Page 307
User Manual
Edition January 2015
TEMPPO V6.1
Abbreviations
12 Abbreviations
DB
Database
HW
Hardware
TD
Test Director
GUI
Graphical User Interface
SW
Software
DSN
Data Source Name
ODBC
Open Database Connectivity
UAI
Universal Automation Interface
CLI
Command Line Interface
Page 308
User Manual
Edition January 2015
TEMPPO V6.1
Appendix
13 Appendix
13.1 DTD-Schema for XMLImport (Test Structure)
<!ELEMENT TEMPPO_EXCHANGE ( PROJECT | TS | TP* ) >
<!-- NOTE: these attributes will not be part of the TEMPPO exchange format:
creator CDATA #IMPLIED
- too many error possibilities, creator will be importer
created CDATA #IMPLIED
- date will be taken from import
NOTE: following elements we currently ignore
PROJECT
TS
-->
<!-- Common PCDATA elements -->
<!ELEMENT DESCRIPTION ( #PCDATA )>
<!ELEMENT PRECONDITION ( #PCDATA )>
<!ELEMENT POSTCONDITION ( #PCDATA )>
<!ELEMENT TESTGOAL ( #PCDATA )>
<!ELEMENT INSTRUCTION ( #PCDATA )>
<!ELEMENT INPUT ( #PCDATA )>
<!ELEMENT EXPECTED ( #PCDATA )>
<!ELEMENT VALUE ( #PCDATA )>
<!ELEMENT PROJECT ( DESCRIPTION, REQUIREMENTSTRUCTURE*, TS* ) >
<!-- currently
IGNORED -->
<!ATTLIST PROJECT
name CDATA #REQUIRED > <!-- the TEMPPO project must already
exist !! -->
<!ELEMENT TS ( DESCRIPTION, TP* ) >
>
<!ATTLIST TS
name CDATA #REQUIRED >
<!ATTLIST TS
test_level CDATA #IMPLIED >
it -->
<!ATTLIST TS
version CDATA #IMPLIED >
<!-- currently IGNORED -<!-- if it does not exist, autom. create
<!-- Added 31.5.2004 -->
<!ELEMENT TP (DESCRIPTION, PRECONDITION, POSTCONDITION, REQUIREMENT*, ( TP | TC )*) >
<!ATTLIST TP
name CDATA #REQUIRED >
<!-- if zero-length then name "New
Testpackage" generated --><!-- if it already exists, add "_1", "_2", ... -->
<!ATTLIST TP
test_category CDATA #IMPLIED > <!-- if it does not exist, autom. create
it for the test level of the containing test structure -->
<!ATTLIST TP
document CDATA #IMPLIED >
<!ATTLIST TP
doc_name CDATA #IMPLIED >
<!ATTLIST TP
chapter CDATA #IMPLIED >
<!ATTLIST TP
inherit_requirements (true | false) "false" >
<!ELEMENT TC ( TESTGOAL, PRECONDITION, POSTCONDITION, REQUIREMENT*, STEP*, AUTOMATION? ,
ADD_TEST_LEVEL*, USER_DEFINED_ATTRIBUTE*) >
<!ATTLIST TC
user_defined_id CDATA #IMPLIED > <!-- if it already exists in
containing test structure, add "_1", "_2!, ... -->
<!ATTLIST TC
name CDATA #REQUIRED >
<!-- if zero-length then name "New
Testcase" generated --><!-- if it already exists in containing test package, add "_1", "_2!,
... -->
<!ATTLIST TC situation (Error | Regular) "Error" >
<!ATTLIST TC
val_ver (Validation | Verification) "Validation" >
<!ATTLIST TC
priority (Top | High | Medium | Low) "Top" >
<!ATTLIST TC
state (Designed | In_Work | Ready_for_Review | Ready | Approved)
"Designed" >
<!ATTLIST TC
inherit_requirements (true | false) "false" >
Page 309
User Manual
Edition January 2015
TEMPPO V6.1
Appendix
<!ELEMENT REQUIREMENT (DESCRIPTION, REQUIREMENTSTRUCTURE) >
<!ATTLIST REQUIREMENT id
CDATA #REQUIRED > <!-- cannot be zero-length string-><!-- if it does not exist, it will be automatically created -->
<!ELEMENT REQUIREMENTSTRUCTURE (DESCRIPTION) >
<!ATTLIST REQUIREMENTSTRUCTURE
name
zero-length string-->
<!ATTLIST REQUIREMENTSTRUCTURE
version
zero-length string-->
CDATA #REQUIRED > <!-- cannot be
CDATA #REQUIRED > <!-- cannot be
<!ELEMENT STEP (INSTRUCTION, INPUT, EXPECTED, USR_FIELD*) >
<!ELEMENT USR_FIELD (VALUE)>
<!ATTLIST USR_FIELD
<!ATTLIST USR_FIELD
name CDATA #REQUIRED >
type (text | image) "text" >
<!ELEMENT AUTOMATION EMPTY >
<!ATTLIST AUTOMATION tool ( SilkTest | WinRunner | UniversalFile | UniversalSocket |
JUnit | QuickTestPro | TestPartner) "UniversalFile" >
<!ATTLIST AUTOMATION file CDATA #IMPLIED >
<!ATTLIST AUTOMATION data CDATA #IMPLIED >
<!ELEMENT ADD_TEST_LEVEL EMPTY >
<!ATTLIST ADD_TEST_LEVEL
name CDATA #REQUIRED > <!-- cannot be zero-length
string--><!--if it does not exist, it will be automatically created -->
<!ELEMENT USER_DEFINED_ATTRIBUTE EMPTY >
<!ATTLIST USER_DEFINED_ATTRIBUTE
name CDATA #REQUIRED >
<!-- cannot be zerolength string--><!-- if it does not exist, it will be automatically created -->
<!ATTLIST USER_DEFINED_ATTRIBUTE
value CDATA #REQUIRED >
<!-- cannot be zerolength string--><!-- if it does not exist, it will be automatically created -->
13.2 DTD-Schema for XMLImport (Test Suite)
<!ELEMENT TEMPPO_EXCHANGE ( PROJECT, TS, EXPORT_ID, TEST_SUITE ) >
<!-- Common PCDATA elements -->
<!ELEMENT DESCRIPTION ( #PCDATA )>
<!ELEMENT PRECONDITION ( #PCDATA )>
<!ELEMENT POSTCONDITION ( #PCDATA )>
<!ELEMENT TESTGOAL ( #PCDATA )>
<!ELEMENT RESULTOUTPUT ( #PCDATA )>
<!ELEMENT INSTRUCTION ( #PCDATA )>
<!ELEMENT INPUT ( #PCDATA )>
<!ELEMENT EXPECTED ( #PCDATA )>
<!ELEMENT ACTUALRESULT ( #PCDATA )>
<!ELEMENT BUGID ( #PCDATA )>
<!ELEMENT VALUE ( #PCDATA )>
<!ELEMENT PROJECT (DESCRIPTION)>
<!ATTLIST PROJECT
name CDATA #REQUIRED >
<!ELEMENT TS (DESCRIPTION) >
<!ATTLIST TS
name CDATA #REQUIRED >
<!ATTLIST TS
test_level CDATA #IMPLIED >
it -->
<!ATTLIST TS
version CDATA #IMPLIED >
<!-- if it does not exist, autom. create
Page 310
User Manual
Edition January 2015
<!ATTLIST TS
<!ATTLIST TS
TEMPPO V6.1
Appendix
lastupdate CDATA #IMPLIED >
lastupdateby CDATA #IMPLIED >
<!ELEMENT EXPORT_ID EMPTY>
<!ATTLIST EXPORT_ID
value CDATA #REQUIRED >
<!ELEMENT TEST_SUITE ( DESCRIPTION, TP*, USER_DEFINED_ATTRIBUTE_TSUITE* ) >
<!ATTLIST TEST_SUITE id CDATA #REQUIRED >
<!ATTLIST TEST_SUITE name CDATA #REQUIRED >
<!ATTLIST TEST_SUITE lastupdate CDATA #IMPLIED >
<!ATTLIST TEST_SUITE lastupdateby CDATA #IMPLIED >
<!ELEMENT TP (DESCRIPTION, PRECONDITION, POSTCONDITION, REQUIREMENT*, ( TP | TEST_RESULT )*) >
<!ATTLIST TP
name CDATA #REQUIRED >
<!-- if zero-length then name "New
Testpackage" generated --><!-- if it already exists, add "_1", "_2", ... -->
<!ATTLIST TP
test_category CDATA #IMPLIED > <!-- if it does not exist, autom. create
it for the test level of the containing test structure -->
<!ATTLIST TP
document CDATA #IMPLIED >
<!ATTLIST TP
doc_name CDATA #IMPLIED >
<!ATTLIST TP
chapter CDATA #IMPLIED >
<!ATTLIST TP
inherit_requirements (true | false) "false" >
<!ATTLIST TP
lastupdate CDATA #IMPLIED >
<!ATTLIST TP
lastupdateby CDATA #IMPLIED >
<!ELEMENT TEST_RESULT ( TESTGOAL, PRECONDITION, POSTCONDITION, RESULTOUTPUT, REQUIREMENT*,
TEST_STEP_RESULT*, AUTOMATION? , ADD_TEST_LEVEL*, USER_DEFINED_ATTRIBUTE*,
USER_DEFINED_ATTRIBUTE_TRESULT*) >
<!ATTLIST TEST_RESULT
tc_id CDATA #REQUIRED>
<!ATTLIST TEST_RESULT user_defined_id CDATA #IMPLIED > <!-- if it already exists in
containing test structure, add "_1", "_2!, ... -->
<!ATTLIST TEST_RESULT name CDATA #REQUIRED >
<!-- if zero-length then name
"New Testcase" generated --><!-- if it already exists in containing test package, add "_1",
"_2!, ... -->
<!ATTLIST TEST_RESULT
type (Manual | Automated) "Manual">
<!ATTLIST TEST_RESULT tester CDATA #REQUIRED >
<!ATTLIST TEST_RESULT tested CDATA #REQUIRED >
<!ATTLIST TEST_RESULT situation (Error | Regular) "Error" >
<!ATTLIST TEST_RESULT val_ver (Validation | Verification) "Validation" >
<!ATTLIST TEST_RESULT priority (Top | High | Medium | Low) "Top" >
<!ATTLIST TEST_RESULT state (Designed | In_Work | Ready_for_Review | Ready | Approved)
"Designed" >
<!ATTLIST TEST_RESULT inherit_requirements (true | false) "false" >
<!ATTLIST TEST_RESULT result ( Failed | Passed | Not_executed | Blocked |
Not_completed | Not_implemented | On_hold) "Not_executed" >
<!ATTLIST TEST_RESULT lastupdate CDATA #IMPLIED >
<!ATTLIST TEST_RESULT lastupdateby CDATA #IMPLIED >
<!ELEMENT REQUIREMENT (DESCRIPTION) >
<!ATTLIST REQUIREMENT REQUIREMENTID
CDATA #REQUIRED > <!-- cannot be zerolength string--><!-- if it does not exist, it will be automatically created -->
<!ELEMENT TEST_STEP_RESULT (INSTRUCTION, INPUT, EXPECTED, ACTUALRESULT, BUGID, USR_FIELD*) >
<!ATTLIST TEST_STEP_RESULT
test_step_id CDATA #REQUIRED >
<!ATTLIST TEST_STEP_RESULT
result
( Failed | Passed | Not_executed | Blocked
| Not_implemented | On_hold) "Not_executed" >
<!ELEMENT USR_FIELD (VALUE)>
<!ATTLIST USR_FIELD
<!ELEMENT AUTOMATION EMPTY >
<!ATTLIST AUTOMATION
JUnit ) "UniversalFile" >
<!ATTLIST AUTOMATION
<!ATTLIST AUTOMATION
name CDATA #REQUIRED >
tool ( SilkTest | WinRunner | UniversalFile | UniversalSocket |
file CDATA #IMPLIED >
data CDATA #IMPLIED >
<!ELEMENT ADD_TEST_LEVEL EMPTY >
<!ATTLIST ADD_TEST_LEVEL
name CDATA #REQUIRED > <!-- cannot be zero-length
string--><!--if it does not exist, it will be automatically created -->
Page 311
User Manual
Edition January 2015
<!ELEMENT USER_DEFINED_ATTRIBUTE EMPTY >
<!ATTLIST USER_DEFINED_ATTRIBUTE
name
length string--><!-- if it does not exist, it will
<!ATTLIST USER_DEFINED_ATTRIBUTE
value
length string--><!-- if it does not exist, it will
TEMPPO V6.1
Appendix
CDATA #REQUIRED >
<!-- cannot be zerobe automatically created -->
CDATA #REQUIRED >
<!-- cannot be zerobe automatically created -->
<!ELEMENT USER_DEFINED_ATTRIBUTE_TRESULT EMPTY >
<!ATTLIST USER_DEFINED_ATTRIBUTE_TRESULT
name CDATA #REQUIRED >
<!-- cannot
be zero-length string--><!-- if it does not exist, it will be automatically created -->
<!ATTLIST USER_DEFINED_ATTRIBUTE_TRESULT
value CDATA #REQUIRED >
<!-- cannot
be zero-length string--><!-- if it does not exist, it will be automatically created -->
<!ELEMENT USER_DEFINED_ATTRIBUTE_TSUITE EMPTY >
<!ATTLIST USER_DEFINED_ATTRIBUTE_TSUITE
name CDATA #REQUIRED >
<!-- cannot
be zero-length string--><!-- if it does not exist, it will be automatically created -->
<!ATTLIST USER_DEFINED_ATTRIBUTE_TSUITE
value CDATA #REQUIRED >
<!-- cannot
be zero-length string--><!-- if it does not exist, it will be automatically created -->
13.3 DTD-Schema for XMLImport (Results) with CLI
<?xml version="1.0" encoding="UTF-8"?>
<!ELEMENT TEMPPO_EXCHANGE ( LOGIN, RESULTS ) >
<!ELEMENT
<!ELEMENT
<!ELEMENT
<!ELEMENT
USER ( #PCDATA )>
PASSWORD ( #PCDATA )>
PROJECT ( #PCDATA )>
LOGIN ( USER, PASSWORD, PROJECT )>
<!ELEMENT SUMMARY ( #PCDATA )>
<!ELEMENT RESULT ( SUMMARY? )>
<!ATTLIST RESULT
testsuiteid CDATA #REQUIRED
testcaseid CDATA #REQUIRED
value CDATA #REQUIRED
>
<!ELEMENT RESULTS ( RESULT* )>
13.4 DTD-Schema for XMLExport (User Profile) with
CLI
Page 312
User Manual
Edition January 2015
TEMPPO V6.1
Appendix
<!ELEMENT LOGIN ( ROLES?, BUGZILLA? )>
<!ATTLIST LOGIN
name CDATA #REQUIRED
superuser CDATA #IMPLIED
result CDATA #REQUIRED
>
<!ELEMENT PROJECT ( #PCDATA )>
<!ELEMENT ROLE ( PROJECT* )>
<!ATTLIST ROLE
name CDATA #REQUIRED
>
<!ELEMENT ROLES ( ROLE* )>
<!ELEMENT EMAIL ( #PCDATA )>
<!ELEMENT PASSWORD ( #PCDATA ) >
<!ELEMENT BUGZILLA (EMAIL+, PASSWORD+)>
13.5 Predefined Functions
Cannot be changed.
13.6 Predefined Roles
The following roles are predefined in TEMPPO:
TEMPPO Super user: All functions activated
TEMPPO Key User: Most important or used functions activated
TEMPPO Key Tester: Important function concerning Test Suite
TEMPPO Tester: Most important functions concerning Test Suite
TEMPPO Requirement Editor: All functions in Requirement Manager plus all
functions concerning requirements in TEMPPO and TEMPPO Administrator
TEMPPO Editor :All functions for creating Test Packages and Test Cases
TEMPPO Reporter :All functions for creating reports and analysis
TEMPPO Guest: All functions for viewing and exporting data
Those roles can be changed – except TEMPPO Super user.
Page 313
User Manual
Edition January 2015
TEMPPO V6.1
Appendix
13.6.1 Functions to be applied to a role
An “X” means that it can be (de)activated for a role.
X
X
X
X
X
X
X
Requirements
Test categories
X
X
X
X
X
X
X
X
X
X
X
X
X
X
X
X
X
X
X
Consider user
Administrate locks
Administrate projects
Administrate roles
Administrate test structures
Administrate test suites
Assign Requirements
Assign Test category
Assign Test level
Assign UDA
Assign Uploads
Assign User Fields
Consistency checker
Freeze Test Structure
Freeze Test Suite
Move ownership
Unfreeze Test Structure
Unfreeze Test Suite
Unlock test suites
Function
Read
Mover
ownership
Delete
Administrator
Metadata
Change
Application
TEMPPO
Administrator
New / Execute
Right
X
Comment
Change includes assignment of roles to users
X
X
X
X
X
X
X
X
X
X
X
X
X
X
X
X
X
Page 314
User Manual
Edition January 2015
TEMPPO Test
structure
TEMPPO Test package
TEMPPO Test case
TEMPPO Test suite
TEMPPO Test result
TEMPPO V6.1
Appendix
Test levels
Uploads
User fields
User defined attributes
X
X
X
X
Apply requirement updates
X
Edit
Export
Import
JUnit Interface
Unlock items
Assign requirements
Assign test categories
Edit
X
X
X
X
X
X
X
X
Assign requirements
Assign test level
Assign test case attributes
Edit
X
X
X
X
Merge
Assign test suite attributes
X
X
Edit
Export
Export To Doors
Import
Remove from export
database
Unlock exported test suite
Unlock items
Assign test result attributes
Edit
X
X
X
X
X
X
X
X
X
X
X
X
X
X
X
X
X
X
X
X
X
X
X
X
X
X
X
X
X
X
Read test structure means any version, not only
main/LATEST
X
X
Test structure root, TP, TC
X
X
X
X
X
X
X
X
X
X
Consider User: deleting requirement assignment is
only allowed if user is TC editor
X
X
X
Consider User concerns only the deleting
Consider User: merging to main/LATEST is only
allowed if user is editor of main/LATEST version
X
X
Delete is only allowed, if test suite has no test
results
X
X
X
X
X
Implies “Run automated” and “Set results (multi)”
Page 315
User Manual
Edition January 2015
TEMPPO Evaluation
TEMPPO Requirement
Manager
TEMPPO Others
TEMPPO V6.1
Appendix
Merge actual execution
time
Analyse
Analyse by bug ID
Creation progress
Execution progress
Personal report setting
Project report setting
Report
Requirement analysis
X
X
X
X
X
X
X
X
X
Export to XML
Import from CSV
Import from RM Tool
Import from XML
Open
Requirement
Requirement Structure
Split
Update
Versions
Multi Selection
Copy
Copy All
Export / Import filter
Filter
Order
Task list
Versions
X
X
X
X
X
X
X
X
X
X
X
X
X
X
X
X
X
X
X
X
X
X
X
X
X
X
X
X
X
X
X
X
X
X
New implies applying a filter
X
X
X
X
X
X
Page 316
User Manual
Edition January 2015
TEMPPO V6.1
Appendix
13.7 UAI Adapters
An adapter is used to convert the results returned from an automation tool into a
format, which can be processed by TEMPPO. Currently 2 adapters are provided.
13.7.1 CDefaultAutoToolAdapter
The result string returned after a test case has been executed must have
following format:
line 1
line 2
line n
result=(passed|failed|blocked|not implemented|on hold)
summary_begin
....
....
....
summary_end
13.7.2 CAPOXIAdapter
Taken from APOXI user’s guide:
“After finishing the test, an exit code is returned to the client, which is 1 if the
test was successful, 2 if the test failed and 3 if the test was not completed.
Additionally, the client gets also a string, which contains the detailed test result
(passed/failed, number of errors and warnings).”
13.7.3 How to implement an adapter
13.7.3.1
Classes
temppo.test.tools.adapters
«Schnittstelle»
IAutoToolAdapter
+getResult(ein/aus returnFromAutoTool : Reader) : IResult
MyAdapter
+getResult(ein/aus returnFromAutoTool : Reader) : IResult
«uses»
«Schnittstelle»
IResult
+getResult() : int
+getSummary() : String
«uses»
MyResult
+gertResult() : int
+getSummary() : Object
Figure 385: Class diagram of an adapter implementation
Interface:
temppo.test.tools.adapters.IAutoToolAdapter
Page 317
User Manual
Edition January 2015
TEMPPO V6.1
Appendix
An adapter must implement this interface.
public IResult getResult(Reader returnedFromAutoTool) throws Exception
This method is called during test execution for each test case. Via
returnedFromAutoTool the adapter must extract the result and return it as an
IResult implementation.
Interface:
temppo.test.tools.IResult
The result returned by the
adapter must implement this interface.
public int getResult()
Must return one of following results (defined in IResult):
PASSED, FAILED, BLOCKED, NOT_EXECUTED, NOT_COMPLETED,
NOT_IMPLEMENTED, ON_HOLD
public String getSummary
Must return the summary for the test result.
13.7.3.2
Code Snippet
The code snippet below can be used as body for an adapter implementation. It
has to extended by parsing the result handed over from the automation tool:
package ext;
import java.io.Reader;
import temppo.test.tools.adapters.IAutoToolAdapter;
import temppo.test.tools.adapters.IResult;
/**
* Implementation of adapter for universial automation interface.
*/
public class MyAdapter implements IAutoToolAdapter {
public IResult getResult(Reader returnFromAutoTool) throws Exception {
Result ret = new Result();
/*
TODO: add parsing of returnFromAutoTool here and set result and summary
Example:
// use buffered reader to process returnFromAutoTool line per line
BufferedReader br = new BufferedReader(returnFromAutoTool);
// read all lines and search for result and summary
String line = null;
StringBuffer summary = new StringBuffer();
while ((line = br.readLine()) != null) {
if (line.startsWith("Result: ")) {
// process result here
if (line.equals("Result: FAILED")) {
ret.result = IResult.FAILED;
} else if (line.equals("Result: PASSED")) {
ret.result = IResult.PASSED;
}
Page 318
User Manual
Edition January 2015
TEMPPO V6.1
Appendix
} else {
// rest is for summary
summary.append(line);
summary.append(System.getProperty("line.separator"));
}
}
ret.summary = summary.toString();
*/
return ret;
}
/**
* Implementation of result interface.
*/
class Result implements IResult {
String summary = "";
int result = BLOCKED;
public String getSummary() {
return summary;
}
public int getResult() {
return result;
}
}
}
13.7.3.3
Implementation and integration steps
1. Create following subdirectories in your TEMPPO installation directory
%INSTDIR%\dev\src\ext
%INSTDIR%\dev\bin
2. Create the file %INSTDIR%\dev\src\ext\MyAdapter.java and implement the
adapter.
3. For compilation a JDK 1.5 is needed. Execute following command in
%INSTDIR%\dev:
javac -classpath ..\lib\temppo.jar -d bin src\ext\MyAdapter.java
4. Pack the adapter into a jar file. Execute following command in
%INSTDIR%\dev:
jar -cf adapter.jar -C bin ext
5. Add adapter.jar to the classpath for TEMPPO and TEMPPO Administrator
via extending common.classpath in %INSTDIR%\launcher.properties:
lib\\temppo.jar;lib\\lib.jar;lib\\commons-codec.jar;\
lib\\commons-httpclient.jar;lib\\commons-logging.jar;\
lib\\commons-cli.jar;lib\\junit.jar;lib\\registry.jar;\
lib\\sqljdbc.jar;lib\\oracle.jar;lib\\pgjdbc.jar;\
Page 319
User Manual
Edition January 2015
TEMPPO V6.1
Appendix
lib\\jcommon.jar;lib\\jfreechart.jar;dev\\adapter.jar
6. The adapter is now available in TEMPPO Administrator for Universal
7. Socket configuration.
8. For configuration of UniversalFile, admin.properties has to be adapted:
automation.UniversalFile.adapter=ext.MyAdapter
Page 320
User Manual
Edition January 2015
TEMPPO V6.1
Index
14 Index
A
Administration
Database Connection 245, 250
Database Migration 249
User Management 246, 254
Analysis 103
Bug ID (project) 110
Bug ID (test suite) 111
Previous test suites 106
Requirement analysis based on several test
suites 119
several test suites 114
Several test suites 113
Apply 190
Attribute 15
activation 184
customize See Metadata, Attributes
B
Baseline 15
C
Command Line 302
D
Database connection See Administration,
Database Connection, See Administration,
Database Connection
Discard 190
E
Evaluation 13, 103
Excel
import Test Cases 28, 40
Execution progress
Standard 114
Export
test suite to DOORS 210
H
Hyperlink
Download an upload 177
Edit 177
existing upload 172
File 171
new upload 172
Remove 177
to description 170
to fields of test case in test suite 170
to instruction, expected, input 170
to precondition 170
to test goal 170
to to postcondition 170
Web 171
Hyperlinks and Uploads 170
I
Implementation Phase 13
Import
Characters from other fonts 210
from Excel 28, 40
J
JUnit 277
Test execution 291
Update 286
K
Keyboard
Quick navigation 58
L
LDAP 255
License Server See Administration, License
Server Connection
Locks 274
Find 144
Login with password 248
F
Filter 199
change 201
criterion 203
delete 202
Edit filter criterion 205
export 206
import 206
Predefined 199
Find and Replace 187
Freeze, unfreeze 273
M
Main Window 18
Merge
Multi selection of changed TPs and TCs
160
Multi selection of unchanged TPs and TCs
155
Metadata 258
Attributes 261
copy 187
Page 321
User Manual
Edition January 2015
Requirement Structure 265
Test Categories See Metadata, Test
Categories
Test Levels 259
Uploads 264
User Field 268
Migration See Administration, Database
Migration
Move ownership 186
Multi selection
Delete 168
Move ownership 167
Multi selection mode 149
Multi user ability 143
N
Newsboard 190
P
Pictures
inline 148
Plug-ins 304
Progress charts 111
Creation 111
Execution 113
Requirement analysis based on several test
suites 119
Project 16
copy 271
create 16, 269
open 17
properties 17
Test case template 179
Projects 269
Assign metadata 271
delete 271
Freeze, unfreeze 273
Move ownership 272
Test Result template 183
R
Refresh 147
recursively 147
Reload whole tree 147
Report
Export to XML 142
Import from XML / trp file 143
Import Templates 142
New 123
Several test suites 133
Templates 142
Reports 122
Chart Settings 137
General Settings 124
preview 138
samples 140
save 138
Textual Settings 126
Requirement
Analysis 107
delete 45
TEMPPO V6.1
Index
Test package 43, 46
Requirement Structure
activation 185
Requirements
Import 15
Roles 251
Predefined 313
S
Settings 222
Bugzilla 241
Change 243
Change Management 240
Clearquest 242
Global 222
JUnit 237
QuickTestPro 235
Ranorex 239
TEMPPO Designer 238
TEMPPO Test Manager 223
Test Automation settings 231
TestPartner 236
UAI 233
T
Task lists 220
TEMPPO Administrator 250
LDAP 255
License Server Connection 275
Locks 274
Metadata 258
Projects 269
Requirement structures 265
Roles 251
Uploads 264
TEMPPO Designer
Restore designed test cases 301
TEMPPO Manager 245
Test Automation
Ranorex 64
Universal Automation Interface (UAI) 65
WinRunner, Quicktest Professional,
SilkTest, TestPartner 62
Test Automation settings 231
Test case
Additional test levels 50
Attributes TR 87
Execution History 54
Link Requirements 44
Set test results 169
Tab History 51
Tab Plan 53
Unlink requirement 45
Test Case 10, 86, 87
Adding more columns 58
attribute 10
Compare 197
design 47
Import from Word 25
Merge 96
Postconditions 55
Preconditions 55
results 83
Page 322
User Manual
Edition January 2015
tab Attributes 48
tab Automated 61
tab General 48
Tab Requirement 51
tab Test Steps 56
Test Case Execution 13, 67
Test Case Implementation 55
Test case template 179
Filter 183
Test Categories See Test Package,
categorize
customize See Metadata, Test Categories
Test Creation Assistant 57
Test Design 12, 15
Test execution
add test package 97
Test Execution 84
add test case 97
automated 92
continue 94, 98
finish 99
manual 82
start 68
Test Level 12
customize See Metadata, Test Levels
Test Package 12
categorize 37
create 34
Test Plan 12
Test Planning 12, 14
Test Result template 183
Test step
Copy Upload 60
Delete Upload 60
Paste Upload 60
Pictures in columns 60
Reference to Upload 60
Upload 60
Uploads 60
Test Step See Test Case, tab Test Steps
results 82
Test structure
TEMPPO V6.1
Index
delete 271
Extend 33
Freeze, unfreeze 273
Transfer 33
Transfer to other database 33
Version 20
XML export 206
XML update 206
Test Structure 12, 18
create 18
generate test cases 25
generate test packages 21
import RTF document 21, 31
open 20
properties 18, 20
reopen 21
Test suite
based on a predescessor 76
Based on previous results 81
copy 80
delete 271
Export 208
Freeze, unfreeze 273
Import 101, 209
tab Attributes 75
tab Details 75
Test Suite 13, 87
create 68
Tools
TEMPPO Designer (IDATG) 296
U
User Management See Administration, User
Management, See Administration, User
Management
V
Versioning 192
Page 323