1
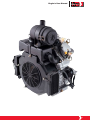
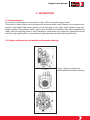
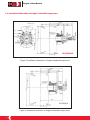
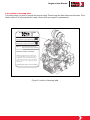
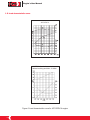
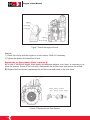
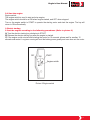
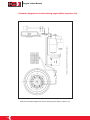
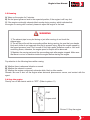
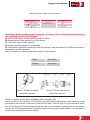
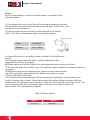
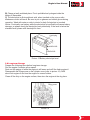
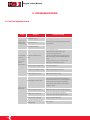
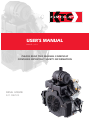
USER'S MANUAL
Miami FL., U.S.A.
PLEASE READ THIS MANUAL CAREFULLY
CONTAINS IMPORTANT SAFETY INFORMATION
DIESEL ENGINE
437-DE2V14
1
Engine’s User Manual
3
Engine’s User Manual
PREFACE
Thank you for purchasing a KTC engine. This manual covers operation and maintenance of the
437-DE2V14 engine. Please read the manual carefully before using the engine to ensure the proper
operation. If you have any commends or problems, please contact with our sales company or the
authorized agent. Follow the instructions to keep your engine in the best working condition and extend
the life of it.
4
Engine’s User Manual
INDEX
1
INSTRUCTION
1.1
Brief instruction
1.2
Engine configuration and installation dimension drawing
1.3
Installation dimension of engine crankshaft output end
1.4
Location of warning label
1.5
Load characteristic curve
1.6
Main technical specifications
1.8
Tighten torque of main bolts and nuts
2
2.1 2.2 2.3
2.4
2.5
2.6
2.7
2.8
3
3.1
3.2
3.3
3.4
3.5
3.6
3.7
3.8
3.9
3.10
3.11
3.12
Page
7
USAGE
Safety
Load installation
Engine usage
Start the engine
Running
Stop the engine
Periodical check and maintenance
Long-term storage
12
TROUBLESHOOTING
No fuel injection sound
Compression pressure is too low
The engine hard starting
Engine overspeed
Unstable engine speed
The engine stops suddenly
Abnormal oil pressure
The oil consumption is too big
Fuel consumption is too big
Abnormal noise during running
The engine power is insufficient
Smoke exhausting is excessive or smoke color is abnormal
24
5
Engine’s User Manual
1. INSTRUCTION
1.1 Brief instruction
This model of diesel engine is two cylinder, V-twin, OHV, four stroke and air cooled.
This model of diesel engine is multi-purpose with horizontal shaft output.Thanks to the compact configuration, light weight, high rotation speed, low oil consumption, low noise, slight vibration, easy start,
simple operation, convenience, safety, agility, good durability and reliability, the engine is applied very
widely, such as supplying power to micro transporter, water pump, air compressor, agricultural tricycle
and micro high-speed yacht, or assembled into light generator set and mobile power station.
1.2 Engine configuration and installation dimension drawing
437-DE2V14
Figure 1 Engine configuration
and installation dimension drawing
7
Engine’s User Manual
1.3. Installation dimension of engine crankshaft output end
Cam sha ft center
Hole depth25 S crew thread deptch18
Cent ral line of
crank shaft pin
Hole depth25 Screw thread deptch18
C enter height
Crankshaft center
437-DE2V14
Central line o f
crankshaft pi n
G auge s ize
Figure 2 Installation dimension of engine crankshaft output end
437-DE2V14
KD2V86FG
Figure 3 Installation dimension of engine crankshaft output end 2
8
Engine’s User Manual
1.4 Location of warning label
This label guides you how to operate the engine safely. Please keep the label clear and unbroken. If the
label comes off or becomes hard to read, contact with your agent for replacement.
DANG E R
The fire source can not be close to
SMOKE & FIRE FORBIDDEN oil port. Stop engine when filling oil.
WA R NIN G
Exhaust gas contains pois onous carbon monoxide.
PREVENT EXHAUST GAS INHALATION Don't operate the engine in poorly ventila ted pla ce
DIES EL
Harm ful or fata l if sw allowed
Keep awa y from re ach o f children
WARNING: EXTREMELY FLAMMABLE
CAUTION: Use light diesel 0# in summer, -10#
or -20# light diesel in winter. Use lube oil
classification CC or CD. For the first time usage,
run the engine 20 hours at low speed and low
load to ensure your engine excellent
performance.
R E AD T HE MANUAL C AR E F ULLY B E F OR E O P E R AT IO N
Figure 4 Location of warning label
9
Engine’s User Manual
1.5 Load characteristic curve
437-DE2V14
437-DE2V14 Load characteristic curve
Related working condition: 12/3600
Figure 6 Load characteristic curve for 437-DE2V14 engine
10
Engine’s User Manual
1.6 Main technical specifications
Table 1 Main technical specification table
Item
Technical specifications
437-DE2V14
Engine model
Two cylinder, V-twin, air cooled,
four stroke, OHV, direct injection
Engine type
Cylinder diameter x piston stroke mm
86 x 72
Displacement L
0.836
19
Compression ratio
Related rotation speed r/min
Related power kW
3000
3600
11
12
33/2500
Max. torque N • m
1300
Min. zero load stable rotation speed r/min
Lubricating system
Starting system
Revolving direction of output terminal
Pressure splashed
12V 1.4KW electric start
Anticlockwise
0# (summer), -10# or -20# (winter)
Fuel type
Lubrication type
Fuel consumption(g/kW.h)
SAE10W-30
3000
3600
273.5
Overall dimension(LxWxH) mm
Net weight
kg
285.7
(395+54) x 509 x 591
64
This specification table is just for your reference, as it will change as the engine improved.
11
Engine’s User Manual
1.7 Tighten torque of main bolts and nuts
Tighten torque of main bolts and nuts for 437-DE2V14
Name
Specification
Tighten torque
Connection rod bolt
M8
40
45N
m
Tank cover locking bolt
M8
25
28 N
m
Cylinder cover locking nut
M10
54
58 N
m
Rocker arm seat bolt
M8
17
23 N
m
Cylinder cover locking bolt
M6
8
10N
m
Inlet pipe nut
M6
8
10N
m
Exhaust pipe nut
M8
20
24 N
m
Starting motor locking bolt
M10
55
65 N
m
Flywheel nut
M18
160
Fuel injector nut
M6
8
180 N
10N
m
m
2. USAGE
2.1 Safety
A) Never operate the engine in case of tired, drinking, or taking medicine. Unprofessional or unskillful
worker can't operate the engine, to prevent accidental personal harm or machine fault happening. Put
on the safe clothing and prepare the safety equipment.
B) In case of abnormal sound, vibration, smoke, oil leakage, or alarming light, please stop the engine
immediately and report to the superintend. Continuously using the engine only after the fault is resolved.
C) Hydrogen will be released out when charging and it is inflammable and explosive, so please use the
engine at place with good ventilation and keep it away from fire.
D) Keep fuel or other inflammable things away from the engine, and use the correct type of light diesel.
Use gasoline or other analog mistakenly will result in fire. Make sure you stop the engine before filling
in fuel and wipe off the fuel if it overflows.
E) Poisonous gas is contained in the exhaust air and is harmful to the personal health, so make sure
exhaust outside. Keep the equipment room well ventilated and don't shut off he window, intake or other
ventilation apparatus. Never operate the engine in the narrow room, channel, cellar or cabin.
12
Engine’s User Manual
F) Don't touch the moving parts when engine is running, since it is dangerous and will cause personal
damage even death. Never operate the engine if no protection shield installed to the moving parts.
Check whether there are tools, clothes or other articles around the engine before starting the engine,
in order to prevent injury. Stop the engine before maintaining, if you have to check the engine during it
running, please pay special attention; don't touch your hands, skin or
clothes with the moving parts to prevent personal damage.
G) The engine is very hot when it is running or just after stopping, as well as the high heat parts, such
as muffler, exhaust pipe, cylinder and cylinder cover. Please be especially careful, and don't touch your
body or hands with the hot parts to prevent scalding.
H) Pay sufficient attention to avoid your eyes, skin or clothes from being contacted with the fluid. The
battery electrolyte is dilute sulfuric acid and causes burns. Wash it off immediately with a large amount
of fresh water if you get any on you.
I ) Make sure turn off the battery switch or disconnect the negative cable before
inspection the electric system. Failure to do so will cause short circuit or fire.
J) If lube oil must be drained from the engine while it is still hot, take care not to
let the oil splash on you to avoid scalding.
WARNING
Modification not authorized! Never modify the engine or screw off the limit devices by
yourself (such as the engine max speed limitation bolts, fuel quantity limitation device,
etc). Such modification or screwing off will affect the engine performance, safety, reliability
and shorten the engine life.
Notice:
The waste oil should be collected in a container. Never dispose the waste oil directly to the outdoors,
into a sewer, river, or the sea. Dispose the waste oil strictly observing the relevant regulations and laws.
Ask a specialized waste recovery company for collection and disposal.
2.2 Load installation
A) Fix the engine base tightly to prevent the engine moving or shocking.
B) Be sure that the output shaft centers are in line.
C) If the engine is on load, the pulley size must be in conformance with the engine rotation speed, load
speed and load side pulley size.
The diameter of the pulley can be calculated by the following formal:
The diameter of engine side pulley=
(load side pulley diameter X load speed)
engine rotation speed(rated speed)
13
Engine’s User Manual
D) Make sure the size of pulley shaft hole and key groove is conformance with the output end, otherwise
accident will result. Correctly screw the output end bolts. Reselect the pulley for the appropriate size, if
black smoke exhausted.
E) Be sure that the tension of pulley is appropriate. If the pulley is too tight, hard starting will result, further more, the belt will worn quickly and the output shaft will be bent, so accident will result.
F) Specified triangle belt model is B (refer to table 4). The quantity of belt is
decided by the load.
Table 4
Mode
Belt model
437-DE2V14
B
Notice:
If the engine runs with too much vibration, the engine and load will be damaged, so make sure fix the
engine tightly. Accident will be caused if the belt is fixed too tightly, so please choose the correct size.
2.3 Engine usage
Incorrect usage will shorten the life of engine. The first 20 hrs are the break-in period of the engine, the
operator must obey to the following items:
A) Warm up the engine 5 minutes after the initial starting. Run the engine at low speed and low load
before the engine becomes warm. Do not run the engine at high speed and full load or low speed and
zero load.
B) Do not run the engine with overload Do not run the engine with overload during break-in period, it is
suggested to run the engine at 3000r/min, with 50% load.
C) Replace the engine oil on time Stop the engine and check the oil level after 0.5 hrs break-in, if the oil
decreases, please refill in oil to the upper limitation level. Restart the engine, replace the oil while the
engine is still warm after 50 hrs running, the old engine oil will be drained out completely.
Starting
Each 100h
About 50h
Replace engine oil
Selection and usage of the fuel oil
Use the light diesel most applicable for the performance of the engine.
A) Diesel usage:
14
Engine’s User Manual
B) If water or dirty mixed in the fuel, abnormal running will result. Seal the fuel in a clean container and
store the container in a dry place away from the rain and dirty.
C) If diesel has been stored for several hours, the water and dirty will deposit at the bottom of the container. You can pump the upper clean diesel for usage.
Refill the diesel.
Notice:
A) Don't loose the oil filler screw except for special usage, otherwise rain or
dust will sunk into the air duct and cylinder, and the engine will wear quickly, so
accident will result.
B) Don't fill in gasoline! It is very dangerous to fill in gasoline into the diesel engine. Do identify the fuel
oil type and model before refilling.
C) Do stop the engine before refilling.
D) Wipe off the overflowed diesel.
Selection and usage of the engine oil
Selection of the engine oil
It is very important to select the appropriate engine oil. If you use the improper diesel, the piston ring
will adhere together, the piston will burn out, and the cylinder head gasket will wear out quickly, as well
as bearings and other moving parts, so the engine life will be shorted. Table 5:
Table 5 Engine oil model
Temperature
Model
Above 20
10
(summer)
SAE30
20
(spring, autumn)
SAE20
Below 10
(winter)
SAE10W-30
Check the oil level and refill the engine oil
A) Do check the oil level before starting the engine. (Picture 7)
Check whether the oil level is between the upper level and lower level with dipstick. Wipe off the
overflow oil. Tighten the dipstick after checking.
B) The engine oil level can not beyond the upper level.
C) Refer to the following table 6 for oil capacity:
Table 6 Oil capacity
Engine model
Oil capacity (L)
437-DE2V14
4
15
Engine’s User Manual
Dipstick
Upper level
Lower level
Dipstick
Drain oil screw
Figue 7 Check the engine oil level
Notice:
1) Check the oil level with the engine on a level surface. Refill oil if necessary.
2) Tighten the dipstick and check the oil level.
Replace the air filter element (Refer to picture 8)
A) In case of insufficient engine output power and abnormal exhaust color, then it is necessary to replace the element. Screw off the lock catch, disassemble the air filter cover and remove the air filter.
B) Replace the filter element, reassemble the air filter cover and screw on the lock catch.
Lock catch Air filter cover
Air filter Air filter Install ation
cover eleme nt brack et Air filter
Picture 8 Replace the air filter element
16
Engine’s User Manual
2.4 Start the engine
Engine switch:
The engine switch is used to start and stop engine.
The engine switch should be at ON when engine started, and OFF when stopped.
Turn on the engine switch to START to operate the starting motor and start the engine. The key will
return to ON automatically.
1.Electric starting
2 Start the engine according to the following procedures: (Refer to picture 9)
A) Turn the electric starting key clockwise to START
B) Release the electric starting key after the engine is started.
C) If the engine could not start after starting the motor for 10 seconds, please wait for another 15
seconds and restart. Long term running will cost the battery power greatly and even burn out the motor.
OFF
ON
START
Engine switch
Picture 9 Engine switch
17
Engine’s User Manual
S chematic diagram for electric s tarting engine
B lue
G ray
G ray
B lue
G round
White White/B lack
White
B lack
Yellow/B lack
Yellow/B lack
Schematic diagram for electric starting engine (Refer to picture 10)
Picture10 Schematic diagram for electric starting engine (Refer to picture 10)
18
Engine’s User Manual
2.5 Running
A) Warm up the engine for 5 minutes.
B) Set the speed governor level to the expected position, if the engine is still very hot.
C) If the engine continually exhausts black smoke during running, which indicates that
the engine is running with overload, please do adjust the engine or the load.
WARNING
1) The exhaust pipe is very hot during or just after running; do not touch the
exhaust pipe.
2) The air filter will suck the surrounding airflow during running, be sure that your hands,
body and cloths do not approach this part to prevent injury. Adjust the engine speed by
the speed governor level. Don't screw off the high speed limitation screw or fuel level
controlling screw, otherwise, the engine speed or output will be abnormal.
3) Maintain the moving parts and the surrounding parts after engine stopped. Make sure
that there is no tool or sundries inside the engine before starting the engine.
Pay attention to the following items while running:
A) Whether there is abnormal vibration or sound.
B) Whether the exhaust is normal.
C) Whether the engine continuously exhausts white, black or blue smoke.
Remark: Be sure to shut off the engine when abnormal phenomenon occurs, and contact with the
agent.
2.6 Stop the engine
Directly turn off the electric switch to "OFF". (Refer to picture 11)
OFF
ON
START
Engine switch
Picture 11 Stop the engine
19
Engine’s User Manual
2.7 Periodical check and maintenance
Periodical check and maintenance are very important for maintaining the performance and life of the
engine. The following is the maintenance intervals and items table. The items with indicate the maintenance item, and the items with "O" require technician or special tools, please contact with "●" the
agents.
Interval
Item
The 1st
Each day month
or 50 h
The 3
month
or 100 h
The 6th
month
or 500 h
(Clean)
(Replace)
rd
Each year
or 1000 h
Check and tighten all the bolts and nuts
Check and refill engine oil
Check for oil leakage
Replace the engine oil
Clean and replace the oil filter element
Clean air filter element
Replace air filter element
(Clean)
Clean and replace fuel filter
(Replace)
Check nozzle
Check oil pump
Check fuel pipe
Grind inlet/exhaust valve seat
Replace piston ring
Clean fuel tank
Each year
Check the electrolyte
Each year
Replace the engine oil
Drain out the exhausted oil when the engine is still warm and refill the recommended engine oil. Refer
to picture 5. Refer to table 8 for oil replacement intervals.
Table 8 Intervals for oil replacement
Replace engine oil
Intervals
First time
Every 50h
Second time and after
Every 100h
Notice: Choose the oil type carefully according to different season and temperature. Refer to table 9.
20
Engine’s User Manual
Table 9 Engine oil type for each season
Temperature
Above 2 0
SAE30
(sum mer)
10 20 (spri ng or autumn)
Belo w 10
Viscosity
Grade
SAE20
Above CC grade
SAE10W
(winter)
30
Replace the oil filter element (refer to picture 12). Refer to table 10 for intervals for cleaning
and replacing the fuel filter element.
A) Drain out the engine oil and tighten the drain oil screw.
B) Disassemble the filter element by oil filter sleeve.
C) Check and clean the filter element.
D) Replace the filter element if it is damaged.
E) Clean the filter seat after installing the new filter element, clean the seal ring of oil filter with clean oil.
Reassemble the filter assembly.
Table 10 Intervals for cleaning and replacing the oil filter element
Clean
Every 100 h
Replace
Every 500 h
Air filter cover
Picture 12 Clean or replace
the oil filter element
Air filter
element
Installation
bracket
Air filter
Picture 13 Clean and replace
the air filter element
Clean or replace the air filter element (refer to picture 13).
If dust is suck into and adhered on the air filter, the engine output will decrease, and the lube and fuel
consumption will increase, furthermore, hard start will result. If dust is suck into the combustion chamber, the moving parts will be damaged quickly and can not run normally. So please shorten your inspection time as short as possible when running the engine at dusty place. Refer to table 11 for intervals for
cleaning and replacing the air filter element.
21
Engine’s User Manual
Notice:
A) Do not use detergent to clean the air filter element; you should use the
soft brush instead.
2) If the element is too dirty, the air flow will be blocked and starting will be hard,
thus insufficient output and black exhausted smoke will result. Further more, it will
cost both fuel oil and engine oil.
3) Running engine with worn element or without element is not allowed.
Table 11 Intervals for cleaning and replacing the air filter element
Fuel filter element
Clean
Every500 h
Replace
Every 1000 h
a. Screw off the bolts on the fuel filter bracket, and take off the fuel filter and
bracket.
Check whether there is deposited water or matter inside the fuel filter;
reassemble the fuel filter if necessary.
B) Please replace the fuel filter if there is too much deposited water or matter on the filter.
(5) Screw on the bolts of the cylinder cover. This operation requires special tools, please contact with
your agent.
(6) Adjust the nozzle and fuel injection pump, replace the valve seat and piston
ring. These operations require special tools, please contact with your agent.
(7)Check and refill the electrolyte
The electrolyte will decrease after several times charging and discharging. (It will decrease more
quickly in summer than in winter). Check the electrolyte level before starting the engine. Refill the
distilled water until the upper level if necessary. Check the electrolyte level once every month, if the
level is below the lower level, refill distilled water to the upper level. (Refer to picture 15).
Refer to table 13 for required battery capacity:
Table 13 Battery capacity
22
Model
Capacity
437-DE2V14
12V60Ah
Engine’s User Manual
B) Charge at well ventilated place. Fire is prohibited as hydrogen inside the
battery is flammable.
C) The electrolyte is dilute sulphuric acid, when touched on the eyes or skin,
blindness or burnt will result. Be sure to put on glasses and rubber gloves during
operation. Wash with water or refer to doctor for help if electrolyte is touched.
Notice: Continually use battery while the electrolyte is insufficient will cause battery
damage, so please check the electrolyte level periodically. If the level is below the
standard level, please refill electrolyte in time.
Liquid plug
UPPER LEVEL
LOWER LEVEL
Picture 15 Battery electrolyte level
2.8 Long-term Storage
Prepare the following items before long-term storage:
Run the engine 5 minutes at low speed.
Drain out the engine oil while the engine is still warm and refill the fresh engineoil.
Disassemble the filling screw on the cylinder cover (refer to picture 16). Refill
about 2ml engine oil and turn the engine for several circles.
Clean off the dirty on the engine surface, then store the engine at the dry place.
Filling screw
Picture 16
23
Engine’s User Manual
3. TROUBLESHOOTING
3.1 No fuel injection sound
Reason
Fault
Troubleshooting
The fuel tank is empty
1.No
fuel
flows into fuel
injection pump
The fuel switch is off
Check the fuel level in the fuel tank, the fuel switch
and the fuel filter
The fuel filter is blocked
Fill in oil and drain out air:
a. Disassemble the high pressure oil pipe
b. Loose the oil outlet valve seat
2. No fuel flows
Air mixed in the fuel injection
out from oil
pump
valve after
(If no oil discharging, revolve the flywheel for half
circle)
d.Tighten and test the oil outlet valve
high pressure
Replace the oil outlet valve for couples
pipe is
disassembled
c. Turn on the oil tank switch and discharge the oil
The oil outlet valve seat is dirty or faulty
Clean the oil outlet valve
The connector of speed adjustor is wrong
Adjust the speed adjusting connector
The fuel injection plug is worn
Replace the fuel injection pump
Clean or replace it. The method for checking the
The fuel injection nozzle is stuck
fuel injection nozzle is that: clean it with light diesel,
lean the needle valve in 4 ¡ã, if the needle valve
could slide into needle valve hole in the action of
gravity, it is normal.
3.Abnormal
fuel injection
24
Incorrect fuel injection pressure
Adjust the fuel injection pressure with adjusting gasket
The fuel injection nozzle is worn
Replace: clean the fuel filter and realign the
location pin to replace the fuel injection nozzle
Incorrect fuel injector assembly
Aligning and location: reassemble
The injection hole of fuel injection
nozzle is blocked
Clean or replace
Engine’s User Manual
3.2 Compression pressure is too low
Fault
Reason
Troubleshooting
Adjust to the correct inlet /exhaust valve clearance:
1.Air leakage of
inlet/exhaust
rotate the flywheel, when the 1" cylinder is at the
Incorrect valve clearance
point with the scale marks on the cylinder block and
valve
2.Air leaks
compression upper dead point, align the upper dead
adjust the valve adjusting screw
The inlet /exhaust valve seat is worn
Replace the inlet /exhaust valve seat
Incorrect torque of fuel injection nozzle
Increase the torque
The fuel injector washer is faulty
Replace the fuel injector washer
Incorrect tighten torque of cylinder cover
Tighten to the correct torque
The cylinder cover gasket is damaged
Replace the cylinder cover gasket
around the fuel
injection nozzle
3.Air leakage if
cylinder cover
4.Air blowby of
crankcase
The oil quality is poor:
Replace the oil: apply the grade AEC or CD (API
a.The oil goes bad
classification), or SAE 30# for warmness, 10W30# for
b.The viscosity is too low
coldness.
Clean or replace the piston ring: a. clear off the
The piston ring is stuck
deposit carbon in the ring groove. b. the factory label
on the piston ring end should be lay upwards. c. don't
mix the position of 1" and 2" ring
The piston ring is worn or broken
Replace the piston ring
The piston ring groove is severely worn
Replace the piston
25
Engine’s User Manual
3.3 The engine hard starting
Fault reason
Remarks
1) Use the recommended fuel
1.The diesel quality is poor, or
water mixed in the diesel
Replace the diesel
2. Incorrect fuel injection timing
1) Adjust the thickness of the
1) Adjust the fuel injection timing
1)The thickness of the adjusting
adjusting gasket
2) Pay attention to the way of
gasket is not suitable
2)Adjust the fuel injection
adjusting the fuel injection
2) Incorrect fuel injection pressure
pressure
pressure
3) The plug is worn
3) Replace the plug
3) Use the clean fuel
3.Poor pulverization of fuel
1) Clean or replace the fuel
Use the clean fuel
injection
injection nozzle
Pay attention to the way of
1) The fuel injection nozzle is stuck
2) Replace the fuel injection nozzle
adjusting the fuel injection
2) The fuel injection nozzle is faulty
3) Replace the fuel injection nozzle
pressure
3) The fuel injection nozzle is worn
4) Clean or replace the fuel
4)The fuel injection hole is blocked
injection nozzle
5) The fuel injection pressure us
5)Adjust the fuel injection
too low
pressure
4. The electric quantity of battery is
insufficient or the connector looses
5. The starting motor gear can't be
set into the flywheel gear ring
6. Air mixed in the fuel injection
pump
7. The fuel filter element is blocked
8. The starting switch is faulty
9. The fuel injection plug is broken
or seized
26
Troubleshooting
2) Obey the correct procedure of
delivering, storing and discharging
Charging; tighten the connector,
repair the connection plug if
necessary
Rotate the flywheel, adjust the
relative position between the
small gear and gear ring
Drain out air, tighten the oil pipe
Drain out air in the fuel system
connector
before starting
Clean or replace the fuel filter
Clean or replace the fuel filter
element
element periodically
Check or replace the starting
switch
Replace the fuel injection pump
parts
Engine’s User Manual
3.4 Engine overspeed
If the engine is overspeed during starting or running, please turn the engine
starting switch to "O" to stop the engine. Long-time overspeed running will
result in severe consequence.
Reason
1.The speed adjusting handle
operation is too not correct
Troubleshooting
Adjust the speed adjusting handle,
check and adjust the installation
Remarks
Use the speed adjusting handle
correctly
position of speed adjusting spring
2.The speed adjustor level is
adjusted incorrectly
1)Incorrect adjusting
2)The tighten bolt adjusting the
Adjust and fix the speed adjustor
fork on the fuel injection pump
looses
3.5 Unstable engine speed
Reason
Troubleshooting
Adjust the speed adjustor incorrectly
Adjust the speed adjustor
The speed adjusting level shaft can't sliding normally
Lubricate or repair it
The speed adjusting level interferes
Repair or replace it
Poor fly ball action
Repair it
The installation clearance of speed
adjusting spring is too big
Adjust the installation clearance
The installation location of speed
adjusting spring is not correct
Adjust the installation location
The fuel quality is poor or is polluted
Replace the fuel
Remarks
Pay attention to the adjusting way
The fuel sprayer performance is poor
One of the fuel injection nozzle is stuck
Grind or replace the fuel injection nozzle
The needle valve is worn or damaged
Replace the fuel injector assembly
The fuel injection timing is too
late or too early
Adjust the fuel injection timing with
adjusting gasket
The camshaft end clearance is too big
Replace crankcase cover gasket
The flywheel nut looses
Tighten the torque
Fuel supplying of the two cylinders
of fuel injection pump is not balance
Send to the oil pump maintaining
station for maintenance
Check the torque of the important
bolt and nut periodically
27
Engine’s User Manual
3.6 The engine stops suddenly
The sudden stopping is usually resulted by poor cooling, insufficient lubricating or not fluent oil supplying,
and these conditions are mainly caused by incorrect maintenance. Maintenance will cost both money
and time, so in order to avoid these problems, please take good care of your engine.
Reason
Troubleshooting
Remarks
No fuel in the fuel tank
Refill in fuel
Check the fuel tank periodically
The fuel is not qualified
Replace for the qualified fuel
Use the recommended fuel
Air sucked into the oil way
Drain out the air
The fuel filter is blocked
Clean or replace the filter element
The fuel injection pump plug and oil
Send to the oil pump maintaining
Send to the professional for
exhausting ring are seized
station for maintenance
maintenance
The fuel injection pump plug spring
Send to the oil pump maintaining
is broken
station for maintenance
Electricity of fuel injection pump
Check, replace or inspect the
electromagnetic valve connector
wiring line
Drain out the air in the oil way in
case of long time no using
Clean or replace the filter element
periodically
is disconnect
28
Scuffing or sticking of cylinder
Send to the maintenance station
The oil pressure is too low or poor
Send to the maintenance station and
Check and replace the lubrication
cooling or lubricating
check the lubricating system
periodically
Engine’s User Manual
3.7 Abnormal oil pressure
Reason
Troubleshooting
1. No oil pressure or low oil pressure
1) Too littler oil
Refill in oil to a certain level
2) Oil dilutes
Replace for the correct type of oil
3) The oil pipe is broken; the pipe connector looses; oil leaks
Replace; tighten
4) The axial clearance of oil pump is too big
Replace
5) The pressure limitation valve of oil pump is not flexible;
the spring distorts or brakes
6) The fitting clearance between main bearing and connection
rod bearing is too big
Replace
Check, adjust or replace
7) The main oil duct is blocked
Check and clean
8) The oil filter is blocked
Check and clean the filter
9) The oil filter is too dirty
Clean or replace the filter element
10) The oil filter or oil cooler is short circuit
Check and replace
11) The oil pressure gauge is damaged
Replace
2. The oil pressure is too high
1) The pressure limitation valve of oil pump is abnormal, oil
return is not fluent
2) The temperature is too low, and oil viscosity is too big
Check and adjust
Use the correct type of oil, the viscosity will
reduce when the engine warms
29
Engine’s User Manual
3.8 The oil consumption is too big
Reason
Troubleshooting
The oil viscosity is too low, incorrect type of oil
Use the correct type of oil
The piston cylinder clearance is too big, the oil return hole
of piston ring groove is blocked
Replace or clean the oil hole
The piston ring is clipped; air ring is installed mistakenly; worn
Clean and replace
Oil leaks at the front /rear oil seal of crankshaft,crankcase and
crankcase cover
Check and replace the damaged parts
The oil temperature and pressure is too high
Reduce the temperature, check and adjust the
pressure limitation valve of oil pump
Oil leakage of valve oil seal
Replace the valve oil seal
3.9 Fuel consumption is too big
Reason
Troubleshooting
Fuel leaks
Replace the fuel pipe tighten to the correct torque
Fuel injection timing is abnormal
Adjust the fuel injection timing
The fuel injector or nozzle parts is abnormal
Clean and replace
3.10 Abnormal noise during runnin
Reason
30
Troubleshooting
Clearance between piston and cylinder is too big
Replace the piston ring or piston
Clearance between piston pin and connection rod small head bushing is too big
Replace the damaged parts and keep the correct clearance
Axial clearance between the main bushing and crankshaft and axial
clearance between the connection rod bushing and crankshaft are too big
Replace the main bushing and connection rod
bushing, keep the correct axial clearance
Clearance between piston ring and piston ring groove is too big
Replace the piston ring, replace the piston if necessary
Clearance between the crankshaft pushing side and thrust is too big
Replace the crankshaft thrust, keep the correct clearance
The gear is worn and clearance is too big, so crash will be
caused if speed suddenly reduces
Replace the gear according to the wearing condition
The oil supplying timing is too early
Check and adjust the oil supplying timing
The fuel injector parts are seized
Clean or replace the nozzle parts
Engine’s User Manual
3.11 The engine power is insufficient
Reason
Troubleshooting
1) The fuel filter element is too dirty, oil supplying is not fluent
Clean or replace
2) The accelerator pulling rod works not well
Adjust the accelerator pulling rod
3) The fuel pipe is blocked, fuel supplying is not fluent
Check and clean
4) Fuel leaks or air mixed in the fuel system
Tighten, drain out the air in the fuel system
5) The oil supplying timing is wrong
Adjust
6) The fuel injector is faulty
Check the fuel injecting pressure and spray
7) The air filter is too dirty
Clean or replace the air filter element
8) The valve distribution phase is incorrect
Check and adjust
9) Insufficient cylinder compression pressure
Air leakage of valve
Grind the valve or replace the valve and valve seat ring
Air leakage of cylinder gasket
Replace the cylinder gasket
Air leakage of fuel injector hole
Replace the sealing washer or heat insulation sheath of nozzle
The cylinder cover bolt looses
Tighten the bolt to the correct torque
Clearance between piston ring and piston ring groove is too big
Replace the piston ring, replace the piston if necessary
Clearance between piston and cylinder is too big
Replace the piston ring and piston
3.12 Smoke exhausting is excessive or smoke color is abnormal
Reason
Troubleshooting
1. Black smoke
1) The fuel injector is blocked by carbon deposits; the needle valve is clipped
Check, repair or replace
2) The load is too heavy
Adjust the load
3) Fuel injection is late
Adjust the fuel injection timing
4) Fuel supplying of each cylinder is not uniform
Adjust the fuel supplying of each cylinder by professional
5) The inlet pipe and air filter are blocked
Disassemble and clean the air filter
2. White smoke
1) Insufficient fuel supplying
Check
2) Start with low temperature and idle running
It is normal, reduce the idle time
3) The fuel quality is poor (water mixed in the fuel)
Replace for the qualified fuel
3. Blue smoke
1) The piston ring is worn, or oil mixed in the cylinder combustion
chamber (occurs in case of no load or low load)
Clean or replace the piston ring
2) The valve oil seal is damaged
Replace the valve oil seal
31
www.ktc-ep.com
Miami FL,. U.S.A.