1
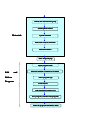
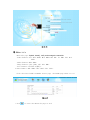
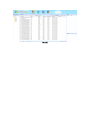
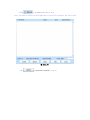
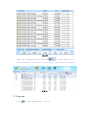
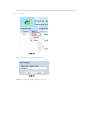
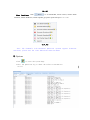
Cloud Release Management System
User Manual
(V 4.x.x)
Contents
1. Introduction
Introduction.............................................................................................................................. 4
1) System Overview
Overview................................................................................................................4
2)System Advantages
Advantages.............................................................................................................4
2. Main Funtions...........................................................................................................................5
1)Introduction for Main Functions
Functions.................................................................................5
2)System Usage Index
Index...........................................................................................................5
2.1 Operation Steps..................................................................................................... 5
2.2 Operation Flow....................................................................................................... 5
3) Environmental Requirements.........................................................................................7
3. Instruction for Use...............................................................................................................7
1) Login...................................................................................................................................7
2) Meterials...........................................................................................................................8
3) Programs........................................................................................................................... 11
4) Terminals.........................................................................................................................20
5) System...............................................................................................................................26
1. Introduction
1) System Overview
Cloud Release Management System (Digital Signage Cloud Release Management
System) is the Company’s self-developed new media technology, which builds a highly
flexible and individualized information interaction platform based on multimedia
information distribution system. The platform adopts network technology to realize
real-time advertisement or program updates, and accepts interactive activities and
information inquiries from audience.
Cloud Release Management System applies to large-scale stores, outdoor
advertisements, product display, man-machine interaction, etc. It is managed by a service
server and controls every terminal’s contents, material management, style management,
and task allocating and authority management. Client server can make a terminal not only
play videos, pictures, text information, but also provide users the touch-screen interactive
searching system. Cloud Release Management System can manage and monitor the
chain stores in the whole city, even in the whole country; its advantages which other
similar products cannot compare with includes stable system, the best display effect,
beautiful interface, rich contents, searching information in network. Also this system
supports plenty of media file formats, like videos, images, texts, web pages, PPT, etc. and
all of these make the Cloud Release Management System become a modern intelligent
platform and be one of the best terminal system.
With technological advantages, Cloud Release Management System subverted the
traditional advertising mode and is leading advertisement & media industry to a new
development age. We are looking forward that Cloud Release Management System will
become the first choice of strategic method and display way of new media.
2) System Advantages
Cloud Release Management System simplified the steps of delivering information
and is more convenient than the old version. Now this management system has the
following advantages:
1. The system supports classification management for folders.
2. The system has the function of scheduling layout and plenty of playing forms.
3. The system can manage a lot of terminals in different industries and different
areas.
4. The system has detailed classified data statistics: log, material playing, fault
conditions, user operation, etc..
5. The system has the perfect warning system.
6. The system supports role classification and privilege management.
2. Main Functions
1) Introduction for Main Functions
Materials page: Upload, classify, verify and manage the materials
<Video formats:AVI、MOV、MPEG、MP4、RMVB、RM、DAT、TS、WMV、FLV、
PPT、
PPTX>
<Audio formats:MP3、WMA>
<Image formats:JPG、JPEG、GIF、PNG、BMP>
<Text formats: TXT(UTF-8)>
<Other formats:SWF、HTML、DOC、DOCX、XLS、XLSX>
Programs page: Edit the layouts for terminals; save layouts or release them to the
terminals directly
Terminals page: It contains all the operations for terminals, such as add, edit, delete,
change, search, monitor, remote power off, restart, etc.
System page: It contains operation log, playing log, software update.
Privilege Management: add, delete, change, search and manage the role’s permission.
2) System Usage Index
2.1 Operation Steps
A、Login
B、Add and verify the materials
C、Manage terminals
D、Make programs, add playing contents, save and deliver the programs
E、User Management
F、Log Management
G、Software Update
2.2 Operation Flow
Operation Flow
Enter Materials page
Classify the materials into group
Install upload control
Materials
Upload materials
Select and verify the materials
Material statistics
Enter Program page
Input program name
Edit
and
Deliver
Select the suitable resolution for terminal
Select program type
Program
Create layout
Add materials in relative area
Save program (or deliver this program)
Select the programs and deliver them
3) Environmental Requirements
Hardware:
� CPU:dual-core 1.8G or above
� Memory:at least 1G,recommend 2G
� Network Bandwidth: above 2M
Software:
� OS:windows XP sp3 or windows 7 32-bit
� Browser:IE7 or above
Firefox
Chrome(recommend)
3. Instruction for Use
1) Login
Open Browser and input http://www.pubds.com/Member/Home/LogOn in the address
bar(3.1.1)
(3.1.1)
Click Register button and then enter relative registration information
(3.1.3)
2) Materials
Materials page: Upload, classify, verify and manage the materials
<Video Formats:AVI、MOV、MPEG、MP4、RMVB、RM、DAT、TS、WMV、FLV、PPT、
PPTX>
<Audio Formats:MP3、WMA>
<Image Formats:JPG、JPEG、GIF、PNG、BMP>
<Text Formats:TXT(UTF-8 格式)>
<Other Formats:SWF、HTML、DOC、DOCX、XLS、XLSX>
Click the Enter PubDS in Member Center page, the PubDS page shows(3.3.1)
(3.3.1)
Click
to enter the Materials page(3.2.2)
(3.2.2)
Click
to upload materials(3.2.3)
Note: You need to install Silverlight while you use the system at the first time.
图(3.2.3)
Click
to upload local materials(3.2.4)
(3.2.4)
Select the uploaded materials and click
to verify them(3.2.5)
Note: The materials that are not verified cannot be delivered to the terminals.
(3.2.5)
3) Programs
Click
to enter Programs page (3.3.1)
(3.3.1)
Program Type: Users can classified the programs according to areas, industries,
etc..(3.3.2)
(3.3.2)
Enter the New Category name(3.3.3)
(3.3.3)
Generate a new program category(3.3.4)
(3.3.4)
Click New Program to enter the Work Area.
You can input the “Name”, “Resolution”, “Type”.(3.3.5)
Note: The Terminals with Different Operation Systems support different functions,
please note the icons behind the area name.
(3.3.5)
Click
to add/delete background(3.3.6)
(3.3.6)
Add Zones: click
to add different areas(you can add more than one
area)。
Program zones: Drag the areas to change its size and position
Drag to appropriate
area size
Add Materials in the layout:
Select the video zone
Click Content button to add video materials(3.3.7)
(3.3.7)
Select the image zone
Click Content button to add picture materials(3.3.8)
(3.3.8)
Select the Text zone
Click Content button to add text materials(3.3.9)
(3.3.9)
Note: If you edit the web zone, you have to make sure the website is in the white
list.
Path: System�website white list
Click Save after adding materials, the system will remind you whether you want
to deliver the current layout.(3.3.10)
Click Confirm to enter the Publish Program page and release this layout to
appointed terminals.(3.3.11)
(3.3.10)
Choose the Terminal Group you want and then publish(3.3.11)
(3.3.11)
�Operation�
�Copy:
Program�
Click Copy to copy current program(3.3.12)
图(3.3.12)
View Schedule:
Click View Schedule to check the schedules for any terminals(3.3.13)
(3.3.13)
Template Manage:
Users can use templates to create programs.
Click Programs�Template manage
3.3.14
3.3.14
图(3.3.14
3.3.14)
Create Template:
Click New Template
The creation flow is similar with the program creation flow. The template cannot be
published.
Make Program
You can make the program based on the template you just created.
4) Terminals
Click
to enter the Terminals page(3.4.1)
Note: The icon which is in front of the terminal name should be the OS type.
(3.4.1)
Click Terminal Group � More � Add to add your own terminal group(3.4.2-3.4.4)
Standard Edition: Dormancy time should be one period.
Professional Edition: Dormancy time have 3 periods.
(3.4.2)
(3.4.3)
(3.4.4)
Terminal Information Management
Click Terminal List�Download State to check the download status(3.4.5)
(3.4.5)
Click
to check the playing contents(3.4.6)
(3.4.6)
Click
to view the terminal files (include all the files belonged to this terminal)(3.4.7)
(3.4.7)
Click
to edit the terminal information(3.4.8)
(3.4.8)
Other functions: Click
to set bandwidth, remote reboot, remote delete
materials, remote shutdown, remote snapshot, get poster report and export(3.4.10)
(3.4.10)
Note: The Terminals with Different Operation Systems support different
functions, please note the icons behind the function names.
5) System
Click
to enter the System Page
Select the Operation Log to check the relative information
(3.5.1)
(3.5.1)
Select the Terminal Log to view the relative information(3.5.2)
(3.5.2)
Select the Terminal Log Analysis to check the relative information(3.5.2)
(3.5.2)
Select the Terminal Error Log to check the relative information(3.5.3)
3.5.3
(3.5.3
3.5.3)
Select the Terminal Update to remote update the appointed terminal(3.5.4)
(3.5.4)
Website White List
If you add the web zone in the program page, the website address should be in this
Website White List.(3.5.5)
(3.5.5)