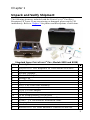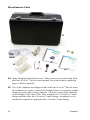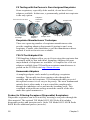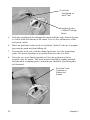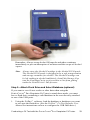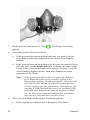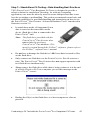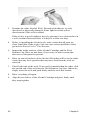
1
Respirator Fit Testing 8030 and 8038 Respirator Fit Testers Operation and Service Manual P/N 6001868, Revision F May 2010 Copyright© TSI Incorporated / 2008-2010 / All rights reserved. Part Number 6001868 / Revision F / May 2010 Address TSI Incorporated / 500 Cardigan Road / Shoreview, MN 55126 / USA Fax No. (651) 490-3824 LIMITATION OF WARRANTY AND LIABILITY (effective July 2000) Seller warrants the goods sold hereunder, under normal use and service as described in the operator's manual, shall be free from defects in workmanship and material for twenty-four (24) months, or the length of time specified in the operator's manual, from the date of shipment to the customer. This warranty period is inclusive of any statutory warranty. This limited warranty is subject to the following exclusions: a. Hot-wire or hot-film sensors used with research anemometers, and certain other components when indicated in specifications, are warranted for 90 days from the date of shipment. b. Parts repaired or replaced as a result of repair services are warranted to be free from defects in workmanship and material, under normal use, for 90 days from the date of shipment. c. Seller does not provide any warranty on finished goods manufactured by others or on any fuses, batteries or other consumable materials. Only the original manufacturer's warranty applies. d. Unless specifically authorized in a separate writing by Seller, Seller makes no warranty with respect to, and shall have no liability in connection with, goods which are incorporated into other products or equipment, or which are modified by any person other than Seller. The foregoing is IN LIEU OF all other warranties and is subject to the LIMITATIONS stated herein. NO OTHER EXPRESS OR IMPLIED WARRANTY OF FITNESS FOR PARTICULAR PURPOSE OR MERCHANTABILITY IS MADE. TO THE EXTENT PERMITTED BY LAW, THE EXCLUSIVE REMEDY OF THE USER OR BUYER, AND THE LIMIT OF SELLER'S LIABILITY FOR ANY AND ALL LOSSES, INJURIES, OR DAMAGES CONCERNING THE GOODS (INCLUDING CLAIMS BASED ON CONTRACT, NEGLIGENCE, TORT, STRICT LIABILITY OR OTHERWISE) SHALL BE THE RETURN OF GOODS TO SELLER AND THE REFUND OF THE PURCHASE PRICE, OR, AT THE OPTION OF SELLER, THE REPAIR OR REPLACEMENT OF THE GOODS. IN NO EVENT SHALL SELLER BE LIABLE FOR ANY SPECIAL, CONSEQUENTIAL OR INCIDENTAL DAMAGES. SELLER SHALL NOT BE RESPONSIBLE FOR INSTALLATION, DISMANTLING OR REINSTALLATION COSTS OR CHARGES. No Action, regardless of form, may be brought against Seller more than 12 months after a cause of action has accrued. The goods returned under warranty to Seller's factory shall be at Buyer's risk of loss, and will be returned, if at all, at Seller's risk of loss. Buyer and all users are deemed to have accepted this LIMITATION OF WARRANTY AND LIABILITY, which contains the complete and exclusive limited warranty of Seller. This LIMITATION OF WARRANTY AND LIABILITY may not be amended, modified or its terms waived, except by writing signed by an Officer of Seller. i Caution This instrument is a Class I laser device. Adjustments or performance of procedures other than those specified herein may result in hazardous radiation exposure. WARNING This instrument contains (1) non-rechargeable Lithium battery which is not user serviceable. Return to factory for replacement. Disclaimer: ® The measurement provided by the PORTACOUNT PRO Respirator Fit Tester is an assessment of respirator fit during a fit test only. Respirator fit at other times will vary. The fit factor value is not intended for use in calculating an individual's actual exposure to hazardous substances. Patents Model 8038 PORTACOUNT® PRO+Respirator Fit Tester is patented under U.S. Patent No. 6,125,845. Service Policy Knowing that inoperative or defective instruments are as detrimental to TSI as they are to our customers, our service policy is designed to give prompt attention to any problems. If any malfunction is discovered, please contact your nearest sales office or representative, or call TSI's Customer Service department at (800) 874-2811 (USA) or (001 651) 490-2811 (International) or visit www.tsi.com. ii Contents Introduction and Overview .......................................................................... 1 Database Operation When Operating in Stand-Alone Demo Mode ......... 1 Registration ............................................................................................. 1 Why Fit Test ............................................................................................ 2 Preparations for Fit Testing ..................................................................... 2 Precautions for Fit Testing ....................................................................... 2 Chapter 1 Unpack and Verify Shipment ..................................................... 5 Chapter 2 Getting To Know The PORTACOUNT® PRO Respirator Fit Tester ................................................................................................ 7 The Touch Screen Display ...................................................................... 7 Sampling Ports ........................................................................................ 7 Electrical Connections ............................................................................. 9 Alcohol Related Parts ............................................................................ 11 Miscellaneous Parts .............................................................................. 12 Optional Accessories ............................................................................. 15 Chapter 3 About Respirators and Fit Testing ......................................... 17 Probed Test Respirators ........................................................................ 17 Probes for Filtering-Facepiece (Disposable) Respirators ...................... 18 Inserting a Test Probe in a Disposable Respirator with the TSI Model 8025-N95 Probe Kit ................................................................. 19 Positive Pressure Respirators ............................................................... 23 Chapter 4 Conducting a Fit Test with the PORTACOUNT® PRO Respirator Fit Tester ........................................................................... 25 Step 1—Prepare the PORTACOUNT® PRO Respirator Fit Tester for Fit Testing .......................................................................................... 26 Step 2—Attach Flash Drive and Select Database (optional) ................. 29 Step 3—Run Daily Checks .................................................................... 30 Step 4—Conducting Fit Tests ................................................................ 32 Step 5—Record Results ........................................................................ 38 Step 6—Using a Printer with the PORTACOUNT® PRO Fit Tester ............. 40 Step 7—Stand-Alone Fit Testing—Data Handling Best Practices ......... 43 Step 8—Advanced Database Tools ....................................................... 44 Chapter 5 Operating Modes and User Interface ...................................... 47 Modes of Operation ............................................................................... 47 User Interface ........................................................................................ 48 New Exercise Name ................................................................................. 53 Setup Tab .............................................................................................. 54 iii Chapter 6 Service and Maintenance ......................................................... 57 Recalibration Interval .............................................................................. 57 Status Messages .................................................................................... 57 Reordering Supplies ............................................................................... 58 Shipping & Storage Precautions............................................................. 58 Changing the Alcohol Wick..................................................................... 59 Nozzle Cleaning ..................................................................................... 61 Applying O-ring Grease to the Alcohol Cartridge .................................... 64 Chapter 7 Troubleshooting........................................................................ 65 On-line Troubleshooting Guides ............................................................. 65 Appendix A Specifications ........................................................................ 71 Flow Rate ............................................................................................... 72 Appendix B Theory of Operation .............................................................. 75 How the PORTACOUNT® PRO Respirator Fit Tester Works....................... 75 How the PORTACOUNT® PRO Fit Tester Counts Particles ........................ 75 Appendix C Calculating Fit Factor ............................................................ 79 Appendix D Calculating Particle Concentration ...................................... 81 Appendix E Timing in Fit Test Mode......................................................... 83 Appendix F Using the PORTACOUNT® PRO Respirator Fit Tester to Fit Test Positive Pressure Respirators ............................................... 85 Appendix G The Rainbow Passage .......................................................... 89 Index iv ........................................................................................................ 91 Introduction and Overview This manual describes both the Model 8030 PORTACOUNT® PRO and 8038 PORTACOUNT® PRO+ Respirator Fit Tester hardware and operation of the tester without the use of FITPRO™ Fit Test Software. The Model 8030 is designed to measure fit factors of masks with an efficiency of 99% or greater. The Model 8038 includes N95-Companion™ technology, which lets you measure any tight-fitting respirator including N95, P2, and P1 disposables. Regardless of whether you intend to use the PORTACOUNT® PRO Respirator Fit Tester with or without the FITPRO™ Fit Test software, you should become familiar with this manual first. Many of the details in this manual that concern PORTACOUNT® PRO fit test operations are not repeated in the FITPRO™ Fit Test Software Manual. Database Operation When Operating in Stand-Alone Demo Mode The PORTACOUNT® PRO Respirator Fit Tester has an on-board (DemoTraining) database that lets you perform all available operations, including adding data. Any changes you make to this Demo-Training database, however, are lost when you power off the PORTACOUNT® PRO fit tester, unless you manually save them using the new Advanced Database Tools (introduced in firmware version 2.0). If you want to save fit test results or other data when using the PORTACOUNT® PRO Respirator Fit Tester in stand-alone mode (not controlled by the FITPRO™ Fit Test Software), you must have a USB flash drive containing a valid database attached to one of the USB ports. (See the FITPRO™ Fit Test Software User Manual for instructions on how to configure the USB flash drive.) Registration Please fill out and mail the registration card that came with your instrument or register it online at http://register.tsi.com. You may re-register at any time to update our records. You will need your instrument model number and serial number. Registration allows TSI to keep in-touch with you regarding important information concerning the TSI instrument(s) and software you own. 1 Why Fit Test There are two primary reasons for respirator fit testing: • Verification of Training. After the individual has received respirator training, a fit test checks that the person has learned how to properly put on and wear a respirator without assistance. • Sizing. It is important to make sure that the individual is issued a respirator that is capable of providing protection when worn properly, that is, it is the right size. Preparations for Fit Testing Training the Trainer The person conducting the fit test must have a clear understanding of respiratory protection, respirators, and fit testing to be effective. Anyone can master the operation of the PORTACOUNT® PRO Respirator Fit Tester simply by studying this manual, but the background knowledge required to proficiently fit test cannot be obtained from here. Consider attending a one-, two- or three-day seminar on fit testing provided by various consultants. Contact TSI for references. Respirator Training Respirator training is critical for any respiratory protection program. All employees who wear respirators must be taught how and why they are used. This training should be done prior to the fit test, not during the fit test. Consult the regulations or standards that pertain to your industry for information on training requirements. The PORTACOUNT® PRO Respirator Fit Tester includes a Real-time Fit Factor display that allows the user to see the results of changes he or she makes to the mask. Precautions for Fit Testing The following is a discussion of several precautions that should be considered prior to conducting a fit test: Fit Testing People Who Smoke Cigarettes or Cigars Smokers exhale particles for at least 30 minutes after they have smoked a cigarette or cigar. The PORTACOUNT® PRO fit tester can count these particles and will interpret them as if they were caused by face seal leakage. It is very important to instruct individuals not to smoke for at least 30 minutes prior to fit testing. Fit factors for anyone who has smoked recently will be lower than that individual deserves and may even cause him or her to fail the fit test entirely. 2 Introduction and Overview Fit Testing with Generated Aerosols The PORTACOUNT® PRO fit tester is designed to operate using the microscopic particles in the ambient air. It can measure particle concentrations and fit factors when generated aerosols (like corn oil, salt or DOP) are used, however, these aerosols may cause the PORTACOUNT® PRO fit tester to need more frequent cleaning and calibration. Fit Testing Near Irritant Smoke Do not conduct fit tests in close proximity to sources of irritant smoke like those used for qualitative fit testing. The irritant smoke is corrosive and can damage the PORTACOUNT® PRO Respirator Fit Tester. Fit testing near sources of amyl-acetate (banana oil) is not a problem. The TSI Web site http://fittest.tsi.com contains additional resources that you may find useful. Disclaimer: The measurement provided by the PORTACOUNT® PRO Respirator Fit Tester is an assessment of respirator fit during a fit test only. Respirator fit at other times will vary. The fit factor value is not intended for use in calculating an individual's actual exposure to hazardous substances. Introduction and Overview 3 (This page intentionally left blank) 4 Introduction and Overview Chapter 1 Unpack and Verify Shipment The following items are included with the PORTACOUNT® PRO/PRO+ Respirator Fit Tester. If any are missing or damaged, please notify TSI immediately. Refer to Chapter 2 for photos and descriptions of each item. Standard Items PORTACOUNT® PRO (Models 8030 and 8038) Qty Description 1 1 1 1 1 2 2 1 1 1 1 16 1 1 1 1 1 ® PORTACOUNT PRO Respirator Fit Tester Model 8030/8038 Stylus Alcohol Cartridge Alcohol Fill Capsule Storage Cap Zero Check Filter Spare Alcohol Wicks 5 ft (1.5 m) Twin Tube Assembly 1/8 to 3/16 Tube Adapter 1/8 to 1/4 Tube Adapter AC Adapter 30 ml Alcohol Bottles (480 ml total) Operation & Service Manual (this manual) FITPRO™ Fit Test Software Installation Guide Carrying Case FITPRO™ Fit Test Software CD and case PORTACOUNT® Fit Tester Interactive Tutorial CD and case 5 Standard Items PORTACOUNT® PRO (Models 8030 and 8038) Qty Description 1 1 1 Additional Items PORTACOUNT® PRO+ (Model 8038 only) Qty Description 1 1 1 6 USB Cable USB Flash drive Container of silicone grease Probe Assembly Tool Probe Kit (100 pieces) Neck Strap Chapter 1 Chapter 2 Getting To Know The PORTACOUNT® PRO Respirator Fit Tester Use the numbered paragraphs and correspondingly numbered arrows to identify the touch screen display, connectors, parts, and accessories of the PORTACOUNT® PRO fit tester. You need to be familiar with these items when following the instructions in this manual. The Touch Screen Display The touch screen display provides the interface to all operations. You can select items on the touch screen using your finger or the stylus that is provided. Do not use a pen, pencil or other sharp instrument, as this may damage the screen. Stylus On/Off Button Sampling Ports Sampling ports permit air to flow into and out of the PORTACOUNT® PRO fit tester. 7 2 1 3 1 The Sample Port is used when sampling air from a respirator during a fit test. The clear tube marked "SAMPLE" of the Twin Tube Assembly (3) connects here. The Sample Port fitting is silver and marked with the letter "S". 2 The Ambient Port is used to sample ambient air during a fit test. The blue tube marked "AMBIENT" of the Twin Tube Assembly (3) connects here. The Ambient Port fitting is blue and marked with the letter "A". 3 The Twin Tube Assembly consists of a pair of tubes: the Sample Tube and the Ambient Tube. The Twin Tube Assembly is about 5.5 feet (1.7 meters) long. It must never be lengthened by more than a few inches for fit testing. The Sample Tube is 7 inches (18 cm) longer than the Ambient Tube. The Twin Tube must not be lengthened except for the few inches added by a Tube Adapter. The two sample tubes must be nearly the same length for accurate fit testing. 8 Chapter 2 Electrical Connections 4 5 6 4 The USB Series “B” receptacle provides for communication between the PORTACOUNT® PRO fit tester and a USB port on the PC. The USB cable provided with the PORTACOUNT® PRO fit tester connects here. 5 Two USB Series “A” receptacles let you connect a USB mouse, USB keyboard, compatible USB printer, or a USB flash drive (thumb drive). 6 The External Power Connector connects the AC Adapter to the PORTACOUNT® PRO fit tester. Getting to Know the PORTACOUNT® PRO Respirator Fit Tester 9 7 7 10 The AC Adapter plugs into the External Power Connector on the PORTACOUNT® PRO fit tester and an AC wall outlet. The AC Adapter senses the input voltage automatically. Chapter 2 Alcohol Related Parts 12 13 9 8 10 11 8 The Alcohol Cartridge holds the isopropyl alcohol consumed by the PORTACOUNT® PRO fit tester. A porous wick inside is soaked with alcohol. 9 The Cartridge Cavity is where the Alcohol Cartridge is inserted during use. Make certain dirt and lint do not enter the Cartridge Cavity. Cover the Cartridge Cavity with the Storage Cap (10) when the instrument is not being used. 10 The Storage Cap is used to cover either the Cartridge Cavity of the PORTACOUNT® PRO fit tester or the Alcohol Fill Capsule, whichever does not currently hold the Alcohol Cartridge. 11 Two spare Alcohol Wicks are included with the PORTACOUNT® PRO fit tester. 12 The Alcohol Fill Capsule is used to store and fill the Alcohol Cartridge. 13 The PORTACOUNT® PRO fit tester is shipped with 16 bottles of reagent grade (99.5% or better) isopropyl alcohol. Each bottle contains 30 ml. The instrument consumes alcohol at approximately 2 ml per hour and the alcohol wick holds approximately 13 ml of alcohol. Do not use isopropyl alcohol that is less than 99.5% pure. Getting to Know the PORTACOUNT® PRO Respirator Fit Tester 11 Miscellaneous Parts 21 23 22 19&20 17 16 15 14 24 18 14 Spare Sampling Port Inlet Screens. These screens are used to help keep the PORTACOUNT® PRO fit tester internal flow path clean by capturing large or fibrous particles. 15 Two Tube Adapters are shipped with each PORTACOUNT® PRO fit tester. The adapters are used to connect the Sample Tube to a respirator sample fitting (or probe) that is larger than the 1/8 inch (3 mm) inside diameter of the Sample Tube. One of the Tube Adapters fits 3/16 inch (4.7 mm) fittings and the other fits 1/4 inch (6.3 mm) fittings. An adapter is not needed for respirators equipped with a 1/8 inch (3 mm) fitting. 12 Chapter 2 16 The Zero Check Filter is provided for the Zero Check and Max FitFactor Check on the PORTACOUNT® PRO fit tester to make sure it is working properly. A spare filter is also provided. Note: TSI recommends that the Zero Check Filter be left attached to the sample line whenever the PORTACOUNT® PRO fit tester is turned on but not in use. This prevents lint and debris from being drawn into the instrument and blocking the airflow. 17 The PORTACOUNT® PRO/PRO+ Respirator Fit Tester Operation & Service Manual (this manual). Visit the TSI Web site http://fittest.tsi.com to download the current version of most TSI manuals. 18 The FITPRO™ Fit Test Software Installation Guide. Visit the TSI Web site http://fittest.tsi.com to download the current version of most TSI manuals. 19 The Compact Disc (CD) contains FITPRO™ Fit Test Software for Windows in addition to manuals and other information related to TSI fit testing products and fit testing in general. There is no printed FITPRO™ software manual in lieu of the online help. The CD is located in a convenient storage case. 20 The Compact Disc (CD) contains the PORTACOUNT® fit tester Interactive Tutorial. The CD is located in a convenient storage case. 21 The Carrying Case provides protection and convenience. The case is designed to hold the PORTACOUNT® PRO fit tester and standard accessories. 22 USB Cable. The USB Cable is used to connect the PORTACOUNT® PRO fit tester to a computer. It is needed whenever the FITPRO™ Software is used to interface and control the PORTACOUNT® PRO fit tester. 23 Grease for lubricating the O-ring on the Alcohol Cartridge. Periodic application of grease to the Alcohol Cartridge O-ring nearest the handle ensures that the cartridge is easy to install and remove. Instructions can be found in Chapter 6, “Applying O-ring Grease to the Alcohol Cartridge”. It is important that grease is used sparingly and is not allowed to get into the two particle passages (holes) found near the O-ring. 24 USB Flash Drive. The flash drive holds active databases and lets you select and use the active database in the PORTACOUNT® PRO fit tester in stand-alone mode. Without a flash drive, you cannot store information and test data collected or updated when using the PORTACOUNT® PRO fit tester in stand-alone mode. The flash drive is used to exchange database Getting to Know the PORTACOUNT® PRO Respirator Fit Tester 13 data between the PORTACOUNT® PRO fit tester and the FITPRO™ software. (See the FITPRO™ Fit Test Software User Manual for instructions on how to configure the USB flash drive.) Additional Items (Model 8038 only) 25 27 26 25 Probe Assembly Tool. Used to install the sampling probes in filteringfacepiece (disposable) respirators. 26 Probe Kit. Includes 100 disposable probes. 27 Neck Strap. Supports the Twin Tube assembly when sampling running fit tests on filtering-facepiece (disposable) respirators. 14 Chapter 2 Optional Accessories 28 28 Model 8026 Particle Generator (optional). If you do not have the minimum 1000 particles/cm3 ambient particle concentration needed for the PORTACOUNT® PRO fit tester to do a fit test, this optional particle generator supplements naturally occurring room concentration with non-toxic salt (NaCl) particles in the right size range for the PORTACOUNT® PRO fit tester. Refer to the Model 8026 Particle Generator information on the TSI Web site http://software.tsi.com. Getting to Know the PORTACOUNT® PRO Respirator Fit Tester 15 (This page intentionally left blank) 16 Chapter 2 Chapter 3 About Respirators and Fit Testing The conventional way to quantitatively fit test is through the use of probed test respirators, but fit tests can also be performed on disposable respirators and positive pressure respirators. This chapter discusses the types of respirators and provides instructions on installing a sampling port to a disposable filtering-facepiece. Probed Test Respirators A probed respirator has a fitting (probe) installed that allows air from inside the respirator to be sampled by an instrument like the PORTACOUNT® PRO fit tester. The probed respirator is only used for fit testing and cannot legally be used in a hazardous environment. You will need at least one respirator of each make, model and size your company issues. After the fit test, the individual should be issued a respirator with the identical facepiece, only without the probe. Most probed respirators are obtained from the respirator manufacturer or distributor. You should be able to buy probed versions of most if not all models. Be sure to buy class-100 or class-99 filters also if you don't already stock them. You must use class-100, class-99, or P3 filters for fit testing even if you use another type of cartridge in the workplace. 17 Fit Testing with the Person's Own Assigned Respirator Some respirators, especially older models, do not have fit test adapters available. In that case, a permanently probed test respirator is the only option. To PORTACOUNT PRO Class-100 Filter Cartridge Adapter’s Inhalation Valve Sampling Adapter Sample Tube Sample Inlet Cap Suction Cup Respirator Manufacturers' Technique There are a growing number of respirator manufacturers who provide sampling adapters that permit fit testing in one's own respirator. Contact your distributor or call the manufacturer direct and ask if such accessories are available. TSI Fit Test Adapter Kits TSI Sampling Adapters allow you to fit test using the respirator that is actually used by that individual. Sampling Adapters for most major brands of respirator are available. A complete list of fit test adapters available from TSI and from respirator manufacturers is posted on the TSI Web site http://fittest.tsi.com. Homemade Adapters A sampling adapter can be made by modifying a respirator cartridge. This usually involves running a tube through the cartridge and into the respirator. TSI recommends that you avoid this option because it is so easy to do poorly. The most fundamental mistake that is often made is to not extend the sampling tube through the inhalation valve and into the breathing zone. This combined with problems sealing around the outside of the tube make this option unattractive. Probes for Filtering-Facepiece (Disposable) Respirators Disposable respirators can be fit tested by inserting a test probe through the filter material. The optional TSI Model 8025-N95 Probe Kit includes disposable probes and insertion tools. Order TSI Model 8025-N95R Probe Refill Kit for additional probes (no tools). 18 Chapter 3 Note: The PORTACOUNT® PRO Model 8030 can successfully fit test class100, class-99, and P3 disposable respirators. Lower efficiency disposable respirators such as class 95, P2, and P1 will usually require use of the PORTACOUNT® PRO+ Model 8038. Inserting a Test Probe in a Disposable Respirator with the TSI Model 8025-N95 Probe Kit To perform a quantitative fit test, the PORTACOUNT® PRO fit tester must draw an air sample from inside the respirator while it is being worn by the person being fit tested. The tools, sampling probes and push nuts contained in the probe kit lets you install a sampling port onto any disposable filteringfacepiece respirator. WARNING Once a sampling probe has been installed, the respirator cannot be used for respiratory protection. Ported respirators are for quantitative fit testing only. Discard (or sanitize) the respirator after each fit test is completed. (Follow the respirator manufacturer’s recommendations.) 1. Choose a location to install the sample probe. For proper fit testing, the sampling point must be in the “breathing zone” of the respirator user. For most respirators, this is in the center of the respirator between the person’s nose and mouth. About Respirators and Fit Testing 19 For flat “duckbill” style respirators, install the probe near the outer edge of the bottom panel where it cannot be blocked by the person’s chin. Bottom panel shown For respirators with center-mounted exhalation valves, install the probe to the left or right of the valve. Do not install the probe above or below the valve because this risks having the probe blocked by the person’s nose or chin. Correct probe location to left (or right) of valve Wrong probe location below (or above) valve 20 Chapter 3 For respirators with an outer mesh, install the probe normally as if the mesh was not present. The sampling probe and push nut will seal properly right through the mesh. 2. Slide the sampling probe onto the piercing tool. As the pointed end of the piercing tool is very sharp, be extremely careful when handling it! Sampling Probe 3. Choose a location on the mask that is in front of the person's nose/mouth region. Avoid seams and folds in the mask. 4. Pierce the mask at the selected location, using the piercing tool with the loaded sampling probe. Be sure to pierce the mask from the inside! About Respirators and Fit Testing 21 Push Nut Positioned on Anvil Tool Sampling Probe Pushed Through Mask 5. Push the sampling probe through the mask until the end of the tool point is visible from the outside of the mask. Leave a few millimeters of the tool point visible. 6. Place the push nut on the anvil tool with the "dished" side up. A magnet prevents the push nut from falling off. 7. Position the anvil tool, with the loaded push nut, over the protruding point. The mask should now be pinched between the two tools. 8. Press the two tools firmly together to force the push nut as far as possible onto the probe. The mask material should be tightly pinched and the mask, sampling probe, and push nut should be joined together as illustrated. Push the Tools Together to Fasten the Probes 22 Chapter 3 9. Inspect the sampling probe to be sure it is not plugged. Try to rotate the probe with your fingers. If it moves freely, use the probe insertion tool kit to press the push nut firmly onto the sampling probe and pinch the mask material more tightly. Correctly Positioned Sampling Probe Note: Once you install a sampling probe into a disposable mask, the mask cannot be used for respiratory protection. Probed masks are to be used for quantitative fit testing only. Discard each probed disposable mask after a fit test is completed. Positive Pressure Respirators Refer to Appendix F for a discussion on Fit Testing positive pressure respirators with the PORTACOUNT® PRO Respirator Fit Tester. About Respirators and Fit Testing 23 (This page intentionally left blank) 24 Chapter 3 Chapter 4 Conducting a Fit Test with the PORTACOUNT® PRO Respirator Fit Tester This chapter describes how to use the PORTACOUNT® PRO fit tester as a stand-alone instrument to conduct a quantitative respirator fit test. You should learn to operate the PORTACOUNT® PRO fit tester in this manner even if you plan to use the FITPRO™ software. After becoming familiar with manual operation, if you want to automate fit testing with a computer and the fit test software, refer to the FITPRO™ software online help for detailed instructions. Note: The PORTACOUNT® PRO Respirator Fit Tester has an on-board Demo database that lets you perform all available operations, including adding data. However, any changes you make to this Demo database are lost when you power off the PORTACOUNT® PRO fit tester and must be manually recorded if a permanent record is desired. If you want to save fit test results or other data when using the PORTACOUNT® PRO Respirator Fit Tester in Stand-Alone mode (not controlled by the FITPRO™ Fit Test Software), you must have a flash drive containing a valid database attached to one of the USB ports. The fit test procedure1 is broken down into the following steps. 1. Prepare the PORTACOUNT® PRO Respirator Fit Tester for testing by filling the Alcohol Cartridge. 2. Attach a flash drive and select a database (optional). If you do not select a database from the flash drive, the Demo database is used by default. 3. Perform daily checks. 4. Perform the fit tests. 1 The procedure assumes that the mask being tested is a negative-pressure air-purifying respirator or a positive-pressure mask temporarily converted to function like a negative-pressure air-purifying respirator. For additional details see Appendix F of this manual and Application Note ITI-070 Introduction to Respirator Fit Testing located on the TSI Web site http://fittest.tsi.com. 25 5. Record the results. 6. Using a Printer with the PORTACOUNT® Fit Tester. 7. Stand-Alone Fit Testing. 8. Advanced Database Tools. Step 1—Prepare the PORTACOUNT® PRO Respirator Fit Tester for Fit Testing Follow the steps below to setup the PORTACOUNT® PRO fit tester for fit testing without using the FITPRO™ Fit Test Software (stand-alone mode). Fill the Alcohol Cartridge WARNING Isopropyl alcohol is hazardous material. Do not ingest or allow alcohol to contact your eyes or skin. Refer to the Material Safety Data Sheet (MSDS) located in the box of alcohol for handling precautions and first aid procedures. Always recap alcohol fill capsule and other containers immediately to prevent absorption of moisture and the escape of alcohol vapors. Dispose of any alcohol with visible contamination. Because the Alcohol Cartridge is inserted into the Cartridge Cavity of the instrument, it is critically important to keep it clean. Any dirt or debris that gets into the PORTACOUNT® PRO fit tester can plug the small internal nozzle and prevent operation. Do not allow the black part of the Alcohol Cartridge to make contact with any surface that may be dirty. Keep the storage cap and alcohol cartridge clean. Maintaining an adequate alcohol supply inside the PORTACOUNT® PRO fit tester is critical to its operation and requires strict adherence to the directions that follow. 1. Make sure the PORTACOUNT® PRO fit tester is turned off. 2. Remove the Alcohol Cartridge from the PORTACOUNT® PRO fit tester by twisting it counter-clockwise. 3. Open the Alcohol Fill Capsule by twisting the Storage Cap off (counterclockwise). 4. Set the Storage Cap and Alcohol Cartridge down on a clean surface to prevent contamination. 26 Chapter 4 5. Open a bottle of alcohol. Invert the bottle and insert the nozzle end into the Alcohol Fill Capsule as far as possible to make certain you do not inadvertently spray alcohol anywhere except into the Capsule. Fill Line 6. Squeeze alcohol into the Alcohol Fill Capsule until it is even with or slightly above the fill-line. 7. Recap the alcohol bottle immediately. 8. Make certain the alcohol cartridge is clean. If it has been contaminated, refer to the Service and Maintenance chapter and follow the instructions to replace it. If it is clean, insert the Alcohol Cartridge into the Alcohol Fill Capsule and turn the capsule clockwise until it locks in place. Conducting a Fit Test with the PORTACOUNT® PRO Respirator Fit Tester 27 9. Set the Alcohol Fill Capsule down and wait at least 2 minutes while the alcohol wick inside the Alcohol Cartridge soaks up alcohol. 10. Remove the Alcohol Cartridge from the Capsule and gently shake it to allow excess alcohol to drip back into the Alcohol Fill Capsule. Stop when excess alcohol is no longer dripping; it is not necessary to wait until the outside surface of the Alcohol Cartridge is dry. 11. Insert the Alcohol Cartridge into the Cartridge Cavity of the PORTACOUNT® PRO Respirator Fit Tester. It should slide in with little effort. DO NOT FORCE IT (see Note below). As you approach full insertion, firmly twist the Alcohol Cartridge clockwise until it locks into position. Note: To ease insertion of the Alcohol Cartridge, apply a bit of supplied silicone vacuum grease to the wick O-ring as described in the section “Applying O-ring Grease to the Alcohol Cartridge”, Chapter 6. 12. Recap the alcohol fill capsule with the storage cap. 28 Chapter 4 Remember: Always recap alcohol fill capsule and other containers immediately to prevent absorption of moisture and the escape of alcohol vapors. Note: Always store the Alcohol Cartridge in the Alcohol Fill Capsule. The Alcohol Fill Capsule is designed to be a safe transportation and storage container for alcohol. The Alcohol Cartridge can be left soaking in alcohol indefinitely. Install the Storage Cap into the Cartridge Cavity to prevent dirt or lint from getting inside the PORTACOUNT® PRO fit tester. Step 2—Attach Flash Drive and Select Database (optional) If you want to save fit test results or other data when using the PORTACOUNT® PRO Respirator Fit Tester in stand-alone mode, you must have a flash drive containing a valid database in the root directory attached to one of the USB ports. 1. Using the FITPRO™ software, load the database or databases you want to use onto the flash drive. (See the FITPRO™ Fit Test Software User Manual for instructions on how to configure the USB flash drive.) Conducting a Fit Test with the PORTACOUNT® PRO Respirator Fit Tester 29 2. Insert the flash drive into one of the USB ports of the PORTACOUNT® PRO fit tester. 3. Press the Database tab. 4. Press Select Database icon. 5. Select the database you want to use as the active database and press Load. 6. When the database is loaded, select Done. The database you selected is now the active database and will remain the active database until you select another one or remove the flash drive. Step 3—Run Daily Checks TSI recommends maintenance checks be performed once each day before the PORTACOUNT® PRO Respirator Fit Tester is used and whenever a problem is encountered. These daily checks are: • Particle Check • Classifier Check (only for the PORTACOUNT® PRO+ 8038 with N95 enabled) • Zero Check • Max FitFactor Check • Valve Check (optional) The optional valve check should be performed to help diagnose why a Max FitFactor check failed. Completed daily checks provide confidence that the PORTACOUNT® PRO fit tester is working properly. Failure of any of the daily checks requires immediate attention. See Troubleshooting chapter. If the PORTACOUNT® PRO Respirator Fit Tester passes the daily checks, and you have difficulty fit testing, the problem is probably NOT in the PORTACOUNT® PRO fit tester. Examine the respirator carefully for leaks or pinched tubes. To start the daily checks: 1. Connect the AC Adapter to the instrument and turn on the PORTACOUNT® PRO fit tester using the O/I button. The PORTACOUNT® PRO fit tester goes through a warm-up period before it is ready to use. 2. From the Activities Tab, select the Daily Checks icon [ 30 ]. Chapter 4 3. Press Yes with the stylus or your finger tip, and follow the directions on the screen. 4. If you want to perform a Valve Check, select the “Enable Valve Check” box. The Valve Check is not part of the recommended Daily Checks. It is used to further diagnose the reason why the Max FitFactor Check failed. Similarly, if you are using a PORTACOUNT® PRO+ 8038 and want to perform a classifier check, select the “N95 Enabled” box. This test is only necessary if you will be testing disposable masks with efficiency less than 99% (such as class 95, P2, and P1 respirators)." 5. Click Settings if you want to change or view the Daily Check settings, then Save or Cancel to return to the Test Status dialog. Caution Changing the Daily Checks settings is not recommended. Factory settings are optimal. 6. As instructed on the display, remove the HEPA filter or mask (if one is attached to the sample intake hose) and press START. The first check is the Particle Check, which determines if the PORTACOUNT® PRO fit tester is working and if the concentration of particles in the ambient air is sufficient to conduct fit testing. When the test begins, progress is shown in the “Test Status” box on the screen. For the Model 8030, the Particle Check passes if the particle concentration is 1000 or above, and fails if the particle concentration is below 1000. For the Model 8038, the Particle Check passes if the particle concentration is 30 or above, and fails if the particle concentration is below 30. If the test fails, refer to the Troubleshooting chapter. 7. If you selected the “N95 enabled” box, the Particle Check is immediately followed by the Classifier Check. The Classifier Check verifies the classifier is functioning properly. 8. The next check is the Zero Check, which provides assurance that there are no leaks in the system. As instructed on the touch screen, attach the HEPA filter to the clear Sample Tube and press START. The test begins. The particle concentration should drop to zero (0.00) in less than 30 seconds. An occasional value of 0.60 or 1.20 is acceptable, but it should read 0.00 most of the time. If the Zero Check fails, see the Troubleshooting chapter. If the PORTACOUNT® PRO fit tester fails the Zero Check, any fit tests you conduct may result in lower fit factors than would be measured otherwise. The risk is that you may fail people who Conducting a Fit Test with the PORTACOUNT® PRO Respirator Fit Tester 31 have good fits, thereby wasting time and effort. There is no possibility that failing the Zero Check could result in overstated fit factors. This is because any particles leaking into the PORTACOUNT® PRO fit tester are interpreted as mask leakage, resulting in lower fit factors. 9. The Max FitFactor Check is after the Zero Check. This check determines if the PORTACOUNT® PRO is capable of measuring high fit factors and if the internal switching valve is functioning properly. The test is essentially a fit test on a HEPA filter which simulates a perfectly fitting respirator. A very high fit factor should result if the instrument is working properly. The Max FF Check actually measures the maximum fit factor that can be determined by the PORTACOUNT® PRO fit tester given the local ambient particle concentration and the mask sample time programmed into the PORTACOUNT® PRO fit tester. Assuming the Zero Check Filter is perfect, the maximum fit factor will be the local ambient particle concentration divided by a mask concentration equivalent to one particle during the mask sample time. When the PORTACOUNT® PRO fit tester actually measures zero particles during the mask sample, one particle is artificially added to prevent division by zero when calculating the fit factor. Performing this test is futile if there are leaks in the system. If this test fails refer to the Troubleshooting chapter. 10. If you checked the “Enable Valve Check” box, the valve check is performed last. 11. Press EXIT when the tests are complete. If the PORTACOUNT® PRO fit tester passed all tests, proceed to Step 4 – Conducting Fit Tests. If the instrument failed any test, refer to the Troubleshooting chapter to resolve the problem and then run the Daily Checks again. Step 4—Conducting Fit Tests 1. Make sure the instrument is turned on, and you have selected the database you want to work with (if you want to save fit test results and other information). 2. Instruct the person being tested to put on the respirator 5 minutes before the fit test starts to purge the particles trapped inside the respirator and permit the wearer to make certain the respirator is comfortable. Have the subject don the mask without assistance. Fit test results depend on the subject knowing how to properly don the mask. All subjects should be trained in proper mask-donning techniques before being fit tested. Do not allow the subject to adjust the mask during the exercises, as this invalidates previous results. If testing a disposable respirator (with the Model 8038), have the fit-test subject hang the tubing support neck strap around his or her neck, 32 Chapter 4 adjusting it to a comfortable position. The tubing support neck strap should be positioned so that the tubing does not pull the mask off the person’s face. Have the person tilt his or her head up and down, turn side to side, and bend over to see if the tubing pulls the mask away from their face. If it does, readjust the neck strap or the tubing and repeat check the fit again. Conducting a Fit Test with the PORTACOUNT® PRO Respirator Fit Tester 33 3. On the Activities tab, press Fit Test [ appears. 4. Select the person to fit test as follows: a. If the person shown on the dialog is the one you want to fit test, press Next to select the respirator for the fit test. Press Next to continue. b. If the person shown on the dialog is not the one you want to fit test, click the arrow on the People List field to display the names in the People Table, click on the name of the person you want, verify the correct name is displayed, then , then press Next to select the respirator for the fit test. Note: 5. If the person you want to fit test is not in the database, press New and create a new record by typing in the information required. To add information, press the field you want to enter and an on-screen keyboard appears. Use the stylus to type the information. (Alternatively, you can plug a USB keyboard into one of the available USB ports and enter information using the keyboard.) When you are done, press Next and confirm that you want to save the new entry and use it for this fit test. After you press Next, the Respirator List dialog appears. a. 34 ]. The People List dialog If the respirator you want to use is displayed, click Next. Chapter 4 b. If you want to select a different respirator, click the arrow on the Respirator List field to display a list of all the respirators in the database. Use the stylus to select the respirator you want to use, click Next to select the current protocol. Note: You cannot add respirator records to the database here. If the respirator you want to use for fit tests is not in the database, or if no records are in the database, you must exit the Fit Test function and use the Database tab to access the respirator database (see Chapter 5). You can also use FITPRO™ software to update the database to include the respirator. 6. After you press Next, the Current Protocol dialog box appears, the mask size and operator fields are blank. You must fill in these fields before you can continue. 7. Make certain the exercise protocol shown in the Current Protocol field is the one you want to use. If you want to select a different respirator, click the arrow on the Current Protocol field to display a list of all the Protocols in the database. Use the stylus to select the respirator you want to use. Note: You cannot add a protocol to the database here. If the protocol you want to use for fit tests is not in the database, or if no records are in the database, you must exit the Fit Test function and use the Database tab to access the protocol database (see Chapter 5). You can also use FITPRO™ software to update the database to include the respirator. 8. Click on the Mask Size field and use the on-screen keyboard to type in the mask size, for example: SMALL, MEDIUM, or LARGE. You can also use abbreviations such as S, M, or L. 9. Click on the Operator field and fill in your name or initials. 10. If you want to change the Due Date for this person’s next fit test, click on the down arrow and select a different date from the calendar. 11. When you have filled in this dialog, click Next to proceed. 12. After you click Next, the Run Test: Fit Test Step 4 of 4 dialog appears, and you are ready to begin the fit test. Before you click START to begin the test, verify the information at the top left of the screen and make certain the PORTACOUNT® PRO sample tube is connected to the respirator (Use one of the Tube Adapters if necessary.), and ask the test subject if they are ready to begin the exercise protocol immediately. Conducting a Fit Test with the PORTACOUNT® PRO Respirator Fit Tester 35 13. Press START. Fit testing begins immediately, and the first exercise name appears. The elapsed exercise time also appears as a graphic progress bar. As each exercise completes, the result appears in the Fit Factor column. The Ambient and Mask Concentration Values fields show the ambient and mask particle concentrations as they are measured. 14. When a fit test starts, the PORTACOUNT® PRO Respirator Fit Tester begins a preprogrammed test sequence, sampling alternately from the Sample Tube and the Ambient Tube. Each exercise includes an ambient sample, a mask sample, and then another ambient sample. Refer to Chapter 5 for more information on creating a new protocol with altered sampling times. Refer to the Appendixes for technical details on exercise/sample timing, calculating exercise fit factors, and calculating overall fit factors. 15. PORTACOUNT® PRO fit tester beeps to alert the person being tested it is time to begin the next exercise. The exercises proceed one after another without pause. Exercises that pass are highlighted in green. Exercises that fail are highlighted in red. Have the test subject follow the exercises one after another when prompted by the instrument. Each exercise takes approximately 60 seconds to complete. 36 Exercise Name Description Normal breathing Remain still and breathe as usual. Deep breathing Take long deep breaths as if working hard. Don’t overdo it Head side to side Breathe normally while slowly turning the head from side to side. Turn far enough to each side to stretch the neck muscles. Each cycle from left to right should take several seconds, pausing momentarily at each side to take a breath. Head up and down Breathe normally while slowly alternating between looking up at the ceiling and down at the floor. Each up and down cycle should take several seconds. Chapter 4 Exercise Name Description Talking out loud Read a prepared paragraph (like the Rainbow Passage located in Appendix G of this manual) or count out loud to simulate the workplace. Grimace Grimace by smiling and/or frowning to create a leak in the respirator face seal. This exercise will often result in a failed fit factor, which is why the OSHA standard allows you to exclude that fit factor when computing the overall fit factor. When performing the grimace, you are intentionally creating a break in the face seal in order to see if the mask re-seals itself afterwards. Successful re-sealing is proven by achieving a passing fit factor on the next exercise. Notes: The OSHA protocol includes special provisions for the grimace exercise. It is allowed to be 15 seconds long and the resulting fit factor may be discarded (excluded) before calculating the overall fit factor. This is allowed because the grimace exercise is done to intentionally break the face seal in order to make sure the mask reseats itself before the next exercise. Bend and touch toes Bend at the waist as if you were touching your toes while breathing normally. Normal breathing Remain still and breathe as usual. 16. PORTACOUNT® PRO Respirator Fit Tester tells you when the fit test is complete. PORTACOUNT® PRO fit tester beeps three times and calculates and displays the overall fit factor for the set of exercises. The upper section of the dialog box displays either a pass or fail status. Pass or fail is determined by comparing the overall fit factor to the Fit Factor Pass Level. The overall fit factor is displayed at the lower left. Conducting a Fit Test with the PORTACOUNT® PRO Respirator Fit Tester 37 Note: In the USA, OSHA requires a minimum fit factor of 100 for half masks and 500 for full-face masks. If necessary, consult the appropriate regulation or standard. • If the test was a Pass, the fit test is over. You will want to keep a record of the test on file if you are not using a database on the flash drive. Also, if the fit test passed, issue that exact size and model respirator to the test subject. • If the fit test failed, determine the reason and repeat the test. Some common reasons for failure are described below. • If you are fit testing with a disposable respirator, discard it when the fit test is complete. Probed respirators are intended for fit testing only and are never to be reused. You may be able to sanitize and reuse other types of respirators. Contact the respirator manufacturer for specific information. • If the fit test is terminated before the last exercise is completed (by pressing Stop), the display indicates the test has stopped. No overall fit factor is displayed. 17. You can now begin to test another person, by pressing Exit. Step 5—Record Results If you use the PORTACOUNT® PRO Respirator Fit Tester in stand-alone mode and do not have a active database on the flash drive attached to one of the USB ports, you have to manually record the fit test results and information about the person and respirator being fit tested. If you are using a database from the flash drive, the results are automatically stored in the database. Use FITPRO™ software to view and print the results. You should record the following information if no database is used. Ambient concentration Mask concentration Fit factor exercise 1 Fit factor exercise 2 Fit factor exercise 3 Fit factor exercise 4 Fit factor exercise 5 . . Fit factor exercise X Overall fit factor Pass or Fail 38 Chapter 4 The overall fit factor is the most important data item. It is the overall result of the fit test and usually the only fit factor value that must be retained as part of your record keeping. The fit factors for the individual exercises are not as important. It is possible to have a passing overall fit factor even though one of the exercises resulted in a failing fit factor. The overall fit factor is not simply an average of all the exercise fit factors. It is a weighted average related to the amount of airborne hazard that the person might have inhaled if he or she were in the workplace. One breath at a fit factor of 100 and then another at a fit factor of 1000 is not the same as two breaths at a fit factor near 550, it is the same as two breaths at a fit factor of about 180. This is because the breath at a fit factor of 100 contains 10 times the amount of hypothetical hazard as the breath at a fit factor of 1000. See the appendix on “Calculating Fit Factors” for more details. Common Problems Resulting in Low Fit Factors Some of the most common problems that result in lower than expected fit factors are described below. Assuming the PORTACOUNT® PRO fit tester passes the Daily Checks, explore the following possibilities. • Not using high efficiency filters If you are not using high-efficiency class-99 or class-100 filters (P3 for non-USA users) on the respirator, you may never get a high fit factor. Filters such as class-95. P1 and P2 (for non-USA users) allow some ambient air particles to get through and be interpreted as face seal leakage by the PORTACOUNT® PRO Respirator Fit Tester. Note: The Model 8038 fit tests lower efficiency respirators including class-95, P1, and P2 filtering-facepieces (disposables). • Alcohol cartridges is not tightly inserted or an O-ring is missing Make sure the alcohol cartridge is installed properly and all O-rings are in position. • Starting fit test too soon after mask is donned. When the mask is first donned, ambient air particles are trapped inside. These particles clear out as the person breathes. Half mask respirators clear very quickly; full-face masks can take over one minute. Don’t start the fit test too soon. • Sample tubes too long No more than the few inches should be added to the Sample tube (use a Tube Adapter). Longer sample tubes prevent proper purging between the ambient and mask sample. Conducting a Fit Test with the PORTACOUNT® PRO Respirator Fit Tester 39 • Leaking respirator probe or fit test adapter Make certain the respirator probe (if used) or fit test adapter does not leak around the outside. • PORTACOUNT® PRO fit tester sample tube leaks where attached to probe or adapter due to wear. Cut a short piece off the end of the tube to expose a fresh end. • Hair interfering with face seal. Make sure there is no hair between the respirator face seal and the individual's skin. • Hair or foreign material in exhalation valve. Make sure the exhalation valve is clear. A single hair can make a big difference. • Cigarette smoker. Do not allow the individual to smoke for at least 30 minutes prior to the fit test. Step 6—Using a Printer with the PORTACOUNT® PRO Fit Tester Version 2.0 PORTACOUNT® firmware adds the ability to connect a compatible printer directly to the PORTACOUNT® PRO fit tester for printing Fit Test Reports in stand-alone (no PC required) testing mode. Printer Compatibility The PORTACOUNT® PRO fit tester is compatible with a variety of commonly available printers. The connection must be USB and the printer must be compatible with the “PCL 3” printing language. In testing we have found that printers specified as “PCL 3 enhanced,” “PCL 3 GUI,” “PCL 5e,” “PCL 6,” and other variations of PCL language support were also compatible. At the time of firmware testing and release, we tested the PORTACOUNT® PRO fit tester and found it compatible with these specific printers: • HP® Photosmart D5460 (HP PCL 3 GUI) • HP® Deskjet 6940 (HP PCL 3) • HP® Officejet H470 (HP PCL 3 enhanced) • Lexmark™ E120 Laser (PCL 5e, PCL 6) ® HP is a registered trademark of the Hewlett-Packard Company. Lexmark is a trademark of Lexmark International. ™ 40 Chapter 4 Connecting and Testing the Printer There are two USB ports on the back panel of the PORTACOUNT® unit. With the PORTACOUNT® PRO fit tester powered off, connect the removable media device used to import/export and store the fit test database files to the first USB port and connect the printer to the second USB port. To test the connection, power up the PORTACOUNT® PRO fit tester and the printer. Allow the printer to boot completely and make sure there is no error condition (refer to the printer manufacturer’s documentation). Once the printer is in its online, idle state, select the Setup tab and click Device Info. On the screen there, you should see the message, “Printer connected”. If you see the message, “No Printer detected”, click OK to dismiss the Device Info screen, check the printer connection, and try again. To test the configuration more thoroughly, you can also click the Printer Test icon. If everything is configured and working properly, the printer should print out a simulated Fit Test Report. Conducting a Fit Test with the PORTACOUNT® PRO Respirator Fit Tester 41 Printing Fit Test Reports There are two places in the PORTACOUNT® PRO fit tester workflow where Fit Test Reports can be printed: • At Fit Test Step 4, after a fit test has been completed, click the Next > button to access the pop-up option menu. • At the top of that menu, select Print to print a report of the fit test that was just completed. Note: If the test is stopped by the user before it completes, or if it fails due to a fault condition such as low ambient concentration, the fit test will not be saved to the database and will not be available for printing. • 42 In the “Fit Test Reports” screen, available through the “Database” page, you can print Fit Test Reports for records that you select from the currently loaded database. Chapter 4 Step 7—Stand-Alone Fit Testing—Data Handling Best Practices TSI’S PORTACOUNT® PRO Respirator Fit Tester is designed to provide a robust solution for stand-alone fit testing. As with any computing application, care must be taken by users to ensure that precious data is not lost due to mishap or mishandling. This section recommends some basic and advanced guidelines for good data handling and instructions on how to use the PORTACOUNT® PRO fit tester “Advanced Database Tools” introduced in firmware version 2.0. • In stand-alone mode, all important fit test data is stored on the removable media device (flash drive) that is connected to the PORTACOUNT® unit. Note: The flash drive provided with the PORTACOUNT® PRO fit tester does not include the necessary PORTACOUNT® PRO database. This must be created through the FITPRO™ software, please refer to the FITPRO™ software user’s manual. • Do not lose or damage the flash drive! All fit test data is stored in files on the flash drive. • Only connect one flash drive to the PORTACOUNT® PRO fit tester at a time. The PORTACOUNT® PRO fit tester does not support operation with two flash drives simultaneously. • Never remove the flash drive while data is being written to it at the end of a Daily Check or Fit Test or anytime you see this message on the PORTACOUNT® screen: • Backup the file(s) on the flash drive to a host computer as often as practical. Conducting a Fit Test with the PORTACOUNT® PRO Respirator Fit Tester 43 Step 8—Advanced Database Tools The “Advanced Database Tools” introduced in firmware version 2.0 are intended for use by advanced users or as instructed by TSI technical support personnel during a phone support session. The “Advanced Database Tools” can be accessed through the Setup tab. Advanced Database Tools Description Statistics Allows the advanced user to determine how many records of each type (people, respirators, protocols, fit test results and daily checks) are in the selected database file and reports the file size in bytes. Clean Copy Allows the advanced user to make a “clean” copy of an existing database file. A “clean” copy retains the people, respirator, protocol, and daily check records, of the original database, but does not copy fit test results. This tool can be used when your working database file is becoming too large to create a second, working copy. 44 Chapter 4 Advanced Database Tools Description Copy Allows the advanced user to make a copy of an existing database file. One typical use might be to create a “master database” using FITPRO™ software that contains commonly used respirator and protocol information, then using “Copy” to make working copies that you can customize by adding people, additional protocols or respirators using the PORTACOUNT® Fit Tester user interface as needed. Save This command writes the database that is active in memory to a file on the flash drive. This is usually not necessary because the file is saved automatically at the end of each test, but can be a useful tool in some situations. For example, in the unlikely event that your primary flash drive should fail and you receive an error message that the data was not saved, you could swap out the primary drive with a backup and use “Save” to write the database from memory to the backup flash drive. You could then continue working with the backup flash drive in place. Conducting a Fit Test with the PORTACOUNT® PRO Respirator Fit Tester 45 Advanced Database Tools Save As Description This command is like Save, but allows you to save the currently loaded database under a different file name. This would not usually be necessary, but you could use this tool to make a backup copy of your database under a different name as an additional precaution. This tool is also capable of saving the “DemoTraining” database to a flash drive, providing a method for creating a new database in stand-alone mode without using FITPRO™ software. The steps in creating a new database based on the “DemoTraining” database are: 1. Insert a blank flash drive into the PORTACOUNT® Fit Tester (or remove the flash drive from the PORTACOUNT® Fit Tester). 2. Use “Select Database” from the Database page to load the “Demo-Training” database into memory. 3. Replace the flash drive, if you had previously removed it, and use the “Save As” tool in the Advanced Database Tools to save the database from memory to flash drive. 4. Use “Select Database” from the Database page to load the new database into the PORTACOUNT® Fit Tester’s memory. The newly created database can be used just like a database exported from FITPRO™ software and you can customize it by adding protocols, respirators and people using the PORTACOUNT® Fit Tester user interface. Delete 46 Allows advanced users to delete database files from the flash drive. Use this tool with caution because it permanently deletes a database file from the flash drive! Chapter 4 Chapter 5 Operating Modes and User Interface This chapter describes the operating modes of the PORTACOUNT® PRO Respirator Fit Tester and describes the options available through the user interface (touch screen). Modes of Operation There are two modes of operation: External Control (using FITPRO™ software) and Stand-alone. External Control Mode The PORTACOUNT® PRO Respirator Fit Tester is operating in External Control Mode when it is being controlled by FITPRO™ software running on your computer. If you attempt to perform an operation from the PORTACOUNT® PRO touch screen while it is being controlled by FITPRO™ software, a message appears asking if you want to unlock the PORTACOUNT® PRO fit tester. If you respond YES, the PORTACOUNT® PRO fit tester breaks the connection with the computer (and the FITPRO™ software) and begins to operate in stand-alone mode. Note: You may lose data already collected in the active flash drive database. Stand-alone Mode Refer to the online help of the FITPRO™ software for operating details. The PORTACOUNT® PRO Respirator Fit Tester is operating in Stand-alone Mode when it is NOT controlled by FITPRO™ software running on your computer. When you turn the PORTACOUNT® PRO fit tester on, the instrument automatically begins a warm-up period. When the warm-up period is over, a beep sounds and the touch-screen display appears. The PORTACOUNT® PRO fit tester is now ready for Fit Testing and other stand-alone operations. 47 User Interface The touch screen provides the user interface to all functions when the instrument is operating in stand-alone mode. These functions are accessed through the tabs at the bottom of the display. The functions available through each tab are described below. Activities Tab The Activities tab lets you perform three functions: Fit Testing, Daily Checks, and Real-time fit factors. Fit Test ] to start a fit test in stand-alone mode. Refer to Press Fit Test [ Chapter 4 for a complete description. Daily Check Press Daily Check [ ] to start the Daily Checks of the instrument. Refer to Chapter 2 for a complete description. Realtime ] to view a graph showing real-time fit factors Press Realtime [ or perform an ambient concentration check. The real-time fit factor display is generally used for respirator training and troubleshooting. It allows a test subject to experiment with strap tension and other adjustments while watching the effect these efforts have in real-time. The test subject learns how each adjustment affects the fit, and learns how to achieve a fit that is comfortable and has minimum leakage. Note: This feature is intended for training. It should not be used immediately before a fit test. Using the feature to help the test subject don the respirator immediately before the official fit test defeats one of the main purposes of fit testing: to prove that the test subject knows how to don the mask properly without help. Use the Real-time Fit Factor feature for training and practice only. You can use the real-time fit factor display prior to a fit test as long as you have the test subject remove the mask and put it on again (without the use of the real time display or other assistance) before the final test. 48 Chapter 5 Before you start the real-time fit factor display, the test subject should put on the respirator and it should be properly attached to the PORTACOUNT® PRO Respirator Fit Tester. When you press Realtime [ appears. ] the Real-Time Fit Factor Display The PORTACOUNT® PRO Respirator Fit Tester takes an ambient concentration reading and stores the value. Next it purges the mask and then begins continuous monitoring of the mask concentration. The line graph lets you (and the test subject) observe the Fit Factor reading as it fluctuates in near real time. (There is a delay of a few seconds between when a change in fit occurs and when the graph displays the change in fit factor.) The graph pauses every 5 minutes while the PORTACOUNT® PRO fit tester takes a fresh ambient air measurement. Press Restart to force a new ambient reading sooner. The Realtime Data Display page also has an “Ambient Concentration Check” mode. Operating Modes and User Interface 49 In this mode, the PORTACOUNT® PRO fit tester continuously measures the particle concentration through the ambient inlet port allowing the user to easily check ambient concentration in preparation for testing. Press Exit to close the Real Time display. Database Tab The Database tab lets you select an active database to use for fit testing or view the People, Respirator, Protocols, and Fit Test records of the active database. (See the FITPRO™ Fit Test Software User Manual for instructions on how to configure the USB flash drive.) Note: Unless a flash drive with valid database files is inserted in one of the USB ports, you cannot use an active database. There is a database available in the PORTACOUNT® PRO fit tester for demonstrations and training purposes only. But this database cannot be permanently modified and adding new records or making other modifications to this internal database does not permanently change them. All changes and additions are lost when you turn off the PORTACOUNT® PRO fit tester. 50 Chapter 5 Select Database When you press Select Database, a dialog opens displaying the available databases on the flash drive. If there is no flash drive attached to the PORTACOUNT® PRO fit tester, a message appears to warn you. If you do not want to use a database from a flash drive, press Exit, otherwise insert a flash drive with a valid database (or databases) in the root directory and press Refresh. Note: Unless a flash drive with valid database files is inserted in one of the USB ports, you cannot use a real database. The database stored in the PORTACOUNT® PRO fit tester is for demonstration/training purposes only. Adding new records or making other modifications to the internal database does not permanently change (save) them and information cannot be exchanged with FITPRO™ software. 1. Use the down arrow to select the database you want to use. 2. Verify the database you want to use displayed in the “Available Databases” field. 3. Press Load. The database is imported and becomes the active database. All changes, additions, fit test results and so on are stored to this database. The database can be exported to your computer running FITPRO™ software by inserting the flash drive in one of your computer’s USB ports. 4. Press Done to exit this function. Fit Test Reports ] to view the Fit Test records of those Select Fit Test Reports [ individuals in the active database. Use the arrow at the right of the Selected Fit Test field to show all the records and select a record by pressing on the person’s name in the dropdown box. If you have a compatible USB printer connected, you will have the option to print a report for the record you’ve selected. When you are done viewing records, press Exit to end this function. People ] to view the records of people in the active Select People [ database or add a new person to the database. Operating Modes and User Interface 51 1. To view records, press the arrow at the right of the People List. Select a record by pressing the name in the dropdown box. 2. To add a new record, press New, and fill in the required fields using the on-screen keyboard, then press Save. If necessary, refer to the FITPRO™ Fit Test Software User’s Manual for a description of these fields. 3. Press Exit to close the People list. Respirators Select Respirators [ ] to view the records of the respirators in the active database or add a new respirator to the database. 1. To view the records, press the arrow at the right of the Respirator List. Select a record by pressing the respirator name in the dropdown box. 2. To add a new record, press New, and fill in the required fields using the on-screen keyboard, then press Save. If necessary, refer to the FITPRO™ Fit Test Software User’s Manual for a description of these fields. 3. Press Exit to close the Respirator list. Protocols Select Protocols [ ] to view the current protocol or access other protocols in the active database or add a new protocol to the database. 1. To select a different protocol, press the arrow at the right of the Current Protocol field. Select the protocol by pressing the Protocol name in the dropdown box. This now becomes the active protocol for fit tests. 2. To add a new Protocol, press New, enter a name using the onscreen keyboard, edit the fields using the up/down arrows in the Protocol Details dialog, and then press OK. 3. When the Create New Entry dialog appears, click on a Exercise Name field to open the Exercise # Parameters dialog and enter information for that exercise (you can also modify any information you entered on the Protocol Dialog in step 2 by clicking on the specific parameter). You can enter up to 12 exercises. The following table describes the fields. 52 Chapter 5 Button or Field Name Ambient Purge Time Ambient Sample Time Cancel Exercise Name Exclude OK Mask Purge Time New Exercise Name Next Test In _ months N95 (Model 8038 only) Protocol Name Mask Sample Time Description Use the up/down arrows to set the time (in seconds) the ambient air is purged before an ambient sample measurement is made. Use the up/down arrows to set the time (in seconds) the ambient air is sampled before the Mask purge time begins. Closes the dialog without saving any changes. A list of all the exercises in the protocol (up to 12 exercises). Check this box if you want PORTACOUNT® PRO fit tester to exclude this exercise when calculating the fit factor. This exercise then is essentially a “timeout.” It is typically used for the OSHA 29CFR1910.134 grimace exercise. Do not exclude exercises unless you are absolutely certain they are not required for the overall fit factor result. Note: When an exercise is excluded, the value stored as the mask sample time becomes the time used for the entire exercise. No actual measurement is made. Closes the dialog box and saves your values. Use the up/down arrows to set the time (in seconds) the mask is purged before the Mask sample time. Enter a name for the exercise using the on-screen keyboard. Number of months before the next fit test is due. This is typically 12 months, although some regulations call for 6 or 24 months. Consult the applicable regulations for additional information. Valid range from 1 to 99. Use the up/down arrows to set this field. If this protocol will be used for testing masks with < 99% filter efficiencies such as N95, P2, and P1 respirators, check this box. Enter the name for the exercise protocol you are creating using the on-screen keyboard. Use the up/down arrows to set the Mask Sample Time for the exercise. Operating Modes and User Interface 53 Button or Field Name Save Stop Fit Test immediately when any exercise fails Description Saves the current protocol information and adds the record to the database. If the protocol requires all exercises to pass, check this box. Most regulations allow an exercise to fail as long as the overall fit factor passes. Default is unchecked. Refer to the regulation or standard that applies to your industry or hazard for guidance on which exercises should be performed and how many there should be. 4. Press Save to save the new protocol. 5. Press Exit to close the Protocol database. Setup Tab The Setup tab lets you set the PORTACOUNT® PRO fit tester’s date and time, get information about the model number and firmware version of your instrument, calibrate the touch screen, and verify/test the printer connection. Date and Time ] to set the date, time, and date format Select Date and Time [ on the instrument. The date and time need to be set to accurately bookmark when a fit test is done. 1. When you press Date and Time, a dialog opens with the default date and time. Use the arrows to the right of the Date field to pick the date from the pop-up calendar. 2. To change the time, select the segment of time you want to change (hour, minute, second), then use the arrows to increase or decrease the value. 3. Select the Date Format from the Date Format box. Note: When you set the date format here it does not change the date format that FITPRO™ software uses. When data is exchanged with FITPRO™ software, it is exchanged in a universal date format. 4. 54 Press OK to close this dialog and save your settings or Cancel to close the dialog without changing it. Chapter 5 Device Info Press Device Info [ ] to view the model number, serial number and version level of your PORTACOUNT® PRO fit tester and verify USB printer connection. The box that appears also contains other information that may be helpful with troubleshooting the instrument with a TSI representative. Touch Screen Calibration ] to recalibrate the touch Press Touch Screen Calibration [ screen. The touch screen needs recalibration when you touch one area of the screen and the wrong action is performed. This is most noticeable when using the on-screen keyboard. For example, you touch the “u” and “j” appears. Use the stylus for calibration, not your finger. As instructed on the touch screen, “Carefully press and briefly hold stylus on the center of the target. Repeat as the target moves around the screen.” When the calibration is complete, you are notified that the settings have been measured. Press anywhere on the screen to end the calibration. Printer Test To verify that the connected printer is working correctly or to easily test the compatibility of a new printer, select the “Printer Test” icon. If a compatible printer is connected to the PORTACOUNT® PRO fit tester, a simulated Fit Test Report will be printed. If no printer is attached, you will see the message, “No Printer Detected”. Advanced Database Tools These tools provide a means for advanced users to manage the fit test result database files stored on removable media devices. Refer to Chapter 4, “Step 7—Stand-Alone Fit Testing—Data Handling Best Practices” for details. Operating Modes and User Interface 55 (This page intentionally left blank) 56 Chapter 5 Chapter 6 Service and Maintenance Recalibration Interval TSI recommends that the PORTACOUNT® PRO Respirator Fit Tester be cleaned and recalibrated annually. Try to arrange your fit testing schedule to allow for annual factory recalibration. If your fit testing schedule is seasonal or you expect heavy usage during an upcoming period (such as an outage), TSI recommends that you have the PORTACOUNT® PRO fit tester serviced prior to that time. TSI's Customer Service Department provides fast service in order to minimize your down time. Contact TSI on the Internet at www.tsi.com or send e-mail to [email protected]. Status Messages Two status messages can be displayed by the PORTACOUNT® PRO Respirator Fit Tester. Low Particle Message The PORTACOUNT® PRO fit tester is factory programmed not to allow fit testing when the ambient particle concentration is below 1000 particles/cm3 for the Model 8030 or 8038 when testing masks with % efficiencies or greater and 30 particles/cm3 for the Model 8038 when testing masks with <99% efficiencies. If the ambient sample in Fit Test Mode is below these levels, the “Low Particle” message appears on the touch screen display and the fit test is automatically terminated. This message appears in Fit Test Mode only, for one of the reasons described below. Consult the Troubleshooting chapter if necessary. Low Alcohol Level Message When the "Low Alcohol Level" message is displayed, it means that the PORTACOUNT® PRO fit tester is low on alcohol. This message does not necessarily mean that the PORTACOUNT® PRO fit tester will stop working soon. Fit test results are accurate even when this message is on. Refer to the Troubleshooting chapter for other possible causes and solutions for this message. 57 Reordering Supplies TSI part numbers for consumable supplies and miscellaneous replacement parts are: Model/Part No. Description 8016 Box of 16, 30 ml bottles of isopropyl alcohol (480 ml total) Box of 10 Alcohol Wicks Zero Check Filter Sampling Hose Kit with 3 Twin Tube Assemblies and 10 each 3/16 in. and 1/4 in. Tube Adapters. Twin Tube Assembly (Quantity 1) AC Adapter for Model 8030/8038 (voltage sensing) PORTACOUNT® PRO Respirator Fit Tester Operation & Service Manual FITPRO™ Fit Test Software Installation Guide Alcohol Cartridge and Fill Capsule Kit for Model 8030/8039 Alcohol Fill Capsule with Storage Cap Storage Cap Alcohol Cartridge with wick 8033 803X-ZFLTR 8017 800197 8034 6001868 6002211 8032 8032-FC 8032-SC 8032-CT Shipping & Storage Precautions When transporting or storing the PORTACOUNT® PRO Respirator Fit Tester, it is important to remove all alcohol. Transporting or storing the PORTACOUNT® PRO fit tester with the alcohol cartridge inside may cause flooding of the optics. When you put the PORTACOUNT® PRO fit tester back into the carrying case you should do the following: 1. Remove the Alcohol Cartridge from the PORTACOUNT® PRO fit tester and store it in the Alcohol Fill Capsule. The Alcohol Fill Capsule is designed to be a safe transportation and storage container for alcohol. The Alcohol Cartridge can be left soaking in alcohol indefinitely. 2. Cover the Cartridge Cavity with the Storage Cap. Installing the Storage Cap into the Cartridge Cavity prevents dirt or lint from getting inside the PORTACOUNT® PRO fit tester. NEVER ship the PORTACOUNT® PRO fit tester back to TSI with any alcohol bottles. 58 Chapter 6 Changing the Alcohol Wick The wick inside the Alcohol Cartridge may be changed in the field. Two spare wicks are included with the PORTACOUNT® PRO Respirator Fit Tester. Normally, the wick does not need to be changed unless one of the following problems develops: • Moisture accumulates in the wick and causes the Low Alcohol Level message to come on even when there is an adequate alcohol supply. This may happen when the PORTACOUNT® PRO fit tester is used extensively for weeks on end. Especially if you are fit testing in an area with high humidity. If moisture accumulation occurs, the Alcohol Wick can be removed, allowed to dry, and then re-installed into the Alcohol Cartridge. • The wick becomes contaminated with dirt, oil, or other foreign substances. This should not happen unless the instrument is used to sample aerosols other than those normally found in ambient air. If the Alcohol Wick is contaminated, it should be discarded and replaced with a new one. Note that some discoloration of the wick is normal and will not influence performance. To remove the Alcohol Wick from the Alcohol Cartridge: 1. Grasp the cartridge with both hands. With the knob in one hand and the Wick Retainer Cap in the other, twist and pull apart the assembly. The cartridge should snap apart exposing the end of the white Alcohol Wick. 2. After separating the two halves, push the Alcohol Wick out of the Wick Retainer Cap from the opposite end with the Wick Removal Tool (wood dowel) provided with each new alcohol wick. Do not use a pencil point because bits of lead could break off. Service and Maintenance 59 3. Examine the white Alcohol Wick. Discard wicks that are severely discolored or physically damaged. Some light brownish-yellow discoloration of the wick is normal. If the wick is in good condition, dry it by placing it on a clean surface in a well-ventilated area and allow it to dry for at least two days. 4. Before re-installing the alcohol wick, make certain that all parts are clean. Small bits of the wick or lint can cause serious problems if they get into the PORTACOUNT® PRO fit tester. 5. Inspect the inside surfaces of the Alcohol Cartridge and the Wick Retainer Cap. Blow air into them, if necessary, to make certain that there are no dust particles present. 6. Blow air onto all surfaces of the Alcohol Wick that will be used to make certain that any loose particles that may have shed from the wick are removed. 7. Check both ends of the wick. If one end is smoother than the other, slide the smooth end of the wick into the Wick Retainer Cap first. Otherwise, simply insert the wick and push firmly until the wick hits bottom. 8. Blow everything off again. 9. Align the two halves of the Alcohol Cartridge and press firmly until they snap together. 60 Chapter 6 Operation in High Humidity When using a Model 8030/8038 in a high humidity environment, the wick assembly will retain water moisture more rapidly than normal and will require more frequent wick replacements. Water moisture collecting in the wick is a normal occurrence, but is greatly increased with a rise in humidity. Under normal conditions with a dry wick freshly charged with isopropyl alcohol, the PORTACOUNT® fit tester will operate approximately 6.5 hours before the “Low Alcohol Warning” appears. This average run time will start to decrease when operating the PORTACOUNT® fit tester in higher humidity. To keep this average run time as long as possible, replace the wick each day with a dry one. To dry out the wick you removed from the PORTACOUNT® fit tester, place it in a wellventilated area that has a humidity level of 50% or lower and let it set overnight (approximately 16 hours). The wick should then be dry and ready to be used again. The 16-hour dry time is based on an 8-hour operation in a humid environment. The total dry time will vary depending on the number of operation hours on the wick in high humidity environment. Nozzle Cleaning If the small (pin-hole size) internal nozzle becomes clogged with lint or other debris, the following procedure should clear it. The symptom of a clogged nozzle is a low (perhaps zero) ambient particle count. This usually, but not always, causes the Particle Check and/or Max FitFactor Check to fail. There are two procedures. Procedure A should be done first, then Procedure B if necessary. Service and Maintenance 61 Procedure A Obtain a source of clean compressed gas, such as Chemtronics® or equivalent. It must have a long nozzle (straw) in order to reach deep into the PORTACOUNT® PRO Respirator Fit Tester. Turn the PORTACOUNT® PRO fit tester off and remove the alcohol cartridge. Insert the long nozzle inside the PORTACOUNT® PRO fit tester as shown. Keep the end of the nozzle centered in the cavity and gently push it in as far as possible. The internal nozzle is located just at the far end of the cavity and cannot be seen. Apply two or three bursts of gas. You will not damage the PORTACOUNT® PRO Respirator Fit Tester. Reinsert the alcohol cartridge. Turn the PORTACOUNT® PRO Respirator Fit Tester on. Perform the Daily Checks. If the problem persists, try Procedure B. 62 Chapter 6 Procedure B Use this procedure only if Procedure A fails to clear the internal nozzle. Turn the PORTACOUNT® PRO fit tester off and remove the alcohol cartridge. Turn and hold the PORTACOUNT® PRO fit tester up on end so that you can look down into the cartridge cavity. Take a bottle of the alcohol used to operate the PORTACOUNT® PRO fit tester and drip 3 to 4 drops down into the cartridge cavity. Try to keep the drops centered so they hit the bottom without touching the sides. Do not use too much. One drop is enough if it all reaches the nozzle. Keep the PORTACOUNT® PRO fit tester in this vertical position for about 5 minutes so the alcohol can soften or dissolve the blockage. Put the PORTACOUNT® PRO Respirator Fit Tester down in normal operating position and perform Procedure A. Service and Maintenance 63 Applying O-ring Grease to the Alcohol Cartridge Over time, the O-ring grease on the Alcohol Cartridge and Storage Cap is worn off or lost due to repeated contact with alcohol. This can make insertion of the Alcohol Cartridge and Storage Cap difficult. To remedy this problem, place a small amount of supplied grease to the O-ring on each component as depicted in the illustrations below. Care must be taken so grease does not get into the particle passages (holes) near the O-ring. Supplied Grease Apply grease to O-ring Apply grease to O-ring Avoid getting grease in hole 64 Chapter 6 Chapter 7 Troubleshooting This chapter lists a series of symptoms, their possible causes and recommended solutions for problems with the PORTACOUNT® PRO/PRO+ Respirator Fit Tester. If your symptom is not listed, or if none of the solutions solves your problem, please contact TSI. Additional help is available from the TSI Web site www.tsi.com or by sending e-mail to [email protected]. Always replenish the alcohol supply as the first step in solving a problem. You can add alcohol to the fill line at any time. Eventually, the Alcohol Wick inside the Alcohol Cartridge will absorb enough moisture to prevent proper operation. Symptoms of excess moisture are low particle counts even though there is plenty of alcohol and plenty of particles in the room, and also having to frequently replenish the alcohol supply (such as every hour or less). Changing the Alcohol Wick is the best way to solve the problem. You could also dry the wick by leaving the Alcohol Cartridge in the PORTACOUNT® PRO and then running it overnight, or by removing the wick from the cartridge and letting it dry for 48 hours. Always perform the Daily Checks as described in Chapter 4 as the first troubleshooting step. Passing the Daily Checks usually indicates that the PORTACOUNT® PRO is working properly and that the problem is elsewhere, such as the connection to the respirator and/or the respirator itself. On-line Troubleshooting Guides Additional application notes on troubleshooting are located on the FITPRO™ software CD or visit TSI’s website at http://fittest.tsi.com and select “Application Notes”: 65 Symptom Possible Causes Solution Low Alcohol Level message Low on alcohol. Refill Alcohol Cartridge. Excessive moisture inside PORTACOUNT® PRO fit tester. Change Alcohol Wick inside Alcohol Cartridge. Run 2 hours to dry optics (remove the alcohol cartridge and install storage cap).Dump old alcohol from the Alcohol Fill Capsule and add fresh alcohol. Return to factory for service. PORTACOUNT® PRO fit tester needs recalibration and cleaning. Low Particle message Nozzle is plugged. See Nozzle Cleaning in Service and Maintenance chapter. Low on alcohol. Replenish alcohol. Hoses are reversed on Twin Tube Assembly. Verify the hoses are connected properly to the PORTACOUNT® PRO and mask. Connect the proper tube to the respirator (clear tube). Straighten out the Twin Tube Assembly or remove the obstruction. Move to another location or use a particle generator (such as a candle or an ultrasonic humidifier with tap water). Wrong tube is connected to respirator. Twin Tube Assembly is kinked, pinched, or blocked. Particle count in area really is low. 66 Chapter 7 Symptom Possible Causes Solution Low Particle message (continued) Moisture build-up inside PORTACOUNT® PRO fit tester. Change Alcohol Wick inside the Alcohol Cartridge. Dump old alcohol from the Alcohol Fill Capsule and add fresh alcohol. Run 2 hours to dry optics (remove the alcohol cartridge and install storage cap). Change Alcohol Wick inside the Alcohol Cartridge. Use only approved alcohol (99.5 % or better isopropyl). See Nozzle Cleaning in Service and Maintenance chapter. Return the instrument to TSI for service. Inferior or contaminated alcohol. Plugged internal nozzle. Unit needs recalibration and cleaning. Does not switch on AC Adapter not plugged in to unit or AC outlet. Connect AC Adapter. Fails Zero Check Alcohol Cartridge is loose. Twin Tube Assembly leaks. Filter leaks. Tightly close the Alcohol Cartridge. Repair or replace the Twin Tube Assembly. Repeat the test with a different filter. Cut off the worn ends on the Twin Tube Assembly. Ends of Twin Tube Assembly are poorly sealed. Twin Tube Assembly is disconnected. Slightly flooded with alcohol. Switching valve is not functioning. Troubleshooting Connect the Twin Tube Assembly to the PORTACOUNT® PRO fit tester. Remove Alcohol Cartridge and run for 15 minutes, then try again. Return to TSI for service. 67 Symptom Possible Causes Solution Fails Zero Check (continued) O-ring on alcohol cartridge is not sealing. Replace O-ring. Smear a very small amount of grease (such as Vaseline™) on the O-ring. Tube fittings on PORTACOUNT® PRO fit tester are loose. Tighten fittings with pliers. Fit factor of 1 or very low Respirator is not equipped with HEPA, class-99, class-100, or P3 filters. Install proper filter for fit testing. (If the PORTACOUNT passes the Daily Checks, the problem is with the respirator, not the PORTACOUNT.) Respirator leaks, has loose filters, or a malfunctioning exhalation valve. Repair the respirator. Twin Tube Assembly is disconnected. Connect the Twin Tube Assembly to the PORTACOUNT® PRO fit tester. Connect the Twin Tube Assembly to the respirator sampling port (clear tube). Repair or replace the Twin Tube Assembly. Use standard 5-foot Twin Tube Assembly. Run 2 hours to dry optics (remove the Alcohol Cartridge and install Storage Cap). Add alcohol to the PORTACOUNT® PRO. Return to TSI for service. Twin Tube Assembly is not connected to respirator sampling port. Twin Tube Assembly Leaks. Sample Tube too Long. PORTACOUNT® PRO fit tester is flooded with alcohol. Alcohol level is low. Switching valve is not functioning. 68 Chapter 7 Symptom Possible Causes ® Solution Suspicious readings PORTACOUNT PRO fit tester is flooded with alcohol. Run 2 hours to dry the optics (remove cartridge and install storage cap). (If the PORTACOUNT passes the Daily Checks, the problem is the respirator, not the PORTACOUNT.) Tube fittings on PORTACOUNT® PRO are loose. Tighten with pliers. PORTACOUNT® PRO leaks. Zero-Check the PORTACOUNT® PRO fit tester and fix any leaks. Use standard 5-foot Twin Tube Assembly. Tightly close the Alcohol Cartridge. Install HEPA filters for fit tests. Sample lines too long. Alcohol Cartridge is loose. Respirator is not equipped with HEPA filters. Twin Tube Assembly is kinked, pinched, or blocked. Leaking respirator probe. Tubing in fit test adapter is kinked or pinched. Respirator is faulty. Particle count is zero or near zero Troubleshooting Straighten out the Twin Tube Assembly or remove the obstruction. Tighten or seal probe. Straighten out tubing. Fix or replace the respirator. Alcohol level is low. Replenish alcohol. Sampling through HEPA Filter. Twin Tube Assembly is blocked. Moisture build-up in Alcohol Wick. Remove filter. Remove the blockage. Change Alcohol Wick inside Alcohol Cartridge. Run 2 hours to dry optics (remove the alcohol cartridge and install storage cap). 69 Symptom Possible Causes Solution Particle count is zero or near zero (continued) Inferior or contaminated alcohol. Change Alcohol Wick inside the Alcohol Cartridge. Use only approved alcohol. Run 2 hours to dry optics (remove Alcohol Cartridge and install Storage Cap). Replace cover and O-ring. See Nozzle Cleaning in Service and Maintenance chapter. PORTACOUNT® PRO fit tester is flooded with alcohol. Filter cover leaking. Plugged nozzle. Requires frequent refill of alcohol (every hour or less) Moisture build-up inside Alcohol Wick. Change Alcohol Wick inside cartridge. Run 2 hours to dry optics (remove the alcohol cartridge and install storage cap) Use only approved alcohol. Alcohol visible in Twin Tube Assembly or coming out of Exhaust Port PORTACOUNT® PRO fit tester is flooded with alcohol. Run overnight to dry optics. (remove Alcohol Cartridge and install storage cap). 70 Chapter 7 Appendix A Specifications (Specifications are subject to change.) Model 8030 PORTACOUNT® PRO Respirator Fit Tester Size............................................................... 9.5 x 8.5 x 6.75 in. (24 x 22 x 17 cm) Weight Unit only ................................................ 5.0 lb. (2.7 kg) With standard accessories and case ....... 16 lb. (7.3 kg) Fit Factor Range ....................................... 1 to greater than 10,000 Concentration Range .............................. 0.01 to 2.5 x 10⁵ particles/cm3 Particle Size Range .................................. 0.02 to greater than 1 micrometer Typical Fit Factor Accuracy ................... ±10% of reading up to fit factors of 10,000 Temperature Range Operation ............................................... 32 to 100oF (0 to 38oC) Storage ................................................... -40 to 160oF (-40 to 70oC) Flow Rate Sample ................................................... 350 cm3/min Total ....................................................... 1000 cm3/min (nominal) Power Requirements........................................ 100 to 250 VAC, 50 to 60 Hz Alcohol Hours per charge .................................... 6 hours at 70oF (21oC) Alcohol type ........................................... Reagent grade isopropyl (99.5% or better) Carrying Case Size......................................................... 21 x 14 x 9 in. (53 x 36 x 23 cm) Pass/Fail Settings..................................... User-selectable: 0 to 10000 Factory Recalibration Interval ............... 1 year Warranty ..................................................... Two years on workmanship and materials 71 Respirator Facepieces that can be Fit Tested Full-face elastomeric Half-face elastomeric NIOSH series-100 filtering-facepiece NIOSH series-99 filtering-facepiece NIOSH series-95 filtering-facepiece (8038 upgrade required for series-95 only) Fit Factor Measurement Direct measurement of fit factor (Cout/Cin) (Mask leakage is measured simultaneously while test subject moves and breathes.) Model 8038 PORTACOUNT® PRO+ Respirator Fit Tester Size .............................................................. 9.5 x 8.5 x 6.75 in. (24 x 22 x 17 cm) Weight Unit only ................................................ 6.8 lb. (3.1 kg) With standard accessories and case ....... 18 lb. (8.2 kg) Fit Factor Range ....................................... 1 to greater than 10,000; 1 to 200 for < 99% efficiency masks Concentration Range .............................. 0.01 to 2.5 x 10⁵ particles/cm3 Particle Size Range.................................. 0.02 to greater than 1 micrometer Typical Fit Factor Accuracy .................. ±10% of reading up to fit factors of 10,000 Temperature Range Operation ............................................... 32 to 100oF (0 to 38oC) Storage ................................................... -40 to 160oF (-40 to 70oC) Flow Rate Sample ................................................... 350 cm3/min Total ....................................................... 1000 cm3/min (nominal) Power Requirements ........................................Autosensing 100 to 250 VAC, 50 to 60 Hz 72 Appendix A Alcohol Hours per charge .................................... 6 hours at 70oF (21oC) Alcohol type ........................................... Reagent grade isopropyl (99.5% or better) Carrying Case Size......................................................... 21 x 14 x 9 in. (53 x 36 x 23 cm) Pass/Fail Settings..................................... User-selectable: 0 to 10000 Factory Recalibration Interval ............... 1 year Warranty ..................................................... Two years on workmanship and materials Respirator Facepieces that can be Fit Tested Full-face elastomeric Half-face elastomeric NIOSH series-100 filtering-facepiece NIOSH series-99 filtering-facepiece NIOSH series-95 filtering-facepiece Fit Factor Measurement Direct measurement of fit factor (Cout/Cin) (Mask leakage is measured simultaneously while test subject moves and breathes.) Specifications 73 (This page intentionally left blank) 74 Appendix A Appendix B Theory of Operation How the PORTACOUNT® PRO Respirator Fit Tester Works The PORTACOUNT® PRO fit tester measures respirator fit by comparing the concentration of microscopic particles outside the respirator to the concentration of particles that have leaked into the respirator. The ratio of these two concentrations is called a fit factor. A fit factor of 100 means that the air inside the respirator is 100 times as clean as the air outside. Fit Factor = Outside Concentration Inside Concentration Since the microscopic particles in the air cannot pass through the class-100 or class-99 filters used on the respirator, any particles that get into the respirator must have come in through a leak. The PORTACOUNT® PRO fit tester has two sample tubes, one samples ambient air and the other attaches to the respirator and samples from inside it. A valve inside the PORTACOUNT® PRO fit tester switches from one tube to the other according to a programmed sequence. PORTACOUNT® PRO Schematic How the PORTACOUNT® PRO Fit Tester Counts Particles The PORTACOUNT® PRO fit tester is based on a miniature, continuous-flow Condensation Nucleus Counter (CNC), also known as a Condensation Particle Counter (CPC). A CNC takes particles that are too small to be easily detected, grows them to a larger, easily detectable size, and then counts them. 75 The idea of CNCs/CPCs is not new. As early as 1888, Aitken described a dust counter that grew particles to detect them. In 1943 the Nolan-Pollack photoelectric CNC was described. In the 1950s and 1960s, commercial, automatic CNCs were available. However, none were of the continuous-flow type, and the PORTACOUNT Respirator Fit Tester is the first highly portable continuous-flow CNC. The concept of using a condensation nucleus counter (CNC) for the purpose of quantitative respirator fit testing was first demonstrated in 1981 by Dr. Klaus Willeke of the University of Cincinnati. Reference: Willeke, K., H.E. Ayer, J.D. Blanchard. “New Methods For Quantitative Respirator Fit Testing With Aerosols,” American Industrial Hygiene Association Journal, Feb. (1981). The PORTACOUNT® PRO Respirator Fit Tester grows submicron particles to supermicron alcohol droplets and then measures the concentration of the alcohol droplets. This makes the PORTACOUNT® PRO fit tester sensitive to particles with diameters as small as 0.015 microns, but insensitive to variations in particle size, shape, composition, and refractive index. Thus, quantitative fit testing can be performed with virtually any aerosol, including ambient air. Aerosol is drawn through the instrument by a diaphragm vacuum pump operating at a flow rate of 1.0 liter per minute. The flow enters the instrument through either the ambient port or the sample port. The switching valve determines which port is used. The outlet of the switching valve leads to the saturator end cap, where the flow splits. A flow rate of 0.35 liters per minute enters the saturator and passes through the condenser, nozzle, and sensing volume. The remaining flow passes through the excess airline and is recombined with the sampled flow down-stream of the sensing volume. The PORTACOUNT® PRO sensor consists of a saturator, condenser, and optical elements. The saturator is lined with an alcohol-soaked wick. A thermoelectric device is mounted between the saturator and condenser which cools the condenser and heats the saturator. After passing through the saturator, the aerosol (now saturated with alcohol vapor) enters the condenser tube. The alcohol vapor condenses on the particles, causing them to grow into droplets. The droplets then pass through the nozzle and into the sensing volume as depicted in the schematic diagram below. The focusing optics in the sensor consists of a laser diode and a series of lenses that focus the laser light into a sensing volume just above the nozzle. 76 Appendix B Each particle passing through the sensing volume scatters light. The light is collected by the receiving optics and focused onto a photodetector. The photodetector generates an electrical pulse from the scattered light as each droplet passes through the sensing volume. The particle count is determined by counting the number of pulses generated during a given time period. Knowing the particle count, time period and flow rate allows particle concentration to be computed. Theory of Operation 77 (This page intentionally left blank) 78 Appendix B Appendix C Calculating Fit Factor Fit factor is defined as the particle concentration outside the respirator divided by the particle concentration inside the respirator. Because ambient concentration can vary over time, the PORTACOUNT® PRO Respirator Fit Tester calculates the fit factor by taking the average of the ambient concentrations measured before and after the respirator sample and then dividing by the concentration measured in the respirator. This is why the first test cycle (exercise) is longer than additional test cycles in Fit Test Mode. It is necessary to measure the required additional ambient concentration sample before the first fit factor can be calculated. Both the ambient and respirator concentrations are determined by integration. The integrated concentrations are determined by the total number of particles counted during the sample periods. Fit factor is actually calculated by: FF = C B +C A 2C R where: FF = fit factor CB = particle concentration in the ambient sample before the respirator sample CA = particle concentration in the ambient sample after the respirator sample CR = particle concentration in the respirator sample. If no particles are counted in the respirator sample, the PORTACOUNT® PRO fit tester automatically adds one particle. This prevents dividing the ambient concentration by zero. At the end of a fit test, the overall fit factor is calculated and displayed, based on the individual fit factors for each test cycle. 79 The following equation is used to calculate the overall fit factor in the PORTACOUNT® PRO fit tester: Overall FF = n 1 1 1 1 1 + + +...+ + FF1 FF2 FF3 FFn 1 FFn where: FFx = fit factor for test cycle n = number of test cycles (exercises). Disclaimer: 80 The measurement provided by the PORTACOUNT® PRO Respirator Fit Tester is an assessment of respirator fit during a fit test only. Respirator fit at other times will vary. The fit factor value is not intended for use in calculating an individual's actual exposure to hazardous substances. Appendix C Appendix D Calculating Particle Concentration Particle concentration is calculated by counting the number of particles passing through the sensor in a given period of time. Since the flow rate is known (5.83 cm3/sec), the particle concentration can be determined. In 1-Second Count Mode the equation is: Particle Concentration = N1 (1 sec) 5.83 cm 3 / sec where N1 is the number of particles counted in a 1-second period Note that the total flow rate of air through the PORTACOUNT® PRO is a nominal 16.7 cm3/sec. The reason that we use 5.83 cm3/sec. in the calculations above is because the flow path inside the PORTACOUNT® PRO is divided into two branches, the sensor flow and the bypass flow. The sensor flow is set at precisely 5.83 cm3/sec and the bypass flow is approximately 10.8 cm3/sec. Using the equation above, you can see that the minimum measurable concentration is 0.17 particles per cm3 in 1-Second Count Mode. The equations above can also be used to determine the minimum measurable mask concentration that can be measured in Fit Test Mode given the mask sample time that is used. For example, with a 40 second mask sample (factory setting), the minimum measurable concentration is 0.004 particles per cm3. 81 (This page intentionally left blank) 82 Appendix D Appendix E Timing in Fit Test Mode Test Sequence When performing a fit test, PORTACOUNT® PRO Respirator Fit Tester automatically samples both the ambient air and the particles inside the respirator. An internal switching valve automatically switches between the two sampling ports. In each test cycle, (exercise) both an ambient sample and a respirator sample are taken. Also, time is allowed for purging of the sensor between each of the samples. The PORTACOUNT® PRO fit tester uses the ambient sample taken before and after each exercise to compute the fit factor. The two ambient particle concentrations are averaged together and then divided by the mask particle concentration to yield the fit factor for that exercise. Averaging the before and after ambient particle concentrations is done to offset any ambient particle concentration drift that may have occurred during the mask sample. Caution Do not lengthen the Twin Tube Assembly more than a few inches unless the mask sample purge time has also been extended accordingly. Insufficient purging between mask and ambient samples will result in unrealistically low fit factors. Shortening the Twin Tube Assembly is never a problem. 83 (This page intentionally left blank) 84 Appendix E Appendix F Using the PORTACOUNT® PRO Respirator Fit Tester to Fit Test Positive Pressure Respirators On January 8, 1998, OSHA released the long-awaited revision to the Respiratory Protection Standard 29CFR1910.134. It replaces the standard with the same name and number that was released in 1971. This new revision has far reaching impact on a large number of existing OSHA standards in that it replaces certain provisions related to respirator use. One of the new requirements is that OSHA now requires all tight-fitting respirator facepieces to be fit tested annually. This includes air-supplied and positive-pressure respirators such as Powered Air Purifying Respirators (PAPR), airline respirators, and Self Contained Breathing Apparatus (SCBA). With few exceptions, these respirator styles were previously exempted from OSHA's fit testing requirements. For detailed information regarding the new standard and to download your own copy, see TSI Application Note ITI-056 Respirator Fit Testing Highlights for OSHA Respiratory Protection Standard 29CFR1910.134 on our website http://fittest.tsi.com. Self Contained Breathing Apparatus (SCBA) are respirators that supply breathing air from a backpack mounted tank. The most common application for SCBA is fire fighting. There are other types of positive-pressure respirators also, including air-line and recirculating respirators. Powered Air Purifying Respirators (PAPRs) are a special class of respirator that utilizes a battery operated blower motor to pump air into the mask through an air-purifying cartridge. The blower/filter assembly is usually either belt mounted or fastened to the front of the facepiece. The OSHA fit testing requirement is only for tight-fitting masks. Tight fitting respirators utilize a facepiece similar to the facepiece on a conventional negative-pressure air-purifying respirator with filter cartridges. In fact, many respirator manufacturers use the identical facepiece for negative and positive-pressure respirators. Tight-fitting masks form a tight seal around the wearer's face. 85 Loose fitting respirators usually employ a hood that fits over a person's head and loosely seals around the neck. The quality of the seal is not dependent on a close physical match with the wearer's body. Since there is no "seal" to test, there is no requirement to do a fit test. Note that some hood-type respirators are classified as tight-fitting and, therefore, require fit testing. Respirator fit testing (testing facepiece leakage) cannot be done while the pressure inside the facepiece is maintained positive by some outside air supply. The positive-pressure will alter the seal and the measurement will not reflect how well the shape of the facepiece matches the person's face. For this reason, all fit testing of positive-pressure respirators must be done in negative-pressure mode, or in other words, without a forced air supply. Any tests done in positive pressure mode are overall performance tests, not fit tests. Hood-style respirators can be performance tested but not fit tested because there is no face seal to test. There are two ways to accomplish fit testing positive-pressure masks in negative-pressure mode. The method preferred by many is to temporarily convert the employee's assigned mask into a negative-pressure mask. This is accomplished through the use of special fit test adapters that temporarily attach to the mask and allow the use of filter cartridges. Added benefits of this method are that an integrity test of the mask is performed simultaneously with the fit test and also, the hygienic concerns associated with sharing a test mask are greatly reduced. Fit Test Adapters are available from the respective respirator manufacturer and from TSI for many popular respirators. When an adapter is not available, the only alternative is to use a surrogate mask or test mask. This involves purchasing a negative-pressure airpurifying mask that has the same sealing surfaces as the positive-pressure mask that will actually be used for respiratory protection. For quantitative fit testing, the mask will need a sampling port so that a sample can be drawn from the breathing zone. Most respirator manufacturers have these available. If the mask comes in multiple sizes, you will need at least one test mask in each size. Using this technique, fit testing for positive-pressure respirators becomes identical to fit testing for negative-pressure respirators. For those people who wish to conduct performance tests on positivepressure respirators using a PORTACOUNT® fit tester, there are a few special precautions. The primary concern is aerosol particulates in the air supply. The PORTACOUNT® fit tester will measure these particles as leakage and report performance factors (fit factors) that are significantly lower than actual. Most PAPRs have a blower motor on the clean side of the filter. Most of these motors generate small particles that the PORTACOUNT® fit tester can 86 Appendix F easily measure. Likewise, air from SCBA tanks, and from compressors, contain significant numbers of particles. Grade D breathing air is by no means particle free. The only way to overcome this problem is to pass the air through a HEPA filter just before it reaches the facepiece. There is no OSHA requirement to do this type of performance testing. Related information located on the TSI Web site: http://fittest.tsi.com: • TSI Application Note ITI-070, Introduction to Respirator Fit Testing • TSI Application Note ITI-029, What You Need to Quantitatively Fit Test Various Brands of Self-Contained Breathing Apparatus Available in the USA • Fit test adapter List • TSI Application Note ITI-056, Respirator Fit Testing Highlights for OSHA Respiratory Protection Standard 29CFR1910.134. Using the PORTACOUNT® PRO to Fit Test Positive Pressure Respirators 87 (This page intentionally left blank) 88 Appendix F Appendix G The Rainbow Passage 89 (This page intentionally left blank) 90 Appendix G Index A C A receptacle, 9 AC Adapter, 10 activities tab, 30, 34, 48 adapter homemade, 18 advanced database tools, 44, 55 clean copy, 44 copy, 45 delete, 46 save, 45 save as, 46 statistics, 44 alcohol supplies, 11 alcohol cartridge, 11, 26, 27 reassembling, 60 removing wick, 59 alcohol fill capsule, 11, 26, 58 alcohol wick, 11 changing, 59 high humidity, 59, 61 ambient concentration check, 48, 49 ambient port, 8 ambient purge, 53 ambient sample time, 53 ambient tube, 8 anvil tool, 22 calculating fit factor, 79 particle concentration, 81 carrying case, 13 cartridge cavity, 11 cartridge not tight, 39 changing alcohol wick, 59 cigarette smoker, 40 clean copy, 44 clear tube, 8 common problems, 39 conduct a fit test, 25 conduct fit test, 35 conducting fit test, 32 connections electrical, 9 copy, 45 B B receptacle, 9 blue tube, 8 bottle alcohol, 5, 27, 58, 63 breathing zone, 18 button, O/I, 30 D daily check, 48 daily checks, 30 data handling, 43 database tab, 50 date and time, 54 delete, 46 demo database, 1 device info, 55 dialog box select a respirator, 34 disclaimer, ii, 3 E electrical connections, 9 enable valve check, 31 91 error messages low alcohol level, 66 low particle, 57, 66 exclude, 53 exercise name, 53 exercised, 36 exhalation valve hair or foreign material in, 40 external control mode, 47 external power connector, 9 F face seal hair interfering with, 40 fit factor calculating, 79 fit test, 48 conducting, 32 fit test adapter kit, 18 leaking, 40 fit test mode test sequence, 83 fit test reports, 51 fit testing generated aerosols, 3 near irritant smoke, 3 people who smoke, 2 personal respirator, 18 preparations, 2 starting too soon, 39 without computer software, 26 FITPRO™ software CD, 13 flash drive, 1, 9, 29 G generator. (see particle generator) grease, 13, 64 H high efficiency filter not using, 39 high humidity, 59, 61 homemade adapter, 18 I–J interactive tutorial, 13 interactive tutorial CD, 13 introduction, 1 K keyboard on-screen, 34, 35, 52, 53, 55 USB, 9, 34 L leaking fit test adapter, 40 PORTACOUNT sample tube, 40 probe, 40 low alcohol level, 57 low fit factors common problems, 39 low particle, 57 M maintenance, 57 mask purge time, 53 mask sample time, 53 mask size, 35 max FF check, 32 modes of operation, 47 N N95 (Model 8038 only), 53 N95 enabled, 31 neck strap, 14 92 Index new exercise name, 53 next test due in __ months, 53 nozzle cleaning, 61 O OK, 53 operating modes, 47 operation modes, 47 operation in high humidity, 61 O-ring grease, 13, 64 missing, 39 overall fit factor, 39 overview, 1 P packing list, 5 particle check, 31 particle concentration calculating, 81 particle generator, 15 parts identifying, 7 people list, 34 people table, 51 piercing tool, 21 PORTACOUNT sample tube leaking, 40 theory of operation, 75 troubleshooting, 65 positive pressure respirator, 23 precautions, 2 print test, 55 printer, 40 compatibility, 40 connecting/testing, 41 fit test reports, 42 setup tab, 54 printer test, 55 printing fit test reports, 42 Index probe assembly tool, 14 probe kit, 14 probed test respirators, 17 probes for filtering facepiece respirators, 18 protocol information, 35 protocol name, 53 protocol table, 52 Q quantitative fit testing respirators, 17 R rainbow passage, 89 realtime data display, 49 realtime fit factors, 48 reassembling alcohol cartridge, 60 recalibration interval, 57 recalibration touch screen, 55 record information, 38 record results, 38 registration, 1 removing wick from alcohol cartridge, 59 reordering supplies, 58 respirator fit testing with personal respirator, 18 leaking probe, 40 manufacturers’ technique, 18 probed test, 17 probes for filtering facepiece, 18 quantitative fit testing, 17 testing positive pressure, 85 training, 2 respirator list field, 35 respirator table, 52 93 S sample port, 8 sample timing field, 53 sample tube, 8 length, 8 too long, 39 sampling hose kit, 58 sampling port inlet screen, 12 sampling ports, 7 save, 45, 54 save as, 46 select a respirator dialog box, 34 select database, 30, 51 service, 57 service policy, ii set the date, time, and date format, 54 setup tab, 54 shipping, 58 smokers, 2 software technical reference CD, 13 specifications, 71 stand-alone fit testing, 43 stand-alone mode, 47 starting fit test too soon, 39 statistics, 44 status messages, 57 stop fit test immediately when any exercise fails, 54 storage, 58 storage cap, 11 supplies reordering, 58 suspicious readings, 69 touch screen, 7, 47, 48 calibration, 55 training verification, 2 transporting or storing, 58 troubleshooting, 65 tube adapter, 8 tube adapters, 12 twin tube assembly, 8, 58 U unpacking, 5 USB cable, 13 USB flash drive, 13, 29, 50 USB keyboard, 9 USB printer, 9, 51 USB receptacles, 9 user interface, 47, 48 V valve check, 31, 32 W–X–Y warranty, i wick removing, 59 wick retainer cap, 59 Z zero check, 31 fails, 67 zero check filter, 13 T test sequence, 83 testing a disposable respirator, 32 theory of operation, 75 thumb drive. (see flash drive) 94 Index TSI Incorporated – 500 Cardigan Road, Shoreview, MN 55126 U.S.A USA Tel: +1 800 874 2811 E-mail: [email protected] Website: www.tsi.com UK Tel: +44 149 4 459200 E-mail: [email protected] Website: www.tsiinc.co.uk France Tel: +33 491 11 87 64 E-mail: [email protected] Website: www.tsiinc.fr Germany Tel: +49 241 523030 E-mail: [email protected] Website: www.tsiinc.de India Tel: +91 80 41132470 E-mail: [email protected] China Tel: +86 10 8260 1595 E-mail: [email protected] Singapore Tel: +65 6595 6388 E-mail: [email protected] Contact your local TSI Distributor or visit our website www.tsi.com for more detailed specifications. P/N 6001868 Rev. F Copyright © 2010 by TSI Incorporated Printed in U.S.A