1
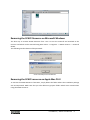
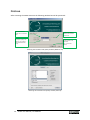
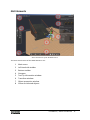
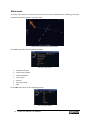
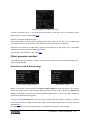
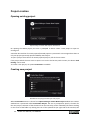
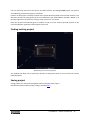
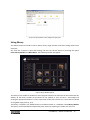
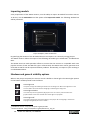
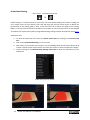
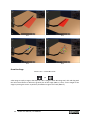
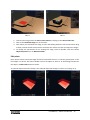
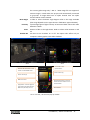
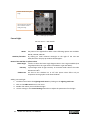
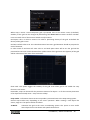
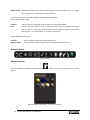
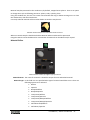
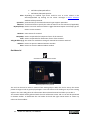
 Table of Contents Introduction ................................................................................................................................... 4 Requirements ................................................................................................................................ 5 Hardware requirements: ........................................................................................................................................ 5 Known limitations and issues of the resource: ....................................................................................................... 5 License ........................................................................................................................................... 6 Installation and un‐installation of the SPACE Resource .................................................................. 7 Downloading the resource ..................................................................................................................................... 7 Installation process on Microsoft Windows ........................................................................................................... 7 Installation process on Apple Mac OS X ................................................................................................................. 8 Removing the SPACE Resource on Microsoft Windows ......................................................................................... 9 Removing the SPACE resource on Apple Mac OS X ................................................................................................ 9 First run ........................................................................................................................................ 10 GUI Elements ................................................................................................................................ 11 Main menu ........................................................................................................................................................... 12 Open/New Project ............................................................................................................................................ 13 Insert library model .......................................................................................................................................... 13 Import 3d model .............................................................................................................................................. 13 Save project ...................................................................................................................................................... 13 Save as... ........................................................................................................................................................... 13 Save ScreenShot ............................................................................................................................................... 14 Undo ................................................................................................................................................................. 14 Redo ................................................................................................................................................................. 14 Cut (CTRL+X) ..................................................................................................................................................... 14 Copy (CTRL+C) .................................................................................................................................................. 14 Paste (CTRL+V) ................................................................................................................................................. 14 Delete (DEL) ...................................................................................................................................................... 14 Preferences ...................................................................................................................................................... 14 About SPACE ..................................................................................................................................................... 14 Help .................................................................................................................................................................. 15 Website ............................................................................................................................................................ 15 Bottom toolbar ..................................................................................................................................................... 16 Compass ............................................................................................................................................................... 17 Tool Tip information window ............................................................................................................................... 18 Transform window ............................................................................................................................................... 18 2 SPACE User Manual | FusedWorks Object properties window .................................................................................................................................... 19 Draw Venue outline & Draw Stage ................................................................................................................... 19 Raked Seating Settings ..................................................................................................................................... 20 Steps Settings ................................................................................................................................................... 21 Box Stage Settings ............................................................................................................................................ 21 Draw canvas box .............................................................................................................................................. 21 Lights settings windows ................................................................................................................................... 22 Gizmo on selected objects ............................................................................................................................... 22 Project creation ............................................................................................................................ 24 Opening existing project ....................................................................................................................................... 24 Creating new project ............................................................................................................................................ 24 Finding existing project ......................................................................................................................................... 25 Saving project ....................................................................................................................................................... 25 Save Project As... .................................................................................................................................................. 26 Using predefined projects .................................................................................................................................... 26 Using library .......................................................................................................................................................... 27 Importing models ................................................................................................................................................. 28 Shadows and general visibility options ................................................................................................................. 28 Navigation ............................................................................................................................................................. 29 Using mouse and keyboard .............................................................................................................................. 29 Using the compass ........................................................................................................................................... 30 Using Walkthrough tool ................................................................................................................................... 31 Keyboard shortcuts ............................................................................................................................................... 31 Creating and editing the venue ............................................................................................................................ 32 Venue Tools ...................................................................................................................................................... 32 Set tools ............................................................................................................................................................ 38 Lighting tools .................................................................................................................................................... 39 Figure Tools .......................................................................................................................................................... 45 Draw Figure ...................................................................................................................................................... 45 Manipulation of the object ................................................................................................................................... 47 Moving objects ................................................................................................................................................. 47 Rotating objects ............................................................................................................................................... 47 Change co‐ordinate systems (local and global/world) ..................................................................................... 47 Selecting objects .............................................................................................................................................. 48 Using Snap function ......................................................................................................................................... 48 Material editor ................................................................................................................................................. 50 FAQ .............................................................................................................................................. 55 FusedWorks | SPACE User Manual 3 Introduction This manual is created by FusedWorks (Doncaster College). It consists of detailed information about the SPACE (Simulated Performing Arts Creative Environment) Resource and is divided into chapters. SPACE is a 3D teaching and learning resource for use by performing arts lecturers/teachers and students. It was co‐developed with teachers, lecturers and students in further and higher education. It is an open educational resource, created as part of the JISC OER phase 2 programme. Benefits The aim of this resource is to: •
supplement and enhance the teaching of performing arts •
help to overcome some of the Health and Safety concerns common in the teaching of performing arts •
help to make the teaching of performing arts more inclusive and accessible As an open educational resource, SPACE is freely available and can be re‐used and re‐purposed, and all source codes are released under a GNU GPL license http://www.gnu.org/licenses/gpl.html Who was involved? The project was funded by JISC/HEA as part the phase 2 OER programme, and was a collaboration between: •
Doncaster College/University Centre Doncaster, incorporating performing arts lecturers/teachers, students, management, and the 3D design studio, who operate as Fusedworks •
National Skills Academy Creative and Cultural (NSA), Creative and Cultural Skills (CCS) and PALATINE, networks of universities and colleges with a strength in performing arts, who provided insight into the needs of performing arts lecturers/teachers and helped to test and evaluate drafts of the resources •
SHM, a research company based in central London, who conducted interviews, facilitated workshops, and helped to ensure the project was carefully managed and met the needs of a wide range of stakeholders 4 SPACE User Manual | FusedWorks Requirements The SPACE Resource requires a computer with one of the following operating systems (OS): •
Microsoft Windows XP and higher • Mac OS X There are two separate installation packages available (one for each OS). Each of the packages represents exactly the same resource. To know more about the types of installation resources please see the section called Installation. Minimum Hardware requirements: The SPACE resources is powered by Unity Engine v3.0 which operates in a scalable manner, so the more powerful your computer the more functionality/speed can be obtained from the resource. If you find the resource is running slowly you may alter the quality settings in preferences, turn off shadows on the lights or perhaps delete a number of figures from your scene, each of these methods will help to increase performance. Below is an estimated minimum specification, however the user through experimentation may soon find their own machines limitations . •
Processor: 1.4 Ghz or higher •
RAM: Ideally 1Gb of memory •
Hard Drive free space : At Least 100MB •
Graphic card: Graphics card supporting ShaderModel2, Shadows and 64Mb Memory •
Input devices: Keyboard, Mouse and Monitor Known limitations and issues of the resource: Some antivirus software may present a message that SPACE is a key log type software which it is not. The source code and other elements of the SPACE Resource has been tested for viruses and at time of release deemed free of any undesirable software such as key logs, malware, viruses etc. The source of the software is freely available from the SPACE project website or via JISCs on‐line repository – Jorum Open. FusedWorks | SPACE User Manual 5 License As an open educational resource, SPACE is freely available and can be re‐used and re‐purposed. For licensing information about individual elements of the project see below: •
Unity 3d environment application – the SPACE resource is available to the network via to the main SPACE website www.space.fusedworks.com. A link to this site can be found on the Jorum open website. The resource which is in an executable format is released as open source under a GNU GPL license. http://www.gnu.org/licenses/gpl.html 1 •
All source codes are released as open source under a GNU GPL license. http://www.gnu.org/licenses/gpl.html 2 •
All Non‐software components i.e. user manual, project guides are released under a creative commons, attribution share alike (CC BY SA) licence. http://creativecommons.org/licenses/by‐nc‐sa/3.0/ 3 11
Page available at the day of publication of this manual (31/08/2011). Page available at the day of publication of this manual (31/08/2011). 33
Page available at the day of publication of this manual (31/08/2011). 22
6 SPACE User Manual | FusedWorks Installation and un‐installation of the SPACE Resource Downloading the resource The installation process must begin with download of the latest version of the resource. The main source of the SPACE project is located at: [1] http://www.space.fusedworks.com/?page_id=132 Depending on the operating system (OS), the user could download Windows or Mac OS versions. Each version is available as a ZIP 4 compressed installation package. The size of the compressed installation package is presented on the webpage [1]. After downloading the package, uncompressing software maybe required. Usually the software is automatically included within the OS. but any external compressing/uncompressing package can be used, examples include: •
7Zip ‐ http://www.7‐zip.org/ •
WinRar ‐ http://www.rarlab.com/ •
WinZIP ‐ http://www.winzip.com/ Installation process on Microsoft Windows The installation wizard guides the user through the set up process. See below for an explanation of the main wizard steps. The executive file (space_setup.exe) should be located on your hard drive in the location where it was uncompressed. Following the wizard steps, the installation path is the folder ‘SPACE’ located under the user’s program file folder. In Windows XP the default program file is C:\ProgramFiles\. If the folder ‘SPACE’ already exists (i.e. there is previous installation) it is recommended to uninstall it before installing the newer version. 4
ZIP file format ‐ http://en.wikipedia.org/wiki/ZIP_%28file_format%29 FusedWorks | SPACE User Manual 7 In next step, specify the Main menu folder name and if a desktop icon should be created. Finally, the user is informed about the installation process and on its end the Finishing window will appear. Installation process on Apple Mac OS X Installation of the SPACE resource on MacX OS is consists of uncompressing the downloaded resource to the required location (see below). 8 SPACE User Manual | FusedWorks Removing the SPACE Resource on Microsoft Windows The best way to remove SPACE Resource from a PC is to use the uninstall tool attached to the resource and which can be executed using Main menu ‐‐> Programs ‐‐> SPACE resource ‐‐> Uninstall SPACE. The following window boxes will be presented: Uninstall confirmation window box. Finish uninstall process window box. Removing the SPACE resource on Apple Mac OS X To remove the SPACE Resource from Macs, simply delete the folder where the installation package was uncompressed. Make sure that you also delete any project folders which were created when using the SPACE resource. FusedWorks | SPACE User Manual 9 First run After executing the SPACE Resource the following window box will be presented: (1) Screen resolution. Default value is 1024x768 pixels. (3) If not selected then software will run in full screen mode. (2) Graphics quality. The quality of your graphics card will determine the quality. (4) Play! button to run application. Quit ‐ will close the window. Choosing the resolution and quality window (Windows OS) Choosing the resolution and quality window (Mac OS) 10 SPACE User Manual | FusedWorks GUI Elements Basic GUI elements of the SPACE Resource The basic GUI elements of the SPACE Resource are: 1 2 3 4 5 6 7 8 Main menu Left hand side toolbar Bottom toolbar Compass Tool Tip information window Transform window Object properties window Gizmo on selected objects FusedWorks | SPACE User Manual 11 Main menu The main menu button is located at the top left corner of the SPACE Resource. Selecting, the menu presents the following options: File, Edit, Help. Top menu activated via Main Menu button. In the file menu there are the following options: File menu with options •
Open/New Project •
Insert Library Model •
Import 3d Model •
Save Project •
Save As •
Save ScreenShot • Quit In the edit menu there are the following options: Edit menu with options 12 SPACE User Manual | FusedWorks •
Undo •
Redo •
Cut •
Copy •
Paste •
Delete • Preferences In the help menu there are the following options: Help menu with options •
About Space •
Help •
Website •
Download Open/New Project This option allows the creation of new projects or the opening and finding of existing ones. For a detailed description for creating new projects or opening existing ones, please see the section here. Insert library model This option is active when a project is opened and is in edit mode. For a detailed description of how to use the model library see here. Import 3d model This option allows the user to import 3D models created in external modelling software. The SPACE Resource supports two main 3d model formats:*.DAE and *.OBJ. More information on importing 3d models is described here. Save project Use this option to save your work. The SPACE project is saved as a file in XML format within the project directory. This directory may also include external files such as texture images. Each project should have a dedicated and individual folder. The name of the directory consists of the project name followed by the word (SPACE) in brackets. For example, a project called ‘my first project’ would have a directory called ‘my first project (SPACE)’, where all the assets used in the project are stored. Save as... FusedWorks | SPACE User Manual 13 This option allows the user to save an opened project under a new name and a new location. A window is presented where user can specify the destination folder and name for the projects copy. More about project saving as is presented here. Save ScreenShot This option allows the user to save a screenshot image from the SPACE Resource. The default format for screenshot image is PNG. The size depends upon the user’s screen size. The screenshot will not include any elements of the user interface, such as buttons or toolbars. The user can specify a location to save the screenshot using the window box presented. Save project on exit resource window box. Undo This option allows the user to undo recently made changes. Redo This operation allows the user to redo an operation that was undone. Cut (CTRL+X) If an object is selected this option will delete it from the scene but also a virtual copy of the object will be made. That virtual copy can be placed in the project via the Paste option. Copy (CTRL+C) If an object is selected this option will make a virtual copy of it. It can be inserted in the scene as many times as needed via Paste option. Paste (CTRL+V) Inserts into the scene an object that was copied or cut. A pasted object is placed in the same location as its source. Delete (DEL) This option deletes the selected object(s) from the scene. Preferences This option allows you to access the settings for: quality, ambient light colour, background light colour, mouse button double click speed, screen shot preferences i.e show/hide gizmos during screen shot. About SPACE 14 SPACE User Manual | FusedWorks This option shows author details. Help This option provides a link to the latest user manual. Website This option will take the user to the SPACE project website: www.space.fusedworks.com Download Checks for and downloads latest versions of SPACE project. Left hand side toolbar Venue Tools Draw Venue outline Creates a multi‐sided venue Draw Stage Creates a multi‐sided stage Draw Raked Seating Creates a sloped seating area Draw Steps Creates steps Draw Box Stage Creates a simple box stage Set Tools Draw Canvas Box Creates a canvas box Draw Canvas Sphere Creates a canvas sphere Lighting Tools FusedWorks | SPACE User Manual 15 Add Profile Spot Creates a spot light Add Fresnel Creates a fresnel light Add Flood Creates a flood light Add Parcan Creates a parcan light Draw Lighting Bar Creates a lighting rig Figure Tools Draw Figure Creates a figure Bottom toolbar Bottom Toolbar Undo Redo Walkthrough Walkthrough navigation mode Group Select Select multiple objects Move Moves objects 16 SPACE User Manual | FusedWorks Rotate Rotates objects Scale Scales objects Local Transform Sets coordinate system to local World Transform Set coordinate system to world House lights On Turns on default lights House lights Shadow Turns on default lights and adds shadows House lights Off Turns off default lights Snap Turns on or off snap constraints Material Selector Opens the Material Selector window Get Material Selects an object’s material Put Material Applies selected material to an object Material Editor Opens the Material Editor window Compass FusedWorks | SPACE User Manual 17 Compass tool The compass tool is located at the bottom left hand corner of the SPACE resource window. It is there to help the user to orientate the scene and navigate within it. By left mouse clicking on specific elements of the compass the user can change the position of a viewpoint: •
Top view •
Front view •
Back view •
Left view •
Right view •
Bottom view •
Perspective view Tool Tip information window This area is used to present helpful information for the user about highlighted/selected tool. It presents short description of the tool which is currently in use. Transform window Presents live information about the position, orientation and scale of a selected object in the scene. The Transform window can also can be used for entering and changing the transform values by direct entry into the text boxes. When the Draw Venue outline tool is selected then the Transform window looks like this: Transform window when Draw tool is selected i.e. Draw Venue outline, Draw Stage etc. Position fields present the position of the mouse which when clicked within the tool will be a construction point for the further venue. The position is presented as X, Y, Z co‐ordinates. Units used within the SPACE Resource are in meters. When an object is selected the transform window looks like this: 18 SPACE User Manual | FusedWorks Transform window when object is selected ‘Position’ represents the X, Y, Z co‐ordinates of the object’s pivot point. This is the position of the gizmos’ centre. Gizmos are described here. Rotation is presented in degree angles. Scale is presented in relative values. As default object are in scale 1:1:1 in axis X, Y, Z. If object have scale values like: 0.5:1:1 means that it was scaled in X axis by the half of its dimension. Dimensions area present as width (W), height (H) and depth (D) of the object. This is calculated based on the local co‐ordinate system of the object. Snap settings ‐ this elements is described here. Object properties window This window pops‐up whenever an object is selected. The content of the window depends upon the type of object selected. Draw Venue outline & Draw Stage Stage Settings window Venue outline Settings window When a user draws a Venue outline the Venue outline Settings window will appear. The options within the window inform about Height, Width and Depth of the shape. Options for Material To Stretch are available. This allows the stretch default image texture to fit all the shape, instead of proportional duplication/tiling option. An option called Edit Points allow user to change existing shape by replacing, adding or removing points which made the shape of the Venue outline. More details about how to use Edit Point are available here. The same window, but with a different title, is presented when the user draws a Stage. FusedWorks | SPACE User Manual 19 Raked Seating Settings Raked Seating Settings window When user draw an auditorium area / raked seating the Raked Seating window will appear. The following elements can be edited/presented: No. of Steps number of steps to be created on the draw area. Default value is 5. The user can change this value every time the seating area is selected. Block Height height value in meters for the seating area. It is a total value. Width width of auditorium area in meters. Depth depth of auditorium area in meters. Seat Width width of the single seat in meters. Default value is 0.54 meter. Seat Height height of the single seat in meters. Default value is 0.97 meter. Seat Depth depth of the single seat in meters. Default value 0.67 meter. Leg Room the distance left for the legs in a row of the seats (in meters). Default value is 0.33 meter. Left Aisle Width size of the empty columns to be left on the left side of the auditorium area Middle Width Aisle size of the empty columns to be left in the middle side of the auditorium area Right Aisle Width size of the empty columns to be left on the right side of the auditorium area Material Stretch To this option stretches the image texture on the wooden base of the auditorium area to fit the shape. 20 SPACE User Manual | FusedWorks Steps Settings Steps Settings When the Draw Steps function is used, then the Steps Settings window will be presented. Options allow the user to specify the number of steps, as well as the overall dimensions of the object. A Material To Stretch option is also available. Box Stage Settings Box Stage Settings When the Draw Box Stage function is used, then the Box Stage Settings window will be presented. Options allow the user to specify the overall dimensions of the object as well as its rake angle. A Material To Stretch option is also available. Draw canvas box Canvas Box Settings When the Draw Canvas Box function is used, then the Canvas Box Settings window will be presented. Options allow the user to specify the overall dimensions of the object as well as its rake angle. A Material To Stretch option is also available. FusedWorks | SPACE User Manual 21 Lights settings windows Flood Settings Fresnel Settings Profile Spot Settings Parcan Settings The windows above represent the creation windows for each of the four lighting types. Gizmo on selected objects Move gizmo Rotate gizmo
Scale gizmo A gizmo in the SPACE Resource is displayed when a transform tool (Move, Rotate, Scale) is applied to an object. The type of gizmo displayed depends on the tool used (see above). Each axis of the gizmo is colour‐coded: 22 SPACE User Manual | FusedWorks •
Red colour represents the X axis •
Green colour represents the Y axis •
Blue colour represents the Z axis The gizmo is always placed on the pivot point for the object. If more than one object is selected, then gizmo is placed on the centre of the selection. FusedWorks | SPACE User Manual 23 Project creation Opening existing project Open Existing or Create New Project window box On opening the SPACE project, the user is prompted to either create a new project or open an existing one. A window box with list of recently opened/created projects is presented. In the image above there is only one project previously opened called My First Project. To open a project from the list of recently opened projects, left click on its name. If the project which the user wants to open is not on the list but the path is known, the button Find Existing can be used. To create a new project, an option Create New is available. Creating new project Window box to specify a location for new project When Create New button is chosen from Open Existing or Create New Project window box another window box is presented called: Create New Project. The user is prompted to specify a location for the new project. Selection of the elements from the hierarchy can be realised by left mouse clicking on the name of the folder. By clicking the icon of the opened file (on right side of the text box) the 24 SPACE User Manual | FusedWorks user can move up one level at the time in the disk hierarchy. By clicking Create button, the process of establishing a new empty project is finalised. Creation of the project is actually creation of the special directory/folder on the chosen location. This directory receives the name given by the user followed by the word SPACE in brackets. Within it, all the files required in the future to re‐open, send, archive etc. are stored. Each new project automatically gets its position on the list of the recently opened projects so the next time SPACE is opened its name appears on the list. Finding existing project Window box for Find Existing Project This window box allow user to specify the location of the project which is not on the list of recently opened projects. Saving project Saving project can execute by using Main menu and option Save project. Detailed information about project saving is available here. FusedWorks | SPACE User Manual 25 Save Project As... Save Project As... window box. This option allows the user to save an opened project under a new name and a new location. A window is presented where the user can specify the destination folder and name for the projects copy. Use this option to save predefined projects as different names and then edit those projects to make sure that the predefined ones are still available in its original form. Using predefined projects The Space Resource include some of predefined stage types. •
Proscenium •
End on •
Thrust •
Traverse •
In The Round The user can use them from the list of recently open projects. They are also available from the same location that the SPACE Resource was installed in. See subfolder called "ProjectExamples". 26 SPACE User Manual | FusedWorks Project Examples folder with predefined stage types. Using library The SPACE Resource includes a built‐in library of key stage elements and some exiting whole‐scene examples. Any time that a project is open and running, the user can call the library by choosing the option Insert Library Model from Main Menu. The following window will appear: Import Library Model window The library of the models is divided into sub‐categories listed on left hand side of the window box. By default, all the library models are presented in the window. A user can filter a sub‐category by clicking the appropriate button. To insert a particular model, left click the icon. The model is inserted at the global origin point (0, 0, 0). The library is located in the SPACE Resource installation folder as a subfolder called Library Models. The library can be extended and replaced by new version by replacing this folder with new one. FusedWorks | SPACE User Manual 27 Importing models A key requirement of the SPACE resource, was the ability to import 3D models from other sources. To do this, use the Main Menu and the option called Import 3d model. The following window box will be presented: Import 3D Object / Mesh window box By specifying the location of the 3D model the user can import it to a currently running project. The SPACE resource allows the import of the following 3D model type: Collada DAE 5 and Wavefront OBJ 6 . The SPACE team has made particular efforts to ensure that the resource is compatible with most popular variants of DAE and OBJ file types. Unfortunately the SPACE team cannot guarantee that each DAE or OBJ file will be imported without problems. Occasionally, an import my fail resulting in so‐called SPACE debris. Shadows and general visibility options When a new project is opened, the scene is lit with a default or house light. The House lights options on the bottom toolbar provide control of these: House lights On This option changes the visibility parameters for the design area. When house lights are on the scene is visible. Use this mode when designing and browsing the design area House lights Shadow This mode may not be supported by all graphic cards. The scene is presented with more graphical details. Some main shadows from house lights are projected. House lights Off This mode is designed for testing the lighting in the project. All house lighting is switched on. Only lights designed by the user are shown. 5
6
COLLADA file format ‐ http://en.wikipedia.org/wiki/Collada Wavefront OBJ file ‐ http://en.wikipedia.org/wiki/Wavefront_.obj_file 28 SPACE User Manual | FusedWorks Some computers graphic cards (especially older than 4 years) may not support shadow generation. Sometimes, a computer may not wish to display shadows for reasons of its own. A solution here, can be to restart the SPACE resource and choose a lower quality option in graphic quality window on the start. See image bellow: Change graphic quality window It is important to note, that depending on number of active lights in the scene the performance speed of the application may be slow. Navigation Using mouse and keyboard Most of the functionality in the SPACE resource requires usage of a mouse. A three‐button mouse is the preferred choice. Command selection is by left mouse clicking the icon; object selection by double clicking the object, to draw the objects etc. Navigation in 3D space within the resource is by using mouse and predefined combination of mouse buttons. The navigation is enabled all the time when no edit shape tool is active (see more here). To rotate the viewpoint, use left mouse button pressed and move mouse left and right. To pan/move the view position, press and hold the middle mouse button and then move the mouse in the pan direction. If a two‐button mouse is used, the same effect can be achieved by pressing and holding CTRL key on the keyboard and then moving mouse with left mouse button also pressed. FusedWorks | SPACE User Manual 29 To zoom‐in and zoom‐out the scroll wheel on the mouse can be used. If the mouse has no scroll, then hold the ALT key and click‐drag the left mouse button. If the user is in Edit point mode all functionality for navigation is disabled. It can be activated if the SHIFT key is pressed. Right mouse button is to be used whenever the current operation/tool is to be cancelled. Using the compass Using the compass tool (bottom left of screen), the user can rapidly change their view position to one of seven predefined ones. See below: Perspective From the top From the front From the right From the left 30 SPACE User Manual | FusedWorks Using the Walkthrough tool The Walkthrough icon on the bottom toolbar Step into your design with the Walkthrough tool. Walkthrough provides users with an intuitive method of testing their creations by giving a person’s‐eye view of the stage area. Select the tool from the bottom toolbar. Then click to select a surface on which to walk. Use the keyboard arrows to navigate. Images below: left – normal navigation view of stage area. Right – Walkthrough in action. Keyboard shortcuts F L CTRL + C L CTRL + X L CTRL + V DEL F2 F3 F4 L CTRL + ; L CTRL + Z L CTRL + Y L CTRL + 1 L CTRL + S L CTRL + SHIFT + S L CTRL + O – – – – – – – – – – – – – – – focus on selected object copy cut paste delete selected object move tool rotate tool scale tool snap on/off Undo Redo screen shot save save as Open FusedWorks | SPACE User Manual 31 Creating and editing the venue Venue Tools Venue tools are used to draw the main elements of the scene: rooms, stages, steps etc. These tools can be launched via left hand side toolbar: Venue Tools icon on left hand side toolbar Draw Venue outline VENUE TOOLS ‐‐> DRAW VENUE OUTLINE This tool allows the user to draw a polygonal (multisided) room of their own design. Select Draw Venue outline tool from the left hand side menu Venue Tools ‐‐> Draw Venue outline. Using left mouse button click to start drawing the polygonal ground plan. By clicking further locations/points the user creates the edges of the polygon shape (img. DPR 1). DPR 1 DPR 2 DPR 3 DPR 4 To finish the polygon declaration the user has to double click with the left mouse button (img. DPR The height of the room is defined by moving the mouse up or down and then left mouse clicking (img. DPR 3). A fully‐fledged 3D room is the result (DPR 4). 32 SPACE User Manual | FusedWorks On the end the right hand side panel will present Venue outline Settings window ‐ described here. If at any time you wish to cancel the drawing process, simply right click the mouse. Draw Stage VENUE TOOLS ‐‐> DRAW STAGE This tool works exactly as the Draw Venue outline but results in a solid stage area: Freeform shape 1. To draw a stage select the Venue Tools menu by clicking on the Venue Tools icon. 2. Click on the Draw Stage icon in the menu. 3. Click one location within the design area, move your pointer to a different location and click again. Continue to click to create your desired stage shape. On the final point double click to complete the shapes outline and move the mouse to create and adjust the height. 4. After the shape is created the Stage Settings window appears and allows to change some of the parameters. Stage Settings window More details about Stage Settings window ‐ here. Drawing the Stage shape Finished Stage shape located on Venue outline
FusedWorks | SPACE User Manual 33 Draw Raked Seating VENUE TOOLS ‐‐> DRAW RACKED SEATING Raked seating is a tiered hierarchy of seat levels. The Draw Raked Seating tool makes creating this easy. Simply select the tool (above), then click and drag with the left mouse button to define the ground plan of the seating (DRS 1). Then, move the mouse up to define the height of the seating (DRS 2). The final result should be an auditorium area (DRS 3). The parameters then can be changed and adjusted to requirements (DRS 4) using Raked Seating Settings window described in details here. Auditorium area 1. To draw the auditorium area select the Venue Tools menu by clicking on the Venue Tools icon. 2. Click on the Draw Raked Seating icon in the menu. 3. Click where you would like the seating to start and holding down the left mouse button drag to draw, release the left mouse button and move the mouse to create and adjust the height. 4. Use the settings in the Raked Seating Settings menu box to adjust the parameters for the auditorium. Raked Seating Settings window 34 SPACE User Manual | FusedWorks DRS 1 DRS 2 DRS 4 DRS 3 Draw Steps VENUE TOOLS ‐‐> DRAW STEPS The Draw Steps tool is very similar. The only difference is that at the end of the process a different windows appears which is described here. Steps Settings To make your steps, click to define the first corner of the step area. Then, drag to create a ground plan and release the mouse (DS 1). Set the total step height by moving the mouse up or down and left‐clicking to accept (DS 2). The final result should be steps (DS 3) with a default number of risers. The parameters then can be changed and adjusted to requirements (DS 4) as well the orientation and position can be changed via gizmo (see here) or transform window box (see here). FusedWorks | SPACE User Manual 35 DS 1 DS 2 DS 3 DS 4 Draw Box Stage VENUE TOOLS ‐‐> DRAW BOX STAGE A box stage is simply a stage in the shape of a box. Using the Draw Box Stage tool, click and drag with the left mouse button to define the ground plan of the stage (DBxS 1). Then, set the height of the stage by moving the mouse. A perfectly‐formed box stage is the result (DBxS. 2). 36 SPACE User Manual | FusedWorks DBxS 1 DBxS 2 1. To draw a box stage select the Venue Tools menu by clicking on the Venue Tools icon. 2. Click on the Draw Box Stage icon in the menu. 3. Click where you would like the stage to start and holding down the left mouse button drag to draw, release the left mouse button and move the mouse to create and adjust the height. 4. To change the parameters for an existing box stage, select it (double click) and choose Object Properties icon on Bottom toolbar. Edit points Draw Venue outline and Draw Stage functions both allow the user to edit the ground plan of the final object. To do this, left mouse double click on the object to select it. In the Settings window for the object, an Edit Points button is shown. To edit the shape click on this button. The selected shape will change its colour to red (img. EP 1) EP 1 EP 2 FusedWorks | SPACE User Manual 37 EP 3 EP 4 EP 5 EP 6 Using the left mouse button, drag and drop a corner point of the shape to change it (img. EP 2). Using the mouse button drag and drop a corner point of the shape to change it (img. EP 2). To remove a point from the shape press ALT key and then click on the point (img. EP 3). To add the point to the shape press the CTRL key and then click on the edge line where the new point should be created (img. EP 4). When editing, the original shape is presented and the new outline shape as well (img. EP 5). To finish the edit process and accept all the changes double mouse click . The shape will change back to solid colour with default textures on it (img. EP 6). Right mouse click to cancel the edit mode without applying changes. Mouse navigation is locked whilst editing shapes. To change a viewpoint hold SHIFT key and then use mouse as usual to rotate, zoom or pan the scene. Set tools Draw Canvas Box To create a canvas box, select the Draw Canvas Box tool then click and drag with the left mouse button to define the ground plan of the box. Then, move the mouse up to define the height of the box. 38 SPACE User Manual | FusedWorks Draw Canvas Sphere To create a canvas sphere, select the Draw Canvas Sphere tool then click and drag with the left mouse button to define the cross‐section of the sphere. Then, move the mouse up to define the height of the sphere (see below). Draw Canvas Sphere tools ‐ on left side there is box which will consist the future spheroid. Lighting tools Bring your scene alive with lights. Using the SPACE resource, the theatrical designer can experiment with an infinite range of lighting effects and shadows. Light colour, intensity and (where appropriate) focus, can all be adjusted. Four key types of lights are provided; profile spot, fresnel, flood, parcan. Each of the light types have options which can be changed and adjusted to users’ requirements. In addition, SPACE ships with its own lighting bar creator, allowing the designer to devise and place their own bar and truss system. Placing the light in the scene To place the light in the scene, select the light icon from the left hand side toolbar Lighting Tools ‐‐> Add Profile Spot ‐‐>Add Fresnel ‐‐>Add Flood ‐‐>Add Parcan Then by double click to place it in the scene. Depending on the light chosen the light setting window will appear. FusedWorks | SPACE User Manual 39 Profile Spot Light LIGHTING TOOLS ‐‐> ADD PROFILE SPOT Adding a profile spot light 1. To add a profile spot select the Lighting Tools menu by clicking on the Lighting Tools icon. 2. Click on the Add Profile Spot icon in the menu. 3. Double click where you would like the light. 4. Use the settings in the Profile Spot Settings menu box to adjust the parameters for the light. Profile Spot Settings In Profile Spot Settings window the following options are available: Watts option of available power values of the bulbs in Watts. Beam Type angular variants for the lights based on power of the bulb. The applied options are presented in table below: Bulb power / Watts Beam Type available (angles in degrees) 650 W 16–32 deg; 28–40 deg 1200 W 11–26 deg; 18–32 deg; 26–44 deg 2000 W 12–22 deg 19–32 deg LEE Filter/Gel Color by clicking on small coloured rectangle on the right of the text LEE Filter/Gel Color the pop‐up window should appear. Name of the LEE filter in yellow colour Gobo (PSL 4) by clicking the image on the right side of the text a pop‐up window should appear. From that window the user can select one of the predefined gobo image. Also a custom image can be loaded. To load 40 SPACE User Manual | FusedWorks the custom gobo image only *.JPG or *.PNG image file are supported. Custom image is saved within the project and automatically converted to greyscale. If image PNG have an alpha channel then the alpha channel will be used as masked. Beam Angle a slider to select the beam angle degree value in the range available (that range depends on the type chosen in field Beam Type and Watts). Intensity a percentage value of light intensity. A horizontal slider selects the value between 0‐100%. Focus Amount of blur to the light beam. Slider to select value between 1 and 22. Shadow On tick box to turn shadows on or off. This option take effect only on computers where graphic cards allow shadows. PSL 1 PSL 2 Curent filder colour representation
Name of LEE Filter which is most similar to selected RGB colour Colour selector (2)
Colour selector (2)
RGB value sliders Override Filter button ‐ allows to choose the colour which is not an actual LEE filter Apply button ‐ this will apply the most relevant LEE filter based on RGB values placed by the user Cancel button
PSL 3 ‐ Lee Filter / Gel selection pop‐up window FusedWorks | SPACE User Manual 41 Current selection of the gobo image Load image button allowing user to load own custom made gobo image. PSL 4 ‐ Gobo pop‐up window Fresnel Light LIGHTING TOOLS ‐‐> ADD FRESNEL the power of the light bulb in Watts. There following options are available: 650 W; 1200 W; 2000 W LEE Filter/Gel Color by clicking on small coloured rectangle on the right of the text LEE Filter/Gel Color the pop‐up window should appear. Name of the LEE filter in yellow colour Beam Angle a slider to select the beam angle degree value in the range available (that range depends on the type chosen in field Beam Type and Watts). Intensity a percentage value of light intensity. A horizontal slider selects the value between 0‐100%. Shadow On tick box to turn shadows on or off. This option takes effect only on computers where graphic cards allow shadows. Adding a Fresnel light 1. To add a Fresnel select the Lighting Tools menu by clicking on the Lighting Tools icon. 2. Click on the Add Fresnel icon in the menu. 3. Double click where you would like the light. 4. Use the settings in the Fresnel Settings menu box to adjust the parameters for the light. Watts 42 SPACE User Manual | FusedWorks Flood Light LIGHTING TOOLS ‐‐> ADD FLOOD Watts the power of the light bulb in Watts. There are following options available: 500 W; 1000 W LEE Filter/Gel Color by clicking on small coloured rectangle on the right of the text LEE Filter/Gel Color the pop‐up window should appear. Name of the LEE filter in yellow colour Intensity a percentage value of light intensity. A horizontal slider selects the value between 0‐100%. Shadow On tick box to turn shadows on or off. This option take effect only on computers where graphic cards allow shadows. Adding a flood light 1. To add a flood light select the Lighting Tools menu by clicking on the Lighting Tools icon. 2. Click on the Add Flood icon in the menu. 3. Double click where you would like the light. 4. Use the settings in the Flood Settings menu box to adjust the parameters for the light. Parcan Light LIGHTING TOOLS ‐‐> ADD PARCAN Watts the power of the light bulb in Watts. There are following options available: Par65 500 W; par64 1000W; Birdie 50W angular variants for the lights based on power of the bulb. Beam Type The applied options are presented in table below: Bulb power / Watts Beam Type available Par64 500 W CP87 Narrow Spot CP88 Medium Flood Par64 1000 W CP61 Narrow Spot CP 62 Medium Flood Birdie 50 W 12 deg 50w EXT 24 deg 50w EXZ 38 deg 50w EXN 60deg 50w FNV FusedWorks | SPACE User Manual 43 LEE Filter/Gel Color by clicking on small coloured rectangle on the right of the text LEE Filter/Gel Color the pop‐up window should appear. Name of the LEE filter in yellow colour Intensity a percentage value of light intensity. A horizontal slider selects the value between 0‐100%. Shadow On tick box to turn shadows on or off. This option take effect only on computers where graphic cards allow shadows. Adding a Parcan light 1. To add a Parcan light select the Lighting Tools menu by clicking on the Lighting Tools icon. 2. Click on the Add Parcan icon in the menu. 3. Double click where you would like the light. 4. Use the settings in the Parcan Settings menu box to adjust the parameters for the light. Lighting Bar LIGHTING TOOLS ‐‐> DRAW LIGHTING BAR Bar Type gives you an option for three bar truss types: standard, triangular, and square the width of the bar rig the depth of the bar rig the diameter of the truss Width Depth Truss Diameter Adding a Lighting Bar 1. To add a Lighting Bar select the Lighting Tools menu by clicking on the Lighting Tools icon. 2. Click on the Draw Lighting Bar icon in the menu. 3. Lighting bars are created in single, straight, segments. Left‐mouse click to define the start of your lighting bar. With the left‐mouse button still depressed, drag the mouse to set the length of the bar, then release. 4. To add more segments to your bar, repeat the above procedure. To create a connected series of bars, make sure that the start or end point of a new bar is over an existing one. 5. When the rig is completed, double‐click the left‐mouse button. 6. Use the Lighting Bar Settings menu box to adjust the parameters for the lighting bar rig. This includes a choice of three bar types. 44 SPACE User Manual | FusedWorks Figure Tools A stage needs people, and the SPACE resource includes an in‐built character creator. Here, you can add a figure to the scene, change its pose, position, and appearance. Draw Figure Select this tool to insert a character in the scene. Double click to position it. A generic figure placed in the scene. With the character selected, the Figure Settings window appears. Here, you can specify details such as the material applied to the figure, and the figure’s name. Figure Settings window. Material use this field to apply the following styles to the figure: •
Natural •
1950s •
Roman •
Catering •
Suit FusedWorks | SPACE User Manual 45 Tint Color Gravity (True/False) Figure Name this allow user to change a main colour of the model. this button trigger gravity to On and Off. add a unique name to the figure in this text box Different materials applied to a character Each figure has five yellow circles and a single orange circle attached. These are the figure control points. Using the Move and Rotate tools, the user can transform the position of rotation of these to effect changes in the figure’s pose. The orange circle – the master control point – is used to move or rotate the whole figure. 46 SPACE User Manual | FusedWorks Position changes in character Manipulation of the object To manipulate any object in the SPACE Resource, the object must be selected first. Moving objects To move a selected object, the move function is available at the bottom toolbar (F2 keyboard shortcut). The gizmo for move allows changing the position of the selected object(s) in each direction. By dragging the gizmo's arrow, the object can be moved in the selected direction. The Transform window, presented when an object is selected, also allows the user to move the object to a specific position. Rotating objects To rotate a selected object the rotate function is available at the bottom toolbar (F3 keyboard shortcut). The gizmo for rotation (curved arrows) allows changing orientation of the selected object(s) in each axis. By dragging the gizmo's arrow object can be rotate in selected direction. The Transform window, presented when an object is selected, also allows the user to rotate the object to a specific position. Change co‐ordinate systems (local and global/world) Each object existing in the SPACE Resource is located in three dimensional space. To describe its position and orientation a specific axis systems been used. The main origin point for all the scene is called Centre Stage and its located on cross point of the grey semitransparent cross‐gizmo. It is where so called world or global axis system is based on. The values of position for that point is 0,0,0 in X,Y, Z axis. Each object has its own axis orientation system attached called local. Each object also has a pivot point which is usually located at its centre. That point allows the user to transform the object via its own values i.e. when object is about to be moved by 2 meters in X‐axis (instead of moving from global position i.e. 10.23, 5, 5 to position 12.23, 5, 5). FusedWorks | SPACE User Manual 47 Selecting objects Wrong usage of selection tool. None of the object will be selected. Right way usage of selection tool. Two object will be selected. Two object are selected. Above, two objects are selected. There is a white border plotted around the selected objects. Also a move gizmo is presented at the centre point for those two objects. The selection of multiple objects can also be realised by holding CTRL key pressed and double clicking on the desired objects. Using Snap function Snapping makes precision drawing and placement easy. The SPACE resource has its own built‐in snap functionality. To use snaps, click the Snap button on the bottom toolbar. 48 SPACE User Manual | FusedWorks When snap is active a semi‐transparent grid is presented next to the mouse cursor (as default). Visibility of this grid can be changed by deselecting field Show Grid on Draw Transform window. From now each click of the mouse is locked to only locations Grid Space: this is a value in meters. This value is presenting density of the grid. As default the density of the grid is 0.5m. Grid Size: Default value is 10. This value determines how many grid elements should be projected in each of direction. In other words if Grid Size will store value 2 and Grid Space value will be 0.5 the grid will be presented as two units in each direction from yellow centre of the grid. Each unit (square) of the grid will be in distance of 0.5 meter from each other. Show Grid: This option toggles the visibility of the grid. Even when grid is not visible the snap function is still active. Remember, snaps can be used for the precision creation of an object – or for the accurate placement of an object that already exists – they’re there to help! Snap modes ‐ information about current snap mode is presented next to the Snap setting option. Several snap modes exist, depending on the user’s operation. When creating a new object like venue, stage etc. The options will be as follows: To World orientates the grid to the scene co‐ordinating system. This option is most useful when object have to be drawn with specific dimensions. FusedWorks | SPACE User Manual 49 Object Points this option allow the user to snap to the edges of an existing object, such as a stage. This is a great way to align objects with confidence. For object that already exist, the following snap options are available: (when LOCAL mode is ON): Collision snap to collision of the object with another one. The grid is hidden. Local present transform values in local co‐ordinate system. This is especially useful when the user wants to move the selected object by some value in relation to its current local position. I.e. moving object by 2 meters in some axis. (when WORLD mode is ON): Collision snap to collision of the object with another one World + Offset present transform values in global/world based co‐ordinate system. Material editor Bottom Toolbar Material Selector This tool presents a window called Material Selector with list of all the materials in the current project. Material Selector window box ‐ with samples as Sphere. 50 SPACE User Manual | FusedWorks Material samples presented in the window are, by default, mapped onto spheres. There is an option to change their style to following primitives: sphere, cube, cylinder, plane. Using this window box, the user can create new materials and copy or delete existing ones. To close the window box, click the Close button. Currently selected material will have white border around the sample icon. Selected material sample icon with white border around it. When a material sample is double clicked the Material Editor window will be presented. Integral materials cannot be deleted or renamed but all materials can be edited and/or copied. Material Editor Material editor window for Diffuse type of material Material Name The name for material. It should be unique for each individual material. Material Type In this field user can specified what type of material would like to use. There are following options to be selected: •
Diffuse •
Specular •
Bumped Diffuse •
Bumped Specular •
Transparent/Diffuse •
Transparent/Specular •
Transparent/Bumped Diffuse •
Transparent/Bumped Specular •
Self‐Illuminated/Diffuse •
Self‐Illumin/Specular FusedWorks | SPACE User Manual 51 •
Self‐Illumin/Bumped Diffuse • Self‐Illumin/Bumped Specular Color depending on material type there could be one or more colours to be selected/specified. By clicking on the colour rectangle a colour selection window will be presented. SpecColor presented only if the selected material type supports SpecColor. Shininess a horizontal slider to specify the value of shininess on the material (if applicable) Repeat/Clamp button over each texture window. Toggles between Repeat and Clamp type for texture on the material. MainTex main texture for material BumpMap texture responsible for bumpiness factor of the material Illum texture responsible for illumination factor of the material Tiling & Offset (x,y) this values are available to change if material have texture attached. <<Selector button to open the Material Selector window Close button to close the Material Editor window Get Material Get Material icon on bottom toolbar Material picker mouse pointer This tool can be used to select a material from existing object. When this tool is active, the mouse pointer change its look to pipette/eyedropper. From that moment left clicking on any of the existing object in the scene will gather the information about selected material and allow you to edit it. The material which will be gathered with the tool will become active and its icon will be presented on bottom toolbar. To deactivate this tool either click with the right mouse button or select any other tool from toolbars. 52 SPACE User Manual | FusedWorks Put Material Put Material icon on bottom toolbar Put Material tool is designed to replicate the currently active material to the objects by selecting the objects. When Put Material tool is active, the mouse pointer change to a Paintbrush. From that moment each time that any existing object is selected, its material will be replaced by the currently selected (the one visible on bottom toolbar). To deactivate this tool either click with the right mouse button or select any other tool from toolbars. Colour selection By using the colour selection window, the user can specify the exact colour which should be applied within currently selected material. The selection can be done either by using the colour palette and clicking on colour from it or by exact values of RGBA values. RGBA stands for Red Green Blue and Alpha. Alpha represents a value of transparency and it change colour visibility only if material type like Transparent / Diffuse; Transparent / Specular; Transparent / Bumped Diffuse; Transparent / Bumped Specular. Colour selection window FusedWorks | SPACE User Manual 53 Texture Selection Texture selection window. Via this window the user can select the texture which should be applied to the right field in the Material Editor. There is an ability to load one’s own textures into project and use them within the material using the Load image button. 54 SPACE User Manual | FusedWorks FAQ Question 1: Do I need an Internet connection to use the SPACE resource? Answer: No, an Internet connection is not required to use SPACE, but you’ll need one to download the latest version of it: www.space.fusedworks.com. Here, you will also find lots of information about the resource. Question 2: Does the SPACE resource run on a Mac or PC? Answer: The SPACE resource is available in two formats – one for Macs, the other for PCs. Simply specify the required version when downloading the resource. Question 3: Can I select multiple objects? Answer: No problem. SPACE gives you two methods for multiple selection. First, the Group Select tool on the bottom toolbar allows you to draw a marquee rectangle around all the objects that you want. Secondly, pressing the CTRL key whilst double‐clicking on an object adds it to the selection set Question 4: What are the units that the SPACE Resource uses? Answer: SPACE uses metres for distances. Angles are measured in degrees. Question 5: Is an auto save function available? Answer: Afraid not. Instead, you can use the Save As function in the main menu: Space > file > Save Project As ... this will prompt you to save a version of the current project under a name and location of your choice. Question 6: Can I change the colour of the background of the scene? Answer: Go for it. Use the preferences options in the main menu : Space > edit > preferences. Question 7: Can I navigate using my keyboard? Answer: You bet. The Walkthrough tool in the bottom toolbar allows you to explore your creations in much the same way as a game. Simply click the tool, select a place to start, and use the arrow keys to get moving. Question 8: Can I can fly and zoom around? Answer: Sorry. SPACE offers only the two types of navigation – mouse‐based rotation, panning, and zooming around a centre point (ideal for scene creation and placement); and keyboard‐based walkthroughs. FusedWorks | SPACE User Manual 55 Question 9: When I’m drawing a stage, I want the lines parallel – what do I do? Answer: Simple ‐ use SPACE’s snap function. This is a drawing aid that constrains lines to a grid allowing the user to design with confidence. Question 10: Can I clean up the last open project list? Answer: The project list represents the last saved projects and cannot be edited. Question 11: Can I rename existing project? Answer: Yes. Use the Save Project As function, as described above Question 12: Can I export elements from one project to another one? Answer: Not directly. You can, however, use the Save Project As function to save a copy of the current project, then delete those elements in the project that you don’t want. Question 13: What modelling software can I use to create my scene elements? Answer: You can fashion your props and other elements using any modelling software that allows the export of DAE and OBJ file types. Question 14: Can I record the stage look? Answer: Have a design that you like? Use the Save ScreenShot function to record its look: Space > file > Save ScreenShot. Question 15: Can I share my design with others? Answer: No problem. Simply make a copy of your project, compress it if necessary, and email it. Question 16: Can I get the figures to run around and interact with each other Answer: No 56 SPACE User Manual | FusedWorks