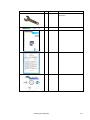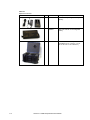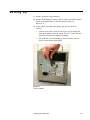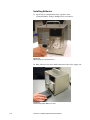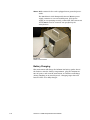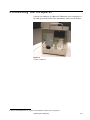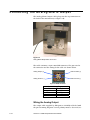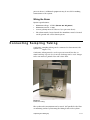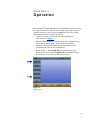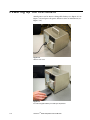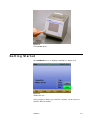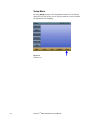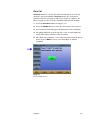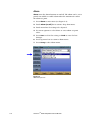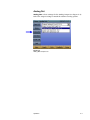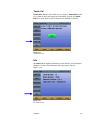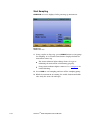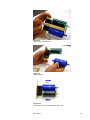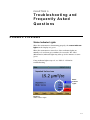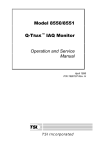
1
Exposure Monitoring AEROTRAK™ 9000 Nanoparticle Aerosol Monitor User Guide P/N 1990083, Revision B May 2008 Exposure Monitoring AEROTRAK™ 9000 Nanoparticle Aerosol Monitor User Guide P/N 1990083, Revision B May 2008 SHIP TO/MAIL TO: TSI Incorporated 500 Cardigan Road Shoreview, MN 55126-3996 USA U.S. Technical Support: (800) 874-2811/(651) 490-2811 Fax: (651) 490-3824 E-mail address: [email protected] Website: http://www.tsi.com INTERNATIONAL Technical Support: (001 651) 490-2811 Fax: (001 651) 490-3824 Manual History The following is a manual history of the AEROTRAK™ 9000 Nanoparticle Aerosol Monitor User Guide (Part Number 1990083). ii Revision Date A B July 2006 May 2008 Warranty Part Number Copyright Address E-mail Address Limitation of Warranty and Liability (effective July 2000) 1990083/ Revision B /May 2008 ©TSI Incorporated / 2006-2008 / All rights reserved. TSI Incorporated / 500 Cardigan Road / Shoreview, MN 55126 / USA [email protected] Seller warrants the goods sold hereunder, under normal use and service as described in the operator's manual, shall be free from defects in workmanship and material for (12) months, or the length of time specified in the operator's manual, from the date of shipment to the customer. This warranty period is inclusive of any statutory warranty. This limited warranty is subject to the following exclusions: a. Hot-wire or hot-film sensors used with research anemometers, and certain other components when indicated in specifications, are warranted for 90 days from the date of shipment. b. Parts repaired or replaced as a result of repair services are warranted to be free from defects in workmanship and material, under normal use, for 90 days from the date of shipment. c. Seller does not provide any warranty on finished goods manufactured by others or on any fuses, batteries or other consumable materials. Only the original manufacturer's warranty applies. d. Unless specifically authorized in a separate writing by Seller, Seller makes no warranty with respect to, and shall have no liability in connection with, goods which are incorporated into other products or equipment, or which are modified by any person other than Seller. The foregoing is IN LIEU OF all other warranties and is subject to the LIMITATIONS stated herein. NO OTHER EXPRESS OR IMPLIED WARRANTY OF FITNESS FOR PARTICULAR PURPOSE OR MERCHANTABILITY IS MADE. TO THE EXTENT PERMITTED BY LAW, THE EXCLUSIVE REMEDY OF THE USER OR BUYER, AND THE LIMIT OF SELLER'S LIABILITY FOR ANY AND ALL LOSSES, INJURIES, OR DAMAGES CONCERNING THE GOODS (INCLUDING CLAIMS BASED ON CONTRACT, NEGLIGENCE, TORT, STRICT LIABILITY OR OTHERWISE) SHALL BE THE RETURN OF GOODS TO SELLER AND THE REFUND OF THE PURCHASE PRICE, OR, AT THE OPTION OF SELLER, THE REPAIR OR REPLACEMENT OF THE GOODS. IN NO EVENT SHALL SELLER BE LIABLE FOR ANY SPECIAL, CONSEQUENTIAL OR INCIDENTAL DAMAGES. SELLER SHALL NOT BE RESPONSIBLE FOR INSTALLATION, DISMANTLING OR REINSTALLATION COSTS OR CHARGES. No Action, regardless of form, may be brought against Seller more than 12 months after a cause of action has accrued. The goods returned under warranty to Seller's factory shall be at Buyer's risk of loss, and will be returned, if at all, at Seller's risk of loss. Buyer and all users are deemed to have accepted this LIMITATION OF WARRANTY AND LIABILITY, which contains the complete and exclusive limited warranty of Seller. This LIMITATION OF WARRANTY AND LIABILITY may not be amended, modified or its terms waived, except by writing signed by an Officer of Seller. Service Policy Knowing that inoperative or defective instruments are as detrimental to TSI as they are to our customers, our service policy is designed to give prompt attention to any problems. If any malfunction is discovered, please contact your nearest sales office or representative, or call TSI’s Customer Service department at 1-800-874-2811 (USA) or +001 (651) 490-2811 (International). Trademarks AEROTRAK and TRAKPRO are trademarks of TSI Incorporated. Microsoft and Windows are registered trademarks of Microsoft Corporation. TSI and the TSI logo are trademarks of TSI Incorporated. iii iv AeroTrak 9000 Nanoparticle Aerosol Monitor Contents Manual History ...................................................................... ii Warranty............................................................................... iii Safety ...................................................................................vii Labels ................................................................................... viii Description of Caution Symbol ................................................ ix Caution ................................................................................ ix Warning ............................................................................... ix Caution or Warning Symbols................................................ ix Getting Help ............................................................................. x CHAPTER 1 Parts Identification ...........................................1-1 CHAPTER 2 Unpacking and Setting Up ................................2-1 Part List ................................................................................2-1 Setting Up .............................................................................2-5 Installing Batteries .............................................................2-6 Instrument Placement ...........................................................2-7 Power Connection and Battery Charging ...............................2-7 Battery Charging ................................................................2-8 Connecting the Computer .....................................................2-9 Connecting the Analog/Alarm Output .................................2-10 Wiring the Analog Output.................................................2-10 Wiring the Alarm ..............................................................2-11 Connecting Sampling Tubing...............................................2-11 Installing TRAKPROTM Data Analysis Software........................2-12 Connecting the AEROTRAK 9000 Nanoparticle Aerosol Monitor to the Computer for the first time ......................2-12 CHAPTER 3 Operation..........................................................3-1 Powering Up the Instrument..................................................3-2 Getting Started......................................................................3-3 Setup Menu........................................................................3-4 Zero Cal .............................................................................3-5 Alarm .................................................................................3-6 Analog Out .........................................................................3-7 DateTime............................................................................3-8 Touch Cal...........................................................................3-9 Info ....................................................................................3-9 Start Sampling .................................................................3-10 Touch Screen Lock ...........................................................3-12 Graphing..........................................................................3-13 RunMode..........................................................................3-13 Data .................................................................................3-20 v CHAPTER 4 Maintenance .....................................................4-1 Periodic Maintenance ............................................................4-1 Cleaning the Cyclone.............................................................4-1 Cleaning the Inlet Orifice.......................................................4-3 Replacing the Carbon Filter and HEPA Filter .........................4-5 Replacing the Conductive Filter .............................................4-8 Replacement Parts ..............................................................4-11 CHAPTER 5 Troubleshooting and Frequently Asked Questions ..........................................................................5-1 Common Problems ................................................................5-1 Status Indicator Lights .......................................................5-1 Frequently Asked Questions..................................................5-3 CHAPTER 6 Contacting Customer Service ............................6-1 Technical Contacts................................................................6-1 Returning for Service.............................................................6-1 APPENDIX A Specifications ................................................. A-1 vi AEROTRAK™ 9000 Nanoparticle Aerosol Monitor Safety This section gives instructions to promote safe and proper handling of the AEROTRAK™ 9000 Nanoparticle Aerosol Monitor. IMPORTANT There are no user-serviceable parts inside the instrument other than the filters included in the maintenance kit, part number 1031599. The cover of this instrument should not be removed for any reason. Refer all repair and maintenance to a factory qualified technician. To prevent problems, take these precautions: Do not remove any parts from the instrument unless you are specifically told to do so in this manual. Do not remove the instrument housing or covers while power is supplied to the instrument. C a u t i o n If the AEROTRAK™ 9000 is used in a manner not specified by the manufacturer, the protection provided by the equipment may be impaired. W A R N I N G High-voltage is accessible in several locations within this instrument. Make sure the power source is unplugged and batteries removed before performing maintenance procedures. vii Labels Advisory labels and identification labels are attached to the outside of the AEROTRAK™ 9000 Nanoparticle Aerosol Monitor and to the inside of the instrument. Labels for the AEROTRAK 9000 are described below: 1. Serial Number Label 2. Electrical Shock caution 3. No user serviceable parts CAUTION NO USER SERVICEABLE PARTS INSIDE. REFER SERVICE TO QUALIFIED PERSONNEL 4. European symbol for nondisposable item. Item must be recycled. 5. Electrical Shock caution (inside case) 6. TSI Service Label viii AEROTRAK™ 9000 Nanoparticle Aerosol Monitor Description of Caution Symbol The following symbols and appropriate caution statements are used throughout the user guide and on the AEROTRAKTM 9000 aerosol monitor. The symbols and caution statements are intended to draw attention to steps that require cautionary measures when working with the AEROTRAK 9000 aerosol monitor: Caution ! C a u t i o n Caution means be careful. Not following the procedures prescribed in this manual may result in equipment damage. Caution also indicates important information about the operation and maintenance of this instrument is included. Warning ! W A R N I N G Warning means unsafe use of the instrument could result in serious injury or cause irrevocable damage to the instrument. Follow the procedures prescribed in this manual to use the instrument safely. Caution or Warning Symbols The following symbols may accompany cautions and warnings to indicate the nature and consequences of hazards: Warns that uninsulated voltage within the instrument may have sufficient magnitude to cause electric shock. Therefore, it is dangerous to make contact with any part inside the instrument. Warns that the instrument is susceptible to electro-static dissipation (ESD) and ESD protection procedures should be followed to avoid damage. Indicates the connector is connected to earth ground and cabinet ground. Safety ix Getting Help To obtain assistance with this product or to submit suggestions, please contact Customer Service: TSI Incorporated 500 Cardigan Road Shoreview, MN 55126 U.S.A. Fax: (651) 490-3824 (USA) Fax: 001 651 490 3824 (International) Telephone: 1-800-874-2811 (USA) or (651) 490-2811 International: 001 651 490-2811 E-mail Address: [email protected] Web site: www.tsi.com x AEROTRAK™ 9000 Nanoparticle Aerosol Monitor CHAPTER 1 Parts Identification The following figures identify the key parts on the front and back panel of the AEROTRAK 9000 aerosol monitor. Figure 1-1 AEROTRAK 9000 Nanoparticle Aerosol Monitor Front Panel Identification Figure 1-2 AEROTRAK 9000 Nanoparticle Aerosol Monitor Back Panel Identification 1–1 CHAPTER 2 Unpacking and Setting Up Part List Table 2-1 provides a packing list for the AEROTRAK™ 9000 aerosol monitor. Table 2-1 AEROTRAK 9000 Nanoparticle Aerosol Monitor Packing List Item Qty Part Number Description 1 900000 Main unit 1 1310061 Carrying case, Dimensions 21.25 in. x 13.25 in. x 11.5 in. (53.97 cm x 33.66 cm x 29.21 cm) 1 1208057 6600 mAH Lithium Ion Rechargeable Battery 1 1030536 Cyclone, 1 micron cut point 2–1 Item HEPA Filter Qty Part Number Description 1 1031599 Filter Maintenance Kit, including (1) HEPA Filter, (1) Carbon Filter, and (1) Conductive Filter 1 1303740 USB cable 1 801652 Analog/alarm output cable 1 3001047 Conductive sampling tubing, 3 ft (1 m) 1 Varies by country Power cord (by country) US - 1303053 Continental Europe - 1303075 United Kingdom - 1303230 Australia -1303229 Carbon Filter Conductive Filter 2–2 AEROTRAK™ 9000 Nanoparticle Aerosol Monitor Item Qty Part Number Description 1 3010006 9/16 inch Wrench (for cyclone attachment) 1 3012094 Screwdriver, dual ended (flat/Phillips) 1 1990083 User Guide 1 NA Calibration Certificate 1 1090014 TRAKPRO Software Unpacking and Setting Up 2–3 Table 2.2 Optional Accessories Item 2–4 Qty Part Number Description 1 2610114 External Battery Charger, 2-battery capacity 1 1208057 6600 mAH Lithium Ion Rechargeable Battery 1 3000180 Hard-sided, wheeled carry case. Dimensions 12.5 in. x 25.5 in. x 19 in. (31.75 cm x 64.77 cm x 48.26 cm) AEROTRAK™ 9000 Nanoparticle Aerosol Monitor Setting Up 1. Remove protective cap from inlet. 2. Attach elbow fitting to cyclone. Place Cyclone assembly on inlet orifice and tighten with 9⁄16 inch wrench provided (see Figure 2-1). 3. Orient elbow vertically with cyclone grit pot at bottom of cyclone. • Cyclone inlet can be rotated 180 degrees by loosening the connection fitting below the elbow. Use the 9⁄16 inch wrench provided to loosen and tighten the fitting. • For optimum aerosol sampling, position cyclone inlet 90 degrees from back of instrument. Figure 2-1 Cyclone Installed Unpacking and Setting Up 2–5 Installing Batteries 1. Open battery compartment door a quarter-turn counterclockwise using a Phillips-head screwdriver. Figure 2-2 Opening Battery Compartment Door 2. Slide batteries into slots with connection tabs to the upper left. Figure 2-3 Install Rechargeable Battery into Unit 2–6 AEROTRAK™ 9000 Nanoparticle Aerosol Monitor WARNING The rechargeable battery supplied by TSI (P/N 1208057) has built in protection against explosion and fire hazard. Any battery used in this instrument must also have built in protection against explosion and fire. WARNING Do not use non-rechargeable batteries in this instrument. Doing so may cause fire, explosions or other hazards. Instrument Placement The AEROTRAK™ 9000 Nanoparticle Aerosol Monitor has no special mounting requirements other than maintaining clear flow access to the cyclone. The instrument can be mounted on a standard survey tripod equipped with a 5⁄8”-11 threaded stud. Power Connection and Battery Charging Connect the AC power cord (supplied) to the AC POWER IN connection on the back of the AEROTRAK™ 9000 aerosol monitor. The instrument accepts line voltage 100 to 240 VAC, 50/60 Hz, 1A maximum single phase. Unpacking and Setting Up 2–7 Notes: Make certain the line cord is plugged into a grounded power outlet. The AEROTRAK™ 9000 Nanoparticle Aerosol Monitor power supply contains no user-serviceable parts. If the power supply is not operating correctly, contact TSI. This instrument should not be used in a manner not specified by the manufacturer. Figure 2-4 Power Cord Connector Battery Charging This instrument will charge the Lithium Ion battery packs. Insert the batteries into the battery compartment, plug the instrument into AC power, and turn the instrument on. Batteries will charge during sampling or in stand-by mode. Charging stops when the batteries have been fully charged. 2–8 AEROTRAK™ 9000 Nanoparticle Aerosol Monitor Connecting the Computer Connect the USB port of a Microsoft® Windows ®-based computer to the USB port on the back of the AEROTRAK™ 9000 aerosol monitor. Figure 2-5 Location of USB Port ® Microsoft and Windows are registered trademarks of Microsoft Corporation. Unpacking and Setting Up 2–9 Connecting the Analog/Alarm Output The Analog/Alarm Output Cable plugs into the top connection at the back of the instrument (see Figure 2-6). Figure 2-6 Analog/Alarm Output Cable Connection The cable contains a 4-pin, mini-DIN connector. The pin-outs for the connector and the wiring for the cable are shown below. Analog Output (+) Alarm Positive (+) Analog Ground (–) Alarm Ground (–) 4-pin miniDIN connector Cable Wiring Diagram Brown Wire Analog Ground Orange Wire Analog Out Red Wire Alarm (+) White Wire Alarm (-) Black Wire Shield Wiring the Analog Output The output cable supplied by TSI (part no. 801652) is labeled with the pin-out wiring diagram. Correct polarity must be observed (see 2–10 AEROTRAK™ 9000 Nanoparticle Aerosol Monitor pin-outs above). Additional equipment may be needed for making connections to the system. Wiring the Alarm System specifications: • Maximum voltage: 15 VDC (do not use AC power) • Maximum current: 1 Amp • Correct polarity must be observed (see pin-outs above) • The alarm switch, located inside the AEROTRAK, must be located on the ground side of the alarm system. Connecting Sampling Tubing Conductive sampling tubing can be connected to draw air into the cyclone (see Figure 2-7). Conductive tubing must be used to prevent aerosol loss due to static build up. Up to 3 feet (1 meter) of tubing can be used. Longer tubes can increase particle loss and reduce flow. Figure 2-7 Conductive Tubing The cyclone inlet orientation can be moved 180o parallel to the floor or mounting surface by loosening the fitting between the cyclone Unpacking and Setting Up 2–11 and the elbow. Orient the cyclone to optimize air sampling capture depending on the placement of the instrument. I n s t a l l i n g T R A K P R O TM D a t a A n a l y s i s Software TRAKPRO software can preprogram the AEROTRAK 9000 aerosol monitor, download data, create graphs, and combine graphs with data from other TSI instruments. The following sections describe how to install the software and set up the computer. Note: TRAKPRO Data Analysis Software version 3.6.0 or higher must be used to communicate with the AEROTRAK 9000 monitor. Older versions do not support the AeroTrak 9000 monitor. Download the latest version of TRAKPRO software from the TSI website: www.tsi.com. To use TRAKPRO software with the AEROTRAK 9000 Nanoparticle Aerosol Monitor, the PC must be running Microsoft Windows ® and the computer must have an available Universal Serial Bus (USB) port. The AEROTRAK 9000 aerosol monitor connects to the PC using Windows USB Mass Storage drivers that are available on Windows 2000 and XP. 1. Insert the TRAKPROTM Data Analysis Software CD into the CDROM drive. The install screen starts automatically. Note: If the software does not start automatically after a few minutes, manually run the program listed on the label of the CD using the Run command on the Windows Start Menu. 2. Follow the directions to install TRAKPRO software. TRAKPRO software contains a comprehensive installation guide. There is no separately printed TRAKPRO Data Analysis software manual. Connecting the AEROTRAK 9000 Nanoparticle Aerosol Monitor to the Computer for the first time All AEROTRAKTM 9000 kits include a USB (Universal Serial Bus) cable to connect the instrument to an available USB port on your PC. 1. Locate an available USB port on the computer. 2. Connect the larger end of the USB cable to the USB port on the computer. ®Microsoft and Windows are registered trademarks of Microsoft Corporation. 2–12 AEROTRAK™ 9000 Nanoparticle Aerosol Monitor 3. Turn the AEROTRAK 9000 aerosol monitor on. 4. Connect the small end of the USB cable to the USB port on the AEROTRAK 9000 aerosol monitor. 5. The first time the AEROTRAK 9000 aerosol monitor is connected to a computer, the Windows utility for installing new hardware will launch automatically. 6. After the New Hardware utility has finished, complete the installation of TRAKPRO software. If instrument communication difficulty is experienced, please review the following troubleshooting steps: Symptom Cause Solution Receive the following error message: The AEROTRAK 9000 drivers take approximately 20 seconds to “load,” each time the instrument is plugged in. Attempting to communicate with the instrument during this period will result in an error message. Wait approximately 30 seconds, after plugging in the USB cable, before attempting to communicate with the instrument. Receive the following error message(s): 1. The Software Configuration is not set properly to AEROTRAK 9000. or 2. The Auto-Configuration is turned off. or 3. The instrument is turned off (powered down). or 4. The instrument is not attached to the USB cable, either at the instrument side or computer side. 1. Select Option: Software Configure: AEROTRAK 9000. or 2. Select the AEROTRAK 9000 from the drop-down list on the menu bar. or 3. Check (turn-on) the Autoconfiguration, under Options. or 4. Turn on the instrument. or 5. Attach USB cable. 1. The instrument is not in the Survey Mode 1. Return to the Survey Mode, before attempting to communicate with the instrument. Receive the following error message: Unpacking and Setting Up 2–13 2–14 AEROTRAK™ 9000 Nanoparticle Aerosol Monitor CHAPTER 3 Operation The AEROTRAKTM 9000 Nanoparticle Aerosol Monitor operates using a touch-screen menu. Tap the screen with a finger tip or plastic stylus to select the menu items. Do not touch the screen with sharp items that may damage the screen. • Clean the cyclone before each use. See maintenance instructions in Chapter 4. • Zero Cal the Electrometer before the first use. Activate “Zero Cal” from the Setup menu. Repeat Zero Cal monthly. • Allow the instrument to warm up for five minutes before performing Zero Cal on the electrometer. • Before first use, Run Touch Cal from the Setup menu to calibrate the screen. Repeat Touch Cal occasionally if dropdown menus or buttons are difficult to activate. Figure 3-1 Setup Screen 3-1 Powering Up the Instrument Attach power cord or insert rechargeable battery (see Figure 3-2 or Figure 3-3) and press the power button to turn on instrument (see Figure 3-4). Figure 3-2 Attach Power Cord Figure 3-3 Insert Rechargeable Battery into Battery Compartment 3–2 AEROTRAKTM 9000 Nanoparticle Aerosol Monitor Figure 3-4 Power ON/OFF Button Getting Started The START UP screen is displayed initially (see Figure 3-5). Figure 3-5 START UP Screen Using a stylus or finger tip, touch the “buttons” on the screen to activate different menus. Operation 3–3 Setup Menu Pressing Setup activates the Setup Menu touch screen buttons along the left edge of the screen. Setup cannot be accessed when the instrument is sampling. Figure 3-6 Setup Screen 3–4 AEROTRAKTM 9000 Nanoparticle Aerosol Monitor Zero Cal Zero Cal should be run the first time the instrument is used and should be repeated monthly. Zero Cal checks the electrometer function. The Zero Cal process takes 30 seconds to complete. No filter is required to Zero Cal the AEROTRAK 9000 aerosol monitor. 1. Press the Zero Cal button (see Figure 3-7). 2. Press the START button to start the electrometer zero process. 3. A count-down clock will appear indicating the time remaining. 4. The pump will turn on then stop after a few seconds while the count-down timer continues. This is normal. 5. After Zero Cal is complete, select other functions from the Setup menu or press Main to select a new Run Mode or initiate sampling. Figure 3-7 Zero Cal Setup Screen Operation 3–5 Alarm Alarm turns the alarm function on and off. The alarm can be set to provide an audible or visible alarm when the instrument reaches the alarm set point. 1. Press Alarm to enter menu (see Figure 3-8). 2. Touch Alarm [on,off] bar to activate drop down menu. 3. Touch menu line for setting to be adjusted. 4. Use menu options to select choice or enter alarm set point value. 5. Press Save to select the setting, or Undo to erase the last changes. 6. Press top menu bar to return to Alarm menu. 7. Press Setup to close Alarm menu. Figure 3-8 Alarm Setup Screen 3–6 AEROTRAKTM 9000 Nanoparticle Aerosol Monitor Analog Out Analog Out selects settings for the Analog Output (see Figure 3-9). Select the output setting to match the alarm receiving system. Figure 3-9 Analog Out Setup Screen Operation 3–7 DateTime DateTime sets the clock and calendar in the instrument. 1. Press DateTime to activate the menu (see Figure 3-10). 2. Touch the menu option to change. 3. Use the arrow keys to make changes. 4. Press Save to keep the changes, press Undo to erase the last changes. Figure 3-10 DateTime Setup Screen 3–8 AEROTRAKTM 9000 Nanoparticle Aerosol Monitor Touch Cal Touch Cal calibrates the touch screen response. Touch Cal should be performed when first using the instrument. Repeat the Touch Cal when drop down menus or buttons are difficult to activate. Figure 3-11 Touch Cal Screen Info The Info button displays instrument serial number, model number, firmware version, and calibration date (yyyy/mm/dd). See Figure 3-12. Figure 3-12 Info Setup Screen Operation 3–9 Start Sampling START UP screen is displayed after powering up instrument. Figure 3-13 START UP Screen 1. Using a stylus or finger tip, press START button to start pump for sampling. A 10-second count-down is displayed while the instrument warms up. • The status indicator lights change from red to green indicating the instrument is functioning properly. • If any status indicator lights remain red, see Chapter 5 for troubleshooting. 2. Press STOP to end sampling and turn off the sampling pump. 3. While the instrument is running, the visible buttons work like tabs. Only the active tab will open. 3–10 AEROTRAKTM 9000 Nanoparticle Aerosol Monitor Status Indicator Lights Figure 3-14 Main Screen Stats While the instrument is running, pressing Stats displays minimum, maximum, average, and TWA readings (see Figure 3-15). Current deposited surface area readings remain active. Pressing the Stats button again removes the displayed stats. Figure 3-15 Stats Screen Operation 3–11 Touch Screen Lock The instrument user interface screen can be locked while operating to prevent tampering with the sampling. 1. To lock the screen controls, touch the “lock” icon, immediately followed by three (3) quick touches on the Main word along the top tool bar. When the screen is locked, the color indicator inside the “lock” will turn red. 2. Repeat the process to unlock the screen. Press the “lock” icon, then immediately press Main three times located on the top tool bar of the screen. Figure 3-16 Touch Screen Lock Note: The word in the upper-right corner of the top tool bar will change depending on the menu function selected. i.e., Main, Graph, RunMode, Setup. The screen lock function works in all modes by tapping the lock icon followed by three (3) taps on any word that is displayed in the upper-right corner. 3–12 AEROTRAKTM 9000 Nanoparticle Aerosol Monitor Graphing During sampling, pressing Graph displays current readings in graphical form. • During Survey Mode, five (5) minutes of data is graphed. • During Logging Mode, the entire log test time is displayed on the graph. In Graphing Mode, pressing Main returns the instrument to the Deposited Surface Area display. Figure 3-17 Graphical Display Graph Time Display Pressing the Time x-axis label on the graph screen switches between Time (s) [elapsed time], Time (abs) [absolute time], and Time (rel) [relative time]. Graph Scale Display Pressing the DSA y-axis label on the graph screen changes the scale of the graph or select auto scale. RunMode The RunMode tab brings up sampling mode options. Sampling mode options include Survey Mode, Manual Log, and Log Mode 1-5. To change sampling mode options, touch the top Operation 3–13 drop-down menu bar two times to display the RunMode choices (see Figure 3-18). Figure 3-18 RunMode Selection Select a RunMode by touching the line on the drop-down menu. The RunMode menu contains adjustable sampling options. Survey Mode runs an active sample, but does not log data. Touching the Survey Mode line brings up the adjustable sampling options (see Figure 3-19). Survey Mode adjustable sampling options include: 3–14 • Deposition Mode can be set to A (alveolar) or TB (Tracheobronchial) • Time Constant can be set from 1 to 60 seconds. AEROTRAKTM 9000 Nanoparticle Aerosol Monitor Figure 3-19 Survey Mode Adjustable Sampling Options Manual Log sets the instrument to log data for a specified run time. Manual Log adjustable sampling options include: • Log Interval, the amount of time between logged samples, 1 second to 59 minutes, 59 seconds. • Test length, from 1 minute to 7 days, 23 hours, 59 minutes. • Deposition Mode, A (alveolar) or TB (Tracheobronchial). See Figure 3-23. • Time Constant, 1 to 60 seconds (see Figure 3-20). Figure 3-20 Manual Log Adjustable Sampling Options Operation 3–15 Log Mode starts and stops the instrument at specified times, run for a specified test length, and perform multiple tests of the same length with a specified time period between tests. Select LogMode by touching the top drop-down bar two times in RunMode (see Figure 3-21), Log Mode adjustable sampling options include: • Log Name, brings up a virtual keypad to name the Logged Data file; limit 20 characters (see Figure 3-24). • Start Date, select the date the test will start. • Start Time, select the time the test will start. • Log Interval, select the amount of time between logged samples from 1 second to 59 minutes, 59 seconds. • Test length, from 1 minute to 7 days, 23 hours, 59 minutes • Number of tests, 1 to 999. • Time between tests, 1 minute to 7 days, 23 hours, 59 minutes. • Deposition Mode A (alveolar) or TB (Tracheobronchial) • Time Constant, 1 to 60 seconds. • Use Start Date, option to use programmed start date or by pass programmed start date. • Use Start Time, option to use programmed start time or bypass programmed start time. Figure 3-21 Log Mode Adjustable Sampling Options 3–16 AEROTRAKTM 9000 Nanoparticle Aerosol Monitor Change the settings by touching the line of the setting and then use the arrow keys to adjust the settings. • Touch Undo or Save after each setting change. • Touch the second drop-down menu line to return to the setting selection screen. • Touch the top drop-down menu to return to the RunMode screen. The Time Constant averages the readings displayed on the screen. A larger time constant number will result in less fluctuations of displayed readings. Time Constant can be set from 1 to 60 seconds. Touch Undo or Save after making any changes to the Deposition Mode or Time Constant. See Figure 3-22 for an example of a Time Constant setting screen in Manual Logging. Figure 3-22 Time Constant Screen Operation 3–17 The Deposition Mode can be selected from the Survey Mode, Manual Mode, or Log Mode. Touch the Deposition Mode option under the RunMode Screen, then use the arrow keys to select A (alveolar) or TB (Tracheobronchial). Figure 3-23 shows the Deposition Mode TB selected for a Survey Mode. Figure 3-23 Deposition Mode Selection Log Interval changes the amount of time between logged samples. The instrument will log the average concentration recorded during the selected log interval. The log interval can be set from 1 second to 59 minutes, 59 seconds. 3–18 AEROTRAKTM 9000 Nanoparticle Aerosol Monitor Log Name brings up a virtual keypad to name the five “Log Data” files (see Figure 3-24); 20 characters maximum. To change a Log Mode name: touch the Log Name drop-down bar. • Use Bsp (backspace) to erase the current name. • Use keypad to type new name. • Touch Save. Figure 3-24 Text Entry Screen for Logged Data Operation 3–19 Data The Data key opens a list of data files for viewing (see Figure 3-25). • Press Data to display the list of files. • Press the arrows on the right side of the screen to scroll up or down to the data file to be viewed. • Touch on the file name to view the logged data o Average reading o Maximum reading o Minimum reading o TWA (Time Weighted Average) o Deposition mode Data can also be viewed in graphical form by pressing the Graph button while the data file is highlighted. Figure 3-25 Data Screen To delete a data file, select the file by touching the file line, then press Delete. Data files can also be deleted using TSI’s TRAKPROTM software when the instrument is connected to a computer. 3–20 AEROTRAKTM 9000 Nanoparticle Aerosol Monitor CHAPTER 4 Maintenance Periodic Maintenance Periodic cleaning and filter changing are necessary to ensure proper performance of the AEROTRAK™ 9000 Nanoparticle Aerosol Monitor. The service intervals depend on the aerosol concentration entering the instrument. Table 4-1 Maintenance Schedule Maintenance Task Hours of Operation Clean the cyclone Before each use Clean the inlet orifice 100 – 250 hours Replace Carbon Filter 500 – 1000 hours Replace HEPA Filter 500 – 1000 hours Replace Conductive Filter 500 – 1000 hours C a u t i o n Collected aerosol may be hazardous to health. Consult qualified safety/occupational hygiene professionals before handling. Follow all local safety and environmental regulations regarding handling and disposal of these materials. Cleaning the Cyclone The cyclone is provided to remove particles above 1 µm (especially fibers) from the inlet flow. This protects the inlet orifice from clogging. The cyclone can be easily cleaned (see Figure 4-1 and Figure 4-2): 1. Turn off the instrument using the power button on front panel. 2. Remove the cup at the bottom of the cyclone. 3. Wash out cup with warm soapy water. 4. Blow out and dry the inside of the cup and wipe off any residue. 5. Inspect the O-ring for any damage and replace the cup. 4-1 6. The cyclone can be cleaned while it is attached to the instrument by removing the bottom cup. If desired, the cyclone can be removed from the instrument for cleaning. Use the 9⁄16 inch wrench provided to loosen the retaining nuts to remove the elbow from the instrument or to remove the cyclone from the elbow. Notice: Do not use grease on the O-ring seals. Grease will contaminate the charger needle. An instrument with a dirty or damaged charger needle must be returned to TSI for service. Figure 4-1 Removing Cyclone 4–2 AEROTRAK™ 9000 Nanoparticle Aerosol Monitor Figure 4-2 Cleaning the Cyclone Cleaning the Inlet Orifice The inlet orifice is exposed to aerosol flowing through the instrument. It is susceptible to clogging if the aerosol particle concentration is high. Follow the steps below to clean the orifice: 1. Turn off the instrument. 2. Remove the cyclone and elbow and then remove the retaining screw of the inlet cover (see Figure 4-3). 3. Pull the inlet cover straight out from the instrument (see Figure 4-4). 4. Inspect the orifice using magnification to see if it is dirty (see Figure 4-5). 5. If necessary, clean the orifice using warm soapy water, followed by clean water, isopropyl alcohol, and dry clean air. Re-inspect the orifice. 6. Inspect the O-rings for cuts or nicks and replace if necessary 7. Re-insert the inlet cover into the instrument and align the retaining screw hole. 8. Insert the retaining screw. 9. Turn the instrument on and verify the status indicator lights are green. Maintenance 4–3 Figure 4-3 Remove Screws of the Inlet Orifice Cover Note: Remove cyclone and elbow first to prevent damage to cyclone. Figure 4-4 Removing Inlet Orifice 4–4 AEROTRAK™ 9000 Nanoparticle Aerosol Monitor Figure 4-5 Inside of Orifice Inlet Notice: Do not use grease on the O-ring seals. Grease will contaminate the charger needle. An instrument with a dirty or damaged charger needle must be returned to TSI for service. Replacing the Carbon Filter and HEPA Filter W A R N I N G High voltage is accessible in several locations within this instrument. Unplug the power source and remove batteries before removing the filter tray. A carbon filter is used to remove organic vapors from the filtered air stream flowing through the charger. These vapors can cause a build-up of material on the charger orifice and charger needle if they are not removed. The carbon filter should be replaced periodically to prevent this buildup. Follow the steps below to replace the charcoal filter and HEPA filter. 1. Disconnect the electric power cable and remove the battery. 2. Remove the filter tray shown in Figure 4-6 and Figure 4-7. 3. Remove the holding screws and bracket shown in Figure 4-8. 4. Remove old filters and insert new filters. Note: Maintain orientation of flow arrows on filters as shown in Figure 4-10 and Figure 4-11. 5. Replace holder bracket (see Figure 4-11). 6. Insert filter tray into the unit. Maintenance 4–5 Figure 4-6 Opening Filter Tray Figure 4-7 Removing Filter Tray 4–6 AEROTRAK™ 9000 Nanoparticle Aerosol Monitor Figure 4-8 Remove Filter Holder Bracket Figure 4-9 Replacing Filters HEPA Carbon Figure 4-10 Activated Carbon Filter and HEPA Filter Orientation Maintenance 4–7 Carbon HEPA Figure 4-11 Filter Support Bracket and Direction of Flow Arrows. Upside Down Orientation Replacing the Conductive Filter W A R N I N G High voltage is accessible in several locations within this instrument. Unplug the power source and remove batteries before changing conductive filter. C a u t i o n The electronic circuits within this instrument are susceptible to electrostatic discharge (ESD) damage. Use ESD precautions to avoid damage. Wear a grounded, static-discharging wrist strap or keep one hand on the instrument case while changing the conductive filter. With use the conductive filter becomes clogged with particles from the sampled aerosol and requires replacement. Follow the steps below to replace the conductive filter. 1. Turn off instrument and disconnect the electric power cable. 2. Remove the cyclone assembly. 3. Remove the four electrometer chamber cover screws shown in Figure 4-12. 4–8 AEROTRAK™ 9000 Nanoparticle Aerosol Monitor Figure 4-12 Electrometer Chamber Cover Screws 4. Pull the electrometer chamber cover straight out. Do not touch the plastic parts attached to the cover. Figure 4-13 Removing Electrometer Chamber Cover Maintenance 4–9 5. Locate and remove the conductive filter by pulling it straight out (see Figure 4-14 and 4-15). Figure 4-14 Conductive Filter Location Figure 4-15 Removing Conductive Filter 6. Replace the filter with wire-core filter provided in the Filter Maintenance Kit (TSI part number 1031599). 7. Inspect the O-rings in the cover for nicks or cuts and replace if necessary. If the insulator is dirty or has been handled (oil from fingers) it should be cleaned and wiped with methanol or isopropanol and then acetone to remove all contamination. 4–10 AEROTRAK™ 9000 Nanoparticle Aerosol Monitor 8. Reinstall the electrometer cover. 9. Turn the instrument on and make sure that the status indicator lights are green. Replacement Parts Table 4-2 AEROTRAK™ 9000 Nanoparticle Aerosol Monitor Replacement Parts Part Description/Location Filter Maintenance Kit, Includes (1) HEPA Filter, (1) Carbon Filter, and (1) Conductive Filter Lithium Ion Rechargeable Battery Pack. Model Li202S-66 Maintenance Part Number 1031599 1208057 4–11 CHAPTER 5 Troubleshooting and Frequently Asked Questions Common Problems Status Indicator Lights When the instrument is functioning properly, the status indicator lights on the display are green. When the instrument is turned on, these indicator lights are initially red, and turn green within a few seconds. The “Elec” (Electrometer) indicator light may take up to five minutes to turn green. If any indicator lights stay red, see Table 5-1 below for troubleshooting. Status Indicator Lights Figure 5-1 Status Indicator Lights 5-1 Table 5-1 Troubleshooting the AEROTRAK 9000 Nanoparticle Aerosol Monitor Problem Solution “Trap” status indicator light stays red Send instrument to TSI for repair. “Chrg” status indicator light stays red longer than 3 minutes Clean cyclone and inlet orifice (Chapter 4) Zero Cal instrument Change Carbon and HEPA Filters (Chapter 4) If these steps don’t fix the problem, send instrument to TSI for repair. “Pump” status indicator light remains red Clean cyclone and inlet orifice (Chapter 4) Change Carbon and HEPA Filters (Chapter 4) Change Conductive Filter If these steps don’t fix the problem, send instrument to TSI for repair. Pump motor pitch changes “Elec” status indicator light stays red longer than 5 minutes. Clean cyclone and inlet orifice (Chapter 4) Check for kinks in sampling tubing Remove any non-TSI supplied sampling accessories attached to inlet Limit length of sampling tubing to 3 feet (1 meter) Elec status indicator light will remain red if Zero Cal has not been performed. Allow instrument to warm up 5–10 minutes Perform Zero Cal If these steps don’t fix the problem, send instrument to TSI for repair. Instrument will not power up Push “On” button located to the lower left of the instrument display. Check battery orientation. (Insert battery with connector in upper left corner.) Check battery charge with charging indicator on battery. Plug instrument into outlet using line cord. If instrument will not power up with fully charged batteries or plugged into a functioning electrical outlet, send instrument to TSI for repair. Instrument is running but display is dark. Turn instrument off and on. If screen does not light up, send instrument to TSI for repair. Display is on but screen will not react to touch. Menu selections are difficult to select on the screen 5–2 If the lock symbol at the top of the screen has a red light, the screen is locked. Follow steps in Chapter 3 to unlock the screen. Press Setup and run Touch Cal AEROTRAK™ 9000 Nanoparticle Aerosol Monitor Frequently Asked Questions Question Answer Do the O-rings in the cyclone cap and inlet orifice need grease? No. Do not grease the O-rings! Grease on the O-rings will contaminate the charger needle requiring cleaning and repair at TSI. Where is the exhaust on this instrument? The exhaust is within the instrument case. The exhaust is filtered and clean. Does the flow rate of the pump need to be checked? No. The instrument self-regulates flow through an orifice. The pump indicator light will turn red if the flow rate is outside the acceptable range. What needs to be done to verify the instrument is functioning properly? Check the status of the four indicator lights. Green lights indicate everything is functioning properly. Is Zero Cal required each time the instrument is used? No, the instrument stores the information from the last Zero Cal. If used frequently, Zero Cal is not required each time the instrument is used. TSI recommends performing Zero Cal every month. If the instrument has not been used for several months, allow the instrument to warm up for 5 to 10 minutes, then perform a Zero Cal. Is a filter needed to perform a Zero Cal? No, the instrument turns off flow to the electrometer during Zero Cal. An external filter is not required. The instrument revs up then stops during Zero Cal, is this normal? Yes. During Zero Cal the instrument pump turns off and flow to the electrometer is stopped. Can the instrument be programmed to log both TB and A modes at the same time? No. The instrument can only measure one deposition mode at a time. The instrument can be programmed to run several tests in a row, alternating between TB and A mode for different tests. Can the AEROTRAK 9000 be used outdoors? Yes, the instrument can be used outdoors. However this instrument is not waterproof. Exposure to water or aspiration of water may damage the instrument and voids the warranty coverage. Can the AEROTRAK 9000 be used in very dusty environments? Yes, this instrument can be used in very dusty environments. The 1 micron cyclone will cut out particles larger than 1 micron. The cyclone and inlet orifice may become plugged when exposed to very dusty environments and will need frequent cleaning. Is the AEROTRAK 9000 intrinsically safe for use in flammable atmospheres? No, the instrument is not intrinsically safe. The touch screen calibration does not stop cycling. Only touch the center of the indicated “X” during touch screen calibration. Be sure parts of the hand or other fingers do not rest on the screen during touch calibration. If touch screen calibration continues to cycle, turn the instrument off (or remove the battery or power cord). Troubleshooting and Frequenty Asked Questions 5–3 CHAPTER 6 Contacting Customer Service Technical Contacts Visit http://www.tsi.com, click on Support, and select AEROTRAKTM 9000 aerosol monitor to view up-to-date frequently asked questions and troubleshooting information. For difficulty setting up or operating the AEROTRAK 9000 Nanoparticle Aerosol Monitor, technical, or application questions about this system, contact an applications engineer at TSI Incorporated, 1-800-874-2811 (USA) or (651) 490-2811 or e-mail [email protected]. Returning for Service Visit our website at http://rma.tsi.com and complete the on-line “Return Merchandise Authorization” form or call TSI at 1-800-8742811 (USA), (651) 490-2811, or 001 651 490-2811 (International) for specific return instructions. Customer Service will need the following information: • The instrument model number • The instrument serial number • A purchase order number (unless under warranty) • A billing address • A shipping address Use the original packing material to return the instrument to TSI. If you no longer have the original packing material, remove the cyclone, cap or seal the inlet orifice, and cover all connector ports to prevent debris from entering the instrument. Package instrument for shipment ensuring the front display and the inlet orifice inlet are protected. 6-1 APPENDIX A Specifications Table A-1 Specifications* of the AEROTRAKTM 9000 Nanoparticle Aerosol Monitor* Sensor Type ............................. Diffusion Charger plus Electrometer Particle Size Range.................. 10 to 1000 nm (with 1µm cyclone on inlet) Inlet Conditioner ..................... Cyclone with 1 µm cutpoint at 2.5 L/min User-Selectable Response........ Tracheobronchial (TB) and Alveolar (A) response settings Aerosol Concentration Range TB........................................... A ............................................. 2 1–2,500 µm /cc 1–10,000 µm2/cc Measurement Accuracy** TB........................................... A............................................. ±20% (20–200 nm) ±20% (20–200 nm) Minimum Resolution............... 2 0.1µm /cc (displayed) Flow Rate ................................. 2.5 SLPM ± 5% total flow 1.5 SLPM ± 5% measured flow (aerosol sample branch) 1.0 SLPM ± 5% measured flow (filtered and ionized branch) Temperature Range Operating Range.................... Storage Range........................ 50-95°F (10-35°C) 32-140°F (0-60°C) Instrument Humidity Range ... 0-90% Rh, non-condensing Time Constant (Display) .......... User adjustable 1 to 60 seconds Data Logging Data Points ............................ Logging Interval .................... >1,000,000 User-adjustable, 1 second to 1 hour Physical External Dimensions (LWH) .. Weight w/o batteries ............. 10.5” × 8.5” × 9.0” (not including handle) (26.7 cm × 21.6 cm × 9.0 cm) 15.8 lbs (7.2 kg) Battery Weight......................... 1.0 lbs (0.45 kg) per battery (instrument can hold up to 3 batteries) Tripod Mount ........................... 5/8”-11 UNC Display ..................................... 5.7” ½ VGA Color Touch Screen A-1 Table A-1 Specifications* of the AEROTRAKTM 9000 Nanoparticle Aerosol Monitor* Battery Type ............................ Rechargeable Lithium Ion Battery Pack. 6600 mA-hrs Power ....................................... 100 to 240 VAC, 50 to 60 Hz Battery Performance Number of 6600 mAH LiIon Battery Packs, 11.6 v (P/N 1208057) Battery Runtime (hours) at 2.5 L/min.................................. Charge Time * (hours) in AEROTRAK 9000.......................... Charge Time* (hours) in external battery charger (P/N 2610114)........................... *of a fully depleted battery Number of Batteries Two Three 6.25 12.5 18.75 3.25 6.50 9.75 3.25 3.25 N/A Communications Interface Type ....................................... Connector, Instrument ......... Universal Serial Bus (USB) 1.1 USB Type-B (socket) Minimum Computer Requirements for TRAKPRO Software Communication Port ............. Operating System.................. USB 1.1 or higher Windows 2000, XP Analog Output Analog Output ....................... Analog Output Scaling Range ..................................... Maximum Load Impendence ........................... Maximum Output Current..... Connector .............................. Alarm Output Type ....................................... Alarm Setpoint Range ........... Maximum Voltage.................. Maximum Current ................. Deadband ............................... Connector .............................. Maintenance User Zero Calibration ............ Inlet Cyclone ......................... User Filter Replacement........ Factory Clean/Calibrate........ A–2 One 0 to 5v, or 4 to 20mA, user-selectable 1-2,500 (TB); 1-10,000 (A), Userselectable, 250 ohms (4–20 mA mode) 5 mA (0–5 V mode) 4-Pin, Mini-DIN connector Non-latching relay 1-2,500 (TB), 1-10,000 (A), user-selectable 15 VDC 1 Amp -5% of alarm setpoint 4-Pin, Mini-DIN connector Before initial use, monthly there after Clean before each use Every 3-6 months (typical use) Recommended annually AEROTRAK™ 9000 Nanoparticle Aerosol Monitor Table A-1 Specifications* of the AEROTRAKTM 9000 Nanoparticle Aerosol Monitor* Approvals CE Rating Information Immunity............................... Emissions............................... Safety ..................................... EN 61326 EN 61326 EN 61010-1 *Specifications are subject to change without notice. TSI and the TSI logo are registered trademarks of TSI Incorporated. **Tested at TSI for NaCl particles. † The instrument will operate optimally under the specified relative humidity conditions. The ICRP-based lung deposition model used to derive TB and A deposition curves in a reference worker (and hence the instrument's measurement for TB and A regions), does not consider the effect of humidity on particle size. Specifications A–3 TSI Incorporated – 500 Cardigan Road, Shoreview, MN 55126 U.S.A Website: www.tsi.com USA Tel: +1 800 874 2811 E-mail: [email protected] Website: www.tsiinc.co.uk UK Tel: +44 149 4 459200 E-mail: [email protected] France Tel: +33 491 95 21 90 E-mail: [email protected] Website: www.tsiinc.fr Germany Tel: +49 241 523030 E-mail: [email protected] Website: www.tsiinc.de India Tel: +91 80 41132470 E-mail: [email protected] China Tel: +86 10 8260 1595 E-mail: [email protected] Contact your local TSI Distributor or visit our website www.tsi.com for more detailed specifications. P/N 1990083 Rev B Copyright © 2008 by TSI Incorporated Printed in U.S.A.