1
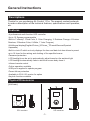
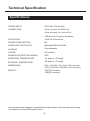
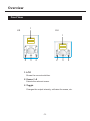
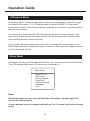
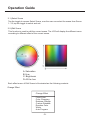
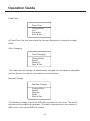
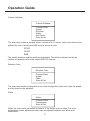
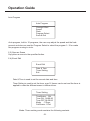
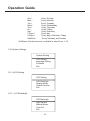
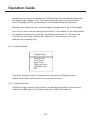
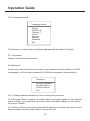
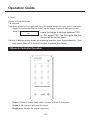
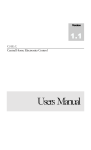
USER MANUAL
AL-Control 1 PRO
It is important to read this instruction book prior to installing or using your new
product for the first time.
Contents
General Introduction...................................................................1
Descriptions
Features
Physical Dimensions
Specifications.............................................................................2
Front View...................................................................................3
Operation Guide..................................................................4~12
1.) Playback Mode.................................................................................................4
2.) User Mode..................................................................................................4~12
2.1.)Select Scene..............................................................................................5
2.2.)Edit Scene..............................................................................................5~8
2.3.)Save as Scene...........................................................................................8
2.4.)Event Edit...............................................................................................8~9
2.5.)System Settings.....................................................................................9~11
2.6.)Password...................................................................................................11
2.7.)Exit...........................................................................................................12
2.8.)Keylock
12
3.) Remote Controller Operation.........................................................................12
General Instructions
Descriptions
Thanks for you purchasing AL-Control 1 Pro. The present content pretends
to make a description of the technical features, specifications and operation,
etc.
Features
-A professional multi-function LED controller
-Up to 12 Scenes programmable
-Built-in 7 effects(1. Fixed Color, 2. Color Changing, 3. Rainbow Change, 4.Custom
Rainbow, 5.Random Color, 6.White, 7. Auto Program)
-Multilingual display(English/Chines_S/Chines_T/French/German/Spanish
/Japanese)
-Built-in clock IC which not only displays the time and date but also allows to preset
up to 16 timer for the raising and shutting of the specified scene.
-Password protection
-LCD backlight can be set to automatically adjust based on the ambient light
-LCD backlight automatically fade in while the human body close it
-Infrared remote control
-Online operation available
-USB port is applied to update program
-Power failure protection
-Available in EU & US version for option
-Keylock function available
Physical Dimensions
85
(Unit:mm)
85
31
EU version
US version
-1-
Technical Specification
Specifications
POWER INPUT
DC12-24V, 200 mA Min.
CONNECTION
4-pin terminal for DMX Out,
4-pin terminal for Link In/Out,
,
USB port for Program Updating
LCD DISPLAY
128x160 Characters
POWER CONSUMPTION
2W
COMPLIANT PROTOCOLS
Standard DMX-512(1990)
HOUSING
Polycarbonate
LISTING
CE certified
INGRESS PROTECTING RATING
IP20
OPERATING TEMPERATURE
-10 degC to +50 degC
STORAGE TEMPERATURE
-20 degC to +70 degC
DIMENSIONS
85(L) x 85(W) x 31(H)mm (EU version)
120(L) x76(W) x 26(H)mm (US version)
WEIGHT
125g (US version)
105g (EU version)
Improvements and changes in specifications and design to this manual and unit may
be made at any time without prior notice.
-2-
Overview
Front View
1
US
EU
1
Main Menu
Select Scene
Edit Current
Save as Scene
AL-Control-1 PRO
Exit
Main Menu
Select Scene
SCENE 1
SCENE 5
SCENE 2
SCENE 6
SCENE 3
SCENE 7
SCENE 4
SCENE 8
Edit Current
Save as Scene
Exit
SCENE 1
SCENE 5
SCENE 2
SCENE 6
SCENE 3
SCENE 4
SCENE 7
SCENE 8
SCENE 4
SCENE 8
AL-Control 1 PRO
2
3
2
2
3
2
1. LCD
Shows the current activities.
2. Scene 1~8
Selects the relevant scene.
3. Toggle
Changes the output intensity, call/raise the scene, etc.
-3-
Operation Guide
1)Playback Mode
In Playback Mode, rotate the toggle may change the output intensity. Press the toggle
can raise/call the scene 1~12. Or directly press the button SCENE 1~8, the preset
scene can be raised. There is a preview bar underside of LCD which is synchronization
with the current output.
If no action, 4 seconds later the LCD will automatically back to clock interface. Just
then, the LCD displays the time, date and the next timed scene will be raised in that
day(including the time of start and close).
In any mode, press the toggle and hold on it for 2 seconds will access black out (no
DMX output) and return to playback mode. In black out state, press the toggle and hold
on it for 2 seconds will exit.
2)User Mode
In Playback mode, press the toggle and hold on it for 1 second will access User Mode.
The LCD displays Main menu, six options are contained in it.
Main Menu
Select Scene
Edit Scene
Save as Scene
Event Edit
System Settings
Password
Exit
Note:
Rotate the toggle the user may preview/select the option , tap the toggle will
access the current option.
In any submenu, press the toggle and hold on it for 1 second it will return to main
menu.
-4-
Operation Guide
2.1.)Select Scene
Tap the toggle to access Select Scene, now the user can select the scene from Scene
1~12, tap the toggle to select and exit.
2.2.)Edit Scene
This function is used to edit the current scene. The LCD will display the different menu
according to different effect of the current scene.
A: Saturation
B: Hue
C: Brightness
D: All the hue
Each effect menu of Edit Scene is illuminated as the following contents.
Change Effect
Change Effect
Fixed Color
Color Changing
Rainbow Change
Custom Rainbow
Random Color
White
Auto Program
-5-
Operation Guide
Fixed Color
Fixed Color
Change Effect
Hue
Saturation
Save & Exit
In Fixed Color, the user may adjust the Hue and Saturation to change the output
effect.
Color Changing
Color Changing
Change Effect
Speed
Direction
Save & Exit
The output color will change via automatically changed hue, the speed is adjustable
and the direction can be set as clockwise or anti-clockwise.
Rainbow Change
Rainbow Change
Change Effect
Speed
Direction
Width
Save & Exit
The Rainbow Change outputs the RGB which consists of color circle. The speed,
direction and the width are adjustable. The width is determined by the number of
RGB circle in the output DMX512 channel.
-6-
Operation Guide
Custom Rainbow
Custom Rainbow
Change Effect
Speed
Direction
Width
Edit Colors
Save & Exit
The user may custom a rainbow which consists of 2~10 colors, each color also can be
defined by user to modify the RGB level to be any a color.
R:100
G:128
B:96
The speed, direction and the width are adjustable. The width is determined by the
number of rainbow circle in the output DMX512 channel.
Random Color
Random Color
Change Effect
Speed
Fade
Save & Exit
The user may random change the hue so that change the output color, also the speed
and the fade can be adjusted.
White
White
Change Effect
Temperature
Save & Exit
When the color circle saturation is close to 0, the output color is white. The color
temperature is hue adjustment which can be adjusted between cool white and
warm white.
-7-
Operation Guide
Auto Program
Auto Program
Change Effect
Speed
Fade
Program Select
Save & Exit
Auto program, built-in 10 programs, the user may adjust the speed and the fade
percent and also can use the Program Select to select the program 1~10 or make
the program running in circle.
2.3.)Save as Scene
Copy/store a scene to the specified button.
2.4.)Event Edit
Event Edit
Date & Time
Timer Setting
Exit
Date & Time is used to set the current date and time.
Timer Setting is used to set the timer, max 16 timers can be set and the timer is
applied to raise the different scene in different time.
Timer Setting
TimeStatus: ON
Time ON: 08:00:00
Time OFF:08:30:00
Mode :7-Days
CallScene: 1 Exit
Mode: Timer working mode contains the following contents
-8-
Operation Guide
Sun./
Mon./
Tue./
Wed./
Thu./
Fri./
Sat./
7-Days./
5-Days./
Sat&Sun/
Every Sunday
Every Monday
Every Tuesday
Every Wednesday
Every Thursday
Every Friday
Every Saturday
Every day
Every day of Monday~Friday
Every Saturday and Sunday
CallScene: the raised scene, available to select from 1~12.
2.5.)System Settings
System Setting
LCD Setting
language Setting
Firmware
Exit
.2.5.1.)LCD Setting
LCD Setting
LCD Backlight
Display Mode
Output Preview
Exit
2.5.1.1.)LCD Backlight
LCD Backlight
Light Sensor
Manual Mode
Time Out
Exit
-9-
Operation Guide
Light Sensor is used to set whether the LCD backlight will automatically adjust with
the ambient light change or not. The lowest brightness can be set that ensures
the LCD backlight will be not lower than it in the darkest ambient brightness.
Manual mode allows the user manually adjust the brightness of the LCD backlight.
Time Out is used to set the backlight shut-off time. If the duration of the state without
any operation exceeds the ruled time, the backlight will black out. The time level
can be set in the range of 5seconds~10minutes. If the level is set as 0, the
backlight will constantly light.
2.5.1.2.)Display Mode
Display Mode
Default Color
Front Color
Back Color
Top Front Color
Top Back Color
Exit
This mode allows the user to customize his favourite color display scheme.
Default Color, there are 8 default color schemes for option.
2.5.1.3.)Output Preview
On/Off the output preview, used to select the preview bar whether synchronously
displays the DMX output. The display channel is 160x3=480 cahnnel.
-10-
Operation Guide
2.5.2.)Language Select
Language Select
English
Chinese_S
Chinese_T
French
German
Spanish
Japanese
Exit
This function is used to select the display language and the default is English.
2.5.3.)Firmware
Displays the Firmware information.
2.6.)Password
Access this mode, the device will prompt to input password and the default is 123456
(changeable), and the super password is 168168(unchangeable, always activity).
Password
Change Password
Program Status
Factory Default
Exit
2.6.1.)Change Password allows the user to change the password.
2.6.2 )Program Status is used to set whether allows to change program. In the forbidden
status, the user can't access the scene save, timer and system setting, etc. The device
will prompt "Disable".
2.6.3 )Factory Default. If the user performed this operation, the device will resume to the
default settings and all the data edited by user will be lost.
-11-
Operation Guide
2.7.Exit
Return to Playback Mode.
2.8. Keylock
Lock:Keep pressing the toggle until the LCD display shows the main menu, rotate the
toggle to choose the Keylock menu, tap the toggle to enter.A dialogue box will
show up Are you sure to lock?
rotate the toggle to change between YES
or NO, select YES, Tap the toggle and the
device will be locked down.
Unlock: A dialogue box shows up requiring users to input the passwords. User
may press Scene1 to Scene 6 button to unlock this device.
NO
3)Remote Controller Operation
AL-Control 1 PRO
Remote Controller
Sc en e1 -12
1
2
3
4
5
6
7
8
9
10
11
12
Br igh tne ss
Power: Allows or forbids DMX output, equals to Black Out function.
Scene 1~12: Used to call/raise the scene.
Brightness: Adjusts the output brightness.
-12-
24-004-3101-00
Rev1.2