1
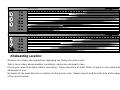
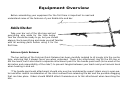
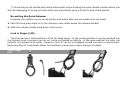
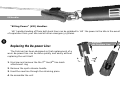
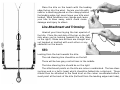
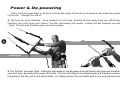
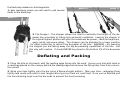
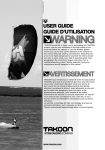
Kite User Manual
2008/2009
Kite User Manual
Dear Rider,
Thank you for purchasing a Nobile kite. Both the 555 and NHP ranges have been designed and
built to the highest standards, but to fully enjoy the high performance of these kites please read this
manual carefully before use. Familiarize yourself with the technical features, guidelines and safety precautions and you will maximize your time on the water. This manual can also be downloaded from the
Nobile website at
www.nobilekiteboarding.com
However, note that this is not a “How to” manual and should not be viewed as a replacement for professional kiteboarding lessons from an official school.
Have fun and ride safely!
THE NOBILE TEAM
Release of Liability and Claim Waiver
By assembling and/or using this Nobile Kiteboarding Product you enter into an agreement that prior to
use you have read and understood the Nobile Kiteboarding Product Owner’s Manual in its entirety, including all instructions and warnings contained therein. You additionally agree that it is your responsibility
that any subsequent user of your Nobile Kiteboarding Product will read and understand the entire Nobile
Kiteboarding Product Owner’s Manual, including all instructions and warnings contained therein, prior to
allowing them to use your Nobile Kiteboarding Product.
The use of this Nobile Kiteboarding Product and any of its components involve certain inherent risks,
dangers and hazards. These can result in serious personal injury, possibly death, to both the user and to
nonuser third parties. By using the Nobile Kiteboarding Product you openly agree to assume and accept
any and all known and unknown risks of injury to you and to nonusers during its use.
In purchasing this Nobile Kiteboarding Product you hereby agree to the fullest extent permitted by law
to waive any and all claims that you have or may have in the future against Nobile, its parent or associated companies, resulting from use of this product and any of its components.
Furthermore you hereby agree to release Nobile from any and all responsibility and liability from any
loss, damage, expenses, accidents and/or injury to people, objects and/or the product which may occur
as a result of the use of the product, due to any cause whatsoever, including negligence or breach of
contract on the part of Nobile in the design or manufacture of this product.
Nobile expressly disclaims any implied warranties of merchantability of fitness for a particular purpose
and disclaims any and all responsibility and liability for consequential and incidental damage or any other
losses arising from the use of these parts, products and/or components.
In entering this agreement you or anyone using this product are not relying upon any oral or written
representations other than the terms set above in this Agreement and Users Manual. If you are unwilling
to be bound by the conditions above please return the product for a full refund before use.
Safety Information & Guidelines . . . . . . . . . . . . . . . . . . . . . . . . . . . . . . . . . . . . . . . . . . . . . . . . . . . . . . . . . . . . .
General Safety Information . . . . . . . . . . . . . . . . . . . . . . . . . . . . . . . . . . . . . . . . . . . . . . . . . . . . . . . . . . . . . . . . . .
What to Wear . . . .
Weather Conditions
.........................................................................
.........................................................................
Kite Size Chart . . . . . . . . . . . . . . . . . . . . . . . . . . . . . . . . . . . . . . . . . . . . . . . . . . . . . . . . . . . . . . . . . . . . . . . . . . .
Kiteboarding Location . . . . . . . . . . . . . . . . . . . . . . . . . . . . . . . . . . . . . . . . . . . . . . . . . . . . . . . . . . . . . . . . . . . . .
Kite Lines . . . . . . . . . . . . . . . . . . . . . . . . . . . . . . . . . . . . . . . . . . . . . . . . . . . . . . . . . . . . . . . . . . . . . . . . . . . . . . .
Equipment Overview . . . . . . . . . . . . . . . . . . . . . . . . . . . . . . . . . . . . . . . . . . . . . . . . . . . . . . . . . . . . . . . . . . . . . . .
Nobile Kite Bar . . . . . . . . . . . . . . . . . . . . . . . . . . . . . . . . . . . . . . . . . . . . . . . . . . . . . . . . . . . . . . . . . . . . . . . . . . .
Fulcrum Quick Release . . . . . . . . . . . . . . . . . . . . . . . . . . . . . . . . . . . . . . . . . . . . . . . . . . . . . . . . . . . . . . . . . . . . . . .
Safety Features . . . . . . . . . . . . . . . . . . . . . . . . . . . . . . . . . . . . . . . . . . . . . . . . . . . . . . . . . . . . . . . . . . . . . . . . . .
Activating Quick Release . . . . . . . . . . . . . . . . . . . . . . . . . . . . . . . . . . . . . . . . . . . . . . . . . . . . . . . . . . . . . . . . . . . . .
Re-Setting Quick Release . . . . . . . . . . . . . . . . . . . . . . . . . . . . . . . . . . . . . . . . . . . . . . . . . . . . . . . . . . . . . . . . . . . . . .
Lock in Finger (LIF) . . . . . . . . . . . . . . . . . . . . . . . . . . . . . . . . . . . . . . . . . . . . . . . . . . . . . . . . . . . . . . . . . . . . . . . . . .
“Killing Power” (Kill) Handles . . . . . . . . . . . . . . . . . . . . . . . . . . . . . . . . . . . . . . . . . . . . . . . . . . . . . . . . . . . . . . . . . . .
Replacing the De-power Line . . . . . . . . . . . . . . . . . . . . . . . . . . . . . . . . . . . . . . . . . . . . . . . . . . . . . . . . . . . . . . . .
Kite Setup . . . . . . . . . . . . . . . . . . . . . . . . . . . . . . . . . . . . . . . . . . . . . . . . . . . . . . . . . . . . . . . . . . . . . . . . . . . . . . . . .
Inflation . . . . . . . . . . . . . . . . . . . . . . . . . . . . . . . . . . . . . . . . . . . . . . . . . . . . . . . . . . . . . . . . . . . . . . . . . . . . . . . . .
Line Attachment and Trimming . . . . . . . . . . . . . . . . . . . . . . . . . . . . . . . . . . . . . . . . . . . . . . . . . . . . . . . . . . . . . .
555 . . . . . . . . . . . . . . . . . . . . . . . . . . . . . . . . . . . . . . . . . . . . . . . . . . . . . . . . . . . . . . . . . . . . . . . . . . . . . . . . . . . .
NHP . . . . . . . . . . . . . . . . . . . . . . . . . . . . . . . . . . . . . . . . . . . . . . . . . . . . . . . . . . . . . . . . . . . . . . . . . . . . . . . . . . .
Launching and Landing . . . . . . . . . . . . . . . . . . . . . . . . . . . . . . . . . . . . . . . . . . . . . . . . . . . . . . . . . . . . . . . . . . . . .
Assisted Launch on Land . . . . . . . . . . . . . . . . . . . . . . . . . . . . . . . . . . . . . . . . . . . . . . . . . . . . . . . . . . . . . . . . . . . .
Assisted Landing . . . . . . . . . . . . . . . . . . . . . . . . . . . . . . . . . . . . . . . . . . . . . . . . . . . . . . . . . . . . . . . . . . . . . . . . . .
Water Launch 555 . . . . . . . . . . . . . . . . . . . . . . . . . . . . . . . . . . . . . . . . . . . . . . . . . . . . . . . . . . . . . . . . . . . . . . . . .
Water Launch NHP . . . . . . . . . . . . . . . . . . . . . . . . . . . . . . . . . . . . . . . . . . . . . . . . . . . . . . . . . . . . . . . . . . . . . . . .
Self Rescue . . . . . . . . . . . . . . . . . . . . . . . . . . . . . . . . . . . . . . . . . . . . . . . . . . . . . . . . . . . . . . . . . . . . . . . . . . . . . .
Power & De-powering . . . . . . . . . . . . . . . . . . . . . . . . . . . . . . . . . . . . . . . . . . . . . . . . . . . . . . . . . . . . . . . . . . . . . .
Deflating and Packing . . . . . . . . . . . . . . . . . . . . . . . . . . . . . . . . . . . . . . . . . . . . . . . . . . . . . . . . . . . . . . . . . . . . . .
Repairs . . . . . . . . . . . . . . . . . . . . . . . . . . . . . . . . . . . . . . . . . . . . . . . . . . . . . . . . . . . . . . . . . . . . . . . . . . . . . . . . . . .
Major Tears. . . . . . . . . . . . . . . . . . . . . . . . . . . . . . . . . . . . . . . . . . . . . . . . . . . . . . . . . . . . . . . . . . . . . . . . . . . . . . .
Minor Tears. . . . . . . . . . . . . . . . . . . . . . . . . . . . . . . . . . . . . . . . . . . . . . . . . . . . . . . . . . . . . . . . . . . . . . . . . . . . . . .
Reparing Punctures. . . . . . . . . . . . . . . . . . . . . . . . . . . . . . . . . . . . . . . . . . . . . . . . . . . . . . . . . . . . . . . . . . . . . . . . .
Strut Puncture . . . . . . . . . . . . . . . . . . . . . . . . . . . . . . . . . . . . . . . . . . . . . . . . . . . . . . . . . . . . . . . . . . . . . . . . . . . . . .
Main Strut Puncture . . . . . . . . . . . . . . . . . . . . . . . . . . . . . . . . . . . . . . . . . . . . . . . . . . . . . . . . . . . . . . . . . . . . . . . . . .
Care and Maintenance . . . . . . . . . . . . . . . . . . . . . . . . . . . . . . . . . . . . . . . . . . . . . . . . . . . . . . . . . . . . . . . . . . . . . .
Warranty Details . . . . . . . . . . . . . . . . . . . . . . . . . . . . . . . . . . . . . . . . . . . . . . . . . . . . . . . . . . . . . . . . . . . . . . . . . . .
Contact Details . . . . . . . . . . . . . . . . . . . . . . . . . . . . . . . . . . . . . . . . . . . . . . . . . . . . . . . . . . . . . . . . . . . . . . . . . . . .
6
6
7
8
8
9
10
11
11
11
12
12
13
13
14
14
15
15
16
16
17
18
18
19
19
20
21
22
23
24
24
24
25
25
27
29
30
31
Safety Information & Guidelines
Warning:
Kiteboarding, power kites, their lines and control system, involve certain inherent risks, dangers and
hazards, to flyers and anyone within their vicinity, which can result in serious injury or death. However,
these inherent risks can be greatly reduced by following the Safety Information & Guidelines below and
by using common sense.
Users under the age of 18 should only kite with correct supervision and the consent from a parent or
guardian. We strongly recommend that all users have professional kiteboarding lessons from an official
school before attempting to use this product.
6
General Safety Information:
Only use this product if you are in good physical health
Thoroughly check all of your equipment each time to ensure it is in good condition and full working order
Never allow anyone who has not received professional lessons to use this product without experienced
assistance
Learn to use a small (1-2metre) power kite before attempting to fly this kite for the first time
Always use your kite with the safety release system. Familiarize yourself with this system before use
The leash system is not a permanent attachment to the kite. Never permanently attach yourself to the
kite or any of its components
Take into account normal risks associated with water sports such as sunburn, hypothermia, jellyfish etc
Do not venture out of your depth with the kite until you are confident with its use
Never venture further from the shore than you can comfortably swim
Always save a little energy in case of emergency. Never sail until exhausted
Always use a partner, who is familiar with inflatable kites, when launching and landing your kite
You are responsible for the correct operation of your kite
Make sure somebody knows where you have gone and when you are expected back
What to Wear:
Helmet
An approved personal flotation device
Neoprene wetsuit
Gloves
Shoes
Knife
Protective Eyewear
Kite Specific Harness
Sun Cream
7
Weather Conditions:
Learn to use this kite in light winds (less than 12knots)
Never fly this kite in high winds, where you cannot remain in a stationary standing position
Never use this kite in wind conditions above your ability level. If in doubt about what kite size to use,
choose smaller rather than bigger
Never fly this kite in thunderstorm or lightning conditions, or at night
Avoid “offshore” and “onshore” wind conditions
Be careful of wave conditions, especially when learning
Seek advice on tides and rip currents
8
Kite Size Chart:
The following chart is intended only as a reference guide. It is based on an average weight rider
(75kg). The most appropriate kite size should take into account ability, water conditions, board size and
riding style, as well as, weight.
When choosing a kite size, personal experience, common sense, checking what other riders are using
and advice from professionals, such as instructors or your authorized Nobile dealer, should all be considered before making a decision.
light wind
strong wind
light wind
strong wind
5m
7m
9m
10 m
12 m
14 m
16 m
7m
9m
10 m
12 m
14 m
Kiteboarding Location:
Observe local laws and regulations regarding the flying of traction kites
Talk to local riders about weather conditions, obstacles and beach rules
Check your area thoroughly before launching. There should be at least 100m of space to the sides and
downwind of you
Be aware of the wind direction in relation to the launch area. Always launch and land the kite at the edge
of the wind window
9
Avoid areas with rocks and/or shallow or exposed reefs
Be aware of the effects of tide changes on submerged obstructions
Do not use your kite near power lines, airports, streets, trees, people, animals, buildings or sharp objects
Avoid crowded beaches and waterways
Make sure your lines do not cross a walkway or passage
Do not let anyone walk between you and your kite
Practice launching, landing and self-rescue techniques before using the kite in water
Be considerate and mindful of other water users
10
Consider your back up landing area in case you do not make it back to your original launch spot
Kite Lines:
Never touch the lines when the kite is flying as they can become dangerously sharp when under tension
Change lines with notches, nicks and cuts immediately
Never use lines with knots. These can reduce the strength of lines by up to 50%. Check all lines for knots
before each use
Do not touch the lines unless the kite is safely secured on the ground. A kite that re-launches unexpectedly puts the lines dangerously under tension
Never wrap or tie lines around your hands, arms or other body parts
Never allow yourself or anybody else to get between the control bar and the kite
Equipment Overview
Before assembling your equipment for the first time is important to read and
understand some of the features of your Nobile kite and bar.
Nobile Kite Bar:
Take your bar out of the kite bag and put
everything else aside for the time being.
Your bar should be ready to go, but you should
always check everything and make yourself familiar
with all working parts before using it for the
first time.
Fulcrum Quick Release:
The top section of the Fulcrum Quick Release has been carefully molded to sit snugly into the centre
hole, ensuring that it always faces you when unhooked. There is an attachment ring for the 5th line or
4th line leash, but it also boasts a separate attachment point for the handle pass leash (to be used at the
discretion and responsibility of the rider*) to prevent tangles between your leash and your harness hook
when hooking in and out.
* The handle pass leash attachment should only ever be considered by expert riders once in open water and after careful consideration of the risks involved from releasing the bar and the possible dragging
that can take place. Riders should NEVER attach themselves on to this attachment when launching the
kite.
11
Safety Features:
Everything has been done to ensure the very highest standards of safety:Activating the Quick Release:
The quick release should be activated in an uncontrolled kite and emergency situation. When activated the kite will lose all power and drop, remaining attached by the 5th line or 4th line leash.**
Due to the unique design of the Fulcrum the pressure needed to open the quick release remains constant irrespective of the loads placed upon it. It is advisable to practice activating the safety system
before you fly the kite.
Check that the quick-release system works before every session.
To activate:
1. Grab the release handle
12
2. Push it positively towards the bar
3. Let go of the release handle to separate yourself quickly and efficiently from
the bar to completely de-power the kite
photo 1
The Quick Release
** Connecting to the handle pass leash attachment and activating the quick release handle means you
will risk damaging or losing your kite and more importantly pose a threat to other third parties.
Re-setting the Quick Release:
Uniquely, the system can be re-set quickly and easily after use even with only one hand:
1. Push the loop piece back on to the retainer (now visible below the release handle)
2. Slide the release handle back down until secure
Lock in Finger (LIF):
The Fulcrum has a three-position LIF for all riding styles. In the normal position it can be inserted into
the harness hook to ensure you do not come un-hooked accidently. In the open position the rider can
perform un-hooked tricks easily. However, the LIF can be re-engaged should you wish to mid-session.
Removing the LIF completely allows for maximum convenience when riding un-hooked.
Lock in Finger
(LIF)
13
Kill handles
“Killing Power” (Kill) Handles:
´kill´ handles leading off from both back lines can be grabbed to ´kill´ the power in the kite in the event
of separation from your kite and all other emergency systems.
14
Replacing the De-power Line:
The Fulcrum has been designed so that replacement of a
worn de-power line can be done quickly and easily without
replacing the unit itself.
1. Unscrew and remove the the 5th line/4th line leash
attachment ring
2. Remove the quick release handle
3. Feed the new line through the retaining piece
4. Re-assemble the unit
Replacing
the De-power Line
Kite setup
Do not rig on asphalt, cement, gravel or other abrasive surfaces as this may damage your equipment.
It is best to rig on sand or grass. Look out for any sharp objects that could tear
the canopy or puncture the struts or main tube.
Inflation:
Use the heavy-duty pump supplied to inflate your kite. Ensure the
large “deflate” valve is closed on the
leading edge. Connect the pump
leash to the kite next to the main
inflation valve. The SMART pump
system means it is not necessary to
inflate the struts individually.
Do not over-inflate the tubes.
Only inflate the tubes until they are
firm to the touch.
Insert the valve cap to seal the
valve. Do not push the valve into the
kite after inflation. It is not necessary
to close the clamps on the connecting tubes during normal flying conditions but in the event of failure in one
of the struts it will ensure that only that strut
deflates and not the entire kite.
Place the kite on the beach with the leading
edge facing into the wind. Secure you kite with
sand or a sand bag placed on the canopy behind
the leading edge, but never leave your kite unattended. Wind conditions can change and cause
your kite to blow away, which could cause
damage and injury to others.
Line Attachment and Trimming:
photo 2
Unwind your lines laying the bar upwind of
the kite. Place the red side of the bar on the left
side when you’re looking towards the kite (blue
on the right). Make sure all lines are straight and
not tangled or knotted with each other or any
obstacles on the beach.
555:
photo 3
Looking from the bar towards the kite:
The red steering line should be on the left
There will be two grey control lines in the middle
The blue steering line should be on the right
The attachment points on the kite are colour coordinated. The two steering lines end in a lark’s head, which should be folded into a slip-knot. These
should then be attached to the fixed knot on the colour coordinated attachment point at the back of the kite (furthest from the leading edge main tube),
red to red and blue to blue (see photo 2).
The two grey control lines end in a fixed knot. This time the grey attachment
points at the front of the kite have the lark’s head. This is to prevent the common mistake of attaching the front lines to the rear of the kite and visa versa.
The lines are attached in the same manner as before (see photo 3).
NHP:
Looking from the bar towards the kite:
The red steering line should be on the left
Next there will be one of the grey control lines
The white fifth line should be in the middle
Then there will be the other grey control line
The blue steering line should be on the right
The attachment points on the kite are colour coordinated. The two steering
lines end in a lark’s head, which should be folded into a slip knot. These should
then be attached to the fixed knot on the colour coordinated attachment point
at the back of the kite (furthest from the leading edge main tube), red to red
and blue to blue (see photo 2).
The two grey control lines end in a fixed knot. This time the grey attachment
points at the front of the kite have the lark’s head. This is to prevent the common mistake of attaching the front lines to the rear of the kite and visa versa.
The lines are attached in the same manner as before (see photo3).
The white fifth line ends in a lark’s head and should be attached to the longer white fifth line attachment point leading from the centre of the leading edge main tube.
Note: After the first few sessions, or if the kite feels like it is pulling to one side, you should check your
lines to see if they have stretched evenly.
Launching and Landing
Before launching always ensure you have a good, clear area around your launching zone. There should
be at least 100m of space to the sides and downwind of you. Always use a kite specific harness which
will allow you to use the de-power system on the control bar.
Familiarize yourself with the leash and quick-release system. Check your lines, kite, other equipment
and launch and landing site carefully.
18
Attach the leash system and hook into the de-power system. At this point do not engage the lock-in
finger as this will prevent you unhooking and releasing the bar should you have a problem during the
launch and want the kite to lose complete power.
Never launch your kite straight downwind - the kite will launch with huge power endangering yourself
and others. If the wind is at your back you should launch at approximately 100 degrees off the wind to
either side.
Assisted Launch on Land:
Organise a clearly recognizable release signal that both you and your partner understand
Position your partner at approximately 100 degrees off the wind
Ensure the kite is held in the centre of the leading edge. It should be vertical and pointing directly into
the wind
Your partner should be behind the kite, not to the side or in front where the kite can hit them after release
After giving the signal, steer the kite slowly out of your partner’s hands, maintaining it at the edge of the wind
window until you are safely in the water
Assisted Landing:
Never land your kite on top of, or close to other beach users. The area should also be clear of obstacles
such as trees, power lines etc
Drop off your board in plenty of time and position the kite low to the water at the edge of the wind window
Your partner should be on the windward side of the kite and should grab the kite in the middle of the
leading edge main tube
The kite should be secured on the beach in the normal manner – turn the kite over and with the leading
edge pointing into the wind use sand or sand bags to prevent the kite blowing away
When not in use you should wind up your lines
Water Launch 555:
A properly inflated kite is essential to aid the re-launchability of your kite from the water
When you kite goes into the water it is important to keep focused on the kite as it can often re-launch
immediately whether you are prepared or not. So be prepared!
If the kite goes down face down, the leading edge main tube touching the water, directly down wind,
you need to get the kite onto its side. Do this by pulling one of your back lines towards your body
Maintain constant tension on this line as you pull it in, but do not wrap the line around your hand or
allow your body to become entangled. You may need to pull as much as two metres of line in order to
lift the wing tip (Tip: If possible keep your board on your feet and position it in front of you to slow your
forward momentum from the drag of the kite. This will increase the speed of the re-launch)
19
As the wing tip lifts, the kite will roll onto its side and move towards the edge of the window. You may
need to maintain tension on the rear line as you slowly feed the line back out. Do not start pulling on the
bar too soon. Wait until the kite is ready to re-launch, release the remainder of the back line and steer
the kite slowly into the air
20
photo 4
photo 5
photo 6
Water Launch NHP:
A properly inflated kite is essential to aid the re-launchability of your kite from the water
When you kite goes into the water its important to keep focused on the kite as it can often re-launch
immediately whether you are prepared or not. So be prepared!
If the kite goes down face down, the leading edge main tube touching the water, directly down wind,
you need to first get the kite onto its back. Do this by pulling on the fifth line. Do not wrap the fifth line
around your hand or allow your body to become entangled (Tip: If you pull on the fifth line ABOVE the bar
it is easier to avoid tangles and also avoids the need to feed the fifth line back through the bar once the
kite has turned on to its back)
Once on its back, to move the kite to the edge of the window, pull on one of the back lines. Maintain
constant tension on the line as you pull it, again being careful not to become entangled in your lines. One
of the wing tips will lift, the kite will roll on to its side and move towards the edge of the window
You may need to maintain tension on the rear line as you slowly feed the line back out. Do not start
pulling on the bar too soon. Wait until the kite is ready to re-launch, release the remainder of the back
line and steer the kite slowly into the air
photo 7
photo 8
photo 9
Self Rescue:
If you are forced to swim back to the beach, in side or on shore conditions, taking hold of one self rescue handle and folding it towards the other one can help you body drag back to the beach
If this isn’t possible you will have to swim with the kite. This is easiest when you position the kite as if
you were carrying it on the beach
Never deflate your kite while you are in the water as it is an aid to flotation and is clearly visible from
the air
21
Power & De-powering
There are three main ways in which to change the angle of the kite to increase or decrease the power
of the kite. Through the use of:
1. The Fulcrum Quick Release – Once hooked in to the loop, pushing the bar away from you effectively
shortens your front lines and “opens” the kite, decreasing the power. Pulling the bar towards you will
“close” the kite and therefore give you more power.
22
sheeting in
sheeting out
2. The´Pull-Pull´ de-power strap – Pulling the red handle on the de-power strap will shorten the strap and therefore
your front lines, decreasing the power of the kite. To return the strap to its original length and therefore increase
the power of the kite, pull on the black handle. For safety reasons, the red handle pulls in one long segment and
the black loop releases in short segments.
To gain maximum power you will need to pull several
times on the black loop.
photo 10
photo 11
photo 12
3. The Stopper – The stopper allows the rider to customize the length of the depower line according to riding style and wind conditions. Leaving the stopper in
its original highest position will give the maximum de-power – ideal for beginners,
gusty winds and wave-riding. The stopper can be adjusted to a lower position
for riders preferring to restrict the de-power of the kite. WARNING – By lowering
the stopper you are taking away the big de-powering capabilities of the kite. Use
this only with caution. It should NEVER be placed in the bottom 2/3 of the de-power
line.
Deflating and Packing
1. Place the kite on the beach with the leading edge facing into the wind. Secure your kite with sand or
a sand bag placed on the canopy behind the leading edge and remove the flying lines from their connection points
2. Wrap your lines tightly onto the bar using a figure-of-eight pattern. Take your time – wrapping them
tightly and neatly will result in less tangles when you lay them out next time! Once you’ve finished pull
the line-retaining loops over the bar ends to prevent the lines loosening
23
3. Remove the sand or sand bag on top of your kite, and holding
the kite by its leading edge, flip the kite so the tips are facing upwards
4. Open the large “deflate” valve and allow the kite to deflate
5. Lay the kite down wind and secure one wing tip with sand. Open
the clamps on the connecting tubes and roll the kite from the unsecured wing tip towards the centre strut expelling the air. You might photo 13
need to help the air out of the struts into the main bladder as you
roll. Remove the sand and repeat with the other wing tip.
photo 14
6. Fold the kite and insert into bag
24
Repairs
Major Tears:
For major tears in the canopy consult your dealer for a reputable photo 15
kite repair loft
Minor Tears:
For minor tears in the canopy you may repair the tear with kite
repair tape. Your kite has been supplied with some adhesive kite
repair material.
Repairing Punctures:
Before attempting to repair any of your bladders:
Make sure the kite is dry and clean
Deflate the bladders
photo 16
Find a clean, dry, wind-free spot
Have a set of flying lines or an extra piece of line and the bladder
repair kit (supplied with kite) at hand
Strut Puncture:
25
1. First lay out the kite flat with the struts facing up
2. Undo the Velcro strap from the valve on the punctured strut and
remove the connecting SMART pump tube (or the valve plug if not
in SMART pump set up). photo13
photo 17
3. Tie a flying line or spare line (it should be at least 2m longer than
the length of the tube) to the air valve of the damaged tube. Make
sure it is securely fastened. photo14
4. Open the Velcro flap at the end of the damaged strut sleeve. photo 15
5. Gently push the valve down through the hole
(photo16)
and very
slowly pull the bladder out through the now open Velcro flap (photo17).
The line tied to the valve should feed into the valve hole, which will
allow you to pull the bladder back into place after completing the
repair
photo 18
6. Once the bladder is completely removed you can untie the line
from around the air valve and inflate the bladder with your pump.
Seal the valve with the plug you have removed (or take a plug from
your kite bag if you were using the SMART pump set up)
photo 19
7. Normally you can hear the leak, but if necessary place the bladder under water and look for the bubbles to locate the hole
8. Once located, dry the area and mark the hole with a permanent
marker
26
9. Lightly sand the area where the leak is (using the small piece of
sandpaper found in your repair kit) and then take a patch, remove
the paper backing and fix over the hole. Apply good pressure to
ensure good cohesion
photo 20
10. Re-inflate and leave
11. Once you are satisfied that it is no longer losing air, deflate the
bladder, remove the valve plug and tie the line (trailing edge end)
back on to the valve
12. Taking the free end of the line (from the valve hole in the kite
sleeve) slowly start pulling the bladder back into the strut avoiding
putting any twists into the bladder
13. Once the bladder is aligned, gently work the valve back up through its hole. Replace the SMART
pump tube (or valve plug if not in SMART pump set up)
14. Close the Velcro flap and re-inflate the bladder. Make sure the bladder fills the strut completely and
that there are no twists
Main Strut Puncture:
Repairing the main leading edge bladder is done exactly the same way except that you will need to
use two kite lines or spare lines
1. First disconnect the five SMART pump tubes, which connect the strut bladders to the main leading edge
bladder.
2. Open the Velcro flaps at either end of the main strut and attach separate lines to the ends of the bladder. Ensure they are tied securely (photo 18).
3. Pull the bladder through the zippered access flap located in the middle of the main strut, one end at
a time (photo 19).
4. After removing the lines from the ends of the bladder you will now have two lines coming out of the
access flap, which will allow you to pull the bladder back into place after completing the repair
5. Find and complete the repair in the same way as for a strut puncture. (You will need to use five valve
plugs (taken from the repair kit) to seal the leading edge bladder whilst searching for the puncture.
6. Once fixed, remove the valve plugs and tie the lines from the access flap to the corresponding ends
of the bladder
7. It is important to fold the bladder flat (like an accordion) off to one side of the opening before reinserting to help avoid twists when you feed it back in (Tip: applying baby powder to the bladder before re-inserting will help it align itself correctly (photo 20)
8. Once the bladder is back in place with all valves correctly aligned, re-insert the SMART pump connecting tubes. (Or reattach the valve plugs if not in SMART pump set up).
27
28
Care and Maintenance
To prolong the life of your kite and equipment please follow these Care and Maintenance guidelines:
Allow the kite to dry completely before storing for any length of time. Never store the kite for extended
periods if wet or moist. Colours may bleed
After using in saltwater it is advisable to wash all equipment with fresh water and allow to dry. Never
use high-pressure water on the canopy
UV from the sun will damage your kite. Either cover your kite or store it out of direct sunlight
Although your kite can be stored with the struts inflated it is recommended to lower the pressure for
storage to avoid any unwanted stretching in the strut material
Leaving a kite lying inflated on the beach when not in use is hugely damaging not only from the UV
light but also from the continual flapping of the trailing edge in the wind. Prolonged flapping will cause
material breakdown and stretching which can reduce the kite’s performance. It is recommendable to
release the air from the main tube to allow the kite to lay flat to prevent fluttering
Periodically check all line connection points and the canopy for signs of wear and tear. Small tears
can become large ones with one big crash and having a connection point break can result in a long swim
home
Avoid putting the kite into contact with sharp-edged rocks, thorns and other objects that may damage
the canopy. Putting a rock on the kite to secure it is one example of carelessness on the ground
Carry a kite by the middle of its leading edge with the wingtips pointing upwards. Do not drag the
wingtips across the ground
Prevent water, sand and dirt from entering the bladders
29
Warranty details
Nobile Kiteboarding warrants this product to be free of major defects in material or workmanship to
the original purchaser for a period of twelve months from the date of purchase.
This warranty is subject to a number of limitations. The warranty is valid only when the product is used
for kiteboarding on water and does not cover use in rental or teaching operations.
Nobile Kiteboarding will make the final warranty decision, which may require inspection and/or photos
clearly showing the defect(s). If necessary, this information must be sent to the Nobile distributor in your
country, postage prepaid.
30
If Nobile Kiteboarding deem the product to be defective the warranty covers the repair or replacement of the defective product only. Nobile Kiteboarding will not be responsible for any costs, losses, or
damages incurred as a result of loss of use of this product. The warranty does not cover damage caused
by misuse, abuse, neglect or normal wear and tear including, but not limited to rigging with non-Nobile
Kiteboarding components, punctures, seam damage caused by over inflation, damage caused by improper handling or storage, damage due to excessive sun exposure, damage caused by use in waves or
shorebreak, damage caused by crashing the kite at high speed and damage caused by anything other
than defects in material and workmanship.
The warranty is voided if any unauthorized repair, change or modification has been made to any part
of the equipment.
The warranty for any repaired or replaced equipment is good from the date of the original purchase
only.
The original purchase receipt must accompany all warranty claims. The name of the retailer and date
of purchaser must be clear and legible. There are no warranties that extend beyond the warranty specified herein.
31
Contact details
For information and news on all the latest Nobile products visit:
www.nobilekiteboarding.com
Have Fun and Ride Safely!