1
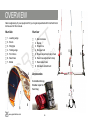
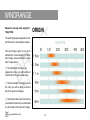
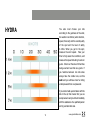
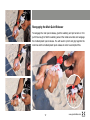
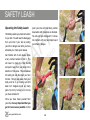
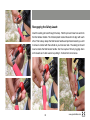
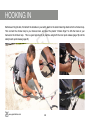
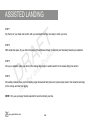
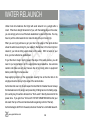
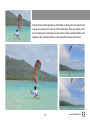
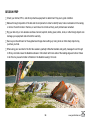
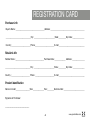
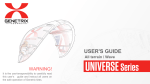
CONTENT
INTRODUCTION
WARNING!
DISCLAIMER
OVERVIEW
SAFETY WIND RANGE
SETTING UP YOUR KITE
SETTING UP YOUR BAR
MAIN QUICK RELEASE
SECONDARY QUICK RELEASE
SAFETY LEASH
HOOKING IN
ASSISTED LAUNCHING
TUNING YOUR KITE
ASSISTED LANDING
WATER RELAUNCH
TIPS
PROBLEMS & SOLUTIONS
WARRANTY
KITE CARE
REGISTRATION CARD
T
F
A
R
D
r
o
tf
n
o
ti
u
b
tri
s
i
d
no
www.genetrixkites.com
3
4
5
6
8
10
12
14
16
18
20
22
24
26
28
30
32
33
34
42
43
INTRODUCTION
INTRODUCTION
Thank you for purchasing a Genetrix kite. You have chosen a high quality product
with exceptional performance. We are proud of the superior materials, design
and construction that make Genetrix kites extraordinary. Please read this manual
in its entirety and familiarize yourself with the design features of our 4 line traction
kites. It is imperative that you understand and follow all directives and safety
precautions in this user guide. This will insure you get the best use of your kite
as well as increase the longevity of your Genetrix product. This user manual has
been written to help you operate your new kite, but is not intended to replace
professional instruction from a certified kite school.
Completing a training course with a professional instructor
before flying your kite is absolutely mandatory for your safety
and for the safety of people around you.
The conditions of the warranty
One (1) year limited warranty for Genetrix kites
To be able to benefit from a full warranty coverage and the advantages of the
client service, you must register your product within 7 days of purchase in the
“warranty” section, on the www.genetrixkites.com website.
www.genetrixkites.com
WARNING!
T
F
It is the user’s responsibility to carefully read this user’s guide and instruct
all users on the safe operation of Genetrix kites.
DO NOT USE THIS GENETRIX PRODUCT UNLESS YOU HAVE READ AND
UNDERSTAND THESE WARNINGS AND INSTRUCTIONS WHICH ARE FOR
YOUR SAFETY AND PROTECTION. THIS INFORMATION MAY BE SUBJECT
TO CHANGE AT ANYTIME. FOR CURRENT UPDATES, PLEASE VISIT OUR WEB
SITE AT: WWW.GENETRIXKITES.COM
A
R
n
o
ti
u
b
tri
You must read and understand the entire contents of this manual before any
attempt to fly your kite. You must be fully aware of the risks that go with this
sport, and know that you are exposing yourself to real danger. Inappropriate
use of traction kite devices can result in serious accidents or lead to the death
of the user or third parties. Completion of formal training in a recognized
kiteboarding school is imperative before first use of any traction kite. Neither
the dealer, distributor, nor manufacturer of products are liable for material or
bodily damage sustained as a result of inappropriate use of this product.
D
r
o
tf
s
i
d
no
www.genetrixkites.com
DISCLAIMER
DISCLAIMER
RELEASE OF LIABILITY AND ASSUMPTION OF RISK:
BY USING THIS PRODUCT YOU ARE AGREEING TO THE FOLLOWING TERMS
AND CONDITIONS: Any use of a traction kite including, kiteboarding, kitesurfing,
landboarding and snowkiting is an extreme sport. Use of this product and any of its
components involves certain inherent risks and hazards, and can cause severe injuries,
damage or death to the user and/or third parties. The purchaser/user of this product
freely agrees to accept any and all known and unknown risks of injury, death and/or
liability which may result from the use or misuse of this equipment. In the event of
your death or incapacity, this Agreement shall be effective and binding upon your heirs,
next of kin, executors, administrators, assigns and representatives. The purchaser/user
agrees to release, indemnify and hold harmless Genetrix, ZoneXcess LLC, and any of its/
their respective agents, affiliates, subsidiaries, employees, instructors, dealers, officers,
directors, suppliers, and their successors FROM ANY AND ALL RESPONSIBILITY
OR LEGAL LIABILITY for damage, injury or death to the user or to any other person
or property which may result while using Genetrix products, to the maximum extent
permitted by applicable law.
Although the information and recommendations in this manual and on any Genetrix website
are believed in good faith to be correct, Genetrix and its agents make no representations
or warranties as to the complete accuracy of the information. Any information is supplied
upon the condition that the person receiving it will make their own determination as to its
accuracy and its suitability for their purposes prior to its use.
www.genetrixkites.com
OVERVIEW
Here is a glossary of your equipment for you to get acquainted with most technical
terms used in this manual.
Your kite
c
c
c
c
c
c
c
1.
2.
3.
4.
5.
6.
7.
T
F
Your bar
Leading edge
Struts
Wingtips
Trailing edge
Front lines
Rear lines
Bridle
1
2
c
1.
2.
3.
4.
5.
6.
7.
8.
Quick release
Swivel
Power line
Stopper ball
Power adjustment clam cleat
Rear lines adjustment strap
Rear leader lines
Kite leash attachment
A
R
c
c
c
c
c
D
t
o
n
c
c
t
u
ib
r
t
s
i
d
r
fo
4
n
o
i
7
7
5
6
3
Accessories
Extensible kite bag
Bladder repair kit
Sand bag
7
3
5
www.genetrixkites.com
6
4
2
6
8
1
SAFETY
WARNING
The sport of kiteboarding is an “extreme sport” and can be extremely dangerous
or deadly. Always be attentive when using this kite and respect the power of the
wind. Do not attempt to use this product unless you are a proficient swimmer
and in good physical condition. Use this kite for the sport of kiteboarding and
not for any other purposes. When you are using this product, you are assuming
and accepting the responsibility for your own safety including the safety of others
surrounding you. That also includes informing subsequent users and owners of
the kite of the risks the sport presents. If you are under 18, these warnings and
instructions must be read by you and by your parent(s) or a legal guardian(s). This
product should only be used under the closest of instruction and supervision. Use
of this product puts the user at risk for numerous un preventable and unexpected
risks and dangers. Do not use this kite while under the influence of alcohol,
drugs or medications.
IMPORTANT SAFETY RULES
Using common sense will reduce, but not eliminate all inherent risks of kiteboarding. There are a number of things you must keep in mind prior to attempting to
launch your kite for the first time:
www.genetrixkites.com
SAFETYcontinued
T
F
c
The leash that comes with this product has a safety release to detach yourself from the kite in case of emergency. Never
permanently attach yourself to the kite or to any of its components.
c
The kite is not a flotation device. For your safety we recommend that you always wear a CE approved life vest for buoyancy when you are kiting on water. Never let an untrained person fly your kite.
c
NEVER allow an untrained person to assist you in launching or landing your kite.
c
It is highly recommended that you wear a helmet, gloves, booties, impact vest and eye protection when you are using the kite.
c
A wetsuit is recommended to prevent hypothermia.
c
Always use a good quality kite-specific harness. It is your connection point to your kite. Do not use a windsurfing harness.
c
Never try to learn kiteboarding on your own. This is a sport where proper training is mandatory.
c
Become very familiar with the safety release system on your kite and how it works. Practice it frequently as it should be second nature to employ in an emergency or non-emergency situation.
c
Check for wear and tear regularly. Before launching your kite, the quick release safety system must be free of sand or debris and functioning properly. Immediately replace any parts that appear worn.
c
Weather and Location for Kiteboarding: WE RECOMMEND THAT YOU KITE ONLY WHEN THE CONDITIONS ARE OPTIMAL FOR KITEBOARDING.
c
You should absolutely understand the basic notions of the wind: its behavior and its power.
c
You must also be able to predict changes of weather and wind pattern. Be familiar with your location and the direction
of the wind.
A
R
D
r
o
tf
n
o
ti
u
b
tri
s
i
d
no
www.genetrixkites.com
c
Use a kite that is appropriate for the wind condition. Check the Wind Range
Chart for the recommended size.
c
Never try to learn kiting when the wind exceeds 10 knots.
c
Never use this kite in extremely gusty winds.
c
Never use this kite under hurricane, thunderstorm or lightning conditions.
c
Never use this kite when the wind conditions exceed your ability to kite safely.
c
Only kite in side/onshore winds. Never use this kite with offshore wind. If you have
a problem or equipment failure a swim to shore will be required and it is extremely
difficult or impossible to swim with the kite equipment when the wind is offshore.
c
Never use this kite with onshore wind if you are a beginner. If you can’t go
upwind the wind will blow you directly back to the beach rapidly and you risk
being carried up onto the beach and hard objects.
c
This wind range chart is only to be used as a guide and is based on an average
rider weight of 75kg/165lbs.
c
Modifications may be necessary based on your ability level, body weight,
water conditions or other factors. Watch and ask seasoned riders at your
area what size kite to use according to body weight ratio. Always use a kite
smaller than you think you need.
www.genetrixkites.com
WINDRANGE
Based on average rider weight of
75kg/165lb.
T
F
ORIGIN
The wind ranges are expressed in knots
and the sizes in actual square meters.
A
R
This wind range is given to you as an
estimate for a rider weighting 75 kilos.
Wind range varies according to each
rider. It depends on:
D
The rider’s level: the more you
progress the more you will be able to
use the kite in the upper wind range.
c
r
o
tf
n
o
ti
u
b
tri
s
i
d
no
The rider’s weight: the bigger you are
the more you will be able to use the
kite in the upper wind range.
c
The board’s volume: the more volume
your board has the more you will be able
to use the kite in the lower wind range.
c
www.genetrixkites.com
10
HYDRA
You also must choose your kite
according to the gustiness of the wind,
the weather conditions (wind direction,
speed, forecast), and the overall quality
of the spot and the level of safety
it offers. When you get to the spot,
measure the wind speed. Take your
time to fully asses the conditions, and
measure the speed including maximum
gusts. Check out the size of other kites
being used and use that as a guide. If
you hesitate between two kite sizes
always take the smaller one, as it is
safer and you will have more fun riding
underpowered than overpowered.
If you cannot walk upwind alone with the
kite in the air, that means that you are
overpowered. Land your kite immediately
with the assistance of a qualified person
and rig a smaller kite size.
11
www.genetrixkites.com
SETTING UP YOUR KITE
Recommended pressure: 8-9 psi. In constant air temperatures above 85 ° F / 30° C, inflate only to 6 psi.
T
F
1 - Determine the wind direction.
2 - Unroll your kite with the struts and intake valve facing upwards. Position it so that one of its wing tips is located upwind
from the other. Place the included Genetrix sand bag on the upwind wing tip of the kite.
A
R
3 - Close one of the deflation valves. Before using the pump, operate it a few times to eject any sand left in the hose. This
will prevent any sand from entering the kite’s bladders.
n
o
ti
4 - Attach the pump leash to the small loop located in the middle of the leading edge to prevent the kite from blowing away.
(When using your new kite for the first few sessions, partially inflate the bladders and gently massage the air through to
D
r
o
tf
u
b
tri
s
i
d
no
www.genetrixkites.com
4
12
3
fill any void and ensure the bladder walls are in full contact with inner walls of
the leading edge and struts).
5 - Remove the sand bag and continue pumping. The kite will turn into the wind
as it becomes fully inflated.
6 - Remove the pump nozzle and make sure to properly close the valve with
the Velcro cover. Do not try to push the valve inside as you would do with an
inflatable toy. Close all valve clips to lock air for each strut. This will allow your
struts to remain inflated (and helpful for self-rescue) even in the event that the
leading edge bladder deflates.
5
7 - Pick up your kite from the middle of the leading edge and turn it around so
that the kite sits leading edge down facing into the wind.
8 - Secure the kite using the Genetrix sand bag.
7
6
13
8
www.genetrixkites.com
ASSEMBLING: Bar & lines
T
F
Downwind method (Rear of the kite)
1 - Unroll your line down wind of the kite. (Rear of the kite) and lay your bar down
with the red Genetrix logo facing down. (Red line on Right and blue on Left).
A
R
2 - Untangle your lines, starting at the bar and walking towards the kite. Spread
your lines with the grey front lines in the center, the red back line on the Right
and the blue back line on the Left.
n
o
ti
u
b
tri
3 - Make sure the bridle is free of knots and tangle free.
D
4 - You connect the lines to your kite by doing a lark’s head knot.
s
i
d
5 - Connect the back lines making sure to connect the red with red and blue with
blue. Be careful, the front and back lines should not cross each other.
r
o
tf
6 - Connect the front lines to the gray front connectors on the bridle.
no
7 - Walk back to the bar and double check one more time for twists in your lines.
Step on the bar and grab the rear lines and spread them out. Look down the
lines all the way back to your kite. The lines should not cross each other.
Not to scale
www.genetrixkites.com
14
15
www.genetrixkites.com
MAIN QUICK RELEASE
T
F
Operating the Main Quick Release:
To activate the main quick release: Grasp the handle of the quick release and
push it away from your body (in the direction of the red arrow). When you activate
this quick release the kite will flag out on one line and fall from the sky, but will still
be attached to your safety leash. (To disconnect entirely from the kite, see the
section describing the operation of the secondary quick release on page 18).
A
R
n
o
ti
u
b
tri
IMPORTANT: It is your responsibility to maintain the proper working order of
the quick release mechanism. Always inspect this piece prior to launching your
kite. Make sure the trigger mechanism is properly seated before you ride, and
occasionally while on the water.
D
r
o
tf
s
i
d
The metal loop to which the flagging line is attached (the smaller line that goes
through the bar) should be rotated to the side of the molded quick release that
features a slot. If not, the quick release will not seat properly.
no
www.genetrixkites.com
16
Reengaging the Main Quick Release:
To reengage the main quick release, grab the webbing and put tension on it to
pull it far enough to fold the webbing around the metal swivel bar and reengage
the molded plastic quick release. You will need to pinch and grip together the
main line and the molded plastic quick release in order to accomplish this.
17
www.genetrixkites.com
SEC QUICK RELEASE
T
F
Operating the Secondary Quick Release:
The secondary quick release is the small red plastic device attached to the end
of the flagging line. This is designed to free yourself entirely from the kite in a
serious situation where the main safety release is inadequate to protect yourself.
Be aware that activating the secondary safety release may endanger others as
your kite is likely to fly away.
A
R
n
o
ti
u
b
tri
Should you be required to activate the secondary quick release, pull the red
plastic handle toward your body very firmly. The chicken loop will
stay with you, but the kite and the rest of the bar assembly will not. Always
practice this before launching your kite so it becomes second nature. As it is
designed to work under load, it might be difficult to desengage while testing it on
the beach when your kite is down on the sand and not pulling.
D
r
o
tf
s
i
d
no
www.genetrixkites.com
18
Reengaging the Secondary Quick Release:
To reengage the secondary quick release:
1 - Insert the metal pin through the loop on the end of the flagging line.
2 - Fold the pin back towards you.
3 - Incase the metal pin inside the plastic tube by pushing the tube, away from
you back onto the pin.
19
www.genetrixkites.com
SAFETY LEASH
Operating the Safety Leash:
The Safety Leash is your last connection
to your kite. You will need to disengage
from your kite if your kite is putting
your life in danger even after you have
activated your main quick release
T
F
point your kite will most likely tumble
downwind until it reaches an obstacle.
You kite will get damaged if it comes
into contact with any hard objects and
put others in danger.
A
R
Get familiar with it and always know
at any moment where to find it. You
will need to grasp the Red handle
and push it way from your body in the
direction of the arrow. This will release
the safety pin and disconect you from
the kite. Simply push away from your
body and let it go making sure the
leash isn’t tangled around any body
parts. Do not try to hang on to it once
you have activated it.
D
r
o
tf
n
o
ti
u
b
tri
s
i
d
no
Once you have freed yourself from
your kite, it is very important that you
get to it as soon as possible. At this
www.genetrixkites.com
20
Reengaging the Safety Leash:
Insert the safety pin back through the loop. Fold the pin and insert one end into
the Red tubular handle. The 2 black plastic coated lines will not align with each
other. That is okay. Grasp the Red tubular handle and pull back towards you until
it comes in contact with the red ball on your harness’ side. The safety pin should
now be inside the Red tubular handle. Test it a couple of time by tugging down
on the leash as if a kite was to be pulling it. It should not come loose.
21
www.genetrixkites.com
HOOKING IN
T
F
Before launching the kite, first attach the shackle on your safety leash to the small metal ring attached to the chicken loop.
Then connect the chicken loop to your harness hook, and insert the plastic “chicken finger” to affix the hook on your
harness to the chicken loop. This is a good opportunity to practice using both the main quick release (page 16) and the
safety leash quick release (page 20).
A
R
D
r
o
tf
n
o
ti
u
b
tri
s
i
d
no
www.genetrixkites.com
22
23
www.genetrixkites.com
ASSITED LAUNCHING
T
F
Just before launching your kite, have a trained assitant hold your kite in the launch position at the side of the wind window
and do a visual check to make sure you have no tangles in your lines or bridle and they are attached correctly to your
kite.
A
R
STEP 1
n
o
ti
Find an open area with unobstructed steady wind. Make sure there aren’t any rocks, trees, fences, cars, power lines or
people downwind of you within 150 feet/ 50 meters.
STEP 2
D
u
b
tri
Have your launching partner walk your kite to the edge of the wind window and have them turn the kite on its side and hold
the leading edge facing towards the wind.
STEP 3
r
o
tf
s
i
d
Make sure your kite is depowered (see section on tuning your kite on page 26). Always err on the side of caution. Once
the kite in the air, you can always increase the power.
STEP 4
no
Signal to your launching partner that you’re ready to launch by giving a thumbs up sign, and as they let go of your kite,
slowly raise your kite into the sky to the neutral position.
STEP 5
Get in the water quickly and enjoy your session!
www.genetrixkites.com
24
3 Origin depower clam cleat.
3 Hydra depower straps.
25
www.genetrixkites.com
TUNING YOUR KITE
Power management principles:
T
F
You should never have to kite with your arms fully extended, as you would have no further depowering ability in a gust. In
this scenario you should shorten your front lines to reduce the power generated by your kite.
A
R
To set power/depower (front line adjustment):
n
o
ti
c
ORIGIN: Pull straight down on the red handle of the trim line below the cam cleat to depower the kite. To repower, simply
pull down on the red handle towards you to free the line from the clam cleat. Hold the handle out to the side and feed out
the desired amount of line and re-engage the line into the cleat.. Always grab the trim line from red handle.
c
HYDRA: Pull down on the red handle of the trim strap to depower the kite. To repower, simpy pull down on the black strap
towards you. Depending on the amount of depower used, you will need to repeat this maneuver as the repower is gradual.
D
r
o
tf
To trim your kite’s rear lines:
u
b
tri
s
i
d
The Genetrix bar is equipped with on the fly rear line adjustments to power up your kite in light conditions by shortening
the back lines at the bar. We recomend to do so before launching your kite, even though it can be done on the fly during
your session when you get more comfortable with this system.
no
Caution:
These tuning techniques have limits – excessively shortening your centre lines will render your kite hard to steer, and
over-shortening your outer lines will ultimately make it fly backwards, stalling the kite.
www.genetrixkites.com
26
Over sheeting diagram.
Place your kite in the neutral position at
12 o’clock above the rider. Power your
kite by briefly pulling on your bar all the
way until it comes in contact with your
quick release. When properly sheeted,
the wing tips should be almost parallel
to each other and the kite should not
stall (i.e., moving backwards.)
Correct trim
An over-sheeted kite (too much back
line tension, front lines too long) will
have the wingtips on an angle and the
kite will stall and move backwards.
To fix this, trim the kite by shortening
the front lines and/or lengthening the
back lines.
Over sheeted
27
www.genetrixkites.com
ASSISTED LANDING
T
F
STEP 1
Tap the top of your head and confirm with your assistant that they are ready to catch your kite.
A
R
STEP 2
n
o
ti
With ample free space, fly your kite to the edge of the window and begin to descend your kite slowly towards your assistant.
STEP 3
D
u
b
tri
s
i
d
Once your assistant grabs your kite by the leading edge begin to walk toward them to release flying line tension.
STEP 4
r
o
tf
Once safely landed, place your kite leading edge downwards facing the wind, place ample sand or the Genetrix sand bag
on the canopy and start de-rigging.
no
NOTE: Only use a properly trained assistant to launch and land your kite.
www.genetrixkites.com
28
29
www.genetrixkites.com
WATER RELAUNCH
Under most circumstances the Origin will await relaunch on a wingtip after a
crash. If the kite is straight downwind of you, with the leading edge on the water,
you can simply pull on one of the back leaderlines to relaunch the kite. You may
have to pull the entire leader line to make the kite roll up on its wing tip.
T
F
A
R
What you are trying achieve is get your kite to the edge of the wind window
where the wind is less strong for your relaunch. Remember, in this most common
relaunch, your kite is sitting upside down on the water. With no twists in your
lines, your bar will also be upside down.
n
o
ti
u
b
tri
To get the kite to begin moving toward the edge of the wind window, you will
need to put some tension on the appropriate back leaderline. Use extreme
caution and make sure all your lines are free of any body parts or equipment
before performing this manoeuveur.
D
r
o
tf
s
i
d
Keep applying tension on the appropriate steering line as the kite rolls on its
wingtip and works its way to the edge of the wind window.
no
As the kite rolls over onto its side expect to let a little bit of leader line out to keep
the kite balanced on its wingtip and preventing it falling back on its trailing edge.
(On a windy day, this action will result in a “Hot Launch” directly downwind in the
power zone. If you get into a “hot launch” do not grab the bar and let your
kite reach the top of the wind window before regaining control of the bar).
As the kite begins to lift from the water, sheet out the bar for a controlled relaunch.
www.genetrixkites.com
30
The bar will now be the right way up. Most often, in strong wind, you wil not need
to apply any presure on the bar as the kite relaunches. Place you hands on the
bar for steering only and bring your kite to the neutral overhead position and
prepare to ride. Make sure that you never wrap the line around your hand.
31
www.genetrixkites.com
TIPS
T
F
In lighter winds, it may be beneficial to use your board to create extra resistance to the pull of the kite, to enable faster
relaunch, and to speed the kite taking an upright position at the edge of the wind window. Once in this position, simply
adjust the bar and steer the kite, launching it upward.
In lighter winds, if the kite is sitting on it’s trailing edge, simply grab the sleved power line above the bar and yank it towards
you in a series or pulls. The kite will tilt forward a bit and hot launch. You do not need to put tension on the bar. As the kite
re lauches, grab the bar for steering. Make sure you do not use this method if there are any obstacles
downwind from you and in winds of 10 knots or higher.
A
R
n
o
ti
u
b
tri
Before each session: If there is any sand or grit on your bar or chicken loop line, submerge the bar in the water to cleanse the
product for a properly working system. This will increase the overall life of your bar, chicken loop, depower line and cleat.
D
s
i
d
When setting up your bar, you can simply manage your rear lines for tangles when connecting them to the kite. A swivel
on the Chicken Loop allows you to un-twist any tangles in the front lines even after they have been connected to the kite.
Hook in before your session, spin the Qick Release to undo your front line twist, lauch and enjoy your ride.
r
o
tf
*Test you lines by hooking up you line’s end to a nail or a sring tied to a tree.
Hook in to your chicken loop and apply
tension on all four lines. Your bar should remaim perpendicular to your front lines. In you cannot achieve this your lines
have to be replaced.
More tips here.......
no
www.genetrixkites.com
32
PROBLEMS & SOLUTIONS
Your kite comes out pre tuned and ready to fly. You just have to hook it up to the bar, hook in and enjoy the ride. After an
extended period of usage, there might be some adjustment necessary.
My kite flies too far over head:
You’ve put too much de power on the front lines. (Front lines too short). Lengthen you front lines by releasing the power line and
sheeting out some length before reengage in the cleat. This setting will depend on the wind strength the day of your session.
My kite stalls and falls back:
You’ve got too much trimming on the back lines. (Back lines too short). Adjust by pushing up on the buckles on the
rear lines adjustment straps, lengthening you back lines.
My kite turns better to one side:
Your back or front flying lines are not the same length*. Make sure your rear adjustment strap have the same amount of
trimming. Your bar should be perpendicular to you power line (clear sleeved line).
My kite folds around the wing tips:
Your kite in under inflated. Give it a few more pumps.
33
www.genetrixkites.com
WARRANTY
T
F
Genetrix warrants that this kite is free from defects in materials and workmanship to retail customers in the United States,
U.S. Possessions and Canada. Genetrix will repair or, at its option, replace defective parts.
1. The warranty is valid ONLY if you have register your product within7 days of purchase, on the www.genetrixkites.com
website, in the “warranty” section.
A
R
2. This warranty is valid only when this product is used for normal recreational activities. Teaching and renting are excluded.
n
o
ti
3. This warranty does not cover damage caused by misuse, abuse, damage due to over-inflation in the shade and/or in the
sun, excessive exposure to sunlight, excessive exposure to cold, or damage caused by improper handling and storage.
u
b
tri
4. This warranty does not cover damage caused by use in waves, shorebreak, reefs, or off the water, any blow or impact
with a hard object or any other irresponsible use. Damage resulting from improper maintenance from normal wear and
tear or incorrect setup, including scratches or paint chipping, or caused by anything other than defects in material and
workmanship is not covered.
D
r
o
tf
s
i
d
5. This warranty is null and void if any unauthorized repair, changeor modification has been made to any part of the equipment.
6. Exposure to sea salt, sand and the elements is considered normal wear and tear and is not covered under our warranty.
no
7. There are no express or implied warranties which extend beyond the warranty specified hereein.
Warranty procedure
If you are faced with any problem within the framework of the warranty, you should bring the defective product back to
your Genetrix retailer with the following documents and information: c - The original purchase receipt, c - The type of
www.genetrixkites.com
34
product and the serial number (located on the wingtip of the kite), c - A precise description of the defect,
picture allowing the identification of the defect, c - Your name and address.
c
- A good
Genetrix will not accept returns directly from customers, unless purchased directly from the genetrixkites.com website.
Customers must call for a Return Authorization Number before returning any product under this Limited Warranty. All
authorized returns must be made through a Genetrix authorized dealer, freight prepaid.
Your retailer will communicate your claim to Genetrix and, if necessary send the product to an official Genetrix repair
center. You will be responsible for all shipping costs.
Only Genetrix is entitled to make the final decision about the warranty. If a product is deemed to be defective by Genetrix,
it will be repaired or replaced by the official Genetrix repair center in the shortest possible time and will be sent back to
your Genetrix dealer at your cost.
THIS WARRANTY DOES NOT COVER:
Line breakage. Normal wear and discoloration. Damage caused by abuse or failure to perform normal maintenance.
Damage caused by hitting solid objects, the ground or beach. Damage caused by improper storage (i.e., wet storage).
Damage caused by alterations or modifications. Transportation of kite to a dealer or distributor. Any kite used for rental,
teaching, or in commercial service. Any other consequential damage, incidental damages or incidental expenses, including
personal injury or damage to property. Some states do not allow the exclusion or limitation of incidental or consequential
damages, so this limitation may not apply to you.
TO OBTAIN WARRANTY SERVICE Within 30 days of discovering the defect, take your kite, along with proof of purchase
(sales receipt or registration card) to the authorized Genetrix dealer from whom you purchased your kite.
IMPLIED WARRANTIES Any implied warranties, including implied warranty of merchantability and fitness for a particular
purpose, shall be no longer than the duration of express warranty. Some states do not allow limitations on how long an
implied warranty lasts, so the above limitations may not apply to you. Genetrix makes no express warranties in addition
35
www.genetrixkites.com
to this Limited Warranty. Genetrix dealers have no authority to make any warranties on behalf of Genetrix in addition to or
inconsistent with those stated herein.
To the extent any provision of this warranty is prohibited by Federal or State law and cannot be preempted, it shall not be
applicable. This warranty gives you specific legal rights. You may have other rights, which vary from state to state.
T
F
IMPORTANT SAFETY RULES
The most important rule is that practicing common sense will reduce, but may not eliminate some inherent risks of
kiteboarding. There are a number of things you must keep in mind prior to attempting to launch your kite for the first time:
The leash that comes with this product has a safety release to detach yourself from the kite in case of emergency. Never
permanently attach yourself to the kite or to any of its components.
A
R
n
o
ti
u
b
tri
c
The kite is not a flotation device. For your safety we recommend that you always wear a CE approved life vest for
buoyancy when you are kiting on water. Never let an untrained person fly your kite.
c
NEVER allow an untrained person to assist you in launching or landing your kite.
c
It is highly recommended that you wear a helmet, gloves, booties and eye protection when you are using the kite.
c
A wetsuit is recommended to prevent hypothermia.
c
Always use a good quality kite-specific harness. It is your connection point to your kite. Do not use a windsurfing harness.
c
Never try to learn kiteboarding on your own. This is a sport where proper training is mandatory.
c
Become very familiar with the safety release system on your kite and how it works. Practice it frequently as it should
be second nature to employ in an emergency or non-emergency situation.
c
Check for wear and tear regularly. Before launching your kite, the quick release safety system must be free of sand or
debris and functioning properly. Immediately replace any parts that seem doubtful or worn.
D
r
o
tf
s
i
d
no
www.genetrixkites.com
36
Weather and Location for Kiteboarding
WE RECOMMEND THAT YOU KITE ONLY WHEN THE CONDITIONS ARE OPTIMAL FOR KITEBOARDING.
You should absolutely understand the basic notions of the wind: its behavior and its power. You must also be able to
predict changes of weather and wind pattern. Be familiar with your location and the direction of the wind.
c
Use a kite that is appropriate for the wind condition. Check the Wind Range Chart for the recommended size (page 10).
c
Never try to learn kiting when the wind exceeds 10 knots .
c
Never use this kite in extremely gusty winds.
c
Never use this kite under hurricane, thunderstorm or lightning conditions.
c
Never use this kite when the wind conditions exceed your ability to kite safely.
c
Only kite in side/onshore winds. Never use this kite with offshore wind. If you have a problem or equipment failure a swim
to shore will be required and it is extremely difficult or impossible to swim with the kite equipment in offshore conditons.
c
Never use this kite with onshore wind if you are a beginner. If you can’t go upwind the wind will blow you directly
back to the beach rapidly and you risk being carried up onto the beach and hard objects.
c
This wind range chart is only to be used as a guide and is based on an average rider weight of 75kg/165lbs. Modifications
may be necessary based on your ability level, body weight, water conditions or other factors. Watch and ask seasoned
riders at your area what size kite to use according to body weight ratio. Always use a kite smaller than you think you need.
c
CHOOSE A SAFE AND CONTROLLED SPOT TO PRACTICE KITING WITH MINIMUM HAZARDS. Always follow
and respect local rules before launching your kite at a new spot. Ask the locals for information before attempting to
launch as they know all the dangers and the etiquette of the launch spot.
c
Never fly the kite anywhere near electrical lines, telephone poles, trees, tall bushes, roads, traffic, airports and/or solid
objects. A collision with any of them could be fatal. Operation of a kite in proximity to an airport may violate federal law.
37
www.genetrixkites.com
c
Never fly the kite anywhere where kiteboarding or kite flying is prohibited.
c
Only launch your kite in an open area where a radius of 100 meters (300 feet) of clear space is available.
c
Refrain from flying the kite over people and animals. Any bystanders should be standing upwind from you, your lines and your kite.
c
Never attempt to launch the kite when bystanders are anywhere close to your lines.
c
Never use this kite in the presence of a crowd or where there are people located downwind of your kite.
c
Be extremely alert. Study the procedures of launching and landing the kite. Always do an assisted launch and landing.
c
BE EXTREMELY CAREFUL WHEN AROUND KITE LINES and always carry a specially designed kite safety knife with a
protected blade.
c
Never touch the lines when the kite is in use. They are extremely dangerous when taut and can cause serious injuries
and even death.
c
Check your lines often for wear and tear and replace them at the first sign of damage. When lines break they can
cause serious injuries including death.
c
NEVER WRAP YOUR LINES AROUND ANY PART OF YOUR BODY OR PERMIT THEM TO BECOME WRAPPED
AROUND ANY PART OF YOUR BODY.
c
Always verify your lines for knots and undo them prior to using the kite. Knots considerably reduce the strength of a kite line.
c
Don’t approach tangled lines when the kite is still flying. The kite should be secured on the ground prior to doing this.
c
Always use the included kite weight bag to hold the leading edge of the kite down while the kite is inflated and not in
use. An unsecured kite on the ground can re-power up and cause serious injury or death.
c
Never allow yourself or anyone else to get between the control bar and the kite when it is in use.
T
F
A
R
D
r
o
tf
n
o
ti
u
b
tri
s
i
d
no
Diligence should be practiced when caring for your kite and your protective gear. This will ensure your safety as well as
prolong the life of the product.
www.genetrixkites.com
38
SESSION PREP
c
Check your helmet, P.F.D., and other protective equipment to determine if they are in good condition.
c
Make a thorough inspection of the kite and its components in order to identify tears, holes or abrasions in the canopy
or struts. Check for knots in the lines, or worn lines. Do not kite until any such problems are remedied.
c
Rig your kite only on non-abrasive surfaces. Cement, asphalt, shells, gravel, sticks, rocks, or other foreign objects can
damage your equipment and will void the warranty.
c
Secure your kite with sand or the supplied sand bags when setting up. Using rocks or other sharp objects may
puncture your kite.
c
When using your new kite for the first few sessions, partially inflate the bladders and gently massage the air through
to fill any void and ensure the bladder walls are in full contact with inner walls of the leading edge and struts. Failure
to do this may cause formation of blisters in the bladder causing it to burst.
39
www.genetrixkites.com
KITE CARE
T
F
Never leave a kite exposed to wind or sunlight for long periods of time. After use in saltwater, it is always wash all gear
thoroughly using fresh water and allow to dry out of direct sunlight. Do not use any high-pressure water system against
the kite components or canopy. An improperly dried kite will developed mildew and the colors will bleed if stored away for
a prolonged time. Clean sand and other debris from the kite before stowing.
A
R
Store your kite in the supplied bag in a cool, dry location. Do not leave your kite inflated in your car or any enclosed spaces
where extreme heat may damage the internal bladders and the adhesives and fabrics used in constructing your kite and
its components.
n
o
ti
u
b
tri
Do not leave your kite sitting on the beach for prolonged period of time when not in use. Such misuse will cause the trailing
edge to flap loosely resulting in unwanted material stretch and cause the trailing edge material to break down which will
drastically reduce kite performance.
D
s
i
d
Periodically check all connection points and canopy damage, throughout the life of your kite. Make sure to repair any small
tears or holes as needed. One bad crash can put stress on the small tear resulting in a much larger tear. A connection
point break can result in a long swim home or the requirement to be rescued.
r
o
tf
no
This card must be sent back properly filled in capital letters, signed and stamped within 7 days of the product’s
purchase. It ensures your right to a claim under this warranty:
ZoneExcess LLC 4872 Topanga Cyn. Blvd. #209 Woodland Hills, CA 91364 888 250 7962 [email protected]
www.genetrixkites.com
40
REGISTRATION CARD
Purchaser info
Buyer’s Name: _______________________________________Address: ______________________________________________
__________________________________Ctiy: ____________________________State:__________Zip Code:________________
Country:__________________________Phone:__________________________E-mail:___________________________________
Retailer’s info
Retailer Name :_______________________________________Purchase Date :_______________ Address :_________________
__________________________________City :____________________________State :__________Zip Code :________________
Country :_________________________ Phone :__________________________E-mail:___________________________________
Product identification
Name or model:___________________Size:_______________Year:_________Serial number :____________________________
Signature of Purchaser:
___________________________
41
www.genetrixkites.com