1
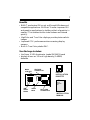
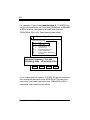
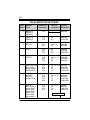
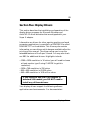
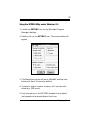
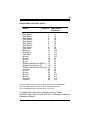
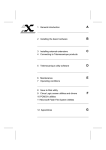
1
2
Super X Accelerator VGA
3
Before You Begin your Installation
The product you have purchased is designed to
be easily installed into most IBM PC or
compatible systems. Many products have large,
easy-to-read legends to allow for the easy
configuring of the product. This installation
manual contains detailed instructions. Most
included software has automatic installation programs to place
the software correctly onto your computer. However, as all
computers are configured differently, you may be required to
perform some basic DOS or Windows tasks. If you are not familiar
with basic DOS commands such as DIR, CD, or EDIT, you should
check your DOS manual, or seek assistance from you local
computer dealer to install the product.
How to get Technical Assistance
The dealer that you purchased this product or your computer from
is the first place you should go for technical
assistance. The dealer is usually the most
qualified source of help, and is most
familiar with your system and how this
product should be installed. Many dealers
have customer service and technical support programs, with
varying levels of support offered, depending on your needs and
computer knowledge. Please contact the dealer first whenever
a problem occurs.
If your Dealer Can’t Assist you
If you can’t get assistance from your dealer, the manufacturer
provides varying levels of technical assistance as summarized on
the following page.
4
1
4
7
1
4
7
8
2
5
8
2
5
3
6
9
3
6
9
Boca BBS
407-241-1601
Standard Free
Technical Support
407-241-8088
Automated
Fax Retrieval
System
407-995-9456
Priority Service
900-555-4900
($2 per minute)
Technical
Support Fax
407-997-0918
On-Line Support!
CompuServe: GO BOCA
Internet:
email: [email protected]
on the World Wide WEB:
http://www.boca.org
The Standard Free Technical
Support number is for quick
answers to specific inquiries on
product features and technical
questions (call 407-241-8088;
M-F, 8 am to 6:30 pm EST).
Direct access to technical
support representatives is provided on a limited basis. If you
require immediate attention or in-depth help with the installation
of the product, please call our 900-priority support number for
service. This number gives you immediate access to senior-level
technicians. The number is 900-555-4900. You will be charged
$2.00 per minute. The charges will appear on your next phone bill.
Damaged or Missing Items
We use many world-class quality assurance programs to ensure
the product you purchased is of the highest caliber. Sometimes,
however, a component may be missing from the box, or is damaged
or corrupt in some way. If this happens, immediately return the
entire package to your place of purchase so you may exchange it
for a new one. Your dealer should be able to provide you with an
exchange far more quickly than by contacting us directly. If for
some reason you are unable to return the product directly to its
place of purchase, refer to the “Servicing Your Product” and
“Warranty” sections in this manual for instructions.
Super X Accelerator VGA
5
Contents
Section One: Introduction ........................................ 6
Section Two: Compatibility & Requirements .......... 8
2.1 Installation Requirements .............................................. 8
2.2 Monitor Compatibility ..................................................... 8
2.3 System Compatibility ...................................................... 9
Section Three: Physical Installation ........................ 10
3.1
3.2
3.3
3.4
3.5
Removing the System Cover .........................................
Inserting the Super X ...................................................
Replacing the System Cover .........................................
Configuring Your System .............................................
Configuring the Super X on a Network .......................
10
11
12
13
14
Section Four: Preparing Your Monitor .................... 15
4.1
4.2
4.3
4.4
4.5
Choosing Attached Monitor Type .................................
CLMODE’s Menu-Driven Interface .............................
Previewing the Video Mode .........................................
Getting Help .................................................................
CLMODE’s Command Line Options ............................
15
17
18
19
20
Section Five: Display Drivers ................................. 23
5.1 Microsoft Windows ........................................................ 26
5.2 AutoCAD 12 ................................................................... 29
Appendix A: Troubleshooting ................................. 32
Appendix B: Servicing Your Boca Product ............ 35
Appendix C: Technical Specifications ................. 37
FCC Compliance ..................................................... 40
Glossary .................................................................... 41
6
Section One: Introduction
Congratulations on the purchase of your Super X
Accelerator VGA board. The Super X is IBM VGA
compatible and is designed to work in all standard AT and
compatible computers. This manual explains how to set up,
install, and use the Super X board. Information is also
provided for installing software drivers which provide
enhanced video display with many popular applications.
Drivers are included on diskettes shipped with your Super
X, but it is NOT necessary to install these drivers for
normal VGA operation.
Features:
• 1MB display memory
• True Color VGA graphical user interface (GUI) accelerator
• Bit Block Transfer (BitBLT) for GUI acceleration
• Hardware graphics cursor
• Compatible with ISA and EISA bus systems
• 16-bit interface
• Integrated RAMDAC with a 262,144-color palette
• Extensive graphic mode support
• Feature connector for use with multi-media applications
• Supports 132-column text modes
Super X Accelerator VGA
7
Benefits:
• BitBLT accelerates GUIs such as Microsoft Windows and
compatible applications. Bit Block Transfer improves GUI
and graphics applications by holding a block of graphics in
memory. This enables the box to be redrawn and moved
quickly.
• HighColor and True Color displays provide photo-realistic
images.
• Improved CPU performance when accessing display
memory.
• Built-in True Color palette DAC.
Your Package Includes:
• the Super X VGA Accelerator (model SVGAX3) board
• display drivers on 3.5-inch high-density (1.44MB)
diskettes
MAIN
CHIP SET
FEATURE
CONNECTOR
FCC ID:EUD 5U9 BRI4495
12
12
12
12
12
12
12
1MB
VIDEO
DRAM
11
12
12
1
12
1211
12
1211
11
11
11
1
VIDEO
BIOS
111234567
12
1234567
12
111234567
12
12
11
12
12
112345678
12
12
○
○
○
○
○
○
○
○
○
○
○
○
○
○
○
○
○
○
12345
12345
12345
12345
DRIVER
INSTALLATION
DISKETTE
Super X
Accelerator
VGA
DB-15 VGA
CONNECTOR
INSTALLATION
MANUAL
Introduction
8
Section Two: Compatibility & Requirements
Please examine the Super X board and driver diskettes to
see if there is any damage which may have occurred during
shipment. If damage exists or if anything appears to be
missing, please contact the retailer from whom the Super X
was purchased.
2.1 Installation Requirements
This user manual is designed to answer questions you might
have concerning the installation and use of the Super X, as
well as provide descriptions of legitimate system
configurations. Please take a little time to read through this
manual before installing your Super X.
2.2 Monitor Compatibility
The Super X board is compatible with VGA Color and
monochrome analog monitors. TTL monochrome monitors
with 9-pin connectors are NOT compatible with the Super X.
It is also compatible with Multiple Frequency Monitors,
provided the proper 15-pin cable adapter is used with the
monitor and the monitor is set to analog.
IMPORTANT: The Super X uses the same 15-pin
(DB15) cable available from monitor manufacturers
to interface with the IBM PS/2 computers. Using an
incorrect cable may result in damage to the monitor
and/or adapter. Contact the monitor manufacturer
for proper cabling and pin-outs if you have questions.
Super X Accelerator VGA
9
2.3 System Compatibility
Most clones are compatible with the Super X. If you are
uncertain, refer to your system’s guide to operation or check
with the dealer or manufacturer of your computer. The
Super X board is compatible with the IBM Video Graphics
Array and Enhanced Graphics Adapter.
Most compatible systems support the IBM VGA or EGA
standard. If your computer supports the IBM Enhanced
Graphics Adapter, then the Super X board will work in your
system.
Some systems may require a ROM BIOS upgrade to support
VGA display. Consult your computer dealer regarding
availability of such an upgrade for your particular system.
NOTE: Drivers are not necessary for normal VGA
operation. Drivers are included on 1.44MB 3.5-inch highdensity diskettes only. You may download drivers released
after the printing of this manual from our BBS 24 hours a
day at (407) 241-1601 (N, 8, 1).
Compatibility and Requirements
10
Section Three: Physical Installation
Installation of the Super X board is simple and quick for the
expert and novice alike. The following instructions assume
an AT-style or compatible machine. Obviously, locations and
types of screws as well as type of case cover will vary based
on your particular system. Refer to your computer system
documentation for additional assistance.
3.1 Removing the System Cover
1. Turn the power switch to the OFF position.
2. Remove the power cord from the back of the computer.
3. Unplug the keyboard cable found in the lower middle of
the computer’s rear panel.
4. Use a small screwdriver to remove the screws that attach
the computer’s cover to the rear panel.
5. Carefully slide the cover forward—away from the rear
panel. Be careful not to let the cover catch on internal
cables to the disk drive and power supply.
è
Super X Accelerator VGA
11
The Super X board must be installed in the first
available 16-bit slot in your system. Adapter card
connector slots normally reside in the rear of the
system board adjacent to the power supply. There
are usually anywhere from five to eight edge
connectors, depending on the model of your system.
3.2 Inserting the Super X Board
IMPORTANT: The Super X uses the same 15-pin
(DB15) cable available from monitor manufacturers to
interface with the IBM PS/2 computers. Using an
incorrect cable may result in damage to the monitor
and/or adapter. If you have a monochrome display adapter
in your system, you need to set the Super X board as the
primary adapter; the primary adapter will be the display
available upon boot-up. The secondary monochrome adapter
will only be used if the appropriate DOS command is
entered. You MUST remove any other color video card
(VGA, EGA, CGA), even if it is multi-functional.
NOTE: Boca Research does not recommend using two
adapters.
1. Select the first available 16-bit expansion slot.
2. Remove the screw and the metal plate that covers the
external access to the slot you have selected.
Physical Installation
12
3. Insert the Super X board in the slot that you have
selected, so that the edge connector on the bottom rear of
the board mates with the socket on the motherboard.
Press down firmly on the board. Secure the board with the
screw which you just removed.
4. Some older motherboards require that switches or
jumpers be set for VGA (EGA on still older machines).
With newer systems, this is done through the system
CMOS setup. Refer to your system documentation for
instructions on either jumper settings or running CMOS
setup.
3.3 Replacing the System Cover
Slide the computer cover back over the chassis taking care not to
let it catch on the disk drive or power cables. Once the cover is in
place, replace all the screws that you removed earlier. Re-attach
all cables and power cords to their original positions. Attach the
appropriate monitor cable to the Super X.
Super X Accelerator VGA
13
15-pin
Connector
To monitor
3.4 Configuring Your System
After the Boca Super X is installed in your system, use the
SETUP program supplied with the system to tell the
computer about the video adapter just installed. Run
SETUP to configure the computer. Sometimes, this utility
comes on a diskette and sometimes it is built into the
system’s ROM BIOS. When you get to the part of the
program which addresses video support, you may be asked if
the monitor you are using will be the primary monitor.
Answer YES. If you are presented with a list of video
options, select the option for “VGA”.
Physical Installation
14
If no option for “VGA” is listed, select support for “EGA”. To
some systems, the Boca Super X will appear as an EGA card.
If you fail to see an option for ‘“EGA”, try the option for “NO
MONITOR”, “RESERVED”, or “SPECIAL”. If this does not
produce the desired results, contact your computer system
dealer. At the conclusion of the SETUP program, the
computer will either automatically restart or offer you the
option of restarting. NOTE: Setup procedures vary for
different computer systems. Please refer to the user’s manual
for your computer system as well as this manual when
configuring the Super X.
3.5 Configuring the Super X on a Network
Generally speaking, when configuring a network system
avoid the following areas the Super X occupies: Memory
addresses A000h - C7FFh, I/O addresses 03B0h - 03Dfh and
in some instances 02E0h - 02EFh. The Super X does not
require an interrupt (IRQ).
Some network cards do not fully decode a 16-bit I/O address;
these cards deal only with 10-bits of a 16-bit I/O address.
The Super X has a global set up register at an I/O base
address of 46E8h. A network card that improperly decodes I/O
addresses will see 46E8h in a 10-bit format as 02E8h.
02E8h may conflict with a network card in the 02E0h-02EFh
range. The symptoms of this conflict manifest in the inability
to access the Server. To alleviate this problem choose an
alternative base I/O address for your network card and
regenerate the shell; refer to your network documentation or
network software vendor if you require additional assistance
in this area.
Super X Accelerator VGA
15
Section Four: Preparing Your Monitor
The CLMODE utility allows you to define the type of
monitor attached and preview the video modes supported by
your monitor. CLMODE is installed by running INSTALL
from diskette #1 and choosing “BOCA CLMODE UTILITY”,
the first selection on the menu. After installation, type the
command CLMODE from the subdirectory in which
CLMODE was installed.
CLMODE Utility Program
Monitor Type
Help on Monitor Type
Video Modes
Help onVideo Modes
About...
Help on Keyboard
CL-GD5426
BIOS Version X.X
1024K Video Memory
Exit
Help on Mouse
To make a selection, press the underlined letter
4.1 Choosing the Attached Monitor Type
Selecting the proper monitor type will allow the Boca
SuperVGA to display the highest quality output that it is
capable of with the attached monitor. The monitor type
determines what video modes will be available to your
system. It will also determine the vertical refresh rates
available to your system. Generally, the higher the refresh
rate, the better the screen will look.
Preparing Your Monitor
16
For example, if you choose monitor type 1 , CLMODE will
restrict the maximum non-interlaced resolutions to 640x480
at 60Hz and the maximum interlaced resolutions to
1024x768 at 87hz, only. See sample screen below:
Monitor Type Setup
MONITOR
0
1
2
3
4
5
6
7
SELECTION
VGA
8514 Compatible
Super VGA
Extended Super VGA
Multifrequency
Extended Multifrequency
Super Multifrequency
Extended Super Multifrequency
Advanced
Horizontal frequency: 35.5 KHz
640x480 @ 60Hz 1024x768 @ 87iHz
Verify
OK
Cancel
Help
If you choose monitor type 6, CLMODE allows the maximum
non-interlaced resolution to be 1024x768 at 70Hz and the
maximum interlaced resolution to be 1280x1024 at 87Hz
interlaced. See sample screen below:
Super X Accelerator VGA
17
Monitor Type Setup
MONITOR
0
1
2
3
4
5
6
7
SELECTION
VGA
8514 Compatible
Super VGA
Extended Super VGA
Multifrequency
Extended Multifrequency
Super Multifrequency
Extended Super Multifrequency
Advanced
Horizontal frequency: 56.0 KHz
640x480 @ 72Hz 1024x768 @ 70Hz
800x600 @ 72Hz 1280x1024 @ 87i
Verify
OK
Cancel
Help
4.2 Using CLMODE’s Menu-driven Interface
From the CLMODE directory, type the following at the DOS
prompt:
CLMODE [Enter]
The main window, as shown on page 15 consists of the
following selections: Monitor Type, Video Modes, and Help.
Each selection contains one or more menu items. The
underlined letter of a menu item specifies the hot key for
that item. For example, pressing the [T] key selects the
Monitor option. Note that a mouse driver must first be
installed prior to running the CLMODE utility in order to
use the mouse pointer for menu selection.
Preparing Your Monitor
18
Select Monitor Type to display the Monitor Type Setup
window. The current monitor type and refresh rate will be
highlighted initially. Use the keyboard or the mouse to
choose the type of monitor attached. Press the OK button to
set the new monitor type. Press the CANCEL button to
discard any changes. Press HELP for an explanation of the
monitor types and VGA refresh rates.
On some systems the monitor type is remembered
from one session to the next. To test this, select a
monitor type and exit the CLMODE program. Turn
the computer off for approximately ten seconds.
After rebooting the computer, run CLMODE and
verify whether or not the monitor you selected is still
enabled. If it is, it should never be necessary to
set the monitor type again during normal operation.
If the monitor type was not kept, then it will be
necessary for CLMODE to be added to your
AUTOEXEC.BAT.
4.3 Previewing the Video Mode
Select Video Modes from the main window. The Video
Modes Preview window displays all the modes supported
according to the monitor type attached and the video
memory present. Use the mouse or the keyboard to move
the highlighted bar to the video mode you wish to preview.
Super X Accelerator VGA
19
To preview the mode, press [ALT] and [P], or position the
mouse cursor on the Preview button, and press the left
mouse button. After CLMODE exits back to DOS, the
desired video mode will be set.
Retrieving the current VGA controller status
The information in the main window displays the VGA
controller type, the BIOS version number, and the amount
of video memory present.
4.4 Getting Help
CLMODE provides Help for the following items: Monitor,
Video Modes, Mouse, Keyboard and About. The Monitor help
window explains the different capabilities of each monitor
type. The Display help window gives a detailed description of
the video modes and the VGA controller status. The
Keyboard and Mouse help windows explain how to use the
keyboard and the mouse to make selections. The About
window displays the CLMODE version number.
Exiting the CLMODE Menu-driven Utility Program
To exit CLMODE at any time, press [ALT] and [F4] keys
simultaneously, or click the left mouse button on the system
button of the main window (i.e., the top left corner button of
the window which is shown as a dot). When CLMODE utility
exits, the current video mode, monitor type, and VGA
refresh rate will be displayed.
Preparing Your Monitor
20
4.5 Using CLMODE’s Command Line Options
When command line options for CLMODE.EXE are given at
the DOS prompt, the menu-driven windows will not be
displayed. Instead, monitor type, video mode, and refresh
rate will be set at the DOS prompt. The command line
options for CLMODE.EXE are as shown below:
CLMODE [[modenum][+*-]] [m[montype] | t6=x t8=x t1=x
t2=x]
[modenum] =mode number (valid values listed in the
Video Modes Preview window, when Video Modes is
selected from the CLMODE main window.
[+*-]
+ selects 400 lines (default)
* selects 350 lines
- selects 200 lines
[montype]=monitor type (valid values are listed in the in
the table on page 22); the following are settings for
advanced monitor types:
t6=x(Hz)
t8=x(Hz)
t1=x(Hz)
t2=x(Hz)
640x480 @ (0 = 60, 1 = 72)
800x600 @ (0 = 56, 1 = 60, 2 = 72)
1024x768 @ (0 = 87i, 1 = 60, 2 = 70, 3 = 72)
1280x1024 @ (0 = 87i, 1 = Not available)
For example, to select mode 3 for a Super VGA monitor
(montype 2), type the following command at the DOS
prompt:
CLMODE 3+ m2[Enter]
Super X Accelerator VGA
21
To select custom monitor timings with 640x480 at 60Hz and
800x600 at 72Hz refresh type:
CLMODE t6=0 t8=2[Enter]
Typing an invalid option will display the command line help
text. Typing [S] as a command line option will display the
current monitor setting e.g.,
CLMODE S [ENTER]
Following is a table of common monitor types and associated
values that you should use for the [montype] option.
Resolutions with more than one entry per line in the vertical
frequency column signify availability of the high-refresh
option.
Display Drivers
22
VALID MONITOR SETTINGS
Valid
Monitor
Value* Type
Horizontal
Frequency
Vertical
Frequency
LOW or HIGH
60
Display
Resolution
0
IBM 8512
IBM 8513
IBM 8503
31.5
1
IBM 8514
IBM 8515
31.5
35.5
60
87i
640x480
1024x768
2
NEC 2A
31.5
35.1
60 or 70
56
640x480
800x600
3
NEC II
31.5
35.1
35.5
60
56
87i
640x480
800x600
1024x768
4
NEC3D
31.5
35.5
37.8
60, 70, 72
87i
60
640x480
1024x768
800x600
5
Sony CPD-1304
NEC 3FGx
Nanao 9065S
Nanao 9070U
31.5
48.0
48.0
48.0
60, 70, 72
72
60
87i
640x480
800x600
1024x768
1280x1024
6
NEC 4D
NEC4FG
Nanao T240i
31.5
48.0
56.5
48.0
60, 70, 72
72
70
87i
640x480
800x600
1024x768
1280x1024
7
NEC 5D
NEC 5FG/6FG
Nanao T560i
Nanao T660i
Nanao F550i
Nanao F750i
Nanao 9400i
Nanao 9080i
31.5
48.0
56.5
48.0
60, 70, 72
72
70
87i
640x480
800x600
1024x768
1280x1024
Super X Accelerator VGA
640x480
i = interlaced
23
Section Five: Display Drivers
This section describes the installation and operation of the
display driver programs for Microsoft Windows and
AutoCAD 12 driver diskettes that are shipped with your
Super X adapter.
Information on drivers for other popular graphics and word
processing applications is provided in a README file called
README.TXT on the diskette. This file may also contain
information on new drivers which became available after the
printing of this manual. The drivers allow you to use the
extended features of the Super X board. You may also check
our BBS for additional drivers. Highlights include:
• 1280 x 1024 resolution in 16 colors (you will need to choose
at least monitor type 5 using CLMODE to get this
resolution).
• 1024 x 768 resolution in 256 colors
• 800 x 600 resolution in 65,536 colors
• 640 x 480 resolution in 16.8 million colors
If you intend to use your VGA adapter in
standard VGA modes, you DO NOT need to
install any of these drivers.
Your display drivers support the following software
applications and environments. For documentation:
Display Drivers
24
In this Manual
On README
On README
(no driver)*
Microsoft Windows
AutoCAD 12
Lotus
Microsoft Word
WordPerfect
Generic CAD
OrCAD
Locus Computing
Colorix
The following applications are NOT supported in the current
release, but are still available on the Boca BBS: GEM3/
Ventura (DOS), WordStar, PCAD, and VersaCAD.
* VESA-based applications. Drivers not supplied; however,
instructions are provided which enable you to run these
applications with the Super X.
NOTE: To use the 800 x 600 or 1024 x 768 graphics
display drivers, you must have a multiple frequency
monitor capable of displaying that resolution. Standard
VGA monitors (such as IBM’s analog monitors) do not
have that capability.
Installing the Display Drivers
IMPORTANT: If you are installing these drivers, make
sure you also install the CLMODE utility.
• Make sure the Boca SuperX VGA is present (physically
installed) BEFORE installing any drivers.
• Insert the driver diskette into your system drive A:.
• Type INSTALL and follow all on-screen instructions.
Super X Accelerator VGA
25
NOTE: Additional drivers may appear on this screen as
more applications are supported. OS/2 drivers are
currently available from our BBS (407-241-1601).
Display Drivers
26
5.1 Microsoft Windows
Installing the Windows 3.1 Drivers
1. Make sure Windows 3.1 is already installed on your
system
2. Put the disk labeled “Windows 3.1 Drivers” into your A: or
B: drive.
3. Start Windows
4. From the Program Manager screen, select File, then
Run.
5. In the Command Line box, type A:SETUP or B:SETUP,
then select OK.
6. The Windows 3.1 drivers will now be installed.
7. The installation will create a new Windows Icon called
SETRES. This utility allows you to change the resolution
and number of available colors for your Windows display.
See the next page, “Using the SETRES Utility under
Windows 3.1”.
Super X Accelerator VGA
27
Using the SETRES Utility under Windows 3.1
1. Locate the SETRES icon on the Windows Program
Manager desktop.
2. Double click on the SETRES icon. The screen below will
appear
3. The Resolution button will be at 640x480, and the color
button will be at 16 colors by default.
4. To select a higher number of colors, click on that color
value (e.g., 256 colors).
5. Only the options in the SETRES window that are bold
(not grayed out) are available at that time.
Display Drivers
28
6. For example; changing from 640x480/16 colors, to
1024x768/256 colors.
• next, click on the 256 color resolution button
• click on the 1024x768 resolution button
Follow all on-screen directions.
The available choices for the SVGAX3 are:
Resolution
Color Choice available
640x480
16
256
64K
16M (TrueColor)
800x600
16
256
64K
1024x768
16
256
1280x1024*
16
* only if a monitor 5 or higher is chosen
Super X Accelerator VGA
29
5.2 Installing AutoCAD 12 Drivers
1. Go to your DOS prompt (C:\) and place the SVGAX3
driver diskette #1 into your A: or B: drive Make A: or B:
drive the working drive, by typing A: or B: at the C:\
prompt, and then pressing [ENTER].
2. Type INSTALL, then [ENTER].
3. Read all the introductory screens, pressing [ENTER] to
view each succeeding screen
4. At the MENU choices screen, Highlight the AutoCAD 12
option and press the [SPACE BAR] to make your choice.
Then press [ENTER].
5. The installation will copy the AutoCAD 12 drivers to your
\ACAD\DRV subdirectory, by default. If AutoCAD 12 is
in another directory, type that directory name in the space
provided instead.
6. When the installation process is done, it will prompt you
to press [ENTER] to return to the A: or B: prompt.
7. If AutoCAD 12 is already installed on your system, the
change to the C:\ drive by typing C: then press [ENTER].
Display Drivers
30
8. At the C:\ prompt, type Acadr12 -r, to start AutoCAD 12
with the batch file Acadr12.bat that was created when
AutoCAD was installed. The -r option tells AutoCAD that
you want to reconfigure AutoCAD.
9. The next screen shows the Current AutoCAD
Configuration, if it was previously configured. Press
[ENTER] to continue.
10. On the next screen, Configuration Menu, select
option #3 to reconfigure the Video Display.
11. The current video display choice will then be shown.
Type Y to say yes, you want to change the current video
display choice.
12. From the next screen, Available Video Displays, choose
the number that corresponds to the option that says
TurboDLD Classic by Panacea, Inc. After you make this
choice, you will be taken into DLDSETUP for the
TurboDLD driver.
13. The next screen is the TurboDLD Classic Main Menu/
Display Device Configuration. Here you will choose
the number of colors and the resolution in which you
want AutoCAD to work.
14. Press [ENTER] to choose the first option, Select
Graphics Board/Resolution. From the Graphics
Board Selection Menu that next appears, highlight
Select Display Graphics Board.
Super X Accelerator VGA
31
15. From the list of Cirrus chip types, choose the following:
SVGAX3
16. After you make a choice, you are taken back to the
Graphics Board Selection Menu. Highlight Select
Display Resolution, and press [ENTER].
17. From the Resolution Selection Menu, choose your
desired resolution, eg. 640 by 480 by 16 colors, or 800 by
600 by 256 colors, etc.
18. Once you have made a choice for the resolution, you are
taken back to the Graphics Board Selection Menu.
Choose Return to Previous Menu, then choose Save
and Exit.
19. Follow all succeeding AutoCAD prompts, making choices
to suit your needs. If you have difficulty making choices,
consult your AutoCAD documentation or Autodesk’s
technical support.
Display Drivers
32
Appendix A: Troubleshooting
This section lists common problems that may be
encountered and their possible solutions.
SYMPTOM
System does not
power up and the
screen is blank.
POSSIBLE REMEDY
• Ensure the SuperX is
properly inserted in its slot.
• Ensure you do not have
another video card in the
system using the memory
address. If you do, you need
to remove it from your system
and try re-booting.
Remember: the SuperX must
be the primary video adapter
(using two video adapters is
not recommended).
• Verify that switch settings
and/or jumpers are properly
set on your motherboard.
Refer to Section Two for
compatibility requirements.
• Confirm that your computer
and monitor are plugged in.
Check all power cables.
The computer
seems to boot, but
there is no
display.
Super X Accelerator VGA
• Check all cable and power
cable connections and verify
that the monitor is powered
on. Adjust brightness and
contrast controls correctly.
33
SYMPTOM
POSSIBLE REMEDY
The computer
seems to boot, but
there is no display
(contd).
• Verify that your monitor cable
is the proper type for the
SuperX.
• Ensure you do not have another video memory card in the
system using the same memory
address; if you do, you may
need to remove it from your
system and try re-booting.
Remember: the SuperX must be
the primary adapter (using two
video adapters is not recommended).
• Verify motherboard switch and
jumper settings.
• If your multi-frequency monitor
has an Analog/Digital switch,
make sure it is set to the Analog
position.
• Examine your monitor display
cable for broken or bent pins.
Your monitor’s
display appears
somewhat
distorted when
running a
graphics
application.
• Set the vertical hold properly
on your monitor.
• Ensure that your current
graphics application software
has been properly installed.
Troubleshooting
34
SYMPTOM
Your monitor’s
display appears
somewhat
distorted when
running a
graphics
application
(contd).
POSSIBLE REMEDY
• Ensure that your monitor is
capable of displaying the
graphics mode you are using.
Refer to your monitor
specifications.
• Ensure you are using the
correct vertical refresh rate for
your monitor.
• If your monitor has vertical
placement and size adjustment
controls, try these controls to
adjust the display.
• Use CLMODE (Section Four) to
match the monitor to the
SuperX.
You are unable to
get the SuperX to
work in your
computer, but
have found that it
works well in
another.
• Refer to the preceding
suggested remedies. If the
SuperX functions properly in
another system, it is likely the
problem lies elsewhere.
• Ensure that your computer has
a VGA-compatible BIOS. This
may be absent in some older
machines. If so, upgrade your
BIOS.
• Ensure that your computer is
completely compatible with IBM
standards. Some machines do
not support IBM-standard video
BIOS requirements.
Super X Accelerator VGA
35
Appendix B: Servicing Your Boca Product
If your Super X board requires service, first contact the authorized
Super X dealer from whom you purchased the board. If the dealer is
unable to assist you, and you must contact Boca Research, Inc.,
please follow the instructions below. Our electronic BBS is available
24 hours a day at (407) 241-1601 and will support data transmission
speeds up to 28.8Kbps with settings of N, 8, 1. If you have a modem,
the BBS may be helpful (especially during off hours) if you have a
question about product settings or compatibility, or if you wish to
download driver software or utilities.
NOTE: CALLING TECHNICAL SUPPORT WITHOUT
COMPLETE AND ACCURATE INFORMATION
CONCERNING YOUR PROBLEM MAY BE BOTH
TIME-CONSUMING AND FRUSTRATING FOR YOU.
1. When calling Boca Research Technical Support, have the following
information available:
•
•
•
•
Exact board name/product code and board part number.
Software/driver revision level • Computer manufacturer
Computer model
• Peripherals in the system
Operating system and version • Contents of system’s
CONFIG.SYS
If you suspect a problem with a specific program or software
package, make note of the name, version or release number, and
manufacturer of the software. Also use CLMODE (see Section Four)
to determine your Super X’s BIOS revision.
2. Call Boca Research Technical Support Department between the
hours of 8:00 a.m. and 6:30 p.m. Eastern time Monday through
Friday at (407) 241-8088. A technical support specialist will be
available to discuss the problem(s) you are experiencing. If it is
determined that factory service is required, you will be given a
Return Merchandise Authorization (RMA) number. Please place
this number on the outside of the package when you return
the item(s) for service and reference it on any correspondence
included in the package. Boca Research, Inc. will return any
product which is not accompanied by an RMA number.
Servicing Your Boca Product
36
3. Refer to the Warranty Statement if the product is covered
under the five-year Boca Research, Inc. Limited Warranty.
4. Certain parts (such as dealer installed RAM chips) will not be
covered under the Boca Research, Inc. Limited Warranty.
Dealer installed parts are warranted by the dealer. Parts which
you have installed yourself are covered only by the supplier’s
warranties. In these cases, Boca Research, Inc. can identify
which parts are defective, but will not replace such parts until
specific written authorization is received from you. The cost of
parts and labor involved in making such repairs will be billed
to you C.O.D.
5. When sending a board to Boca Research, Inc. for repairs, please
be sure to include the Super X board, your return street
address (for UPS purposes), phone number, and the RMA
number mentioned above. Package the product securely in a
container equivalent to the original packaging, and insure the
package to protect against loss or damage during transit.
Shipping charges must be prepaid; C.O.D. shipments will not
be accepted. Please use the address below for all
correspondence:
Boca Research, Inc.
RMA Department - RMA #____________
1601 Clint Moore Road
Boca Raton, FL 33487-2841
6. If the repairs performed on your board were covered by the
warranty, Boca Research, Inc. will return it prepaid via UPS.
Copyright
©1995 Boca Research, Inc. All rights reserved. No reproduction of this document in any form is allowed
without permission in writing from Boca Research, Inc. Boca Research is not liable for any damages
resulting from technical or editorial errors or omissions contained in this document. The information in
this manual is subject to change without notice. Revisions to the product(s) in this manual may occur at
any time without notice.
Trademarks
All Boca Research products are trademarks of Boca Research, Inc. All other references to computer
systems, software, and peripherals use trademarks owned by their respective manufacturers.
Publication Date: September, 1995
Printed in the U.S.A.
Super X Accelerator VGA
SVGAX3.PM5
37
Appendix C: Technical Specifications
Connector Information
The following table shows the pin-out assignments for the
DB15 video cable connectors.
IMPORTANT:
The Super X uses the same 15-pin (DB15) cable
available from monitor manufacturers to interface
with the IBM PS/2 computers. Using an incorrect
cable may result in damage to the monitor and/or
adapter. Note: some monitor manufacturers use
slightly different naming conventions for the signal
while retaining the same pin functionality. Do not be
concerned. All that is required is PS/2 functionality.
Signal
Pin
Red
Green
Blue
Monitor ID bit 2
Ground
Ground
Ground
Ground
Ground
Not Used
Monitor ID bit 0
Monitor ID bit 1
Horizontal Sync
Vertical Sync
Monitor ID bit 3
1
2
3
4
5
6
7
8
9
10
11
12
13
14
15
Pin-Out Assignments for the DB15 Video Cable Connector
Technical Specifications
38
Technical Specifications
• 1MB DRAM of on-board memory
• Supports up to 24-bit per pixel color
• Compatible with VGA color, analog monochrome monitors,
and multiple frequency monitors
• 15-pin analog connector
• Power: 1A @ 5V
• 6.2" x 3.2"
Video Modes
Resolution
Display
1280 x 1024
Up to 16 colors
interlaced
1024 x 768
Up to 256 colors
interlaced and
non-interlaced
800 x 600
Up to 65,536 colors
non-interlaced
640 x 480
Up to 16 million
colors non-interlaced
VESA Standard VGA Pass Through Connector Specification
A 26-pin header stake connector is provided which
maintains pin to pin compatibility with IBM’s feature
connector as shown in the table on the next page.
Super X Accelerator VGA
39
26-pin stake connector pinout:
Signal
Vesa Pin
Pixel Data 0
Pixel Data 1
Pixel Data 2
Pixel Data 3
Pixel Data 4
Pixel Data 5
Pixel Data 6
Pixel Data 7
Pixel clock
Blanking
Horz. Sync
Vert. Sync
ground
ground
ground
ground
Enable External Pixel Data (1)
Enable External Sync (2)
Enable External Pixel Clock (3)
not used
ground
ground
ground
ground
not used
(clipped)
1
2
3
4
5
6
7
8
9
10
11
12
13
14
15
16
17
18
19
20
21
22
23
24
25
26
IBM Feature
Connector
y1
y2
y3
y4
y5
y6
y7
y8
y9
y10
y11
y12
y13
z1
z2
z3
z4
z5
z6
z7
z8
z9
z10
z11
z12
z13
(1) A low enables feature connector pixel data input to the RAMDAC.
(2) A low enables feature connector sync and blanking inputs.
(3) A low enables feature connector pixel clock input.
For additional information see the Auxiliary Video
Connector description in the IBM PS/2 Hardware Technical
Reference Manual.
Technical Specifications
40
FCC Compliance
This equipment has been tested and found to comply with the
limits for a Class B digital device, pursuant to Part 15 of the
FCC Rules. These limits are designed to provide reasonable
protection against harmful interference in a residential
installation.
This device complies with Part 15 of the FCC Rules. Operation
is subject to the following two conditions:
(1) This device may not cause harmful interference.
(2) This device must accept any interference received, including interference that may cause undesired operation.
Shielded cables are required between the computer and the
monitor with the shield properly grounded. This equipment
generates, uses, and can radiate radio frequency energy and,
if not installed and used in accordance with the instructions,
may cause harmful interference to radio or television reception. However, there is no guarantee that interference will not
occur in a particular installation. If this equipment does cause
harmful interference to radio or television reception, which
can be determined by turning the equipment off and on, the
user is encouraged to try to correct the interference by one or
more of the following measures:
• Reorient or relocate the receiving antenna.
• Increase the separation between the equipment and the
receiver.
• Connect the equipment into an outlet on a circuit different
from that to which the receiver is connected.
• Consult the dealer or an experienced radio/TV technician for
help.
CHANGES OR MODIFICATIONS TO THIS EQUIPMENT
NOT EXPRESSLY APPROVED BY THE
MANUFACTURER COULD VOID YOUR AUTHORITY
TO OPERATE THE EQUIPMENT.
Super X Accelerator VGA
41
Glossary
24-bit. The number of bits which represent each pixel, or
point on the screen. An 8-bit per pixel card can generate 256
colors; 24 bits per pixel yields 16.8 million colors.
8514. An IBM color monitor capable of resolutions of
720x400 non-interlaced with a refresh rate of 70MHz;
640x480 non-interlaced at 60MHz; or 1024x768 interlaced at
43.58 MHz. All of these resolutions are in 256 colors.
Analog Monitor. A monitor which uses an analog signal.
Analog monitors can display an infinite number of shades
for each primary color.
Autoswitch. The ability of a display adapter to
automatically
determine the display standard required by your software
and to take action accordingly.
BIOS. Basic Input Output System. Provides fundamental
services required for the operation of a computer.
Permanently present in the machine, these routines are
generally stored in ROM (Read Only Memory). The system
board contains a ROM BIOS to support all of its standard
functions. The Super X also has a BIOS for display features.
Bit Block Transfer. A method of holding a block of
graphics, such as Windows dialogue box, in memory so that
it can be moved and redrawn quickly by memory-to-memory
operations.
CGA. Color Graphics Adapter. Medium resolution IBM
graphics standard capable of displaying 640 x 200 pixels in
2 colors, or 320 x 200 pixels in 4 colors.
Color Monitor. Any CGA, EGA, VGA color, or multiple
frequency monitor.
42
Digital Monitor. Monitor which receives discrete binary
signals. Digital monitors do not have as wide a range of color
choices as analog types; digital EGA monitors can display
just 64 colors.
DRAM. Dynamic RAM. RAM is random access memory.
ECD. Enhanced Color Display. An EGA specification. TTL
monitor capable of displaying video signals with horizontal
scan frequencies of 15.750KHz (CGA) or 21.850KHz (EGA)
only.
EGA. Enhanced Graphics Adapter. High resolution IBM
graphics standard capable of displaying 640 x 350 pixels in
16 colors out of a palette of 64 colors.
EGA Monitor. Any monitor capable of displaying both EGA
and CGA standard modes. This includes ECD and multiple
frequency monitors.
Extended EGA. Offered by proprietary chip sets on nonIBM
adapter cards with 640 x 480 resolution or better.
Feature Connector. Used by graphics adapters to give
compatibility with VGA text and graphics codes for use with
multi-media applications.
GUI. Graphical User Interface.
Flicker. The wavering or unsteady image on some monitors.
A major cause can be a low refresh rate.
Hardware Graphics Cursor. Provides a faster method of
displaying/moving a cursor (GUI arrow) on the screen. The
video adapter’s main chipset controls this function which
resides in system memory, as opposed to slower handling by
the application software.
Super X Accelerator VGA
43
HGC. Hercules Graphics Card. Compatible with MDA, but
also capable of displaying 720 x 348 pixels in a 4-bank
graphics mode.
Hi-res. Short for High Resolution, this term should be only
applied to a minimum of 640 x 350 resolution and above.
Horizontal Scan Rate. The frequency in KHz (kilohertz)
at which the monitor is scanned in a horizontal direction;
high horizontal scan rates produce higher resolution. The
EGA horizontal scan rate is 21.8 KHz, while the extended
EGA horizontal scan rate is 30.1 KHz.
Interlaced. A method of scanning a screen which results in
alternate lines being drawn with each full pass of the
electron beam. The resulting display is less stable than a
flicker-free non-interlaced display.
MDA. Monochrome Display Adapter. Early IBM Video
display board designed for use with IBM monochrome text
standard.
Monochrome Monitor. A TTL monitor which can display
only 2 colors (generally green/black or amber/black).
Multiple Frequency Monitor. Monitor capable of
displaying video signals over a wide range of horizontal scan
frequencies. This may include a horizontal capture range
from 5.5KHz to 35KHz or wider. Examples of monitors in
this class are the NEC MultiSync and the Sony Multiscan.
The Multiscan has a wide horizontal scan capture range
which enables it to display monochrome signals.
Palette. The range of colors from which you can select the
actual colors that the video adapter will display
simultaneously.
44
Pixel. A single dot on the CRT display. This word is derived
from the words ‘picture’ and ‘element’.
RAMDAC. RAM Digital to Analog Converter.
Refresh Rate. Also called Vertical Scan Rate, the speed at
which the screen is repainted. Typically, color displays must
be refreshed at 60 times per second. Usually, the faster the
refresh rate, the less flicker a monitor has (normally defined
in Hz).
Register Level Compatibility. Complete compatibility to
the hardware level.
RGB Monitor. Red/Green/Blue. A CGA compatible monitor
limited to a 15.750KHz horizontal scan rate.
Scan rate. The frequency in Hertz (Hz) at which the
monitor is scanned horizontally. Generally, the higher the
scan rate, the higher the resolution.
TSR. Terminate and Stay Resident. A program that remains
in memory after it has been loaded.
TTL. Transistor-Transistor Logic; a fast, reasonable-cost
type of integrated circuit used in some monitors.
TTL Monitor. Video and synchronization signals (all
digital) are on separate lines and have TTL compatible
voltage levels.
VESA. Video Electronics Standards Association.
VGA. (Video Graphics Array) Analog graphics standard
introduced with the IBM PS/2 series. Backwards compatible
with EGA at the BIOS level, but provides higher resolutions.
Supports a maximum resolution of 640 x 480 pixels in 16
colors out of a palette of 262,144 colors.
Super X Accelerator VGA
45
Limited Warranty
Boca Research, Inc. (BRI) warrants to the original buyer of this BRI product that the
hardware is free of defects in materials and workmanship for a period of five (5) years
from the date of purchase from BRI or its authorized dealer. Should the product fail to
be in good working order at any time during the five-year
period, BRI, will at its option, repair or replace this product as described below. This
warranty does not cover defects resulting from misuse, abuse, negligence, accident,
repairs, or alterations made by either the customer or another party. Boca Research
reserves full rights to determine whether a defective product falls into this category.
The entire risk as to the quality and performance of the product rests with the
customer. Any written or oral information or advice given by Boca Research dealers,
distributors, agents, or employees will in no way increase the scope of this warranty.
This warranty applies only to the product described in this manual and not to any
other value-added software which may be included.
All products will be serviced and returned via UPS-ground at no charge to customers
DURING the first year of service.
All customers are required to demonstrate proof of purchase when requesting a
Return Merchandise Authorization (RMA). The period of service commences on the
date of purchase. A copy of the sales slip must be included with the returned
merchandise.
Products which require Limited Warranty service during the warranty period should
be delivered to BRI at the address in the Appendix (Servicing Your Boca Product)
with proof of purchase and the Return Merchandise Authorization (RMA) number
provided by BRI Technical Support. Refer to the Appendix in your manual.
Replacement parts or complete products will be furnished on an exchange basis only.
Replaced parts and/or products become the property of BRI.
If the returned product is sent by mail, the purchaser agrees to prepay shipping
charges, insure the product or assume the risk of loss or damage which may occur in
transit, and to use a shipping container equivalent to the original packaging. ALL
EXPRESS AND IMPLIED WARRANTIES OF MERCHANTABILITY AND FITNESS
OF PURPOSE FOR THE PRODUCT ARE LIMITED IN DURATION TO THE ABOVE
FIVE- AND ONE-YEAR PERIODS, RESPECTIVELY.
UNDER NO CIRCUMSTANCES (WHETHER BASED IN CONTRACT OR TORT)
SHALL BOCA RESEARCH BE LIABLE FOR INCIDENTAL, CONSEQUENTIAL,
INDIRECT, SPECIAL, OR PUNITIVE DAMAGES OF ANY KIND, OR FOR LOSS OF
REVENUE, LOSS OF BUSINESS, OR OTHER FINANCIAL LOSS AS A RESULT OF
THE SALE, INSTALLATION, MAINTENANCE, USE, PERFORMANCE, FAILURE,
OR DISRUPTION OF ITS PRODUCTS.
Boca Research reserves the right to make periodic changes or enhancements to any
Boca Research product without prior notification, but has no obligation to modify or
update products once sold.
This warranty gives you specific legal rights, and you have other rights which may
vary from state to state. This warranty is valid only in the United States.
46
Software License Agreement for the Boca Research Super X
Boca Research, Inc. (BRI) grants the owner permission to use Super X software upon
adherence to the terms and conditions of this agreement.
1. The use of Super X software will be limited to computers that contain the Super X board.
2. Any reproductions of the Super X software are also subject to this agreement.
3. Super X software is not to be modified in any way; it should be used in its original form.
4. Should a change in ownership occur, these three conditions MUST be met:
• the Super X board must also be transferred to the new owner.
• any copies of the Super X software which are not being transferred must be destroyed.
• the new owner must abide by the terms presented in this agreement.
5. BRI remains the copyrighted owner of the Super X software. The ONLY rights given to
the licensee are those which have been provided for under this agreement.
6. UNDER NO CIRCUMSTANCES WILL BRI BE HELD LIABLE IN ANY WAY TO
ANY PURCHASER FOR DAMAGES, LOST REVENUE, LOST WAGES OR FOR
ANY OTHER INCIDENTAL OR CONSEQUENTIAL DAMAGES OF ANY KIND
WHETHER COVERED UNDER THIS AGREEMENT OR OTHERWISE. THE Super
X SOFTWARE IS NOT WARRANTED IN ANY WAY AND ITS USE IS THE SOLE
RESPONSIBILITY OF THE LICENSEE FREE FROM ANY EXPRESSED OR
IMPLIED WARRANTIES OF MERCHANTABILITY AND FITNESS FOR A
PARTICULAR PURPOSE.
7. BRI provides a five year warranty for the media on which the Super X software is
furnished. This warranty is limited to defects in materials and workmanship; it does not
cover the functions provided by the Super X software. This license is subject to
termination upon breach of this agreement. The Super X software and any copies must
be destroyed or returned to Boca Research, Inc.
8. BRI reserves the right to make modifications to the software without any prior notice.
9. This license is governed by the laws of the state of Florida.
Super X Accelerator VGA
47
48
Manual Part No. 9175
Rev. 2.4
Super X Accelerator VGA