1
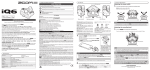
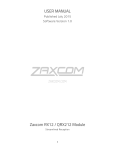
USER MANUAL
Published August 2014
MicPlexer 2
Refined Distribution
1
KNOWING YOUR MICPLEXER 2 ...................................................................................................................... 3
FRONT ...................................................................................................................................................................... 3
REAR ........................................................................................................................................................................ 4
MICPLEXER2 OPERATIONS............................................................................................................................. 5
SUPPLYING POWER ..................................................................................................................................................... 5
CONNECTING INPUT ANTENNAS .................................................................................................................................... 5
CONNECTING OUTPUT ANTENNAS ................................................................................................................................. 5
SELECTING A FREQUENCY BLOCK.................................................................................................................................... 5
USING THE VARIABLE INPUTS........................................................................................................................................ 6
Setting the variable filter ................................................................................................................................... 6
OVERLOAD LEDS ........................................................................................................................................................ 6
LED RF indication levels ..................................................................................................................................... 6
PRODUCT SUPPORT ...................................................................................................................................... 7
SPECIFICATIONS ............................................................................................................................................ 8
ZAXCOM WARRANTY POLICY AND LIMITATIONS............................................................................................ 9
2
Zaxcom MicPlexer2
Front
Knowing your MicPlexer2
Front
1
1.
2.
3.
4.
5.
6.
2
3
4
5
6
1
SMA Antenna in Connection (2) SMA – Use only 50 Ohm connectors.
Overload LEDs
Power Switch
16 Position Frequency Adjust Dial
Power LED
User Adjustable Filter Potentiometers
3
Zaxcom MicPlexer2
Rear
Rear
7
8
9
7. Antenna B outputs (4) SMA – Use only 50 Ohm connectors.
8. Antenna A outputs (4) SMA – Use only 50 Ohm connectors.
9. Power connector – Switchcraft 761K
4
Zaxcom MicPlexer2
Operations
MicPlexer2 Operations
Supplying power
The MicPlexer2 uses a Switchcraft 761K locking connector and will accept 8 to 18 volts DC and has a power
draw of 90mA at 12 volts. The center pin is wired positive and the ring is negative.
Connecting input antennas
The MicPlexer2 will receive its signal on the two SMA connectors on the top of the MicPlexer2. If using
remote antennas, to ensure optimal performance, use only 50 Ohm low loss coax cable with 50 Ohm
connectors and keep the cable run as short as possible. You can connect any proper UHF antenna to the
MicPlexer2.
Connecting output antennas
The MicPlexer2 has 8 SMA connectors on the bottom of the unit. There are 4 SMA connectors that
distribute the signal for antenna 1 and 4 SMA connectors for antenna 2. There are no differences in the
silver and gold connectors. When connecting the MicPlexer2 to receivers use 50 Ohm low loss coax cable
with 50 Ohm SMA connectors and keep the length of the cable as short as possible.
Selecting a frequency block
The MicPlexer2 has a 16 position frequency select dial on the front of the unit which allows you to change
the front end filter on the MicPlexer2. When selecting a position the tunable filter on the Micplexer2
moves the 35MHz window so that only radio frequencies (RF) in the desired frequency range will be
received while any unwanted and undesirable RF that is not within the 35MHz window of the tunable
filter is rejected.
Using a small screwdriver set the filter on the Micplexer2 to the position (frequency) that you want to
operate at.
Position
Block
0
1
2
3
4
5
6
7
8
9
A
B
C
D
V1
V2
20
21
22
23
24
25
26
NA
NA
NA
NA
NA
NA
NA
Variable 1
Variable 2
Center
Frequency
Frequency
Range
525.0 MHz
550.0 MHz
575.0 MHz
600.0 MHz
625.0 MHz
650.0 MHz
675.0 MHz
507.5 to 542.5
532.5 to 567.5
557.5 to 592.5
582.5 to 617.5
607.5 to 642.5
633.5 to 667.5
657.5 to 692.5
Variable
Variable
Variable
Variable
5
Zaxcom MicPlexer2
Operations
Using the Variable inputs
The MicPlexer2 has two user adjustable settings V1 and V2. The variable positions allow you to
custom set the center of the 35MHz filter to any frequency desired. This will allow the MicPlexer2
to be customized for any frequency range. This will also allow the MicPlexer2 to cross blocks.
Setting the variable filter
To set the variable filter you will need a small screwdriver and a transmitter.
1. Set the rotary dial to the desired variable position (V1 or V2).
2. Turn the transmitter on and set it to its lowest output power setting then tune the
transmitter to the desired frequency you will be operating it at.
3. Place the transmitter about 3 to 3 feet (.5 to 1 meter) away from the MicPlexer2.
4. Adjust the appropriate potentiometer (V1 or V2) till you see the first position LED just barely
illuminate. Turning the pot to right increases the frequency and turning to the left lowers the
frequency.
Now the center of the 35 MHz filter for that variable position is set to the frequency of that
transmitter, and the useable frequencies for that variable position are 17.5 MHz above and 17.5
MHz below that frequency.
Overload LEDs
The MicPlexer2 has three overload LEDs for each antenna input. The purpose of these LEDs are to
determine if the MicPlexer2 is receiving too strong of an RF signal. If a strong signal, either from
your transmitters or some other RF source, is received the RF amp in the MicPlexer2 can
overload. If the amp overloads it can desensitize the unit and can cause possible intermodulation
interference which will decrease performance.
In most situations there should be no illumination of any of the LEDs. If the left most LED is lit,
this should be a warning and you should try to move away from the RF source to get the LED to
go out. If the center LED starts to illuminate you may be overloading the MicPlexer2 so you will
want to reduce the incoming RF. If the right OL (overload) LED comes on you are overloading the
MicPlexer2 and you will need to minimize the RF by moving the antennas away from the RF
source or you may even need change the frequency block.
LED RF indication levels
•
•
•
Left LED will illuminate when the RF noise floor is at -24dB
Center LED will illuminate when the RF noise floor is at -18dB
Right (Overload) LED will illuminate when the RF noise floor is at -14dB
.
6
Zaxcom Micplexer2
Support
Product Support
Register your product with Zaxcom:
Download the latest Firmware from:
Download the latest User Manuals from:
Submit Technical Questions at:
Submit information for Repair Services at:
Join the Zaxcom User Forum at:
Join the Zaxcom Face Book User Group at:
http://zaxcom.com/support/product-registration/
http://zaxcom.com/support/updates/
http://zaxcom.com/support/updates/
http://www.zaxcom.com/submit-a-technical-question
http://www.zaxcom.com/support/repairs
http://www.zaxcom.com/forum/forum.php
https://www.facebook.com/groups/682199065139938/
7
Zaxcom Micplexer2
Specifications
Specifications
Frequency Tuning Range
Tuned Pass Band
Attenuation: +/- 25 MHZ
Attenuation: +/-50 MHz
Attenuation: +/-75 MHz
512-702 MHz
35MHz
12.5dB
35dB
51dB
RF Gain
RF Channels
Channel Crosstalk
Amplifier Noise Figure
OIP3 Distortion
6 dB
2
Less than 40 dB
.35dB
+37 dB
Power requirements
Size
Weight
8-18VDC @100ma
1.25 x 3.25x 4.75
8 ounces
8
Zaxcom Warranty Policy and Limitations
Zaxcom Inc. values your business and always attempts to provide you with the very best service.
No limited warranty is provided by Zaxcom unless your MicPlexer2 (“Product”) was purchased from an authorized distributer or authorized reseller.
Distributers may sell Product to resellers who then sell Product to end users. Please see below for warranty information or obtaining service. No warranty
service is provided unless the Product is returned to Zaxcom Inc. or a Zaxcom dealer in the region where the Product was first shipped by Zaxcom.
Warranty Policy
The Product carries a Standard Warranty Period of one (1) year.
NOTE: The warranty period commences from the date of delivery from the Zaxcom dealer or reseller to the end user.
There are no warranties which extend beyond the face of the Zaxcom limited warranty. Zaxcom disclaims all other warranties, express or implied,
regarding the Product, including any implied warranties of merchantability, fitness for a particular purpose or non-infringement. In the United States, some
laws do not allow the exclusion of the implied warranties.
Troubleshooting & Repair Services
No Product should be returned to Zaxcom without first going through some basic troubleshooting steps with the dealer you purchased your gear from.
To return a product for repair service, go to the Zaxcom Repair Services page http://www.zaxcom.com/repairs and fill in your information; there is no
need to call the factory for an RMA. Then send your item(s) securely packed (in the original packaging or a suitable substitute) to the address that was
returned on the Repair Services page. Insure the package, as we cannot be held responsible for what the shipper does.
Zaxcom will return the warranty repaired item(s) via two-day delivery within the United States at their discretion. If overnight service is required, a FedEx
or UPS account number must be provided to Zaxcom to cover the shipping charges.
*Please note a great resource to troubleshoot your gear is the Zaxcom Forum: http://www.zaxcom.com/forum.
Warranty Limitations
Zaxcom’s limited warranty provides that, subject to the following limitations, each Product will be free from defects in material and workmanship and will
conform to Zaxcom’s specification for the particular Product.
Limitation of Remedies
Your exclusive remedy for any defective Product is limited to the repair or replacement of the defective Product.
Zaxcom may elect which remedy or combination of remedies to provide in its sole discretion. Zaxcom shall have a reasonable time after determining that
a defective Product exists to repair or replace a defective Product. Zaxcom’s replacement Product under its limited warranty will be manufactured from
new and serviceable used parts. Zaxcom’s warranty applies to repaired or replaced Product for the balance of the applicable period of the original
warranty or thirty days from the date of shipment of a repaired or replaced Product, whichever is longer.
Limitation of Damages
Zaxcom’s entire liability for any defective Product shall, in no event, exceed the purchase price for the defective Product. This limitation applies even if
Zaxcom cannot or does not repair or replace any defective Product and your exclusive remedy fails of its essential purpose.
No Consequential or Other Damages
Zaxcom has no liability for general, consequential, incidental or special damages. These include loss of recorded data, the cost of recovery of lost data, lost
profits and the cost of the installation or removal of any Product, the installation of replacement Product, and any inspection, testing or redesign caused
by any defect or by the repair or replacement of Product arising from a defect in any Product.
In the United States, some states do not allow exclusion or limitation of incidental or consequential damages, so the limitations above may not apply to
you. This warranty gives you specific legal rights and you may also have other rights, which vary from state to state.
Your Use of the Product
Zaxcom will have no liability for any Product returned if Zaxcom determines that:
• The Product was stolen.
• The asserted defect:
• Is not present,
• Cannot reasonably be fixed because of damage occurring when the Product is in the possession of someone other than Zaxcom, or
• Is attributable to misuse, improper installation, alteration, including removing or obliterating labels and opening or removing external covers (unless
authorized to do so by Zaxcom or an authorized Service Center), accident or mishandling while in the possession of someone other than Zaxcom.
• The Product was not sold to you as new.
Additional Limitations on Warranty
Zaxcom’s warranty does not cover Product, which has been received improperly packaged, altered or physically abused.
9