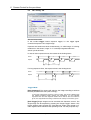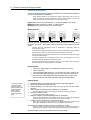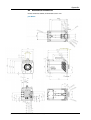
1
user manual pco.dimax pco.dimax HD/HD+ In this manual you find instructions for the pco.dimax and pco.dimax HD/HD+ CMOS high-speed cameras. Note: Depending on your actual camera version and installed firmware, not all features might be applicable. Target Audience: This camera is designed for use by technicians, engineers, and scientists. In case of any questions or comments, please contact us at PCO. telephone +49 (0) 9441 2005 50 fax +49 (0) 9441 2005 20 email postal address [email protected] PCO AG Donaupark 11 93309 Kelheim, Germany The cover photo shows an exemplary PCO camera system. The lens is sold separately. Copyright © 2012 PCO AG (called PCO in the following text), Kelheim, Germany. All rights reserved. PCO assumes no responsibility for errors or omissions in these materials. These materials are provided "as is" without warranty of any kind, either expressed or implied, including but not limited to, the implied warranties of merchantability, fitness for a particular purpose, or non-infringement. PCO further does not warrant the accuracy or completeness of the information, text, graphics, links or other items contained within these materials. PCO shall not be liable for any special, indirect, incidental, or consequential damages, including without limitation, lost revenues or lost profits, which may result from the use of these materials. The information is subject to change without notice and does not represent a commitment on the part of PCO in the future. PCO hereby authorizes you to copy documents for noncommercial use within your organization only. In consideration of this authorization, you agree that any copy of these documents, which you make, shall retain all copyright and other proprietary notices contained herein. Each individual document published by PCO may contain other proprietary notices and copyright information relating to that individual document. Nothing contained herein shall be construed as conferring by implication or otherwise any license or right under any patent or trademark of PCO or any third party. Except as expressly provided, above nothing contained herein shall be construed as conferring any license or right under any PCO copyright. Note that any product, process, or technology in this document may be the subject of other intellectual property rights reserved by PCO, and may not be licensed hereunder. Updated November 2012 © PCO AG 2 pco.dimax User Manual V1.02 © PCO AG, Germany Table of Contents Table of Contents 1 Introduction ..................................................................... 4 High Speed meets High Resolution. 2 Safety Instructions .......................................................... 5 Save money, reduce stress, stay healthy 3 System Components ....................................................... 6 What’s in the Box? 4 Installation ....................................................................... 7 Get your camera and computer ready for start. 5 Quick Start ....................................................................... 8 How to get an image fast and easy 6 Camera Control for the pco.dimax ................................ 9 The main interface for all camera settings 6.1 6.2 6.3 6.4 6.5 6.6 6.7 7 The “Camera Control” window ............................................................... 9 The Timing tab...................................................................................... 10 The Sensor (Size) tab ............................................................................ 15 The Sensor (Misc.) tab .......................................................................... 16 The CamRam tab.................................................................................. 17 The Recording tab ................................................................................ 18 The In/Out Signals tab .......................................................................... 20 Camware Features ........................................................ 21 Software for image acquisition and archiving 7.1 If no camera is connected .................................................................... 21 7.2 Overview .............................................................................................. 22 7.3 The File Menu ....................................................................................... 23 7.4 The Camera Menu ................................................................................ 27 7.5 The Acquisition Menu ........................................................................... 28 7.6 The View Menu ..................................................................................... 29 7.7 The Window Menu................................................................................ 32 7.8 The Help Menu ..................................................................................... 32 7.9 The Local Menu .................................................................................... 33 7.10 Additional Features............................................................................... 34 Appendix A1 Technical Data ................................................................ 36 A2 Mechanical Dimensions .................................................. 37 A3 GigE Installation and System Requirements ................... 39 A4 Image File Formats .......................................................... 45 A5 Service and Maintenance ................................................ 47 A6 Customer Service and Trouble Shooting ........................ 47 A7 Battery Operation ............................................................ 48 About PCO .............................................................................. 53 pco.dimax User Manual V1.02 © PCO AG, Germany 3 1 Introduction 1 Introduction High Speed meets High Resolution. Features This high speed 12 bit CMOS camera system comprises advanced CMOS and electronics technology. It is perfectly suited for high speed camera applications such as material testing, off-board crash or impact tests or super slow motion movie clips. The system features also a variety of trigger options to cover all off-board applications that have been required by the automotive industry. The cameras’ main features are: max speed at full resolution max speed at HD resolution max speed at 1k x 1k resolution pco.dimax 1279 fps (2016 x 2016 pixels) 2470 fps (1920 x 1080 pixels) 4501 fps (1008 x 1000 pixels) pco.dimax HD 1547 fps (1920 x 1080 pixels) 1547 fps (1920 x 1080 pixels) 2779 fps (1008 x 1000 pixels) pco.dimax HD+ 1166 fps (1920 x 1440 pixels) 1547 fps (1920 x 1080 pixels) 2779 fps (1008 x 1000 pixels • 12 bit dynamic range • color & monochrome image sensor versions available • Correlated Double Imaging for superior image quality • exposure time range 1.5 µs - 40 ms • image memory in camera (camRAM up to 36 GB) • double shutter operation (pco.dimax) • GigE & USB2.0 or Camera Link data interfaces (HD-SDI optional) • multiple trigger interface optimized for automotive applications • smart battery control (1h full operation or 6h data backup) Areas of Application • high speed particle image velocimetry (PIV) • short time physics • spray analysis • hyper velocity impact studies • automobile crash tests • material testing • tensile tests • airbag inflation • fast flow visualization 4 • hydrodynamics • fuel injection • sparks in electronical switches • combustions imaging • semiconductor quality control • fast events in nature and machine • super slow motion movie clips • ballistics • 3D high speed photogrammetry pco.dimax User Manual V1.02 © PCO AG, Germany 2 Safety Instructions Never operate the camera in humid or dusty environments or in places with high amounts of X-ray radiation. Humidity, dust or X-rays could damage the camera. To avoid the risk of water condensation, protect the camera against extreme changes of ambient temperature. If condensation enters the camera, there is the risk of electric shock. To prevent damage to the camera, the system must be kept stable and protected against strong jolts or vibrations. The socket at the bottom of the camera is to be used for mounting purposes only. The slits in the camera case (side & back planes) are designed for heat dissipation by the camera fan. To prevent overheating of the camera, do not block these slits. Do not leave the camera system in direct sunlight to avoid the risk of overheating. Electric shock warning – Never slide any items through the slits into the camera because of the risk of electric shock if the voltage parts inside are touched. Each time the camera is used, check the power cable for any damage. Never position the cable in a way that it could become a tripping hazard. Do not force the lens onto the camera. To protect the lens connector thread from damage, use minimal force when attaching a lens to the camera. If any of the following conditions apply, immediately switch off the camera, separate it from the power line and contact our customer support: If the power cable or the power plug seems to be worn or damaged. If liquids have penetrated the device. If, after thoroughly reviewing the instruction manual, the device is still not operating properly. If the camera has been dropped or the casing is damaged. pco.dimax User Manual V1.02 © PCO AG, Germany 5 3 System Components 3 System Components The camera system includes the following parts (using the example of pco.dimax). Camera Head F-mount optical connection: The distance between the front edge of the F-mount and the sensor is 46.5 mm. For standard F-mount/SLR lenses and adapters. LEDs indicate camera status Recording – Status – Error ON/OFF Switch Power Input 12-36 VDC Dust Filter (exchangeable) Input/Output BNC connectors Trigger – Acquire – IRIG-B – Status – Sync in/out Lemosa connectors Automotive applications - www.lemo.com Interface GigE Vision – USB 2.0 – Cameralink – (HD-SDI optional) 1/4-20 UNC and 3/8-16 UNC and M8 threads 5.2 mm pinholes Serial Number tag Power Supply 24V AC External Power Supply ETF150-24 Power Cord (optional) Standard IEC13 connector (please refer to your local dealer) Battery Pack (optional) Lithium Iron Phosphate (LiFePO4) battery Cable 10m Patch cable RJ45 Cat6.0 Digital Camera Tools (CD-ROM) The accompanying CD contains: • Camware: software for camera control & image acquisition • camera driver & tools • software development kit (SDK) and demo programs in C and C++ 6 pco.dimax User Manual V1.02 © PCO AG, Germany 4 Installation 4 Installation You will find all necessary files on the accompanying CD. You may also download the newest versions of our software, camera drivers, and third party software drivers from our website (support section). In this chapter you find the quick installation utilizing USB interface. For the more advanced GigE Vision installation and system requirements please see appendix A3. Minimum computer system requirements: • Clock speed > 1.6GHz • RAM > 512MB • Windows XP/ Service Pack 2 • Windows7 64-bit • 1280 x 1024 pixel resolution display • nVIDIA CUDA GPU • USB 2.0 (1000Mbps NIC with PCI-Express) Priority of USB over GigE when both connections are used at the same time! Commands over GigE will be ignored. 4.1 USB Please have the USB drivers and files downloaded on your computer. Connect camera with PC and start camera. The camera is ready after one beep. 4.2 Camera Driver The first time the camera is connected via USB to the computer, Windows will notify the user that a new device has been detected. Afterwards, the typical Windows hardware drivers’ installation process will begin. At this point, you are asked for the location of the corresponding file. 4.3 After successful installation, you will find the folder “Digital Camera Toolbox” in your program directory. Camware The pco.camware 32-bit/64-bit Windows application software enables you to control every camera parameter or setting. Images can be displayed on a monitor and may be downloaded and stored. Please run the respective software installation provided on the CD: For Camera Link Use: Select the required runtime libraries! E.g. “Dll MeIV” pco.dimax User Manual V1.02 © PCO AG, Germany 7 5 Quick Start 5 Quick Start Note: In order to get familiar with your new camera & software it might be helpful, if you first aim at an object that is easy to focus and that can be seen at standard light conditions. 5.1 Preparation installation is finished (see chapter 4) an appropriate lens is attached (remove cap!) or the camera is attached properly to the microscope, spectrograph or other scientific device camera is connected to the power supply camera is connected to the PC computer is on camera is on (the camera is ready after one beep) 5.2 Start start Camware “live preview” Useful for fast and easy camera adjustment and focusing. This command disables the Camera Control window if it is opened (except exposure time setting)! open view window - if not already open - start “live preview” apply “auto range peak” you may adjust aperture and focus You should now clearly see the object in the window. If you need to change exposure time (e.g. the image is still either too dark or too bright), please go to chapter 6! If you want to record and save images, please see chapter 6 and chapter 7 for detailed information! 8 pco.dimax User Manual V1.02 © PCO AG, Germany 6 Camera Control for the pco.dimax 6 Camera Control for the pco.dimax The 'Camera Control' window in Camware is the main interface for all camera settings. For further Camware features please see chapter 7! 6.1 The “Camera Control” window The camera control window can be opened by selecting the proper command in the "Camera"-Menu or by the corresponding button in the toolbar: The camera control dialog always adapts to the camera type connected. For the pco.dimax the camera control settings are spread over six property tabs 1, which will be explained below. 1 The camera control dialog automatically adjusts settings in case they are out of limits. 3 2 Changes to the camera control tabs must be completed by pressing the “Accept” button 2. If the "Accept" button is not pressed, these changes will be ignored and lost. The camera control dialog automatically adjusts settings in case they are out of limits. When the ‘Accept’ button is pressed the settings will be transferred to and validated by the camera. If the camera accepts the settings the green LED will be highlighted. The red LED will be highlighted in case a record is started. In the information field 3 you can view some information about the camera. Click into the info field in order to scroll through the values. Estimated Recording Time (est. rec. time) due to selected fps, ROI, camRAM size. pco.dimax User Manual V1.02 © PCO AG, Germany 9 6 Camera Control for the pco.dimax 6.2 The “Timing” tab General Information In this context trigger means exposure trigger, i.e. the trigger signal controls the exposure of a single image. Exposure and readout are done simultaneously, i.e. while image “n” is being readout from the sensor, image “n+1” is already integrated within the sensor’s pixel elements. In case of short exposure times, the readout is the limiting factor: n readout exposure n texp n+1 n+1 n+2 n+2 treadout For long exposure times, the exposure time is the limiting factor: n-1 readout exposure n n texp n+1 n+1 tsys Trigger Mode [Auto Sequence] The camera will optimize the image recording to achieve the best possible frame rate (“free running”). In the [auto sequence] exposure control mode, the camera determines the fastest possible image uptake rate depending on the adjusted exposure time and the required readout time. After a start command is given, the sequential recording is started until a stop command is given. [Soft Trigger] Single images can be recorded with Camware control. The single image can be acquired by pressing the "Single Trigger" button. This button appears after pressing the “Start Record” button (see chapter 7.2). Other signals cannot influence this operating mode. For test purposes only. 10 pco.dimax User Manual V1.02 © PCO AG, Germany 6 Camera Control for the pco.dimax [Ext. Synch.] In addition to the Master-Slave camera synchronization mode (see page 14) the pco.dimax also utilizes an external synchronization signal that feeds a phase locked loop (PLL) in the camera. The exposure times are generated based on the frequency of the phase locked loop. Advantages of the PLL solution: • Reliability: In case of dropouts of the external synchronization signal, the synchronization is kept internally by the PLL signal with only small deviation. • Noise immunity: Interference on the signal is automatically detected and discarded. • Flexibility: The cameras can even be set to different frame rates, as long as all frame rates are an integer multiple of the synchronization frequency. Please refer to PCO for further information. [External Exp. Start] The image acquisition is triggered by an external signal. It is also possible to force a software trigger for a test image with the "Single Trigger" button. In the [External Exp. Start] exposure control mode, single image recording is started by the falling or rising edge of the voltage signal at the BNC input (see chapter 6.7). The frame-rate cannot be set, as the frame-rate is defined by the frequency of the external signal. However the exposure time and ROI settings affect the maximum possible framerate. A new trigger is possible after treadout or (texp + tsys) (whichever is longer) after the preceding trigger. The Busy Status signal (see chapter 6.7) indicates if a new trigger will be accepted. exp trig (in) Exp Stat (out) Busy Stat (out) acc. not acc. accepted accepted The maximum achievable frame rate in external trigger mode is negligibly less (about 0.1%) than when operating the camera in [Auto Sequence] mode. Note: If the trigger rate of the external signal is quite near the maximum possible frame-rate (difference < 1/1000), then it will be random, whether or not a trigger is accepted! If the trigger rate of the external signal is higher than the maximum possible frame-rate, then every second trigger pulse is ignored. Therefore the actual frame-rate drops to ½ of the external trigger rate. If the trigger rate is increased further, then only every 3rd, every 4th etc. trigger edge will be accepted. exp trig (in) Exp Stat (out) Busy Stat (out) acc. not acc. acc. not acc. acc. not acc. acc. not acc. In order to avoid trade-offs at maximum frame-rate use either the Busy Status signal (see chapter 6.7) or make sure that the external trigger rate follows this condition: External Trigger Rate ≤ fmax / 1.001 pco.dimax User Manual V1.02 © PCO AG, Germany 11 6 Camera Control for the pco.dimax [External Exp. Ctrl] An external signal, which is applied to the trigger input, controls the start and the duration of the exposure (see chapter 6.7). In trigger mode [External Exp. Ctrl] a new exposure is started by the falling or rising edge of the voltage signal at the BNC input (see chapter 6.7). The exposure is finished when the opposite edge is detected. Thus in this mode, the start as well as the length of the exposure time can be controlled. No further settings can be made, as the image timing is completely controlled by the exp trig signal. There is a maximum exposure time. If the trigger pulse is longer than 20 ms, the integration will be stopped at 20 ms. A new trigger is possible after treadout or (texp + tsys) (whichever is longer) after the preceding trigger. The Busy Status signal (see chapter 6.7) indicates if a new trigger will be accepted. exp trig (in) Exp Stat (out) Busy Stat (out) treadout acc. not acc. accepted accepted The detailed timing for external trigger includes system delay times, an adjustable additional delay time, and the jitter. exp trig (in) exposure trsys trsys (rising edge) tfsys (falling edge) tjit (jitter) tdelay (delay) tdelay tjit tfsys tdelay tjit 40 MHz pco.dimax HD/HD+ 55 MHz pco.dimax color 62.5 MHz pco.dimax monochrome W + 1.63 µs 960 W + 1.21 µs 1320 W + 1.04 µs 1500 3.63 µs @ full resolution 1.73 µs @ 100x100 2.74 µs @ full resolution 1.29 µs @ 100x100 2.38 µs @ full resolution 1.11 µs @ 100x100 W + 2.13 µs 960 W + 1.61 µs 1320 W + 1.40 µs 1500 4.13 µs @ full resolution 2.23 µs @ 100x100 3.14 µs @ full resolution 1.69 µs @ 100x100 2.74 µs @ full resolution 1.47 µs @ 100x100 -0 / +25 ns (max.) -0 / +20 ns (max.) -0 / +20 ns (max.) 0 … 1 ms 0 … 1 ms 0 … 1ms W: width of selected ROI Trigger edges occurring within (tdelay + 200 ns) after a preceding trigger will be ignored! There is no specified timing for the software trigger. The software trigger is not recommended for applications where an exact timing is required! Delay time is not recommended for high speed applications. 12 pco.dimax User Manual V1.02 © PCO AG, Germany 6 Camera Control for the pco.dimax Timing Please see notes to the external trigger modes for respective timing issues. The exposure and delay time can be adjusted in steps of 1 µs. pco.dimax pco.dimax HD/HD+ exposure time 1.5 µs … 40 ms 1.5 µs … 40 ms delay time 2 µs … 40 ms 2 µs … 40 ms The slider and the up/down control refer to the blue highlighted unit . Delay time is not recommended for high speed applications. [FPS based] The camera will optimize the image recording to achieve the selected frame rate with chosen exposure time as close as possible. Only for [Auto Sequence] trigger mode. First the frame-rate is set. If the time required for readout of the image is longer than 1 / frame-rate, then the frame-rate will be reduced to 1 / treadout. If the selected exposure time requires a lower frame-rate, the exposure time is cut to the maximum possible time at that frame-rate. The minimum selectable frame-rate is 0.465 Hz. pco.dimax User Manual V1.02 © PCO AG, Germany 13 6 Camera Control for the pco.dimax Camera Synchronization The Sync Mode feature eliminates the need for an external synchronization source and facilitates the operation. Using defined settings for all cameras the master camera takes into account the maximum frequency deviation between the cameras and calculates the maximum frame rate such that it is ensured that no camera drops images. [off] Set this camera as ‘stand-alone’, i.e. not participating in the chain. [Master] Set this camera as ‘master’ in a daisy chain. [Slave] Set this camera as ‘slave’ in a daisy chain. Wiring Scheme Master The camera must be wired from the Sync Out to the Sync In of the following camera in the chain. The master camera must be at the beginning of the chain. Cameras which are configured as slave or standalone, do electrically repeat the synchronisation signal. A master camera ignores the signal at its Sync In port and generates a synchronisation signal at the Sync Out port. Thus a master camera interrupts a wired chain. The cameras can also be wired as a ring structure. In this case any one of the cameras can act as a master camera. A camera configured as a standalone camera does not participate and can be operated individually, but does not interrupt the chain. All cameras should have the same sensor frequency. If not, please define the camera with the lowest sensor operating frequency as master! Specifications • • • • • up to 50 m cable (RG174 or RG58) from camera to camera up to 5 cameras synchronization delay less than 1 us (5 cameras, 100 m cable in all) synchronization jitter less than 50 ns (for any camera in the chain) the maximum achievable frame rate in camera sync mode is only about 0,5% less than when operating the camera individually Camera Setup In case of one single Camware instance for all cameras, the software will start the slave cameras first and the master camera last (vice versa at acquisition stop). • • • • Set all cameras to same ROI and same size of the RAM segment. Define the master and slave cameras. Exposure/delay time and frame rate can only be set for the master camera. Start all slave cameras first (record button in Camware). • Start the master camera. • Stop the master camera first (Stop button in Camware). The slave cameras do not record images but wait for the master camera to start. Now all cameras are recording images The slave cameras are still in record state, but do not record. They must be stopped as well. All cameras have now recorded the same number of images. • Images can now be read from all of the cameras. This is done by using an index, where #1 is the first/earliest image. Images with the same index requested from different cameras are taken at the same time. The sequence trigger can also be used in camera sync mode. However, only the master camera must be configured for the sequence trigger and trigger delay. The sequence trigger mode setting for all slave cameras must be “off”! Acquire Enable mode is not possible in camera sync mode. 14 pco.dimax User Manual V1.02 © PCO AG, Germany 6 Camera Control for the pco.dimax 6.3 The “Sensor (Size)” tab Binning Feature not applicable for pco.dimax Sensor Format The implemented sensor has the option to readout a standard size (effective pixels recommended by the sensor manufacturer) or an extended size (not in pco.dimax HD/HD+), which adds optical black pixels, which can be helpful for calibration or control purposes. In extended mode, you will not increase image size! Region of Interest The ROI (region of interest) selects only a part of the sensor to be read out, in order to speed up the frame rate and to save memory. Due to the sensor structure and readout electronics the selectable region is always symmetric about the center. increments horizontal: increments vertical: 48 pixel steps 4 pixel steps minimum ROI: 48 x 8 pixels Selection of possible ROI with corresponding storage/recording values (pco.dimax mono): resolution horizontal [pixel] 2016 1920 1008 720 240 240 240 2016 resolution vertical [pixel] 2016 1080 1000 480 120 32 16 16 max frame rate [fps] 1 279 2 470 4 502 11 576 63 841 126 263 153 563 73 443 # of images in camRAM 36 GB 6 324 12 395 25 499 74 374 892 496 3 346 862 6 693 725 796 872 recording time [s] 4.9 5.0 5.7 6.4 14.0 26.5 43.6 10.9 Values are for estimation purposes only. The Camware will show the actual frame rate and estimated recording time due to selected ROI and timing values in the information box: pco.dimax User Manual V1.02 © PCO AG, Germany 15 6 Camera Control for the pco.dimax 6.4 The “Sensor (Misc.)” tab Pixelclock The pixel clock sets the clock frequency and therefore the image sensor readout speed. In general, at higher readout speed the image quality will suffer due to higher readout noise. 40 MHz HD Mode pco.dimax HD/HD+ 55 MHz Quality Mode pco.dimax color 62.5 MHz Speed Mode pco.dimax monochrome AD Converter (Feature not applicable for pco.dimax) Double Image Feature for particle image velocimetry (PIV) measurements. interframing time 40 MHz - 55 MHz 3.58 µs 62.5 MHz 3.15 µs CDI mode The correlated double image (CDI) mode offers to record images with increased dynamic range and a 30% better performance on the weak signal side of the images (at the expense of half of the usual frame rate). Offset Control Offset control is done automatically for optimal results. User control is disabled. B/W Noise Filter In the pco.dimax an optimal hot pixel correction is already integrated. Analog Settings The number refers to the conversion factor that defines how many charges (electrons), which have been generated by light in the image sensor in each pixel, are necessary to generate one count (one intensity level) in the digital image. Electronics Temperature Display of electronics and sensor temperature. Due to digital temperature compensation and sophisticated electronic design the pco.dimax comes with ultra-stable offset, where there is no need for extra black or current session references. 16 pco.dimax User Manual V1.02 © PCO AG, Germany 6 Camera Control for the pco.dimax 6.5 The “CamRam” tab The CamRam tab is for controlling the camera built in memory (camRAM). You have the possibility to record into 3 different segments. Pointer over the size field will show max number of images in this segment. max number of images in CamRam (100%) @ full resolution @ HD resolution 18 GB 3154 6182 36 GB 6324 12395 Values are for estimation purposes only (pco.dimax). Example of single segment with 100% memory usage (18 GB, pco.dimax): pco.dimax User Manual V1.02 © PCO AG, Germany 17 6 Camera Control for the pco.dimax 6.6 The “Recording" tab Recorder Mode In sequence mode the camera will stop after the memory (i.e. the active camRAM segment) is completely filled. In ring buffer mode the camera will record until it is stopped, overwriting previous images. Acquire Mode The acquire mode gives you the ability to enable or disable the recording by an external signal. If set to [Auto] all images are accepted and all images taken are saved. A signal at the acq enbl input (see chapter 6.7) is ignored for this function. This mode still requires initial camera recording activation by software (press record button)! If set to [External], the camera will only record images, if the external signal enables recording. While the sensor timing scheme is not affected by the signal at the acq enbl input, the acq enbl input is sampled at the beginning of the exposure time, which can be seen at the rising edge of the exp stat input. If the acq enbl input is high (low, when inverted) at that time, the image is saved to memory. If the acq enbl input is low (high, when inverted), the image is not saved to memory (image is lost). Exp Stat (out) acq enbl (in) saved not saved not saved saved saved In trigger mode [External Exp. Start], the acq enbl input works like a gate for the trigger signal. A trigger edge (rising, falling when exp trig is inverted) is accepted only when the acq enbl signal is high (low, when inverted). acq enbl (in) exp trig (in) Exp Stat (out) accepted not acc. not acc. accepted accepted In trigger mode [External Exp. Ctrl], the acq enbl input works very similar to the mode [External Exp. Start]. However, the acq enbl input is ignored for the edge which is closing the exposure time (started exposure will be finished accordingly). 18 pco.dimax User Manual V1.02 © PCO AG, Germany 6 Camera Control for the pco.dimax When using acq enbl in external trigger modes, the following timing specification should be met: exp trig (in) acq enbl (in) tsu th pco.dimax 50 ns 50 ns tsu pco.dimax HD/HD+ 60 ns 60 ns th If the acq enbl signal changes within the window of tsu (set up) to th (hold), the behavior is random. The trigger may be accepted or ignored. Sequence Trigger Mode The Sequence Trigger enables the user to stop capturing a sequence of images via an external signal, and then the number of images to be stored after this event can be defined. The sequence trigger function utilizes the acq enbl input port (see chapter 6.7), therefore the acquire function cannot be used, and the acquire mode has to be set to “Auto”. The recorder mode should be set to “Ring Buffer”, otherwise the recording may stop, when the selected RAM segment is full. For most cases, this is long before the sequence trigger occurs. [Off] Function is not available; signal at acq enbl does not stop record. [Software Event] Only the software command can stop the sequence. [Ext. or Soft. Event] Both, an edge at acq enbl or a software command can stop the sequence. acq enbl (in) exposure 1 2 3 4 5 6 7 8 9 10 record state Stop Event [Delay Images] = 10 The relative position of the trigger within the recorded time window depends on the size of the RAM segment and the skip images parameters. The following figure shows one example, where the buffer size is 1000 images: RAM 1000 images [Delay Images] = 800 (80%) #1 #1000 800 images stopp event The position of the trigger is always calculated backwards from the end of the buffer. The relation is always in terms of images. Time Stamp A time stamp can be placed into the upper left corner of the image. Content of the image will be replaced by the text. pco.dimax User Manual V1.02 © PCO AG, Germany 19 6 Camera Control for the pco.dimax 6.7 The “I/O Signals” tab Acquire Enable If checked, a signal for Acquire Mode or Sequence Trigger Mode (see chapter 6.6) is accepted at the acq enbl BNC input. Exposure Trigger If checked, a signal for [External Exp. Start] or [External Exp. Ctrl] trigger mode (see chapter 6.2) is accepted at the exp trig BNC input. Status Expos / Status Busy If checked, a signal indicating exposure status or busy status is given at the status BNC output. Once an acceptable trigger edge is received, busy will go high. As soon as busy goes low again, a new trigger edge is accepted. exp trig (in) Exp Stat (out) Busy Stat (out) treadout Ready Status Automotive Feature (signal on Lemosa connector). [Type] TTL: High Lev.: CONTACT: RS485: Maximum low level: 0.8V Minimum high level: 2V Maximum low level: 5V Minimum high level: 10V Maximum switch on resistance: 100Ohms Minimum switch off resistance: 40kOhms Minimum switch voltage rating: 5VDC Minimum switch current rating: 1mA Receiver sensitivity: +-200mV Note: termination of 120Ohms outside camera required [Filter] electrical interference filters (off, medium, high) [Polarity] active for high/low signal or rising/falling edge 20 pco.dimax User Manual V1.02 © PCO AG, Germany 7 Camware Features 7 Camware Features PCO’s renowned software for camera control, image acquisition, and archiving of images in various file formats. You will find an online help under the common Help menu. Note: There are some features explained in the online help that are not applicable for this camera version. 7.1 If no camera is connected When Camware is started, it automatically recognizes the camera type of the connected and running cameras. If Camware is started with no camera connected to the PC or with cameras switched off, it starts in demo mode. In this mode all image processing features are available. The user only has to tell Camware which type of images will be opened. For that purpose, the "Demo Mode Setup" window opens and asks for the corresponding input. pco.dimax HD/HD+ will be implemented soon. Need Help? If this window pops up because you have trouble running the camera, please see instructions in appendix A6. Resolution The drop down list offers the existing image sensor spatial resolutions of all PCO camera systems. Please select the specific resolution and bit depth of the images to be opened! If double shutter images have been recorded and should be opened, “Double Shutter Mode” should be checked. Color With the radio buttons, the user can specify whether the image type is monochrome or color. Alignment These two radio buttons adjust whether MSB aligned ("upper") or LSB aligned ("lower") images have been stored (see page 24, “File Settings”). Settings to view the b16 files of the pco.dimax: pco.dimax pco.dimax color Resolution 2016x2016 2016x2016 pco.dimax User Manual V1.02 © PCO AG, Germany bit 12 12 DoubleShutter <no/yes> <no/yes> Color b/w color Alignment upper upper 21 7 Camware Features 7.2 Overview Menu Bar See chapter 7.3 - 7.8. Local Menu The “mouse right-click” is explained in chapter 7.9. Toolbar prints the currently displayed image or comment window opens a b/w | color display window opens the camera control window opens the convert control auto range peak/crop (see chapter 7.6 under “Convert Control BW”) live preview: useful for fast and easy camera adjustment and focusing This command disables the camera control window if it is opened! soft trigger: records a single image (see chapter 6.2) Cursor display cursor: pixel position and intensity value continuous “auto range crop" scaling Recorder record START / STOP / PLAY opens the recorder settings window replay navigation The 'Recorder Browser' gives an overview of the images in the recorder. A click on the desired image makes it the current image in the Black/White or Color window. ‘Skip #images’ allows for convenient overview at large numbers of images. With the "Multi Frame Window" it is possible to view all active camera images in one window. The user might select between "time" oriented or "camera number" oriented order. 22 pco.dimax User Manual V1.02 © PCO AG, Germany 7 Camware Features 7.3 The File Menu Open Raw File (single image only) This command should be used to import a single image into the currently active image window. Only files with the extension and format of "*.b16" (PCO proprietary binary image format) and "*.tif" (TIFF image format) can be imported. If the recorder is enabled, each imported image will be transferred to the buffer shown in the picture number. The image itself will be fitted to the current image size. If the recorder is disabled, the current image sizes will be set to the parameters of the imported image. Open Raw File Set (for hsfc pro camera) This command is used to open a set of images, previously saved with the ‘Save Raw File Set’ command. The corresponding windows will be opened automatically. Additionally a comment window will be opened, which shows the settings of the channel and a comment. This option is not accessible in case of the recorder is switched on. Open Raw Recorder Sequence (image sequence from one camera) This command is used to import a sequence of images. If more than one camera is connected and an image window is currently open, the sequence will be loaded to the active window. If no image window is open, the images will be loaded to camera #1. This command opens the "Open file" dialog box. Only files with the extension and the format of "*.b16" and "*.tif" (TIFF16) can be imported. Save Raw File (single image only) The "Save" command should be used to save or export the image, which is displayed in the active window. The command opens the "Save file" dialog box. The image file can be saved in "*.b16", "*.fts", "*.tif", "*.bmp" or ASCII format. Note: be aware of the different storage abilities of the formats, for example "*.bmp" - the bitmap format only allows for 8bit values to be stored and therefore the image content of a 12 or 14bit image is reduced, if stored as bitmap. If more than one camera is connected, it is possible to save all current images by selecting "Export all images" in the "Save file" dialog box. With this feature it is possible to save one image of each active camera within one process step (it is not necessary to repeat the save process for each camera). The "Save" command will not be available, if there is no image window open. See 6.5 for further information! Save Raw Set (for hsfc pro camera) To save one image of each active camera within one single b16 file. Save Raw Recorder Sequence (image sequence from one camera) The "Save Recorder" command should be used to save or export image records. If more than one camera is connected and an image window is currently open, the record of the active window will be saved. The command opens the "Save file" dialog box. If another image format than "*.b16" or "*.tif" (16bit) is chosen, image content will be lost, and it will be impossible to reload the images. The "Save Recorder" command will not be available, if there is no image window open. See 6.5 for further information! Export File (not reloadable!) Use this command to export the image in the active image window. This command will open the Save file dialog box. Only files with the extensions "fts", "tif", "bmp", "asc", “jpg”, and “jp2” can be exported. This item will be not visible, if there is no image window open. pco.dimax User Manual V1.02 © PCO AG, Germany 23 7 Camware Features Export Recorder Sequence (not reloadable!) Use this command to export a record of images. If more than one channel is connected and an image window is currently open the record of the window which has got the input focus will be saved. If no image window is open the images of channel 1 will be saved. This command will open the Save file dialog box. Only files with the extensions "fts", "tif", "bmp", "asc", "avi", "mpg", “jpg”, “jp2”, and “wmv” can be exported. If you export recorder files you will not be able to reload them into CamWare! Print Setup The "Print Setup" command opens the Windows "Print Setup" dialog box for adjustments and settings of the connected printer(s). Print Preview The "Print Preview" command opens a "Print Preview" window. Print Opens the Windows "Print" dialog box for the currently displayed image or comment display. Options This command opens the "Options" dialog, allowing special settings. Options: File Settings Tiff Bit Alignment Here you can select the alignment of the pixel value. If this item is checked each pixel value is shifted from bit 12-1 to bit 16-5. This removes the 'dark image effect' inside other image applications. Check this item if you want to import Camware generated TIFF-files into other applications. Tiff RAW Here you can select whether the 16bit RGB tif file is saved with 16bit raw or white balanced data. If this item is checked, each 16bit RGB pixel value is saved as raw 16bit RGB (48bit) value, without white balancing. Saving to 16bit RGB can be done by selecting the color display window, export recorder, selecting 8bit-tif (!) and checking 'Save 16bit RGB'. ASCII file separator Here you can select an appropriate separator for the ASCII file format. Jpeg High Quality Here you can select the quality of the saved jpeg/jp2 files. High quality saves images with 100% quality. Unchecking this option will create jpeg files with 85% quality. Preserve Last Record If checked, a message box will pop up in case the user may overwrite or loose data. 24 pco.dimax User Manual V1.02 © PCO AG, Germany 7 Camware Features Options: View Settings Image Browser Here you can select between showing all image tiles inside the browser window either b/w or color. Setting b/w will result in a faster refresh. (valid only for color CCD). Marker Use this command to display a cross in the centre or elsewhere in the image (see “Set Crosshair page 33). Convert (Min/Max) (“Continuous Auto Range Crop”, see chapter 7.6 under “Convert Control BW”) This option enables the automatic min/max function during record and replay. Disable this feature if the application stops responding during this mode (due to operating system capacity problems). Paint Images: This option enables the update of both double shutter images (or multiple cameras) during record and replay. Disable this feature if the application stops responding during this mode (due to operating system performance problems). Options: Toolbar Toolbar Opens the corresponding toolbars (see 7.2) Math. Functions With the math window you have the ability to build the difference between a reference image and the actual image. If you activate math every new image acquired will be subtracted from the reference image or vice versa. last acquired image will be copied to reference buffer a reference picture will be acquired and copied to reference buffer add offset here to avoid negative values, which would not be visible enable / disable math function Replay Speed Bar The faster replay speed is useful if large sets of image data need to be scanned. pco.dimax User Manual V1.02 © PCO AG, Germany 25 7 Camware Features Options: Misc Infotext Use this command to show or hide the start-up information dialog box. Synchronous Scrolling If this item is checked all opened image windows will be scrolled at the same time and in the same manner. View Embedded Image Info (for pixelfly and sensicam models) If this item is checked an embedded text will be shown inside the image. See chapter 7.6. Multi Win Picture Order With the 'Multi Window' you have the ability to view the images of all active cameras in one window. You can select between 'time' oriented or 'camera number' oriented order. 'Time' oriented means that the sequence of images depends on the individual time stamp of each image. 'Camera number' oriented means that the first image shown is from camera 1, then camera 2 and so on. Logfile This option enables the logging of errors and system info. Enable this feature in order to create a support file, which can help to find out troubles with the cameras (see A6 “Customer Service and Trouble Shooting”). Load lookup Table (for monochrome cameras) With the Pseudo LUT feature you can load any LUT with one of four different formats and you can view the result in the color view window. Use one of the attached predefined LUTs or define your own. Direct Record To File (not recommended for high-speed) Use this command to record images directly onto hard disk. This command will open the “Save File” dialog box. Set the number of images to store to disk. If the camera captures images faster than the computer can save to disk, then you will loose images. The displaying of the images doesn't interfere with the record process. A rate of 4-5 frames per second (fps) for display is typical. Record with ‘Flowfile’ (for pixelfly and sensicam models) Exit This command exits the program and closes all channel dialog windows. Window positions, settings and sizes are stored in the windows registry and will be loaded again at next start-up. 26 pco.dimax User Manual V1.02 © PCO AG, Germany 7 Camware Features 7.4 The Camera Menu Camera Control Use this command to open the camera control window (see 6.1). Load Camera Settings With this command you can reload camera settings which have been previously saved. You can reload only a file which has been made with the same camera configuration as it was found by the application at start-up. Save Camera Settings This command saves the actual camera settings of all existing cameras. Create Hot Pixel List (for long exposure only) This feature applies for cameras with exposure times longer than 5s and is not applicable for the pco.dimax camera. Hotpixel Correction (for long exposure only) Sophisticated hot pixel correction is already implemented in the pco.dimax camera. Auto Exposure Starts some exposures and tries to find an exposure time that captures images with grey values between 1400 and 1500. It re-adjusts the lookup tables in order to display the images with the new settings best. For low light conditions only. Close Disconnects camera and switches Camware to Demo Mode. Rescan Disconnect and reconnect camera. Setup For pco.edge sCMOS camera. pco.dimax User Manual V1.02 © PCO AG, Germany 27 7 Camware Features 7.5 The Acquisition Menu Live Preview The 'Live Preview' is useful for fast and easy adjusting and focusing of the camera. The active window will be updated. To see another window, simply click on the window. This option is not available in double shutter mode. Acquire Picture Records single images in case of pixelfly and sensicam cameras. Acquire Sequence Starts recording images into the system memory according to Trigger Mode selection (see 6.2). During the recording, the camera controls are locked. Rec. Memory Settings (for pixelfly and sensicam models) Recorder Settings This command opens Settings dialog window. the Recorder The Play Settings are referred to the camera. If more than one camera is connected, the camera number is retrieved from the image window that has received the input focus (is active). If no image window is opened, the dialog is referred to camera 1. If the 'Set to all' checkbox is checked the settings apply to all connected cameras. The Global Settings are valid for all connected cameras. Averaging If in the "Avg." dropdown list a value not equal to 1 is selected, the corresponding number of images is averaged in the buffer, reducing the statistically independent noise. Another option to reduce the noise is the activation of the "IIR lowpass" IIRfilter: Image(act) = Image(act - 1) * 0.9 + Image(new) * 0.1 Replay Speed Slider The slider can be used to adjust the sequence replay speed, from slow (turtle) to fast (rabbit). Seq. Wrap Rec Sequential Wrap Recording sets Recorder Mode (6.6) to “Ring Buffer”. Seq. Wrap Play The play button starts the display for a sequence as defined by the first image/last image fields and will loop until the stop button is pressed. Reverse Play If the "Reverse Play" box is checked, it is possible to play the recorded images in reverse. 28 pco.dimax User Manual V1.02 © PCO AG, Germany 7 Camware Features 7.6 The View Menu B/W Window Use this command to open a b/w display window. Color Window Use this command to open a color display window. Convert Control BW switch tab/histogram hide the histogram of original data histogram of original data The user can influence how the 10 (12,14) bit intensity values (x-axis) of the original image are converted into 8 bit values (y-axis) in different ways. Green sliders in histogram - left slider = 'Min' controller (corresponds to value "0" of the 8 bit display) Values below that mark are set to "0", i.e. displayed as black. - right slider = 'Max' controller (corresponds to value "255") Values above that mark are set to "255", i.e. displayed as white. The values in-between are converted into a value between "0" and "255" according to Contrast and Gamma settings. See the small graph, which reflects the calculation. histogram of converted data How the Auto Range applies: Auto Range Peak searches for the minimum and maximum 12 (10,14) bit intensity values of the image. Given these number the converter scales the 8 bit display (256) within these two values. Auto Range Crop sets the converter to ignore the extreme intensity values of the image and scales the display in a smaller range. Thus dark or bright light spots, reflections, etc. are cut off. Min/Max (Automatic) = Continuous Auto Range Crop ‘Proc config’ tab: please see under ‘Convert Control Color’ pco.dimax User Manual V1.02 © PCO AG, Germany 29 7 Camware Features Convert Control Color switch tab/histogram white balance hide the histogram of original data histogram of original data The user can influence how the 10 (12,14) bit intensity values (x-axis) of the original image are converted into 8 bit values (y-axis) in different ways. White sliders in histogram - left slider = 'Min' controller (corresponds to value "0" of the 8 bit display) Values below that mark are set to "0", i.e. displayed as ‘no color’. - right slider = 'Max' controller (corresponds to value "255") Values above that mark are set to "255", i.e. displayed as ‘full color’. The values in-between are converted into a value between "0" and "255" according to Contrast and Gamma settings. See the small graph, which reflects the calculation. histogram of converted data The balancing of RGB can be controlled by Col.Temp and Tint. Press the Auto button to set the white balance. Intensity of single color can be controlled by Saturation and Vibrance. ‘non local means’ algorithm switch on in order to significantly reduce processing time adaptive to brightness and patterns pixel color correction After reboot of the PC you might need to switch on GPU Processing here again. 30 Due to proprietary high-end algorithms used for these image processing features, no detailed description is given here. pco.dimax User Manual V1.02 © PCO AG, Germany 7 Camware Features AMD's ATI graphics processing units are not recommended. GPU Processing In order to benefit from all of Camware’s advanced processing features, we highly recommend a NVIDIA CUDA-enabled graphics processing unit (GPU), e.g. NVIDIA GeForce 9600 GT or better. Find a list of CUDA-enabled products here: http://www.nvidia.com/object/cuda_learn_products.html Get the CUDA driver here: http://www.nvidia.com/object/cuda_get.html Make sure: - that the CUDA driver is successfully installed. - that the GPU has at least 512MB memory. List subject to change. Also consider successor versions. Notebook users should look for workstation models, e.g. - HP HDX X18-1300 Premium Notebook PC - HP EliteBook 8730w Mobile Workstation - Lenovo ThinkPad W700 series - Sony VAIO VGN-AW series - Dell Precision M6400 series - Samsung P560-Pro P8600 Primo Camware Image Processing color monochrome Pre Processing Noise Reduction Bayer Processing Bayer Demosaicing Sharpen Refine Process Chroma Blurr Post Processing Offset, Gain (Min/Max) Color Correction Saturation, Vibrance Color Temperature, Tint, White Balance Gamma, Contrast Browser The 'Recorder Browser' gives an overview of the images in the Recorder, and helps you in an easy way to select a new current image. Simply click on the desired image to make it the current image. It may then be viewed in the Black/White and Color Window. The Browser window can show up to 40 pictures per page, thus enabling easy printing of the Browser window. You can switch between the single pages by double clicking inside the Browser window or with the local menu (right mouse button). ‘Skip #images’ allows for convenient overview at large numbers of images. Multi Window View the images of all active cameras in consecutive order in one window. 'Time' oriented means that the sequence of images depends on the individual time stamp of each image. 'Camera number' oriented means that the first image shown is from camera 1, then camera 2 and so on. Embedded Image Info (only for pixelfly and sensicam models) see Timestamp feature in chapter 6.6 pco.dimax User Manual V1.02 © PCO AG, Germany 31 7 Camware Features 7.7 The Window Menu Cascade Show all windows overlapped. Tile Tile windows vertically or horizontally. Arrange Icons Rearranges all minimized topic icons on the desktop. Close All Close all windows. 7.8 The Help Menu Contents Opens the main page of the online program help. Search for Help on Opens an index list for help. About This window shows program information and contains helpful support links. In case of a camera problem, support files (see 7.3 Options/Misc/Logfile) may be generated, which can be automatically attached to the email. The support files contain relevant hardware information, the log files and the PCO related registry entries. These files are moved into a ziparchive called “CWSupport.zip”, which can be found in the application folder. 32 pco.dimax User Manual V1.02 © PCO AG, Germany 7 Camware Features 7.9 The Local Menu The local menu is opened by clicking the right mouse button inside the client area of an image window. Image Properties Opens an information bubble with main image properties and activates ‘in image’ display. The ‘in image’ display does not overwrite image data. Camera Control Opens the Camera Control window (see chapter 6). Convert Control BW/Color Opens the corresponding Convert Control windows (see 7.6). Zoom Changes the zoom used to display the image. Auto Range Peak/Crop Displays the image in a predefined scaling (see 7.6). Auto Balance Color The white balance feature, which corresponds to the white balance button in the ‘Convert Control Color’ (see 7.6). Auto Exposure Auto Exposure feature (see 7.4) Flip The image will be flipped before display. Mirror The selected the image will be mirrored before display. Rotate The image will be rotated by 90° clockwise (right) or counter clockwise (left) before it is shown in the image window. Line Tool Select 'Line Tool' to show a graph, which shows the intensity of the pixels under the red line shown in the image window. The selection of this menu item determines the location of the first point. After this you can move the mouse to the second point, which can be selected by a 'left click'. Now a 'Line Diagram' opens and the length of the line (unit: pixel) is shown in a bubble and displayed in the window. Copy To Clipboard Copies the active image to clipboard. Set Crosshair Move the marker (see page 25) to any point in the image. pco.dimax User Manual V1.02 © PCO AG, Germany 33 7 Camware Features 7.10 Additional Features Setting Contrast Area by Mouse You can control the minimum and maximum values used for the conversion from 12 to 8 bit with the mouse. Move the mouse cursor into a region which should be shown with maximum contrast. Press the shift and the left mouse button. Hold down the mouse button while increasing the size of the rubber band window with mouse moves. After releasing of the mouse button the coordinates of the rubber band window act as a border for calculating the minimum and maximum values. Setting a new ROI by Mouse In the same manner you can setup a new region of interest (see ROI in Camera control) for the camera. You only have to press the CTRL (Strg) button instead of the shift button. The coordinates of the rubber band window are used for calculating a new region of interest. You can reset the ROI to maximum by pressing the CTRL (Strg) button and the right mouse button. White Balance by Mouse In the same manner you can change the ‘white balance’. You only have to press the CTRL (Strg) and the shift button at the same time. The pixel values within the coordinates of the rubber band window are used for calculating a new ‘white balance’. For best results we recommend to use the white balance button in the ‘Convert Control Color’ (see 7.6) or the ‘Auto Balance Color’ in the Local Menu (see 7.9) respectively. 34 pco.dimax User Manual V1.02 © PCO AG, Germany Appendix Appendix pco.dimax User Manual V1.02 © PCO AG, Germany 35 Appendix A1 resolution (hor x ver) pixel size (hor x ver) sensor format sensor diagonal quantum efficiency full well capacity dark current image sensor dynamic range unit pixel µm² mm² mm % ee /pixel s dynamic range A/D read out noise bit e-rms imaging frequency (frame rate) monochrome version pixel scan rate fps setpoint Mpixel/s A/D conversion factor spectral range exposure time e-/ count nm s 22.18 x 22.18 31.36 @ peak @ 20 °C standard mode CDI mode 64 dB (1600:1) 66 dB (2000:1) @ 62.5 MHz (standard) @ 62.5 MHz (CDI) @ full frame @ HD (1920x1080) @ 1008 x 1000 23 18 1279 2470 4501 62.5 (mono) 55 (color) 5198 (mono) 4479 (color) 8.8 % trigger, auxiliary signals input signals output signals binning (hor x ver) power supply power consumption mechanical dimensions (w x h x l) weight ambient temperature operating humidity storage temperature data interface CE / FCC certified pco.dimax 2016 x 2016 MHz pixel data rate anti-blooming factor smear optical input Technical Data VAC W mm³ kg °C % °C max. pco.dimax HD pco.dimax HD+ 1920 x 1080 1920 x 1440 11 x 11 21.1 x 11.9 21.1 x 15.8 24.2 26.4 50 36 000 530 proprietary 64 dB (1600:1) 65 dB (1900:1) 12 22 (typical) 19 (CDI, typical) 1547 1166 1547 1547 2779 2779 40 3046 8.34 290 … 1100 1.4 µs … 40 ms no blooming no smear F-mount C-mount (opt.) frame trigger, sequence trigger, stop trigger exposure, busy - 80 90 … 260 V (12V DC optional) 70 170 x 185 x 321 7 range range range 3060 160 x 205 x 319 8.1 +5 … +40 10 … 90 -20 … +70 GigE & USB2.0 (Camera Link optional) (HD-SDI optional) yes Subject to change, please refer to current data sheets. 36 pco.dimax User Manual V1.02 © PCO AG, Germany Appendix A2 Mechanical Dimensions Unless otherwise stated, all dimensions are in mm. pco.dimax pco.dimax User Manual V1.02 © PCO AG, Germany 37 Appendix pco.dimax HD/HD+ 38 pco.dimax User Manual V1.02 © PCO AG, Germany Appendix A3 GigE Vision Installation and System Requirements GigE Vision® is an interface standard for high-performance industrial cameras. It has been developed by a group of about 50 companies. GigE Vision is based on the Gigabit Ethernet standard which uses standard Ethernet category cabling. The standard is trying to unify protocols currently used in machine vision industrial cameras and let 3rd party organizations develop compatible software and hardware (www.machinevisiononline.org). System Requirements • Camware 3.08 (check PCO website for latest version) • GigE/USB driver package V1.08.18 (check PCO website for latest version) • the complete network must be GigE compliant (see appendix A3-1) • Cat5e or higher patch cable • deactivated virus protection A3-0 Quick Installation Guide Please follow the steps in this order. Additional information can be found in the respective subchapters (e.g. chapter A3-1 for GigE card). Install GigE card (NIC) [1.1] Install GigE driver GigE_Installer_xxx_xx.exe: automatic installation. Please follow instructions. [1.2] Start PCO GigE Calibration Tool for camera calibration [1.4] Deactivate (uncheck) the GigE driver at each NIC that will not physically be connected to your camera! [1.2] Make sure that just the service “pco.camera with GigE” and the protocol “Internet protocol (TCP/IP)” are activated for each NIC used for PCO cameras! Make sure the descriptors of your NIC are set to its maximum! [1.1] Start Camware pco.dimax User Manual V1.02 © PCO AG, Germany 39 Appendix A3-1 It is recommended to install the original INTEL driver. GigE Network Interface Card (NIC) A gigabit network interface card (NIC) is attached to your computer and ready to use. Ideally it is a PCI-Express NIC to bring out the best data throughput, e.g. Intel Pro/1000 Pt with Intel 82572GI chipset. Note: It is absolutely essential that the NIC is Gigabit compatible. Such cards should be designated with a maximum data throughput of 1000 Mbps. Furthermore it is important to know which kind of PCI interface the NIC uses. The PCI-Express interface allows a faster and more stable data transfer than ordinary PCI interfaces. Finally, the NICs vary in the used chipset. Strongly recommended are chipsets from Intel. There are different ways to connect one or several PCO GigE cameras to a computer. Only some of them are introduced here: One camera system: • Point to Point connection: NIC and camera are connected via a patch cable directly. Before you turn on the camera set the NIC IP address to 192.168.144.10 manually. Otherwise the connection between NIC and camera will not succeed, because both, camera and NIC, have to be located to the same subnet. The PCO GigE camera is set to the persistent IP address 192.168.144.200 by default, if no DHCP server is available. Use the tool “PCO GigE Calibration Tool” to change the persistent IP address (see A34). The camera has to be reset, if the persistent IP address was changed. Several cameras: • Via a switch without a DHCP Server: Camera and NIC IP addresses have to be set manually. • Via a switch with DHCP Server: NIC and cameras obtain the IP addresses automatically by a DHCP-Server. • Via several NIC’s at one PC: Camera and NIC IP addresses have to be set manually. Each camera-NIC pair needs a separate network/subnet. Camera1 IP: 192.168.144.200 Sub: 255.255.255.0 Camera2 IP: 192.168.145.200 Sub: 255.255.255.0 Camera3 IP: 192.168.146.200 Sub: 255.255.255.0 NIC1 IP: 192.168.144.10 Subnet: 255.255.255.0 NIC2 IP: 192.168.145.10 Subnet: 255.255.255.0 NIC3 IP: 192.168.146.10 Subnet: 255.255.255.0 40 pco.dimax User Manual V1.02 © PCO AG, Germany Appendix For some NIC you have the opportunity to set parameters manually affecting the stability of the data transfer. The most important one is called Number of Descriptors. Set the value of this parameter to its maximum. To do so open the windows device manager and right-click on the NIC, that is connected with your camera, and select Configuration under Properties. Set “Receive- and Transfer-Descriptors” to its maximum size. This step is individual for each NIC. For instance, the descriptors of the Intel PRO/1000 Pt are set with its “Performance-Options” dialog. Its maximum size is 2048. A3-2 PCO GigE Intermediate Driver Automatic Installing Open the GigE Driver Install Shield calling the “GigE_Installer_xxx_xx.exe”. Please follow the instructions shown by the dialog-window. How to uninstall: • open the file “GigE_Uninstall.exe” Start->Programs->Digital Camera Tools->pco.gige->UnInstall pco.gige • or call the GigE Driver InstallShield (“GigE_Installer_xxx_xx.exe”) and click the "uninstall" Activating/Deactivating The checkbox next to “pco.camera with GigE” is checked for activating and unchecked for deactivating. Note: It is absolutely essential that the PCO GigE driver is only activated at the specific NIC that is physically connected to your camera! In addition, just the service “pco.camera with GigE” and the “Internet protocol (TCP/IP)” should be activated for each NIC used for PCO cameras: pco.dimax User Manual V1.02 © PCO AG, Germany 41 Appendix A3-3 Network Environment/Patch Cable A correct configuration of the network is important for the throughput of the image data which could be brought out. It is mandatory that any component used for the network connection between camera and computer is compatible with a data throughput of 1000Mbps. Some of these components are the NIC, Router, Hub, Switch, etc., but also the patch cable. The quality of patch cables is specified in categories. It is necessary to use category 5e-, 6-, or 7- patch cables for a network connection with a data throughput of 1000Mbps. Virus protection needs to be inactive or uninstalled. A3-4 PCO GigE Calibration Tool Use this tool for each NIC connected to any PCO camera! The PCO GigE Calibration Tool is part of the PCO software package and is started automatically during the PCO GigE Driver installation or can be opened by double-click on . Start->Programs->Digital Camera Tools->pco.gige->Calib Tool The purpose of this software is • to set network parameter (Packet-Delay-Time, Max-Speed-Mode), • to change the persistent IP of the camera (see chapter 1.1), • to find out which PCO GigE cameras are currently online, • to check, if the network is configured correctly. How does it work? First of all the camera is set to default. After that images of the PCO camera are requested with a delay of 80µs between each UDP image packet. If the image could be transferred (no lost packets), the delay is decreased and again images are requested. This procedure will be repeated until a packetdelay is found at which images can be transferred without losing packets or until the delay value is 0µs. If the image transfer succeeded at a delay of 0 µs, this transfer will be repeated at “Max-Speed-Modus”. If the image transfer is successful, “Max-Speed-Modus” can be activated with the dropdown bar. After the camera was successfully tested a respective message appears in the "Message Box". Press "Save Results" to save the calibration result or press "Save Results and Quit" to save calibration results and quit the program. If the PCO GigE Calibration Tool is opened, it is connected to each detected camera and will not allow any other program to open them. Any PCO camera, which is physically connected to a NIC and turned on, is listed and its Network Settings can be changed. But only accessible PCO cameras (not used by another application) with a valid connection (see A31) can be calibrated. 42 pco.dimax User Manual V1.02 © PCO AG, Germany Appendix start new calibration for selected camera progress of current image transfer test total progress of calibration quit program and save parameters to a file save parameters to a file Save Camera Network settings, reboot Camera Gige Interface and refresh camera list. Save Camera Network settings, reboot camera and quit program. quit program without saving parameters Configuration Parameter These parameters are necessary to set up the communication between PCO GigE Cameras and a computer. It is recommended to always use the “PCO GigE Calibration Tool” to set the GigE Configuration Parameters. If the configuration succeeded, the parameters are saved to the windows registry. If the configuration fails or the “PCO GigE Calibration Tool” is not used default parameter values are set and the image transfer via GigE does not work with maximum performance! „Packet Delay“: The delay between two UDP packets sent from a PCO GigE device to a computer. Values from 0µs to 320µs are possible. ,Max Speed Mode“: With this mode a maximum data throughput up to 100 MB/s is possible. Note: for full resolution, not for small Region of Interests (ROI's); see A3-5. pco.dimax User Manual V1.02 © PCO AG, Germany 43 Appendix A3-5 Performance with minimum/recommended configuration The following tables give two example configurations, minimum and recommended. The specified values are only valid for these configurations and should act as an orientation. Setup minimum recommended 1000Mbps NIC with standard PCI interface 1000Mbps NIC with PCIExpress interface (e.g. Intel Pro/1000 Gt with Intel 82541PI chipset) (e.g. Intel Pro/1000 Pt with Intel 82572GI chipset) - number of descriptors are set to its maximum directly or via switch directly or via switch (e.g. NetGear GS 605) (e.g. NetGear GS 605) Cat5e Cat5e or higher switch, hub, router are compatible to 1000Mbps switch, hub, router are compatible to 1000Mbps - virus protection inactive PCO GigE driver installed PCO GigE driver installed 20µs / off 0 µs / on AMD Athlon 64 X2 Dual Core Processor 4600+; 2.4GHz; 2GB RAM AMD Athlon 64 X2 Dual Core Processor 4600+; 2.4GHz; 2GB RAM NIC NIC configuration network connection Patch cable additional network components network environment driver packet delay /max speed mode computer Performance pco.1200hs 15.7 1) fps at full resolution 29.5 2) 41.3 Ø net data throughput [MB/s] 77.3 8.3 Ø CPU load 15.6 1) with minimum configuration 2) with recommended configuration pco.1600 10.7 21.7 41.0 83.4 8.1 14.6 pco.2000 5.0 11.5 42.1 96.5 7.6 16.9 pco.4000 2.0 4.7 42.6 100.7 7.7 17.3 pco.dimax 5.2 11.4 42.2 88.7 7.8 15.6 Note: Data throughput performance depends on sensor resolution! The listed performance values are true for full resolution. With decreasing Region of Interests (ROI's) the data throughput decreases as well. For ROI's smaller than 1000x1000 pixel "Max Speed Mode" is disabled. 44 pco.dimax User Manual V1.02 © PCO AG, Germany Appendix A4 Image File Formats There are different file formats available for saving camera images with Camware. b16 The “b16” 16 bit format is similar to the bmp format. However, 16 bit pixel values are used instead of 8 bit pixel values. The 16 bit pixel values represent "unsigned integer values", where the camera (12 bit values) sets the higher 4 bits to zero. The file format consists either of a "Basic Header" (6 Long-parameter) or of an "Extended Header" (32 Long-parameter), the latter of which is optionally for additional information. There might follow a variable comment field (ASCII code). Finally, there is the actual data set that is saved linearly (as in the case of BMP files). With the exception of the first value, all parameters are "Long Integers" (4 Byte). The first 6 parameters must always exist. The rest of the parameters, as well as the comment field, are optional. 1 2 3 4 5 6 7 8 9 10 11 12 13 14 15 16 17 18 Parameter “PCO-“ file size header length image width image height extended header color mode b/w min b/w max b/w linlog red min red max green min green max blue min blue max color linlog Function the first 4 byte are the characters “PCO-“ file size in byte header size + comment filed in byte image width in pixel image height in pixel -1 (true), extended header follows 0 = black/with camera, 1 = color camera black/white LUT-setting, minimum value black/white LUT-setting, maximum value black/white LUT-setting, 0 = linear, 1 = logarithmic red LUT-setting, minimum value red LUT-setting, maximum value green LUT-setting, minimum value green LUT-setting, maximum value blue LUT-setting, minimum value blue LUT-setting, maximum value color LUT-setting, 0 = linear, 1 = logarithmic internal use 266 Comment file in ASCII characters with variable length of 0…XX. The length of the comment filed must be documented in the “header length” field. 16 bit pixel data line 1, pixel 1 value of the first pixel line 1, pixel 2 value of the second pixel … … We recommend that all images should be saved first in the b16 or TIFF format. The advantage is to have the b16 or tiff images available all the time. You will always have the maximum 12 bit information. Please note that not all image analysis programs can accommodate 16 bit data. The 8 bit format saves only the information displayed on the monitor screen. The 12 bit information will be lost and cannot be displayed later. pcoraw This new 16 bit PCO file format is based on the new BigTIFF format, thus allowing for file size > 4GB. A new PCO proprietary compression scheme is added in case it is necessary. TIFF Tag Image File Format, version 6.0 and lower. There is a 16bit monochrome and color image format. pco.dimax User Manual V1.02 © PCO AG, Germany 45 Appendix BMP Windows Bitmap Format, b/w or color 8 bit format-images, which have been saved in BMP format can be loaded later only as 8 bit images, i.e. part of the original information (10bit, 12bit or 14bit) is lost. FTS Flexible Image Transport System, Version 3.1. There is a 16 bit image format. The NASA/Science Office of Standards and Technology (NOST) has defined this format. Some programs use the FIT extension for this format. ASCII 16 bit format, some mathematical programs prefer ASCII data. JPG JPEG (named after the Joint Photographic Experts Group who created the standard) is a commonly used method of lossy compression for photographic images. The degree of compression can be adjusted, allowing a selectable tradeoff between storage size and image quality. JP2 JPEG 2000 is a wavelet-based image compression standard and coding system. It was created by the Joint Photographic Experts Group committee in the year 2000 with the intention of superseding their original discrete cosine transform-based JPEG standard (created 1992). AVI Audio Video Interleave is a multimedia container format introduced by Microsoft in November 1992 as part of its Video for Windows technology. MPG MPEG-1, similar to JPEG, is a standard for lossy compression of video and audio developed by the Moving Picture Experts Group (MPEG). WMV Windows Media Video (WMV) is a compressed video compression format for several proprietary codecs developed by Microsoft. The original video format, known as WMV, was originally designed for Internet streaming applications, as a competitor to RealVideo. 46 pco.dimax User Manual V1.02 © PCO AG, Germany Appendix A5 Service and Maintenance Service The camera is designed to operate with no need of special adjustments or periodic inspections. Maintenance Unplug the camera from any power supply before cleaning it. Use a soft, dry cloth for cleaning the camera. Do not use liquid cleaners or sprays. The lens is best cleaned with pressurized air or with liquid cleaners such as pure alcohol or with special optical cleaners that are available at high quality photo stores. Never use aggressive cleaning liquids such as gasoline, acetone, spirits or nitro cleanser. Every time the input window is cleaned, there is the possibility of surface damage. Do not clean the input window unless it is absolutely necessary. Be careful and avoid scratches and damage to the input window surface. Use a cotton swab dipped in pure alcohol or optical cleaning liquid and wipe only on the glass surface. Do not get any cleaning liquid on the metallic parts such as the lens thread, because tiny detached particles may scratch the surface. Always store the camera with the protective cap or with a lens mounted to avoid dust and dirt on the input window! Camera Disposal The camera includes electronic devices, which can contain materials harmful to the environment. If the camera is to be discarded, please dispose of it in an environmentally responsible manner and use recycling facilities, where available. pco.dimax User Manual V1.02 © PCO AG, Germany 47 Appendix A6 Customer Service and Trouble Shooting If you have a question, which is not adequately addressed in this manual, please contact PCO or your local dealer. To speed your request, we need the following information: • Short description of the problem • Description of your application • Camera settings • Type and version of camera software being used • Camera serial number • Operating system (PC) • Processor type (PC) • Memory • Graphic card • Graphic card setup Please use the email options under the Help menu (see 7.8), or go to our website: http://www.pco.de/support-request/ Repair Before sending the camera for repair, first contact your local dealer or PCO respectively. When shipping the camera for repair, be certain to carefully pack the camera with proper shipping materials. If possible use the original packaging. Use the protection cap to protect the camera on the lens thread. Firmware, Software and Driver Update You will find all necessary software and drivers on the accompanying CD. For the latest versions please check our website: http://www.pco.de/de/software/pcodimax/ 48 pco.dimax User Manual V1.02 © PCO AG, Germany Appendix A7 Battery Operation The pco.dimax camera is optionally available with a high-performance battery pack, which is mounted on top of the camera body. Charging the Battery The pco.dimax has a built-in battery recharge circuitry, which will recharge the battery and maintain the battery charge level, whenever the power supply is connected and working. Therefore it is not required to remove the battery pack for recharge. Note: the battery is recharged automatically when the power supply of the camera is connected AND the camera is switched on. The recharging process starts few seconds after the power has been connected. Battery recharge does not depend on the configured battery operating mode. Specifications and General Notes Battery operating time (100% charged): • Standard Operation Mode: 1 hour • Power-Save Mode: 3 hours Maximum recharge time: • Lithium Iron Phosphate (LiFePO4): 6 hours Calculating remaining time in Power-Save Mode (tps): tps = 360 min – top * 6 top [min]: preceding operating time on battery backup Power Consumption The data for the power consumption mentioned in the pco.dimax datasheet does not include the recharge current for the battery. If the camera will recharge the battery, an additional 40 W peak power is required! Resetting Camera by Power Switch With the power switch in off state, the external power supply as well as the battery is disconnected from the camera. There is only a very small selfdischarge current within the battery itself. Some customers are used to switch the camera on and off not using the power switch but switching the supply voltage connected to the camera. However, this is not possible with attached backup battery. In the worst case, the battery will be dead next day (when done overnight) and (if repeated many times) it will lead to significantly increased aging and possibly early defect of the battery! See SDK feature “Do not use battery mode” in this appendix. pco.dimax User Manual V1.02 © PCO AG, Germany 49 Appendix Standard Operation Mode The Standard Battery Operation is the default setting of the camera and activated when shipped to customer. In order to maintain stable operation of the camera, the battery backup provides power immediately in case the power supply fails. As soon as the power supply is reestablished, the camera draws the supply current again from the power supply. Whenever the power supply is disconnected the camera runs on battery until the battery is discharged. Before the battery is finally dead the camera shuts down completely. In that case the current settings as well as the image data are lost! The camera provides information about the current charge level of the battery. This information can be used to estimate the remaining operating time as well as to avoid loss of image data. This mode is applicable for: • Operating the camera in an environment where no regular power supply is available or desired. • Backup capability to maintain camera operation in case of unexpected supply breakdowns. Power-Save Mode The Power-Save Mode will keep recorded images in the event of a major power breakdown. The camera must be configured by SDK to change into Power-Save Mode and the user can define a desired delay time. After a power breakdown the camera will continue in Standard Operation Mode. If there is no power supply available during the configured delay time, the camera stops the current recording and enters into Power-Save Mode. When power supply is available again, the Standard Operation Mode will be restored and the battery will be charged. If the main power supply is available at least for 10 seconds during the delay time, the delay is stopped. If the power supply is disconnected again, the delay starts from the beginning. Also, the Power-Save Mode is stopped if power is available again for at least 10 seconds. Please note: • you must reestablish the power supply in order to bring the camera back to Standard Operation Mode • you must to close and reopen the connection to the camera after the camera is back to Standard Operation Mode • you must reconfigure all settings and validate them by an “Arm Camera” command, when the camera shall be used for recording again • you are able to read recorded images from the camera memory without restoring any settings. 50 pco.dimax User Manual V1.02 © PCO AG, Germany Appendix SDK Commands Please contact PCO for further information, if needed. Function PCO_SetPowersaveMode Function declaration: DWORD PCO_SetPowersaveMode (HANDLE ph, WORD wMode, WORD wDelayMinutes); • wMode: − − − 0x0000: Standard battery operation: If power supply is not available, camera runs on battery until battery is discharged,. 0x0001: Powersave mode on, camera switches to powersave mode wDelayMinutes min. after power supply was removed. 0x0002: Do not use battery mode. If the powersave mode is set to this mode, the camera (or to be more exact: the most parts of the camera) will be switched off, when the external power supply is removed or switched off. I.e. the battery will not be used for backup. After connecting the power supply, the camera is switched on. The functional behaviour is the same as when switching off and on the camera. When the camera is on again, the powersave mode is by default 0x0000 = Standard battery operation. Note: Also the powersave mode is in default state, meaning that the next power loss is compensated again by the backup battery. Thus, setting the “Do not use battery” mode is not persistent; it is only effective exactly for one dropout of the external power supply. The power down state is quite near but not exactly the same state as power off (power switch is off). The most parts of the camera are switched off except the internal power supply and some monitoring circuits. Therefore the camera draws still a quite small but not negligible current from the battery. Therefore this is not a power down mode which might be used instead of switching off the cameras for hours! • wDelayMinutes: If powersave mode is on, the camera automatically switches to powersave mode, wDelayMinutes min. after the power supply was disconnected. Please note, that there is an additional sampling delay of somewhat less than one minute. The actual switching delay is between wDelayMinutes and wDelayMinutes + 1. Possible range is 1...60. • Functions returns operation status, which is − PCO_NOERROR, if successful. − PCO_FIRMWARE_NOT_SUPPORTED in case of older firmware. − PCO_ERROR_VALUE_OUT_OF_RANGE if arguments are not in the supported range. − PCO_ERROR_FIRMWARE_NOT_POSSIBLE if no battery pack is mounted. The default settings of the powersave mode after power up is: • wMode = 0x0000, powersave mode off • wDelayMinutes = 0x0000 (not relevant, as powersave is off) Function PCO_GetPowersaveMode Function declaration: DWORD PCO_GetPowersaveMode (HANDLE ph, WORD* wMode, WORD* wDelayMinutes); Returns the currently configured settings. See PCO_SetPowersaveMode. pco.dimax User Manual V1.02 © PCO AG, Germany 51 Appendix PCO_GetCameraHealthStatus Function declaration: DWORD PCO_GetCameraHealthStatus (HANDLE ph, DWORD* dwErr, DWORD* dwStatus); The function will return additional status information concerning the current status of the powersave mode: • dwStatus & 0x00000080: Camera has detected a battery. • dwStatus & 0x00000100: Camera is in powersave mode. • dwStatus & 0x00000200: Camera has left powersave mode. The “left powersave mode” flag will be reset by applying an “Arm Camera” command. Function PCO_GetBatteryStatus DWORD PCO_GetBatteryStatus (HANDLE ph, WORD* wBatteryType, WORD* wBatteryLevel, WORD* wPowerStatus); The function provides some information about the state of charge of the camera: • wBatteryStatus: 0x0000 = no battery mounted 0x0001 = nickel metal hydride type 0x0002 = lithium ion type 0x0003 = lithium iron phosphate type 0xFFFF = unknown battery type • wBatteryLevel: State of charge in percent [0 .. 100] where: 0xFFFF means unknown. • wPowerStatus: Bit mask of power status of camera, where: 0x0001 = power supply is available 0x0002 = battery mounted and detected 0x0004 = battery is charged bits can be combinded e.g. 0x0003 means that camera has a battery and is running on external power, 0x0002: camera runs on battery. • Functions returns operation status, which is − PCO_NOERROR, if successful. − PCO_FIRMWARE_NOT_SUPPORTED in case of older firmware versions 52 pco.dimax User Manual V1.02 © PCO AG, Germany About PCO PCO AG was founded in 1987. The company headquarters in Kelheim employs more than 50 specialists in the development and production of optimized, fast, sensitive camera systems for scientific applications. PCO’s range of products includes digital camera systems featuring high dynamics, extremely high sensitivity, high resolution, high speed, and extremely low noise, which are sold in industrial and scientific markets all over the world. Cameras for every point of view. The systems produced by PCO AG are cameras and scientific measuring instruments at the same time. Our high-tech systems are mostly the result of manual labor: over 50 highly specialized employees handle development and production at the Kelheim site. We deliver roughly 4.000 cameras a year to customers all over the world. As in every cutting edge technology, dialogue with the user is the main focus of PCO’s approach. Worldwide representatives, in cooperation with the in-house marketing division and technical support team, ensure that PCO camera systems are developed in step with the individual requirements of our customers. pco.dimax User Manual V1.02 © PCO AG, Germany 53