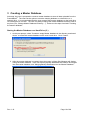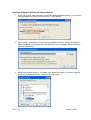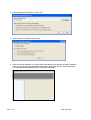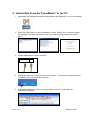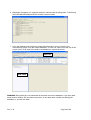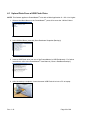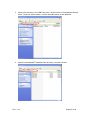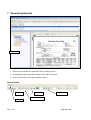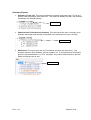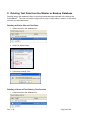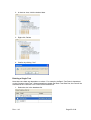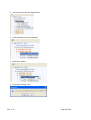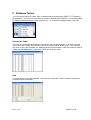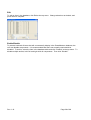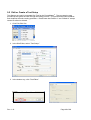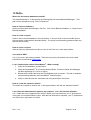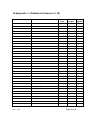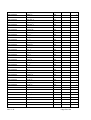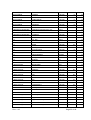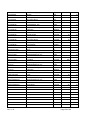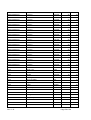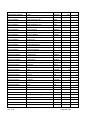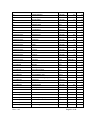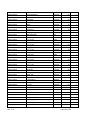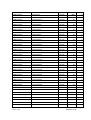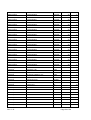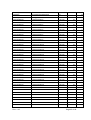
1
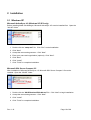
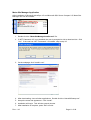
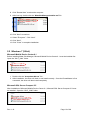
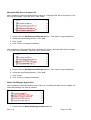
Meter Site Manager 2
Version 1.4.0.0
Product Manual
Revision 1.10
Rev: 1.10
Page 1 of 68
Copyright Notice:
Copyright © by TEC, 2011. All rights reserved. No part of this document may be reproduced,
transmitted, transcribed, stored in a retrieval system, or translated into any language in any form
by any means without the express written permission of TEC.
Disclaimer
This documentation is provided for information purposes. TEC makes no warranty of any kind
with regard to this material, including, but not limited to, the implied warranties of merchantability
and fitness for a particular purpose. TEC shall not be liable for errors, omissions, or
inconsistencies which may be contained herein or for incidental or consequential damages in
connection with the furnishing, performance, or use of the material. Information in this document
is subject to change without notice and does not represent a commitment on the part of TEC.
Rev: 1.10
Page 2 of 68
Table of Contents
Contacting Powermetrix .................................................................................. 4
Release Notes................................................................................................. 5
1
System Requirements............................................................................... 9
2
Installation............................................................................................... 10
2.1
Windows XP ................................................................................................................... 10
2.2
Windows 7 (32-bit) .......................................................................................................... 12
2.3
Windows 7 (64-bit) .......................................................................................................... 13
2.4
Updating (all Operating Systems).................................................................................... 15
3
Creating a Master Database ................................................................... 16
4
Upload Data From the PowerMaster® to the PC ...................................... 19
4.1
5
Download Data from the PC to the PowerMaster® (Creating a Route) .... 25
5.1
6
Upload Data From a USB Flash Drive............................................................................. 22
Erase Data from the PowerMaster® ................................................................................ 28
Merging Backup Databases into the Master Database............................ 29
6.1
Merging a Single Backup Database ................................................................................ 29
6.2
Merging Multiple Backup Databases with the “Batch Merge Process”............................. 31
7
Generating Reports................................................................................. 32
8
Deleting Test Data from the Master or Backup Database........................ 34
9
Database Tables ..................................................................................... 37
9.1
Edit or Create a Site........................................................................................................ 39
9.2
Edit or Create a Test Setup............................................................................................. 40
9.3
Edit or Create a Phantom Load Setup............................................................................. 41
10 Import/Export an ODBC Database .......................................................... 43
10.1
Export to Microsoft Access.............................................................................................. 43
10.2
Import from Microsoft Access.......................................................................................... 44
10.3
Export to Microsoft SQL Server 2005.............................................................................. 44
10.4
Import from Microsoft SQL Server 2005.......................................................................... 45
11 Export/Import .txt or .csv Files................................................................. 46
11.1
Export to .txt or .csv files ................................................................................................. 46
11.2
Import .txt or .csv files ..................................................................................................... 47
12 Preferences............................................................................................. 49
13 FAQ’s...................................................................................................... 51
14 Appendix 1 - Database Columns (v1.12)................................................. 53
Rev: 1.10
Page 3 of 68
Contacting Powermetrix
Technical Support
For technical support, please contact the factory at (865) 218-5838 (877-966-5851 toll free) and
ask for “Powermetrix Technical Support.” You may alternatively email Powermetrix at
[email protected]. The support staff will answer questions about the operation and care of
your equipment, assist you in troubleshooting a problem, and help you overcome common
application difficulties whenever possible. If it becomes necessary for your equipment to be
returned to us for any reason, you will be issued an RMA number during the technical support
contact.
Updates
Updates will be available at the PowerMaster® Support website at no charge. Contact technical
support for a username and password. Please note that all previous versions of Meter Site
Manager 2 must be uninstalled before updating. Refer to Section 2.4 for further instructions.
Feedback
Powermetrix depends on information from our customers to continue the attributes of quality,
dependability, and simplicity associated with our products. We invite you to contact our Technical
Support office.
Rev: 1.10
Page 4 of 68
Release Notes
Product:
Meter Site Manager 2
Version:
1.4.0.0
Release Date:
6/30/11
Manual Version:
1.10
What’s New
1. Fixed a bug in Summary of Last Test report. If the CT test performed was Burden Only,
the report would incorrectly display as Burden + Ratio.
2. Fixed a bug in Summary of Last Test report. If only CT tests were present, the Phantom
Load test results would not display.
3. Added function to import Microsoft Access and SQL Server 2005 databases.
4. Added database tables UserFieldNames and UtsFieldNames to store information read
from the PowerMaster.xml file concerning the user fields.
5. Added the MasterTestRecord user fields to Summary of Last Test report.
6. Added the ability of the user fields to only display when modified.
7. Added all available Phantom Load test results to Summary of Last Test report.
8. Added the control of copying and pasting the directory path in the Backup Database
Directory in Preferences.
9. Added more exception handling for errors not caught.
10. Changed the TestDate field in the database site list to display the latest test date for the
most recent revision.
11. Changed the database merge between a Master and Backup to update any existing row
from one database to another.
12. Removed the “Test Setup Editor” item from the Tools menu.
13. Updates database from 1.11 to 1.12.
Known Issues
1. Does not have a user interface in the database tables to edit custom field names.
2. Need ability for multiple users to view the database while simultaneously being edited by
another user.
3. In the Site Editor, the label headers for Meter, CT, and PT are not aligned.
4. Cannot view data trends.
5. Sites that are “marked” in the database list will lose the denotation when columns are
sorted.
6. No search function.
7. Some service types incorrectly calculate Neutral when averaging Sys PF in the Basic Test
Data report.
8. Element tests in the Phantom Load test results always display “ABC”.
Rev: 1.10
Page 5 of 68
The following are changes which were included in Release 1.2.0.0
1. Added ability to import/export a formatted .csv or .txt file into database table(s).
2. Added ability to export the database into an ODBC database (Access) or a SQL Server
2005 database.
3. Added “Site Report” for details about the site, meter, CT, etc. Double click the SiteID
under “Tests” to generate the report.
4. Added fields in Meter table to allow specifications for IEC meters.
5. Added “57.7V” and “220V” to Phantom Load Setup for Voltage.
6. Added ability to support 64-bit operating systems.
7. Added changes to the database to allow 10 characters for the Load Box labels
(LoadTypeCodes).
8. Added a shortcut to the Site Editor (under Edit)
9. Fixed a bug in PT Editor. Nameplate Ratio now allows decimals.
10. Fixed a bug in the editors. When the user closed the window (as opposed to Cancel), any
changes made were automatically saved regardless if it was intended.
11. Fixed a bug in Test Setup. When the user made an override in the test setup changing
energy test mode (Whr, VARhr, or VAhr), the displayed data would default to the saved
energy test mode. The data now displays the energy mode active during the test.
12. Fixed a bug in the Demand Test report. The total interval data for Wh/h, VARh/h, and
VAh/h are now averaged.
13. Fixed a bug in the Demand Test report. When intervals would exceed the first page, the
data would not display. It now displays the information correctly on the second page (and
up to the third if meter trend data is present).
14. Fixed a bug in the Phantom Load Test Sequence Summary report. When data would
exceed the first page, the data would not display. It now displays the information correctly
on the second page and beyond.
15. Increased the visible width in the Customer Load Meter Test Report for Meter and Actual.
16. When changing the master database, it now automatically refreshes the screen.
17. Updates database from 1.10 to 1.11
The following are changes which were included in Release 1.1.0.1
1. Added ability to import and export a formatted .csv or .txt file into database table(s
2. Added ability to delete test data.
3. Added a user interface in Site Editor to enter the new 60 custom fields.
4. Added a feature when the application closes the database now compresses automatically
saving storage space on both the PC and the analyzer. When data is deleted from the
database this will greatly reduce database size.
5. Added manual feature (Tools, Compact Master Database) to allow optimal compression of
the database after data is deleted.
6. Added the ability to multi disable/enable components in the database table editors via Ctrlright click.
Rev: 1.10
Page 6 of 68
7. Fixed a bug when viewing the harmonics report for service types S003F02 and S009F06.
8. Fixed a bug for Test Date. The bug caused the test date to disappear when a revision
was made.
9. Fixed a bug in the Integrated Site Test editor. The bug would not allow the user to select
other demand intervals.
10. Fixed a bug in the Meter Editor. The bug saved “5” minute intervals by default.
11. Fixed a bug when viewing the Meter Trend report for service type S009F06.
12. Fixed the resolution for “Pulses Expected” on meter test reports.
13. Increased the visible field width of Primary Voltage in the Site Editor.
14. Made “60Hz” the default when creating/editing a meter in Meter Editor.
15. Added “347V” entry when creating/editing a meter in Meter Editor.
16. Changed copyright date to 2010.
17. FUNCTION CHANGE: The user will now be required to double-click the test data to run
reports (as opposed to single-click).
The following are changes which were included in Release 1.0.0.1
1. Upgraded the database to support the new database for PowerMaster® version software
1.0.0.23.
The following are changes which were included in Release 0.0.7.0
1. Added database synchronization feature. The user can now download a “route” into the
PowerMaster® using sites in the master database. The user can also send a blank
database down to the PowerMaster® to erase the existing one.
2. Added an icon to the master database (king) and backup database (pawn) to better
differentiate the two.
3. Added check boxes next to the sites in the master database for selection to be
downloaded into the PowerMaster®.
4. Added the ability to create, edit, and delete sites in the master database. This also
includes the Test Editor and Phantom Load Setup.
5. Fixed the ability to open the application twice.
6. Added message prompt when the master database is being viewed by another user.
The following are changes which were included in Release 0.0.6.0
1. Created the function and interface for the master database. Users can now create a
master database to store all information in one place.
2. Added a merge and batch merge feature to allow users to easily merge all backup
databases into the master database.
3. Added support tables for the metering components (AMR, meter, CT, PT). The user can
now create, edit, and delete metering components within Meter Site Manager rather than
the PowerMaster® exclusively.
4. After creating the master database, it will open as a default action at bootup.
Rev: 1.10
Page 7 of 68
5. Added a selection of how many database backups the user can select. Selections are 10,
5, 3, or 1. The user is prompted when the backups exceed the current selection.
6. Removed “Percent Registration” from the site view until a fix in the PowerMaster®
application is added. The registration never displayed.
The following are changes which were included in Release 0.0.5.0
1. Added support for Guatemala regional Windows settings.
2. Added support for reduced administrative rights (data must be downloaded first with full
administrative rights, then the user can be reduced down afterward).
3. Added two breaks at the bottom of the communication log to better display “Backup
complete”.
4. Improved the communication process so the user does not have to close the application
before downloading again after a fail occurs.
The following are changes which were included in Release 0.0.3.0
1. Added the ability to display revisions (or changes) to the database.
2. Fixed the parallelogram title from “Meter Accuracy” to “Accuracy Parallelogram”.
3. Fixed minor issues with display pairs on non-Blondel service types.
4. Organized the test results to the appropriate Site ID. This allows the user to click on the
Site ID to display the associated test data. In version 0.0.2.0, all the test data for all Site
ID’s were together.
The following are changes which were included in Release 0.0.2.0
1. Fixed issue with incorrectly displaying energy data instead of power data when Basic Test
Data is saved.
2. Added a window to display to the user when a report is generating
Rev: 1.10
Page 8 of 68
1 System Requirements
PowerMaster®
Main Application: 1.0.0.28
Windows CE (BSP): 2.2.1.0.100312or higher
PC Hardware
Memory: Min 64 MB of RAM
Hard Disk: Min 210 MB of available hard disk space
Display: Super VGA (1024 x 768) or higher-resolution monitor with 256 colors
Peripherals: Mouse or compatible pointing device & keyboard
PC Software
Operating System: Windows XP or Windows 7
Microsoft ActiveSync 4.5 (for Windows XP users)
Microsoft Mobile Device Center 6.1 (for Windows 7 users)
Microsoft SQL Server Compact 3.5
Microsoft .NET Framework 3.5 SP1
Rev: 1.10
Page 9 of 68
2 Installation
2.1 Windows XP
Microsoft ActiveSync 4.5 (Windows XP SP2 only)
Before installing Meter Site Manager, Microsoft ActiveSync 4.5 must be installed first. Open the
“WinXP” folder.
1. Double click the “setup.msi” file. Click “Run” to start installation
2. Click “Next”
3. Accept the terms and agreement. Click “Next”.
4. Enter your name and organization (optional). Click “Next”.
5. Click “Next”.
6. Click “Install”.
7. Click “Finish” to complete installation.
Microsoft SQL Server Compact 3.5
After installation of Microsoft ActiveSync 4.5, Microsoft SQL Server Compact 3.5 must be
installed. Open the “WinXP” folder.
1. Double click the “SSCERuntime-ENU-x86.msi” file. Click “Next” to begin installation.
2. Accept the terms and agreement. Click “Next”.
3. Click “Install”.
4. Click “Finish” to complete installation.
Rev: 1.10
Page 10 of 68
Meter Site Manager Application
After installation of Microsoft ActiveSync 4.5 and Microsoft SQL Server Compact 3.5, Meter Site
Manager can now be installed.
1. Double-click the “MeterSiteManagerInstaller.msi” file.
2. If .NET Framework 3.5 is not installed, the user is prompted to visit a download site. Click
“Yes”. If the user has .NET Framework 3.5 installed, skip to step 10.
3. On the webpage, click “Install it now”.
4. After downloading, close all other applications. Double click the “dotnetfx35setup.exe”.
5. Accept the terms and agreement. Click “Install”.
6. Installation will begin. This will take several minutes.
7. After installation is complete, press “Exit” to finish.
Rev: 1.10
Page 11 of 68
8. Click “Restart Now” to reboot the computer.
9. After boot up, double-click the “MeterSiteManagerInstaller.msi” file.
10. Click “Next” to continue.
11. Select “Everyone”. Click “Next”.
12. Click “Next”.
13. Click “Close” to complete installation.
2.2 Windows 7 (32-bit)
Microsoft Mobile Device Center 6.1
Before installing Meter Site Manager, Microsoft Mobile Device Center 6.1 must be installed first.
Open the “Win7_32bit” folder.
1. Double click the “drvupdate-x86.exe” file.
2. After installation, the driver will claim to not install correctly. Once the PowerMaster is first
connected, the driver will then install completely.
Microsoft SQL Server Compact 3.5
After installation of Microsoft Mobile Device Center 6.1, Microsoft SQL Server Compact 3.5 must
be installed. Open the “Win7_32bit” folder.
Rev: 1.10
Page 12 of 68
1. Double click the “SSCERuntime-ENU-x86.msi” file. Click “Next” to begin installation.
2. Accept the terms and agreement. Click “Next”.
3. Click “Install”.
4. Click “Finish” to complete installation.
Meter Site Manager Application
After installation of Microsoft Mobile Device Center 6.1 and Microsoft SQL Server Compact 3.5,
Meter Site Manager can now be installed.
1. Double-click the “MeterSiteManagerInstaller.msi” file.
2. Click “Next” to continue.
3. Select “Everyone”. Click “Next”.
4. Click “Next”.
5. Click “Close” to complete installation.
2.3 Windows 7 (64-bit)
Microsoft Mobile Device Center 6.1
Before installing Meter Site Manager, Microsoft Mobile Device Center 6.1 must be installed first.
Open the “Win7_64bit” folder.
1. Double click the “drvupdate-amd64.exe” file.
2. After installation, the driver will claim to not install correctly. Once the PowerMaster is first
connected, the driver will then install completely.
Rev: 1.10
Page 13 of 68
Microsoft SQL Server Compact 3.5
After installation of Microsoft Mobile Device Center 6.1, Microsoft SQL Server Compact 3.5 (32bit) must be installed. Open the “Win7_64bit” folder.
1. Double click the “SSCERuntime-ENU-x86.msi” file. Click “Next” to begin installation.
2. Accept the terms and agreement. Click “Next”.
3. Click “Install”.
4. Click “Finish” to complete installation.
After installation of Microsoft SQL Server Compact 3.5 (32-bit), Microsoft SQL Server Compact
3.5 (64-bit) must be installed. Open the “Win7_64bit” folder.
5. Double click the “SSCERuntime-ENU-x64.msi” file. Click “Next” to begin installation.
6. Accept the terms and agreement. Click “Next”.
7. Click “Install”.
8. Click “Finish” to complete installation.
Meter Site Manager Application
After installation of Microsoft Mobile Device Center 6.1 and Microsoft SQL Server Compact 3.5,
Meter Site Manager can now be installed.
1. Double-click the “MeterSiteManagerInstaller.msi” file.
Rev: 1.10
Page 14 of 68
2. Click “Next” to continue.
3. Select “Everyone”. Click “Next”.
4. Click “Next”.
5. Click “Close” to complete installation.
2.4 Updating (all Operating Systems)
Before updating Meter Site Manager 2, the previous version must be uninstalled first. Do the
following:
1. Click Start, Control Panel
2. At the Control Panel, click “Add or Remove Programs”
3. Find “Meter Site Manager 2” in the list, and click “Remove”
4. After uninstalling the previous version of Meter Site Manager 2, open the
“MeterSiteManager2” folder. Double click “MeterSiteManagerInstaller.msi”. Ignore all
other files.
5. Install as normal (see “Meter Site Manager Application” under Section 2 for further
instructions).
Rev: 1.10
Page 15 of 68
3 Creating a Master Database
At bootup, the user is prompted to create a master database to store all data uploaded from the
PowerMaster®. The user has the option to store the master database on a hard drive or a
network drive. It is recommended that the user creates ONE master database on the hard drive
OR network drive; not both. The user can always change the master database directory path at
any time (File, Change Master Database Directory…”). Below are the steps involved in creating
the master database:
Storing the Master Database on a Hard Drive (C:)
1. At the user prompt, select “Create an empty Master database in the directory mentioned
above” to create the master database on the user’s hard drive. Click “Create”.
2. After the master database is created, the main screen in Meter Site Manager will display
noting the blank database. If the user has any backup databases that need to be merged
into the master database, see “Merging Backup Databases Into the Master Database”.
Rev: 1.10
Page 16 of 68
Storing the Master Database on a Network Drive
1. At the user prompt, select “Browse to a different Master database directory” to create the
master database on the user’s network drive. Click “Browse”.
2. Click “Change” to browse and set the master database directory. Please note that the
Master Database cannot be stored in a subdirectory of the “Database Backup Directory”
(found in Preferences).
3. Browse the network directory. If needed, click “Make New Folder” to create a separate
folder for the network directory. Click “Ok” when complete.
Rev: 1.10
Page 17 of 68
4. After selection of the directory, press “Ok”.
5. Click “Create” to complete the process.
6. After the master database is created, Meter Site Manager will display the blank database.
If the user has any backup databases that need to be merged into the master database,
see “Merging Backup Databases into the Master Database”.
Rev: 1.10
Page 18 of 68
4 Upload Data From the PowerMaster® to the PC
1. Open Meter Site Manager by double-clicking “Meter Site Manager 2” icon on the desktop.
2. When at the Main Menu on the PowerMaster®, select “Utilities” then “Connect to Meter
Site Manager” (for Main Applications 1.0.0.15 and below, simply remain at the Main
Menu).
3. Use the USB cable to connect to the PC.
USB To Host
PC
4. Wait for the sync icon in the system tray to turn green. You may see a window asking if
you want for set up a 'partnership'. Say NO.
5. In Meter Site Manager 2, click on “Communication”, then on “Load Data from
PowerMaster Analyzer.”
Rev: 1.10
Page 19 of 68
6. Messages will appear in a separate window to indicate what is taking place. Transferring
the PowerMasterDatabase.sdf file will take several minutes.
7. Once the database has transferred, Meter Site Manager 2 will try to open it and
automatically merge it into the master database. You will see a Site List at the top off the
screen, and a Tree View of the data in the database in a panel at the left.
SITE LIST
TREE VIEW
WARNING: Data trends are not transferred at the same time as the database. If you have data
trend saved to USB or SD card memory devices, do not wipe them out after transferring the
database, or you will lose data!
Rev: 1.10
Page 20 of 68
8. After download is complete, press ENTER or SPACE on the PowerMaster to reboot or
simply power off by pressing “ON” if complete.
Rev: 1.10
Page 21 of 68
4.1 Upload Data From a USB Flash Drive
NOTE: This feature applies to PowerMaster® units with a Main Application of 1.0.0.14 or higher.
1. When at the Main Menu on the PowerMaster®, press #3 to enter the “Utilities” Menu.
2. In the Utilities Menu, press #4 (Save Database Snapshot (Backup)).
3. Insert a USB Flash drive into one of the PowerMaster®’s USB Peripherals. For further
instructions, refer to the PowerMaster® User Manual (“Save a Database Backup”).
4. After the backup completes, insert the same USB Flash drive into a PC or laptop.
Rev: 1.10
Page 22 of 68
5. Viewing the directory in the USB Flash drive, double-click the “PowerMaster Backup”
folder. Under the serial number, view the time/date stamp of the database.
6. Open the PowerMaster® Database Path directory in another window.
Rev: 1.10
Page 23 of 68
7. Drag (or copy and paste) the database from the USB Flash drive into the PowerMaster®
Database Path directory for the correct PowerMaster® serial number.
8. In Meter Site Manager 2, click File, Open to browse and view the database files.
Rev: 1.10
Page 24 of 68
5 Download Data from the PC to the PowerMaster® (Creating
a Route)
When the user desires to create a list of sites to test in the field, the database must be
downloaded into the PowerMaster®. This process will allow the user to select sites that are
currently in the Master Database (via check boxes) for download. This process will also
synchronize the Master Database to the PowerMaster®, which may include newly created
metering components (CT, PT, Meter, AMR), test setups, Phantom Load Setups, new sites, and
even historical test data.
1. Open Meter Site Manager by double-clicking “Meter Site Manager 2” icon on the desktop.
2. When at the Main Menu on the PowerMaster®, select “Utilities” then “Connect to Meter
Site Manager” (for Main Applications 1.0.0.15 and below, simply remain at the Main
Menu).
3. Use the USB cable to connect to the PC.
USB To Host
PC
4. Wait for the sync icon in the system tray to turn green (Windows XP).
Rev: 1.10
Page 25 of 68
5. At the Master Database (king icon), select the desired site(s) you wish to download into
the PowerMaster®.
6. After selection, click Communication, “Create Route and Send to PowerMaster
Analyzer...”
7. Verify the route is correct. The user can also select to download historical test data for
each site (3, 6, 12, or 24 months in the past). If no historical test data is needed, select “0
Months”. When ready, click “Replace Analyzer’s Data with this New Route.”
Rev: 1.10
Page 26 of 68
8. Messages will appear in a separate window to indicate what is taking place. Transferring
the PowerMasterDatabase.sdf file will take several minutes.
9. After download is complete, press ENTER or SPACE on the PowerMaster to reboot or
simply power off by pressing “ON” if complete.
Rev: 1.10
Page 27 of 68
5.1 Erase Data from the PowerMaster®
Since data cannot be deleted in the PowerMaster®, Meter Site Manager 2 gives the user the
ability to delete all existing sites and test data in the PowerMaster database. This process simply
replaces the existing database with a blank database. This process will also synchronize the
Master Database to the PowerMaster®, which may include newly created metering components
(CT, PT, Meter, AMR), test setups, and Phantom Load Setups
1. Follow steps 1-4 in Section 5.
2. Click Communication, “Erase all Sites and Tests in PowerMaster Analyzer...”
3. Click “Yes” to confirm.
4. Messages will appear in a separate window to indicate what is taking place. Transferring
the PowerMasterDatabase.sdf file will take several minutes.
5. After download is complete, press ENTER or SPACE on the PowerMaster to reboot or
simply power off by pressing “ON” if complete.
Rev: 1.10
Page 28 of 68
6 Merging Backup Databases into the Master Database
Using Meter Site Manager 2 version 1.05 and below, only backup databases were created at the
time of upload. In versions1.06 and above, the user now has the ability to store a single master
database for all records. After the master database is created, each upload from the
PowerMaster® will automatically be merged into the master database. The following describes
the two methods on how to merge all of the backup databases into a single master database.
6.1
Merging a Single Backup Database
1. Click File, Open Backup Database.
2. Browse the default directory (located in Preferences). To browse elsewhere, click
“Change”. Expand the directory until a time/date stamp appears (in bold). Click “Open” to
open the backup database.
Rev: 1.10
Page 29 of 68
3. Once opened, note the database has not been merged into the master database.
4. To merge this database, click Tools, Merge Into Master Database.
5. After the merge process, the backup database will reflect the merged changes.
6. To view the master database with the reflected changes, click File, Show Master
Database.
Rev: 1.10
Page 30 of 68
6.2
Merging Multiple Backup Databases with the “Batch Merge Process”
This process will merge all backup databases in the default Database Backup Directory (see
Preferences). This easy-to-use process is highly recommended if there are many backup
databases that need to be merged.
1. To begin, click Tools, Batch Merge Process…
2. The user is prompted to verify if they want to continue. If ok, click Yes.
3. After the merging process, the master database will automatically display.
Rev: 1.10
Page 31 of 68
7 Generating Reports
TREE VIEW
1. In the tree view at the left, expand the list by clicking on the +.
2. Generate the report by double-clicking on the name of the test.
3. Click the Print icon on the report header to print.
Report Header
Print report
Zoom In/Out
Page Up/Down
Multiple page views
Tab(s)
Rev: 1.10
Page 32 of 68
Summary Reports
1. Summary of Last Test: This report includes the customer load meter test, CT test (at 0
burden), and the phantom load meter test. This report will display the LAST test acquired
according to the time/date stamp.
CLICK HERE
2. Phantom Load Test Sequence Summary: This report gives the user a summary of all
phantom load meter tests that were performed in the test sequence (up to 16 tests).
CLICK HERE
3. Site Report: This report gives the user information about the site exclusively. This
includes customer name, address, account number, etc. It also includes the information
about the associated Meter, CTs, PTs, and AMR. Any custom fields entered in the Site
Editor will display here as well.
CLICK HERE
Rev: 1.10
Page 33 of 68
8 Deleting Test Data from the Master or Backup Database
Deleting data in the database refers to removing undesirable data collected in the field by the
PowerMaster®. The user can delete a single test, a group of tests within a session, or the entire
site with any associated tests.
Deleting an Entire Site and Test Data
1. Select the site in the database list.
2. Click File, Delete Data.
3. Confirm by clicking “Yes”.
Deleting a Group of Test Data by Test Session
1. Select the site in the database list.
Rev: 1.10
Page 34 of 68
2. In the tree view, click the desired date.
3. Right click, Delete.
4. Confirm by clicking “Yes”.
Deleting a Single Test
Note that some data are dependent on others. For example, the Basic Test Data is dependent
on the Customer Load Test. When attempting to delete the Basic Test Data first, the user will be
warned that the Customer Load Test must be deleted first.
1. Select the site in the database list.
Rev: 1.10
Page 35 of 68
2. In the tree view, click the desired date.
3. Click the desired test to be deleted.
4. Right click, Delete.
5. Confirm by clicking “Yes”.
Rev: 1.10
Page 36 of 68
9 Database Tables
The user has the ability to create, edit, or delete metering components (AMR, CT, PT, Meter) in
the database. They also have the ability to enable or disable the component. It is recommended
to disable components that the user does not use. To access the database tables, click Edit.
Viewing the Table
The user can scroll through the table to view all the items in the database. If an item is grayed
out for New, Edit, Delete, and Disable, the item is currently being used in a site. The user can
also click on the column header (ex. Model) and sort the entire table. If the user wants to view all
enabled and disabled items, simply click “Show All” at the top menu.
New
To create a new item in the database, click New at the top menu. Enter selections as desired,
and press Save to complete.
Rev: 1.10
Page 37 of 68
Edit
To edit an item in the database, click Edit at the top menu. Change selections as desired, and
press Save to complete.
Enable/Disable
To prevent hundreds of items that will unnecessarily display in the PowerMaster® database, the
user can disable components. It is recommended that items not normally used should be
disabled. To do this, select the item in the database table and click “Disable” at the top menu. To
disable multiple entries, hold Ctrl and right click all components. Then click “Disable”.
Rev: 1.10
Page 38 of 68
9.1 Edit or Create a Site
To edit a site, first select a site in the Master Database list (highlighted below). Then, click Edit,
Edit Site. All fields can be edited (except “Site ID”). Once complete, click “Save.”
Entering a Meter, CT, PT, or AMR
Click inside the selection box. Once selected, a button will appear at the bottom of the tray (ex.
“Meter Editor”). If the metering component cannot be found in the drop-down box, click the button
to enter the database table (see Section 8, New). Click New to create a new component. After
the additions are made, click Save to complete. Close the window. The user can now select the
new component in the Site Editor’s drop-down box.
Deleting a Site
Deleting a site can be done when there is no test data associated with it. If there is any test data,
the user cannot delete the site from the database.
Create a New Site
To create a new site, click File, New Site. After the additions are made, click Save to complete.
Rev: 1.10
Page 39 of 68
9.2 Edit or Create a Test Setup
Test Setups are used in Integrated Site Test for the PowerMaster®. They are step-by-step
procedures that guide the user through the testing process. This process eliminates mistakes
and simplifies the entire testing procedure. Please note that “Default 1” and “Default 2” setups
cannot be edited or deleted.
1. Click Edit, Edit Site
2. In the Site Editor, select “Test Setup.”
3. In the bottom tray, click “Test Editor.”
Rev: 1.10
Page 40 of 68
4. In the “Integrated Site Test Setup,” click Edit Setup to make changes or New Setup to
create a new test setup.
Edit Setup
New Setup
5. After changes are made, click Save to complete. The setup will now be available in the
“Test Setup” drop-down box in Site Editor.
9.3 Edit or Create a Phantom Load Setup
The Phantom Load Setups (PLS) are pre-programmed test procedures to test a meter under
known conditions. These setups are also used in Integrated Site Test for the PowerMaster®.
Please note that “ANSI 5.0 AMP FL, LL, PF” and “ANSI 2.5 AMP FL, LL, PF” setups cannot be
edited or deleted.
1. Follow steps 1-4 in Section 8.2 (“Edit or Create a Test Setup”).
2. In Integrated Site Test Setup, select “Phantom Load Setup” (Phantom Load must be
checked).
Rev: 1.10
Page 41 of 68
6. Click Edit PLS to make changes or New PLS to create a new test setup.
Edit PLS
New PLS
7. After changes are made, click Save Setup to complete. The setup will now be available in
the “Phantom Load Setup” drop-down box in Site Editor.
Rev: 1.10
Page 42 of 68
10 Import/Export an ODBC Database
The database for Meter Site Manager 2 (“MsmDatabase.sdf”) is a compact SQL Server database
that is designed for mobile devices. This type of database does not have open connectivity and
does not allow the use of typical tools accessible to most database administrators. To combat
this, Meter Site Manager 2 allows the user to import/export to an ODBC database via Microsoft
Access or SQL Server 2005. This can help the database administer export pertinent information
into a corporate database with minimal customization and programming. Any master
(MsmDatabase.sdf) or backup (PowerMasterDatabase.sdf) database can be exported or
imported into.
10.1 Export to Microsoft Access
1. Open the desired .sdf database in Meter Site Manager 2. By default, the Master database
is open. Any backup databases can be opened via File, Open Backup Database…
2. Click Tools, Import/Export an ODBC database…
3. Select the database output directory in the drop-down box or click “Change” to browse to
another directory.
4. Select “Microsoft Access” as the database type.
5. Click OK.
6. If an ODBC database does not exist, select “Create an ODBC database…”. If an ODBC
database was created previously and you wish the data to be merged, click “Browse to a
different ODBC database directory” and locate the existing database.
7. After export, the Access database can be found in the directory that was created. Double
click the .mdb file to open with Microsoft Access.
Rev: 1.10
Page 43 of 68
10.2 Import from Microsoft Access
If an Access database (.mdb) is formatted correctly for the .sdf database, Meter Site Manager 2
can import this file. Each import will update the change(s) to the database.
1. Open the desired .sdf database in Meter Site Manager 2. By default, the Master database
is open. Any backup databases can be opened via File, Open Backup Database…
2. Click Tools, Import/Export an ODBC database…
3. Click “Import” for Select Type, and Microsoft Access for Select Database Type
4. Select the database directory in the drop-down box or click “Change” to browse to another
directory.
5. Click OK.
10.3 Export to Microsoft SQL Server 2005
1. Open the desired .sdf database in Meter Site Manager 2. By default, the Master database
is open. Any backup databases can be opened via File, Open Backup Database…
2. Click Tools, Export data to an ODBC database…
3. Select the database output directory in the drop-down box or click “Change” to browse to
another directory.
4. Select “SQL Server 2005” as the database type.
5. Click OK.
6. If an ODBC database does not exist, select “Create an ODBC database…”. If an ODBC
database was created previously and you wish the data to be merged, click “Browse to a
different ODBC database directory” and locate the existing database.
7. When prompted, enter the server name, username, and password. If no username and
password is required, select “Trusted Connection”. Click OK to continue.
Rev: 1.10
Page 44 of 68
10.4 Import from Microsoft SQL Server 2005
1. Open the desired .sdf database in Meter Site Manager 2. By default, the Master database
is open. Any backup databases can be opened via File, Open Backup Database…
2. Click Tools, Import/Export an ODBC database…
3. Click “Import” for Select Type, and SQL Server 2005 for Select Database Type.
4. Select the database directory in the drop-down box or click “Change” to browse to another
directory.
5. Click OK.
6. When prompted, enter the server name, username, and password. If no username and
password is required, select “Trusted Connection”. Click OK to continue.
Rev: 1.10
Page 45 of 68
11 Export/Import .txt or .csv Files
The Meter Site Manager 2 software allows the user to export the database tables to a flat file (.txt
or .csv). It also allows flat files to be imported, granted they are formatted exactly as the exported
files. For an overview of the database columns, go to Appendix 1.
11.1 Export to .txt or .csv files
1. Open the desired .sdf database in Meter Site Manager 2. By default, the Master database
is open. Any backup databases can be opened via File, Open Backup Database…
2. Click Tools, Import/Export Database Table Files…
3. Select the file output directory in the drop-down box or click “Change” to browse to
another directory.
4. Select “Export”. Select the desired extension (.txt or .csv). Then, select the desired
table(s) to be exported. If all tables are to be exported, click Select All. Click OK to
continue.
5. Click OK to complete.
6. After export, the file(s) can be found in the directory that was created. Double click the file
to open in Notepad (.txt) or Microsoft Excel (.csv) to review.
Rev: 1.10
Page 46 of 68
11.2 Import .txt or .csv files
WARNING: Verifying all database keys that correspond to multiple tables is critical when
importing .txt or .csv files into the Meter Site Manager 2 database. Not doing so will cause
database corruption that is beyond repair. Powermetrix will not be held responsible for any lost or
corrupted data when importing. It is highly recommended that a database backup is made before
importing any files.
Generating and formatting an import file
1. Follow Section 11.1 to export a desired table (.csv file recommended) to review the
formatting structure.
2. Once the formatting structure is reviewed, open Microsoft Excel.
3. In the first row, the user may enter headers for each column of data. Otherwise, the first
row is always ignored when importing.
Headers
4. In the following rows, enter all necessary information. Review Appendix 1 for column field
characteristics (data type, max length, nullable, etc.).
5. Once all information is entered, click File, Save As. Enter the filename EXACTLY the
same as the formatted table name in step 1 (ex. CTTABLE.csv). Save the file as a “CSV
(Comma delimited) (*.csv)” extension. Click Save.
Importing a formatted file
1. Open the desired .sdf database in Meter Site Manager 2. By default, the Master database
is open. Any backup databases can be opened via File, Open Backup Database…
2. Click Tools, Import/Export Database Table Files…
3. Select the formatted file(s) directory in the drop-down box or click “Change” to browse to
another directory.
4. Select “Import”. Select the desired extension (.txt or .csv). Then, select the desired
table(s) to be imported. If all tables are to be imported, click Select All. Click OK to
continue.
Rev: 1.10
Page 47 of 68
5. Click OK to close any error messages that display. The message notes to the user what
action is taken in the import process. The user can go back and edit the file to correct any
errors to fully complete the import.
6. Once the import process is complete, click OK to finish.
Rev: 1.10
Page 48 of 68
12 Preferences
*Accessed by clicking Tools, Preferences
Database Backup Directory
This directory is where the PowerMaster® will download all acquired data to be stored. To change
the directory path, click “Change”. Browse to the desired directory path (including network paths),
and click OK to accept. Click OK once more at the bottom of the Preferences screen to save the
directory path. The new directory path is applied to the next download from the PowerMaster®.
Number of Database Backups to Keep for Each Analyzer
Meter Site Manager 2 will create a backup of the PowerMaster® database each time it is
uploaded. To prevent from unnecessary disk space to be taken up, the user has the option of
selecting how many database backups they desire to store. The user can select from 10
(default), 5, 3, or 1. When the user exceeds the selected database backups, the following dialog
will display:
Rev: 1.10
Page 49 of 68
The user has the option to keep the backups until prompted at the next upload (“Keep the Old
Backups for Now”) or to delete the backups immediately (“Delete the Old Backups”). Before a
choice is made, the user also has the option to select to automatically delete the backups
according to the Preferences (“Always delete automatically: Do not show this warning again”).
Customizations
*Accessed by clicking Tools, Preferences, Customizations
Your Company Logo Graphic
Meter Site Manager 2 offers a feature that allows the user to add a company logo to all reports.
To select a company logo, click “Change”. Browse to the desired image (.bmp or .jpg), and click
OPEN to accept. A preview of the image will display. Click OK at the bottom of the Preferences
screen to save the image. Close Meter Site Manager 2 and reopen to make the changes
effective.
Rev: 1.10
Page 50 of 68
13 FAQ’s
Where are the backup databases located?
The default directory is “C:\Documents and Settings\My Documents\MeterSiteManager”. This
path can be changed by using Tools, Preferences.
How do I open a database?
When you open Meter Site Manager, click File. Click “Open Backup Database” or “Open Recent
Backup Database”.
How do I view a report?
Select a site in the site database in the top window. In the tree view to the left, double-click on
the test results underneath the time/date stamp. The report is automatically generated (this may
take several seconds).
How do I print a report?
After the report is generated (from above), click on the Print icon in the report header.
Can I print to PDF?
Yes, if you have a pdf creator installed. There are many free pdf creators found on the web.
Powermetrix recommends PDFCreater.
I can’t communicate with the PowerMaster®. What’s wrong?
1. Verify the PowerMaster® is powered on.
2. Verify the PowerMaster® is in Connect Mode (Utilities, Connect to Meter Site Manager)
(for Main Application V1.0.0.16 or higher)
3. Disconnect the USB cable from the PowerMaster® and re-connect. This will re-establish
communications between the PowerMaster® and ActiveSync.
4. Verify no other devices are connected and using ActiveSync at this time.
How do I view the harmonic details?
The details are located on another tab. In the report header, click the tab “Harmonic Details”.
I don’t have full administrative rights on my computer. Can I still use this software?
Yes. Install and run the application as normal. Before your first download, your IT professional
must grant you full administrative rights. After the first download is complete, your IT professional
can reduce your rights back to normal.
Rev: 1.10
Page 51 of 68
If I merge a backup database into the Master database more than once, will it create
duplicate data?
No. During the merge process, the application goes through each database entry and looks at
data changes. If data changes exist, it writes to the database. Otherwise, the process ignores
the existing entry and moves to the next one until complete.
What’s the difference between “uploading” and “downloading”?
When you want to send data to the PC from the PowerMaster®, we consider this to be
“uploading”. When you want to send data to the PowerMaster® from the PC, we consider this to
be “downloading”.
When creating a route, what is the option “Include Disabled Support Table Records (CT,
PT, etc.)”?
When a route is created in the PowerMaster® , the Master Database is also synchronized to the
PowerMaster® database. The metering components that are “disabled” will also be downloaded
as well. By default, Meter Site Manager 2 only downloads metering components that are
“enabled” to prevent unnecessary memory allocation. Refer to Section 8 for further details on
Enable/Disable.
What does the function “Compact Database” do?
When deleting data, the size of the database remains the same. Fortunately, when Meter Site
Manager 2 is closed, it automatically compresses the database to accommodate any data
deletion. If the user wants to do an optimal compression, the user can manually compress the
database by clicking Tools, Compact Database to save another 5% approximately in size.
How do I synchronize my changes from my Master database to the PowerMaster®?
How do I know what version of software I’m using?
Click Help, About.
Rev: 1.10
Page 52 of 68
14 Appendix 1 - Database Columns (v1.12)
Table Name
Column Name
Data
Type
Char
Length
Is
Nullable
AMR
AMR_Key
bigint
AMR
Manufacturer
nvarchar
32
Y
AMR
Model
nvarchar
16
Y
AMR
CatalogNumber
nvarchar
15
N
AMR
Enabled
bit
Y
AMR
LastModified
datetime
Y
AMRManufacturer
Manufacturer
nvarchar
32
N
AMRManufacturer
Address1
nvarchar
64
Y
AMRManufacturer
Address2
nvarchar
64
Y
AMRManufacturer
City
nvarchar
50
Y
AMRManufacturer
State
nvarchar
2
Y
AMRManufacturer
Zip
nvarchar
10
Y
AMRManufacturer
Contact
nvarchar
32
Y
AMRManufacturer
ContactPhone
nvarchar
16
Y
AMRManufacturer
Country
nvarchar
6
Y
AMRManufacturer
LastModified
datetime
AMRManufacturer
WebSite
ntext
BasicTestData
BasicTestData_Key
bigint
N
BasicTestData
MasterTestRecord_Key
bigint
N
BasicTestData
MeterTestMaster_Key
bigint
N
BasicTestData
RecordDateTime
datetime
N
BasicTestData
Frequency
real
N
BasicTestData
VDesignator_A
nvarchar
4
Y
BasicTestData
VDesignator_B
nvarchar
4
Y
BasicTestData
VDesignator_C
nvarchar
4
Y
BasicTestData
IDesignator_A
nvarchar
4
Y
BasicTestData
IDesignator_B
nvarchar
4
Y
BasicTestData
IDesignator_C
nvarchar
4
Y
BasicTestData
VRMS_A
real
Y
BasicTestData
VRMS_B
real
Y
BasicTestData
VRMS_C
real
Y
BasicTestData
VRMS_N
real
Y
BasicTestData
IRMS_A
real
Y
Rev: 1.10
N
Y
536870911
Page 53 of 68
Y
BasicTestData
IRMS_B
real
Y
BasicTestData
IRMS_C
real
Y
BasicTestData
IRMS_N
real
Y
BasicTestData
VPhase_A
real
Y
BasicTestData
VPhase_B
real
Y
BasicTestData
VPhase_C
real
Y
BasicTestData
IPhase_A
real
Y
BasicTestData
IPhase_B
real
Y
BasicTestData
IPhase_C
real
Y
BasicTestData
PF_A
real
Y
BasicTestData
PF_B
real
Y
BasicTestData
PF_C
real
Y
BasicTestData
Watts_A
real
Y
BasicTestData
Watts_B
real
Y
BasicTestData
Watts_C
real
Y
BasicTestData
VA_A
real
Y
BasicTestData
VA_B
real
Y
BasicTestData
VA_C
real
Y
BasicTestData
VAR_A
real
Y
BasicTestData
VAR_B
real
Y
BasicTestData
VAR_C
real
Y
BasicTestData
Q_A
real
Y
BasicTestData
Q_B
real
Y
BasicTestData
Q_C
real
Y
BasicTestData
VTHD_A
real
Y
BasicTestData
VTHD_B
real
Y
BasicTestData
VTHD_C
real
Y
BasicTestData
ITHD_A
real
Y
BasicTestData
ITHD_B
real
Y
BasicTestData
ITHD_C
real
Y
BasicTestData
VSys
real
N
BasicTestData
ISys
real
N
BasicTestData
WattsSys
real
N
BasicTestData
VASys
real
N
BasicTestData
VARSys
real
N
BasicTestData
QSys
real
N
BasicTestData
VMode
nvarchar
6
N
BasicTestData
IMode
nvarchar
6
N
Rev: 1.10
Page 54 of 68
BasicTestData
WMode
nvarchar
6
N
BasicTestData
VAMode
nvarchar
6
N
BasicTestData
VARMode
nvarchar
6
N
BasicTestData
VARSysMode
nvarchar
6
N
BasicTestData
PFMode
nvarchar
6
N
BasicTestData
DataMode
nvarchar
6
N
BasicTestData
Connection View
bit
N
CalibrationVerificationFile
CalibrationVerificationFile_Key
bigint
N
CalibrationVerificationFile
DateTime
datetime
N
CalibrationVerificationFile
TestMode
nvarchar
N
CalibrationVerificationFile
FileName
nvarchar
N
CT
CT_Key
bigint
N
CT
Manufacturer
nvarchar
32
N
CT
Model
nvarchar
16
N
CT
CatalogNumber
nvarchar
15
N
CT
AccuracyClass
nvarchar
6
N
CT
BurdenClass
real
N
CT
NameplateRatio
smallint
N
CT
RatingFactor
real
N
CT
Enabled
bit
N
CT
LastModified
datetime
N
CTBurdenClass
BurdenClass
real
N
CTManufacturer
Manufacturer
nvarchar
32
N
CTManufacturer
Address1
nvarchar
64
Y
CTManufacturer
Address2
nvarchar
64
Y
CTManufacturer
City
nvarchar
50
Y
CTManufacturer
State
nvarchar
2
Y
CTManufacturer
Zip
nvarchar
10
Y
CTManufacturer
Contact
nvarchar
32
Y
CTManufacturer
ContactPhone
nvarchar
16
Y
CTManufacturer
Country
nvarchar
6
Y
CTManufacturer
LastModified
datetime
CTManufacturer
WebSite
ntext
CTPTAccuracyClass
AccuracyClass
nvarchar
CTPTAccuracyClass
HighEnd
real
N
CTPTAccuracyClass
HighEndAccuracy
real
N
CTPTAccuracyClass
LowEnd
real
N
CTPTAccuracyClass
LowEndAccuracy
real
N
Rev: 1.10
Y
536870911
Y
6
N
Page 55 of 68
CTTestDetail
CTTestMaster_Key
bigint
N
CTTestDetail
Burden
real
N
CTTestDetail
PrimaryAmps
real
N
CTTestDetail
SecondaryAmps
real
N
CTTestDetail
PhaseShift
real
N
CTTestMaster
CTTestMaster_Key
bigint
N
CTTestMaster
MasterTestRecord_Key
bigint
N
CTTestMaster
DateTime
datetime
N
CTTestMaster
Phase
nchar
CTTestMaster
PrimaryProbe
CTTestMaster
4
N
nvarchar
16
N
PrimaryProbeSN
nvarchar
15
N
CTTestMaster
SecondaryProbe
nvarchar
16
N
CTTestMaster
SecondaryProbeSN
nvarchar
15
N
CTTestMaster
CTTestMode
smallint
N
DatabaseVersion
Major
int
N
DatabaseVersion
Minor
int
N
DataTrendFile
DataTrendFile_Key
bigint
N
DataTrendFile
MasterTestRecord_Key
bigint
N
DataTrendFile
DateTime
datetime
N
DataTrendFile
FileName
nvarchar
Harmonic
Harmonic_Key
bigint
N
Harmonic
MasterTestRecord_Key
bigint
N
Harmonic
MeterTestMaster_Key
bigint
N
Harmonic
DateTime
datetime
N
Harmonic
FileName
nvarchar
256
N
LoadTypeCodes
Code
nvarchar
10
N
LoadTypeCodes
Description
nvarchar
50
N
MasterTestRecord
MasterTestRecord_Key
bigint
MasterTestRecord
SiteID
nvarchar
32
N
MasterTestRecord
TechName1
nvarchar
32
N
MasterTestRecord
TechName2
nvarchar
32
N
MasterTestRecord
Comment
nvarchar
4000
Y
MasterTestRecord
DataFile
nvarchar
32
Y
MasterTestRecord
AnalyzerSN
nvarchar
12
N
MasterTestRecord
CalibrationDate
datetime
Y
MasterTestRecord
Created
datetime
N
MasterTestRecord
LastModified
datetime
N
MasterTestRecord
SiteRevNum
smallint
N
Rev: 1.10
256
N
N
Page 56 of 68
MasterTestRecord
TimeZoneBiasMinutes
int
MasterTestRecord
UTS11
nvarchar
32
Y
MasterTestRecord
UTS12
nvarchar
32
Y
MasterTestRecord
UTS13
nvarchar
32
Y
MasterTestRecord
UTS21
nvarchar
32
Y
MasterTestRecord
UTS22
nvarchar
32
Y
MasterTestRecord
UTS23
nvarchar
32
Y
MasterTestRecord
UTS31
nvarchar
32
Y
MasterTestRecord
UTS32
nvarchar
32
Y
MasterTestRecord
UTS33
nvarchar
32
Y
MasterTestRecord
UTS41
nvarchar
32
Y
MasterTestRecord
UTS42
nvarchar
32
Y
MasterTestRecord
UTS43
nvarchar
32
Y
MasterTestRecord
UTS51
nvarchar
32
Y
MasterTestRecord
UTS52
nvarchar
32
Y
MasterTestRecord
UTS53
nvarchar
32
Y
MasterTestRecord
UTS61
nvarchar
32
N
MasterTestRecord
UTS62
nvarchar
32
N
MasterTestRecord
UTS63
nvarchar
32
N
MasterTestRecord
UTS71
nvarchar
32
N
MasterTestRecord
UTS72
nvarchar
32
N
MasterTestRecord
UTS73
nvarchar
32
N
MasterTestRecord
UTS81
nvarchar
32
N
MasterTestRecord
UTS82
nvarchar
32
N
MasterTestRecord
UTS83
nvarchar
32
N
MasterTestRecord
UTS91
nvarchar
32
N
MasterTestRecord
UTS92
nvarchar
32
N
MasterTestRecord
UTS93
nvarchar
32
N
MasterTestRecord
UTS101
nvarchar
32
N
MasterTestRecord
UTS102
nvarchar
32
N
MasterTestRecord
UTS103
nvarchar
32
N
MasterTestRecord
UTS111
nvarchar
32
N
MasterTestRecord
UTS112
nvarchar
32
N
MasterTestRecord
UTS113
nvarchar
32
N
MasterTestRecord
UTS121
nvarchar
32
N
MasterTestRecord
UTS122
nvarchar
32
N
MasterTestRecord
UTS123
nvarchar
32
N
MasterTestRecord
UTS131
nvarchar
32
N
Rev: 1.10
N
Page 57 of 68
MasterTestRecord
UTS132
nvarchar
32
N
MasterTestRecord
UTS133
nvarchar
32
N
MasterTestRecord
UTS141
nvarchar
32
N
MasterTestRecord
UTS142
nvarchar
32
N
MasterTestRecord
UTS143
nvarchar
32
N
MasterTestRecord
UTS151
nvarchar
32
N
MasterTestRecord
UTS152
nvarchar
32
N
MasterTestRecord
UTS153
nvarchar
32
N
MasterTestRecord
UTS161
nvarchar
32
N
MasterTestRecord
UTS162
nvarchar
32
N
MasterTestRecord
UTS163
nvarchar
32
N
MasterTestRecord
UTS171
nvarchar
32
N
MasterTestRecord
UTS172
nvarchar
32
N
MasterTestRecord
UTS173
nvarchar
32
N
MasterTestRecord
UTS181
nvarchar
32
N
MasterTestRecord
UTS182
nvarchar
32
N
MasterTestRecord
UTS183
nvarchar
32
N
MasterTestRecord
UTS191
nvarchar
32
N
MasterTestRecord
UTS192
nvarchar
32
N
MasterTestRecord
UTS193
nvarchar
32
N
MasterTestRecord
UTS201
nvarchar
32
N
MasterTestRecord
UTS202
nvarchar
32
N
MasterTestRecord
UTS203
nvarchar
32
N
Meter
Meter_Key
bigint
Meter
Manufacturer
nvarchar
32
N
Meter
Model
nvarchar
16
N
Meter
CatalogNumber
nvarchar
15
N
Meter
AccuracyClass
real
Meter
Type
nvarchar
Meter
Class
smallint
N
Meter
TestAmpsHi
real
N
Meter
TestAmpsLo
real
N
Meter
MeterForm
nvarchar
Meter
Voltage
real
N
Meter
Frequency
real
N
Meter
DemandPeriod
real
N
Meter
Enabled
bit
N
Meter
LastModified
datetime
N
Rev: 1.10
N
N
2
4
Page 58 of 68
N
N
Meter
Kt
real
N
Meter
Imax
real
Y
Meter
I_n
real
Y
Meter
Ist
real
Y
Meter
Style
int
Y
MeterAccuracyClass
AccuracyClass
real
N
MeterCurrentClass
CurrentClass
smallint
N
MeterForm
MeterForm
nvarchar
MeterForm
Elements
smallint
N
MeterForm
CurrentCircuits
smallint
N
MeterForm
ExternalWires
nvarchar
2
N
MeterForm
Description
nvarchar
64
N
MeterForm
Diagram
nvarchar
64
N
MeterForm
Enabled
bit
N
MeterForm
LastModified
datetime
N
MeterForm
Comment
nvarchar
4000
Y
MeterManufacturer
Manufacturer
nvarchar
32
N
MeterManufacturer
Address1
nvarchar
64
Y
MeterManufacturer
Address2
nvarchar
64
Y
MeterManufacturer
City
nvarchar
50
Y
MeterManufacturer
State
nvarchar
2
Y
MeterManufacturer
Zip
nvarchar
10
Y
MeterManufacturer
Contact
nvarchar
32
Y
MeterManufacturer
ContactPhone
nvarchar
16
Y
MeterManufacturer
Country
nvarchar
6
Y
MeterManufacturer
LastModified
datetime
MeterManufacturer
WebSite
ntext
MeterTestIntervalDetail
MeterTestMaster_Key
bigint
N
MeterTestIntervalDetail
Index
smallint
N
MeterTestIntervalDetail
DateTime
datetime
N
MeterTestIntervalDetail
TimeSeconds
real
N
MeterTestIntervalDetail
MeasuredPulses
real
N
MeterTestIntervalDetail
Voltage
real
N
MeterTestIntervalDetail
Current
real
N
MeterTestIntervalDetail
W
real
N
MeterTestIntervalDetail
VA
real
N
MeterTestIntervalDetail
VAR
real
N
MeterTestIntervalDetail
PF
real
N
Rev: 1.10
4
N
Y
536870911
Page 59 of 68
Y
MeterTestIntervalDetail
PercentRegistration
real
MeterTestIntervalDetail
Label
nvarchar
MeterTestMaster
MasterTestRecord_Key
bigint
N
MeterTestMaster
MeterTestGroup_Key
bigint
N
MeterTestMaster
TestIndex
smallint
N
MeterTestMaster
MeterTestMaster_Key
bigint
N
MeterTestMaster
TimeTestBegan
datetime
N
MeterTestMaster
TimeTestSaved
datetime
N
MeterTestMaster
PhantomLoadSetup_Key
bigint
N
MeterTestMaster
EnergyTestMode
smallint
N
MeterTestMaster
TestSeconds
real
N
MeterTestMaster
PulseCount
int
N
MeterTestMaster
Kt
real
N
MeterTestMaster
ExternalPulseCount
int
N
MeterTestMaster
DemandIntervalInMinutes
int
N
MeterTestMaster
UserInternalPulser
int
N
PhantomLoadSetup
Name
nvarchar
PhantomLoadSetup
CreationDate
datetime
N
PhantomLoadSetup
CustomSetup
bit
N
PhantomLoadSetup
LastModified
datetime
N
PhantomLoadSetup
PhantomLoadSetup_Key
bigint
N
PhantomLoadTest
TestIndex
tinyint
N
PhantomLoadTest
Phase
nvarchar
3
N
PhantomLoadTest
Label
nvarchar
8
N
PhantomLoadTest
Voltage
nvarchar
4
N
PhantomLoadTest
Current
real
N
PhantomLoadTest
CurrentPF
real
N
PhantomLoadTest
LeadLag
nvarchar
PhantomLoadTest
Pulses
smallint
N
PhantomLoadTest
Time
real
N
PhantomLoadTest
Rotation
nvarchar
PhantomLoadTest
LastModified
datetime
N
PhantomLoadTest
EnergyTestMode
smallint
N
PhantomLoadTest
PhantomLoadSetup_Key
bigint
N
PhantomLoadTest
EnergyDeliveredOrReceived
nvarchar
3
N
PhantomLoadTest
ComplexTestFile
nvarchar
32
Y
PT
PT_Key
bigint
PT
Manufacturer
nvarchar
Rev: 1.10
N
100
32
4
3
N
N
N
N
N
32
Page 60 of 68
N
PT
Model
nvarchar
16
N
PT
CatalogNumber
nvarchar
15
N
PT
AccuracyClass
nvarchar
6
N
PT
BurdenClass
nvarchar
11
N
PT
NameplateRatio
real
N
PT
RatedVoltage
real
N
PT
Enabled
bit
N
PT
LastModified
datetime
N
PTBurdenClass
BurdenClass
nvarchar
11
N
PTManufacturer
Manufacturer
nvarchar
32
N
PTManufacturer
Address1
nvarchar
64
Y
PTManufacturer
Address2
nvarchar
64
Y
PTManufacturer
City
nvarchar
50
Y
PTManufacturer
State
nvarchar
2
Y
PTManufacturer
Zip
nvarchar
10
Y
PTManufacturer
Contact
nvarchar
32
Y
PTManufacturer
ContactPhone
nvarchar
16
Y
PTManufacturer
Country
nvarchar
6
Y
PTManufacturer
LastModified
datetime
PTManufacturer
WebSite
ntext
PTTestDetail
PTTestMaster_Key
bigint
N
PTTestDetail
Burden
real
N
PTTestDetail
PrimaryVoltage
real
N
PTTestDetail
SecondaryVoltage
real
N
PTTestDetail
PhaseShift
real
N
PTTestMaster
PTTestMaster_Key
bigint
N
PTTestMaster
MasterTestRecord_Key
bigint
N
PTTestMaster
DateTime
datetime
N
PTTestMaster
Phase
nchar
PTTestMaster
PrimaryProbe
PTTestMaster
Y
536870911
Y
4
N
nvarchar
16
N
PrimaryProbeSN
nvarchar
15
N
PTTestMaster
PTTestMode
smallint
SiteDescription
SiteID
nvarchar
SiteDescription
SiteRevNum
smallint
N
SiteDescription
SiteDescription_Key
bigint
N
SiteDescription
Locator
nvarchar
SiteDescription
TestDate
datetime
Y
SiteDescription
PercentRegistration
real
Y
Rev: 1.10
N
32
64
Page 61 of 68
N
Y
SiteDescription
Customer
nvarchar
50
Y
SiteDescription
AccountNumber
nvarchar
20
Y
SiteDescription
Address1
nvarchar
50
Y
SiteDescription
Address2
nvarchar
50
Y
SiteDescription
City
nvarchar
32
Y
SiteDescription
State
nvarchar
15
Y
SiteDescription
Zip
nvarchar
10
Y
SiteDescription
Telephone
nvarchar
16
Y
SiteDescription
PrimaryVoltage
real
Y
SiteDescription
BillingMultiplier
real
Y
SiteDescription
CT_A_Key
bigint
Y
SiteDescription
CT_B_Key
bigint
Y
SiteDescription
CT_C_Key
bigint
Y
SiteDescription
CT_A_SN
nvarchar
16
Y
SiteDescription
CT_B_SN
nvarchar
16
Y
SiteDescription
CT_C_SN
nvarchar
16
Y
SiteDescription
PT_A_Key
bigint
Y
SiteDescription
PT_B_Key
bigint
Y
SiteDescription
PT_C_Key
bigint
Y
SiteDescription
PT_A_SN
nvarchar
16
Y
SiteDescription
PT_B_SN
nvarchar
16
Y
SiteDescription
PT_C_SN
nvarchar
16
Y
SiteDescription
Meter_Key
bigint
SiteDescription
MeterSN
nvarchar
SiteDescription
AMR_Key
bigint
SiteDescription
AMR_SN
nvarchar
SiteDescription
Enabled
bit
Y
SiteDescription
LastModified
datetime
Y
SiteDescription
MeterNumber
nvarchar
20
Y
SiteDescription
Country
nvarchar
36
Y
SiteDescription
NextTest
datetime
SiteDescription
Substation
nvarchar
32
Y
SiteDescription
CommunicationID
nvarchar
20
Y
SiteDescription
CustomField1
nvarchar
30
Y
SiteDescription
CustomField2
nvarchar
30
Y
SiteDescription
TestSetup_Key
bigint
SiteDescription
ServiceTypeFileName
nvarchar
SiteDescription
Kt
real
Rev: 1.10
Y
50
Y
Y
16
Y
Y
Y
32
Y
Y
Page 62 of 68
SiteDescription
MeterNetworkAddress
nvarchar
256
Y
SiteDescription
Instructions
nvarchar
4000
N
SiteDescription
Telephone
nvarchar
50
N
SiteDescription
CustomField3
nvarchar
30
Y
SiteDescription
CustomField4
nvarchar
30
Y
SiteDescription
CustomField5
nvarchar
30
Y
SiteDescription
CustomField6
nvarchar
30
Y
SiteDescription
CustomField7
nvarchar
30
Y
SiteDescription
CustomField8
nvarchar
30
Y
SiteDescription
CustomField9
nvarchar
30
Y
SiteDescription
CustomField10
nvarchar
30
Y
SiteDescription
CustomField11
nvarchar
30
Y
SiteDescription
CustomField12
nvarchar
30
Y
SiteDescription
CustomField13
nvarchar
30
Y
SiteDescription
CustomField14
nvarchar
30
Y
SiteDescription
CustomField15
nvarchar
30
Y
SiteDescription
CustomField16
nvarchar
30
Y
SiteDescription
CustomField17
nvarchar
30
Y
SiteDescription
CustomField18
nvarchar
30
Y
SiteDescription
CustomField19
nvarchar
30
Y
SiteDescription
CustomField20
nvarchar
30
Y
SiteDescription
CustomField21
nvarchar
30
Y
SiteDescription
CustomField22
nvarchar
30
Y
SiteDescription
CustomField23
nvarchar
30
Y
SiteDescription
CustomField24
nvarchar
30
Y
SiteDescription
CustomField25
nvarchar
30
Y
SiteDescription
CustomField26
nvarchar
30
Y
SiteDescription
CustomField27
nvarchar
30
Y
SiteDescription
CustomField28
nvarchar
30
Y
SiteDescription
CustomField29
nvarchar
30
Y
SiteDescription
CustomField30
nvarchar
30
Y
SiteDescription
CustomField31
nvarchar
30
Y
SiteDescription
CustomField32
nvarchar
30
Y
SiteDescription
CustomField33
nvarchar
30
Y
SiteDescription
CustomField34
nvarchar
30
Y
SiteDescription
CustomField35
nvarchar
30
Y
SiteDescription
CustomField36
nvarchar
30
Y
SiteDescription
CustomField37
nvarchar
30
Y
Rev: 1.10
Page 63 of 68
SiteDescription
CustomField38
nvarchar
30
Y
SiteDescription
CustomField39
nvarchar
30
Y
SiteDescription
CustomField40
nvarchar
30
Y
SiteDescription
CustomField41
nvarchar
30
Y
SiteDescription
CustomField42
nvarchar
30
Y
SiteDescription
CustomField43
nvarchar
30
Y
SiteDescription
CustomField44
nvarchar
30
Y
SiteDescription
CustomField45
nvarchar
30
Y
SiteDescription
CustomField46
nvarchar
30
Y
SiteDescription
CustomField47
nvarchar
30
Y
SiteDescription
CustomField48
nvarchar
30
Y
SiteDescription
CustomField49
nvarchar
30
Y
SiteDescription
CustomField50
nvarchar
30
Y
SiteDescription
CustomField51
nvarchar
30
Y
SiteDescription
CustomField52
nvarchar
30
Y
SiteDescription
CustomField53
nvarchar
30
Y
SiteDescription
CustomField54
nvarchar
30
Y
SiteDescription
CustomField55
nvarchar
30
Y
SiteDescription
CustomField56
nvarchar
30
Y
SiteDescription
CustomField57
nvarchar
30
Y
SiteDescription
CustomField58
nvarchar
30
Y
SiteDescription
CustomField59
nvarchar
30
Y
SiteDescription
CustomField60
nvarchar
30
Y
TestSetup
TestSetup_Key
bigint
TestSetup
Name
nvarchar
TestSetup
PhantomLoadSetup_Key
bigint
Y
TestSetup
TestRevs
smallint
Y
TestSetup
DemandInterval
smallint
Y
TestSetup
TestTime
smallint
Y
TestSetup
HasCTTest
bit
N
TestSetup
HasPTTest
bit
N
TestSetup
LastModified
datetime
Y
TestSetup
HasPhantomLoadTest
bit
N
TestSetup
HasCustomerLoadTest
bit
N
TestSetup
MaxCTBurden
real
Y
TestSetup
MaxPTBurden
real
Y
TestSetup
CTTestMode
smallint
Y
TestSetup
PTTestMode
smallint
Y
Rev: 1.10
N
32
Page 64 of 68
N
TestSetup
DoCustomerLoadwithDemand
bit
N
TestSetup
SyncDemandToRealTime
bit
N
TestSetup
EnergyTestMode
smallint
Y
UserFieldNames
UserField1Name
nvarchar
32
Y
UserFieldNames
UserField2Name
nvarchar
32
Y
UserFieldNames
UserField3Name
nvarchar
32
Y
UserFieldNames
UserField4Name
nvarchar
32
Y
UserFieldNames
UserField5Name
nvarchar
32
Y
UserFieldNames
UserField6Name
nvarchar
32
Y
UserFieldNames
UserField7Name
nvarchar
32
Y
UserFieldNames
UserField8Name
nvarchar
32
Y
UserFieldNames
UserField9Name
nvarchar
32
Y
UserFieldNames
UserField10Name
nvarchar
32
Y
UserFieldNames
UserField11Name
nvarchar
32
Y
UserFieldNames
UserField12Name
nvarchar
32
Y
UserFieldNames
UserField13Name
nvarchar
32
Y
UserFieldNames
UserField14Name
nvarchar
32
Y
UserFieldNames
UserField15Name
nvarchar
32
Y
UserFieldNames
UserField16Name
nvarchar
32
Y
UserFieldNames
UserField17Name
nvarchar
32
Y
UserFieldNames
UserField18Name
nvarchar
32
Y
UserFieldNames
UserField19Name
nvarchar
32
Y
UserFieldNames
UserField20Name
nvarchar
32
Y
UserFieldNames
UserField21Name
nvarchar
32
Y
UserFieldNames
UserField22Name
nvarchar
32
Y
UserFieldNames
UserField23Name
nvarchar
32
Y
UserFieldNames
UserField24Name
nvarchar
32
Y
UserFieldNames
UserField25Name
nvarchar
32
Y
UserFieldNames
UserField26Name
nvarchar
32
Y
UserFieldNames
UserField27Name
nvarchar
32
Y
UserFieldNames
UserField28Name
nvarchar
32
Y
UserFieldNames
UserField29Name
nvarchar
32
Y
UserFieldNames
UserField30Name
nvarchar
32
Y
UserFieldNames
UserField31Name
nvarchar
32
Y
UserFieldNames
UserField32Name
nvarchar
32
Y
UserFieldNames
UserField33Name
nvarchar
32
Y
UserFieldNames
UserField34Name
nvarchar
32
Y
UserFieldNames
UserField35Name
nvarchar
32
Y
Rev: 1.10
Page 65 of 68
UserFieldNames
UserField36Name
nvarchar
32
Y
UserFieldNames
UserField37Name
nvarchar
32
Y
UserFieldNames
UserField38Name
nvarchar
32
Y
UserFieldNames
UserField39Name
nvarchar
32
Y
UserFieldNames
UserField40Name
nvarchar
32
Y
UserFieldNames
UserField41Name
nvarchar
32
Y
UserFieldNames
UserField42Name
nvarchar
32
Y
UserFieldNames
UserField43Name
nvarchar
32
Y
UserFieldNames
UserField44Name
nvarchar
32
Y
UserFieldNames
UserField45Name
nvarchar
32
Y
UserFieldNames
UserField46Name
nvarchar
32
Y
UserFieldNames
UserField47Name
nvarchar
32
Y
UserFieldNames
UserField48Name
nvarchar
32
Y
UserFieldNames
UserField49Name
nvarchar
32
Y
UserFieldNames
UserField50Name
nvarchar
32
Y
UserFieldNames
UserField51Name
nvarchar
32
Y
UserFieldNames
UserField52Name
nvarchar
32
Y
UserFieldNames
UserField53Name
nvarchar
32
Y
UserFieldNames
UserField54Name
nvarchar
32
Y
UserFieldNames
UserField56Name
nvarchar
32
Y
UserFieldNames
UserField57Name
nvarchar
32
Y
UserFieldNames
UserField58Name
nvarchar
32
Y
UserFieldNames
UserField59Name
nvarchar
32
Y
UserFieldNames
UserField60Name
nvarchar
32
Y
UtsFieldNames
UtsField11Name
nvarchar
32
Y
UtsFieldNames
UtsField12Name
nvarchar
32
Y
UtsFieldNames
UtsField13Name
nvarchar
32
Y
UtsFieldNames
UtsField21Name
nvarchar
32
Y
UtsFieldNames
UtsField22Name
nvarchar
32
Y
UtsFieldNames
UtsField23Name
nvarchar
32
Y
UtsFieldNames
UtsField31Name
nvarchar
32
Y
UtsFieldNames
UtsField32Name
nvarchar
32
Y
UtsFieldNames
UtsField33Name
nvarchar
32
Y
UtsFieldNames
UtsField41Name
nvarchar
32
Y
UtsFieldNames
UtsField42Name
nvarchar
32
Y
UtsFieldNames
UtsField43Name
nvarchar
32
Y
UtsFieldNames
UtsField51Name
nvarchar
32
Y
UtsFieldNames
UtsField52Name
nvarchar
32
Y
Rev: 1.10
Page 66 of 68
UtsFieldNames
UtsField53Name
nvarchar
32
Y
UtsFieldNames
UtsField61Name
nvarchar
32
Y
UtsFieldNames
UtsField62Name
nvarchar
32
Y
UtsFieldNames
UtsField63Name
nvarchar
32
Y
UtsFieldNames
UtsField71Name
nvarchar
32
Y
UtsFieldNames
UtsField72Name
nvarchar
32
Y
UtsFieldNames
UtsField73Name
nvarchar
32
Y
UtsFieldNames
UtsField81Name
nvarchar
32
Y
UtsFieldNames
UtsField82Name
nvarchar
32
Y
UtsFieldNames
UtsField83Name
nvarchar
32
Y
UtsFieldNames
UtsField91Name
nvarchar
32
Y
UtsFieldNames
UtsField92Name
nvarchar
32
Y
UtsFieldNames
UtsField93Name
nvarchar
32
Y
UtsFieldNames
UtsField101Name
nvarchar
32
Y
UtsFieldNames
UtsField102Name
nvarchar
32
Y
UtsFieldNames
UtsField103Name
nvarchar
32
Y
UtsFieldNames
UtsField111Name
nvarchar
32
Y
UtsFieldNames
UtsField112Name
nvarchar
32
Y
UtsFieldNames
UtsField113Name
nvarchar
32
Y
UtsFieldNames
UtsField121Name
nvarchar
32
Y
UtsFieldNames
UtsField122Name
nvarchar
32
Y
UtsFieldNames
UtsField123Name
nvarchar
32
Y
UtsFieldNames
UtsField131Name
nvarchar
32
Y
UtsFieldNames
UtsField132Name
nvarchar
32
Y
UtsFieldNames
UtsField133Name
nvarchar
32
Y
UtsFieldNames
UtsField141Name
nvarchar
32
Y
UtsFieldNames
UtsField142Name
nvarchar
32
Y
UtsFieldNames
UtsField143Name
nvarchar
32
Y
UtsFieldNames
UtsField151Name
nvarchar
32
Y
UtsFieldNames
UtsField152Name
nvarchar
32
Y
UtsFieldNames
UtsField153Name
nvarchar
32
Y
UtsFieldNames
UtsField161Name
nvarchar
32
Y
UtsFieldNames
UtsField162Name
nvarchar
32
Y
UtsFieldNames
UtsField163Name
nvarchar
32
Y
UtsFieldNames
UtsField171Name
nvarchar
32
Y
UtsFieldNames
UtsField172Name
nvarchar
32
Y
UtsFieldNames
UtsField173Name
nvarchar
32
Y
UtsFieldNames
UtsField181Name
nvarchar
32
Y
Rev: 1.10
Page 67 of 68
UtsFieldNames
UtsField182Name
nvarchar
32
Y
UtsFieldNames
UtsField183Name
nvarchar
32
Y
UtsFieldNames
UtsField191Name
nvarchar
32
Y
UtsFieldNames
UtsField192Name
nvarchar
32
Y
UtsFieldNames
UtsField193Name
nvarchar
32
Y
UtsFieldNames
UtsField201Name
nvarchar
32
Y
UtsFieldNames
UtsField202Name
nvarchar
32
Y
UtsFieldNames
UtsField203Name
nvarchar
32
Y
Waveform
Waveform_Key
bigint
N
Waveform
MasterTestRecord_Key
bigint
N
Waveform
MeterTestMaster_Key
bigint
N
Waveform
DateTime
datetime
N
Waveform
FileName
nvarchar
Rev: 1.10
256
Page 68 of 68
N