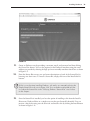
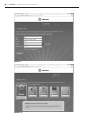
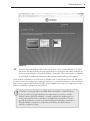
1
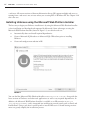
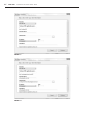
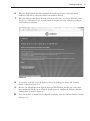
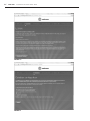
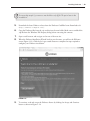
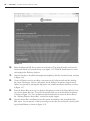
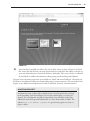
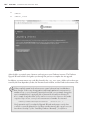
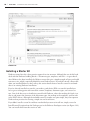
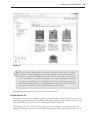
PART I
TE
RI
AL
Creating Your First Site with
Umbraco
MA
CHAPTER 1: Installing for the First Time
CHAPTER 2: The Umbraco Approach
TE
D
CHAPTER 3: Document Types
CHAPTER 4: Templates, Markup, and Master Pages
GH
CHAPTER 5: Using Macros
RI
CHAPTER 6: Languages and Dictionaries
CO
PY
CHAPTER 7: Multiple Sites, Hostnames, and Localization
1
Installing for the First Time
‰
What are the steps for installing Umbraco?
‰
How do you upgrade your current site?
‰
Which Umbraco starter kit should you use and how do you install it?
‰
How do you apply and manipulate Umbraco skins?
‰
How do you find and install Umbraco modules?
Users have installed Umbraco literally hundreds of thousands of times in a variety of
environments — everywhere from an entry-level Windows XP machine, to multiserver
load-balanced sites, and even to Microsoft Windows Azure. In the vast majority of these
cases the installations complete successfully and take no more than a few minutes. The
fi rst section of this chapter contains the Umbraco quick start instructions for facilitating
a successful install. Read it, install Umbraco, and then continue reading for additional
considerations.
You can always fi nd the latest released version of Umbraco on the Umbraco CodePlex home at
http://umbraco.codeplex.com/ from the Downloads tab. The latest version of Umbraco is
also available via Microsoft’s Web Platform Installer and Web Application Gallery (http://
www.microsoft.com/web/gallery/umbraco/). This chapter offers a detailed overview for
installing Umbraco with both the Microsoft Web Platform Installer and directly from the
Umbraco installation fi le downloaded from the Umbraco CodePlex home.
INSTALLING UMBRACO
The text in this chapter, as well as the rest of the book, assumes that you have a PC running
Windows Vista or Windows 7 and have user permissions sufficient enough to allow for administrative actions. If this is not the case, or if you are installing to a different environment (such
as to a shared-hosting account) skip this section for now and refer to Chapter 14, which has
troubleshooting tips. One important item to note is that Umbraco is best installed as a website
root rather than as a virtual directory under a web root, so plan on running Umbraco from
4
x
CHAPTER 1 INSTALLING FOR THE FIRST TIME
a web root. All current versions of Internet Information Server (IIS) support multiple web roots so
running from a web root is not an issue unless you are using IIS5 on Windows XP. See Chapter 14 if
this is the case.
Installing Umbraco using the Microsoft Web Platform Installer
The best way to begin your Umbraco installation is by using the Microsoft Web Platform Installer
(a free installation tool developed and supported by Microsoft). Some advantages to using the
Microsoft Web Platform Installer (shown in Figure 1-1) are that the tool can:
‰
Automatically detect and install required dependencies.
‰
Create a Microsoft SQL database or Microsoft SQL CE database prior to installing
Umbraco.
‰
Create and configure new websites in IIS.
FIGURE 1-1
You can fi nd the Microsoft Web Platform Installer at www.microsoft.com/web/ along with the
latest versions of Umbraco and other web applications as well as any required dependencies. In
addition, the Microsoft Web Platform Installer is available as an IIS extension at www.iis
.net/extensions/WebPI/ and is integrated into web hosting control panels such as cPanel and
DotNetPanel. Using a web host’s control panel to install Umbraco in a shared hosting environment can greatly simplify the installation process.
Installing Umbraco
Use the following steps to install Umbraco with the Web Platform Installer:
1.
Launch the Web Platform Installer from the Microsoft Web Application Gallery (http://
www.microsoft.com/web/gallery/Umbraco).
2.
Review the list of files that the Web Platform Installer will download and install.
The list of installation files that the Web Platform Installer presents may only
include the Umbraco Content Management System (CMS) component if you
already have the required dependencies, such as SQL Server and the .NET
Framework, installed.
3.
Select the Microsoft SQL Server CE database option as shown in Figure 1-2.
FIGURE 1-2
4.
5.
Select New Web Site from the Web Site drop-down menu as shown in Figure 1-3.
Enter the site information for Site Name, Path, Port, Home Directory, and Host Name.
The author recommends leaving the Umbraco CMS Application Name blank, as
shown in Figure 1-4.
x 5
6
x
CHAPTER 1 INSTALLING FOR THE FIRST TIME
FIGURE 1-3
FIGURE 1-4
Installing Umbraco
6.
When the Web Platform Installer completes the installation process, click the Launch
Umbraco CMS link to launch the Umbraco Installation Wizard.
7.
When the Umbraco Installation Wizard loads in your browser, you see the Welcome screen
(Figure 1-5). Click the Let’s get started! button to complete the steps required to configure
your Umbraco installation.
x 7
FIGURE 1-5
8.
To continue, read and accept the Umbraco license by clicking the Accept and Continue
button as shown in Figure 1-6.
9.
Because you selected Microsoft SQL CE from the Web Platform Installer, the correct database options will already be set. Click the Install button to complete the Umbraco database
configuration as shown in Figure 1-7.
10.
Once the database is installed and configured completely, click the Continue button as shown
in Figure 1-8.
8
x
CHAPTER 1 INSTALLING FOR THE FIRST TIME
FIGURE 1-6
FIGURE 1-7
Installing Umbraco
x 9
FIGURE 1-8
11.
Create an Umbraco user by providing a username, email, and password and then clicking
the Create User button. You can also register for the Umbraco newsletter using the email
address you provide by selecting the Sign up for our monthly newsletter check box as shown
in Figure 1-9.
12.
From the Starter Kits screen, you can browse descriptions of each of the Starter Kits by
hovering over their icons. To install a Starter Kit, simply click one of the Install this kit
buttons.
If this is your first time installing Umbraco, the author recommends selecting the
Simple Starter Kit as shown in Figure 1-10. You can find more detailed information about the Starter Kits in the “Utilizing Umbraco Starter Kits” section later
in this chapter.
13.
Once the Starter Kit is installed, you have the option of installing a skin from the Install a
Skin screen. Umbraco Skins are a simple way to make your Starter Kit beautiful. You can
preview a skin by hovering over the skin icon and install a skin by clicking the Install button
as shown in Figure 1-11.
10
x
CHAPTER 1 INSTALLING FOR THE FIRST TIME
FIGURE 1-9
FIGURE 1-10
Installing Umbraco
x 11
FIGURE 1-11
14.
Once the skin is installed you will see the You’re done screen as show in Figure 1-12. From
this screen click the Preview your new website button to launch the skin editor or the Set up
your new website button to launch the Umbraco backoffice. This screen also has a collection
of useful links to additional information about getting started working with Umbraco.
You’re all done and Umbraco is ready for use, complete with a fully functional web site and beautiful skin! As you can see, when you compare the process to a manual installation as discussed in the
next section, using the Web Platform Installer greatly simplifies the setup and configuration of the
website and database requirements for Umbraco.
A limitation of using the Microsoft Web Platform Installer to install Umbraco
is that only Microsoft SQL databases are supported. If you want to install
Umbraco using a MySQL database, you must configure the database prior to
running the installation from the Microsoft Web Platform Installer. You then
provide the database connection information during the Umbraco Installation
Wizard database configuration step rather than during the Web Platform
Installer configuration step.
12
x
CHAPTER 1 INSTALLING FOR THE FIRST TIME
FIGURE 1-12
Installing Umbraco Manually
Although using the Microsoft Web Platform Installer to install Umbraco is strongly advised, cases
may exist where a manual installation is desired. In such a case, you must manually complete the
steps to create the IIS website, create the database, and set required permissions. The following are
the steps to complete a manual installation of Umbraco: If you fi nd yourself stuck on one of these
steps, try installing Umbraco using the Quick Start steps fi rst and then return to this section later.
1.
2.
Create a new folder with a unique name for your Umbraco installation on your local hard drive.
From IIS Manager create a new site and set the home directory to be the new folder; leave the
remaining settings at the default.
3.
Set permissions on the new folder to allow the new site’s application pool identity (usually this is the Network Service or Application Pool Identity account) to Modify, Read &
Execute, and Write.
4.
From SQL Management Studio create a new database and assign a login to the dbo role for
the database. Make a note of the SQL instance name (such as ./SQLEXPRESS), the database
name, and the login name and password.
Installing Umbraco
x 13
You may skip step 4 if you want to use the Microsoft SQL CE option later in the
installation.
5.
Download the latest Umbraco release from the Umbraco CodePlex home Downloads tab
(http://umbraco.codeplex.com/).
6.
Copy the Umbraco files from the .zip archive into the new folder. Make sure to unblock the
.zip file from the Windows File Property dialog before extracting the contents.
7.
8.
Open a web browser and navigate to the root of the new site.
When the Umbraco Installation Wizard loads in your browser, you will see the Welcome
screen (Figure 1-13). Click the Let’s get started! button to complete the steps required to
configure your Umbraco installation.
FIGURE 1-13
9.
To continue, read and accept the Umbraco license by clicking the Accept and Continue
button as shown in Figure 1-14.
14
x
CHAPTER 1 INSTALLING FOR THE FIRST TIME
FIGURE 1-14
10.
Select the Microsoft SQL Server option in the Database Type drop-down list and enter the
Connection Details you created in step 4 (see Figure 1-15). Click the Install button to create
and configure the Umbraco database.
11.
Once the database is installed and configured completely, click the Continue button as shown
in Figure 1-16.
12.
Create an Umbraco user by providing a username, email, and password and then clicking
the Create User button. You can also register for the Umbraco newsletter using the email
address you provide by selecting the Sign up for our monthly newsletter check box as shown
in Figure 1-17.
13.
From the Starter Kits screen you can browse descriptions of each of the Starter Kits by hovering over the Starter Kit icons. To install a Starter Kit click one of the Install this kit buttons
as shown in Figure 1-18. You can find more detailed information about the Starter Kits in
the “Utilizing Umbraco Starter Kits” section later in this chapter.
14.
Once the Starter Kit is installed you have the option of installing a skin from the Install a
Skin screen. You can preview a skin by hovering over the skin icon and install a skin by clicking the Install button as shown in Figure 1-19.
Installing Umbraco
FIGURE 1-15
FIGURE 1-16
x 15
16
x
CHAPTER 1 INSTALLING FOR THE FIRST TIME
FIGURE 1-17
FIGURE 1-18
Installing Umbraco
x 17
FIGURE 1-19
15.
Once the skin is installed you will see the You’re done screen as show in Figure 1-20. From
this screen click the Preview your new website button to launch the skin editor or the Set up
your new website button to launch the Umbraco backoffice. This screen also has a collection
of useful links to additional information about getting started working with Umbraco.
You now have everything you need to successfully run, build, and extend Umbraco. Obviously not
all Umbraco installations will fit into the preceding step-by-step instructions. The remainder of this
chapter covers additional considerations for other installation scenarios and environments.
A NOTE ON SECURITY
One item that some readers will no doubt notice is that the permissions settings
in the preceding manual installation are less than optimal from a security perspective. For a production or public-facing website, you will likely make some
additional, more fi nely grained adjustments to a site’s home folder and fi les. The
website http://our.umbraco.org/wiki/ is a good starting point on what settings to adjust.
18
x
CHAPTER 1 INSTALLING FOR THE FIRST TIME
FIGURE 1-20
Tips for Installing Umbraco in Special Environments
One of the great strengths of Umbraco is its simple architecture, which enables it to adapt to a
variety of installation and usage scenarios. Certainly the earlier quick start is a simple scenario
intended for use on a single machine — most likely a web builder’s desktop or laptop — but you can
use this same procedure to install Umbraco on a netbook running Windows 7 or a web server running Windows 2008. This procedure is also appropriate for installing an evaluation instance, for
an install used to “test” a feature or to reproduce a defect, as well as for a fresh start when building
websites with Umbraco.
Debugging in a Development Environment
For web developers, especially those working with .NET user controls integrated with Umbraco,
the ability to debug code while running Umbraco is important. You can easily do this debugging by
installing Umbraco onto the same physical machine that has Visual Studio installed. This can be
on a local development laptop, a virtual machine, or a remote development machine accessed via
remote desktop. You can also debug .NET code in a running Umbraco instance on domain-joined
machines with the appropriate debugging tools installed and configured, but that is beyond the
scope of this book. For this scenario, check out the advanced developer sections of the Umbraco
wiki (http://our.umbraco.org/wiki).
Upgrading Umbraco
x 19
Security Settings in a Production Environment
When installing to a production environment, you must take some additional considerations into
account, and not the least of these are the security and access settings for the Umbraco site and
related fi les (see the earlier A Note on Security sidebar in the “Installing Umbraco Manually” section). In addition you will likely create a backup routine for your Umbraco instance. Including both
your Umbraco database and your Umbraco fi les in your backup is important to have a complete
snapshot. The author recommends reviewing the current backup documentation on the Umbraco
wiki (http://our.umbraco.org/wiki).
Other Installation Scenarios
Of course, other scenarios exist in which you might install Umbraco, such as load balancing, cloud
installation (Amazon EC2 or Microsoft Windows Azure), distributed publishing, and others. These
scenarios are supported but are outside the scope of this book. For more information on them refer
to the Umbraco wiki, the Umbraco forum, and Umbraco.tv for more information.
UPGRADING UMBRACO
The Umbraco Installation Wizard can manage patch upgrades (e.g., 4.5.1 to 4.5.2) and single major
version upgrades (e.g., 4.0 to 4.5) gracefully and is the recommended approach for upgrading an
installation. With all upgrades, knowing whether your installation contains any modified source or
fi les from the original distribution is important. If so, take care to make backup copies of these files.
In addition, if your installation contains a customized web.config fi le, or other configuration fi le,
creating a backup of your configuration fi les for later use is essential.
Performing a Patch Upgrade
Typically, a patch upgrade contains no new functionality and requires no changes to configuration files.
Reading the notes associated with a new Umbraco release prior to installing or upgrading an installation is good practice because any changes to configuration files will be documented in the notes.
The process to complete a patch upgrade is generally as follows:
1.
2.
3.
Extract the patch release from the archive.
Copy new or altered files to your installation.
Run the Umbraco Upgrade Wizard (see Figure 1-21).
You can always fi nd the latest release of Umbraco at the Umbraco home on CodePlex at http://
umbraco.codeplex.com/releases.
Unless specified in the release notes, you will only copy the following directories to your
installation:
‰
/app_data
‰
/bin
‰
/install
20
x
CHAPTER 1 INSTALLING FOR THE FIRST TIME
‰
/umbraco
‰
/umbraco_client
FIGURE 1-21
After the fi les are copied, open a browser and navigate to your Umbraco instance. The Umbraco
Upgrade Wizard launches and guides you through the process to complete the site upgrade.
In addition, you must remove any cache files located in the /app_data/TEMP/ folder, such as those generated by the client dependency loader, the Examine Search indexer, and the Umbraco document cache.
Unless explicitly stated in the release notes, a patch release doesn’t include database changes. In this case, the upgrade wizard simply updates the current version
number in web.config. Instead of running the wizard, you can simply change this
version number before copying the files to prevent the wizard from running. To
do so, simply change the value of the <umbracoConfigurationStatus> key under
<appSettings> in web.config to the current version number. For instance:
<add key=”umbracoConfigurationStatus”
value=”4.5.2” />
Verify permissions! If you skip the Upgrade Wizard, make sure to verify that
you have correct file permissions for directories because the file copy process can
reset them. See step 3 of the “Installing Umbraco Manually” for reference.
Utilizing Umbraco Starter Kits
x 21
Performing a Version Upgrade
When upgrading between single major versions, identifying all third-party components and
Umbraco version-specific features is important. Breaking changes are noted in the major version’s
release notes and in Umbraco-provided installation and upgrade guides. Aside from verifying that
third -party components are compatible with the version to which you are upgrading, creating a
backup of all modified fi les, dependent assemblies, ASP.NET user controls, and all configuration
fi les is essential.
The process to complete a version upgrade is generally:
1.
2.
3.
4.
5.
6.
Gather information about changes to configuration files.
Identify third-party components and related files.
Extract the version release from the archive.
Copy new or altered files to your installation.
Apply changes to configuration files.
Run the Umbraco Upgrade Wizard.
After the fi les are copied and the configuration fi les are updated, open a browser and navigate to
your Umbraco instance. The Umbraco Upgrade Wizard launches and guides you through the process to complete the site upgrade.
Updating your installation’s configuration files to properly contain both a new
version’s required settings and your specific settings is tricky at best. Most users
have the most success by using a file difference and merge tool to create new
configuration files based on the new file and adding the settings from the older
version where no conflict exists.
Some settings will need to be determined based on your specifi c requirements
and the specifi c version being used for the upgrade — for example, XML
schema changes from version 4.0 to version 4.5 and Umbraco user password
format — set in web.config — from version 4.5.0 to version 4.5.1.
UTILIZING UMBRACO STARTER KITS
Umbraco comes with four starter kits to help you get up and running quickly with your Umbraco
installation. These include the Simple starter kit, the Blog starter kit, the Personal starter kit, and
the Business starter kit. Each of these starter kits contains a collection of document types, templates,
and modules that make up a simple but complete site. In addition, you can customize each starter
kit with a skin and additional modules (discussed later). You can either install Umbraco starter kits
when you install Umbraco or at a later time from the Developer Packages section of the Umbraco
backoffice as shown in Figure 1-22.
22
x
CHAPTER 1 INSTALLING FOR THE FIRST TIME
FIGURE 1-22
Installing a Starter Kit
Umbraco starter kits take a best practices approach to site structure. Although the rest of this book
deals with the Umbraco building blocks — document types, templates, and such — in great detail,
after Umbraco has been installed, the Umbraco starter kits give a simple example of how you should
structure a site, which is especially helpful for new Umbraco users. If you didn’t install a Starter Kit
when you installed Umbraco, don’t worry; this section details how to install a starter kit and modules to an existing Umbraco installation.
If you’ve already installed a starter kit, you made a good choice! With a starter kit installed you
have a great starting point with some basic content, templates, document types, and a macro or
two. One of the best ways to familiarize yourself with Umbraco, other than reading this book, is to
dive in and inspect the structure of the document types, the markup in the templates, and the code
in the XSLT macros. Although the included starter kit samples are quite simple, they also represent
Umbraco best practices for creating a simple site and its structure.
If you didn’t install a starter kit and have now decided you want to install one, simply access the
Install Starter Kit option from the Packages tree in the Umbraco Developer section (see Figure 1-23).
You can install skins from this section as well.
Utilizing Umbraco Starter Kits
x 23
FIGURE 1-23
If you’ve opted to skip installing a starter kit and want to dive right in, it is best
to start by creating a simple document type, template, and content structure to
familiarize yourself with Umbraco’s structure. Read on in this book for more on
how to use Umbraco to create and manage your content. Remember though: the
strongest recommendation for new Umbraco users is to install a starter kit and
skin when installing Umbraco. Installing and investigating any of the starter kits
gives you an overview of how you might structure your own site.
The following sections discuss the various starter kits in detail.
Simple Starter Kit
The Simple starter kit is the simplest and most semantically strict starter kit. It has a generic structure and is the prerequisite for many modules and other Umbraco packages. If you are new to web
CMS, and Umbraco in particular, you should begin with this starter kit.
The Simple starter kit contains a home page and several subpages along with a navigation
module. The Simple starter kit is intentionally missing styling and images in order to focus on the
24
x
CHAPTER 1 INSTALLING FOR THE FIRST TIME
structure. A few minutes spent looking over the Homepage document type and template is time
well spent understanding the Umbraco approach to defi ning data storage and layout.
Blog Starter Kit
The Blog starter kit contains all the elements of a blog site and demonstrates the Umbraco approach
to keeping content organized in a date folder format. You can create a new blog post to see this
feature in action. After you have given your blog a name, right-click the blog site’s home page and
select Create, then select Blog Post. Notice that Umbraco creates the folders for year, month, and
day automatically.
The Blog starter kit also contains macros that list the latest blog posts on the blog site’s home page,
list the blog posts in the archive, and allow site visitors to submit comments related to a blog post.
The kit even applies a spam fi lter to submitted comments so your blog site is not inundated with
comment spam.
The Blog starter kit is a great example of how you can allow user-generated content, comments in
this case, on your site. It’s robust enough for you to install and start blogging today without any
changes required, or you can use it as the basis for a blog site you customize further.
Personal Starter Kit
The Personal starter kit is a complete site for your own personal home on the web with a summary
Homepage and subpages for more about you. The kit also includes a Gallery section where you
can feature photos or images you provide in a web-friendly gallery format. The Personal starter kit
is also a great starting place for a portfolio site as well where you might feature your own work,
whether it is photography, graphics, or poetry.
Business Starter Kit
The Business starter kit is the starting point for a business presence on the web. With the
Business starter kit as a beginning, a business can build a meaningful website in almost no time.
The Business starter kit includes a blog section, with blog comment moderation tools, a news
section, and a built-in contact form. As with all the Umbraco starter kits, you can easily add new
functionality or change the default functionality to create the Umbraco site that perfectly fits
your needs.
Extending the Starter Kits
The Umbraco starter kits are only a starting point. Each is licensed with the MIT open source
license, which allows you to change, add, and remove any feature, code, or layout you want. When
you combine the Umbraco starter kits with the knowledge you gain from this book, there are no
limits to what you can accomplish.
With the addition of a skin and modules, which are discussed later, creating a complete website
without writing one line of code is entirely possible. After you add in some of the advanced techniques discussed later in this book, you will have the platform for building a myriad variety of
websites.
Applying and Manipulating Umbraco Skins
x 25
APPLYING AND MANIPULATING UMBRACO SKINS
Umbraco skins are created by the Umbraco community members and can be installed from the
Developer Packages section of the Umbraco back office. Basically, Umbraco skins enable you to
change the look and feel of an Umbraco starter kit simply by applying the skin to a starter kit site. In
addition, you can customize skins with user-defi ned text, colors, and images. Umbraco skins build
on the best practices approach of Umbraco starter kits by demonstrating the best way to implement
styling and layout control in your site.
When you apply a skin to an Umbraco starter kit site, the skin’s styles are used in place of the
existing starter kit site’s styles. The skin simply provides a unique Cascading Style Sheet (CSS) file,
including any images required to achieve the layout defi ned by the CSS. A skin can also add or
change small portions of the starter kit site’s HTML templates if needed. You can roll back all CSS,
images, and HTML changes to the starter kit’s default skin for a site because Umbraco creates a
backup of the starter kit’s default skin when you apply a different skin.
By default, you can only apply skins to the Umbraco starter kits as opposed to an arbitrary Umbraco
site as skins depend on the starter kit’s layout. Umbraco automatically determines which skins you
can apply to the currently installed starter kit and presents these in the skin selector.
You can select and apply a skin (see Figure 1-24) either when you install an Umbraco starter kit or
you can do so at a later time.
FIGURE 1-24
26
x
CHAPTER 1 INSTALLING FOR THE FIRST TIME
To access, install, and customize a skin, follow these steps:
1.
Navigate to the Developer section, expand the Packages tree and click the Install skin icon.
The available skins display in the right pane.
Umbraco skins are stored in a central Internet repository so they can be kept
current. An Internet connection is required to browse and install a skin.
2.
3.
To install a skin, click the skin icon.
To customize an installed skin, navigate to the Settings section, expand the Templates tree,
select the Starterkit Master template, and then click the Modify Template Skin button on the
right pane toolbar. The Umbraco Customize Skin editor will be launched and you can
customize the skin with your own text, colors, and images (see Figure 1-25).
FIGURE 1-25
Customizing a Skin
You can customize an Umbraco skin using only the Umbraco Skin editor with no code required. An
Umbraco skin may contain dependencies. Think of these as options that enable you to customize the
skin for your own site’s use. You can use Umbraco skin dependencies to customize a starter kit site’s text,
Applying and Manipulating Umbraco Skins
x 27
colors, and images. In this way a single skin applied to a single starter kit can be unique from every other
Umbraco site with the same starter kit and skin because of the customized text, colors, and images.
When you install a skin, the dependencies defi ned by the skin author can be set using the Umbraco
Skin editor. After a skin has been installed it can be customized.
To customize an installed skin:
1.
Navigate to the Settings section, expand the Templates tree, and select the “Starterkit
Master” template.
2.
Click the Modify Template Skin button on the right-pane toolbar. The Umbraco Customize
Skin editor launches.
3.
You can customize the skin with your own text, colors, and images. Using the Customize
Skin editor you can enter text for text dependencies, choose colors for color dependencies,
and choose and edit images for image dependencies (see Figure 1-26).
FIGURE 1-26
Modifying a Simple Umbraco Skin
If you’re comfortable editing HTML and CSS you can modify a skin further for your own use. At its
most basic, an Umbraco skin contains only CSS to achieve the desired changes to a starter kit site’s
styles. You simply include a reference to the skin’s unique CSS fi le in the starter kit’s MasterPage
28
x
CHAPTER 1 INSTALLING FOR THE FIRST TIME
template. Don’t worry about the terminology yet; this is just an example and all terms you see now
are explained fully a bit later in this book. Using this simple example, you can include the following
line in the starter kit’s MasterPage template so that any styles defi ned in the referenced CSS fi le will
automatically apply to the starter kit site:
<link ref=”stylesheet” type=”text/css”
src=”/css/new_skin.css”></link>
When you modify a skin, you may need to add additional elements to a starter kit’s MasterPage template in order to apply the desired layout control. To do this, the skin alters the starter kit’s default
MasterPage template, in this case by adding a single <div> element.
The default Runway starter kit MasterPage template contains this markup:
<asp:contentplaceholder id=”cp_top” runat=”server”>
<div id=”top”>
<h1 id=”siteName”>
<a href=”/”>
<umbraco:Item runat=”server”
field=”siteName”
recursive=”true” />
</a>
</h1>
<h2 id=”siteDescription”>
<umbraco:Item runat=”server”
field=”siteDescription”
recursive=”true” />
</h2>
<umbraco:Macro Alias=”RunwayTopNavigation” runat=”server” />
</div>
</asp:contentplaceholder>
A skin might add a <div> element, the <div id=”menu” class=”container”>, to apply a particular style to the starter kit’s navigation sections, as follows:
<asp:contentplaceholder id=”cp_top” runat=”server”>
<div id=”top”>
<h1 id=”siteName”>
<a href=”/”>
<umbraco:Item runat=”server”
field=”siteName”
recursive=”true” />
</a>
</h1>
<h2 id=”siteDescription”>
<umbraco:Item runat=”server”
field=”siteDescription”
recursive=”true” />
</h2>
Finding and Installing Umbraco Modules
x 29
<div id=”menu” class=”container”>
<umbraco:Macro Alias=”RunwayTopNavigation” runat=”server” />
</div>
</div>
</asp:contentplaceholder>
In this way an Umbraco skin can insert the HTML needed to achieve the desired styling without
affecting the function of the starter kit site in any way.
Typically, a skin should only change the CSS and related images and script for a site. If needed, a
skin may also change small snippets of HTML, such as to add an ID to an HTML element or create a new <div> for layout control. In this way, skins are kept as independent of a starter kit site’s
markup as possible and maintain maximum flexibility. A skin may also introduce a unique set of
scripts, generally JavaScript, to add functionality related to the skin. In addition, a skin may include
images used for layout and styling.
FINDING AND INSTALLING UMBRACO MODULES
Umbraco modules are small pieces of functionality that are compatible with the Umbraco starter
kits and are open-source licensed so that you may change the way the modules work if you
want. When you install an Umbraco starter kit, such as the Simple starter kit, some modules are
installed for you. The top navigation, contact form, and feed viewer are all examples of Umbraco
modules.
Umbraco modules are simply Umbraco macros specifically designed to work seamlessly with
Umbraco starter kits. The modules may have dependencies on specific starter kit markup, such
as an HTML element id or a content placeholder id. In most cases, you can also use Umbraco
modules with Umbraco sites that are not based on Umbraco starter kits. Most Umbraco modules
are created without compiled code, which allows you to investigate the module or to alter it for
your own specific use. Some modules use XSLT, which you can fi nd in the /xslt/ folder in your
Umbraco site’s root. Other modules use ASP.NET, generally C#, code, which is either in the
/app_code/ or /usercontrols/ folder in your Umbraco site’s root.
Some Umbraco modules are installed when you install an Umbraco starter kit.
You can install Umbraco modules directly from the Umbraco Skin editor. When working with the
Skin editor for an Umbraco starter kit, do the following:
1.
Click the Insert Module button from the toolbar. A list of available modules appears as
shown in Figure 1-27.
2.
Select a module and then click the area on the page labeled with Module Placeholder where
you want to locate the module.
30
x
CHAPTER 1 INSTALLING FOR THE FIRST TIME
FIGURE 1-27
You can learn more about Umbraco macros in Chapter 5.
TAKE HOME POINTS
After reading this chapter, you should feel comfortable installing Umbraco for the first time. Besides
knowing how to install Umbraco using the Web Platform Installer or manually, you should know what
to do in special environments and how to upgrade Umbraco. In addition, you should understand the
purpose of a Starter Kit and a skin. The following list outlines what you should be “taking home.”
‰
You should use the Microsoft Web Platform Installer for an error-free installation.
‰
You must pay close attention to your website’s user permissions during manual installation.
‰
You should use the sample checklist provided when upgrading
‰
Installing a Starter Kit is a quick way to get your site installed.
‰
You can install a Skin to make your site beautiful.
‰
Skins are easy to customize for your own use.
‰
Modules are small features that you can easily add to a Starter Kit.