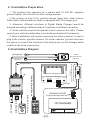
1
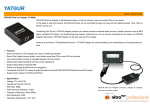
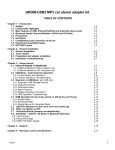
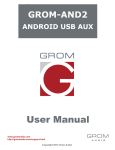
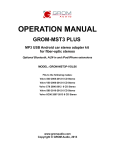
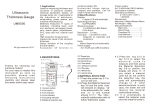
Digital Media Changer
YT-M07
User Manual
English
1- Product Introduction
1.1 Introduction
Yatour Digital Media Changer is a revolutionary replacement of CD
Changer. It can be easily installed and used. It delivers CD quality sound
directly into car stereo system via CD Changer Port, without loss of sound
quality that occurs with existing cassette and FM transmitter solutions.
Yatour Digital Media Changer supports direct controls from car radio
panel, and multi-function steering wheel remains fully operational. With
built-in USB slot , SD Card slot , iPod connection and Bluetooth extension
slot, users only need a SD/SDHC/MMC card, USB stick, or iPod/iPhone,
then they can enjoy MP3/WMA/WAV in the car with optimum sound quality.
Combining AUX IN slot as well, it provides car owners access to more audio
sources(For example, Internet Radio of Android devices).
All in all, car owners are able to enjoy the abundance of CD-quality music
via Yatour. It’s your best choice of upgrading current car stereo system.
1.2 Accessories
Digital Media Changer
YT-M07
Digital Media Changer
User Manual
Module Unit
Wire Harness
iPod Cable 3.5mm AUX Cable
User Manual
1.3 Optional Accessories (sold separately)
CDC
MP3
Bluetooth Carkit
Parallel Harness Converter Cable
Y Cable
Removal Tools
For more information about optional accessories, please visit www.yatour.net
2- Installation Guide
Before installation, please carefully read the Manual. To guarantee user
interests, it is suggested that the product be installed by professional staff.
—[1]—
2.1 Installation Preparation
1. The product only operates on a vehicle with 12 Volt DC, negative
ground system. Do not use it on other voltage system.
2.The product is only fit for vehicles whose Head Unit, either factory
fitted radio or aftermarket car radio, is equipped with CD changer port.
3. Moreover, different solutions of Digital Media Changer would be
adopted according to different brand of vehicles or different car radios.
4. Some vehicles require the special tools to remove the radio. Please
consult your vehicle's dealership or car audio professional if necessary.
5. Most installations will require removing the factory stereo in order to
plug in the vehicle- specific harness. For some vehicles, you will also have
the option to connect the interface to the factory pre-run CD changer cable
located in the trunk or glove box.
2.2 Installation Diagram
Mic r ophone
YT-BTM
Bluetooth Module
(optional)
Remote Control
(optional )
BACK OF T HE HEAD UNIT
LED
USB FLASH
SD/SDHC/MMC
MP3、PSP、GPS、etc.
iPod/iPod Touch/iPhone
Digital Media Changer
AV
Power And
Speaker
CD Changer
Port
ANT
Switch between mp3 and CDC
(optional)
WIRE HARNESS
SOCKET
ORIGINAL SOCKET
(FOR USE IN SOME CARS ONLY)
原车CD/VCD/DVD机械碟盒
CD
CHANGER
CD CHANGER
—[2]—
MP3
CDC
2.3 Installation Guide
1. Turn off car engine and remove key from ignition, if your radio uses a
Security Code, make sure that you have the code before unplugging the
radio.
2. Unmount the radio from the dash in order to get access to the back side
of the radio, and find CD Changer port at the back of the radio.
3. Attach the wire harness connector to the back of the stereo to the CD
changer port. Be sure to make a firm connection but do not force it.
4. Once the Yatour is connected to the radio, you will need to test the
operation of the interface before re-assembling the dash. Insert SD card
or USB flash stick, and power on the Head Unit, then press CD (or Disc /
Mode / CDC / SOURCE / AUX) button for once or twice to switch to
playback mode of Digital Media Changer, with the symbol of LED light
being on. Meanwhile, CDC, EX, or CD01 will display on the radio
screen(depending on the car stereo type). Now the Digital Media
Changer will run normally.
5. After successful test, re-assemble the radio, and put wire harness and
module unit box in proper place. Then installation is completed. If you
experience difficulties with the installation, please check our
troubleshooting section of this manual.
2.4 Important Installation Notes
1. If there is a BLACK ground wire on the harness, please attach it to any
metal part of the car stereo body; If there is a YELLOW power wire on the
harness, please attach it to the power of the car, which connect to
battery; If there is a RED ACC wire on the harness, please attach it to the
ACC signal of the car. Without attaching those cables to the right
position, this Digital Media Changer will not work!
2. As to some vehicles with existing CD Changer, Parallel Harness or
MP3/CDC Switch Cable will be provided. This allows Digital Media
Changer to hook up with existing CD Changer. Simply connect the
existing CD Changer to the male connector of Digital Media Changer.
3. Regarding Fiat, Renault models, two black wires with metal ends
(male+female) come along with CDC connector. If noise problem exists
when using Digital Media Changer, please hook up the two grounding
wires with each other.
—[3]—
4.As for Audi factory radio of mini ISO 8 pin, its CDC connector is 20-pin
block connector, in order to install Yatour, it requires to cut the 8-pin part
or connect with our special Audi 20-pin adapter cable.
5. As for Clarion protocol radios, such as some BUICK radio and SUZUKI
radio, it requires to totally unplug the wire harness before installation, in
order to power off the electric supply. If not, it would probably cause
Yatour not to work, or radio screen flickering.
6. As for installation on CAN-Bus radios of Peugeot/Citroen, Renault,
Ford(new) and Mazda(new), it is required to unplug the radio from the
power before installation. Otherwise, Digital Media Changer might work
improperly or the radio might be caused damage. Regarding
Peugeot/Citroen without pre-installed CD Changer, to enable Digital
Media Changer to work, the CD Changer function must be activated by
professional tools. Please enquire the Peugeot/Citroen dealer on how to
activate the CD Changer function.
7. As per BMW radios with CD Changer, the CD Changer must be
completely disconnected before installation (The 3-pin and the 6-pin
connector, both are located in the trunk, must be disconnected),
otherwise, Yatour will not be recognized. Besides, if the BMW radios are
with DSP, extra DSP kit and specific Yatour would be used.
3- Functions and Usage Preparation
3.1 Working Modes Instruction
Read over this instruction carefully before using Yatour.
After finishing installation of Yatour, press once or twice the CD (or
disc/source/mode/cdc etc.) button to switch to Yatour working modes.
Yatour Digital Media Changer offers several connection ports of
USB/SD/iPod/AUX/Bluetooth etc., and offers 4 types of working modes:
USB/SD mode, iPod adapter mode, AUX IN mode, Bluetooth mode.
USB/SD, iPod and AUX IN modes can not work at the same time except
Bluetooth mode. For example, under USB/SD working mode, audio device
has to be paused or be disconnected from AUX input.
3.2 USB/SD MODE Operation
3.2.1 Supported USB/SD Storage Devices
—[4]—
Yatour supports SD/SDHC/MMC card and USB sticks, Mobile hard
drives, USB card reader, etc. Yatour supports only FAT16/32 formatted
storages, up to 16GB. NTFS is not supported!
3.2.2 Supported Music formats
The Yatour supports the following music formats:
- MP3 with bitrates up to 320Kbps
- WMA with bitrates up to 389Kbps
- WAV
To enjoy optimum sound quality, it is suggested that music files of high
compression ratio are used.
3.2.3 Music File Saving & Playing Mode:
Just take the following fig. as a showing example.
The Radio Panel:
The setting of storage device:
—[5]—
Yatour supports multi-folder playback. To access the music, it is
important that the music has been saved/organized into folders which are
named CD01, CD02, CD03...CD15. When playback, CD01, CD02,
CD03...CD15 will correspondingly display on radio panel screen. If there is
no folder named "CD0X", all folders and tracks/songs will be recognized as
only one virtual CD disk. Any folder or music file not named as per the
above-mentioned rule will not be recognized or played.
The naming of the tracks/songs is unrestricted, and the playing order is
in line with the time that music files are saved on the SD card or USB stick.
Besides, please do not save music files in the folders of the sub directory,
otherwise, music files cannot be identified or recognized.
3.2.4 Supported Folder & Track Quantity:
Yatour can support up to 15 folders, every folder can save up to 99
files(You can save up to 1000 music files, but If your radio only can display
a maximum of two digits for track number. Track number 100 will be
displayed as 01, track 101 as 02, track 102 as 03...). But most OEM radios
can only identify 6-10 folders.
3.3 iPod/iPhone MODE Operation
The Yatour has two modes of iPod/iPhone operation:
1. Hybrid Mode:
Search and select music on iPod directly just as you would in portable
use. The music will play back through your car stereo. And you can use the
track up/down, fast forward, and reverse buttons on your radio to control
music playback. All audio tracks on your iPod will be played at Hybrid
Mode, Operate and control the iPod like it is one CD.
2. Playlist Mode:
In the Playlist Mode, operate and control the iPod like it is a CD changer.
This mode allows you to access 5-9 playlists on iPod from radio. iPod
screen always display "OK to disconnect" or "Attached to accessory" and
iPod's keypad is not functional or locked. Please note that if you want to
switch to this Mode, you need to use iTunes to set up the corresponding
Playlists on the iPod. Please refer to iPod usage instruction about how to
set up playlists.
Between Hybrid Mode and Playlist Mode, you can switch by pressing CD
selection button of OEM radio panel. Generally, DISC 1 is for Hybrid Mode,
and DISC 2-DISC 10 are for No.1-No.9 playlist of Playlist Mode.
—[6]—
3.3.1 CONNECTING & PLAYING of iPod/iPhone
1. Connecting iPod to the interface
After iPod connect to the adapter, iPod will take a few moments to get
into the external control mode. During the initialization, iPod screen may
shift or change continuously for approximately 25 seconds.
If connect iPhone to the adapter, iPhone will register a message stating
“This accessory is not made to work with iPhone.” It will ask if you want to
“Turn On the Airplane Mode.” Please answer “NO”.
2. Select iPod mode on radio
Press the CD(or Disc/ Mode/ CDC/ SOURCE/ AUX) button on radio
repeatedly until "CD x-x" appears on the radio display (x is the track
number of "Now Playing" song on iPod). This display confirms that iPod
mode has been completely synchronized and activated. Synchronization
timing varies according to the number of Playlists on your iPod.
If iPod was playing previously before radio or ACC power was OFF,
and the iPod was not disconnected, playback resumes from where it was
stopped. Changing source to AM/FM, CD, Cassette When a source other
than the iPod is selected on radio, the iPod will pause.
3. Disconnecting iPod from the interface
If your iPod is disconnected during playback in iPod mode, the radio
will automatically switch to AM/FM mode.
After disconnecting, iPod screen changes from the external control
mode screen back to the normal menu. Press and hold the Play/Pause
button on iPod may get the normal menu back faster.
4. Playback of songs on iPod
All audio tracks on your iPod will be played at disc 1. Track order is
determined by the default order on your iPod. Selecting disc 2 to disc 10 on
radio will allow playback of 9 Playlists on iPod.
5. Selecting a Playlist
Press DISC UP (+) or DISC DOWN (-) button to select a Playlist. The
selected Playlist will begin playing and the Playlist number and track
number will be displayed. In rare cases, this may take up to a few seconds
for the completion of synchronization. used to seek within a single song
too. but the time on the radio will not accurately reflect the position with a
given song.
—[7]—
3.3.2 Important Operation Notes
1. In the Hybrid Mode, CD1 1-1 is displayed on the radio screen, only the
playback time will change, showing the total playback time instead of single
song's playback time.
2. In the Hybrid Mode, Fast Forward and Rewind can be activated after a
long press. Given a short press to Fast Forward or Rewind, the function is
as same as that of previous Track/next Track.
3.When you turn your car stereo or car ignition off, the iPod will
automatically will go into sleep mode. In the sleep mode, the iPod will still
consume power—although very little—from the car battery. There is no
need to disconnect the iPod every time you turn off your car. However, it is
strongly advised that you disconnect the iPod if you do not plan to operate
your car for long periods of time.
3.4 AUX MODE Operation
AUX IN port is used to load auxiliary audio equipment, such as MP3
player, PSP, iPod/iPhone and Android phone via 3.5mm jack plug into the
head unit. Users will be able to listen to Internet radio of smart phone via
AUX IN port. Please remove the USB disk/SD card from Digital Media
Changer before you use the AUX IN, as USB disk/SD card playback will not
automatically stop. You can only adjust the volume via head unit when in
AUX playback status.
3.5 Bluetooth MODE Operation
Please refer to the Bluetooth Module Manual.
3.6 Detailed Operation Instructions
Once the Yatour is active and playing, the following operations are
available:
- Last Position Memory: when the stereo is switched to the CD changer
mode, the Yatour will automatically start playing the last track played on the
current USB stick from the last played position.
- Next track: playback will switch to the next song and the car stereo
track number will represent the song number from the current folder or
playlist.
- Previous track: playback will switch to the previous song and the car
—[8]—
stereo track number will represent the song number from the current folder
or playlist.
- Fast Forward: the Yatour will start fast forwarding the current track
forward.
- Fast Reverse: the Yatour will start rewinding the current track
backward.
- Play/Pause: When the stereo is turned to the CD changer mode, Yatour
will automatically start playing. Turning the stereo off or switching to
another source (FM, AM, etc.) will cause Yatour to pause the current track.
- Scan: Press the “scan” button, each track in the current folder play for
10 seconds.
- Disc Change: selecting Disc 1-6 or using Disc ^/Disc v will cause the
Yatour to change the current root directory to the appropriate one based on
the virtual disc number.
- Mix/Random/shuffle: plays songs in a shuffle mode. The track
enumeration will show the currently playing track number. When switched
off, the playback will continue from the currently playing track.
- Repeat: when turned on, it will to repeat playback of a single song.
- Text: on some stereos, pressing text button will display ID3 tag(song
name, artist name, etc.) of current track.
3.7 LED indicator
The LED indicating light is on when Digital Media Changer starts
working, and it takes about 1-20 seconds to load music files before starting
playback. If the car radio is turned on but Yatour is not working and the LED
indicating light are not on, that means Yatour is not connected properly or
not supported by the stereo.
Once switching to FM or the Head Unit is OFF, Digital Media Changer
would stop working, and LED indicating light would go off.
3.8 Important Compatibility Notes
1. MP3/CDC Switch Cable is provided for existing CD Changer on some
vehicles(sold separately). Power off your radio or vehicle and switch
between Yatour and CDC (Original CD changer). For some vehicles, you
may need to restart the radio for once after operating on MP3/CDC Switch.
—[ 9 ]—
2. For most vehicles equipped with external factory CD changer, you
must disconnect CD changer in order to install Yatour.
3. The operation of Digital Media Changer is nearly equal to that of the
factory fitted radio, but some button functions of some factory radios might
be altered. However, this alteration would not affect the functions of the
factory radio or existing CD changer.
4- Common Troubleshooting
1. Digital Media Changer doesn't work after installation.
Please check whether the wire harness is correctly connected. And if
there is GND wire(for some car models), please check whether it connects
well with metal parts of car radio.
2. After installation, I pressed CD button for switch, it can switch to
MP3 playback status, but only one CD folder works, how should I do?
This problem is probably caused by improper folder structure you
saved/organised in USB device/SD card. Please follow the rules as abovestated, to access the music, it is important that the music has been
saved/organised into folders which are named CD01, CD02, CD03...CD99.
Otherwise, all tracks/songs will be recognized as only one virtual CD disk.
3. When auxiliary audio device is connected via AUX IN slot, I can still
hear music sound from USB device, how to do with this?
Please then remove the USB device/SD card from Digital Media Changer
before you use the AUX IN, otherwise, USB device/SD card playback will
not automatically stop.
4. When playing tracks from AUX device, it is running quite well, but
cannot be controlled by head unit, either tracks or CD folders cannot
be switched, what can I do?
AUX is an external audio input, you can only adjust the volume via head
unit when in AUX playback status. It is normal that you cannot switch tracks
or CD folders. So if you need full-function control via head unit, please
replace AUX with SD card or USB flash stick.
5. My car has a CD changer already, and I want to install Digital Media
Changer, how can I do?
As to part of the cars equipped with existing CD Changer, we can offer
Parallel Harness, which allows Digital Media Changer to hook up with the
—[10]—
existing cd Changer. There is a Switch for CDC and MP3 conversion, thus
you could choose to play Digital Media Changer or CD Changer as you like.
However, please note Parallel Harness is not available for all cars.
6. My car original stereo has only Cassette, can I connect Digital Media
Changer to my car stereo?
It depends on whether there is extra CD changer port for Digital Media
Changer, but has nothing to do with whether the head unit is CD or
Cassette.
7. What happens when I receive a call and my iPhone is connected?
The sound from the stereo will automatically mute and the phones ring will
be heard over the factory radio speakers. When the call answered on the
iPhone, it will enter privacy mode and the iPhone operates as it normally
does during a call. No sound will come from the stereo system. Once a call
is completed the sound returns to the factory radio.
5- Specifications
Voltage Input : 11V~14.6V DC
Operational Current : 350mA
Standby Current : 5mA
Operating Temperature: -35℃~+85℃
DAC Resolution : 20bit
Total Harmonic Distortion : 0.05%
SN Ratio : 90dB
Frequency Response : 20HZ-20KHZ
6- Warranty
All the items are guaranteed against manufacturing defects for a period of
twelve months from purchase.
7- Disclaimer
The hardware and software along with the function setting are subject to
change without prior notice.
Future iPod and iTunes firmware updates may affect the features and
functions described in this User manual.
All trademarks are the property of their respective owners, under the
protection of law.
YTM07-EN V1.0
Guangzhou Yatour Electronics Technology Co.,Ltd.
—[11]—