1
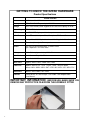
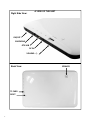
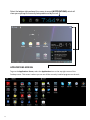
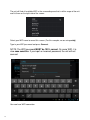
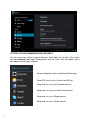
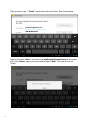
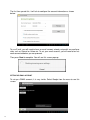
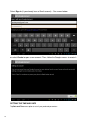
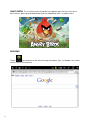
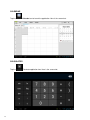
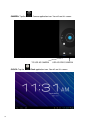
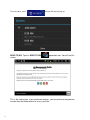
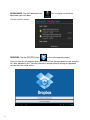
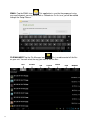
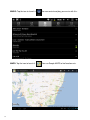
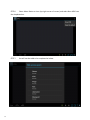
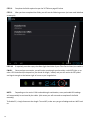
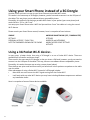
910C
Android Mobile Internet Device
Setup & Quick Start Guide
Thank you for purchasing the EZPAD 910C MID. The operational guidelines below are a quick and
convenient guide to its main functions providing the user with trouble free use for business and
pleasure. This guide has been designed to help setup your unit, but is not designed as a complete
Android reference manual. Please read the instructions carefully before use.
Spotbuy cannot support the Google Android Operating System or any of the programs the user
may download or install. For Android support, we suggest you visit the Android forums on-line or
visit www.android.com.
1
CONTENTS
OPENING NOTE & COMPANY STATEMENT …………………………………………………………….
3
BEFORE USING THE UNIT
PRODUCT SPECIFICATIONS & PACKAGE CONTENTS …………………………………………..
GETTING TO KNOW THE HARDWARE ……………………………………………………………………
CHARGING THE BATTERY ……………………………………………………………………………………..
TURNING THE UNIT ON/OFF ………………………………………………………………………………..
CONNECTING THE UNIT TO YOUR COMPUTER……………..……………………………………..
USING A MICRO SD CARD …………………………………………………………………………………….
4
4
6
6
7
8
OPERATING THE UNIT
TOUCH SCREEN NAVIGATION ……………………………………………………………………………….
THE DESKTOP—OVERVIEW ………………………………………………………………………..………..
DESKTOP FUNCTIONS & MENUS ………………………………………………………………………
9
10
11-13
SETTING UP THE UNIT FOR THE FIRST TIME
CONNECTING TO WI-FI…………………………………………………………………………………………
SCREEN BRIGHTNESS, SOUND & TIMEOUT ADJUSTMENT……………………………………..
SETTNG UP COMMUNICATIONS -EMAIL, GMAIL ..………………………………………………..
DATE AND TIME ….. ………………………………………………………………………………………………
SETTING UP INPUT METHOD ………………………………………………………………………………..
14-15
16
17-20
20
21
APPLICATION SCREEN OPERATION
2
APPLICATION SCREEN MANAGEMENT…………………………………………………………………….
PRE-INSTALLED APPLICATIONS….. …………………………………………………………………………
22-24
25-37
SETTING UP 3G ….. ………………………………………………………………………………………………
38-41
APPENDIX FOR 3G DONGLES ………………………………………………………………………………..
42-44
TROUBLE SHOOTING & FAQ ………………………………………………………………………………………..
45
WARRANTY & SUPPORT ……………………………….………………………………………………………
46-47
Opening Note
•
•
•
•
•
•
•
•
•
This product is a high precision electronic product, do not disassemble.
Avoid strong impact or any collision with the product.
Avoid using this product the following conditions: high and low temperature, moisture, dust,
magnetic fields strong and long-term exposure to sunlight.
Please use a wet cotton cloth wrung gently wipe the product shell, do not use any other
chemical cleaning solution.
This product should not be placed near any liquid in case of accidental spillage onto or into
the
product.
Excess use of the headphone at high volume may cause permanent hearing impairment.
Please only use permitted batteries, chargers and accessories, use any other type of products will violate the warranty regulations and may be dangerous.
Please follow the relevant local environmental regulations to deal with obsolete machines and
accessories.
Where the product may become faulty, Spotbuy assumes no responsibility for any loss of data / music / video or any other files. Please follow the user manual for standard operation, and
timely backups.
Company Statement
•
•
•
•
•
•
•
•
3
Specifications are subject to change without notice.
Always copy your important data. We assume no responsibility for the data loss.
This manual has been carefully checked, however, we assume no responsibility for any errors.
Please read the operating instructions carefully and only the accessories supplied with the
unit to avoid any unexpected damage. No warranty can be executed if you connect with
incompatible accessories.
Although the latest version of Android available at the time of manufacture that is compatible
with this unit’s hardware specifications has been installed, Spotbuy assumes no responsibility
for the performance of the Android operating system supplied by Google, or for any errors /
software bugs and/or software failures.
Any discrepancy between the data and/or pictures in this manual with the actual product hereinafter, the actual product prevails.
We cannot be responsible for any act of downloading illegal software or any content that is
illegal.
Spotbuy cannot support the Android Operating System or offer any support for any Android
based software that the user may download, install or purchase.
GETTING TO KNOW THE EZPAD HARDWARE
Product Specifications
EZPAD 910C MID
Processor
A13 Cortex – A8 1.2Ghz
Memory
DDRIII RAM: 512MB, speed up to 1333MHz
Storage
Built-in flash memory 8GB. Support for SD card, max capacity of 32GB
Networking
IEE802.11B/G wireless network
USB
1 x USB2.0 OTG high speed interface port
Other Ports
1 each TF card, Headphone Port, Microphone; DC Power Port
Camera
Front position, 300,000 pixels hardware / 1.3 Megapixel with software
Audio
3.5mm headphone jack; Stereo speakers
Screen
Size: 9.0 inch; WVGA 800 x 480; 16 million colors
Type: Capacitive—5 x Point Touch
Battery
Built-in lithium polymer battery 4000mAH
User Interface Touch Screen—Capacitive Touch
OS
Google Android 4.03
Music Files
Supports: MPEG / MP3 / WMA / AAC / WAV
Video Files
Supports: MPEG1/2/4,XViD,DiVX4,H264,MJPEG 1080P
Formats: MKV / WMV / MPG / DAT / VOB / AVI / MOV / ISO / MP4 / FLV
Photo Files
Formats: JPEG / BMP / GIF / PNG
Contents
EZPAD device / AC wall charger / USB Cable / USB Adaptor cable
/ User Manual
IMPORTANT INFORMATION:
BEFORE USE, MAKE SURE YOU
REMOVE ANY PROTECTIVE FILM FROM THE SCREEN IF FITTED
4
A VIEW OF THE UNIT
Right Side View:
ON/OFF
EARPHONE
OTG USB
DC IN
VOLUME + / -
Back View:
TF CARD
RESET
5
SPEAKER
Battery Charging
The unit has an internal charging battery. We suggest to charge up the battery overnight using the
supplied wall charger before first use. This will help keep the battery integrity.
CHARGING THE BATTERY
Plug in the wall adapter to the DC port of the unit. You will notice a large battery symbol appear on
the screen. and the battery will start to charge. If you turn the unit on, you will notice the battery
charge icon on the bottom right of the screen.
Note: During Battery Charging, you can operate the unit. The charging time will be longer when operating and charging at the same time.
Note: This model can also charge through the USB port. If you connect the unit to a USB port for files
transfer etc, it will charge the unit at the same time. USB charging is convenient if you are near your
computer, however, it takes longer than using the wall charger.
Startup / Shutdown / Sleep / Reset
STARTUP: Press and hold the power button for 2-5 seconds until you see the screen startup, then
release. The system will begin the startup process, and then enters the Android Operating System at
the default home interface. To Unlock the unit , slide the Lock icon to the right.
SHUTDOWN: Press and hold the power button for 3-4 seconds until this screen will appear:
Power off
Would you like to shut down?
Cancel
OK
To Power off, tap OK.. To cancel the Power Down, select Cancel.
STANDBY MODE ON/OFF: To enter Standby mode, press the power button quickly and you will the
unit’s screen turn off. Standby mode puts the unit to “sleep” without complete power down. This helps
extend battery life by turning off the screen. To exit Standby Mode and operate the unit once more,
press and hold the power button for approx. 2-3 seconds, then release.. The screen re-appear in
locked mode.
To Unlock the unit , slide the Lock icon to the right.
You can adjust the time elapsed for the unit to automatically enter Standby mode in the settings
menu – Select Settings / Display / Sleep. Then choose between 15 seconds and 30 minutes from
the menu. Standby mode is used in order to conserve battery consumption.
6
RESET BUTTON: If Android stops un-expectantly, press the reset button to reset the device. Reset
will erase all user data currently in memory on the device. (Note: Using the RESET function will not
erase any Applications or Android itself etc)
CONNECTING THE UNIT DIRECTLY TO YOUR COMPUTER:
You can connect the unit directly to your computer using the OTG USB port.
The purpose of connecting the unit is either copying files to and from your PC to the unit, or to
an SD card which you may have in the unit at that time.
Using the normal USB cable supplied, connect the unit to a USB port of your PC. Make sure you
DO NOT use a USB Hub, or else, it may not connect.
The unit is a “generic USB Device” and does not need any extra software drivers to connect to
your PC. After your PC has recognized the unit, you will see a message on the bottom of your
PC screen informing you. (If your PC warns: Drivers not installed, ignore this)
To complete the connection, you need to reveal the Notifications Screen on the unit. To do this,
select the bottom right portion of the screen:
Now you will see a menu similar to this:-
Select USB connected.
You will then see this screen:
Select Turn on USB storage.
7
Using Windows Explorer, you will no:ce that another “disk drive” has been added … this is the
tablet.
If you also see another “Removable Disk” under the MID, then this will be the SD card currently
in the unit.
USING A MICRO SD CARD (Not Included)
☆ The device supports up to a maximum 32GB micro SD card.
Inser3ng an SD card: Insert your card into the micro SD slot un:l it clicks into place.
Make sure you insert it with the label or wri3ng on the SD card visible, and do not force it.
In a few seconds, you will see the message: - SD Card Mounted.
Removing a card: Close all applica:ons or documents which have been opened on the card,
press the card lightly; it par:ally ejects allowing you to pull the card out.
☆ DO NOT insert and remove the micro SD Card repeatedly in a short me, as this may cause
damage to the card and or to any data on the card.
☆ We recommend using major brands of memory cards to avoid incompability.. If your TF card
is not recognized, format it using your PC and try again. If its is sll not recognized, replace the
TF card.
8
Touch-Screen Navigation
Use your fingers to manipulate icons, buttons, menus, the onscreen keyboard, and other items on
the touchscreen. You can also change the screen's orientation.
To select or activate something, touch it.
To type something, such as a name, password, or search terms, just touch where you want to type.
A keyboard pops up that lets you type into the field.
Other common gestures include:
♦
Touch & hold: Touch & hold an item on the screen by touching it and not lifting your finger until
an action occurs.
♦
Drag: Touch & hold an item for a moment and then, without lifting your finger, move your finger
on the screen until you reach the target position. For example, you can drag to reposition
shortcuts on the Home screen.
♦
Swipe or slide: Quickly move your finger across the surface of the screen, without pausing
when you first touch (so you don't drag something instead). For example, you can slide a
Home screen left or right to view the other Home screens.
♦
Pinch: In some apps (such as Maps, Browser, and Gallery), you can zoom in and out by placing two fingers on the screen at once and pinching them together (to zoom out) or spreading
them apart (to zoom in).
To avoid scratching or crushing, do not place objects on the touch screen surface.
GETTING AROUND THE SCREEN
(depending on what
Menu: For ALL Android applications and screens, pressing the MENU icon
screen you are on, it will be on the bottom left portion or the extreme top right corner of the unit) or
the Menu Button
(right hand side on front of unit) will reveal the menu items and
options available at that time of operation.
At the boIom of the screen, you'll find three Naviga:on buIons. They're always available. No maIer
what you're doing with your unit, you can always get back to the main Home screen or return to
previous screens:
Icon
9
Name
Back
Descrip3on
Opens the previous screen you were working in, even if it was
in a different app. Once you back up to the Home screen, you
can’t go back any further in your history.
Home
Opens Home. If you're viewing a leN or right Home screen,
opens the central Home screen.
Recent apps
Opens a list of thumbnail images of apps you've worked with
recently. To open an app, touch it. To remove a thumbnail from the
list, wipe it to the right.
DESKTOP – Overview:
GOOGLE SEARCH
RETURN HOME RECENT
APPLICATIONS
MENU
APPS RUNNING
WIFI
TIME
BATTERY
To Launch an Applica3on: Tap once on any applicaon icon to launch it.
To Reposi3on an Applica3on Icon: Touch, hold and then slide icons to reposion them on the
screen.
To Move an Icon to another Desktop Screen: There are 5 Desktops you can posi:on icons onto.
You can see these by wiping to the leN or right. You will see a faint frame moving to indicate another Desktop. To move an icon from one Desktop to another: touch, hold and slide icons onto
the Desktop screen you would like it to be on.
Most users have their most used icons on the centre screen, and less used icons on the others.
To Remove an Icon from the Desktop: Touch and hold an icon unl you see an X appear on the
top centre of the screen. Without releasing the icon, slide it onto the X and it will be deleted from
the Desktop.
Note, this does not delete or uninstall the applicaon; it simply removes the icon from the
Desktop.
10
DESKTOP FUNCTION MENUS:
While on the Desktop screen, you can tap the MENU icon or MENU buIon, to display the
Func3on Menu:
TAP THIS
Wallpaper:
TO DISPLAY THIS
Select this to show the Wallpaper Selection Menu:
You can choose the wallpaper from the Gallery (any photos you may have stored on the device),
Live Wallpaper (these are moving wallpapers) or from the default Wallpapers stored in the unit.
When you select one of the above, you will see the wallpapers to choose from.
11
Manage Apps:
Select this to go directly to SeQngs / Apps. From here, you will see Apps
that are on your unit. You can choose from ALL the Apps,
DOWNLOADED Apps, Apps on the SD CARD or all the Apps that are currently
RUNNING.
Se<ngs:
Select this to go to the SETTINGS menu, from where you can control
your en:re unit.
Select the RECENT icon to
reveal the most recent tasks you have been doing.
You can then quickly select your next choice.
If you want to cancel a task, simply select it and wipe it to the right.
12
Select the bottom right portion of the screen to reveal (NOTIFICATIONS) which will
show you anything else currently being addressed by the unit.
APPLICATIONS SCREEN:
To go to the Applica3ons Screen, select the Applica3ons icon on the top right corner of the
Desktop screen. This screen is where you can see all the currently installed programs on the unit:
13
SETTING UP YOUR UNIT FOR THE FIRST TIME
Before using the unit, we strongly recommend setting up all the necessary items
first. By doing this, you are assured all is set up correctly to provide trouble free
use.
After the completion of a normal start, the Android opening screen will be displayed.
(See the picture below).
To start setting up your unit, select the SETTINGS icon to reveal this screen:
WIFI SETUP FOR THE FIRST TIME:
Tap and slide → WIFI menu item to turn on the Wi-Fi feature. (it may already be
switched to on)
14
The unit will find all available WIFI in the surrounding area that is within range of the unit
and list them on the right side of the screen:
Select your WIFI name to reveal this screen: (For this example, we are using coldy)
Type in your WIFI password and press Connect.
NOTE: The WIFI password MUST be 100% correct. On some WIFI, it is
also case sensitive. If you input an incorrect password, the unit will not
connect.
You now have WIFI connection.
15
If the unit reports “no connection” .. or “connection failed” … the most common cause of
this is that the Password was typed incorrectly.
To try again, select your WIFI name, press FORGET; turn the WIFI off and on, to start
the procedure again.
NOTE:- Once you have connection the first time, you not need to go through this procedure again as all settings and connections are now written to the unit’s software.
For any future WIFI use, you just need to turn the unit on to reconnect automatically
(Assuming you are in the same WIFI Hot Zone and you have not manually turned WIFI
off)
SETTING THE SOUND:
Tap the Sound menu item to adjust the type of sounds you prefer and the volumes.
ADJUSTING THE DISPLAY:
Tap the Display menu item to adjust the displays levels and screen behavior.
Please refer to the screen shot below:
16
SETTING UP YOUR COMMUNICATION ACCOUNTS
You can setup many different type of Accounts. Scroll down the left side of the screen
and tap Accounts and sync. Below please find the screen that will appear and a
description of each type of account:
Setup a Corporate email using Microsoft Exchange
Setup POP email such as Hotmail or MSN etc
Setup and / or sync your Facebook account
Setup and / or sync your Gmail email account
Setup and / or sync a Skype account
Setup and / or sync a Twitter account
17
From the menu, tap → “Email” icon to enter the e-mail client. See screen below:
[email protected]
…....
Type in your email address (we have used [email protected] for this example). Press Return, type in your password and press Next. Then you will see this
screen:
18
The first time you do this, it will ask to configure the account information as shown
below:
To use E-mail, you will need to have an email account already setup with an email provider such as Hotmail or Yahoo etc. To set your email account, you will need to be network connected before you can proceed.
Then press Next to complete. You will see this screen pop up:
SETTING UP GMAIL ACCOUNT
To set up a GMAIL account, it is very similar. Select Google from the menu to see this
screen:
19
Select Sign in (if you already have a Gmail account) .. See screen below:
or select Create to open a new account. Then, follow the Google screens to create it.
SETTING THE TIME AND DATE
Tap Date and Time menu option.to set all your preferred parameters.
20
You will this screen:
Go to each of the items listed on the right to set it up as per the time zone you are in and
as you prefer it.
SELECTING THE INPUT METHOD
Tap on Language & input. Under KEYBOARD & INPUT METHODS, check the default
is set to English (UK) - Android Keyboard. If not, select it and you will see this pop-up:
Select English (UK) to make sure your unit is set to English.
21
Application Screen Operation
Tap the Applications icon to reveal the Applications screen:
NOTE: Depending on your date of purchase, your unit may have more or less
applications pre-installed.
APPLICATION MANAGEMENT
How to Install Android Applications:
Purchased or free Android applications that you have downloaded to your computer can be installed quickly & easily on the unit by using the File Manager application.
1.
Copy the .apk files that you want to install onto a SD card or USB device, then
insert or connect it to your Device.
Tap the File Manager application icon to
reveal this screen:
3. Tap or and locate the folder in which the .apk application files were saved.
22
4.
Tap on an .apk file → Install.. (we have used the Tune in Radio Application as the
example)
Confirm you want to install it
….. And then see the confirmation of install
Tap Open to launch the application now, or tap Done to return to File Manager.
23
Download Android Applications from Android Market:
One of the most popular ways to get new applications / games etc, is to download them
from Google Play / Android Market. You will need to have a Google Gmail account to
use Android Market / Play.
Press the Market Icon to enter the site.
icon, which is the same program.
Your unit may have the Google Market
Then, enter your Gmail login and password to access Android Market. The fist time you
do this may take a few minutes due to Android Market syncing with your unit. You will
then see this screen:
How to Uninstall Android Applications:
You can also quickly and uninstall the Android applications that you have installed.
1. Tap Settings → Manage apps.
2. Scroll down the list and tap the application you want to uninstall, → Uninstall → OK
24
SOFTWARE ON THE EZPAD
The following pages will give you an overview of the software installed. Please note this
manual should not be used as an Android Operating System manual, rather, as a
general guide to the Applications pre-installed.
25
Aldiko eBook
Reader
Use this program to read eBooks
Popular Game
This is free version of Android’s most popular game.
For extended versions, go to Market to purchase.
Browser
Access the Internet and “surf the web” whenever
desired.
Calculator
Do calcula3ons.
Calendar
Calendar with ability to set events.
Camera
Take photo and capture video.
Clock
Use as alarm clock with scheduled alarms.
Docs to Go
A MicrosoD Office file compa3ble program. This is
free version. You may buy Premium version online.
Downloads
View any files you downloaded.
Dropbox
Enjoy 2.5GB of free CLOUD storage for your files. You
can increase this for a small fee online.
Email
Send/Receive email using your exis3ng email addresses.
Facebook
Use the world’s most popular social network.
File Manager
Use this to view files on the device / USB device / SD
card.
Gmail
Send/Receive email using Google Gmail Service
Hi MSN
Use MSN to communicate with your friends
Hi Q
Studio
Use this to record voice from the microphone
La3tude
A program to search for Countries using Google
Maps data
Music
Play MP3 Music Files from device or TF card
Naviga3on
Use this to get a des3na3on map for reference. This
EZPad model does not have GPS.
Places
Use this to find Cafes, ALrac3ons, Bars .. And many
more
Google
Android Market – Purchase applica3ons or download
Market / Play
them free.
Store
26
Search
Use Google Search to find anything on the Web.
Se<ngs
Mul3ple se<ngs for personalizing and enhancing
your Device.
Skype
Communicate with other Skype users anywhere in
the world.
Super HD
Program for watching videos and photos.
Tune in Radio
Excellent Internet Radio program. Listen to 1000’s of
radio sta3ons around the world.
TwiLer
One of the world’s most popular social networks.
YouTube
Quick launch to YouTube.com videos.
NOTE: Depending on your date of purchase, you unit may have more or less applications
pre-installed.
Most of the programs are self-explanatory and easy to operate. Below, please find brief introductory
descriptions and screenshots where necessary of most of the pre-installed programs on the unit.
NOTE: We cannot offer direct support for any of the individual programs that may be
pre-installed on the unit, or any other applications you may download or install.
ALDIKO is one of the most popular eBook reading applications for Android.
1. Tap the
application icon and you will see this screen:
2. After you have selected a book to read, for more options, press Settings. This is a
sample screen of a book that is being read with the menu options displayed:
27
ANGRY BIRDS: This is the free version of Android’s most popular game. For the full version of
other releases, please go to Android Market to purchase/download. Here is a sample screen:
BROWSER
Tap the
icon to connect to the Internet through the browser, then, use Google in the normal
manner. Here is the screenshot:
28
CALENDAR
Tap the
Calendar icon to launch the application. Here is the screenshot:
CALCULATOR
Tap the
29
Calculator application icon. Here is the screenshot:
CAMERA: Tap the
Camera application icon. You will see this screen:
TO USE AS CAMERA
CLOCK: Tap the
30
USE AS VIDEO CAMERA
Clock application icon. You will see this screen:
To set an alarm, press
DOCS TO GO: Tap the DOCS TO GO
screen:
and you will see this pop up:
application icon. You will see this
This is the free version. If you need more features, you can purchase the premium
version from the Author online for a very small fee.
31
DOWNLOADS: Tap the Downloads icon.
downloads you have done.
This is used to see the latest
You will see this screen:
DROPBOX: Tap the DROPBOX icon
to reveal the opening screen.
After you sign up, this program gives you 2.5GB of free storage space to store your photos, data, documents etc. You can extend the storage space by buying an upgraded
version from the author online.
32
EMAIL: Tap the EMAIL icon.
This application is used for the purpose of using
any email accounts you may have such as Outlook etc. On first use, you will be walked
through the Setup Process.
FILE MANAGER Tap the File Manager icon.
This is used to control all the files
on your unit. You can select the way you want to see the files:
UNIT
33
SD CARD
USB
PHOTOS
VIDEOS
INFO
MANAGE
HI-Q MP3: Tap the icon
to launch it. This is for making voice recordings:
MSN EMAIL: Tap the icon to launch it.
34
Use this for MSN Email:
35
MUSIC: Tap the icon to launch it.
You can control and play your music with this:
MAPS: Tap the icon to launch it.
You can Google MAPS to find locations etc.
PLAY SHOP / GOOGLE MARKET: Tap
the icon to launch it. Using this
application, you can download free Android Apps and / or purchase them:
36
TUNE in RADIO: Tap the
radio stations to listen to:
YOUTUBE Tap the
icon to launch it. This will give you 1000’s of internet
icon to launch it. This is a nice YouTube interface to see the
latest YouTube videos. You can use this or go to YouTube through the Browser:
37
There are various ways to use your tablet while outside of a WIFI hotspot.
Using a 3G USB Dongle:•
The SoNware drivers for 3G dongles are supplied by Google for the Android 4.0 opera:ng
system, which is installed in your unit.
The compa:ble 3G dongles currently are outlined here:3G WCDMA:
HUAWEI: E160E / E1750 / E230 / E1782 / E182G / E176G / UMG1691
ZTE: MF637U / MF633 / MF633BP-1
3G CDMA2000/EVDO: HUAWEI : E150 / EC1261 / EC122 / EC156 / EC1270
ZTE: AC580 / AC2736 / AC2746
•
All of the Dongles used by the Australian Telco companies (Telstra / Optus /Vodafone etc)
are manufactured by HUAWEI which is the largest 3G Dongle factory in the world. Then
they put their brand on the devices.
•
Before you purchase a 3G dongle, please double check with the Telco store that it is compa:ble with one of the above models
•
Then, follow the instruc:ons below on how to install it:
STEP 1:
Go to SeQngs and turn off WIFI by sliding to the leN.
STEP 2:: Ensure that the SIM card provided by your Telecommunica:ons Provider (Telstra /
Optus etc) is correctly installed into the external 3G dongle. (Please refer to your 3G
Dongle manual)
STEP 3:
Using the supplied mini USB to USB cable (that came with your tablet) connect the
dongle to the cable and then the cable to the tablet’s mini USB port.
STEP 4:
Provided that your dongle is one of the supported models listed above, the
dongle’s LED will blink displaying that it has power from the tablet. You may need to
wait approx. 3-10 seconds. Once you see this, con:nue to step 4.
STEP 5:
Go to SeQngs, (under Wireless & networks) select More. Then select Mobile Net
works, Access Point Names. You will then see the following screen:
38
STEP 6:
Select Menu BuIon or icon (top right corner of screen) and select New APN from
the dropdown box.
STEP 7:
39
You will see the table to be completed as below:
STEP 8:
Complete the fields required as per the 3G Table on page 42 below.
STEP 9:
ANer you have completed the fields, you will see the following screen: (we have used Vodafone
as example)
STEP 10:
If required, press the empty checkbox (right hand side of your Telco Carrier Name) to enable it.
FINISH:
Once you have connec:on, you will no:ce your dongle now has either a solid LED light, or another LED illuminated (this depend on your brand of dongle / model) and you will no:ce the 3G symbol
and signal strength at the boIom right of screen as per image below:
NOTE:
Depending on the carrier’s SIM card and dongle combina:on, some preloaded APN seQngs
will automa:cally be retrieved by the tablet. (this means you will not need to complete all the fields
manually)
To disable 3G, simply disconnect the dongle. To use WIFI, make sure you go to SeQngs and turn WIFI back
on.
40
Using your Smart Phone instead of a 3G Dongle
Another choice you have is to set up your Smart Phone as a portable WIFI router.
This works in the same way as 3G dongles, however, you do not need to connect it to the USB port of
the tablet. This way, there are no soNware drivers compa:bility issues.
Essen:ally, this method is like having a portable WIFI router in your pocket (your smart phone) and
works like this: “3G in—Wi-Fi out”.
Just setup your Smart Phone to be a WIFI Hot Spot and then “tune” the tablet to it using the normal
Wi-Fi feature.
Please consult your Smart Phone manual, however, here is a snapshot of how its done:IPHONE
SETTINGS
PERSONAL HOTSPOT—TURN IT ON
NOTE THE PASSWORD SHOWN ON THE PHONE
ANDROID SMART PHONE (HTC / SAMSUNG ETC)
SETTINGS
WIRELESS and NETWORKS
MOBILE ACCESS POINT SETTINGS
ACTIVATE
Using a 3G Pocket Wi-Fi device:In many ways, a beIer choice that using a 3G dongle is to use a Pocket Wi-Fi device. These are
available from all retailer and phone shops.
These work in the same way as 3G dongles in that you insert a SIM card, however, you do not need to
connect it to the USB port of the tablet. This way, there are no soNware drivers compa:bility issues.
Essen:ally, this works the same way as using a smart phone (above)
These devices are quite small and most users just have them in their pocket or anywhere on the table
near the tablet.
Other advantages of using a Pocket Wi-Fi instead of a 3G dongle include:•
More than one user can use the Wi-Fi signal coming from the Pocket Wi-Fi
•
It will work with any other Wi-Fi device you may have including Windows computers etc without
any installa:on issues.
Here is a snapshot of some of these devices available:
41
42
43
44
FREQUENTLY ASKED QUESTIONS
Android
Q: What Android OS version is on my Device?
A: 4.03
Basic Device Function
Q: Do I have to charge the battery before use?
A: You should charge the battery for at least 4 hours, but you can use the device
while it’s charging. Use the included power adapter to charge it. This model does
charge via the USB cable when connected to your PC, however, it charges
extremely slowly this way.
Q: Why is my device running slowly?
A: You have too many applications running at the same time. Use SETTINGS /
MANAGE APPS to turn some applications off.
Email
Q: Can I use any of my personal email addresses to send/receive email?
A: Yes. To set up your existing emails as accounts on the tablet, please refer to
page X of this manual
Media Cards
Q: Which media cards are compatible with my Device?
A: micro SD cards, sometimes known as TF cards.
Music
Q: What type of music files can I play on my device?
A: MP2, MP3, WAV, AAC, WMA
Q: How do I add music files to my device?
A: Copy the music files from your computer onto a SD card or USB storage device,
and then use the File Manager to copy the files into the device. Or, connect the unit
to your computer via USB cable and use Windows Explorer in the normal manner.
Photos
Q: What type of photo files can I view on my device?
A: JPG, JPEG, BMP and PNG.
Q: How do I add photo files to my device?
A: Copy the photo files from your computer onto a SD card.
Or USB storage device and then use the File Manager to copy the files into the
device. Or, connect the unit to your PC using the USB cable and use Windows Explorer in the normal manner.to copy directly.
45
Video
Q: What type of video files can I play on my device?
A: MPEG1/2/4、MJPG、H263、H264. In addition to H264 which is supported by (720
× 480) resolution, the other video formats are supported (1280 × 720) resolution.
Q: Can I play YouTube videos on my device?
A: Yes. You can tap the YouTube application icon to quick access videos.
Q: How do I add video files to my device?
A: Copy the music files from your computer onto a SD card or USB storage device,
and then use the File Manager to copy the files into the device. Or, connect the unit to
your computer via USB cable and use Windows Explorer in the normal manner.
Wi-Fi
Q: Do I need a Wi-Fi adapter to connect to the Internet?
A: No. The Wi-Fi adapter is built-in to the device.
PRODUCT WARRANTY
Warranty Conditions of this Product
Spotbuy warrants that all its products are free from defects in material and workmanship. Subject to the conditions and limitations set out below, Spotbuy will, at its option, either repair or replace any part of its products that prove defective by reason of improper workmanship or materials. Repaired parts or replacement
products will be provided by Spotbuy without charge for parts and labour, and Spotbuy will either replace it
with a new one or repair it to be functionally equivalent to a new one.
Our goods come with guarantees that cannot be excluded under the Australian Consumer Law. You are
entitled to a replacement or refund for a major failure and compensation for any other reasonably foreseeable loss or damage. You are also entitled to have the goods repaired or replaced if goods fail to be of acceptable quality and the failure does not amount to a major failure.
Warranty Claim Requirements
This warranty does not cover any damage to any product that results from:
•
Improper installation, accident, or negligence.
•
Unauthorised installation of a different Android version
•
Abuse, misuse, or any unauthorised disassembly, repair, or modification.
•
Unusual physical or electrical stress or interference, failure or fluctuation of electrical power, lightning,
static electricity, fire, or acts of nature, including use of incompatible charging devices etc.
•
Damage caused by the user or by mail or any other delivery service used to return the product to
Spotbuy.
In order to process a warranty claim, you must complete and enclose the SPOTBUY PRODUCT RETURN
INSTRUCTIONS with the product together with proof of the date of original purchase as evidence that
shows the product is within the applicable warranty period. This is generally a copy of the invoice or receipt.
Otherwise, it becomes the discretion of Spotbuy as to whether the product is covered under warranty.
46
In addition, Spotbuy is not responsible for any data recovery in the event of a defective flash memory that
may be part of the product. The product must be used with devices that conform to the recommended
industry standards. Spotbuy will not be liable for damages resulting from a third party device that causes the
product to fail. Spotbuy shall in no event be liable for any consequential, indirect, or incidental damages, lost
profits, lost business investments, lost goodwill, or interference with business relationships as a result of lost
data. Spotbuy is also not responsible for damage or failure to any third party equipment, even if Spotbuy
has been advised of this possibility. This limitation does not apply to the extent that it is illegal or unenforceable under applicable law.
Duration of Warranty
12 month warranty – Spotbuy provides a 12 month warranty on all its products calculated from the purchase
date of the product as shown on the invoice or receipt. Other warranties - as stated on product packaging.
Charges for Repairs
Free Of Charge - If the product is within the warranty period, should it fail under normal use in the recommended environment due to improper workmanship or materials, Spotbuy will repair the product or replace
it with a comparable one without any charge for parts and labour. Delivery charges are as per the
SPOTBUY PRODUCT RETURN FORM, which can be downloaded from www.spotbuy.com.au..
Fees - Spotbuy will repair a defective product even beyond warranty; however, the customer will be charged
for the cost of labour, replaced parts and return delivery.
* Please note that should the product defect be caused by any of the mentioned factors listed above (e.g.
misuse, neglect, abuse, etc.), even if the product is inside the warranty period, the customer will be charged
for the cost of labour, replacement components and delivery.
Returns
Please return the product to the address and in accordance to the SPOTBUY PRODUCT RETURN FORM.
Please read the SPOTBUY PRODUCT RETURN INSTRUCTIONS carefully in order to understand the
conditions and complete the process easily. This form can be downloaded from www.spotbuy.com.au
Spotbuy is not responsible for damage to or loss of any programs, data or removable storage media. It is
highly recommended to save (back up) any programs, data or removable storage media before sending the
products back.
Spotbuy’s return policy is based on stock availability; hence the repaired product that you receive might not
be the one you have originally sent.
Due to ongoing technology development, any discontinued Spotbuy product that is unable to be repaired
will be replaced by a comparable or one that is higher in specifications.
Spotbuy Contact Details
SPOTBUY AUSTRALIA;
P.O. BOX 421, CASTLE HILL, NSW 1765
UNIT A, 11-13 SHORT STREET, AUBURN, NSW 2144
You can also contact Spotbuy by email [email protected] or complete the contact form on
www.spotbuy.com.au
47


![BrilCloud User Manual [Final] 5-3-14.pages](http://vs1.manualzilla.com/store/data/005901816_1-e324554f00cd86f23cb66e80ebc5f4dd-150x150.png)