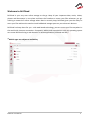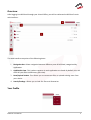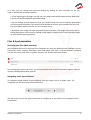
1
!! !! !! !! !! !! !! !! !! ! Y O U R B U S I N E S S W I T H I N R E A C H BrilCloud User Manual Table of Contents ! Welcome to BrilCloud Overview 3 4 Your Profile 4 5 Accessing your Files (Web Interface) 5 NavigaFng inside your BrilCloud 5 CreaFng/uploading files 6 SelecFng files 6 Viewing files 6 Moving files 6 Sharing files 6 Version Control 7 Deleted Files 8 Desktop SynchronisaFon 8 Storage Quota 9 Checking the available space Sharing 9 Shared files 9 Shared directories 9 Resharing 9 Excluded from quota 9 Metadata and cache 9 Deleted files 9 Contacts & Calendar 10 Using the Contacts Feature 10 Adding contacts 10 ImporFng 10 11 Adding picture to the contact 12 CreaFng new address books 13 Using the Calendar Feature 13 CreaFng a calendar 13 CreaFng events 14 Files & Synchronisa@on Create contacts manually BrilCloud User Manual ! ! 9 2 Welcome to BrilCloud ! BrilCloud is your very own online storage on the go. Keep all your important data, music, videos, photos and documents in one place and have the freedom to access your files wherever you go. UFlising a network of online storage where data is securely kept, BrilCloud gives you the ability to store your files without the need to install addiFonal storage space on your electronic devices. BrilCloud is always there for you – with web-‐based technology, you can access your files anywhere in the world with Internet connecFon. Computers, tablets and smartphones with any operaFng system can access BrilCloud using a web browser or naFve applicaFons (Android and iOS).1 ! [1]Mobile apps are subject to availability. ! ! ! ! ! ! ! ! ! ! ! ! ! ! ! ! ! ! ! ! ! ! BrilCloud User Manual ! ! 3 Overview !Aber logging into BrilCloud through your Virtual Office, you will be redirected to BrilCloud's main web interface: ! !! The web interface comprises of the following items: ! 1. Naviga@on bar: Allows navigaFon between different parts of BrilCloud, categorised by applicaFon. 2. Applica@on view: This is where contents in each applicaFon are listed. By default, this will show a ll your files and directory (file view). 3. New/Upload buMon: This allows you to create new files or upload exisFng ones from your device. 4. Search/SeNngs: Allows you to look for files and directories. ! Your Profile ! ! BrilCloud User Manual ! ! 4 As a user, you can change your personal segngs by clicking on your username on the top-‐ right of BrilCloud and choose Personal. ! • In the beginning of the page, you will see your usage and available quota and the download links for the BrilCloud Mobile and Desktop App. ! • You can change your password. For that, you need to enter your current and new password in the field named Password. If you would like to be able to recover your password via email, fill the email field with the one that you are currently using. ! ! • By default, your image will have the iniFal of your username. This image is currently used in ediFng documents. You can either upload a new image or choose one from the exisFng images on your BrilCloud photo galleries. Files & Synchronisa@on Accessing your Files (Web Interface) !Your BrilCloud files can be accessed from anywhere by using the BrilCloud web interface. You can easily view, move, rename, download, share and delete your files. If Version Control is enabled, you can also revert a file back to specific versions. See Version Control for details. !! !! By hovering your cursor over a file, you will be provided with some file operaFon opFons. You can rename, download and share your file. ! Naviga@ng inside your BrilCloud !To navigate through folders in your BrilCloud, you can simply click on a folder name. The navigaFon bar will show your current directory: ! ! !! !! ! You can click on one of the upper directories to navigate up or use home icon to navigate to your home folder. ! ! ! ! ! BrilCloud User Manual ! ! 5 Crea@ng/uploading files !You can create files by simply clicking on the New buion. You will be presented with three opFons to choose from: ! ! ! ! ! ! ! ! ! ! ! ! ! ! • Text file will create a simple text file. • Folder will create a folder in the current folder. • From link will download the file from the provided link and place it into the current folder. Selec@ng files !You can select one or more files by clicking on the small thumbnails or file icons. To select all files in the current directory, use the checkbox just above the first file/folder in the list. ! If you select mulFple files, selected files can be deleted or downloaded as ZIP files. ! Viewing files !BrilCloud can display uncompressed text files, PDFs, and image files by simply clicking on the file name. If the file cannot be displayed, the download process will start. ! Moving files !In BrilCloud web interface, file(s) can be moved by dragging and dropping them into a sub-‐directory. If you would like to move a directory to an upper directory, drag the file(s) into one of the folders shown in the navigaFon bar. ! Sharing files !Any file/folder on BrilCloud can be shared with and downloaded by a local user, group or any person online with the file’s public link. Shared files/folders will show a Shared text next to their names. ! To share a file/folder, hover your cursor on the item in the files app and click Share. You will be provided with some opFons: ! !! !! BrilCloud User Manual ! ! 6 !! !! !! !! !! !! !! !! !! !! !! !! ! Share dialogue-‐ • The first field is to share this file/folder with BrilCloud Users. This is very useful if you want to create a quick share with another BrilCloud User. ! • If you click on Share link, the other opFons will be visible. Since this link allows everyone to download this file/folder, you may want to protect the share file with a password. To do that, click on Password protect and set a password. ! • If this share is a folder, you will also have the opFon to enable uploads into this folder using the provided link. You can give mulFple users the permission to upload the file into this folder. ! • You can share the files with mulFple users by separaFng the email addresses with space when sending the link. ! ! ! • You also have the option to set the expiry date to your shared links. If you type a user to the share with field, you will be given extra sharing opFons such as informing via email, legng users edit (create, update, delete, re-‐share) the share. To revoke permissions from users, simply click on delete icon on the user’s name. ! Version Control !BrilCloud supports simple version control for files. Version control creates backups of files which are accessible via the Versions link. This link contains the history of the file where you can roll back a file to any previous version. Changes made at intervals greater than two minutes are saved in data/ [user]/versions, and made accessible using the above pages. ! To restore a specific version of a file, hover your cursor on a file and click Versions link. If any version is available, you should see a list like the image below: ! ! BrilCloud User Manual ! ! 7 ! ! ! ! ! ! ! ! Clicking on Restore next to any version will revert the file to that version. ! The version control automaFcally expires old versions to make sure that the user doesn't run out of space. ! Version control feature will never use more that 50% of the user’s currently available space. Deleted Files !BrilCloud keeps a copy of your deleted files in case you need them again. To make sure that the user doesn't run out of memory, the Deleted Files feature manages the size of the deleted files for the user. The app takes care to never use more that 50% of your currently available free space. If your deleted files exceed this limit, BrilCloud deletes the oldest versions unFl it meets the memory usage limit again. ! Deleted files can be found by clicking on the Deleted files buion on Files feature of the web interface. You can either restore or permanently delete using appropriate buions. BrilCloud also checks the age of deleted files every Fme new files are added to the deleted files. By default, deleted files stay in the trash bin for 180 days. AddiFonally, BrilCloud calculates the maximum available space every Fme a new file is added. If the deleted files exceed the new maximum allowed space, BrilCloud will expire old deleted files unFl the limit is met once again. Desktop Synchronisa6on [2] !For synchronising files with your desktop computer, we recommend using the `BrilCloud Client` for Windows and Mac OS X. ! The BrilCloud Desktop Client enables you to connect to your private BrilCloud Server. You can create folders in your home directory, and keep the contents of those folders synced with your BrilCloud server. Simply copy a file into the directory and the BrilCloud desktop client does the rest. Make a change to the files on one computer, and it will sync with your other computers that are connected with BrilCloud. Always have your latest files with you wherever you are. ! !! Desktop SynchronisaFon is subject to availability !! !! [2] BrilCloud User Manual ! ! 8 Storage Quota !BrilCloud makes it possible to specify a storage quota for users which is the maximum space a user is allowed to use for files located in their individual home storage. ! Checking the available space !You can check your available space by going to the Personal page from the top-‐right menu. ! Sharing !When sharing files or directories, their used space is counted in the owner's quota. ! Shared files !If user A shares a file with user B, the size of the file will be counted towards the user A's storage quote, even if the file is modified or its size is increased by user B. Shared directories !If user A shares a directory with user B, any file that is modified or uploaded by user B inside of the directory will be counted towards user A's used space. Resharing !When resharing a file or a directory, the used space is sFll counted in the quota of the owner who shared it iniFally. Excluded from quota Metadata and cache !ApplicaFon metadata and cached informaFon are excluded from the total used space. ! Such data could be thumbnails (icon previews, pictures app), temporary files, encrypFon keys, etc. ! Some features also store informaFon directly in the database (not as files) like the Calendar and Contacts feature. This data is also excluded from the total used space. Deleted files !When deleFng files, the files will be moved to the Trash bin. These files will not be counted in the user's used space. ! ! ! ! ! ! ! ! ! ! BrilCloud User Manual ! ! 9 Contacts & Calendar Using the Contacts Feature !The contacts feature of BrilCloud is like any other mobile contact feature but with more funcFonality. When you access your account, you will get the default address book. Adding contacts !There are two ways you can add contacts: !1. Adding by VCF file !2. Manual adding Impor@ng !Click on the gear buion at the boiom: ! ! ! !! !Contact segngs icon-‐ Once you've clicked it, an up arrow buion which lets you upload files will be shown: ! ! ! ! ! ! ! ! ! ! ! ! !! ! !! Contact file upload icon -‐ Aber choosing an address book to import into, click on the arrow. The upload window will open and let you choose your files. You can upload the files one by one or upload all of them at one go. !! ! BrilCloud User Manual ! ! ! ! ! ! ! ! 10 ! ! ! ! ! ! ! ! ! ! ! ! ! ! ! !Picking VCF files -‐ Aber upload, the interface will automaFcally place your contacts into BrilCloud. Create contacts manually !On the leb side of contacts feature, you will see the new contact buion. Click on it and a dd all informaFon about the contact: the name, the address, the email, the telephone, etc. ! Just click on a field and start typing the informaFon. You can use the Add Field buion to add other types of informaFon for this contact. ! !! ! ! ! ! !! ! ! ! Empty contact view – When you want to remove your contact informaFon, just click on liile delete icon at the right of the field you want to remove. ! ! ! ! ! ! ! ! ! ! BrilCloud User Manual ! ! 11 Adding picture to the contact !There are two methods in which you can give a picture ID to the specific contact: ! !Contact picture opFons -‐ ! 1. Direct upload !2. From BrilCloud photo galleries Aber you have selected the picture for the contact, you will get an opFon to crop the picture to suit your requirements. ! ! ! ! ! ! ! ! ! ! ! ! !! !! Cropping contact picture -‐ You can crop the picture however you wish and then press OK. ! As you can see, it is really easy to set things right in contact feature. It automaFcally picks up the first name, middle name (if any) and the last name You may add or delete any secFon you want at your own convenience. ! BrilCloud User Manual ! ! 12 Crea@ng new address books !When you click on se@ngs buion situated at the boiom, you will have access to the applicaFon's segngs. Then, you will be shown all available address books to access the opFons. ! ! ! ! ! ! ! ! ! !! Address book opFons -‐ There, you have the ability to add, delete, download or share your address books. Hover your cursor on every icon to see what they mean. ! Using the Calendar Feature Crea@ng a calendar ! ! ! ! ! ! ! ! ! ! ! ! !! !! !! ! !! ! Calendar view – When using the calendar fe a t u re fo r the first Fme, t h e Default calendar. You can manage your calendars with a click on the Calendar buion in the top right corner. In the dialogue box, which will appear, you can add, edit, export, enable, disable and/or delete your calendars. ! BrilCloud User Manual ! ! 13 Crea@ng events !To create an event just click, on the date in the month view or choose the Fme frame in the week view. In the dialogue which will appear, you can enter the necessary informaFon. ! ! ! ! ! ! ! ! ! ! ! ! ! With Advanced opFons, you can set the descripFon, the locaFon and the repeFFon of an event. You can choose to repeat your event every weekday or bi-‐weekly. ! ! BrilCloud User Manual ! ! 14