1
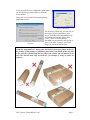
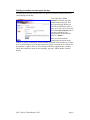
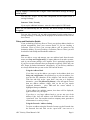
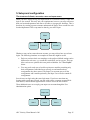
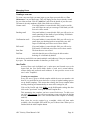
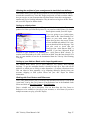
Velocity Web Booking System
Client Manual
January 2005
© NetDespatch Ltd 2005 – All Rights Reserved Worldwide
Subject to NetDespatch Terms and Conditions at www.netdespatch.com
APC Client User Manual
APC Client User Manual ...............................................................................................2
1. Overview....................................................................................................................3
System requirements..................................................................................................3
Security ......................................................................................................................3
2. Getting started............................................................................................................4
Booking a delivery .....................................................................................................4
Printing a manifest and closing for the day. ..............................................................6
3. More options for entering bookings...........................................................................7
Using the “Standard Entry” screen. ...........................................................................7
Using the “Quick Entry” screen...............................................................................11
4. Other menu options..................................................................................................13
Cancelling a booking ...............................................................................................13
Tracking ...................................................................................................................13
Downloads ...............................................................................................................13
Printing Labels .........................................................................................................14
5. Setup and configuration ...........................................................................................15
The structure of clients, accounts, users and super-users. .......................................15
Managing Users .......................................................................................................16
Allowing the recipient of your consignment to track their own delivery ................17
Setting up a label printer ..........................................................................................17
Setting up your Address Book and/or importing addresses.....................................17
Working with Cost Centres and References ............................................................17
APC Velocity Client Manual v2.00
Page 2
1. Overview
Welcome to APC Velocity. Your account – with a User ID and Password will have
been set up by your APC Depot to allow you to start booking consignments, make
collection requests and track your consignments straight away.
Please don’t be daunted by the amount of information in this “User Manual”. Making
bookings on the web is very simple. By following the “Getting Started” section you
can be making your bookings within minutes.
The additional information in the subsequent sections explains how your APC
Velocity system can be configured by you to help speed up this process further and
also to reduce the opportunity for error. In most cases making a web booking can be
reduced to a few key strokes and/or mouse clicks.
Note: You may even be able to link Velocity to your internal systems to make
bookings automatically. Contact your APC Depot for further information.
System requirements
The following requirements should be met for your APC Velocity system to work
properly.
Java should be installed and enabled (minimum version 1.4) and the TrueType
font “Arial Narrow Bold” installed. Both can be downloaded from the
Velocity Label Printing configuration screen, See “Setting up a label printer”
in “Section 5”.
Most of the major web browsers are suitable for accessing APC Velocity;
however it is recommended that the latest version should be used to ensure
maximum security.
Pop-ups should be enabled – at least from www.netdespatch.com
PDFs should be enabled and Adobe Acrobat installed. This can be
downloaded from the pages where it is used by APC Velocity, if necessary
Security
Velocity is a secure website and uses similar security systems to sites operated by
banks and credit card companies.
APC Velocity Client Manual v2.00
Page 3
2. Getting started
This section explains all you need to know to
make simple bookings on-line, produce labels (if
applicable) and print a manifest.
Your APC depot will have provided you with a
username and password together with a link to the
depot’s login webpage. This will usually be sent
by email.
Once logged in you will see your “Home Page”
Booking a delivery
Login
Homescreen
Page
To book a delivery click on “Quick
Entry” and this will take you to the
Quick Entry booking screen.
Home page
Enter “Your Reference” if required. Tab
down to the “UK Post Code” box, or
click on it with the mouse. Enter the Post
code for the delivery address and click
on the
icon next to it (or hit TAB and
Return). If the Postcode is recognised, a
list of possible organisation names
and/or addresses will be displayed for you to
select from (click on or TAB/Return to
select). If there is only one address with this
postcode it will be selected for you
automatically. Once you have selected the
correct address you will need to add a name in
the Organisation box if it’s empty (a persons
name is ok if it’s not an organisation). Select
“Apply Address” (click on or TAB/Return to
select).
Next, change the number of pieces if more
Quick entry screen
than one, enter the weight and check the
“Tariff” is correct (top right section of the
screen). If you need to change the tariff click
on the tariff box and select the correct one.
Finally click on “Submit” to send the
booking.
If your booking is correct the system will
display the order confirmation screen.
Order confirmation screen
APC Velocity Client Manual v2.00
Page 4
If your account has been configured to print labels
you will also be given the chance to select the
correct printer.
It may take a few seconds for the label printing
programme to start.
Select your label printer
Home page
The first time you use this, you may see an
alert asking if you would like to grant
access. This allows the programme to use
your printer and you may safely click
"Yes", "Grant" or "Grant Always"
depending on your browser and version of
Java. If you click "Always" you will no
longer be presented with the alert.
Note: It is vital to attach the APC label in a suitable position. Failure to do so may
result in a delayed delivery. Always place the label on the largest, flattest surface of
the package. If the package is cylindrical, place label in the middle of the long side
so the barcode is parallel with the long side of the cylinder (do not attach it to the
end). The barcode must NOT be obscured - for example by string or plastic tie
straps etc.
APC Velocity Client Manual v2.00
Page 5
Printing a manifest and closing for the day.
The only other task that should be done is to print off your daily manifest and close
your bookings for the day.
To do this select “Print
Manifest” from the reporting
menu on the home page. This
will open the page shown left.
The date will default to today’s
date, so all you need to do is tick
the “Close after manifest” box if
you have booked all your
consignments for the day and
click on “submit”.
After several seconds the
manifest should appear in the
form of an Adobe Acrobat PDF, which can then be printed in the normal way. If there
are a lot of bookings or your internet connection is slow it can take up to a minute for
the manifest to appear, however if the manifest still hasn’t appeared after a minute
follow the instructions on the screen regarding “pop-ups” and the Adobe Acrobat
Reader.
APC Velocity Client Manual v2.00
Page 6
3. More options for entering bookings
The process described in section two will handle 80% of bookings; although your
settings may need modifying to ensure it suits your needs as closely as possible. The
following sections describe how you can have more flexibility when making bookings
as well as how you can adjust your account settings to speed up your booking entry
even further and minimise errors.
Using the “Standard Entry” screen.
The Standard Entry screen allows more options when entering a booking e.g.
arranging remote collections (There to Here or There to There), and is divided into 6
sections
Defaults
Order details
Pickup details
Destination details
Shipping information
Other details
Defaults
Unless you need to change any of the settings in the top (Defaults) section for a
particular consignment, you can leave it unchanged and move on to the second section
(below). These defaults can be changed to make bookings faster (see ‘Templates’
below).
You can make the following changes to this section
Order Ref
This is a time saving feature if you wish to repeat a similar previous booking.
Otherwise leave this field blank.
The Order Reference is a unique number given to each Velocity booking in the
format 9999z999. The first four digits identify your APC Depot. It is shown on
all paperwork and the booking confirmation screen. When making a new
booking, you can enter a previous Order Reference, click ‘Go’ and all the
details will be re-entered for you (don’t forget to change the pickup date and
time).
Note: You can abbreviate entry of this number by just using the digits after the ‘z’.
Templates
When you first start using the system an ‘Initial Template’ will have been set
up for you. Templates set out your preferred defaults for options like your
Account ID, Service, Tariff, and Job Type - for the bookings you make. You
can create extra templates to make the entry of other regular types of bookings
– such as collections – quick and easy (see Setup and configuration).
Job Type
Select either a delivery (Here to There), or a collection (There to Here or
There to There). If you select a collection the page will be re-displayed to
allow for the appropriate addresses to be entered.
APC Velocity Client Manual v2.00
Page 7
Account
If you have more than one account set up, you are able to select which one to
use for this booking.
Note: Multiple accounts can be set up for you by your APC depot.
Service
Select the type of service you require, Overnight, Sameday or International.
Tariff
Select the APC tariff you’d like to use within that service, e.g. Courier Pack by
12:00.
Order Details
Booked By
Ensure that this is your user-name; if not, then return to the main menu,
logout, and login with your own User Id and Password.
Pickup Date
If the consignment is ready for collection now, tick the ‘Ready Now’ box. If
not, un-tick the box and enter the date and time (24hr format e.g. 15.00 or
15:00) that your consignment will be ready for collection.
Note: ‘Ready Now’ can be set as the default for your account by your APC Depot.
Pickup Deadline (Closing Time)
This is the time by which the collection must be made from your premises.
Saturday Delivery
This only applies if the projected delivery date falls on a Saturday, e.g. if you
book an overnight delivery on a Friday. If you tick this box you are asking for
the delivery to be made on the Saturday morning at extra cost, otherwise it is
assumed you want a Monday (or next working day) delivery.
Note: A reminder for ‘Saturday Delivery’ can be set/unset for you by your APC
Depot.
Cost Centre
If you plan to use Cost Centres you can enter a list and select them here. For
further information see Setup and configuration.
Your Reference
This is your own reference for this booking i.e. your purchase order, returns
number or department name. If you wish to enter a list of references then see
Setup and configuration.
Goods Type / Fragile
Select the ‘Goods Type’ you require.
APC Velocity Client Manual v2.00
Page 8
Note If ‘Laptops’ is selected, then ‘Fragile’ is also ticked and a carriage surcharge
will be applied.
You may tick ‘Fragile’ for any other consignment, but this option incurs a
carriage surcharge.
Insurance Value / Security
If you require additional insurance, enter the value required in UK Pounds.
Note: This will automatically tick the ‘Security’ box and a carriage surcharge will
be applied.
You may tick ‘Security’ for any other consignment, but this option incurs a
carriage surcharge. A warning will be displayed if an Insurance Value has not
been entered.
Pickup and Destination Details
If you are booking a Delivery (Here to There) your pick up address details are
entered automatically from your account details. If you are booking a
Collection (There to Here) your account address will be entered as the
destination address. If you are booking a Collection (There to There) you will
be asked for both Pickup and Destination addresses.
Addresses
You are able to set up and manage your own address book from the main
menu (see Setup and configuration) or import addresses from other systems,
such as your accounts package or PC implant. This is particularly appropriate
if you have account customers that you despatch to regularly. Please ask your
APC Depot for further information. Alternatively, if your delivery addresses
are always different then you can use the UK Postcode locator.
Using the Address Book
If you have set up the address you require in the address book (see
Setup and configuration), the quickest way to select an address is to
type the first few characters of the Address Code into the Address
Code box and click on the “open book” icon next to it (keyboard
alternative - press Tab followed by Return). A list will appear if more
than one address matches; simply click on the one you require
(keyboard alternative - press Tab until the correct address is
highlighted then press Return).
If your address has multiple contacts, then these will be displayed;
again select the one you require.
If you have a very large address book or you are not sure of the
Address Code, leave the address code field blank and click on the
“open book” icon. You can then search on company name, postcode or
contact name in a variety of ways.
Using the Postcode / Address lookup
To select an address using the Postcode Locator type the Postcode into
the Postcode box and click on the “open book” icon next to it
APC Velocity Client Manual v2.00
Page 9
(keyboard alternative - press Tab followed by Return). A list will
appear if more than one address matches; simply click on the one you
require (keyboard alternative - press Tab until the correct address is
highlighted then press Return).
Check the address, adding the Company Name or Contact Name in the
first line, and adjusting any lines that are too long to print on a label.
Click ‘Apply’ and the address will be inserted into the booking form.
Note: Ensure the Company field is correctly entered (Company or individual name).
If not, enter one now as the system will not allow you to book the order without it.
Contact Details
If required you can also include at this stage (if not already populated by the
Address Book data)
Contact, Phone, Extension, Mobile, Fax
Email Address
Email Alert
Check this box if you wish an email alert to be sent to the collection and/or
delivery contact email address to confirm to them that the delivery or
collection has been requested.
Shipping information
Enter the number of pieces in the consignment and the total weight. These
fields are mandatory.
You can also optionally enter the dimensions (in Centimetres) of your
package. A volumetric weight will be calculated. If this exceeds the weight
you have entered, then this volumetric weight will be used to calculate the
charges.
Note: Your APC depot can make these fields mandatory if you require.
Other details
Notes
Enter any special notes to your APC depot regarding this consignment. It is best to
keep these brief, as printing space on delivery labels and collection requests is limited.
Confirmation email and POD email
If you have requested confirmation emails and/or POD emails in your ‘User Profile’,
then these will be entered here automatically.
Leave the ‘Activate’ boxes ticked if you’d like to receive emails to confirm the
booking has been received by your APC Depot, and to receive the POD by email. The
email addresses are taken from your profile settings and can be changed at this point if
required.
Note: to add multiple email addresses, leave a single space between each address.
APC Velocity Client Manual v2.00
Page 10
Errors and Warnings
When you click submit, the booking page will be redisplayed if there is an Error or a
Warning.
Errors might reference mandatory fields or perhaps that you are requesting a service
not appropriate to the date and time requested.
Warnings might reference a ‘Saturday Delivery’ reminder or a ‘Late Cut Off’
warning.
Booking Confirmation page
The system now shows you the “Unique Order Reference” for this consignment
together with the Consignment Number. If your account has been configured to print
labels for each consignment, then the labels will be printed (one per piece).
You can reprint them by clicking the ‘reprint’ option if necessary. You are also able to
print a Consignment Note if you wish.
Using the “Quick Entry” screen
This option allows you to enter simple delivery (Here to There) bookings in the
shortest possible time.
The Quick Entry screen is divided into 2 sections
Defaults
As for “Standard Entry” above, but Job Type may only be
for Deliveries - Here to There)
Order / Destination details
Order / Destination Details
Below are the main differences between the “Quick Entry” and the “Standard
Entry” above.
Pickup Date
This is always defaulted to ‘Ready Now’.
Pickup Deadline (not displayed)
This is set to 17:00 and cannot be changed in “Quick Entry”
Saturday Delivery (not displayed)
This is defaulted to ‘No’. If the reminder option is switched on for your
account, then if a booking is made for a Friday, a ‘Saturday Reminder’
warning will be displayed.
Your Reference / Cost Centre
The default entry field is set as ‘Your references’.
Note: If you would rather enter a Cost Centre here instead of a Reference, please
contact your APC Depot to change the configuration for you.
Destination Address Details
The destination address is either entered through the Address Book or UK Post
Code Lookup (see 2. Standard Entry)
APC Velocity Client Manual v2.00
Page 11
Confirmation email and POD email (not displayed)
If you have requested confirmation emails and/or POD emails in your ‘User
Profile’, then these will be entered here automatically.
APC Velocity Client Manual v2.00
Page 12
4. Other menu options
Cancelling a booking
Bookings can only be cancelled while their “Status” remains at ‘BKD’ (booked but
not downloaded by the depot). Otherwise you need to telephone your APC depot to
ensure that they are aware of the cancellation.
Note: to see the Status of a web booking use the Track Option or Tracking
Summary (see Tracking below).
Select the “Cancel” option under the “Order Management” heading on your Home
page and identify the booking using one of - the unique Order Reference (e.g.
4574z156), Your Reference or the Consignment Number.
If there is more than one which satisfies the search requested, then a list will be
displayed. Select the one you require, check the details, and then click ‘Cancel’. The
status will change to ‘CAN’ (cancelled).
Tracking
You can track orders individually using the “Track” option under the “Order
Management” heading (this option gives a chronological history of all tracking
events), or collectively using the Tracking Summary under the “Reports” heading.
Tracking individual items
Select the “Track” option from your main menu and identify the booking using either
the unique Order Reference (e.g. 4574z156), Your Reference or the Consignment
Number.
Tracking Summary Report
Specify the date range required (default is today) and select the appropriate filters or
leave blank for all. The resulting report can be cut and pasted into an Excel
Spreadsheet for further analysis.
Downloads
At any time you can download all of the web bookings you have made to a CSV file
(suitable for use within an Excel spreadsheet).
The column headings are:
Account
Collection date
Order Reference
Job Number (Sameday)
Your Reference
Cost Centre
Service
Tariff
Pieces
Weight
Goods Description
Collection Town / Postcode
APC Velocity Client Manual v2.00
Page 13
Destination Town / Postcode
Wait and Return (Sameday)
Booked By
Pricing Information
Collection Deadline (if available)
Delivery Deadline
Date / Time Booked
Date / Time Accepted
Date / Time Collected
Status
Date/Time Delivered
POD Name
Printing Labels
At any time you can print off all labels for a specific date range and/or for a range of
booking reference numbers (e.g. the 9999z999 range of numbers). Select “Print
Labels” from the “Utilities” heading on your home page and enter the required
ranges.
APC Velocity Client Manual v2.00
Page 14
5. Setup and configuration
The structure of clients, accounts, users and super-users.
When your APC Depot sets up your organisation as a Client on Velocity a super-user
login is also created. This may suit your requirements; however you may need more
than one location/department and want to be able to segregate the bookings. This is
best done by creating separate accounts underneath the main Client account for each
location/department. This set-up must be done by your APC Depot.
Client
Account 1
Account 2
Account 3
Whether or not you have more than one account, you may wish to have several user
logins. The following situations are examples of when this might be useful.
•
Each user can have their own templates so the preferred default settings can be
different for each user, e.g. account ID, usual tariff, service type etc. This can
allow each user to optimise their own preferred defaults. See “User Profile”
below.
•
You may prefer each user to be able to print out a manifest containing only
their consignments. Individual users can only see and manifest those
consignments they have entered. The Super User account can see all the
consignments and a manifest printed by the Super User will also contain all
consignments.
Several users can login using the same login name. If you have more than one
location with several users at each, you may wish to have a separate account ID for
each address, and a different login name for each set of users at each location.
These additional users are set up by your super-user account through the User
Administration option
Super-user
User 1
APC Velocity Client Manual v2.00
User 2
User 3
Page 15
Managing Users
Creating a new user
To create a new user login you must login as your Super-user and click on “User
Maintenance” on your home page. This will display the list of users already created
for your client account. Click on “Add User” and fill in the details of your new user.
The name is the only mandatory field. Other fields are as follows:Contact email
If an email address is entered in this field, it can be used by
your APC Depot to send you a message. If left blank you will
not receive these emails.
Booking email
If an email address is entered in this field, you will receive an
email containing all the details of your booking. If left blank
you will not receive these emails.
Confirmation email
If an email address is entered in this field, you will receive an
email when your booking has been accepted by your APC
Depot. If left blank you will not receive these emails.
POD email
If an email address is entered in this field, you will receive
POD emails. If left blank you will not receive these emails.
Start Date
The date this user was created.
End Date
After this date this user will no longer be able to make
bookings. It is left blank by default.
All the above email fields can contain multiple email addresses if they are separated
by a space. The maximum number of characters per field is 150.
User Profile
Accessed from each individual user’s main menu and located next to the
logout link, the User Profile holds details of each user’s normal address,
contact details and preferred email addresses. It also provides access to the
user’s order 'Templates'.
Creating new templates
Every new user is given a default template which the user can amend to suit
them. It is a good idea for users who have a variety of regular booking types to
set up further templates. This means that selecting the correct template when
entering a booking will automatically set some of the settings for you.
Click on My Profile and click <Edit> on the NetDespatch settings bar then
click on the “open book” icon by the Default Template box.
This summarises the templates you have created for this user. To add a new
one click Add Template, give the new template a name, and select the default
account you wish to use (this is the account address this template is normally
used for).
Next select the service required (e.g. overnight), which will then make
available a list of available APC tariffs for you to choose from. When you’ve
finished click the Add Template button.
APC Velocity Client Manual v2.00
Page 16
Allowing the recipient of your consignment to track their own delivery
This feature allows you to provide the recipient of your consignment with the ability
to track their own delivery. Your APC Depot can provide you with a website address
that you can give to your customer that will allow them to enter their consignment
number and receive tracking information. They do not have to login to do this. Please
ask your APC Depot for further details.
Setting up a label printer
APC Velocity allows you to print APC approved labels for every job. These can be
produced on either specialist label printers or your own laser/inkjet printer. For further
details please contact your APC depot.
If you are going to use a label printer,
please click on the ‘Label Printing Test’
option on your main menu page to
ensure that you have the correct version
of Java installed and enabled. If it is not,
you can download it from this page. You
will also need to check that the
TrueType font “Arial Narrow Bold” is
installed; if you have Microsoft Word
installed on your machine you probably have “Arial Narrow Bold” already. To
confirm, start Word and try to select “Arial Narrow Bold” from the font selection. If it
isn’t on your machine it can also be downloaded from the Velocity Label Printing
Test page.
Setting up your Address Book and/or importing addresses
The Address Book allows you to select addresses very quickly when entering
bookings. To get the maximum benefit it should be kept up to date with all the
addresses to which you are likely to make despatches (or request collections from).
This can either be done manually, or by importing addresses directly from your
accounts, shipping or SOP system. Please ask your APC Depot for further
information.
Working with Cost Centres and References
Cost Centre and Reference lists are created in the Standard Order Screen. Click on the
“open book” icon by the Cost Centre or Your Reference box in the Standard Order
Screen and click on New Cost Centre or New Reference.
Enter a suitable code and a description. You can then allow this Cost Centre or
Reference to be available to just one of your accounts, or all of them (if you have
multiple accounts set up by your APC Depot).
APC Velocity Client Manual v2.00
Page 17