1
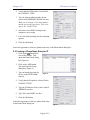
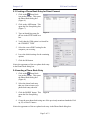
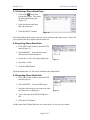
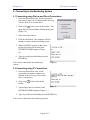
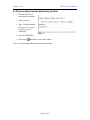
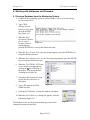
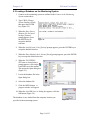
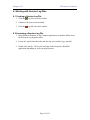
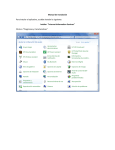
PGComm
User Manual
Puregas, LLC
PGComm User Manual
1. Overview................................................................................................................................................ 3
2. Working with the Phone Book ............................................................................................................... 3
2.1 Creating a Phone Book Entry for Dial-up....................................................................................... 3
2.2 Creating a Phone Book Entry for IP ............................................................................................... 4
2.3 Creating a Phone Book Entry for Direct Connect........................................................................... 5
2.4 Inserting a Phone Book Entry ......................................................................................................... 5
2.5 Deleting a Phone Book Entry.......................................................................................................... 6
2.6 Editing a Phone Book Entry............................................................................................................ 6
2.7 Selecting a Phone Book Entry ........................................................................................................ 7
2.8 Importing Phone Book Data ........................................................................................................... 7
2.9 Exporting Phone Book Data ........................................................................................................... 7
3. Connecting to the Monitoring System.................................................................................................... 8
3.1 Connecting using Dial-up and Direct Connections......................................................................... 8
3.2 Connecting using IP Connections ................................................................................................... 8
4. Disconnecting from the Monitoring System........................................................................................... 9
5. Working with Databases and Firmware .............................................................................................. 10
5.1 Saving a Database from the Monitoring System........................................................................... 10
5.2 Loading a Database on the Monitoring System ............................................................................ 11
5.3 Installing Firmware on the Monitoring System ............................................................................ 12
6. Working with Session Log Files........................................................................................................... 13
6.1 Creating a Session Log File .......................................................................................................... 13
6.2 Accessing a Session Log File........................................................................................................ 13
Page 2 of 13
Puregas, LLC
PGComm User Manual
1. Overview
PGComm is an application that allows you to communicate with all Puregas and Sparton
monitoring systems. It allows you to view and modify system statistics online in a live
environment. PGComm also enables you to backup and load offline databases as well as
update firmware on the monitoring system. (Figure 1.)
Figure 1
2. Working with the Phone Book
The Phone Book in PGComm allows you to create and save connection entries for
monitoring systems that you communicate with. These entries can include Dial-up, IP,
and Direct connections to systems. You also have the ability to Import and Export phone
book entries when needed.
2.1 Creating a Phone Book Entry for Dial-up
1. Click on the
Phone Book
icon on the toolbar. This opens
the Phone Book dialog box
(Figure 2.)
2. Click on the ADD button. This
opens the Site Setup dialog box
(Figure 3.)
3. Type an identifying name for
the site in the SITE NAME text
box.
Figure 2
Page 3 of 13
Puregas, LLC
PGComm User Manual
4. Verify that the COM option is selected for
the CONNECT TYPE.
5. Type the primary phone number for the
system in the PRIMARY PHONE text box.
Make sure to include a 1 for long distance
and the area code if necessary. Don’t use
spaces. Ex. 13034273700
6. Select the correct PORT setting for the
computer you are using.
7. Leave the default settings for the remaining
options.
Figure 3
8. Click the OK button.
Notice the appearance of the new phone book entry in the Phone Book dialog box.
2.2 Creating a Phone Book Entry for IP
1. Click on the
Phone Book
icon on the toolbar. This
opens the Phone Book dialog
box (Figure 4.)
2. Click on the ADD button.
This opens the Site Setup
dialog box (Figure 5.)
3. Type an identifying name for
the site in the SITE NAME
text box.
Figure 4
4. Verify that the IP option is selected for the
CONNECT TYPE.
5. Type the IP Address of the system in the IP
ADDRESS text box.
6. Type 7001 in the PORT text box.
7. Click the OK button.
Notice the appearance of the new phone book entry
in the Phone Book dialog box.
Page 4 of 13
Figure 5
Puregas, LLC
PGComm User Manual
2.3 Creating a Phone Book Entry for Direct Connect
1. Click on the
Phone Book
icon on the toolbar. This opens
the Phone Book dialog box
(Figure 6.)
2. Click on the ADD button. This
opens the Site Setup dialog box
(Figure 7.)
3. Type an identifying name for
the site in the SITE NAME text
box.
Figure 6
4. Verify that the COM option is selected for
the CONNECT TYPE.
5. Select the correct PORT setting for the
computer you are using.
6. Leave the default settings for the remaining
options.
7. Click the OK button.
Notice the appearance of the new phone book entry
in the Phone Book dialog box.
Figure 7
2.4 Inserting a Phone Book Entry
1. Click on the
Phone Book
icon on the toolbar. This opens
the Phone Book dialog box
(Figure 8.)
2. Select the phone book entry
that you want to insert a new
phone book entry ahead of.
3. Click the INSERT button. This
opens the Site Setup dialog
box.
Figure 8
4. Create the new phone book using one of the previously mentioned methods: Dial
up, IP, or Direct Connect.
Notice the appearance of the new phone book entry in the Phone Book dialog box.
Page 5 of 13
Puregas, LLC
PGComm User Manual
2.5 Deleting a Phone Book Entry
1. Click on the
Phone Book
icon on the toolbar. This opens
the Phone Book dialog box
(Figure 9.)
2. Select the phone book entry
that you want to delete.
3. Click the DELETE button. The
Delete Site dialog box appears.
Figure 9
4. Click the YES button to confirm deletion of the entry
(Figure 10.)
The phone book entry is now removed from the list in the
Phone Book dialog box.
Figure 10
2.6 Editing a Phone Book Entry
1. Click on the
Phone Book
icon on the toolbar. This opens
the Phone Book dialog box
(Figure 11.)
2. Select the phone book entry
that you want to edit.
3. Click the EDIT button. This
opens the Site Setup dialog
box.
Figure 11
4. Update the information as necessary.
5. Click the OK button.
The phone book entry is now updated in the Phone Book dialog box.
Page 6 of 13
Puregas, LLC
PGComm User Manual
2.7 Selecting a Phone Book Entry
1. Click on the
Phone Book
icon on the toolbar. This opens
the Phone Book dialog box
(Figure 12.)
2. Select the phone book entry
that you want to use.
3. Click the SELECT button.
Figure 12
The selected phone book entry is now the active selection in the main screen. Notice the
active phone book entry displayed in the status bar.
2.8 Importing Phone Book Data
1. Click FILE on the toolbar to open the FILE
menu (Figure 13.)
2. Select IMPORT… from the FILE menu.
This opens the Open dialog box.
3. Locate the .csv file in the Open dialog box.
Figure 13
4. Select the .csv file.
5. Click the OPEN button.
The data found in the .csv file is now included in the Phone Book.
2.9 Exporting Phone Book Data
1. Click FILE on the toolbar to open the FILE
menu (Figure 14.)
2. Select EXPORT… from the FILE menu.
3. Navigate to the location you want to save the
file in the Save As dialog box.
Figure 14
4. Type a file name in the FILE NAME text
box.
5. Click the SAVE button.
All the entries in the Phone Book are now saved in the .csv file you just created.
Page 7 of 13
Puregas, LLC
PGComm User Manual
3. Connecting to the Monitoring System
3.1 Connecting using Dial-up and Direct Connections
1. Select the Phone Book entry for the system that
you want to connect to as outlined in the Selecting
a Phone Book Entry section above.
2. Click on the
Connect icon on the toolbar. This
opens the Pick Desired Phone Number dialog box
(Figure 15.)
3. Select one of the choices.
4. Click the OK button. The computer will now
attempt to connect to the monitoring system.
5. When CONNECT appears on the screen,
tap the Space Bar several times until
ENTER KEYWORD appears (Figure
16.)
6. Type in your Keyword and then press the
ENTER key.
You are now connected to the monitoring
system.
Figure 16
3.2 Connecting using IP Connections
1. Select the Phone Book entry for the
system that you want to connect to as
outlined in the Selecting a Phone Book
Entry section above.
2. Click on the
toolbar.
Connect icon on the
3. Tap the Space Bar several times until
ENTER KEYWORD appears (Figure 17.)
Figure 17
4. Type in your Keyword and then press the ENTER key.
You are now connected to the monitoring system.
Page 8 of 13
Figure 15
Puregas, LLC
PGComm User Manual
4. Disconnecting from the Monitoring System
1. Press the ESC key to
return to the root menu.
2. Type Q to quit.
3. Type Y when prompted
to Enter Yes to confirm
Log Off [return to
command].
Figure 18
4. Press the ENTER key.
5. Click on the
Disconnect icon on the toolbar.
You are now disconnected from the monitoring system.
Page 9 of 13
Puregas, LLC
PGComm User Manual
5. Working with Databases and Firmware
5.1 Saving a Database from the Monitoring System
1. Connect to the monitoring system as outlined in the Connect to the Monitoring
System section above.
2. Type CSDS
(Change-SystemDatabase-Save) then
press the ENTER
key (Figure 19.)
3. When the Enter
Destination (Remote
file, On board
Figure 19
backup) [Remote]
prompt appears,
press the ENTER key to accept the default selection.
4. When the Save (System, Unit) [System] prompt appears, press the ENTER key to
accept the default selection.
5. When the Enter Method (Ascii, Stitrm) [Stitrm] prompt appears, press the ENTER
key to accept the default selection.
6. When the Tell STITRM / STIComm
to save database prompt appears,
click on the Save DB icon on
the toolbar. This opens the Save
As dialog box (Figure 20.)
7. Navigate to the location you want
to save the file in the Save As
dialog box.
8. Type a file name in the FILE
NAME text box.
Figure 20
9. Click the SAVE button. A progress window will appear.
10. When the Save DB Success! dialog box appears, click the
OK button (Figure 21.)
The database is now saved from the monitoring system to the
computer location you specified.
Page 10 of 13
Figure 21
Puregas, LLC
PGComm User Manual
5.2 Loading a Database on the Monitoring System
1. Connect to the monitoring system as outlined in the Connect to the Monitoring
System section above.
2. Type CSDL (ChangeSystem-Database-Load)
then press the ENTER
key (Figure 22.)
3. When the Enter Source
(Remote file, On board
backup) [Remote]
prompt appears, press
the ENTER key to
accept the default
selection.
Figure 22
4. When the Load (System, Unit) [System] prompt appears, press the ENTER key to
accept the default selection.
5. When the Enter Method (Ascii, Stitrm) [Stitrm] prompt appears, press the ENTER
key to accept the default selection.
6. When the Tell STITRM /
STIComm to load database
prompt appears, click on the
Load DB icon on the toolbar.
This opens the Open dialog box
(Figure 23.)
7. Locate the database file in the
Open dialog box.
8. Select the database file.
9. Click the OPEN button. A
progress window will appear.
Figure 23
10. When the Load DB Success! dialog box appears, click the
OK button (Figure 24.)
The database is now loaded from the computer location you
specified to the monitoring system.
Page 11 of 13
Figure 24
Puregas, LLC
PGComm User Manual
5.3 Installing Firmware on the Monitoring System
1. Connect to the monitoring system as outlined in the Connect to the Monitoring
System section above.
2. Type CSDL (ChangeSystem-Database-Load)
then press the ENTER
key.
3. When the Enter Source
(Remote file, On board
backup) [Remote]
Figure 25
prompt appears, press
the ENTER key to accept the default selection.
4. When the Load (System, Unit) [System] prompt appears, press the ENTER key to
accept the default selection.
5. When the Enter Method (Ascii, Stitrm) [Stitrm] prompt appears, press the ENTER
key to accept the default selection.
6. When the Tell STITRM /
STIComm to load database
prompt appears, click on the
Send File icon on the toolbar.
This opens the Open dialog box
(Figure 26.)
7. Locate the firmware file in the
Open dialog box.
8. Select the firmware file.
9. Click the OPEN button. The
Send File progress window will
appear.
Figure 26
10. When the Send File Success! dialog box appears, click the
OK button (Figure 27.)
11. Wait for 30 – 60 seconds.
12. Click the
Disconnect icon on the toolbar
Figure 27
The firmware is now loaded from the computer location you specified to the monitoring
system.
Page 12 of 13
Puregas, LLC
PGComm User Manual
6. Working with Session Log Files
6.1 Creating a Session Log File
1. Click the
Log On icon on the toolbar.
2. Continue with your session normally.
3. Click the
Log Off icon on the toolbar.
6.2 Accessing a Session Log File
1. In the Windows Explorer or My Computer application, located the folder where
the PGComm.exe program resides.
2. Locate the .log file that shows the date the log was recorded (yyyy-mm-dd).
3. Double click the file. The log file will open in the Notepad or WordPad
application depending on your system preferences.
Page 13 of 13