1
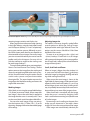
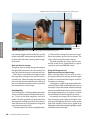
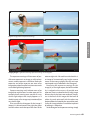
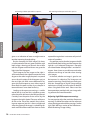
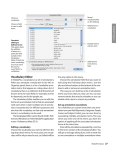
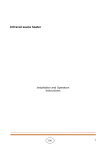
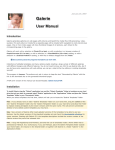
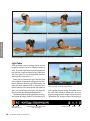
Reviewing Media
Comparing media: MediaPro’s new Light Table mode is the ideal tool for viewing and comparing images.
Light Table
The Light Table mode is the best way to view an
image or compare up to six different images at
once. To use the Light Table mode, select between
one and four images and choose Light Table from
the View menu, or use the keyboard shortcut,
Alt+Enter (Mac: Command + / ).
When you first launch the Light Table the Help
menu appears showing the navigation and keyboard shortcuts. While in Light Table mode, use
right click (Mac: Option+Click) to show the contextual options menu that includes the option to
show this initial help menu again. See page 143
for a list of all Light Table keyboard shortcuts.
The default display of the Light Table is the chosen number of images shown in a Grid layout (2x2)
Label, rating
drop-down menus
66
Media Info: Filename, Dimensions,
Scale Percentage
I V I E W M E D I A P R O U S ER MANUAL
Layout: Choose between Grid (top), Landscape and
Portrait (above) modes for image display.
with a toolbar for each image. The toolbar shows
the color label, filename, dimensions and scaling percentage of each image (see figure below).
The toolbar also displays buttons for trashing or
Remove/Trash
Rotate
Size
Contextual Options menu: Right-click (Mac: Option-Click) on any image to display the Light Table Options menu.
Marking images
Color labels are set using the normal label hotkeys
(1-9, 0 [zero] to remove a label). When more than
one image is shown the color label is applied to
the image that the cursor is currently over. These
are the same labels used throughout MediaPro.
You can also mark images using star ratings.
Use the shortcuts Alt+1-5 (Mac: Ctrl+ 1-5) to set
the rating. See page 64 for more about labels; page
63 for ratings.
Adjusting image size
The toolbar’s size menu (magnify symbol) offers
several options to define the scale of images
displayed within each Light Table cell. These size
options are the same as MediaPro’s Slide Show
and Media View modes.
To zoom in on an image, use the + (plus) and
- (minus) hotkeys. If Scroll Lock is on, all images
will increase and decrease by the same magnification. If Scroll Lock is off, only the scale of the active
image will be adjusted.
Reviewing Media
removing images, rotation and display size.
When you have more than one image showing
in the Light Table, try using the Landscape, Portrait
and Grid layouts (hotkeys L, P and G respectively)
to use your monitor space as efficiently as possible. Which layout works best for you depends on
the orientation of your images, how many image
you view at once and wether you want to see the
toolbar and/or the histogram. You may wish to
hide the toolbar to maximize the viewing area
for each image (hotkey T).
The trash/remove button gives you two options:
Move to Trash and Remove From Catalog. The first
option removes the image from the catalog and
moves the original image file to the trash or recycle bin. Be careful when using this option. Do not
use this unless you are sure you want to delete
the original file. The second option removes the
image from the MediaPro catalog and leaves the
original file untouched.
Scroll, Scroll Lock and Zoom
When an image is bigger than the window it is
in, your cursor will turn into a hand ( ) which can
move the image by dragging (clicking and holding while moving the mouse).
When more than one image is shown in the
Light Table, all shown images will be moved simultaneously while Scroll Lock (hotkey S) is on. If any
of the images do not move when scrolling in this
way it is probably because they fit the current window and there is no more of the image to show.
When Scroll Lock is turned off, only the image
under the cursor is moved by dragging. Scroll
Lock is useful when examining an important area
of similar images.
By zooming in and scrolling to the part of an
image you are interested in, the other shown
images will show the same portion of the image.
If the images are not absolutely identical you
Reviewing Media
67
Reviewing Media
RGB color values and X/Y coordinates apply to this green square.
Use slider to
adjust zoom.
The Pixel magnifier shows a close up of the image area underneath the cursor.
may need to toggle Scroll Lock off and move the
image individually. Remembering the hotkey (S)
for the Scroll Lock makes viewing similar images
much faster.
Next and Previous images
The right or down arrow key changes the image in
the Light Table to the next one in the catalog. The
up or left arrow key changes to the previous one.
When there is more than one image onscreen,
the image that is changed is the one the cursor is
currently over. When changing the image using
the cursor keys, the current zoom and scroll positions are maintained to make it easier to examine
the same point on similar images.
Pixel Magnifier
The Pixel magnifier is a floating palette that shows
a close up of the image area underneath the cursor. To turn on the pixel magnifier, use the M
hotkey. The pixel magnifier can be quicker than
zooming and scrolling, particularly when there is
more than one area in any particular image that
you need to examine closely.
The slider controls how far the magnifier zooms
68
I V I E W M E D I A P R O U S ER MANUAL
in. There are four settings from the least magnified at the bottom to the most, at the top. The
slider snaps to one of these four settings.
The pixel magnifier also shows the X/Y coordinates of the cursor (highlighted by a green
square), as well as the RGB color values.
Using the Histogram and
Exposure warnings to judge images
When viewing images you may wish to view a
Histogram and Exposure warnings for each image,
(hotkey H to show/hide the histogram and W for
the exposure warnings).
A histogram is a graph showing the relative distribution of Red, Green and Blue pixel densities in
an image. It shows the number of pixels with high
density on the left (darker colors) and low density
on the right (lighter colors). Its purpose is to show
the distribution of tone throughout an image.
For example, an image with no shadows will
have a histogram with a valley on the left; a histogram with no highlights will have a valley on the
right. Dark shadows will be seen as a peak of all
three colors to the left and bright highlights a peak
of all three colors of the right.
A
B
Original images, with no exposure warnings.
A
B
Reviewing Media
Judging images: Light Table showing exposure warnings and histograms.
The exposure warnings will show areas of possible over exposure in an image as solid red represents, under exposure in solid blue. Both over
exposure and under exposure are areas of an
image where detail may be lost due to too much
or too little light being captured.
Exposure warnings only indicate areas of an
image that might be over or under exposed For
example, these warning areas may be of a very
dark or light object that simply appears as it
should or parts of an image may intentionally be
very dark or light.
If we consider the histogram for the image A
(above), it is biased towards the right, the green
and blue colors reach the top of the chart at the
extreme right side. We could consider that this is
an image of a intentionally very bright summer
scene, so the strong sunlight, blue sky and aqua
marine pool are just reflected in the histogram.
Examining the exposure warnings for this
image (A), as we might expect, the left the whole
sky is colored red to warn us of possible over
exposure. There is no detail in the sky in this image
because the sky has been over exposed. The person is the focus of this image and the band of
white sky works quite well with the other two
horizontal bands created by the sea and the pool.
So, for this image, whether it would be improved
by editing is a subjective.
So the histogram and exposure warnings simply
Reviewing Media
69
Reviewing Media
Red warnings indicate potential over exposure.
Blue warnings indicate potential under exposure.
Histogram
gives us an indication of areas we might want to
consider improving through editing.
But lets compare this with image B. It shows
a similar pattern of the red, green and blue with
both images showing red towards the middle
with lots of green and then blue as we go to the
light side of the histogram.
The histogram, for the image on the right, is
still biased towards the right but not to the same
degree as the other image, the pixels are spread
across the mid section of the histogram not just
the very light side. With a more balanced histogram we would expect to see a wider range of
tones. Both the pool and the sky are deeper in
tone and there is some detail in the sky.
Looking at the exposure warnings, a smaller
area of the sky is red and this is a broken up area,
rather than the solid area in the left hand picture.
Certainly, from the point of view of the sky, the
image on the right is better. There are solid areas
of red on the side of the models face, indicating over exposure, but this is direct sunlight and
since the subject of the image is sunbathing this
works well. Part of the models hair shows as under
70
I V I E W M E D I A P R O U S ER MANUAL
exposed but again that is not necessarily an indication of a problem.
One opinion may be that the image on the left
would benefit from editing and the image on the
right less so. A balanced histogram is normally
considered better although there is no ideal histogram. Areas shown as possible over and under
exposure are things to consider when viewing
your images.
In the end, whether an image is good or can
be improved is subjective. The histogram and
exposure warnings should help you make your
decision. Knowledge of digital image editing
techniques will help you know what to look for
when using both these tools. Please read the
documentation provided with your image editing software for more information.
Adjusting Light Table exposure warnings
You may want to adjust the sensitivity of exposure
warnings. To define the under and over exposure
values that trigger red and blue warnings, see the
Light Table Warnings section of the Preferences ›
Media Rendering › Images dialog.