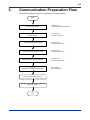
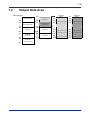
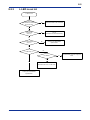
1
User’s Manual YHLS Master Module IM 34M6H46-04E Applicable Modules: Model Code Model Name F3LH01-1N YHLS Master Module F3LH02-1N YHLS Master Module IM 34M6H46-04E Yokogawa Electric Corporation 1st Edition Blank Page i Applicable Product Range-free Multi-controller FA-M3 Model code : F3LH0 -1N Name : YLHS Master Module The document number and document model code for this manual are given below. Refer to the document number in all communications; also refer to the document number or the document model code when purchasing additional copies of this manual. Document No. Document Model Code Media No. IM 34M6H46-04E (CD) 1st Edition : April, 2008 (AR) All Rights Reserved Copyright © 2008, Yokogawa Electric Corporation : : IM 34M6H46-04E DOCIM IM34M6H46-04E 1st Edition : April 2008 ii Important About This Manual - This Manual should be passed on to the end user. Before using the product, read this manual thoroughly to have a clear understanding of the product. This manual explains the functions of this product, but there is no guarantee that they will suit the particular purpose of the user. Under absolutely no circumstances may the contents of this manual be transcribed or copied, in part or in whole, without permission. The contents of this manual are subject to change without prior notice. Every effort has been made to ensure accuracy in the preparation of this manual. However, should any errors or omissions come to the attention of the user, please contact the nearest Yokogawa Electric representative or sales office. Safety Precautions when Using/Maintaining the Product - The following safety symbols are used on the product as well as in this manual. Danger. This symbol on the product indicates that the operator must follow the instructions laid out in this user’s manual to avoid the risk of personnel injuries, fatalities, or damage to the instrument. Where indicated by this symbol, the manual describes what special care the operator must exercise to prevent electrical shock or other dangers that may result in injury or the loss of life. Protective Ground Terminal. Before using the instrument, be sure to ground this terminal. Function Ground Terminal. Before using the instrument, be sure to ground this terminal. Alternating current. Indicates alternating current. Direct current. Indicates direct current. IM34M6H46-04E 1st Edition : April 2008 iii The following symbols are used only in the user’s manual. WARNING Indicates a “Warning”. Draws attention to information essential to prevent hardware damage, software damage or system failure. CAUTION Indicates a “Caution” Draws attention to information essential to the understanding of operation and functions. TIP Indicates a “TIP” Gives information that complements the present topic. SEE ALSO Indicates a “SEE ALSO” reference. Identifies a source to which to refer. - For the protection and safe use of the product and the system controlled by it, be sure to follow the instructions and precautions on safety stated in this manual whenever handling the product. Take special note that if you handle the product in a manner other than prescribed in these instructions, the protection feature of the product may be damaged or impaired. In such cases, Yokogawa cannot guarantee the quality, performance, function and safety of the product. - When installing protection and/or safety circuits such as lightning protection devices and equipment for the product and control system as well as designing or installing separate protection and/or safety circuits for fool-proof design and fail-safe design of processes and lines using the product and the system controlled by it, the user should implement it using devices and equipment, additional to this product. - If component parts or consumable are to be replaced, be sure to use parts specified by Yokogawa. This product is not designed or manufactured to be used in critical applications which directly affect or threaten human lives and safety — such as nuclear power equipment, devices using radioactivity, railway facilities, aviation equipment, air navigation facilities, aviation facilities or medical equipment. If so used, it is the user’s responsibility to include in the system additional equipment and devices that ensure personnel safety. - - Do not attempt to modify the product. Exemption from Responsibility - Yokogawa Electric Corporation (hereinafter simply referred to as Yokogawa Electric) makes no warranties regarding the product except those stated in the WARRANTY that is provided separately. - Yokogawa Electric assumes no liability to any party for any loss or damage, direct or indirect, caused by the use or any unpredictable defect of the product. IM34M6H46-04E 1st Edition : April 2008 iv Software Supplied by the Company - Yokogawa Electric makes no other warranties expressed or implied except as provided in its warranty clause for software supplied by the company. - Use the software with one computer only. You must purchase another copy of the software for use with each additional computer. Copying the software for any purposes other than backup is strictly prohibited. - Store the original media, such as floppy disks, that contain the software in a safe place. - Reverse engineering, such as decompiling of the software, is strictly prohibited. No portion of the software supplied by Yokogawa Electric may be transferred, exchanged, sublet or leased for use by any third party without prior permission by Yokogawa Electric. IM34M6H46-04E 1st Edition : April 2008 v General Requirements for Using the FA-M3 Controller Avoid installing the FA-M3 controller in the following locations: - - Where the instrument will be exposed to direct sunlight, or where the operating temperature exceeds the range 0°C to 55°C (32°F to 131°F). Where the relative humidity is outside the range 10% to 90%, or where sudden temperature changes may occur and cause condensation. Where corrosive or flammable gases are present. - Where the instrument will be exposed to direct mechanical vibration or shock. Where the instrument may be exposed to extreme levels of radioactivity. - Use the correct types of wire for external wiring: - Use copper wire with temperature ratings greater than 75°C (167°F). Securely tighten screws: - Securely tighten module mounting screws and terminal screws to avoid problems such as faulty operation. - Tighten terminal block screws with the correct tightening torque as given in this manual. Securely lock connecting cables: - Securely lock the connectors of cables, and check them thoroughly before turning on the power. Interlock with emergency-stop circuitry using external relays: - Equipment incorporating the FA-M3 controller must be furnished with emergencystop circuitry that uses external relays. This circuitry should be set up to interlock correctly with controller status (stop/run). Ground for low impedance: - For safety reasons, connect the [FG] grounding terminal to a Japanese Industrial Standards (JIS) Class D (earlier called Class 3) Ground*1 . For compliance to CE Marking, use braided or other wires that can ensure low impedance even at high frequencies for grounding. *1 Japanese Industrial Standard (JIS) Class D Ground means grounding resistance of 100 Ω max. Configure and route cables with noise control considerations: - Perform installation and wiring that segregates system parts that may likely become noise sources and system parts that are susceptible to noise. Segregation can be achieved by measures such as segregating by distance, installing a filter or segregating the grounding system. Configure for CE Marking Conformance: - For compliance to CE Marking, perform installation and cable routing according to the description on compliance to CE Marking in the “Hardware Manual” (IM34M6C11-01E). IM34M6H46-04E 1st Edition : April 2008 vi Keep spare parts on hand: - Stock up on maintenance parts including spare modules, in advance. Discharge static electricity before operating the system: - Because static charge can accumulate in dry conditions, first touch grounded metal to discharge any static electricity before touching the system. Never use solvents such as paint thinner for cleaning: - Gently clean the surfaces of the FA-M3 controller with a cloth that has been soaked in water or a neutral detergent and wringed. - Do not use volatile solvents such as benzine or paint thinner or chemicals for cleaning, as they may cause deformity, discoloration, or malfunctioning. Avoid storing the FA-M3 controller in places with high temperature or humidity: - Since the CPU module has a built-in battery, avoid storage in places with high temperature or humidity. - Since the service life of the battery is drastically reduced by exposure to high temperatures, take special care (storage temperature should be from -20°C to 75°C (-4°F to 167°F)). - There is a built-in lithium battery in a CPU module and temperature control module which serves as backup power supply for programs, device information and configuration information. The service life of this battery is more than 10 years in standby mode at room temperature. Take note that the service life of the battery may be shortened when installed or stored at locations of extreme low or high temperatures. Therefore, we recommend that modules with built-in batteries be stored at room temperature. Always turn off the power before installing or removing modules: - Failing to turn off the power supply when installing or removing modules, may result in damage. Do not touch components in the module: - In some modules you can remove the right-side cover and install ROM packs or change switch settings. While doing this, do not touch any components on the printed-circuit board, otherwise components may be damaged and modules may fail to work. Do not use unused terminals: - Do not connect wires to unused terminals on a terminal block or in a connector. Doing so may adversely affect the functions of the module. IM34M6H46-04E 1st Edition : April 2008 vii Waste Electrical and Electronic Equipment Waste Electrical and Electronic Equipment (WEEE), Directive 2002/96/EC (This directive is only valid in the EU.) This product complies with the WEEE Directive (2002/96/EC) marking requirement. The following marking indicates that you must not discard this electrical/electronic product in domestic household waste. Product Category With reference to the equipment types in the WEEE directive Annex 1, this product is classified as a “Monitoring and Control instrumentation” product. Do not dispose in domestic household waste. When disposing products in the EU, contact your local Yokogawa Europe B. V. office. IM34M6H46-04E 1st Edition : April 2008 viii Introduction Overview of the Manual This manual describes the specifications, operations, and communications protocol of the YHLS (Yokogawa High-speed Link System) master module F3LH0 -1N. Related User’s Manuals For individual sequence CPU modules, read the latest versions of the relevant user's manuals as required. F3SP66, F3SP67 functions - Sequence CPU – Functions (for F3SP66-4S, F3SP67-6S) (IM34M6P14-01E) - Sequence CPU – Network Communication Functions (for F3SP66-4S, F3SP67-6S) (IM34M6P14-02E) F3SP28, F3SP38, F3SP53, F3SP58, or F3SP59 functions - Sequence CPU – Functions (for F3SP28-3N/3S, F3SP38-6N/6S, F3SP53-4H/4S, F3SP58-6H/6S, F3SP59-7S) (IM34M6P13-01E) F3SP21, F3SP25, F3SP35, F3SP05, or F3SP08 functions - Sequence CPU – Functions (for F3SP21, F3SP25, and F3SP35) (IM34M6P12-02E) The following user’s manuals are common to all sequence CPUs. Instructions - Sequence CPU – Instructions (IM34M6P12-03E) Ladder programming - FA-M3 Programming Tool WideField2 (IM34M6Q15-01E) For the FA-M3 specifications and configurations*1, installation and wiring, test run, maintenance, and module installation restrictions, refer to: *1: Refer to the relevant product manuals for specifications except for power supply modules, base modules, input/output modules, cables and terminal units. All sequence CPU modules - Hardware Manual (IM34M6C11-01E) IM34M6H46-04E 1st Edition : April 2008 ix Copyrights and Trademarks Copyrights Copyrights of the programs and online manual included in this CD-ROM belong to Yokogawa Electric Corporation. This online manual may be printed but PDF security settings have been made to prevent alteration of its contents. This online manual may only be printed and used for the sole purpose of operating this product. When using a printed copy of the online manual, pay attention to possible inconsistencies with the latest version of the online manual. Ensure that the edition agrees with the latest CD-ROM version. Copying, passing, selling or distribution (including transferring over computer networks) of the contents of the online manual, in part or in whole, to any third party, is strictly prohibited. Registering or recording onto videotapes and other media is also prohibited without expressed permission of Yokogawa Electric Corporation. Trademarks - The trade and company names that are referred to in this document are either trademarks or registered trademarks of their respective companies. IM34M6H46-04E 1st Edition : April 2008 Blank Page TOC-1 FA-M3 YHLS Master Module IM 34M6H46-04E 1st Edition CONTENTS Applicable Product ....................................................................................i Important ...................................................................................................ii Introduction............................................................................................viii Copyrights and Trademarks ...................................................................ix 1. Overview ....................................................................................... 1-1 1.1 1.2 2. Specifications ............................................................................... 2-1 2.1 2.2 2.3 3. What is YHLS? ......................................................................................... 1-1 Features of YHLS..................................................................................... 1-2 1.2.1 Communications between YHLS Master Module and Slave Units ................................................................................ 1-2 1.2.2 Constant Communication Cycle Time ....................................... 1-2 1.2.3 Output Control Function ............................................................ 1-2 1.2.4 Daisy-chain Connection............................................................. 1-2 1.2.5 Transmission Line Quality Indicators......................................... 1-2 Standard Specifications.......................................................................... 2-1 Model and Suffix Codes ....................................................................... 2-1 Operating Environment ........................................................................ 2-1 General Specifications ......................................................................... 2-1 Components and Functions ................................................................. 2-2 External Dimensions ............................................................................ 2-2 External Connection ............................................................................... 2-3 Connection Topology............................................................................ 2-3 Connector Pin Assignment................................................................... 2-3 Cable.................................................................................................... 2-4 Connector............................................................................................. 2-4 Shield Treatment .................................................................................. 2-4 Pin Terminals........................................................................................ 2-4 Attaching/Detaching the Module............................................................ 2-5 Attaching the Module ........................................................................... 2-5 Detaching the Module .......................................................................... 2-5 Attaching the Module in Intense Vibration Environments .................... 2-6 Functions ...................................................................................... 3-1 3.1 3.2 List of Functions ..................................................................................... 3-1 Communication with Slave Units........................................................... 3-2 3.2.1 Starting Communications........................................................... 3-2 3.2.2 Input........................................................................................... 3-2 IM34M6H46-04E 1st Edition : April 2008 TOC-2 3.3 3.4 3.5 4. 3.2.3 Output ........................................................................................ 3-2 Constant Communication Cycle Time................................................... 3-3 3.3.1 When a Slave Unit is Withdrawn from Communication............. 3-3 3.3.2 When a Slave Unit Resumes Communication .......................... 3-3 Output Control Function......................................................................... 3-4 Transmission Line Quality Indicators ................................................... 3-4 Response Time............................................................................. 4-1 4.1 4.2 Data Transfer Time .................................................................................. 4-1 Remote Scan time (RST) ........................................................................ 4-3 5. Communication Preparation Flow .............................................. 5-1 6. List of I/O Relays .......................................................................... 6-1 6.1 6.2 7. List of Registers ........................................................................... 7-1 7.1 7.2 7.3 7.4 8. Input Data area......................................................................................... 7-2 Output Data area...................................................................................... 7-4 Parameter Setup Area ............................................................................. 7-6 7.3.1 Last Address.............................................................................. 7-7 7.3.2 Transmission Speed .................................................................. 7-7 7.3.3 Communications Mode.............................................................. 7-8 7.3.4 Monitored Slave List .................................................................. 7-8 Parameter Monitoring Area .................................................................... 7-9 7.4.1 Last Address............................................................................ 7-10 7.4.2 Transmission Speed ................................................................ 7-10 7.4.3 Communications Mode............................................................ 7-10 7.4.4 Alive Slave List ........................................................................ 7-10 7.4.5 Failed Slave List (non-latched).................................................7-11 7.4.6 Failed Slave List (latched) ....................................................... 7-12 7.4.7 Monitored Slave List ................................................................ 7-12 Troubleshooting ........................................................................... 8-1 8.1 8.2 9. Output Relays .......................................................................................... 6-1 Input Relays ............................................................................................. 6-2 Troubleshooting Using LEDs ................................................................. 8-1 Troubleshooting Using FlowCharts....................................................... 8-3 8.2.1 Main Flowchart .......................................................................... 8-3 8.2.2 RDY LED is not Lit..................................................................... 8-4 8.2.3 L LED is not Lit .......................................................................... 8-5 8.2.4 A LED is Lit ................................................................................ 8-6 8.2.5 No Output to Slave Unit............................................................. 8-7 8.2.6 No Input from Slave Unit ........................................................... 8-7 Sample Program........................................................................... 9-1 Appendix: KM8 Cable Preparation ............................................ Appx-1 Index ...............................................................................................Index-1 Revision Information .................................................................................i IM34M6H46-04E 1st Edition : April 2008 1-1 1. Overview The Yokogawa High-speed Link System (YHLS) master module F3LH01-1N has one YHLS master interface port, while the F3LH02-1N has two master interface ports for connecting slave units to perform remote I/O. Table 1.1 Applicable Module Model Code F3LH01-1N F3LH02-1N 1.1 Module Name YHLS Master Module YHLS Master Module Description One YHLS port Two YHLS ports What is YHLS? Yokogawa High-speed Link System (YHLS) is designed for implementing high-speed remote I/O in the FA-M3 system. A YHLS system consists of the FA-M3 master module (F3LH0-1N) connected to multiple distributed slave units through a communication cable to allow high-speed control of remote I/O units from a sequence CPU. It has the following merits: - High-speed scan of 63 slave units in just 0.96 ms. - Reduced wiring through use of distributed devices within a system Simple mechanism for high-speed exchange of ON/OFF signals and numerical data with remote devices Adoption of the HLS open network allows flexibility in building customized application systems by connecting HLS-compliant I/O units from different vendors. IM34M6H46-04E 1st Edition : April 2008 1-2 1.2 Features of YHLS 1.2.1 Communications between YHLS Master Module and Slave Units Through periodic communications with connected slave units, the YHLS master module acquires ON/OFF information of switches connected to these slave units into its input data area, as well as outputs information stored in its output data area as ON/OFF information for actuators. By accessing the I/O data areas of the YHLS master module using READ and WRITE instructions, the sequence CPU module can thus exchange information with field equipment. Sequence CPU Module 1.2.2 YHLS Master Module Slave Unit Internal devices READ instruction Input area Communication Input Internal devices WRITE instruction Output area Communication Output Constant Communication Cycle Time YHLS features a constant communication cycle time, not affected by automatic participation or withdrawal of slave units, thus delivering reliable communications with constant cycle time under all circumstances. 1.2.3 Output Control Function The YHLS master module can be made to suspend YHLS communications when the sequence CPU module “stops”. By combining this feature with output control functions of individual slave units, which can be used to reset or hold the contact outputs of individual slave units when YHLS communication stops, you can implement output control of the entire YHLS system when sequence stops. 1.2.4 Daisy-chain Connection As YHLS adopts a daisy-chain connection inside each communication connector, a slave unit that is powered off or down does not affect normal communication with the other slaves. 1.2.5 Transmission Line Quality Indicators The YHLS master module indicates transmission line quality using its L (LINK) LED and A (ALARM) LED. It also stores transmission line quality status information in its internal registers. IM34M6H46-04E 1st Edition : April 2008 2-1 2. Specifications 2.1 Standard Specifications Model and Suffix Codes Model F3LH01 F3LH02 Suffix Code -1N -1N Style Code …… …… Option Code …… …… Description 12 Mbps max., 1 YHLS port 12 Mbps max., 2 YHLS ports Operating Environment There is no restriction on the type of CPU module that can be used with the F3LH0-1N module. General Specifications Item Operating ambient temperature Operating ambient humidity Operating ambient atmosphere Storage ambient temperature Storage ambient humidity Specifications 0 to 55°C 10 to 90% RH (non-condensing) Must of free of corrosive gases, flammable gases and heavy dust -20 to 75°C 10 to 90% RH (non-condensing) Performance Specifications Item Communications mode Transmission speed Transmission format Synchronization Transmission distance Error detection Number of ports Number of connectors Max. number of slaves per module Number of I/O points per module Impedance Terminating resistor Connector type Recommended communication cable RAS functions Current consumption External dimensions Weight Specifications F3LH01-1N F3LH02-1N 4-wire full-duplex or 2-wire half-duplex 3 Mbps, 6 Mbps or 12 Mbps HLS compliant Bit synchronization 300 m (at 3 Mbps), 200 m (at 6 Mbps), or 100 m (at 12 Mbps) CRC-12 1 2 2 4 63*1 126*1 (32 per connector) (32 per connector) 1008 inputs 2016 inputs 1008 outputs 2016 outputs 100 Ω Internal*2 European type KM80 and KM81 - Automatic slave unit participation - Reset/hold outputs when CPU stops - Network quality monitoring 360 mA at 5 VDC 480 mA at 5 VDC 28.9 (W) x 100 (H) x 83.2 (D) mm*3 100 g 105 g *1: One connector can connect up to 32 slave units (one port supports up to 63 slave units). To connect 63 slave units, connect 32 slaves to one connector 31 slaves to the other connector. *2: The module has a built-in terminating resistor, which must be enabled for terminal stations (the farthest module on a communication line) of the I/O system. *3: Excluding protrusions (see External Dimensions for details). IM34M6H46-04E 1st Edition : April 2008 2-2 Components and Functions z Front View LED status indicators RDY: Lit when the internal circuitry is functioning normally. (the RDY LED is shared by ports 1 and 2) Each port is provided with one set of the following LEDs (labeled as “1” for port 1 and “2” for port 2): L : Lit when communicating with one or more slave units. A : Lit on communications error at one or more slave units. F : Lit when communicating in full-duplex mode. H : Lit when communicating in half-duplex mode. 12 : Lit when communicating at 12 Mbps. 6 : Lit when communicating at 6 Mbps. 3 : Lit when communicating at 3 Mbps. YHLS communication ports F3LH01-1N F3LH02-1N z LED Indicators Designation (color) RDY (green) L (green) Description Internal circuit status Communications status (LINK) A (yellow) Communications error (ALARM) F/H (red) Communications mode 12/6/3 (red) Transmission speed When Lit When Not Lit Normal Error Communicating with one or more slave units. Communication failure has been detected at one or more slave units. Indicates communications mode when Request to Communicate relay is ON. F: full duplex; H: half duplex Indicates transmission speed when Request to Communicate relay is ON. 12: 12 Mbps, 6: 6 Mbps, and 3: 3 Mbps Not communicating with slave units. No communication failure has been detected at any slave unit or no communication has occurred yet. No indication when Request to Communicate relay is OFF. No indication when Request to Communicate relay is OFF. * For details on how to interpret combinations of LED indicators, see Chapter 8, “Troubleshooting.” External Dimensions (Unit: mm) F3LH01-1N F3LH02-1N IM34M6H46-04E 1st Edition : April 2008 2-3 2.2 External Connection Connection Topology FA-M3 YHLS communications YHLS master module (F3LH0-1N) Up to 32 units for connector 1 of port 1*1 Up to 32 units for connector 2 of port 1*1 Up to 32 units for connector 1 of port 2*2 Up to 32 units for connector 2 of port 2*2 *1: Up to 63 units for port 1 *2: Up to 63 units for port 2 Connector Pin Assignment Use straight connection type cables for master-slave, as well as slave-slave connections. Connector 1 Connector 2 Pin 5 Pin 5 Pin 1 Pin 1 Figure 2.1 Front View of Module Connectors Connector of Each Port Connector 1 Connector 2 Pin No. 5 4 3 2 1 5 4 3 2 1 Full-duplex Communications Signal Flow Signal Symbol Master Slave TxD→ TxD+ → RxD← RxD+ ← SHIELD ←→ TxD→ TxD+ → RxD← RxD+ ← SHIELD ←→ Half-duplex Communications Signal Flow Signal Symbol Master Slave NC — NC — TRD←→ TRD+ ←→ SHIELD ←→ NC — NC — TRD←→ TRD+ ←→ SHIELD ←→ IM34M6H46-04E 1st Edition : April 2008 2-4 Cable Prepare and use cables, taking into consideration the connector pin assignments. We recommend using the cables listed below. z Recommended cables KM80 (YHLS fixed cable) KM81 (YHLS flexible cable) CAUTION Not using KM8 cables may result in sub-optimal performance. Connector The module comes with connector(s). If required, you may use the following type of connector: - FMC 1,5/5-ST-3,5-RF from Phoenix Contact Shield Treatment The cable shield must be treated as follows: - The drain wire of the cable must be connected to pin 1 of FMC 1,5/5-ST-3,5-RF. CAUTION The cable shield of the YHLS communication line is connected to the base module (F3BU-) through pin 1 of a communication connector of the module. Therefore, you can increase the noise immunity of the YHLS communication line by gounding (JIS class-D grounding) the base module or the FG terminal of the power supply module (F3PU-). Pin Terminals We recommend attaching pin terminals at the end of cable wires before connection to the connector of the module. The following pin terminals can be used: - AI 0,34-8 TQ from Phoenix Contact - AI 0,5-10 WH from Phoenix Contact IM34M6H46-04E 1st Edition : April 2008 2-5 2.3 Attaching/Detaching the Module Attaching the Module Figure 2.2 shows how to attach this module to the base module. First hook the anchor slot at the bottom of the module to be attached onto the anchor pin on the bottom of the base module. Push the top of the module toward the base module until the yellow anchor/release button clicks into place. CAUTION Always switch off the power before attaching or detaching the module. Base Module Anchor pin Master Module F01.VSD Figure 2.2 Attaching/Detaching the Module CAUTION Do not bend the connector on the rear of the module by force during the above operation. If the module is pushed with improper force, the connector may bend causing an error. Detaching the Module To remove this module from the base module, reverse the above operation. Press the yellow anchor/release button on the top of this module to unlock it and tilt the module away from the base module. IM34M6H46-04E 1st Edition : April 2008 2-6 Attaching the Module in Intense Vibration Environments If the module is used in intense vibration environments, fasten the module with a screw. Use screws of type listed in the table below. Insert these screws into the screw holes on top of the module and tighten them with a Phillips screwdriver. Required Screw M4-size binder screw 12 to 15 mm long (or 14-15 mm long if fitted with a washer) F02R1.VSD Figure 2.3 Securing Module Using Screws IM34M6H46-04E 1st Edition : April 2008 3-1 3. Functions This chapter describes the functions of the YHLS master module. 3.1 List of Functions Table 3.1 List of Functions Functions Communication with slave units Constant communication cycle time Output control function Transmission line quality indicators See Section: Description I/O communication with slave units for ON/OFF control and monitoring. The YHLS features a constant communication cycle time, which is not affected by automatic withdrawal or participation of slave units. A slave unit that is unavailable for communication due to power off or any other reason is withdrawn from scanning and communication continues with the remaining normal slave units. When the slave unit recovers, it automatically resumes communications with the YHLS master module. This function can be used to suspend communications of the master module with slave units when the sequence CPU module enters STOP mode. The YHLS master module indicates transmission line quality using its L (LINK) LED and A (ALARM) LED. A program can also check the transmission line quality using internal registers of the YHLS master module. IM34M6H46-04E 3.2 3.3 3.4 3.5 1st Edition : April 2008 3-2 3.2 Communication with Slave Units 3.2.1 Starting Communications After setting the transmission speed, communications mode, the slave unit last address, and various registers as required, turn on the Request to Communicate relay start communication between the YHLS master module and the slave units. CAUTION Changes to the transmission speed, communications mode, last address and some other settings are applied when the Request to Communicate relay is turned on. Changing these settings while the Request to Communicate relay is on has no effect. 3.2.2 Input Input statuses of slave units are transmitted to the YHLS master module and stored in its input area according to slave unit number during a communication cycle. The sequence CPU module then issues a read instruction at its own timing to read the input status of a slave unit from the input area of the YHLS master module into its internal device. Sequence CPU module YHLS master module Slave unit Slave unit Input data area Internal devices READ instruction Data 1 Comm. Data 2 Comm. Input data Input data Unit No.: 1 16 inputs 3.2.3 Unit No.: 2 16 inputs Output The sequence CPU module issues a write instruction to store the data of its internal device to the output area of the YHLS master module. Data stored in data positions corresponding to each slave unit number within the output area of the YHLS master module is transmitted to the respective slave units during a communication cycle. Sequence CPU module YHLS master module Slave unit Slave unit Output data area Internal devices WRITE instruction Data 257 Data 258 Data 259 Data 260 Comm. Output data Output data Comm. Unit No.: 3 16 outputs IM34M6H46-04E Unit No.: 4 16 outputs 1st Edition : April 2008 3-3 3.3 Constant Communication Cycle Time 3.3.1 When a Slave Unit is Withdrawn from Communication Slave units that are no longer available for communication due to power off or other reasons are withdrawn from YHLS communication but communication continues with the remaining normal slave units. Although there is no response for accesses to withdrawn slave units, remote scan time remains constant as no retries are attempted. YHLS master module Terminator Error Slave unit Slave unit Slave unit Slave unit Terminator CAUTION If a communication cable is broken, communication fails due to YHLS communication line instability caused by the loss of the terminating resistor. YHLS master module Terminator Slave unit Slave unit Slave unit Slave unit Terminator Broken 3.3.2 When a Slave Unit Resumes Communication When a slave unit that was unavailable due to power off or any other reason recovers, it automatically resumes communication with the YHLS master module. Automatic participation by a slave unit does not prolong the remote scan time. IM34M6H46-04E 1st Edition : April 2008 3-4 3.4 Output Control Function This function is used to suspend communications of the YHLS master module with slave units when the sequence CPU module “stops”. To enable this function, set the “Output when Stopped” setting to ‘Reset’ in the DIO setup for the slot installed with the F3LH0-1N master module in the configuration setup of the CPU module. The states of the contact outputs (reset or hold) of an individual slave unit when the YHLS master module suspends communication depend on the configuration of the slave unit. SEE ALSO For details on the sequence CPU module configuration, see: - Sequence CPU User’s Manual - Functions (IM34M6P13-01E) Section 1.2.3, Configuration Chapter 8, RAS Features - FA-M3 Programming Tool WideField2 (IM34M6Q15-01E) Section B7.1.3, Configuration Setup CAUTION In the event of a moderate or fatal failure of the sequence CPU module, the YHLS master module stops communications with slave units. The status of the contact outputs of an individual slave unit when the master module suspends communications can be specified using the Reset/Hold setting of the slave unit. 3.5 Transmission Line Quality Indicators Each YHLS unit has “L” and “A” LED indicators that indicates the transmission line quality. “L” denotes “LINK”, while “A” denotes “ALARM.” The YHLS master module also provides internal registers, which can be used by a program for checking transmission line quality. For details, see Chapter 7, "List of Registers." IM34M6H46-04E 1st Edition : April 2008 4-1 4. Response Time This chapter describes the response time of a remote I/O system. Data transfer time Sequence CPU scan time SequenceCPU module 4.1 Remote scan time YHLS master module Slave unit Internal devices Read instruction Input data area Communication Input Internal devices Write instruction Output data area Communication Output Data Transfer Time z Data transfer from YHLS master module to Sequence CPU module Data stored in the input area of the YHLS master module is transferred to internal devices of the sequence CPU module by execution of a READ instruction. The instruction execution time depends on the sequence CPU type. Moreover, for some sequence CPU types, data transfer time is significantly reduced when the master module is installed in the main unit instead of a sub-unit. Table 4.2 Data Transfer Time from YHLS Master Module to Sequence CPU Module When master module is installed in the main unit When master module is installed in a sub-unit No. of words transferred F3SP05 F3SP08 F3SP21 F3SP28 F3SP38 1 16 63 1 16 63 250 μs 470 μs 690 μs 260 μs 460 μs 1.2 ms 17 μs 23 μs 35 μs 27 μs 220 μs 790 μs IM34M6H46-04E F3SP53 F3SP58 F3SP59 F3SP66 F3SP67 13 μs 21 μs 29 μs 20 μs 200 μs 760 μs 1st Edition : April 2008 4-2 z Data transfer from sequence CPU module to YHLS master module Data stored in internal devices of the sequence CPU module is transferred to the output area of the YHLS master module by execution of a WRITE instruction. The instruction execution time depends on the sequence CPU type. Moreover, for some sequence CPU types, data transfer time is significantly reduced when the master module is installed in the main unit instead of a sub-unit. Table 4.1 Data Transfer Time from Sequence CPU Module to YHLS Master Module When master module is installed in the main unit When master module is installed in a sub-unit No. of words transferred F3SP05 F3SP08 F3SP21 F3SP28 F3SP38 1 16 63 1 16 63 240 μs 350 μs 670 μs 250 μs 450 μs 1.2 ms 17 μs 21 μs 33 μs 25 μs 220 μs 800 μs F3SP53 F3SP58 F3SP59 F3SP66 F3SP67 12 μs 15 μs 27 μs 18 μs 210 μs 770 μs CAUTION - The data transfer time varies with the system configuration and the user program. The data transfer time varies with the sequence CPU type used. - The data transfer time is different when the YHLS master module is installed in a sub-unit instead of the main unit. When using the F3SP28, F3SP38, F3SP53, F3SP58, F3SP59, F3SP66 or F3SP67 sequence CPU, you can shorten the data transfer time by installing the YHLS master module in the main unit instead of a sub-unit. - IM34M6H46-04E 1st Edition : April 2008 4-3 4.2 Remote Scan time (RST) Remote scan time is the time required by the YHLS master module to update the data of all slave units. The remote scan time can be computed using the communications mode (full-duplex or half-duplex), transmission speed, and last address of slave units as shown below. z RST for full-duplex communication RST = 182 x FA x Tbps (s) RST 182 : : Remote scan time Constant FA Tbps : : Slave unit last address 1/transmission speed Calculation example: Suppose that 8 slave units are connected for communication at 12 Mbps. FA : Slave unit last address = 8 Tbps : 1/transmission speed = 1/12 Mbps = 0.083 x 10⁻⁶ Thus, RST = 182 x 8 x 0.083 x 10-6 = 121.3 x 10⁻⁶ (s) z RST for half-duplex communication RST = 354 x FA x Tbps (s) RST 354 : : Remote scan time Constant FA Tbps : : Slave unit last address 1/transmission speed Calculation example: Suppose that 16 slave units are connected for communication at 6 Mbps. FA : Slave unit last address = 16 Tbps : 1/transmission speed = 1/6 Mbps = 0.167 x 10⁻⁶ Thus, RST = 354 x 16 x 0.167 x 10-6 = 944 x 10-6 (s) IM34M6H46-04E 1st Edition : April 2008 4-4 Remote scan time (full-duplex) 4500.0 Remote scan time (μs) 4000.0 12Mbps 6Mbps 3Mbps 3500.0 3000.0 2500.0 2000.0 1500.0 1000.0 500.0 0.0 3 5 7 9 11 13 15 17 19 21 23 25 27 29 31 33 35 37 39 41 43 45 47 49 51 53 55 57 59 61 63 Slave unit last address Fig. 4.1 Remote Scan time (for full-duplex communication, slave unit last address: 2 to 63) Remote scan time (full-duplex) 1200.0 1000.0 Remote scan time (μs) 12Mbps 6Mbps 3Mbps 800.0 600.0 400.0 200.0 0.0 2 3 4 5 6 7 8 9 10 11 12 13 14 15 16 Slave unit last address Fig. 4.2 Remote Scan time (for full-duplex communication, slave unit last address: 2 to 16) IM34M6H46-04E 1st Edition : April 2008 5-1 5. Communication Preparation Flow The following flowchart shows how to prepare for communications. Start Install the YHLS master module on the base module. See Section 2.3, "Attaching/Detaching the Module." Connect slave units to the YHLS master module. See Section 2.2, "External Connection." Set up the transmission speed. See Section 7.3, "Parameter Setup Area." Set up the communications mode. See Section 7.3, "Parameter Setup Area." Set up the slave unit last address. See Section 7.3, "Parameter Setup Area." Turn on the Request to Communicate relay. See Chapter 6, "List of I/O Relays." Communicating relay turns on. LINK relay turns on. End IM34M6H46-04E 1st Edition : April 2008 Blank Page 6-1 6. List of I/O Relays The YHLS master module has 32 input and 32 output relays for interfacing with the FA-M3 sequence CPU module. Each of the input relays can be configured to raise an interrupt. 6.1 Output Relays Table 6.1 Output Relays Output Relay Number Output Relay Name Description *1 Y33 Request to Communicate relay Y34 to Y40 Reserved *2 Y41 Request to Communicate relay Y42 to Y64 Reserved *1 : For port 1 *2 : For port 2 Turn on this relay to start communication. Once communication is started, input relay X01 (Communicating relay) turns on. Turn off this relay to stop communication. Turn on this relay to start communication. Once communication is started, input relay X09 (Communicating relay) turns on. Turn off this relay to stop communication. : Slot number IM34M6H46-04E 1st Edition : April 2008 6-2 6.2 Input Relays Table 6.2 Input Relays Input Relay Number Input Relay Name X01 Communicating X02 Link X03 Alarm X04 to X08 Reserved X09 Communicating X10 Link X11 Alarm X12 to X32 Reserved *1 : For port 1 *2 : For port 2 *1 *1 *1 *2 *2 *2 Description Turns on when communication is started by Y33. Turns off when Y33 is turned off. Turns on when communication is started if one or more slave units are available for communication. Turns off when Y33 is turned off. Turns on when one or more slave units that were previously available for communication are no longer available. Turns off when Y33 is turned off or when there is no failed slave unit. Turns on when communication is started by Y41. Turns off when Y41 is turned off. Turns on when communication is started if one or more slave units are available for communication. Turns off when Y41 is turned off. Turns on when one or more slave units that were previously available for communication are no longer available. Turns off when Y41 is turned off or when there is no failed slave unit. : Slot number IM34M6H46-04E 1st Edition : April 2008 7-1 7. List of Registers Registers of the YHLS master module are grouped into the following four areas: Input data area Output data area : For storing data read from slave units : For storing data to be written to slave units Parameter setup area Parameter monitoring area : For YHLS parameter setup : For YHLS parameter monitoring Data position No. 1 Input data area 256 257 Output data area 512 513 Reserved 516 517 Parameter setup area 580 581 Parameter monitoring area 676 IM34M6H46-04E 1st Edition : April 2008 7-2 7.1 Input Data Area Data position No. For port 1 1 1 Input data area 256 Input data area for port 1 64 257 65 Output data area 512 Input data area for port 2 128 513 129 Reserved Reserved For port 2 1 Slave 1 65 Slave 1 2 Slave 2 66 Slave 2 3 Slave 3 67 Slave 3 4 Slave 4 68 Slave 4 ・ ・ ・ ・ ・ ・ ・ ・ ・ ・ ・ ・ 60 Slave 60 124 Slave 60 516 192 61 Slave 61 125 Slave 61 517 193 62 Slave 62 126 Slave 62 63 Slave 63 127 Slave 63 64 Reserved 128 Reserved Parameter setup area 580 581 Reserved 256 Parameter monitoring area 676 IM34M6H46-04E 1st Edition : April 2008 7-3 Table 7.1 Mapping between Data Position No. and Slave Addresses for Input Data of Port 1 Data position No. Slave Address Data position No. Slave Address Data position No. Slave Address Data position No. Slave Address 1 Slave 1 17 Slave 17 33 Slave 33 49 Slave 49 2 Slave 2 18 Slave 18 34 Slave 34 50 Slave 50 3 Slave 3 19 Slave 19 35 Slave 35 51 Slave 51 4 Slave 4 20 Slave 20 36 Slave 36 52 Slave 52 5 Slave 5 21 Slave 21 37 Slave 37 53 Slave 53 6 Slave 6 22 Slave 22 38 Slave 38 54 Slave 54 7 Slave 7 23 Slave 23 39 Slave 39 55 Slave 55 8 Slave 8 24 Slave 24 40 Slave 40 56 Slave 56 9 Slave 9 25 Slave 25 41 Slave 41 57 Slave 57 10 Slave 10 26 Slave 26 42 Slave 42 58 Slave 58 11 Slave 11 27 Slave 27 43 Slave 43 59 Slave 59 12 Slave 12 28 Slave 28 44 Slave 44 60 Slave 60 13 Slave 13 29 Slave 29 45 Slave 45 61 Slave 61 14 Slave 14 30 Slave 30 46 Slave 46 62 Slave 62 15 Slave 15 31 Slave 31 47 Slave 47 63 Slave 63 16 Slave 16 32 Slave 32 48 Slave 48 64 Reserved Table 7.2 Mapping between Data Position No. and Slave Addresses for Input Data of Port 2 Data position No. Slave Address Data position No. Slave Address Data position No. Slave Address Data position No. Slave Address 65 Slave 1 81 Slave 17 97 Slave 33 113 Slave 49 66 Slave 2 82 Slave 18 98 Slave 34 114 Slave 50 67 Slave 3 83 Slave 19 99 Slave 35 115 Slave 51 68 Slave 4 84 Slave 20 100 Slave 36 116 Slave 52 69 Slave 5 85 Slave 21 101 Slave 37 117 Slave 53 70 Slave 6 86 Slave 22 102 Slave 38 118 Slave 54 71 Slave 7 87 Slave 23 103 Slave 39 119 Slave 55 72 Slave 8 88 Slave 24 104 Slave 40 120 Slave 56 73 Slave 9 89 Slave 25 105 Slave 41 121 Slave 57 74 Slave 10 90 Slave 26 106 Slave 42 122 Slave 58 75 Slave 11 91 Slave 27 107 Slave 43 123 Slave 59 76 Slave 12 92 Slave 28 108 Slave 44 124 Slave 60 77 Slave 13 93 Slave 29 109 Slave 45 125 Slave 61 78 Slave 14 94 Slave 30 110 Slave 46 126 Slave 62 79 Slave 15 95 Slave 31 111 Slave 47 127 Slave 63 80 Slave 16 96 Slave 32 112 Slave 48 128 Reserved IM34M6H46-04E 1st Edition : April 2008 7-4 7.2 Output Data Area Data position No. For port 1 1 257 Input data area Output data area for port 1 For port 2 257 Slave 1 321 Slave 1 258 Slave 2 322 Slave 2 256 320 259 Slave 3 323 Slave 3 257 321 260 Slave 4 324 Slave 4 Output data area 384 385 512 513 Reserved 516 517 Reserved 448 449 Parameter setup area 580 581 Output data area for port 2 Reserved 512 ・ ・ ・ ・ ・ ・ ・ ・ ・ 316 Slave 60 380 Slave 60 317 Slave 61 381 Slave 61 318 Slave 62 382 Slave 62 319 Slave 63 383 Slave 63 320 Reserved 384 Reserved Parameter monitoring area 676 IM34M6H46-04E 1st Edition : April 2008 7-5 Table 7.3 Mapping between Data Position No. and Slave Addresses for Output Data of Port 1 Data position No. Slave Address Data position No. Slave Address Data position No. Slave Address Data position No. Slave Address 257 Slave 1 273 Slave 17 289 Slave 33 305 Slave 49 258 Slave 2 274 Slave 18 290 Slave 34 306 Slave 50 259 Slave 3 275 Slave 19 291 Slave 35 307 Slave 51 260 Slave 4 276 Slave 20 292 Slave 36 308 Slave 52 261 Slave 5 277 Slave 21 293 Slave 37 309 Slave 53 262 Slave 6 278 Slave 22 294 Slave 38 310 Slave 54 263 Slave 7 279 Slave 23 295 Slave 39 311 Slave 55 264 Slave 8 280 Slave 24 296 Slave 40 312 Slave 56 265 Slave 9 281 Slave 25 297 Slave 41 313 Slave 57 266 Slave 10 282 Slave 26 298 Slave 42 314 Slave 58 267 Slave 11 283 Slave 27 299 Slave 43 315 Slave 59 268 Slave 12 284 Slave 28 300 Slave 44 316 Slave 60 269 Slave 13 285 Slave 29 301 Slave 45 317 Slave 61 270 Slave 14 286 Slave 30 302 Slave 46 318 Slave 62 271 Slave 15 287 Slave 31 303 Slave 47 319 Slave 63 272 Slave 16 288 Slave 32 304 Slave 48 320 Reserved Table 7.4 Mapping between Data Position No. and Slave Addresses for Output Data of Port 2 Data position No. Slave Address Data position No. Slave Address Data position No. Slave Address Data position No. Slave Address 321 Slave 1 337 Slave 17 353 Slave 33 369 Slave 49 322 Slave 2 338 Slave 18 354 Slave 34 370 Slave 50 323 Slave 3 339 Slave 19 355 Slave 35 371 Slave 51 324 Slave 4 340 Slave 20 356 Slave 36 372 Slave 52 325 Slave 5 341 Slave 21 357 Slave 37 373 Slave 53 326 Slave 6 342 Slave 22 358 Slave 38 374 Slave 54 327 Slave 7 343 Slave 23 359 Slave 39 375 Slave 55 328 Slave 8 344 Slave 24 360 Slave 40 376 Slave 56 329 Slave 9 345 Slave 25 361 Slave 41 377 Slave 57 330 Slave 10 346 Slave 26 362 Slave 42 378 Slave 58 331 Slave 11 347 Slave 27 363 Slave 43 379 Slave 59 332 Slave 12 348 Slave 28 364 Slave 44 380 Slave 60 333 Slave 13 349 Slave 29 365 Slave 45 381 Slave 61 334 Slave 14 350 Slave 30 366 Slave 46 382 Slave 62 335 Slave 15 351 Slave 31 367 Slave 47 383 Slave 63 336 Slave 16 352 Slave 32 368 Slave 48 384 Reserved IM34M6H46-04E 1st Edition : April 2008 7-6 7.3 Parameter Setup Area Data position No. For port 1 1 517 Parameter setup area for port 1 Input data area 256 532 257 533 Output data area 512 548 513 549 Reserved 516 Parameter setup area for port 2 Reserved Parameter setup area 580 Last address 533 Last address 518 Transmission speed 534 Transmission speed 519 Communications mode 535 Communications mode 520 Reserved 536 Reserved 521 522 523 524 Monitored slave list 537 538 539 540 Monitored slave list 525 564 565 517 For port 2 517 541 Reserved Reserved 532 Reserved 548 580 581 Parameter monitoring area 676 Data position No. For port 1 For port 2 517 518 519 520 521 to 524 525 to 532 Description Default Between 1 and 63 Other values are treated as 63. 0 : 12 Mbps 1 : 6 Mbps 534 Transmission speed 2 : 3 Mbps Others : 12 Mbps. 0 : Full-duplex Communications 535 1 : Half-duplex mode Others : Full-duplex. 536 Reserved 537 to 0 : Not monitored Monitored slave list 540 1 : Monitored 541 to Reserved 548 533 Last address 63 0 0 1 IM34M6H46-04E 1st Edition : April 2008 7-7 7.3.1 Last Address The Last Address parameter specifies the maximum slave unit address value that can be specified for communication. Specify this parameter as the largest slave unit address value or a larger value. The specified value must be between 1 and 63. If the specified last address is beyond this range, it is assumed to be 63. CAUTION - A slave unit whose address is larger than the specified last address will not be included for communication with the master module and, therefore, its input/output data, alive list and error monitoring information is not updated. - Beware that setting the last address to a number larger than the number of slave units actually used lengthens remote scan time unnecessarily. - Last Address parameter value 1 is not allowed for full-duplex communications. When using full-duplex communications, specify the last address as 2 even if there is only one slave unit. Last Address parameter value 1 is valid, however, for halfduplex communications. Any change to the last address setting is applied when the Request to Communicate relay is turned on. Changing the setting while the Request to Communicate relay is on has no effect. - 7.3.2 Transmission Speed Specify the transmission speed of the master module to be the same as that of the slave units. There are three transmission speed options: 0: 12 Mbps 1: 6 Mbps 2: 3 Mbps The default is 0 (=12 Mbps). If a number other than 0, 1 or 2 is specified, 0 (=12 Mbps) is assumed. CAUTION - - Any change to the transmission speed setting is applied when the Request to Communicate relay is turned on. Changing the setting while the Request to Communicate relay is on has no effect. The total transmission distance for a connector depends on the transmission speed setting; the total transmission distance is 100 m at 12 Mbps, 200 m 6 Mbps, and 300 m at 3 Mbps. If the total transmission distance exceeds 100 m, specify the transmission speed as 6 Mbps or 3 Mbps. If the total transmission distance exceeds 200 m, specify the transmission speed as 3 Mbps. Communication will fail if the total transmission distance exceeds 300 m. IM34M6H46-04E 1st Edition : April 2008 7-8 7.3.3 Communications Mode Specify the communications mode of the master module to be the same as that of the slave units. There are two communications mode options: 0: Full-duplex 1: Half-duplex The default is 0 (= full-duplex). If a number other than 0 or 1 is specified, 0 (= full-duplex) is assumed. - Any change to the commiunications mode setting is applied when the Request to Communicate relay is turned on. Changing the setting while the Request to Communicate relay is on has no effect. - Remote scan time of half-duplex communications is double that of full-duplex communications. To specify the last address parameter as 1, you must specify communications mode as half-duplex. - 7.3.4 Monitored Slave List You can specify which slave units are to be monitored for communication error. To monitor error for a specific slave unit, set the bit of the Monitored Slave List corresponding to its slave address to 1. If a communication error with a monitored slave unit is detected, the ALARM relay turns on and the A (ALARM) LED located on the module front lights up. By default, all slave units are monitored for communication error. For port 1 Data position No. 521 522 523 524 15 16 32 48 15 31 47 63 14 30 46 62 13 29 45 61 12 28 44 60 11 27 43 59 10 26 42 58 9 25 41 57 8 24 40 56 7 23 39 55 6 22 38 54 5 21 37 53 4 20 36 52 3 19 35 51 2 18 34 50 0 1 17 33 49 15 31 47 63 14 30 46 62 13 29 45 61 12 28 44 60 11 27 43 59 10 26 42 58 9 25 41 57 8 24 40 56 7 23 39 55 6 22 38 54 5 21 37 53 4 20 36 52 3 19 35 51 2 18 34 50 0 1 17 33 49 For port 2 Data position No. 537 538 539 540 15 16 32 48 CAUTION - If a slave unit is not specified for communication error monitoring, the ALARM relay will not turn on and the A (ALARM) LED will not light up even if a communication error occurs with the slave unit. - Any change to the Monitored Slave List is applied when the Request to Communicate relay is turned on. Changing the setting while the Request to Communicate relay is on has no effect. IM34M6H46-04E 1st Edition : April 2008 7-9 7.4 Parameter Monitoring Area Data position No. For port 1 1 581 Input data area 256 604 257 605 Output data area 512 628 513 629 Parameter monitoring area for port 1 Parameter monitoring area for port 2 Reserved 652 653 516 517 Reserved Parameter setup area 580 Reserved 676 581 Last address 605 Last address 582 Transmission speed 606 Transmission speed 583 Communications mode 607 Communications mode 584 Reserved 608 Reserved 585 609 586 610 Alive slave list 587 611 588 612 589 613 590 614 Failed slave list 591 615 592 616 593 Parameter monitoring area 594 676 For port 2 581 595 596 597 598 599 600 Monitored slave list 618 619 620 621 622 623 624 604 606 583 607 584 585 to 588 589 to 592 593 to 596 597 to 600 601 to 604 608 609 to 612 613 to 616 617 to 620 621 to 624 625 to 628 Failed slave list (latched) Monitored slave list 625 Reserved 582 Failed slave list 617 Failed slave list (latched) 601 Data position No. For port 1 For port 2 581 605 Last address Alive slave list Reserved 628 Description Between 1 and 63 0 : 12Mbps Transmission speed 1 : 6Mbps 2 : 3Mbps Communications 0 : Full-duplex mode 1 : Half-duplex Reserved Alive slave list Failed slave list Failed slave list (latched) Monitored slave list 0 1 0 1 0 1 0 1 : Error : Normal : Normal : Error : Normal : Error : Not monitored : Monitored Reserved IM34M6H46-04E 1st Edition : April 2008 7-10 7.4.1 Last Address This parameter monitors the last address setting for the current communication cycle. 7.4.2 Transmission Speed This parameter monitors the transmission speed setting for the current communication cycle. 7.4.3 Communications Mode This parameter monitors communication cycle. 7.4.4 the communications mode setting for the current Alive Slave List This parameter monitors the statuses of connected slave units. If a slave is available for communication, its corresponding alive bit is set to 1. If a slave is unavailable for communication because it is powered off or for some other reason, its corresponding bit is reset to 0. For port 1 Data position No. 585 586 587 588 15 16 32 48 15 31 47 63 14 30 46 62 13 29 45 61 12 28 44 60 11 27 43 59 10 26 42 58 9 25 41 57 8 24 40 56 7 23 39 55 6 22 38 54 5 21 37 53 4 20 36 52 3 19 35 51 2 18 34 50 0 1 17 33 49 15 31 47 63 14 30 46 62 13 29 45 61 12 28 44 60 11 27 43 59 10 26 42 58 9 25 41 57 8 24 40 56 7 23 39 55 6 22 38 54 5 21 37 53 4 20 36 52 3 19 35 51 2 18 34 50 0 1 17 33 49 For port 2 Data position No. 609 610 611 612 15 16 32 48 IM34M6H46-04E 1st Edition : April 2008 7-11 7.4.5 Failed Slave List (non-latched) While scanning slave units within the address range defined by the Last Address parameter, if a problem is detected during communications with a slave unit specified for error monitoring, its corresponding bit in the Failed Slave List (non-latched) is set to 1. When the problem disappears (for instance, when a transient noise disappears so that the slave becomes accessible in the subsequent scan), the bit is automatically reset to 0. If the bit of any slave unit is set to 1, the A (ALARM) LED lights up and the ALARM relay turns on. For port 1 Data position No. 589 590 591 592 15 16 32 48 15 31 47 63 14 30 46 62 13 29 45 61 12 28 44 60 11 27 43 59 10 26 42 58 9 25 41 57 8 24 40 56 7 23 39 55 6 22 38 54 5 21 37 53 4 20 36 52 3 19 35 51 2 18 34 50 0 1 17 33 49 15 31 47 63 14 30 46 62 13 29 45 61 12 28 44 60 11 27 43 59 10 26 42 58 9 25 41 57 8 24 40 56 7 23 39 55 6 22 38 54 5 21 37 53 4 20 36 52 3 19 35 51 2 18 34 50 0 1 17 33 49 For port 2 Data position No. 613 614 615 616 15 16 32 48 CAUTION - The Failed Slave List (non-latched) parameter reflects the quality of communications, while the Alive Slave List parameter indicates which slave units are available for communication. IM34M6H46-04E 1st Edition : April 2008 7-12 7.4.6 Failed Slave List (latched) While scanning slave units within the address range defined by the Last Address parameter, if a problem is detected during communications with a slave unit specified for error monitoring, its corresponding bit in the Failed Slave List (latched) is set to 1. Once turned on, a bit is not reset to 0 even when the problem disappears. To reset a bit, you must overwrite the bit with 0 using a user program. For port 1 Data position No. 593 594 595 596 15 16 32 48 15 31 47 63 14 30 46 62 13 29 45 61 12 28 44 60 11 27 43 59 10 26 42 58 9 25 41 57 8 24 40 56 7 23 39 55 6 22 38 54 5 21 37 53 4 20 36 52 3 19 35 51 2 18 34 50 0 1 17 33 49 15 31 47 63 14 30 46 62 13 29 45 61 12 28 44 60 11 27 43 59 10 26 42 58 9 25 41 57 8 24 40 56 7 23 39 55 6 22 38 54 5 21 37 53 4 20 36 52 3 19 35 51 2 18 34 50 0 1 17 33 49 For port 2 Data position No. 617 618 619 620 15 16 32 48 CAUTION - 7.4.7 The Failed Slave List (latched) parameter reflects the quality of communications, while the Alive Slave List paramete indicates which slave units are available for communication. Monitored Slave List This parameter indicates which slave units are currently monitored for error. Bits corresponding to slave units that are currently monitored for error are set to 1. For port 1 Data position No. 597 598 599 600 15 16 32 48 15 31 47 63 14 30 46 62 13 29 45 61 12 28 44 60 11 27 43 59 10 26 42 58 9 25 41 57 8 24 40 56 7 23 39 55 6 22 38 54 5 21 37 53 4 20 36 52 3 19 35 51 2 18 34 50 0 1 17 33 49 15 31 47 63 14 30 46 62 13 29 45 61 12 28 44 60 11 27 43 59 10 26 42 58 9 25 41 57 8 24 40 56 7 23 39 55 6 22 38 54 5 21 37 53 4 20 36 52 3 19 35 51 2 18 34 50 0 1 17 33 49 For port 2 Data position No. 621 622 623 624 15 16 32 48 IM34M6H46-04E 1st Edition : April 2008 8-1 8. Troubleshooting 8.1 Troubleshooting Using LEDs This section describes how to check communication statuses using LED indicators of the master module and the LED indicators of the YHLS slave units. The timing charts are shown on the following page. When two or more slave units are connected No. 1 2 3 4 5 6 Master module When only one slave unit is connected Slave unit normal Slave unit in error PWR LNK ALM OCP PWR LNK ALM OCP PWR LNK ALM OCP PWR LNK ALM OCP PWR LNK ALM OCP PWR LNK ALM OCP PWR LNK ALM OCP PWR LNK ALM OCP PWR LNK ALM OCP PWR LNK ALM OCP PWR LNK ALM OCP PWR LNK ALM OCP PWR LNK ALM OCP PWR LNK ALM OCP RDY L A RDY L A PWR LNK ALM OCP PWR LNK ALM OCP RDY L A PWR LNK ALM OCP RDY L A PWR LNK ALM OCP PWR LNK ALM OCP PWR LNK ALM OCP PWR LNK ALM OCP RDY L A PWR LNK ALM OCP PWR LNK ALM OCP RDY L A RDY L A RDY L A RDY L A RDY L A RDY L A RDY L A Master module RDY L A RDY L A RDY L A RDY L A RDY L A RDY L A Slave unit in error PWR LNK ALM OCP PWR LNK ALM OCP PWR LNK ALM OCP PWR LNK ALM OCP PWR LNK ALM OCP PWR LNK ALM OCP PWR LNK ALM OCP Causes No cause of error - Normal. No need of remedy. No power to slave unit - Check the 24 V DC power supply and power cable. Communication was once successful but there is now no power to slave unit - Check the 24 V DC power supply and power cable. Power supply is normal but communication has never been successful. - Check the FS area, cables, address settings and communication settings. OCP is triggered right after power on and communication has never been successful. - Remove the cause of overcurrent. Communication was once successful but now fails. - Check cables and connectors for loose connection . Communication is sometimes successful but not reliable over a long period. - Ensure that the terminating resistor switch on the farthest slave unit on a communications line is on . - Ensure that no more than 32 slave units are connected to each connector on the master module . - Ensure that transmission speed and maximum transmission distance constraints are met. - Ensure that recommended cables are used . Communication is sometimes successful but not reliable even over a short period. - Ensure that no slave address is duplicated . - Ensure that the terminating resistor switch on the farthest slave unit on a communications line is on . - Ensure that no more than 32 slave units are connected to each connector on the master module . - Ensure that transmission speed and maximum transmission distance constraints are met. - Ensure that recommended cables are used . - Check for excessive noise, and implement noise suppression measures if necessary. Communication was once successful but the slave was later disconnected by OCP. - Remove the cause of overcurrent. 7 8 9 10 RDY L A RDY L A Remedies Communication was once - Check the RDY, RUN, ALM and ERR LEDs on the successful but the master module is CPU module. now not accessible. - Check the RDY LED on the YHLS master module . - Check the user program for its control of the Request to Communicate relay. Troubleshooting according to the statuses of LEDs on the YHLS master module and slave unit (s). - When only one slave unit is connected , only one slave unit may be in error. - When two or more slave units are connected , one or more slave units may be either normal or in error . : lit, : not lit IM34M6H46-04E 1st Edition : April 2008 8-2 z Timing chart (when two or more slave units are connected) Communicating *1 YHLS master module RDY L A Power is ON Power is ON Powered off Powered on Join Withdrawn Re-join Communicating Overcurrent Loose cable Not communicating YHLS slave unit Slave unit in error Output control PWR LNK ALM OCP Condition No. in “Trouble-shooting Using LEDs” - ON OFF ON OFF ON OFF ON OFF OFF OFF - OFF ON 2 4 1 9 1 6 1 7*2 1 8*3 1 3 1 10 OFF OFF OFF OFF OFF OFF OFF OFF OFF - OFF OFF Power is ON Powered on Join Communicating YHLS slave unit Normal slave unit Output control PWR LNK ALM OCP OFF OFF *1: X01 (port 1) or X09 (port 2) is ON. *2: LNK and ALM blink alternately. Condition No. 5 in “Troubleshooting Using LEDs” above rarely occurs and is thus omitted from this timing chart. *3: The master module’s slave error monitoring latched-type registers can be used to identify the slave unit in error. : lit, : not lit. z Timing chart (when only one slave unit is connected) Communicating *1 YHLS master module RDY L A *2 *2 Power is ON Power is ON Powered off Powered on Join Withdrawn Communicating Re-join Loose cable Overcurrent Not communicating YHLS slave unit Slave unit in error Output control PWR LNK ALM OCP Condition No. in “Trouble-shooting Using LEDs” - ON OFF ON OFF ON OFF ON OFF OFF OFF - OFF ON 2 4 1 9 1 6 1 7*3 1 8*4 1 3 1 10 *1: X01 (port 1) or X09 (port 2) is ON. *2: L and A blink alternately. *3: LNK and ALM blink alternately. Condition No. 5 in “Troubleshooting Using LEDs” above rarely occurs and is thus omitted from this timing chart. *4: The master module’s slave error monitoring latched-type registers can be used to identify slave units in error. : lit, : not lit. IM34M6H46-04E 1st Edition : April 2008 8-3 8.2 Troubleshooting Using FlowCharts 8.2.1 Main Flowchart The following is the main flowchart for troubleshooting. Branch from this main flowchart to specific flowcharts given in different subsections to locate and correct different causes of problems. IM34M6H46-04E 1st Edition : April 2008 8-4 8.2.2 RDY LED is not Lit RDY LED is not lit. Is RDY LED on other modules lit? No Check total current consumption. If it is within the specification, replace the power supply module or base module. No Push the module until it locks in place. Yes Is the module properly mounted in its slot? Yes Does RDY LED light up if installed in another slot? Yes Replace the module with another module in the original slot. Does RDY LED light up? No No Yes Contact your YOKOGAWA representative. IM34M6H46-04E 1st Edition : April 2008 8-5 8.2.3 L LED is not Lit L LED is not lit. Does Device Monitor indicate that the module is in the correct slot? No Mount the module in the correct slot. No Turn on the Request to Communicate relay. No Contact your YOKOGAWA representative. Yes Is Request to Communicate relay on? Yes Is Communicating relay on? Yes Is LINK relay on? No Is A LED lit? No Check the slave unit power supply and cable. Yes Yes See Subsection 8.2.4, “A LED is lit.” Contact your YOKOGAWA representative. IM34M6H46-04E 1st Edition : April 2008 8-6 8.2.4 A LED is Lit A LED is lit. Is L LED lit? No Note: If L LED is not lit, it means that no slave unit is available for communication. Yes Is A LED blinking? No (Lit solid) No Only the terminating resistor of the farthest slave unit must be switched on. Note: The master module contains a built-in terminating resistor. Yes Is the number of slave units connected within specification? Troubleshoot the slave unit in error according to Alive Slave List. Note: If A LED is lit, at least one slave unit, which was previously normal, has developed an error. Yes Is slave unit terminating resistor set correctly? Check cables between YHLS master module and slave units. Check slave unit power supply. No The number of slave units connected per connector must be within specification. No No slave unit address must be duplicated. No Supply power of correct voltage to slave units. Check power supply cables. No The maximum total transmission distance at specific transmission speed must be observed. No Prepare a communication cable according to Appendix: KM8 Cable Preparation. No Provide noise protection according to Section A3.4, “Noise Control Considerations,” of Hardware Manual (IM34M6C11-01E), Yes Are all slave unit addresses unique? Yes Is slave unit power supply normal? Yes Is cable length within specification? Yes Is cable normal? Yes Are noise control considerations observed? Yes Note: A slave unit may be temporarily inaccessible due to noise. Such an unstable slave unit can be identified in the Failed Slave List. Contact your YOKOGAWA representative. IM34M6H46-04E 1st Edition : April 2008 8-7 8.2.5 No Output to Slave Unit No output to a slave unit. Is LINK relay on? No Note: If the LINK relay is off, it means that no slave unit is available for communication. Yes Is corresponding bit in Alive Slave List on? Check the cable from YHLS master module. Check the power supply of the slave unit. No Check the cable from YHLS master module. Check the power supply of the slave unit. Check the communication conditions. No Check the slave unit number. Check the program code that writes data to the output data area. No Remove the cause of error on the slave unit. Yes Does slave unit no. and position no. for writing match? Yes Any error found when troubleshooting from slave side? Yes Contact your YOKOGAWA representative. 8.2.6 No Input from Slave Unit No input from a slave unit. Is LINK relay on? No Note: If the LINK relay is off, it means that no slave unit is available for communication . Yes Is corresponding bit in Alive Slave List on? Check the cable from YHLS master module. Check the power supply of the slave unit. No Check the cable from YHLS master module. Check the power supply of the slave unit. Check the communication conditions. No Check the slave unit number. Check the program code that reads data from the input data area. No Remove the cause of error on the slave unit. Yes Does slave unit no. and data position no. for reading match? Yes Is the slave unit Confirmed normal in troubleshooting? Yes Contact your YOKOGAWA representative. IM34M6H46-04E 1st Edition : April 2008 Blank Page 9-1 9. Sample Program The sample program below assumes that the YHLS master module (F3LH02-1N) is installed in slot 4 of the FA-M3 main unit and YHLS slave units are connected to port 1 of the master module as shown in the figure below. FA-M3 YHLS communications YHLS master module (F3LH0-1N) TAHWD32-3 16-input, 16-output slave unit TAHXD16-3 16-input slave unit TAHYD16-3 16-output slave unit Address 1 Address 2 Address 3 The sample program reads input data from each input slave unit into D registers, and writes output data stored in D registers to each output slave unit. The program checks the statuses of slave units by reading the Slave Alive List, the Failed Slave List (non-latched) and the Failed Slave List (latched). It clears the Failed Slave List (latched) parameter at the beginning of scanning (on rising edge of input relay X00401). IM34M6H46-04E 1st Edition : April 2008 9-2 *** Parameter setup for port 1 of YHLS master module (F3LH02-1N) Last address =3 Transmission speed =12 Mbps Communications mode = full-duplex Monitored Slave List 1-16 setting=$0007 Monitored Slave List 17-32 setting=$0 Monitored Slave List 33-48 setting=$0 Monitored Slave List 49-63 setting=$0 Write parameter data Write parameter data *** Begin scan 1-second timer Begin scan after 1 second *** Read input data address=$1 <TAHWD32-3PAM> Read from slave #1 address=$2 <TAHXD16-3PEM> Read from slave #2 *** Write output data address=$1 <TAHWD32-3PAM> Write to slave #1 address=$3 <TAHYD16-3EAM> Write to slave #3 IM34M6H46-04E 1st Edition : April 2008 9-3 *** Check Alive Slave List (check for normal slaves) Read Alive Slave List *** Check Failed Slave List (check quality of communications) Read Failed Slave List (non-latched) *** Check Failed Slave List (latched) (check quality of communications) Read Failed Slave List (latched) *** Clear Failed Slave List (latched) (at beginning of scan) Write Failed Slave List (latched) IM34M6H46-04E 1st Edition : April 2008 Blank Page Appx.-1 Appendix: KM8 Cable Preparation (1) Components and tools - YHLS communication connector For master module (example): Manufacturer: Phoenix Contact Model: FMC 1,5/5-ST-3,5-RF YHLS communication connector Master module side For slave units (example): Manufacturer: Phoenix Contact Model: TFKC 2,5/5-STF-5,08 AU Slave unit side - Insulation tube For cable insulation and drain insulation (example): Approx. 8 mm diameter for fixed cable with 22 AWG drain, or Approx. 11 mm diameter for flexible cable with 22 AWG drain - Pin terminal Insulation tube Pin terminal For fixed cable (example): Manufacturer: Phoenix Contact Model: AI 0,34 – 8 TQ AI 0,34 – 8TQ For flexible cable (example): Manufacturer: Phoenix Contact Model: AI 0,5 – 10 WH AI 0,5 – 10WH - Pin terminal crimping tool (Example) Manufacturer: Phoenix Contact Model: CRIMPFOX ZA3 Pin terminal crimping tool IM34M6H46-04E 1st Edition : April 2008 Appx.-2 - Wire stripper Wire stripper (Example 1) Manufacturer: Hozan Tool Industrial Model: P-90-A (with green handle) (Example 2) Manufacturer: Vessel Co., Inc. Model: 3000A or 3000C Note: The picture shows wire stripper model P-911 with black handle from Hozan Tool Industrial. Model P-90-A has a green handle instead. CAUTION Always use a recommended wire stripper for the KM81 flexible cable. As its wires are fine copper strands, a significant number (or even half) of these strands may be inadvertently cut off during a stripping operation if a non-recommended wire stripper is used. IM34M6H46-04E 1st Edition : April 2008 Appx.-3 (2) Preparing a connector-cable set (using a fixed cable and a YHLS communication connector to a master module) (1) Peel off about 60-mm length of outer vinyl insulation from the cable. Tin-plated soft-copper braided shield Vinyl insulation 60 (2) Remove the exposed tin-plated softcopper braided shield, aluminum-mylar tape, and plastic stuffing. Take care not to damage the exposed drain wire. mm Drain wire Aluminum-mylar tape Twist pair Tin-plated softcopper braided shield Plastic stuffing (3) Straighten the exposed twisted wires. (4) Apply an insulation tube onto the drain wire and shrink the tube with a heat gun. Approx. 8 mm Insulation tube IM34M6H46-04E 1st Edition : April 2008 Appx.-4 (5) Strip off a sufficient length of the insulation of each wire to allow good electrical contact with a pin terminal. Then put and crimp a pin terminal onto each wire using a crimping tool. Pin terminal Check that the pin terminal size is compatible with the wire size. Check that each pin terminal is securely crimped to a wire. (6) Apply an insulation tube to the cable such that it partially covers both the cable insulation and the exposed wires. Then shrink the tube with a heat gun. Insulation tube (7) Fully insert each pin terminal into the connector. Ensure that each pin terminal is securely inserted in the connector. YHLS communication connector (master module side) Pin 5 Pin 5 4 3 2 1 Signal Name (master module) Full Half duplex duplex TxD- NC TxD+ NC RxD- TRD- RxD+ TRD+ SHIELD SHIELD Wire Color (KM8) Full duplex Green Yellow Blue White Drain Half duplex Blue White Drain Pin 1 Note: The connector-cable set must become a straightconnection type. (8) A connector-cable set is completed. Note: Check the completed connectorcable set for any wrong connection, shorted circuit or open circuit using an ohmmeter or other appropriate instrument. Note: The connector-cable set preparation procedure is the same for the FMC 1,5/5-ST-3,5-RF connector (for master module) and the TFKC 2,5/5-STF5,08 AU connector (for slave units). The pictures on the right show the former case. IM34M6H46-04E 1st Edition : April 2008 Appx.-5 (3) Preparing a connector-cable set (using a flexible cable and a YHLS communication connector to a slave unit) (1) Peel off about 60-mm length of outer vinyl insulation from the cable. Tin-plated soft-copper braided shield Vinyl insulation m 60 m (2) Remove the exposed tin-plated softcopper braided shield, aluminum-mylar tape, paper insulation, and stuffing. Take care not to damage the exposed drain wire. Drain wire Tin-plated softcopper braided shield Stuffing Paper insulation Twist pair Aluminum-mylar tape (3) Straighten the exposed twisted wires. (4) Apply an insulation tube onto the drain wire and shrink the tube with a heat gun. Insulation tube IM34M6H46-04E ox. Appr m m 10 1st Edition : April 2008 Appx.-6 (5) Strip off a sufficient length of the insulation of each wire to allow good electrical contact with a pin terminal. Then put and crimp a pin terminal onto each wire using a crimping tool. Pin terminal Check that the pin terminal size is compatible with the wire size. Check that each pin terminal is securely crimped to a wire. (6) Apply an insulation tube to the cable such that it partially covers both the cable insulation and the exposed wires. Then shrink the tube with a heat gun. Insulation tube (7) Fully insert each pin terminal into the connector. Ensure that each pin terminal is securely inserted in the connector. Pin 5 4 3 2 1 Signal Name (slave unit) Full Half duplex duplex RxD- NC RxD+ NC TxD- TRD- TxD+ TRD+ SHIELD SHIELD YHLS communication connector (slave unit side) Pin 5 Wire Color (KM8) Full duplex Green Yellow Blue White Drain Half duplex Blue White Drain Pin 1 Note: The connector-cable set must become a straightconnection type. (8) A connector-cable set is completed. Note: Check the completed connectorcable set for any wrong connection, shorted circuit or open circuit using an ohmmeter or other appropriate instrument. Note: The connector-cable set preparation procedure is the same for the FMC 1,5/5-ST-3,5-RF connector (for master module) and the TFKC 2,5/5-STF5,08 AU connector (for slave units). The pictures on the right show the latter case. IM34M6H46-04E 1st Edition : April 2008 Index-1 FA-M3 YHLS Master Module IM 34M6H46-04E 1st Edition INDEX C constant communication cycle time.............. 1-2, 3-3 D daisy-chain connection .........................................1-2 data transfer time..................................................4-1 F full-duplex .......................................2-1, 2-2, 4-1, 7-8 H half-duplex ......................................2-1, 2-2, 4-3, 7-8 I I/O relays, list of ....................................................6-1 L LED indicators ......................................................2-2 12/6/3 (red) .............................................. 2-1, 2-2 A LED (yellow) ........................................ 2-2, 8-1 F/H (red) .................................................. 2-1, 2-2 L LED (green) ......................................... 2-2, 8-1 RDY LED (green) ................................... 2-2, 8-1 N maximum number of slaves per module....... 2-1, 2-3 O Output Control function................................. 1-2, 3-4 R registers, list of......................................................7-1 remote scan time ..................................................4-3 response time .......................................................4-1 S shield treatment ....................................................2-4 T transmission line quality indicators ............... 1-2, 3-4 transmission speed................................ 2-1, 2-2, 7-7 Y YHLS cable............................................ 2-4, Appx.-3 YHLS communication port............................ 2-1, 2-2 YHLS connector.............................. 2-3, 2-4, Appx.-1 IM34M6H46-04E 1st Edition : April 2008 Blank Page i Revision Information Document Name : YHLS Master Module Document No. : IM 34M6H46-04E Edition 1st Date April 2008 Revised Item New publication Written by International Sales & Marketing Gr. PLC Product Marketing Dept. IA Systems Business Div. Industrial Automation Systems Business Headquarters Yokogawa Electric Corporation Published by Yokogawa Electric Corporation 2-9-32 Nakacho, Musashino-shi, Tokyo, 180-8750, JAPAN Printed by Kohoku Publishing & Printing Inc. IM34M6H46-04E 1st Edition : April 2008 Blank Page