1
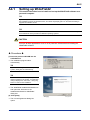
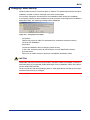
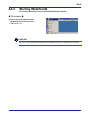
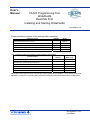
User’s Manual FA-M3 Programming Tool WideField2 Read Me First Installing and Starting WideField2 IM 34M6Q15-11E Please check the contents of the package after unpacking. Quantity Media FA-M3 Programming Tool WideField2, User's Manual (electronic document) Package Contents 1 CD-ROM FA-M3 Programming Tool WideField2 Read Me First 1 Manual FA-M3 Programming Tool WideField2 License Agreement 1 Sheet Software User Registration Card 1 Sheet CD-KEY 1 Sealed The CD ROM contains the following main electronic documents. Document Name FA-M3 Programming Tool WideField2 User's Manual Document Number Document Model Code IM34M6Q15-01E DOCIM IM34M6P13-01E DOCIM Sequence CPU – Functions (for F3SP28-3N/3S, F3SP38-6N/6S, F3SP53-4H/4S, F3SP58-6H/6S, F3SP59-7S) Sequence CPU – Functions User's Manual IM34M6P14-01E DOCIM Sequence CPU – Network Functions User's Manual IM34M6P14-02E DOCIM Sequence CPU – Instructions User's Manual IM34M6P12-03E DOCIM Personal Computer Link Commands User's Manual IM34M6P41-01E DOCIM Hardcopies of the above user's manuals are not provided with this product. They can be purchased separately, if required, by quoting their respective document numbers and document model codes. IM 34M6Q15-11E Yokogawa Electric Corporation 2nd Edition Blank Page A4-1 A4. Installing and Starting WideField2 This section describes how to install the WideField2 software, how to remove it from the PC when it is no longer required, how to start the WideField2 software, and how to exit from the WideField2 software. It also describes how to install the USB driver. CAUTION Always log in as the system administrator before installing, maintaining or removing the WideField2 software. Users without administrator access privileges are not allowed to install, maintain or remove the WideField2 software. If your PC is running Windows Vista, select [Run as Administrator] and run the installer program. Installation cannot proceed without Administrator access privileges. CAUTION If your PC is running Windows Vista with the User Account Control (UAC) function enabled, the installer program cannot be automatically executed from the product CD-ROM. In this case, select "Setup.exe" on the CD-ROM using Explorer or some other means, and run the installer using "Run as Administrator." CAUTION When installing WideField2, we recommend that you install WideField2 into a folder for which restricted users have access rights. If WideField2 is installed in a folder for which restricted users do not have access rights, they will not be able to use the WideField2 software. IM 34M6Q15-11E 2nd Edition: Jun. 15, 2007-00 A4-2 A4.1 Setting up WideField2 This section describes how to install and set up the WideField2 software on a personal computer. TIP If you already have an older version of WideField2 installed on a PC, you may upgrade its version. Run the installation program as described below, and select the [Repair] option on the Welcome dialog to upgrade the software version. TIP We describe here WideField2 setup in the Windows 2000 environment. Take note that there may be some differences in the procedure for different operating systems. CAUTION Exit from all other applications such as virus protection software before installing the WideField2 software. Procedure (1) Insert the product CD-ROM into the CD-ROM drive. ⇒ The installation program starts automatically. TIP If your PC is running Windows Vista operating system, select [Run as Administrator]. Step (1) A0402_01.VSD TIP If an older version WideField (SF610) is already installed on the system, a confirmation dialog is displayed on the screen. Click [Yes] button to continue with installation. ⇒ The WideField2 InstallShield Wizard runs and opens the “Welcome to the InstallShield Wizard for WideField2” dialog box. (2) Click [Next]. ⇒ The License Agreement dialog box opens. Step (2) A0402_02.VSD IM 34M6Q15-11E 2nd Edition: Jun. 15, 2007-00 A4-3 (3) Click [Yes]. TIP A license agreement document is provided with the product. Click [Yes] only if you have carefully read the license agreement and agree with the terms therein. Clicking [No] aborts the installation. ⇒ The Customer Information dialog box will be displayed. Step (3) A0402_03.VSD (4) Enter the CD-KEY and click [Next]. TIP The CD-KEY is given on the registration card provided with the product. ⇒ The Choose Destination Location dialog box is displayed. Step (4) A0402_04.VSD (5) Select the installation destination and click [Next]. ⇒ The Select Components dialog box is displayed. Step (5) A0402_05.VSD (6) Select the components you wish to install and click [Next]. TIP The components available for installation include program files (WideField2 software and sample program files), instruction manuals and I/O module help files. Turn on the checkboxes for the components you wish to install. ⇒ Installation begins. Step (6) A0402_06.VSD TIP Restart the computer after installation ends. IM 34M6Q15-11E 2nd Edition: Jun. 15, 2007-00 A4-4 Changing Folder Security Windows allow a user to set access rights on folders. The WideField2 software should be installed in a folder for which restricted users have access rights. You can also change the access right for an installation folder during the installation. If you specify a folder for which restricted users do not have access right as the installation destination folder, the following message will be displayed. A04_05.VSD Figure A4.1 Changing Access Rights - - - [Yes] button Adds access rights to folder for restricted users, and allows restricted users to continue with installation. [No] button Continues installation without changing folder security. In this case, restricted users will not be able to run the WideField2 software. [Cancel] button Returns to an earlier screen to specify the installation destination folder. CAUTION WideField2 frequently accesses system files in the folder where it is installed. Therefore, if restricted users are not granted update permission for the installation folder, they cannot use the WideField2 software. We do not warrant that the operating system or other applications will operate correctly if and after folder security is changed. IM 34M6Q15-11E 2nd Edition: Jun. 15, 2007-00 A4-5 A4.2 Removing WideField2 This section describes how to remove the WideField2 software TIP Removing the WideField2 software does not automatically delete project files or other application files previously created by a user. It also does not delete the USB driver software. Procedure (1) Insert the product CD-ROM into the CD-ROM drive. (2) Using Explorer or some other program, move to the root folder on the CD-ROM, and browse the files in the folder. (3) Select and run SETUP.EXE TIP If your PC is running Windows Vista operating system, select [Run as Administrator]. ⇒ The InstallShield wizard runs and displays the Welcome dialog box if WideField2 is already installed on your PC. (4) Turn on the [Remove] option button and click [Next]. ⇒ The Confirm File Deletion dialog box will be displayed. (5) Click [OK]. ⇒ File deletion begins. The Maintenance Complete dialog box will be displayed when the program has been removed. Step (4) A0402_07.VSD Step (5) A0402_08.VSD (6) Click [Finish]. Step (6) A0402_09.VSD IM 34M6Q15-11E 2nd Edition: Jun. 15, 2007-00 A4-6 A4.3 Starting WideField2 This section describes how to start the WideField2 software. Procedure (1) Select [Programs]–[WideField2]– [WideField2] from the Start menu. ⇒ WideField2 runs. Step (1) A04_04.VSD CAUTION Do not run the WideField2 software and the WideField (SF610) software concurrently. IM 34M6Q15-11E 2nd Edition: Jun. 15, 2007-00 A4-7 A4.4 Installing USB Driver This section describes how to install the USB driver software. CAUTION The USB driver software is installed when the PC detects a sequence CPU with USB support. Procedure (1) Connect the sequence CPU with USB support to the PC using a USB cable. (2) The Found New Hardware wizard is displayed. (3) Select [Install from a list or specific location (Advanced)], and click [Next]. (4) Select [Search for the best driver in these locations], turn on the [Include this location in the search] checkbox, and in the text box enter "<WideField2 installed folder>\Driver". Click [Next]. ⇒ Installation begins. Step (4) A04_05.VSD Step (5) A04_06.VSD (5) Click [Finish] to exit from installation. CAUTION Do not connect the same PC to two or more FA-M3 units using USB cables as only the first connected USB port can be used. The USB driver of the second and subsequent connected USB ports will not be correctly detected. To rectify the problem, remove and reattach the USB cable. IM 34M6Q15-11E 2nd Edition: Jun. 15, 2007-00 i Revision Information Document Name : FA-M3 Programming Tool WideField2 Read Me First Document No. : IM 34M6Q15-11E Edition Date Revised Item 1st Mar. 2002 New publication 2nd Jun. 2007 Updated for WideField2 R4 version Written by PLC International Sales & Marketing Gr. PLC Product Marketing Dept. Industrial Automation Systems Business Yokogawa Electric Corporation Published by Yokogawa Electric Corporation 2-9-32 Nakacho, Musashino-shi, Tokyo, 180-8750, JAPAN Printed by Kohoku Publishing & Printing Inc. IM 34M6Q15-11E 2nd Edition: Jun. 15, 2007-00 Blank Page