1
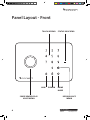
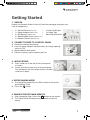
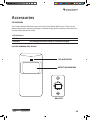
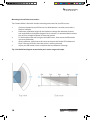
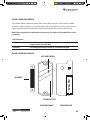
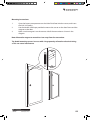
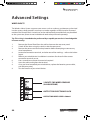
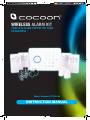
WIRELESS ALARM KIT
COMPLETE ALARM SYSTEM FOR HOME
OR BUSINESS
Model Number: IT214054
INSTRUCTION MANUAL
Warranty Details/Support
This product is warranted against defects for a period of One year if the product is faulty,
Winplus will repair or replace the product (at its discretion) at no cost to you provided the
product has been used in accordance with instructions provided. The benefits under our
Warranty are in addition to other rights and remedies under consumer law in relation
to these goods. Our goods come with guarantees that cannot be excluded under the
Australian. Consumer Law. You are entitled to a replacement or refund for a major failure and
for compensation for any other reasonably foreseeable loss or damage. You are also entitled
to have the goods repaired or replaced if the goods fail to be of acceptable quality and the
failure does not amount to a major failure.
For additional support including helpful guides and videos, visit the Cocoon support website
at www.winplus.com.au/cocoon.html
Telephone: Email: Website:
Address:
1300 663 907
[email protected]
www.winplus.com.au
Winplus Australasia Pty Ltd, PO Box 537
Bayswater Business Centre Vic 3153
General Safety Instructions
Read this manual thoroughly before first use and keep it in a safe place for future reference,
along with the warranty card, purchase receipt and packaging. The safety precautions
enclosed herein reduce the risk of fire, electric shock and injury when correctly adhered to.
Follow all instructions and take notice of all warnings to reduce the risk of fire or electric
shock.
• Do not expose this product to water, rain, moisture or dust. Electronic products of this kind
should never be subjected to moisture or extreme temperatures.
• There are no user-serviceable parts inside this product.
• Do not repair the unit yourself. If your device is not functioning correctly, disconnect the
product from power, remove the batteries, and contact after sales support.
• Supervise young children to ensure they do not play with the product.
• Do not expose to water, dust, moisture, chemicals, oils, or other liquids.
• Do not expose to naked flames or other heat sources.
• Do not drop or subject the device to undue shock.
• Keep device away from magnets at all times.
• Keep away from direct sunlight. Indoor use only.
• Unplug this device during lightning storms or when unused for long periods of time.
• Always observe basic security precautions – this device is not a substitute for basic security
measures such as locking door and window locks.
2
After Sales Support
Telephone: Internet: 1300 663 907
www.winplus.com.au
Product Specifications
Parts List:
Technical Specifications:
• 1 x Control Panel
• 4 x PIR (passive infrared) Motion Sensors
• 2 x Door / Window Sensors
• 2 x Swipe Tags
• 2 x Keychain Remote Controls
• 1 x Power Adaptor
• 2 x Rechargeable Batteries (Control Panel)
• 4 x 9V Batteries (PIR Sensors)
• 2 x 23A Batteries (Door / Window Sensors)
• 2 x CR2016 Batteries (Remote Control)
• 2 x Security Stickers
• Mounting Accessories
Control Panel
Power Supply: DC12V, 1000mA – Only use
the power adaptor provided
Backup Battery: 2x 3.7V, 850mAh Li-Ion
Internal Siren: 110dB
Remote Frequency: 433Mhz
RF operating range: Up to 80m line of sight
Operating Conditions:
- Temperature -10C ~ 55C
- Humidity: <80% (non-condensing)
Dimensions: 188mm x 132mm x 26mm
Product Features:
• PIR motion sensors to detect intruders
• Door / Window Sensors to detect when
a door or window has been opened or
closed
• Battery operated sensors for easy
installation
• 110dB alarm built into the Control Panel
with provision to add an additional wired
alarm
• Control Panel with built-in rechargeable
batteries for up to 5hrs backup power in
case of power failure
• Supports up to 50 wireless sensors, 10
remote controls and 50 Swipe Tags
• Disarm the system with a swipe of the tag
• 1 million built-in Swipe Tag combinations
for high security
• Voice memo function allows you to record
10 sec voice memos on Control Panel
After Sales Support
Telephone: Internet: 1300 663 907
www.winplus.com.au
PIR Motion Sensor Technical Specifications
Power Supply: DC 9V Battery
Static Current: <50uA
Alarm Current: <9.5mA
Detection Scope: 8m/110⁰ tested to 8m
RF operating range: Up to 80m line of sight
Remote Frequency: 433Mhz
Detector Dimensions: 105mm x 56mm x
34mm (L x W x H)
Bracket Dimensions: 52mm x 30mm x
26.5mm (L x W x H)
Door / Window Sensor Technical
Specification
Power Supply: DC 12V, 1 x 23A battery
Static Current: <30uA
Alarm Current: <40mA
RF operating range: Up to 80m line of sight
Remote Frequency: 433MHz
Transmitter Dimensions: 68mm x 28mm x
13mm (L x W x H)
Magnet Dimensions: 56mm x 10mm x 10mm
(L x W x H)
3
Panel Layout - Front
Touch Keypad
Arm
Swipe Reader/Play
Voice Memo
4
Disarm
Status Indicator
Home
Mode
Record Voice
Memo
After Sales Support
Telephone: Internet: 1300 663 907
www.winplus.com.au
Panel Layout - Back
Microphone
Tamper
Switch
Loud
Speaker
Back-up Batteries
After Sales Support
Telephone: Internet: 1300 663 907
www.winplus.com.au
5
Contents
General Safety Instructions/Warranty/Support
Product Specification
Panel Layout
Getting Started
Installing Your Alarm
Installing the Control Panel
Wall Mounting
Stand Mounting
Configuring Your Alarm
Setting Your Pin
Armed Mode / Disarmed Mode / Home Mode
Activating Swipe Tags
Disarm with Swipe Tags
Remote Control
Voice Memos
Accessories
PIR Sensors
Pairing the PIR to Control Panel
Mounting Location
Mounting & Installation Instructions
Door / Window Sensor
Pairing the Door / Window Sensor to the Control Panel
Mounting Instructions
Replacing the Battery
Advanced Settings
Wired Inputs
Changing Sensor Operating Modes
To Change the Operating Mode
Changing the PIR Motion Sensor Time Delay
Troubleshooting Guide
Repair & Refurbish Notice
6
2
3
4
7
9
9
9
10
10
10
11
12
12
13
14
15
15
16
17
18
19
20
21
21
22
22
23
24
25
26
27
After Sales Support
Telephone: Internet: 1300 663 907
www.winplus.com.au
Getting Started
1. UNPACK
Unpack the Cocoon Wireless Alarm Kit from the packaging and check you
have all components.
•
•
•
•
•
•
1 x Control Panel (Batteries Incl.)
•
1 x Power Adaptor (Batteries Incl.)
•
4 x PIR Sensors (Batteries Incl.)
2 x Door/Window Alarms (Batteries Incl.)
2 x Remote Controls (Batteries Incl.)
2 x Security Stickers
2 x Swipe Tags
Mounting accessories
2. Connect Power to Control Panel
a. Remove the bottom back panel
B. Insert the power adaptor and feed cable up through opening,
switch to ‘ON’
C. Replace bottom back panel
D. Connect to power and turn power point on
3. Mount Stand
A. Insert stand arm to the top of the control panel
B.
as shown
Attach wall mount panel to rear of control panel.
This will depress the anti-tamper button and hold
stand arm in place
4. Enter Pairing Mode
A. To enter pairing mode Enter the PIN number of the control
panel (default 1234)
B. Press the
button
5. Pairing the Keychain Remote
A. After completing step 4, press the
button on the remote
B. The Control Panel will beep twice to indicate successful
pairing
After Sales Support
Telephone: Internet: 1300 663 907
www.winplus.com.au
7
Getting Started
6. Pairing the Swipe Tags
A. Repeat step 4 then hold the Swipe Tag over the circle on the Control Panel
B. The Control Panel will beep twice indicating it has paired successfully
7. Pairing the PIR Sensor
A. Repeat step 4, move your hand over the PIR sensor
B. The Control Panel will beep twice, indicating it has successfully paired with the PIR
8. Pairing the Door Sensor
A. Insert included battery in door sensor
B. Place the magnet on the left side of the door sensor as pictured
C. Repeat step 4 to enter pairing mode
D. Move the magnet away from the door sensor
E. The Control Panel will beep twice indicating it has successfully paired with the Door Sensor
9. Arming the Alarm
A. Press the
or
B. Press the
the alarm
button on the remote control
button on the control panel to arm 10. Disabling the Alarm
A. Press the
button on the remote control
or
B. Hold the Swipe Tag over the circle to disarm the alarm
C. Enter pin on control panel, the press
Congratulations your Wireless Alarm Kit is now ready to
use. Consult the instruction manual for advanced features
and functions.
8
After Sales Support
Telephone: Internet: 1300 663 907
www.winplus.com.au
Installing Your Alarm
Installing the Control Panel
The Control Panel should be placed in an area that is convenient for you to reach as you enter
and exit your home. Before mounting the unit, you should ensure that it is placed within
range of the sensors that are paired with the Control Panel.
Wall Mounting
The Cocoon Wireless Alarm Kit Control Panel can be mounted on a wall for easy access.
1. 2. 3. 4. 5. 6. 7. Remove the Control Panel and the Wall Mounting Plate from the packaging.
Mark the position where you wish to attach the Control Panel on your wall.
Secure the Wall Mounting Plate using the included wood screws.
Before attaching to the mounting plate, open the rear cover of the Control Panel to:
a. Connect the power adapter inside the Control Panel.
b. Turn the ON/OFF switch to the ON position.
c. Insert the backup batteries (2x Li-Ion rechargeable batteries)
Position the power cable so it exits the battery compartment at the top of the Control Panel.
Replace the back cover of the Control Panel.
Attach the Control Panel to the wall mount by sliding into place.
Note: The Wall Mounting Plate will depress the anti-tamper switch. In the event the
Control Panel is removed from the wall, the siren will be triggered.
IMPORTANT: ALWAYS TEST ALL COMPONENTS ARE WORKING PRIOR TO
PERMANENTLY INSTALLING
After Sales Support
Telephone: Internet: 1300 663 907
www.winplus.com.au
9
Stand Mounting
If you do not wish to attach the Control Panel to a wall, you can use the stand mount.
1. Remove the Control Panel, Wall Mounting Plate and the stand arm from the packaging.
2. With the Wall Mounting Plate removed, slide the notched end of the stand arm into the slot at the top of the Control Panel.
3.
Attach the Wall Mounting Plate to hold the stand arm in place, ensuring that it is fully inserted.
4. Open the rear cover of the Control Panel to:
a. Connect the power adapter inside the Control Panel.
b. Turn the ON/OFF switch to the ON position.
c. Insert the backup batteries (2x Li-Ion rechargeable batteries)
5. Position the power cable so it exits the battery compartment at the top of the compartment.
6. Replace the back cover of the Control Panel.
7. Replace the Wall Mounting Plate to the back of the Control Panel.
8. Stand the Control Panel in the desired location.
Note: The Wall Mounting Plate will depress the anti-tamper switch, so it must be fully
inserted when using the Control Panel as a freestanding panel. In the event the wall
mounting bracket is removed from the rear of the product, the siren will be triggered.
Configuring Your Alarm
Setting your PIN
The default pin number for the Control Panel is 1234. We strongly recommend changing this
pin number to something more difficult to guess but easy to remember. To change the pin
number, follow these steps.
1.
2.
3.
4.
5.
10
Enter the pin number 1, 2, 3, 4
Press the Home Mode button
Enter your new pin number from 4-6 digits
Press the Home Mode button
The new pin number is now active
After Sales Support
Telephone: Internet: 1300 663 907
www.winplus.com.au
Armed Mode / Disarmed Mode / Home Mode
There are 3 modes available for the Cocoon Wireless Alarm System.
1.
Armed Mode
All sensors are actively monitoring activity in your home.
Once a sensor is triggered, the alarm will sound.
1.
2.
3.
Press the
button to enter Armed Mode.
After a short delay, all sensors will be armed.
Once armed, if the sensors are triggered the alarm will activate.
Tip: See p. 25 for details on changing the PIR motion sensor time delays.
2.
Disarmed Mode
All wireless sensors in the system will be inactive except those operating in 24 hour mode.
Wired sensors (which operate in 24hr mode) will also remain active.
A.
B.
C.
Enter your PIN (Default: 1234) and press the
button to enter Disarm Mode. You will hear 1 beep to indicate the password was correct.
If you hear 2 beeps, your password is incorrect and you will need to enter it again.
In disarm mode, you will deactivate all sensors in the system except those
operating in 24H mode.
Tip: See p.23 for information on setting operating modes for each sensor.
3.
Home Mode
Door and window sensors will be armed and wireless PIR sensors will be disarmed when using the
default settings.
A.
Press the
button to enter Home Mode. In home mode, all sensors set to Normal Mode will remain armed.
Note: By default, door and window alarms are set to Normal Mode while the PIR
motion sensors are set to Home Mode. This allows you to move about your house freely
without activating motion detection alarms, however, if the door or window alarms are
triggered the alarm will be activated.
Tip: See p. 23 for details on changing the PIR motion sensor modes.
After Sales Support
Telephone: Internet: 1300 663 907
www.winplus.com.au
11
Activating Swipe Tags
The Cocoon Wireless Alarm System comes with 2 Swipe Tags for easy disarming of the Control
Panel.
1. 2.
3.
4.
To pair the Swipe Tag to the Control Panel, enter your PIN (Default: 1234), then press the
button.
Within 15 seconds, place your Swipe Tag against the blue LED circle on the Control Panel.
The Control Panel will beep to indicate the tag is now registered to the Control Panel.
Repeat this process for other Swipe Tags you wish to add to your security system.
Swipe Tag
Swipe
Reader
Status
Indicator
Disarm with Swipe Tags
1.
2.
To disarm the security system, simply place your Swipe Tag over the circle on the front of the Control Panel.
Your control panel will be disarmed.
Note: You can only pair/disarm using the Swipe Tag when the Control Panel is connected
to mains power. When operating using the backup battery, the Swipe scanner will not
function.
12
After Sales Support
Telephone: Internet: 1300 663 907
www.winplus.com.au
Remote Control
The Cocoon Wireless Alarm System comes with 2 keychain remote controls for easy arming/
disarming of the Control Panel.
Activating Remote Controls
1.
To pair the remote control to the Control Panel, enter your PIN (Default: 1234), then press
button. 2. Within 15 seconds, press any button on the remote control.
3.
The Control Panel will beep to indicate the remote control is now registered to the Control Panel.
4.
Repeat this process for other remote controls you wish to add to your security system.
Using the Remote Control
Press the
button to enter Armed Mode.
Press the
button to enter Disarmed Mode.
Press the
to enter Home Mode.
Press the
in an emergency – this will instantly trigger the Control Panel alarm regardless of the prior setting.
KEYCHAIN REMOTE
CONTROL
LED INDICATOR
ARMED MODE
HOME MODE
DISARMED MODE
EMERGENCY
Keyring SLOT
After Sales Support
Telephone: Internet: 1300 663 907
www.winplus.com.au
13
Voice Memos
The Cocoon Wireless Alarm Kit features a voice memo function to leave a voice message for
the next person to access the panel.
1. 2.
3.
4.
5.
6.
Press
to record a voice message up to 10 seconds in length.
When you have finished recording your voice message, press
to end recording.
When there is an unplayed messaging waiting, the blue LED circle will flash to
alert you.
Press the center of the blue LED circle button to listen to the voice memo.
The LED light will turn off once the message has been played.
Press the circle button at any time, to replay the last recorded message.
RECORD A VOICE MESSAGE
PLAY A RECORDED A VOICE
MESSAGE
Tip: Only one voice message will be stored at any time. Recording a new message will
delete the existing message
14
After Sales Support
Telephone: Internet: 1300 663 907
www.winplus.com.au
Accessories
PIR Sensors
The Cocoon Wireless Alarm Kit comes with 4 x Passive Infrared (PIR) Sensors. These sensors
detect movement by measuring changes in infrared energy levels caused by movement of an
intruder within the field of vision.
LED Indicators
LED flashes once
Motion detected
Solid LED
Low voltage indication. Batteries should be changed.
PASSIVE INFRARED (PIR) SENSOR
LED Indicator
Detection window
bracket
After Sales Support
Telephone: Internet: 1300 663 907
www.winplus.com.au
15
Pairing the PIR to Control Panel
To pair the PIR motion sensor to the Control Panel:
1.
2.
3.
Enter your PIN then press the
button.
Within 15 seconds, wave your hand in front of the sensor to trigger the PIR motion sensor. (The PIR motion sensor’s LED light will flash).
The Control Panel will beep to indicate the PIR motion sensor is now registered to the Control Panel.
Tip: Sensor numbers are assigned automatically, in the order which the sensors have
been paired to the control panel.
4.
Press the
button to enter Armed Mode and test the PIR motion sensor. When the alarm sounds, the keypad will flash one number, showing which sensor has been tripped.
5.
Enter your PIN or use your Swipe Tag to enter Disarmed Mode.
6.
Repeat this process for other PIR motion sensors you wish to add to your security system.
Replacing the Battery
Each PIR motion sensor comes with a 9V battery installed. This will need to be changed when
the battery is running low, refer below for further information.
Tip: You can tell the battery is low when the light is constantly on.
1.
2.
3.
4.
5.
6.
16
Remove the PIR motion sensor from the wall bracket.
Use a Phillips head screwdriver to unscrew the fastening at the bottom of the unit.
Remove the front housing, and remove the old battery.
Insert a new 9V battery, observing the correct polarity.
Replace the front housing and tighten screw.
Reattach the PIR motion sensor to the wall bracket.
After Sales Support
Telephone: Internet: 1300 663 907
www.winplus.com.au
Mounting Location
When choosing a location to mount the PIR motion sensors, the below should be taken into
consideration:
• Mount the PIR motion sensor in a location which an intruder is likely to walk past.
• Mount the PIR motion sensor in the corner of a room to maximize the sensor coverage,
ideally at a height of 2m.
• Ensure your PIR motion sensor has clear sight of the area you want to protect. Infrared
signals can be blocked by solid objects (including glass and metals).
• Always test the sensor detection before mounting the sensor to ensure the coverage is
sufficient for your needs.
• Avoid mounting the detector close to windows, air conditioners, heaters, refrigerators,
ovens or in direct sunlight. These places can have rapid temperature changes and may
mistakenly trip the sensor.
• If two detectors are installed in the same detection area, adjust their location to avoid
interference and false alarms.
2m
ground
top
view
After Sales Support
Telephone: Internet: 1300 663 907
www.winplus.com.au
Side
view
17
Mounting & Installation Instructions:
The Cocoon Wireless Alarm Kit includes mounting accessories for your PIR sensors.
1.
2.
3.
4.
5.
Choose a location for your PIR sensor. An ideal location is one that an intruder is likely to walk past.
Determine installation height for the bracket to change the detection distance and angle. Refer to the below diagrams for assistance. It is recommended to mount the sensor at a height of about 2m from the ground.
Fix the bracket to the wall using the included screws, then secure the PIR motion sensor to the bracket.
After installation, walk close to the sensor and watch the for the LED indicator to flash. If the sensor flashes, then the sensor is working correctly.
Adjust your PIR motion sensor to achieve the best detection coverage.
Tip: Use the below diagram to maximize your sensor range and scope.
18
After Sales Support
Telephone: Internet: 1300 663 907
www.winplus.com.au
Door / Window Sensor
The Cocoon Wireless Alarm kit comes with 2 entry contact sensors. These can be installed
on doors, windows, drawers or any other object that opens/closes. The sensor will transmit a
signal to the Control Panel when the magnet mounted near the sensor is moved away.
Note: The magnet must be mounted no more than 1cm from the left side of the sensor
to operate.
LED Indicators
LED flashes once
Door/Window has been opened and the transmitter is sending
a signal to the Control Panel.
Solid LED
Low voltage indication. Batteries should be changed.
Door / Window Sensor
LED INDICATOR
MAGNET
TRANSMITTER
SENSOR FRONT
After Sales Support
Telephone: Internet: 1300 663 907
www.winplus.com.au
SENSOR BACK
19
Pairing the Door / Window Sensor to the Control Panel
1.
2.
3.
4.
5.
6.
Enter your PIN then press the
button.
Within 15 seconds, trigger the Door / Window Sensor, by separating the magnet from the sensor (the Door / Window Sensor’s LED light will flash).
The Control Panel will beep to indicate the Door / Window Sensor is now registered to the Control Panel.
Press the
button to enter Armed Mode and test the Door / Window Sensor by separating the magnet from the sensor. When the alarm sounds, the keypad will flash one number, showing which sensor has been tripped.
Enter your PIN or use your Swipe Tag to enter Disarmed Mode.
Repeat this process for other Door / Window Sensors you wish to add to your security system.
Note: The Door/Window Sensor will first be activated when the magnet is placed near
the sensor. If you arm the control panel while your door is open it will not become active
until the door is shut.
Replacing the Battery
The Door/Window Sensor comes with 1 x 23A battery pre-installed in the unit.
This will need to be changed when the battery is running low, refer to page 19 for further
information.
1.
2.
3.
4.
20
Open the battery tab on the right side of the sensor
Remove the old battery
Insert a new 23A battery, taking note of the correct polarity
Replace the battery cover
After Sales Support
Telephone: Internet: 1300 663 907
www.winplus.com.au
Mounting Instructions
1.
2.
3.
Open the battery compartment on the side of the Door/window sensor, and insert the 23A 12V battery
Use the double sided tape provided to mount the sensor on the door frame and the magnet on the door.
Make sure the magnet is on the correct side of the transmitter as shown in the diagram.
Note: Mount the magnet no more than 1cm away from the transmitter.
Tip: Avoid mounting sensors in areas with a large quantity of metal or electrical wiring
as this can cause interference.
After Sales Support
Telephone: Internet: 1300 663 907
www.winplus.com.au
21
Advanced Settings
Wired Inputs
The Wireless Alarm System supports extra sensors such as smoke or gas detectors to be wired
into the system, these operate in an always-on mode, regardless of the Armed or Disarmed
mode on the Control Panel. A wired siren and an electronically controlled lock may be added
to the system too, (these are not included and need to be purchased separately).
Tip: This wiring is intended to be performed by a capable person who is knowledgeable
in home security.
1.
2.
3.
4.
5.
6.
7.
8.
9.
Remove the Control Panel from the wall and remove the rear cover panel.
Switch off the alarm using the switch inside the cover panel.
Remove the power cord and backup batteries before attempting to connect any wired components.
Locate the connection terminals, and take note of the markings – refer to the below layout.
Refer to your wired device’s installation instructions for the to find the correct connection terminals to use.
Use a screwdriver to loosen the terminal required.
Insert the cable, and tighten the terminal.
Once you have connected your wired devices, replace the batteries, power cable, and the cover panel.
Test the function of your wired devices.
2 INPUTS FOR WIRED SENSORS
(24 HOUR ZONE)
OUTPUT FOR ELECTRONIC LOCK
OUTPUT FOR WIRED SIREN ≤ 500mA
22
After Sales Support
Telephone: Internet: 1300 663 907
www.winplus.com.au
Changing SENSOR operating modeS
Each of the PIR motion and door / window sensors can be set to one of 4 modes, by
rearranging the jumpers supplied inside the product housing.
Door / Window Sensor: Default ‘Single Delay Mode’
PIR Sensor: Default ‘Home Mode’
Mode Name
Pin
configuration
Control Panel Setting
Armed Mode
Disarmed
Mode
Home Mode
Home Mode
Armed
Disarmed
DISArmed
Normal
Mode
Armed
Disarmed
Armed
Single
Delay Mode
Armed,
with
warning
beeps
before
siren
sounds
Disarmed
Armed,
with
warning
beeps
before
siren
sounds
24 Hour
Mode
Armed
Armed
Armed
After Sales Support
Telephone: Internet: 1300 663 907
www.winplus.com.au
23
To change the operating mode:
Each PIR or Door / Window Sensor can be programmed to the operating modes on page 23.
Follow the below steps to access the operating mode settings.
1.
2.
3.
4.
5.
6.
7.
8.
Remove the screw from the bottom of the PIR Sensor or the screw on the back of the Door / Window Sensor.
Remove the front housing cover.
Remove the battery.
Locate the Mode Setting jumpers. See the diagrams below for the location on each sensor.
Using fine tipped pliers arrange the jumpers to match the modes listed on page 23.
Reconnect the battery taking note of the polarity.
Replace the front housing cover and screw.
Test the sensors are working correctly and re-pair them if necessary.
PIR Sensor
Mode Setting
WINDOW / DOOR SENSOR
23A 12V LR6
24
Mode Setting
After Sales Support
Telephone: Internet: 1300 663 907
www.winplus.com.au
Changing the PIR motion sensor time delay
Each of the PIR motion sensors can be set to one of three time delays, (5s, 30s, 2mins) by
rearranging the jumpers supplied inside the product housing. The default delay is 30 seconds.
1.
2.
3.
4.
5.
6.
7.
Remove the PIR motion sensor from the wall bracket.
Use a Phillips head screwdriver to unscrew the fastening at the bottom of the unit.
Remove the front housing, and remove the battery.
Locate the time delay setting jumpers – they are near the bottom of the PCB, close to the battery.
Use fine-tipped pliers to rearrange the jumpers to your desired configuration, as marked on the PCB.
Install the battery, observing the correct polarity.
Replace the front housing and tighten screw.
PIR SENSOR
Sensor Time Delay
How do I reset the system?
1.
2.
3.
4.
Remove the control panel from the wall mounting plate.
The alarm will sound. Enter your pin and press disarm.
Rapidly press the tamper switch (back button) 5 times within 5 seconds.
The control panel will beep twice to indicate a successful reset.
After Sales Support
Telephone: Internet: 1300 663 907
www.winplus.com.au
25
Troubleshooting Guide
There is no power.
Check the switch inside is turned to on. Check the power adaptor is
connected to mains power
The siren will not turn off.
Enter your pin code and press the disarm button. Press the disarm
button on the remote.
Swipe the Swipe Tag on the circle
How long will the siren
sound?
The siren will sound for 3 minutes. After 3 minutes the unit will
automatically arm again. If movement is again detected the siren
will sound again.
Will my pets set off the
alarms?
Yes, some pets will be large enough to be detected by the PIR
sensors. Ensure the PIRs are not in areas likely to be detected by
pets.
Can I buy more remote
controls or Swipe Tags?
Contact Winplus Technical Support for assistance with purchasing
additional accessories.
How many sensors can
I connect to the control
panel?
The control panel will connect up to 50 wireless sensors (PIR and
door / window sensors), 10 remote controls and up to 50 Swipe Tags.
How long do the batteries
last?
Door / window sensors and PIR sensors will last 6-8 months
depending on usage. The remote control batteries will last several
years on average depending on usage (depressing the button
constantly will drain the battery much quicker).
Where should I place my
door / window sensors?
Generally these sensors should be positioned in areas of concern
such as external doors, sliding doors, easily accessible windows, etc.
They can also be used on internal doors or desk drawers you wish to
protect.
Where should I place my
PIR sensors?
PIR's should be placed in areas of high traffic approximately 2m up.
These are useful for hallways, open rooms, pointed at possessions of
high value such as home theatres, computers and electronics.
I keep getting false
positives (my alarm goes
off by itself).
Pets such as cats and dogs can set off PIR sensors. Ensure these are
in area that will not detect pets.
Can I use the Swipe Tag to
arm the alarm?
No, the Swipe Tag is only used to disarm the alarm. Simply press the
button on the panel.
How do I set a longer
delay on the PIR?
See the section Changing the PIR motion sensor time delay,
on page 25.
My door alarm is triggered
before I can exit my house.
The control panel will enter armed mode after 5 seconds of being
activated. The Door/Window alarm will become active when the
magnet is in close proximity to the sensor.
If you have placed your control more than 5 seconds away from your
door try the following:
- Open the door before you activate the control panel. The sensor
will become active once you shut the door as you exit.
- Use the remote control to activate the control panel once you are
already outside the house.
- Place the control panel closer to your door so you can exit in time.
26
After Sales Support
Telephone: Internet: 1300 663 907
www.winplus.com.au
Wireless Alarm Kit
After Sales Support
Telephone: Internet: 1300 663 907
www.winplus.com.au
27