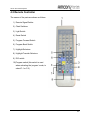
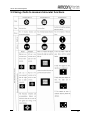
1
AMCON AUTOMATIC
CHART PROJECTOR
USER’S MANUAL
EQ-6002
1-800-255-6161• Fax 1-800-397-0013
www.amconlabs.com
Disclaimer ...................................................................................3
1. Introduction ............................................................................4
2. Safety Instructions.................................................................5
3. Operating Specifications.......................................................7
3.1 Conversion from “M” Notation to Snellen Notation......9
4. Names of the parts.................................................................10
4.1 Names of the parts on the projector body .....................10
4.2 Remote Controller ............................................................11
5. Operating Procedures ...........................................................12
5.1 Preparation .......................................................................12
5.2 Operation of the remote controller .................................13
5.3 Using the program function ............................................14
5.4 Carrying out program base examinations .....................16
5.5 Using charts to measure binocular functions ...............17
6. Maintenance and Care ...........................................................19
6.1 Daily Maintenance ............................................................19
6.2 Replacing the projection lamp (bulb) .............................20
6.3 Replacing the fuse ...........................................................23
6.4 Changing the channel setting of the remote control. ...24
7. Troubleshooting.....................................................................25
Amcon Auto Chart Projector
Disclaimer
Amcon: The Eyecare Supply Center makes no representations or warranties, either
expressed or implied, with respect to the contents hereof and specifically disclaims any
warranties, merchantability or fitness for any particular purpose. Further, Amcon: The
Eyecare Supply Center reserves the right to revise this publication and to make
changes from time to time in the contents hereof without obligation of this company to
notify any person of such revision or changes.
3
Amcon Auto Chart Projector
1. Introduction
Thank you for purchasing the Amcon Auto Chart Projector.
Please read these instructions and keep this manual in a convenient location for future
reference.
The remote controlled Amcon Auto Chart Projector is used to test eyesight employing
the principle of optical imaging. Additionally, by projecting charts on the screen and
changing the shape and size of the charts, spherical power, cylinder power and
accommodation balance can be tested. These same techniques can be used to
determine the quality of glasses.
The Amcon Auto Chart Projector provides operational convenience in a high quality
instrument.
4
Amcon Auto Chart Projector
2. Safety Instructions
To ensure safe use of this product, it is important that you follow the instructions
outlined in this manual as well as the warning notices on the instrument.
•
Please read this user’s manual before you operate your projector. Save this user’s
manual for future reference.
•
Do not look directly into the projector lens during operation. The intense light beam
may be harmful to your eyes.
•
To avoid damage, always place this device on a stable stand. This instrument is not
designed to sustain rough treatment or falls.
•
To reduce the risk of electric shock, do not disassemble this appliance. Take it to a
qualified technician when service or repair is required. Incorrect re-assembly can
cause malfunction of the projector or electric shock when the appliance is
subsequently used.
•
Never attempt to replace the lamp assembly or any electronic component unless the
instrument is unplugged from the power source.
•
Always open the lens shutter or remove the lens cap prior to turning on the projector
lamp.
5
Amcon Auto Chart Projector
•
Avoid placing this projector in the following environments.
•
Poorly ventilated or confined locations. Place at least 2 inches (50 cm) from
walls and allow free flow of air around the projector.
•
Locations where temperatures may become excessively high, over 90°F (32°C).
•
Locations with excessive humidity, dust, or cigarette smoke.
•
Do not place any objects on projector.
•
Avoid placing liquids near the projector. If the projector does become wet,
immediately disconnect it from the power source.
6
Amcon Auto Chart Projector
3. Operating Specifications
Category of the charts
a) Tumbling “E” chart 0.1, 0.16, 0.2, 0.3, 0.4, 0.5, 0.6, 0.7, 0.8, 0.9, 1.0, 1.2, 1.5
and 2.0
b) Landolt “C” chart 0.05, 0.1, 0.16, 0.2, 0.3, 0.4, 0.5, 0.6, 0.7, 0.8, 0.9, 1.0, 1.2,
1.5 and 2.0
c) Number chart 0.1, 0.2, 0.3, 0.4, 0.5, 0.6, 0.7, 0.8, 1.0, 1.2 and 1.5
d) Fixed astigmatic chart
e) R and G chart
f) Polarized chart
g) Balance chart
h) Polarized crosshair
i) Children’s chart
j) Coincidence test
k) Worth four dot test
l) Stereo test
7
Amcon Auto Chart Projector
Refraction distance
1.5m---6m
Projection distance
1.5m---6m
Projection magnifications
30X (at 5m refraction)
Number of charts
30
Chart changeover
1 frame / 0.1 sec.
Number of masks
Open 1, Horizontal line 5, Vertical line 8 Single
isolation 21, R and G 1
Mask changeover
1 frame / 0.1 sec.
Program step
Max
Projection lamp
12V 50W (Halogen lamp)
Replacement bulbs are available from Amcon
Product number: RQ-6200.
Electricity
AC 110V 60Hz
Power consumption
80W
Weight
13 lbs. 3 ounces
(6.0 Kg)
Dimensions
11 7/8” x 9” x 9 ½”
(300mm X 230mm X240mm)
8
Amcon Auto Chart Projector
3.1 Conversion from “M” Notation to Snellen Notation
"M"
Snellen
Snellen
Notation
in Feet
in Meters
2
20/100
6/30
1.6
20/80
6/24
1.4
20/70
6/21
1.2
20/60
6/18
1.0
20/50
6/15
0.8
20/40
6/12
0.6
20/30
6/9
0.5
20/25
6/7.5
0.4
20/20
6/6
0.2
20/10
6/3
0.1
20/5
6/1.5
9
Amcon Auto Chart Projector
4. Names of the parts
4.1 Names of the parts on the projector body
1) Top cover
2) Remote Sensor
3) Front panel
4) Lamp cover
5) Barrel screw
6) Projection window
7) Base
8) Power switch
9) Power socket
10
Amcon Auto Chart Projector
4.2 Remote Controller
The names of the parts are shown as follows.
1) Remote Signal Emitter
2) Chart Switches
3) Light Switch
4) Reset Switch
5) Program Forward Switch
6) Program Back Switch
7) Highlight Selectors
8) Highlight Transfer Selectors
9) R/G switch
10) Program switch (this switch is used
when activating the ‘program’ mode, to
select P-1 or P-2)
11
Amcon Auto Chart Projector
5. Operating Procedures
Caution: Do not tilt the projector or place in an unstable place. The
projector may topple over, drop or cause injury.
Warning: Connect the power plug to a properly grounded three-prong
AC outlet. If it is connected to an ungrounded outlet, fire and/or
electrical shock may result.
Caution: Handling the power plug with wet hands can cause electric
shock.
5.1 Preparation
1. Place the instrument approximately level to the person to be tested.
2. Turn the power switch ‘off’.
3. Insert the power cord into the power socket on the projector body and plug into
the wall outlet.
4. Turn the power switch ‘on’.
5. Remove the battery cover from the back of the remote controller.
6. Insert batteries into the remote controller as illustrated and replace the battery
cover.
7. Adjust the position of the projector so that the projector light is centered on the
screen. Be sure the projector is in the position from which it will be used.
8. To focus the projector, slide the focusing knob that is found on the underside of
the projector base. (The same side as the lamp cover.) There is a barrel screw
that must be loosened before the knob can be moved. The enclosed Allen
wrench can be used to loosen or tighten this screw.
12
Amcon Auto Chart Projector
5.2 Operation of the remote controller
1. Turn the projector’s power switch on. The chart will automatically reset to the
start position and the lamp will light.
2. When using the remote controller, point the remote signal emitter in the direction
of the remote sensor on the front of the projector.
3. The switch functions are as follows
a) Chart Switches
Projects the indicated chart on the switch.
b) Light Switch
Turns the lamp off and on.
c) Reset Switch
Returns to chart 1 of the program.
d) Program Forward Switch
Fowards the program automatically.
e) Program Back Switch
Reverses the program automatically.
f) Highlight Selector
Isolates chart characters. (Horizontal Line of
Characters, Vertical Line of Characters, Single
Character).
g) Highlight Transfer Selectors
Moves the isolation of the characters in the
direction indicated.
When the highlighted area of a chart being projected advances to the maximum
or minimum on that chart, the next or previous chart in the sequence will
automatically appear. Charts can be switched within the same type.
h) R&G Switch
Applies the R&G filters to the designated charts.
i) Program Switch
Refer to the Program Procedure, section 5.3, for
using this function.
Note: The projector will automatically turn off if not in use for 5 minutes.
13
Amcon Auto Chart Projector
5.3 Using the program function
1. How to program the Projector
1. Starting the Programming. Getting in the programming mode.
a) Turn on the power switch. The projector goes into initialization state.
b) Press the “RESET” button on the remote control.
c) Press the “R and G filter” button on the remote control.
d) Press the “Reset” button again on the remote control.
The projector will beep twice after pressing each button in “1b, 1c, 1d”. After the
third button, the projector will be in programming mode.
At any time up to step “d”, pressing any other button will return the projector to
normal operating state.
2. Select Program 1 or 2
Press the “P1/P2” switch to select program 1 or 2. The beeper will sound once if
program 1 is selected and twice if program 2 is selected.
3. Selecting Charts for the Program
a) Press the “program up” button to open the position for the first chart.
b) Select the desired chart button along with the desired “highlight” button.
c) Press the “program up” button again to enter the selection and move to open
the next position of the program. The beeper will sound four times. Repeat
steps 3a, 3b, 3c to enter other charts. Up to 30 selections are possible.
14
Amcon Auto Chart Projector
4. Completing the Program
a) When finished entering, press the “Reset” button to exit.
b) Press the light switch to turn off the projector.
5. Using the Program
a) To use a program, select program P1 or P2 by pressing the “P1/P2” button.
The beeper will indicate the program selected by sounding once for P1 and
twice for P2.
b) Press the “Program Up” button to run the program. The “Program Up” and
“Program Down” buttons will advance or reverse the program.
15
Amcon Auto Chart Projector
5.4 Carrying out program base examinations
16
Amcon Auto Chart Projector
5.5 Using charts to measure binocular functions
17
Amcon Auto Chart Projector
18
Amcon Auto Chart Projector
6. Maintenance and Care
6.1 Daily Maintenance
1) Cover the projector when not in use. This instrument is sensitive to dust
contamination.
2) Turn the power switch off when not in use. It is also recommended to unplug this
instrument when not in use for longer periods of time.
3) Keep projector clean by wiping the outside panels with a dry cloth. To remove
more difficult stains, a damp cloth with a mild detergent may be used. A mild
glass cleaner may be used on the outside panels. Be careful not to dampen the
inside parts of the projector.
4) When the lens is dirty, wipe it lightly with a good quality, dry micro-fiber cloth. An
Amcon “Vista Cham” is recommended.
19
Amcon Auto Chart Projector
6.2 Replacing the projection lamp (bulb)
Caution: To avoid electric shock, unplug the power cable when
replacing the projection lamp.
Caution: Do not replace the projection lamp immediately after turning
off the light. The lamp may still be hot and could lead to burns.
1) Turn the power switch off.
2) Remove the lamp cover screw and remove the cover.
20
Amcon Auto Chart Projector
3) Remove the lamp attaching screw, hold the
socket and remove the lamp.
4) Hold the socket and the lamp
flange and remove the lamp
from the socket.
21
Amcon Auto Chart Projector
5) Install the new lamp securely. Make sure you install
it in the correct direction.
Do not touch the glass of the bulb directly with your
fingers. If the bulb is touched by accident, wipe the
fingerprint off with alcohol.
Replacement bulbs are available from Amcon
Product number: RQ-6200.
6) Match the protruded part of the
lamp attaching area with the
lamp flange notch and tighten
with the lamp attaching screw
to secure the lamp.
7) Place the lamp cover on.
8) Turn the power switch on.
9) Make a trial projection to check that there is no illumination irregularity. If there is
any irregularity, turn the power off again and check that the lamp is installed
properly.
22
Amcon Auto Chart Projector
6.3 Replacing the fuse
Warning: Unplug the power cable before removing the fuse cover to
replace the fuse. Removing the fuse cover with the power cable
plugged in can cause electric shock.
Warning: Use only attaching fuses (250 v, 1 A). Using other fuses
may cause a fire in the event that the instrument fails.
1) Turn the power switch off and disconnect the power supply plug.
2) The fuse holder is located just below the power supply socket. Pull on the fuse
holder to remove it. The fuse will be removed together with the holder.
3) Remove the blown fuses and insert the new fuses on the cap of the fuse holder
and install it as before.
23
Amcon Auto Chart Projector
6.4 Changing the channel setting of the remote control.
1)
Turn the power switch off and unplug the power cable.
Remove the lamp cover screws and the screw on the lower cover (four in total)
and lift the top to remove it.
Change the DIP switch 5 and 6 according to the diagram.
Remove the battery cover from the back of the remote controller and change the
channel switch S.
Replace the top cover after completing the DIP switch setting, tighten the screws
on the lower cover and then tighten the lamp cover with attaching screw.
24
Amcon Auto Chart Projector
7. Troubleshooting
Warning: Do not break down, modify or repair the equipment. Doing so can
cause electric shock. Request a repair from your dealer.
Check the ‘situations’ covered in the following table for the problem you are
experiencing. If your situation is not covered or if the recommended action does not
solve the problem, contact your dealer for further support.
Situation
Question
Is the power supply cord plugged
in?
Action
Plug it securely in the outlet.
The projection lamp
does not light with
Is the power cord connected to
Plug it securely in the power
the power switch
the projector?
on the main body.
on.
Is the fuse blown?
Replace the fuse.
Is the lamp (bulb) blown out?
Replace the lamp (bulb).
Are the batteries dead?
Replace the batteries.
The instrument
Is there anything interrupting the
does not function
light emitter on the remote control
Remove the interrupting
when the remote
or the sensor on the projector
object.
controller switch is
body?
pressed.
Is the remote control set at the
Change the remote
proper channel setting?
operating channel.
25