1
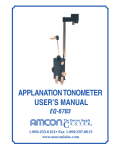
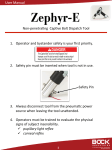
AMCON
DIGITAL PD METER
USER’S MANUAL
EQ-6000
1-800-255-6161• Fax 1-800-397-0013
www.amconlabs.com
Disclaimer ...................................................................................3
1. Introduction ............................................................................4
2. Recommendations .................................................................5
3. Specifications.........................................................................6
4. Components ...........................................................................7
5. Operation ................................................................................9
Amcon Digital Pupilometer
Disclaimer
Amcon: The Eyecare Supply Center makes no representations or warranties, either expressed or
implied, with respect to the contents hereof and specifically disclaims any warranties,
merchantability or fitness for any particular purpose. Further, Amcon: The Eyecare Supply
Center reserves the right to revise this publication and to make changes from time to time in the
contents hereof without obligation of this company to notify any person of such revision or
changes.
3
Amcon Digital Pupilometer
1. Introduction
Thank you for purchasing the Amcon Digital Pupilometer. The Amcon Digital Pupilometer is
used to measure a patient’s interocular pupil distance. The instrument is compact and
lightweight with a modern, ergonomic design and an easy to read digital display. It offers many
features such as a memory lock, simultaneous viewing of monocular and binocular readings as
well as near and far distance calculations from just one reading. This pupilometer measures
PD’s from 45-82mm.
Please read these instructions and keep this manual in a convenient location for future reference.
WARNING: Never attempt to operate this instrument before you have thoroughly read and
understand all of the instructions.
4
Amcon Digital Pupilometer
2. Recommendations
To ensure safe use of this product, it is important that you follow the instructions outlined in this
manual and marked on the product.
•
Please read this user’s manual before you operate your pupilometer. Save this user’s manual
for future reference.
•
Avoid storing or using it in areas where there is excessive heat or cold.
•
Avoid placing the machine in direct sun light.
•
Avoid using chemicals to clean the pupilometer, doing so may cause damage.
•
Do not disassemble any part of the unit except the parts that are explained in this manual.
Doing so will void all warranties.
•
Remove the batteries when the unit is not in use for a long period of time.
•
Use only quality alkaline AA batteries.
•
Wipe the nose rest and germ guard after every use.
•
Do not touch surface of window glass.
•
Fingerprint, dust, or stain should be cleaned with absorbent cotton dipped with mixed
solutions of alcohol and ether.
5
Amcon Digital Pupilometer
3. Specifications
Data Range
Binocular PD
45 – 82 mm
Monocular PD
22.5 – 41 mm
Measurement Increments
0.5 mm
Target Distance
30 cm - ∞
Power Supply
4 AA Batteries
Auto Shut Off
1 minute
Size
8½” x 6⅓” x 2⅓”
(212 mm x 158 mm x 58 mm)
Weight
1.2 lbs.
(0.55 kg)
6
Amcon Digital Pupilometer
4. Components
7
Amcon Digital Pupilometer
1) Reset Key: Press this key to turn on pupilometer.
2) Right Pupil Adjustment Key: Adjusts the right pupillary distance pointer in .5 mm
increments.
3) Left Pupil Adjustment Key: Adjusts the left pupillary distance pointer in .5 mm increments.
4) Display Window
5) Memory Key: Press once to store current reading and press again to clear.
6) TDIS (Target Distance Selection) Key: 30 cm to ∞
7) Binocular / Monocular Setting Key
8) Nose Rest
9) Eye Piece
10) Patient View Windows
(Not shown)
Battery Compartment: One on either side of unit (each holds 2 AA batteries).
Germ Guard: On bottom of unit, release to provide separation between practitioner and patient.
8
Amcon Digital Pupilometer
5. Operation
Before using the pupilometer, review the instrument components on the previous page. Make
sure that batteries are installed and are in operating order.
1. Turn the pupilometer on by pressing the RESET button.
2. Select a target distance by pressing the TDIS button. Options are 30, 35, 40, 50, 65, 1m, 2m
and ∞. The setting is viewed on the lower portion of the digital display.
3. Select the binocular or monocular setting using the BIN button. Options include left (L),
right (R) and binocular (BIN). The setting is viewed on the lower right hand corner of the
digital display.
4. Instruct the patient to hold the pupilometer up to their eyes the same way they would
binoculars. Make sure their nose is on the nose rest. If desired, release germ guard located
on the bottom of the pupilometer.
5. Instruct the patient to stare at the Red or Green Bull’s-eye through the view windows.
6. Look through the eyepiece. Using the left and right eye control buttons, slide the vertical PD
lines over the patient’s retinal reflections. (The pinpoint of light located inside the pupil.)
7. Press the memory button to store the readings.
8. Transfer the readings onto the patient’s records.
9. Select other PD measurements desired by pressing the TDIS button. The pupilometer will
automatically calculate the patient’s PDs at all other distances.
9