1
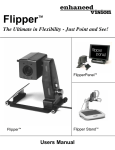
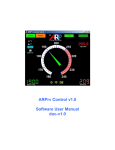
DISCLAIMER ..........................................................................1
SAFETY INSTRUCTIONS
INTRODUCTION .....................................................................1
To ensure safe use of this product, it is important that you
follow the instructions outlined in this manual.
SAFETY INSTRUCTIONS.......................................................2
Please read this user manual before you operate your frame
warmer. Save this user manual for future reference.
When the machine is in use, make sure the airflow is not
obstructed so not to damage the heating elements.
Do not operate or store the frame warmer in a damp area.
OPERATING INSTRUCTIONS................................................2
COMPONENTS .......................................................................3
DISCLAIMER
Amcon: The Eyecare Supply Center makes no representations
or warranties, either expressed or implied, with respect to the
contents hereof and specifically disclaims any warranties,
merchantability or fitness for any particular purpose. Further,
Amcon: The Eyecare Supply Center reserves the right to revise
this publication and to make changes from time to time in the
contents hereof without obligation of this company to notify any
person of such revision or changes.
OPERATING INSTRUCTIONS
1. Plug unit into 3 prong outlet.
2. Press ON/OFF switch to start cold air flow.
3. Press Temp. 1 switch for warm air flow.
4. Press Temp. 2 switch for hot air flow.
INTRODUCTION
Thank you for purchasing the Amcon Frame Warmer. The
Amcon Frame Warmer is ideal for any retail shop or wholesale
lab. If offers quick heating with dual temperature switches and
provides cold, warm, or hot air. Please read this instruction
book before use and keep this manual in a convenient location
for future reference.
-1-
5. Attach frame stand for use when heating frame bridges,
frame fronts, and temples.
6. Attach diffuser cap if you prefer heating smaller areas of
frames. Be sure to align the hole in the cap with the air
outlet.
-2-
COMPONENTS
exhaust mechanism
heater mechanism
main machine mechanism
air outlet
air inlet
ON/OFF switch
Temp 1 switch
-3-
Temp 2 switch