1
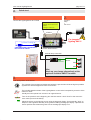
User manual
LightingSensor
LightingFX Tools
for professional filmmakers
www.movie-inter.com
copyright © movie-intercom® 2011
edition 2011-0916V1.7e
This user manual is valid for the LightingSensor from version
V2.5-2011
(the version number can be found on the back side of the unit)
The newest version of this user manual is available under
http://www.movie-inter.com/en/support/downloads/index.html
movie-intercom® und LFXHub®
are registered trademarks
of Olaf Michalke, movie-intercom
LightingFX Tools.
use or dispersal of the mentioned trademarks
is strictly vorbidden.
This user manual is also available in german language
http://www.movie-inter.com/de/support/downloads/index.html
᪾
user manual LightingSensor
page 3 of 17
chapter table of content
page
1.
Safety first please read me first
4
2.
Quick start
5
3.
Function overview
6
4.
Controls & indicators
7
5.
Synchronisation set-up
8
6.
Hints & knowledge
9
7.
Mechanical fixing
10
8.
Connection to the LFXHub / settings at the LFXHub
11
9.
Battery
13
10.
Trouble shooting / maintenance
14
11.
Specifications
15
12.
Address / support
16
13.
Index
17
symbols in this handbook
Safe time and read this manual!
Create much more effeciently and faster lighting effects with the LightingSensor.
CAUTION! please read this!
basic knowledge
application example
Please read the safety regulations first!
included in delivery
-
LightingSensor
user manual
Serial number
Each LightingSensor of movie-intercom has a serial number.
The version number can be found on the back side of the unit.
11-0916V1.7e
http://www.movie-inter.com
user manual LightingSensor
1.
Safety first
page 4 of 17
please read me first
Please read this user manual before the first operation !
The LightingSensor ...
...is a precise optical measurement unit and sholud be handled with care.
...controls an optional available LFXHub®.
...may contain a 9 volts battery. Please consider to remove the battery
from the unit if it is stored for any longer period.
If used with an LFXHub a battery is not required.
Leaking acid from the battery may destroy the LightingSensor!
...must not be operated in extremely warm and wet environments!
...will be operated with low voltage, is short circuit proof and does not
need any fuse.
츊
...must be safely mounted with a 3/8" pin. Be sure the unit may not fall
down by the influence of vibrations or movements of the place where the
unit is attchached to.
Especiallly protect the optical bearing tube against dirt and water otherwise this may result in malfunction of the LightingSensor.
ῖ
Prior testing or shooting please inform all present persons there will be a
lighting effect. If applicable people with deseases like epelipsys should
leave the area where the lighting effect is visible.
Please make sure prior testing an shooting all present people are informed about an upcoming lighting effect.
11-0916V1.7e
http://www.movie-inter.com
user manual LightingSensor
2.
page 5 of 17
Quick start
2.
1.
connect the LightingSensor to LFXHub
LFXSensor activates
LFXHub with function:
dimmer
»change function
connect
lamp
+
turn it on!
LFXHub
For tungsten
lighting ONLY!
to socket "analog IN"
extendable with a maximum of
two universal cables
to socket "DMX IN/OUT"
optional lamp connection
DMX-TX module
DMX-line
DMX
dimmer
CH1
CH2
CH3
Hint
Hook up your lamps alternatively at the
optional available DMX-TX module.
3.
find ideal position of the sensor:
The contrast of the background brightness behind the practical should be as high as possible
opposite the ambient brightness of the environment.
OK
11-0916V1.7e
The invisible detection beam of the LightingSensor must not be interrupted by an action of the
actress or actor.
Usually the beam points from a lower to an upper direction.
Turn on the practical. At the beginning turn the blue sensor´s knob "level" to the most minimum value (turn anti-clockwise).
Adjust the sensor to the lighting source using the bargraph display. Use eventually "level" to
adapt it to the brightness intensity of the practical reading the bargraph display. Optimize the
sensor position that at least the green LED of the bargraph display is on.
http://www.movie-inter.com
user manual LightingSensor
3.
page 6 of 17
Function overview
The focused and invisible beam of the LightingSensor detects the brightness intensity of
a lighting source e.g. a ceiling lamp, a car head light or a candle.
The Sensor converts the detected brightness level to an electrical on or off signal and
so (de-) activates film lighting connected to an LFXHub.
Because of the optical detection there is no need to modify the wiring of practicals.
Advantage for the talents and lighting technicans
The talent simply uses the original switch e.g. of a practical.
The optical eye of the Lightinsensor reads the lighting source level, converts this signal
to an electrical value and sends it through the control cable to the LFXHub.
All lamps connected at the LFXHub will activate the selected effect (mostly the activated
effect is simply the "dimmer") with an active signal from the Lightingsensor.
Any lighting effect producible with the LFXHub can be (de-)activated.
Thus the film lighting is automatically synchronized with the lighting source, mostly a
practical.
Nobody has to care about the right moment of synchronization of film lighting with the
lighting effect of the practical; the talent can keep its concentration on acting.
With the LightingSensor you can...
...automatically synchronize a lighting effect of a practical with film lighting.
This method means that scenes with alternating lighting situations can be
accomplished in a single shot.
...automatically turn on or off any lighting effect generated by the LFXHub.
application examples:
An actor turns on a ceiling lamp using a switch on the wall.
The LightingSensor recognizes that the lamp has been switched on and activates
the film lighting connected at an LFXHub.
A romantic candle light dinner situation; the lighting effect of the candle is generated by an LFXHub. The real candle is blown out by the talent.
The LightingSensor detects the blown off candle and deactivates the flicker effect
of the LFXHub.
The LightingSensor is powered by the LFXHub via "analog IN", no battery in the Lightingsensor is necessary.
HINT:
Find out the ideal position of the LightingSensor without a connection to an LFXHub.
Insert a 9-Volts block battery into the Sensors´ battery compartment behind the lid.
Then you can walk around with the Sensor and find a good place for fixing.
9V
Please keep in mind to remove the battery of the LightingSensor before storage.
Leakage of the battery can destroy the LightingSensor!
11-0916V1.7e
http://www.movie-inter.com
user manual LightingSensor
4.
page 7 of 17
Controls & indicators
white indicator
"output active"
output control cable
to LFXHub
bearing tube
to lighting source
battery department
and
power-on switch*
10 step bargraph display for
precise orientation
gain control (level of sensitivy)
to the lighting source
to adapt the sensor to different brightness
levels, distance to object
ON
power switch*
battery department
for 9V block battery*
* a battery is only required when used stand-alone - find out the ideal position on location.
The LightingSensor is powered by an LFXHub when connected at the analog input.
11-0916V1.7e
http://www.movie-inter.com
user manual LightingSensor
Synchronisation set-up
topper
keep background of the LightingSensor dark
original
ceiling lamp
얙
5.
page 8 of 17
8 degrees
measurement angle
original switch
LFXHub
analog IN
finding the ideal position and adjustment setting of the sensor
1. link the LightingSensor with an LFXHub (via "analog IN"), connect a lamp at the LFXHub
2. turn on the practical or the lighting source
3. turn the blue level control knob to the counter clockwise mechanical stop (minus).
4. align the sensor to the practical using the bargraph display handheld, check if it roughly works. If yes >
5. fix the sensor with a magic arm or a grip head using a 3/8" pin screwed in at the back side of the sensor
6. make a bearing to the lighting source using the bargraph display, move the sensor until the maximum
level is shown, fix the sensor
7. when the white LED indicates an active output of the sensor >
the connected film lighting at the LFXHub will come on (selected effect is "dimmer")
8. if the white LED is not on, slowly increase the gain level turning the blue knob clockwise until the output
of the Sensor is active, evtuallly repeat the bearing to the practical.
If there is a TURN ON delay: increase gain level and readjust Sensor to lighting source
If there is a TURN OFF delay: : decrease gain level and readjust Sensor to lighting source
11-0916V1.7e
http://www.movie-inter.com
user manual LightingSensor
6.
page 9 of 17
Hints & Knowledge
The bargraph display consists of ten dots (LEDs). Depending on the detected brightness
intensity the according LED of the bargrapgh display will come on.
Hints & knowledge
1.
The green LED (#7) indicates the optimal turn on level of the sensor. Connected
film lighting stays on if the brightness level is exceeded indicated by an LED to the
right of the "smiling face" symbol.
2.
The turn-off level is lower than the turn-on level - the hystereses. This function prevents an undesired flicker effect when the detected brightness level alternates
around the turn on level. The hysteres prevents undesired flicker effects.
Please consider the hystereses when setting up the LightingSensor.
3.
Movement of the sensor to the lighting source results in movement of a lighting dot
of the bargraph display.
Use this feature to center the invisible detection beam to the lighting source.
4. The blue level knob changes the gain. Use it according to the distance and/or
intensity of virtually any lighting source.
5.
If helpful use the bounced light of a lighting source for the synchronization.
6.
If the lighting source is too bright try to turn the sensor out of the center of the
maximum brightness source.
7.
If there is a turn-off delay decrease the level.
8.
If there is a turn-on delay increase the level.
bar graph display
LED #
1
2
3
4
5
gain level
6
7
8
9
10
output state of the
sensor
intensity of lighing source
green LED
HINT:
aktive
hystereses
Detect the bounced light of a
practical when used in tight
environment.
OFF
turn on level
turn off level
11-0916V1.7e
http://www.movie-inter.com
user manual LightingSensor
7.
page 10 of 17
Mechanical fixing
For reliable function please attach the
LightingSensor to a place without any movement.
Use a 3/8 inch pin to fit the sensor with a
grip head or variable friction arm .
3/8" thread
Please consider:
Avoid mounting the LightingSensor on a stand. Vibrations caused by the movement of an
actress (e.g. steps on the floor) may change the precise bearing of the sensor. This phenomenon might result in a turn- or turn-off delay.
11-0916V1.7e
http://www.movie-inter.com
user manual LightingSensor
8.
page 11 of 17
Connection to the LFXHub / settings at the LFXHub
For the operation of the LighingSensors with LFXHub plug in the connector of the
Sensor to the "analog IN" of the LFXHub.
The settings at the LFXHub are discribed on the next page.
connection of LFX Tools to "analog IN"
extendable with a maximum of
two universal cables
socket
"analog IN"
or
A lighting effect can additionally be accomplished by one ore more connected DMX dimmer packs (with optional DMX module). The result of the lighting effect is the same as provided at the anlog outputs.
LightingSensor
setting up the LFXHub
turn "EFFECT" to position
"analog IN"
If there is no LFX tool connected
"analog IN",
the orange LED is flashing
Each movie-intercom LFX tool connected at "analog IN" is
automatically recognized by the LFXHub. Depending on the
connected module suitable functions are initialised in the
LFXHub.
Please connect LFX
tool to "analog IN"
on your left hand
side!
Please plug the LightingSensor´s plug into socket "analog IN" of the LFXHub.
11-0916V1.7e
http://www.movie-inter.com
user manual LightingSensor
8.
page 12 of 17
Connection to the LFXHub / settings at the LFXHub (contd.)
The LFXHub can (de-)activate any lighting effect producible with the LFXHub.
With an active control signal of a sensor (the white LED "active" is turned on at the
sensor) the LFXHub activates any function selectable within the menu of "Analog
IN".
With an inactive control signal of a sensor (the white LED "active" is off at the
sensor) all lamps connected at the LFXHub are switched off.
LFXHub
function
The function "DIMMER" simply turns
on/off the internal (and all external)
dimmer packs.
For a dimmed switched circuit without
turn on/off delay use the internal dimmer of the LFXHub.
The rotary switch "EFFECT" is
in position "analog IN".
If a LightingSensor is connected
at "analog IN" the menu looks
like this:
LFXSensor activates
LFXHub with function:
flicker TV
»change function
»change function:
flicker •TV
fire
dimmer
»help
puls /\/\
r
Please choose the desired function to activate with an "active" signal of the sensor.
The sensor always activates the recently used settings of the selected LFXHub
function. Within a function there is a selected preset. This preset will be used.
Examples in practice
An actor turns on a ceiling lamp using the original switch on the wall.
The Lightingsensor recognizes that the lamp has been switched on and activates
film lighting connected at the LFXHub.
application
example 1
The LightingSensor acitvates the function "dimmer" of the LFXHub when the actor turns
on the lamp.
Connected film lighting can be dimmed with "DIMMER max".
An actor blows out a real candle. The Lightingsensor detects the extingished flame
and thus deactivates the flicker effect (preset candlegenerated by the LFXHub.
application
example 2
Thats the way it works:
align the LightingSensor to a real candle and adjust the gain.
turn "EFFECT" to position "Flicker" > "Fire"
choose desired candle effect, preset or any other setting
turn back "EFFECT" to "analog IN"
choose desired function (in this example here "Flicker" > "Fire" with preset "candle")
blow off candle > candle flicker effect generated by the LFXHub is synchronized
Alternatively the setting of "speed", "sym", "DIMMER max.", "DIMMER min" and "ramp"
can also be changed as long as the sensor sends an active signal.
Duplicate an effect of a real stroboscope.
detect with the lightingsensor a real stroboscope
choose function "dimmer" at the LFXHub within menu "Analog IN"
11-0916V1.7e
application
example 3
http://www.movie-inter.com
user manual LightingSensor
9.
page 13 of 17
Battery
If the LightingSensor is used with a PowerSwitch a 9 volts battery have to be set in the
LightingSensor´s battery compartment.
9V
If used with an LFXHub there is no need to use a battery.
The LightingSensor is powered by the LFXHub.
Do not use rechargable batteries, because the nominal voltage is not sufficient.
To change the battery open the lid as shown below.
Do NOT USE a screwdriver
How to open the lid without a tool
push in direction upwards
then turn lid to open.
ON
power switch*
battery department
for 9V block battery*
* a battery is only required when used stand-alone - find out the ideal position on location.
The LightingSensor is powered by an LFXHub when connected at the analog input.
11-0916V1.7e
http://www.movie-inter.com
user manual LightingSensor
10.
page 14 of 17
Trouble shooting / maintenance
Possible problems using the LFXHub might be solved here.
Basic conditions for operation
1. The operation voltage of an LFXHub is 220 - 240 VAC /50 Hz (or 115 VAC / 60 Hz for the US version).
The LFXHub is powered.
2. connected lamps are operative and switched on
symptom
a connected lamp does
not light
possible source
power plug of LFXHub or PowerSwitch is connected to a mains socket without power
solution
use other mains socket
The switch of the connected lamp is off
turn it on
the connected lamp is inoperative
swap lamp
the value of "dimmer max." at the LFXHubis too
low
the rotary switch "EFFECT" at the LFXHub is
not on position "analog IN"
increase value of "dimmer
max."
turn "EFFECT" to position
"analog IN"
connected lamps turn on bearing on lighting source is incorrect, gain level repeat bearing on lighting
delayed
is too low
source that green LED at Sensor is on, eventually increase
gain level
connected lamps turn off bearing on lighting source is incorrect, gain level repeat bearing on lighting
delayed
is too high
source that green LED at Sensor is on, eventually decrease
gain level
If you have a problem which can not be solved by this manual, please disconnect the LFXHub from the
mains and contact movie-intercom.
cleaning the unit
ONLY clean the unit when disconnected completely from any unit and the battery is removed!
Use a clean slightly wet cloth. After that basic cleaning use a coth dipped in spirit for the housing to clean.
disposal
In order to avoid any possible effects resulting from the disposal of electrical an elecronic
equipment containing substances damaging the environment and human health, the European
Parliament and Council directives
2002/96/EC on waste electrical and electronic equipment (WEEE) and
2002/95/EC on the restriction of the use of certain hazardous substances in electrical and electronic equipment (RoHS) have been transferred into national law in all EU member states.
The product you have purchased was developed in line with the current state of the art in an environmentally friendly manner and with the view of recycling.
The product is labelled with the symbol illustrated above. If you wish to dispose this product, this symbol
obliges you to do so separately from industrial sorted waste.
Waste equipment should be shipped to movie-intercom. We will dispose the waste for you.
Electrical equipment does not belong in regular waste.
11-0916V1.7e
http://www.movie-inter.com
user manual LightingSensor
11.
page 15 of 17
Specifications
LightingSensor
general
operation voltage
output signal
operation temperature
dimensions (l x w x h without cable)
weight
10 volts DC*
5 VDC
0°C ...70°C (32°F ...158°F)
150 x 108 x 42 mm (5.6" x 4.3" x 1.7")
410 g (0.9 lbs)
detection circuit
max. range
measurement angle
level indicator
fixing
gain range
12 m (39´)
8 degrees
10-step bargraph display
3/8" thread
20 dB
* battery is not required for use with the LFXHub.
11-0916V1.7e
http://www.movie-inter.com
user manual LightingSensor
12.
page 16 of 17
Address / Support
If there are any questions concerning the LightingSensor we are looking forward to answer your inquiry!
postal address
movie-intercom
Urbanstr. 171B
10961 Berlin
Germany
phone 24h / 7 days
+49 (0)30 22 32 05 75
fax
+49 (0)30 22 32 05 71
e-mail
[email protected]
@
web
http://www.movie-inter.com
11-0916V1.7e
http://www.movie-inter.com
user manual LightingSensor
13.
A
N
A
B
C
D
E
F
G
H
I
J
K
L
M
N
O
P
Q
R
S
T
U
V
W
X
Y
Z
page 17 of 17
Index
B
O
C
P
D
Q
E
R
F
S
G
T
H
U
I
V
J
W
K
X
L
Y
M
Z
adapt intensity to lighting source 8, 9
address of movie-intercom 16
adjustment of sensor 8, 9
analog IN (LFXHub) 11, 12
background contrast 5, 8
bargraph display 9
battery 13
battery compartment 13
bearing to a lighting source 8
bearing tube 7
blow off candle effect 12
candle with blow off effect 12
connection to LFXHub 11
control fire effect 12
controls 7
disposal 15
DMX dimmer packs 5
examples of application 12
gain level 7,9
help 14, 15
hysteres 9
included in delivery 3
knowledge 9
mechanical fixing 10
operation voltage 15
output signal 15
position of sensor 8
quick start 5
rain 4
serial number 3
safety 5
support 17
synchronisation of lighting circuits 6
specifications 15
symbols in this handbook 3
turn off delay 8, 9
tungsten lighting 2, 6
turn on delay 8, 9
trouble shooting 14
universal cable 5, 11
11-0916V1.7e
http://www.movie-inter.com