1
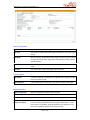
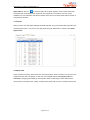
TempCentre Lite Help (20120530 Rev. A)
Contents
Contents........................................................................................................................ 1
Welcome to TempCentre Lite ........................................................................................... 2
Overview ............................................................................................................................. 2
TempCentre Lite Software Introduction.................................................................... 3
Minimum System Requirements ...................................................................................... 3
Menu Bar ............................................................................................................................ 3
Tool Bar ............................................................................................................................... 3
Installation .................................................................................................................... 4
Installing TempCentre Lite................................................................................................ 4
Uninstalling TempCentre Lite ........................................................................................... 4
Working With Data Loggers ....................................................................................... 4
How to connect data logger.............................................................................................. 5
Configuring Data Logger................................................................................................... 6
Viewing Data Record......................................................................................................... 7
Saving Data into Data Base ........................................................................................... 11
Exporting Data Records ............................................................................................ 11
Data Base .................................................................................................................... 12
Warranty ...................................................................................................................... 14
Page 1 of 14
Distributor: Loggershop Technologies, Dorset | Tel: +44 (0)845 520 0202
Fax: +44 (0) 845 520 0203 | Email: [email protected] | www.loggershop.co.uk
TempCentre Lite Help (20120530 Rev. A)
Welcome to TempCentre Lite
Overview
TempCentre Lite data management software is comprehensive desktop software designed for reading,
configuring data loggers from TempSen Electronic Company and storing, viewing, analyzing data
collected by data loggers. TempCentre software is characterized for user-friendly interface and process
oriented function modules, which enable a quick access of data records via various views, and provide
user with detailed and accurate information on temperature conditions of your goods throughout the
supply chain. Furthermore, database-based storage and retrieval system would offer a time saving
approach of pinpointing the data you need among vast data.
TempCentre Lite contains following feature functions,
Viewing Manager
•
Summary View provides user with summarized information of a trip monitored by TempSen
data loggers.
•
Graph View allows user to view data in a 2D graph which is plotted according to temperature
value and date/time.
•
List View lists every data point recorded with temperature- time value.
•
Report combines summary, graph and list view into several pages, which is equivalent in form
to report to be exported into PDF and to be printed.
Data Base
•
•
Every data record will be save to a local installed database.
Multi-Record mode allows user to view multiple records in one view window for easy
comparison.
Exporting to file
•
Export to TPS TPS(.tps) is a self defined format developed by TempSen for working with
TempCentre software.
•
Export to PDF Data report or audit trail will be saved as a portable document file (.pdf).
•
Export to Excel Data report will be saved as spreadsheet format (.xls).
20120530 Rev. A
Page 2 of 14
TempCentre Lite Help (20120530 Rev. A)
TempCentre Lite Software Introduction
Minimum System Requirements
Before installing TempCentre software, please confirm that your system meets the necessary hardware
and software system requirements shown below.
•
Pentium III 650 MHz with 512 MB of RAM
•
A hard drive with 250 MB available disk space
•
Windows XP SP2 or above
•
A mouse or other pointing device
•
A VGA monitor with display resolution of 1024 x 768px or better
•
Administrator account of the computer
Menu Bar
Menu bar offers the following functions of TempCentre Pro software.
•
File Use to Open, Save, Export, Print, Email and Exit TempCentre Pro software.
•
Options Provides options for user to configurate global graph display and date/time format.
•
Help Use to look up Help file, Check for Updates and learn about TempCentre Pro software.
•
Log In/Out Use to log in or out software.
Tool Bar
Tool bar contains the two main command areas of TempCentre Pro, the left section is main function area,
and right section is tool area.
Function Area
Description
Device Manager This section is where user works with devices, for example
downloading data inside data logger to computer, and configurating devices.
Date Base This section is where data records are stored for future reviewing,
analysis.
Tool Area
Description
Update Use to upgrade TempCentre Pro to newest version, which may help fix
bugs and add new function, software upgrade requires connection to internet.
Page 3 of 14
TempCentre Lite Help (20120530 Rev. A)
Export Helps user to export data file saved in local data base to various
document formats, TempCentre Pro supports 3 different file formats, TPS, PDF
and Excel, when you click this icon, a list appears and gives you options to
choose to which type of format you are going to export to.
Print Use to print data reports, audit trails, content to be printed depends on
window you are currently in.
Email Use to send current file through Email, it will open your default email
program.
Installation
Installing TempCentre Lite
We suggest you close all running applications before installing TempCentre Lite.
1.
Log on computer as Administrator
2.
Click TempCentre_Lite_1.0_Setup.exe to start installer.
3.
If prompted to install .NET Framework 4.0, click Yes. This may take 2 to 5 minutes for download
and installation to complete.
4.
Default directory for installing TempCentre is C:\Program Files\TempSen\TempCentre, or you
could click Change to browse to the directory in which you want TempCentre Lite to be installed.
5.
When you receive a message that installation completes, click Finish.
6.
Click the icon of TempCentre Lite in desktop to run program.
Uninstalling TempCentre Lite
1.
Select Start, go to Control Panel; then Add or Remove Programs, select TempCentre in list,
Change/Remove
2.
A message notifying uninstallation of TempCentre software will not remove data base created,
click Confirm to continue
3.
Your TempCentre software has been successfully uninstalled, except the data base containing
data and user information, to delete this data base, navigate to your installation directory and
delete the tempsen.db file.
Important: Data base contains all data generated by data loggers and crucial user information, please
handle it with care
Working With Data Loggers
Page 4 of 14
TempCentre Lite Help (20120530 Rev. A)
How to connect data logger
Data loggers made and sold by TempSen are all equipped with USB connecters, please follow steps
below to connect data logger to computer.
1. Connect the USB connector of data logger to USB interface in computer, and you need to tear open
the wrapping to expose the USB plug when using ITAG series temperature labels.
2. Open TempCentre Pro software, navigate to Device Manager in tool bar, and select the product
already connected to computer in Device List.
3. Click the Connect button, if you are not sure what data logger you are currently using, click the Auto
button without selecting any product in list, software will automatically search and find the data logger
connected and establish connection.
4. When connected successfully, brief information of data logger currently connected such as Product
Name, Model Number, Serial Number will display in Status Window, at lower left corner of software.
Page 5 of 14
TempCentre Lite Help (20120530 Rev. A)
If you want to disconnect data logger from computer, click Disconnect button and pull the logger out of
USB port of computer.
Note: User could click Cancel button to cancel unnecessary connection
Configuring Data Logger
Select Configure Device in title bar of work area, you will move into configuration interface.
Configuration of a data logger contains 3 steps as below.
1. Trip Information
Trip Number
A number consisting of a maximum of 10 alphanumeric characters and
used to mark one recording task. It defaults to be assigned by software
automatically, user are allowed to set it by unchecking the box Auto
generate.
Trip Description
A remark entered by user to describe a Trip(a recording task), which will be
stored in data logger.
Note: Pre-configured temperature labels could not provide description
information.
2. Device Configuration
Log Interval
Recording frequency of data logger, which supports from 10 seconds to 2
hours.
Log Cycle
The maximum duration that a data logger could work at current log interval
setting.
Start Mode
Gives you options to select startup methods between Manual Start and
Auto Start.
Start Delay
When selecting Manual Start, the time data logger needs to wait to start
recording after pressing START button.
Start Date
When selecting Auto Start, the date and time data logger will start working
at.
3. Alarm Settings
Page 6 of 14
TempCentre Lite Help (20120530 Rev. A)
Alarm Mode
No Alarm Setting, no temperature limit set for alarm in data logger.
High&Low Alarm, set data logger with high or low temperature limit for
common high and low alarm.
Multiple Alarms, enable multiple alarm ranges by setting up to a maximum
of 6 alarm limits, for purpose of providing more precise and elaborate alarm
triggering system for applications like life science.
Note: Not all data loggers support multiple alarms, refer to specification of
each data logger to check whether it supports this function or not.
Alarm Limit/Zone
Alarm limit, alarm will be triggered when lower or higher than this
temperature value.
Alarm zone, alarm ranges divided by alarm limits.
Alarm Delay Time
Time threshold for triggering an alarm.
Alarm Type
Single Event, alarm will be triggered after temperature has been below or
above alarm limit for a consecutive time set as alarm delay.
Cumulative Alarm, alarm will be triggered after temperature has been
below or above alarm limit for a cumulative time set as alarm delay.
4. Writing and Saving Configuration
a. Click Write Configuration button, data logger will be programmed with parameters set by user.
b. Click Save Profile button to save current configuration into a .config format file for future use.
c. Click Load Profile button to load a .config format file to use previously saved configuration.
Note: ITAG series temperature loggers are provided with parameters pre-configured, user is not able to
configure it again, and other single use data logger can only be configured by user once
Viewing Data Record
To view data records, click View Manager in title bar of work area, select different tabs to view data
record in different view windows. If you want to change the temperature value to be displayed in
Fahrenheit, check the Fahrenheit radio in the upper right corner of work area.
1.Summary View
Select Summary tab, which contains all summarized information and statistics figures forming a data
record.
Page 7 of 14
TempCentre Lite Help (20120530 Rev. A)
Device Configuration
Log Interval
Recording frequency of data logger.
Log Cycle
The maximum duration that a data logger could work at current log interval
setting.
Start Mode
Method of startup. Manual Start means logger is started by pressing button
on logger, Auto Start means logger starts automatically on basis of preset
specific date/time.
Start Delay
Time data logger need to wait to start recording after pressing START
button.
Start Date
The specific date and time data logger will be started at.
Trip Information
Trip Number
A number consisting of a maximum of 10 alphanumeric characters used to
mark one monitoring task.
Trip Description
A note entered by user to describe a trip, which is stored in data logger.
Logging Summary
Highest Temperature
Maximum temperature value has been recorded.
Lowest Temperature
Minimum temperature value has been recorded.
Average Temperature
Average temperature value throughout a recording trip.
Mean Kinetic
MKT is an expression of cumulative thermal stress experienced by a
Temperature (MKT)
product at varying temperatures during storage and distribution. In other
words, MKT is a calculated, single temperature that is analogous to the
effects of temperature variations over a period of time.
Page 8 of 14
TempCentre Lite Help (20120530 Rev. A)
Start Time/First Point
The time data logger starts recording at, also the time of the first data point
recorded.
Stop Time
The time data logger stops recording.
Data Points
The total number of data points recorded.
Trip Length
The total time between first and last data point recorded.
Alarms
Alarm Limits
Temperature threshold in ℃ or ℉.
Alarm delay
Time threshold for triggering alarm.
Total Time
Total time above or below alarm limit.
Alarm Events
Total number of events below low alarm limit or over high alarm limit.
Alarm Status
Status of alarm condition.
2. Graph View
Select Graph tab to view data points to be plotted in graph as curve.
Hover, move cursor to the data curve, a tips containing summarized information of the data point below
appears.
Zoom In, right-click mouse and hold to drag a range horizontally to zoom in the data curve in this range.
Analyze left-click mouse and hold to drag a range horizontally to analyze the data curve of this range, a
tips containing summarized information like max, min temperature and MKT values over this selected
time range will appear.
Restore Default View, click icon
to restore current graph to default view.
Page 9 of 14
TempCentre Lite Help (20120530 Rev. A)
Graph Options, click icon
, an advanced option list for graph appears, which includes options like
Show alarm limit, Show ideal range, Show mark, and change the x coordinates, there are 3 types
available for X axis, Data/Time, Data Points, Elapsed Time, data curve will be plotted with the specific X
axis parameter selected.
3. List View
Select List tab to view data points displayed in detailed tabulate, every point is listed along with date, time
and temperature value. If you want to view data points along with elapsed time, check the radio Show
Elapsed Time.
4. Report View
Report combines summary, graph and list view into several pages, which are equal in form to report to be
exported into PDF and to be printed, so what you have changed here like editing Report Title and
Comments, changing graph visibility by showing alarm limits or ideal ranges, will be reflected in the
report printed or exported to PDF. Adding or editing report header will not cause a change to data record.
Page 10 of 14
TempCentre Lite Help (20120530 Rev. A)
Saving Data into Data Base
TempCentre employs data base as data storage system, which is more safe and efficient than traditional
file based system, and able to bring user more conveniences in searching, reviewing and managing
stored data. After data logger was connected to computer, data inside logger will be downloaded to RAM
of computer automatically, so you need to save the data into data base before leaving or closing software,
otherwise data downloaded will be lost. Clicking button Save to save data collected by data loggers to
local data base.
Actions like editing report title and comments will cause changes to a data record, you need to save
these changes by clicking button Save.
Exporting Data Records
TempCentre provides three types of format for user to export data records into. To export data, click icon
in tool bar and specify a file format you want to save as. Formats supported are shown below.
(1) .tps format, a encrypted format defined by TempSen for working with TempCentre software, user
could export data into .tps file in one computer ,and then read it again in another computer installed
TempCentre.
(2) Excel format, data record could be saved as an encrypted Excel file.
(3) PDF format, data record could be saved as an encrypted PDF file.
Page 11 of 14
TempCentre Lite Help (20120530 Rev. A)
Data Base
Click Data Base button in tool bar to enter into data base of TempCentre Lite, this section allows user to
search, review and analyze the stored data records.
Data Records List
All stored data records will be listed in the list Data Records. To quickly find a data record you are
looking for, enter the name of data record in the searchbox to start searching, otherwise, you could also
use the filter to narrow down the time range for data over a specific period of time.
If you want to view data records with addional information other than record name, please click the icon
in header of records list to unfold a detailed data record table, in which each data record is shown with
record name, description, created time, signature symbol, etc.
Delete Data Records, select the data record you want to delete in data records list by checking the box
ahead of record name, click the icon
in title bar of list, and select Delete Selected Record in menu
appears, if you want to clear all the data records in data base, select the option Delete All Records.
Viewing Multiple Records
To have a comparison between different data records in summary, graph and list view, change to the
radio Multi-Record at bottom of data records list. View Manager will change to multi-record view, then
you are allowed to select more than one records to start comparison. A maximum of 10 data records are
allowed to be added into comparison every time.
1. Summary View, when in multi-records mode, summary will change to tabular in order to list all items in
columns, example is shown below.
Page 12 of 14
TempCentre Lite Help (20120530 Rev. A)
2. Graph View, multiple curves of record are plotted in one graph window, and every curve are marked
with different colors and character marks, example is shown below.
3. List View, when in multi-records mode, summary will change to tabular form to list all items in columns,
example is shown below.
Page 13 of 14
TempCentre Lite Help (20120530 Rev. A)
Warranty
TempSen Electronics Company, warrants that all TempSen-branded data loggers against defects in
materials and workmanship for a period of ONE(1) YEAR from the date of products being sold. If a
hardware defect arises and a valide claim is received within the period of warranty period, at its option
and to the extent permitted by law, TempSen will either (1) repair the hardware defect at no charge, using
the new parts or parts equivalent to new in performance and reliability, (2) exchange the product with a
product that is new or equivalent to new in performance and reliability and is at least functionally
equivalent to the original product, or (3) refund the purchase price of product.
TempSen does not warrant that the operation of the product will be uninterrupted or error-free, TempSen
is not responsible for damage arising from failure to follow instructions relating to the product's use.
This warranty does not apply: (a) to batteries;(b) to damage caused by operating products in temperature
lower than -45℃ or higher than 85℃, unless the product is designed for working in temperature outside
the range; (c) to damage caused by the ingress of moisture;(d) to a product or part that has been
modified to alter functionality or capability; or (e) if any TempSen serial number has been removed or
defected.
Page 14 of 14